Appium Testing - Real Device On HyperExecute
This page outlines how to execute your Appium tests on HyperExecute using TestNG with YAML 0.2
HyperExecute uses YAML 0.2 to perform the tests using Appium.
Prerequisites
To run the Tests on HyperExecute from your Local System, you are required:
- HyperExecute YAML file which contains all the necessary instructions.
- HyperExecute CLI in order to initiate a test execution Job .
- Your lambdatest Username and Access key
- Setup the Environmental Variable
- Ensure you have Appium’s Java client library installed.
- Access to an Android app (.apk or .aab file) or an iOS app (.ipa file).
All the code samples in this documentation can be found on LambdaTest's Github Repository. You can either download or clone the repository to quickly run your tests.  View on GitHub
If you do not have any .apk or .ipa file, you can run your sample tests on LambdaTest by using our sample 🔗 Android app or sample 🔗 iOS app.
Download HyperExecute CLI
The HyperExecute CLI is used for triggering tests on HyperExecute. It is recommend to download the HyperExecute CLI binary on the host system to perform the tests on HyperExecute. The CLI download site for various platforms is displayed below:
| Platform | HyperExecute CLI download location |
|---|---|
| Windows | https://downloads.lambdatest.com/hyperexecute/windows/hyperexecute.exe |
| macOS | https://downloads.lambdatest.com/hyperexecute/darwin/hyperexecute |
| Linux | https://downloads.lambdatest.com/hyperexecute/linux/hyperexecute |
Setup Environment Variable
Export the environment variables LT_USERNAME and LT_ACCESS_KEY that are available in the LambdaTest Profile page. Run the below mentioned commands in the terminal to setup the CLI and the environment variables.
- Linux / MacOS
- Windows
export LT_USERNAME="YOUR_LAMBDATEST_USERNAME"
export LT_ACCESS_KEY="YOUR_LAMBDATEST_ACCESS_KEY"
set LT_USERNAME="YOUR_LAMBDATEST_USERNAME"
set LT_ACCESS_KEY="YOUR_LAMBDATEST_ACCESS_KEY"
Steps to Run Your Test
Step 1: Upload your Application
Upload your iOS application (.ipa file) or android application (.apk file) to the LambdaTest servers using our REST API. You need to provide your Username and AccessKey in the format Username:AccessKey in the cURL command for authentication. Make sure to add the path of the appFile in the cURL request. Here is an example cURL request to upload your app using our REST API:
- App file
- App URL
- Linux / MacOS
- Windows
curl -u "YOUR_LAMBDATEST_USERNAME:YOUR_LAMBDATEST_ACCESS_KEY" --location --request POST 'https://manual-api.lambdatest.com/app/upload/realDevice' --form 'name="Android_App"' --form 'appFile=@"<RELATIVE_PATH_OF_YOUR_APP>"'
curl -u "YOUR_LAMBDATEST_USERNAME:YOUR_LAMBDATEST_ACCESS_KEY" -X POST "https://manual-api.lambdatest.com/app/upload/realDevice" -F "appFile=@"<RELATIVE_PATH_OF_YOUR_APP>""
- Linux / MacOS
- Windows
curl -u "YOUR_LAMBDATEST_USERNAME:YOUR_LAMBDATEST_ACCESS_KEY" \
--location --request POST 'https://manual-api.lambdatest.com/app/upload/realDevice' \
--form 'name="Android_App"' \
--form 'url="https://prod-mobile-artefacts.lambdatest.com/assets/docs/proverbial_android.apk"'
curl -u "YOUR_LAMBDATEST_USERNAME:YOUR_LAMBDATEST_ACCESS_KEY" --location --request POST "https://manual-api.lambdatest.com/app/upload/realDevice" --header "Content-Type: application/x-www-form-urlencoded" --data-urlencode "url=:https://prod-mobile-artefacts.lambdatest.com/assets/docs/proverbial_android.apk" --data-urlencode "name=Proverbial_App"
Response of above cURL will be a JSON object containing the
App URLof the format -lt://APP123456789123456789and will be used in the next step.
Step 2: Configure your Test Script
Write Your Automation Script in the client language of your choice from the ones supported by Appium. An automation script for the sample applications have been provided below.
Here is a sample automation script in Java for the sample app downloaded above. Ensure to update the app_url, username and accesskey in the below code.
- Android
- iOS
import io.appium.java_client.AppiumDriver;
import io.appium.java_client.MobileBy;
import io.appium.java_client.MobileElement;
import io.appium.java_client.android.AndroidElement;
import org.openqa.selenium.remote.DesiredCapabilities;
import org.openqa.selenium.support.ui.ExpectedConditions;
import org.openqa.selenium.support.ui.WebDriverWait;
import org.testng.annotations.Test;

import java.net.URL;
import java.util.List;

public class AndroidApp {

    public static String userName = System.getenv("LT_USERNAME");
    public static String accessKey = System.getenv("LT_ACCESS_KEY");

    public String gridURL = "@mobile-hub.lambdatest.com/wd/hub";

    AppiumDriver driver;

    @Test
    @org.testng.annotations.Parameters(value = {"device", "version", "platform"})
    public void AndroidApp1(String device, String version, String platform) {
        version = System.getProperty("platformVersion");
        try {
            DesiredCapabilities capabilities = new DesiredCapabilities();
            capabilities.setCapability("build","Java TestNG Android");
            capabilities.setCapability("name",platform+" "+device+" "+version);
            capabilities.setCapability("deviceName", device);
            capabilities.setCapability("platformVersion",version);
            capabilities.setCapability("platformName", platform);
            capabilities.setCapability("isRealMobile", true);
            //AppURL (Create from Wikipedia.apk sample in project)
            capabilities.setCapability("app", "lt://proverbial-android"); //Enter your app url
            capabilities.setCapability("deviceOrientation", "PORTRAIT");
            capabilities.setCapability("console", true);
            capabilities.setCapability("network", false);
            // capabilities.setCapability("visual", true);
            capabilities.setCapability("devicelog", true);
            //capabilities.setCapability("geoLocation", "HK");

            String hub = "https://" + userName + ":" + accessKey + gridURL;
            driver = new AppiumDriver(new URL(hub), capabilities);

            MobileElement color = (MobileElement) driver.findElementById("com.lambdatest.proverbial:id/color");
            //Changes color to pink
            color.click();
            Thread.sleep(1000);
            //Back to orginal color
            color.click();

            MobileElement text = (MobileElement) driver.findElementById("com.lambdatest.proverbial:id/Text");
            //Changes the text to "Proverbial"
            text.click();

            //toast will be visible
            MobileElement toast = (MobileElement) driver.findElementById("com.lambdatest.proverbial:id/toast");
            toast.click();

            //notification will be visible
            MobileElement notification = (MobileElement) driver.findElementById("com.lambdatest.proverbial:id/notification");
            notification.click();
            Thread.sleep(2000);

            //Opens the geolocation page
            MobileElement geo = (MobileElement) driver.findElementById("com.lambdatest.proverbial:id/geoLocation");
            geo.click();
            Thread.sleep(5000);

            //takes back to home page
            MobileElement home = (MobileElement) driver.findElementByAccessibilityId("Home");
            home.click();

            //Takes to speed test page
            MobileElement speedtest = (MobileElement) driver.findElementById("com.lambdatest.proverbial:id/speedTest");
            speedtest.click();
            Thread.sleep(5000);

            MobileElement Home = (MobileElement) driver.findElementByAccessibilityId("Home");
            Home.click();

            //Opens the browser
            MobileElement browser = (MobileElement) driver.findElementByAccessibilityId("Browser");
            browser.click();

            MobileElement url = (MobileElement) driver.findElementById("com.lambdatest.proverbial:id/url");
            url.sendKeys("https://www.lambdatest.com");

            MobileElement find = (MobileElement) driver.findElementById("com.lambdatest.proverbial:id/find");
            find.click();

            driver.quit();

        } catch (Exception e) {
            e.printStackTrace();
            try{
                driver.quit();
            }catch(Exception e1){
                e.printStackTrace();
            }
        }


    }
}
import io.appium.java_client.AppiumDriver;
import io.appium.java_client.MobileBy;
import io.appium.java_client.MobileElement;
import io.appium.java_client.android.AndroidElement;
import org.openqa.selenium.remote.DesiredCapabilities;
import org.openqa.selenium.support.ui.ExpectedConditions;
import org.openqa.selenium.support.ui.WebDriverWait;
import org.openqa.selenium.JavascriptExecutor;
import org.openqa.selenium.remote.DesiredCapabilities;
import java.net.URL;
import org.testng.annotations.Test;

public class iOSApp {

    public static String userName = System.getenv("LT_USERNAME");
    public static String accessKey = System.getenv("LT_ACCESS_KEY");

    public String gridURL = "@mobile-hub.lambdatest.com/wd/hub";

    AppiumDriver driver;

    @Test
    @org.testng.annotations.Parameters(value = {"device", "version", "platform"})
    public void iOSApp1(String device, String version, String platform) {

        try {
            DesiredCapabilities capabilities = new DesiredCapabilities();
            capabilities.setCapability("build","Java TestNG iOS");
            capabilities.setCapability("name",platform+" "+device+" "+version);
            capabilities.setCapability("deviceName", device);
            capabilities.setCapability("platformVersion",version);
            capabilities.setCapability("platformName", platform);
            capabilities.setCapability("isRealMobile", true);
            capabilities.setCapability("app", "lt://proverbial-ios"); //Enter your app url
            capabilities.setCapability("deviceOrientation", "PORTRAIT");
            capabilities.setCapability("console", true);
            capabilities.setCapability("network", false);
            // capabilities.setCapability("visual", true);
            capabilities.setCapability("devicelog", true);
            //capabilities.setCapability("geoLocation", "HK");

            String hub = "https://" + userName + ":" + accessKey + gridURL;
            driver = new AppiumDriver(new URL(hub), capabilities);

            WebDriverWait Wait = new WebDriverWait(driver,30);

            //Changes the color of the text
            Wait.until(ExpectedConditions.presenceOfElementLocated(MobileBy.AccessibilityId("color"))).click();
            Thread.sleep(1000);

            //Changes the text to "Proverbial"
            Wait.until(ExpectedConditions.presenceOfElementLocated(MobileBy.AccessibilityId("Text"))).click();
            Thread.sleep(1000);

            //Toast will be visible
            Wait.until(ExpectedConditions.presenceOfElementLocated(MobileBy.AccessibilityId("toast"))).click();
            Thread.sleep(1000);

            //Notification will be visible
            Wait.until(ExpectedConditions.presenceOfElementLocated(MobileBy.AccessibilityId("notification"))).click();
            Thread.sleep(4000);

            //Opens the geolocation page
            Wait.until(ExpectedConditions.presenceOfElementLocated(MobileBy.AccessibilityId("geoLocation"))).click();
            Thread.sleep(4000);

            //Takes back
            driver.navigate().back();

            //Takes to speedtest page
            Wait.until(ExpectedConditions.presenceOfElementLocated(MobileBy.AccessibilityId("speedTest"))).click();
            Thread.sleep(4000);

            driver.navigate().back();

            //Opens the browser
            Wait.until(ExpectedConditions.presenceOfElementLocated(MobileBy.AccessibilityId("Browser"))).click();
            Thread.sleep(1000);

            MobileElement url = (MobileElement) driver.findElementByAccessibilityId("url");
            url.click();
            url.sendKeys("https://www.lambdatest.com");

            Wait.until(ExpectedConditions.presenceOfElementLocated(MobileBy.AccessibilityId("find"))).click();
            Thread.sleep(1000);

            driver.quit();

        } catch (Exception e) {
            e.printStackTrace();
            try{
                driver.quit();
            }catch(Exception e1){
                e.printStackTrace();
            }
        }


    }
}
Step 3: Update your XML file
Create .XML file in order to run your test and define device capabilities. Please find sample code below for the same.
- Android
- iOS
<?xml version="1.0" encoding="UTF-8"?>
<!DOCTYPE suite SYSTEM "http://testng.org/testng-1.0.dtd">
<suite thread-count="100" name="Mobile" parallel="tests">

    <test name="AndroidAppTest_1">
        <parameter name="version" value="11" />
        <parameter name="platform" value="Android" />
        <parameter name="device" value="Galaxy Note20 Ultra 5G" />
        <classes>
            <class name="AndroidApp" />
        </classes>
    </test>

    <test name="AndroidAppTest_2">
        <parameter name="version" value="12" />
        <parameter name="platform" value="Android" />
        <parameter name="device" value="Galaxy S22 5G" />
        <classes>
            <class name="AndroidApp" />
        </classes>
    </test>

        <test name="AndroidAppTest_3">
        <parameter name="version" value="13" />
        <parameter name="platform" value="Android" />
        <parameter name="device" value="Galaxy S21 Ultra 5G" />
        <classes>
            <class name="AndroidApp" />
        </classes>
    </test>

        <test name="AndroidAppTest_4">
        <parameter name="version" value="11" />
        <parameter name="platform" value="Android" />
        <parameter name="device" value="Galaxy S20" />
        <classes>
            <class name="AndroidApp" />
        </classes>
    </test>

        <test name="AndroidAppTest_5">
        <parameter name="version" value="12" />
        <parameter name="platform" value="Android" />
        <parameter name="device" value="Galaxy S21 5G" />
        <classes>
            <class name="AndroidApp" />
        </classes>
    </test>
</suite>
<?xml version="1.0" encoding="UTF-8"?>
<!DOCTYPE suite SYSTEM "http://testng.org/testng-1.0.dtd">
<suite thread-count="100" name="Mobile" parallel="tests">

    <test name="iOSApp_1">
        <parameter name="version" value="16" />
        <parameter name="platform" value="iOS" />
        <parameter name="device" value="iPhone 14" />
        <classes>
            <class name="iOSApp" />
        </classes>
    </test>

    <test name="iOSApp_2">
        <parameter name="version" value="15" />
        <parameter name="platform" value="iOS" />
        <parameter name="device" value="iPhone 13" />
        <classes>
            <class name="iOSApp" />
        </classes>
    </test>

    <test name="iOSApp_3">
        <parameter name="version" value="15" />
        <parameter name="platform" value="iOS" />
        <parameter name="device" value="iPhone 11" />
        <classes>
            <class name="iOSApp" />
        </classes>
    </test>
</suite>
Step 4: Configure YAML and Execute your Script
- Android
- iOS
version: 0.2
globalTimeout: 150
testSuiteTimeout: 150
testSuiteStep: 150

runson: linux

concurrency: 5

autosplit: true

retryOnFailure: false
maxRetries: 1

pre:
  - mvn -Dmaven.repo.local=./.m2 dependency:resolve

appium: true
framework:
  name: maven/testng
  defaultReports: false
  discoveryType: xmltest
  flags: ["-Pandroid-parallel"]

jobLabel: ['HYP-RD', 'Android', 'Multiple Device']
version: 0.2
globalTimeout: 150
testSuiteTimeout: 150
testSuiteStep: 150

runson: linux

concurrency: 3

autosplit: true

retryOnFailure: false
maxRetries: 1

pre:
  - mvn -Dmaven.repo.local=./.m2 dependency:resolve

appium: true
framework:
  name: maven/testng
  defaultReports: false
  discoveryType: xmltest
  flags: ["-Pios-parallel"]

jobLabel: ['HYP-RD', 'iOS', 'Multiple Device']
The
regionparameter specifies the region or location where the Appium tests will be executed. Our platform supports the following three regions:
- ap (Asia-Pacific)
- us (United States)
- eu (European Union)
Step 5: Execute your Test Suite
NOTE : In case of MacOS, if you get a permission denied warning while executing CLI, simply run
chmod u+x ./hyperexecuteto allow permission. In case you get a security popup, allow it from your System Preferences → Security & Privacy → General tab.
Run the below command in your terminal at the root folder of the project:
./hyperexecute --config RELATIVE_PATH_OF_YOUR_YAML_FILE
OR use this command if you have not exported your username and access key in the step 2.
./hyperexecute --user YOUR_LAMBDATEST_USERNAME --key YOUR_LAMBDATEST_ACCESS_KEY --config RELATIVE_PATH_OF_YOUR_YAML_FILE
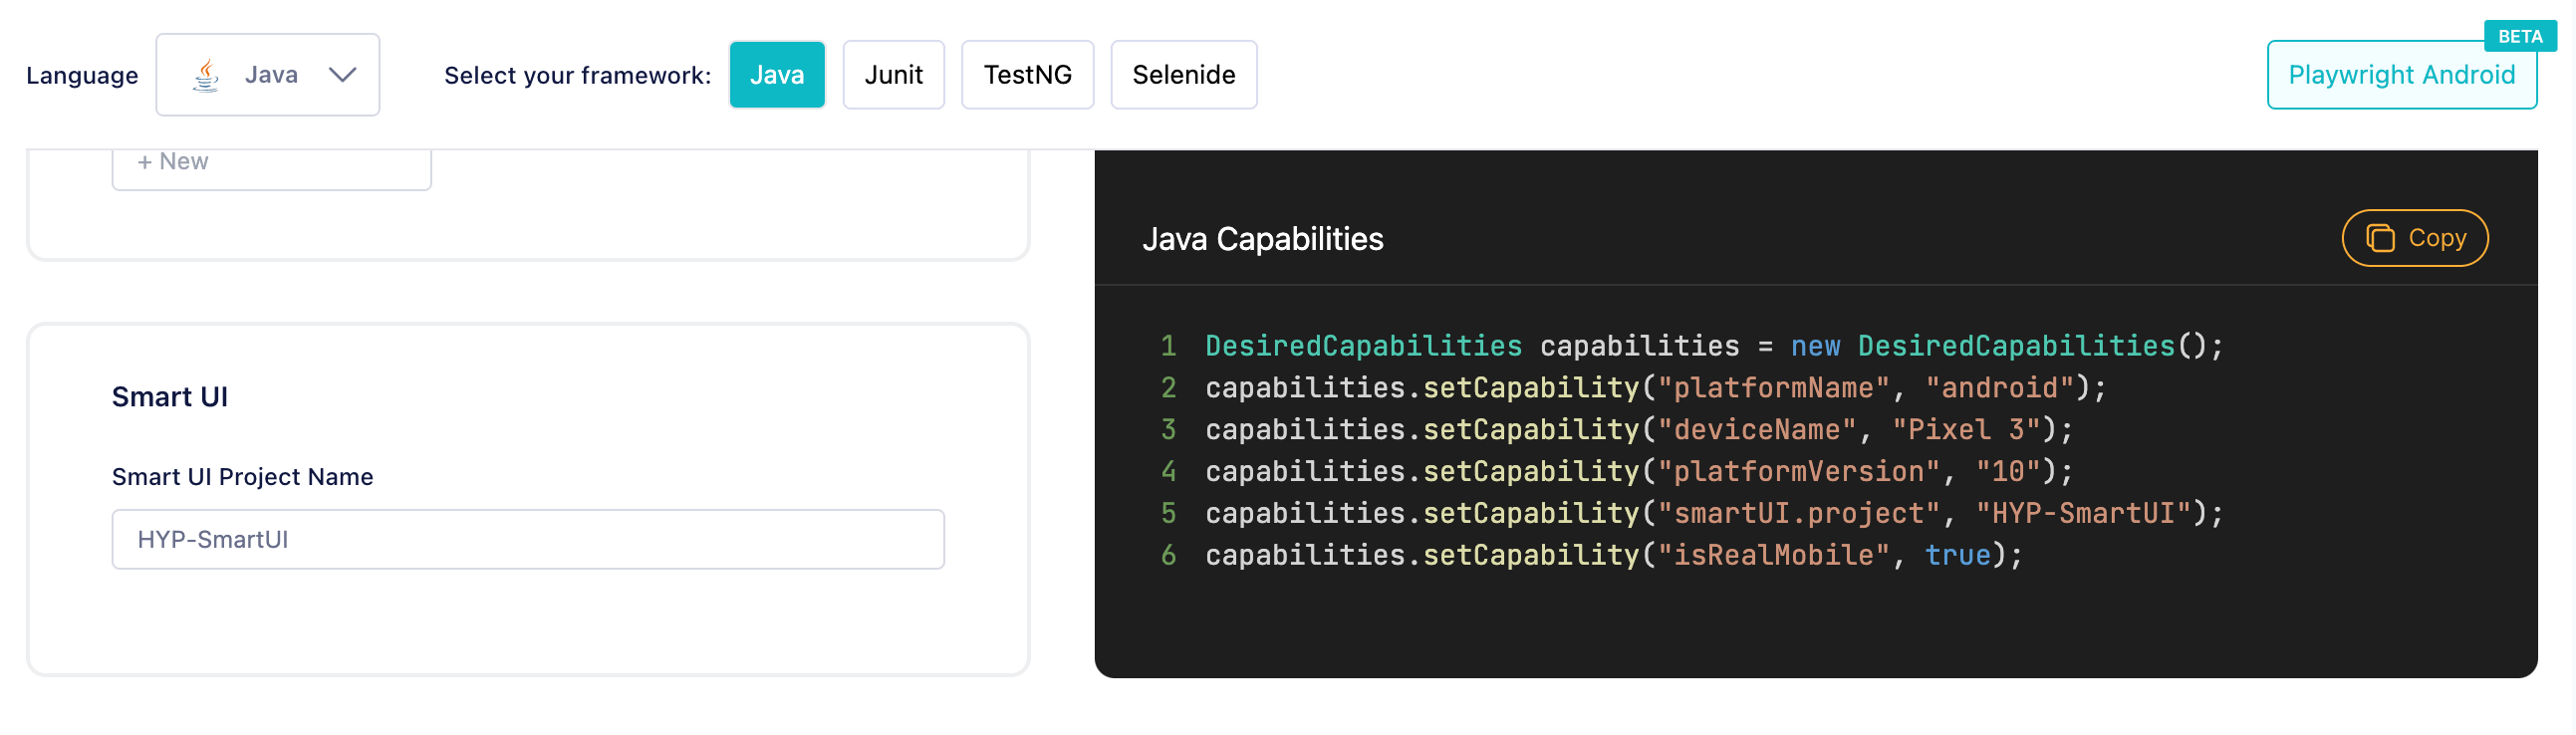
Configure Smart UI
To configure SmartUI with HyperExecute, you need to simply add a capability in your test file:
"smartUI.project": "<YOUR_SMARTUI_PROJECT_NAME>"
Refer to the Automation Capabilities Generator to understand how to write the capability in different languages.
More About Desired Capabilities
Sample Capabilities for both android and iOS are mentioned below -
- Android
- iOS
{
  "deviceName": "Galaxy Tab S4",
  "platformName": "android",
  "platformVersion": "10",
  "app": "App_url",
  "visual": True,
  "console": True,
  "deviceOrientation": "PORTRAIT",
  "build": "new-12",
  "isRealMobile": True,
}
{
  "deviceName": "iPhone 12 Mini",
  "platformName": "ios",
  "platformVersion": "14",
  "app": "App_url",
  "isRealMobile": True,
  "visual": True,
  "console": True,
  "build": "lt-web-4",
  "network": True,
}
For more details, please refer to our guide on Desired Capabilities in Appium.
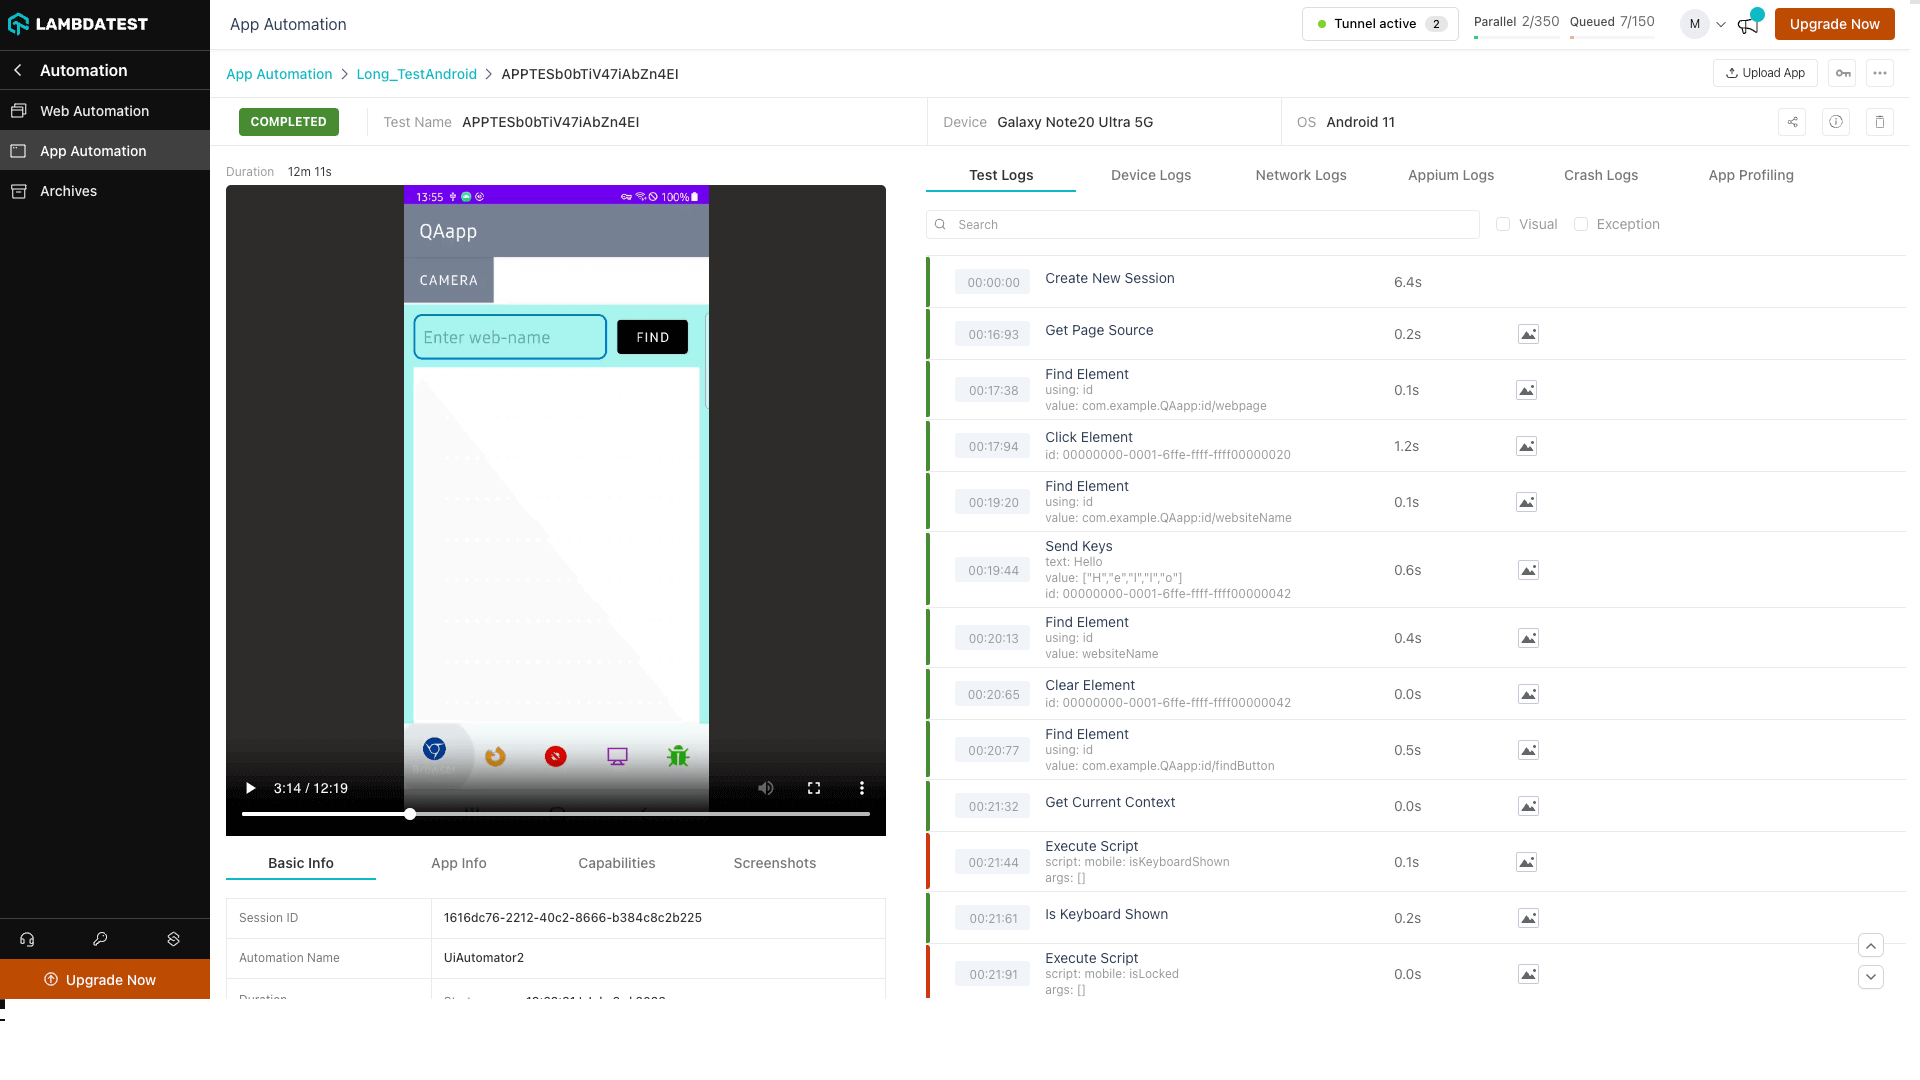
Navigation in Automation Dashboard
Every test run on the HyperExecute has a unique jobId associated with it. Each jobId can in turn constitute single (or multiple) groupId(s). You can visit HyperExecute automation dashboard for checking the status of the test execution.
The snapshot below shows how to navigate to the respective testID for viewing the Selenium logs: