xUnit Testing Tutorial: Unit Testing With Selenium C#
Himanshu Sheth
Posted On: July 22, 2020
![]() 151634 Views
151634 Views
![]() 25 Min Read
25 Min Read
When you are developing a consumer web product, you would have come across scenarios where some functionalities do not work on certain browsers, operating systems, or devices. As a developer, you want your code to work seamlessly on all the combinations, but you do not have infinite time in your hands. This is where unit test automation frameworks like xUnit come to the rescue. How? That is exactly what we will be looking at in this detailed xUnit testing tutorial which will show you how to perform automated browser testing using xUnit framework with Selenium and C#.
With Selenium C# testing, you get a variety of test automation frameworks to choose from. The most popular unit testing frameworks for Selenium C# are:
- NUnit
- MSTest
- xUnit
If you’re a Selenium C# geek then we recommend you read our detailed tutorials to help you get started with NUnit testing & MSTest framework. This tutorial is dedicated to helping you get from beginner to advanced with xUnit framework for unit testing with Selenium C#.
Below is the gist of the sub-topics that are covered as a part of this xUnit testing tutorial:
TABLE OF CONTENT
What Is xUnit Framework?
xUnit aka xUnit.net is a unit testing framework for the .NET. It is open-source and completely free to use. In case you are wondering, the ‘x’ in xUnit denotes the programming language for which a framework has been built, for example, NUnit is for C#, JUnit is for Java, and so on. A lot of focus is given to community-driven development for the structure of the framework. As it is a community-focused framework, it is easy to expand upon.
The creators of the NUnit framework, James & Brad, are also credited for writing the xUnit testing framework with the sole purpose of building a better test framework. Hence, you would find a lot of similarities between NUnit testing and xUnit testing. NUnit serves as the base for a lot of new features that are introduced in xUnit.
Unlike NUnit, xUnit testing does not have standard tags like [Test] & [TestFixture]. As the syntax used in xUnit is different from NUnit & MSTest frameworks, migrating existing implementations to xUnit.net framework might require more effort. However, the advantage is that you are using a more extensible test framework when compared to other frameworks.
Advantages of Unit Testing with xUnit.Net
Instead of repeating guidance about “Do X” or “Don’t do Y”, the inventors of the NUnit framework decided that it was the right time to reconsider the entire framework. They already had an in-depth understanding of the success & failure patterns with their experience of working on the NUnit framework. They started with the development of the NUnit.net framework keeping this problem statement in mind and those learnings have helped in the development of the xUnit testing framework.
Here are some of the enhancements/advantages of the xUnit testing framework:
1. Fact and Theory for Improved Extensibility
xUnit.net is much more extensible when compared to other .Net test frameworks and Custom functionality is now a possibility with the xUnit testing framework. You can even have custom functionality for NotEqual, Equal, DoesNotContain, Contains, etc. attributes that belong to the Asset class.
[Fact] annotation is used in place of the [Test] attribute. [Fact] attribute is normally used when the unit test does not include any arguments. [Theory] attribute is used when there is a requirement for parameterized tests. Introduction of the [Theory] attribute is one of the prime examples of the extensibility feature of xUnit.net. Though there are a number of ways in which the data can be supplied, usage of [InlineData] is very common for parameterized tests.
2. Better Isolation Of Tests
There are major under-the-hood changes which are not evident to the end-user when executing the tests. In xUnit, the test class is instantiated, executed and discarded after every test run. A new class is again instantiated for the next method and the same sequence is followed. This facilitates an acceptable isolation of tests.
As the tests are more isolated, they can be executed in any order without the need to be worried about the effect of one test on other tests. Hence, it eliminates the dependency between different test methods.
3. Absence Of [SetUp] and [TearDown] Attributes
In the majority of the .Net test frameworks, methods for setting up the infrastructure for initialization are included under the [SetUp] attribute, and methods for de-initialization are included under the [TearDown] attribute. This also led to code duplication which is not a good practice when it comes to programming.
The inventors of the NUnit framework did not want to carry forward this practice in the development of xUnit.net. Hence, there are no [SetUp] and [TearDown] attributes in xUnit.net. Alternatively, xUnit developers use the constructor for initiazilation and IDisposable for the de-initialization of a test class.
4. Minimal Custom Attributes
Many attributes/annotations that are a part of other .Net test frameworks are either deprecated or combined to make the framework more user-friendly. Below are some of the major highlights as far as annotations/attributes in xUnit are concerned:
- [SetUp] and [TearDown] – replaced with Constructors and IDisposable
- [TestFixture], [TestFixtureSetup] & [TestFixtureTearDown] are eliminated
- [ClassCleanup] and [ClassInitialize] are eliminated
- [TestCleanup] and [TestInitialize] are eliminated
- [Skip] can be used alongside the [Fact] attribute
- Throws replaces [ExpectedException]
Elimination of these annotations means that they were not so relevant for the development of xUnit.net.
5. Assert.Throws Instead Of [ExpectedException]
When you have a single line of code and an exception occurs in that line of test method, [ExpectedException] annotation comes in handy. There can be umpteen number of cases where the error in the test method is not caught.
The introduction of Assert. Throws in xUnit allow you to verify conditions and assert them even when the exception is generic. Also, it is not confined to only the first line of the test method which is the biggest shortcoming of using the [ExpectedException] attribute.
All these enhancements make xUnit a more light-weight & powerful unit testing framework when it comes to testing using C# and Selenium framework! With that said, let’s get your hands dirty in this xUnit testing tutorial as we head to the practical demonstration.
Take this certification to master the fundamentals of Selenium automation testing with C# and prove your credibility as a tester.
Here’s a short glimpse of the Selenium C# 101 certification from LambdaTest:
Setting Up xUnit Framework For Visual Studio
For code implementation, download the Community Edition of Visual Studio 2019.
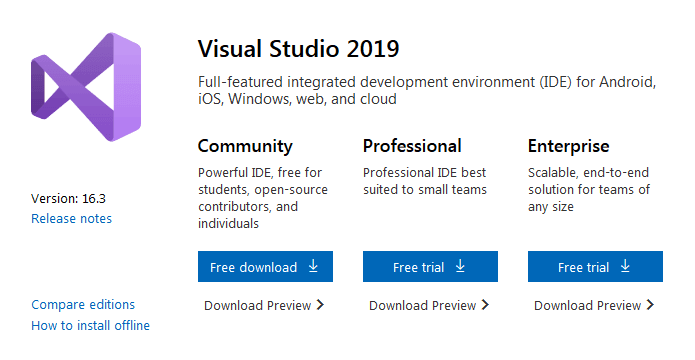
Though Professional and Enterprise editions of Visual Studio are available, the choice largely depends on the project requirements.
You would require a good amount of disk space for installing the required packages. Hence, it is recommended that you free up disk space (in case there is shortage), before you proceed with the installation.
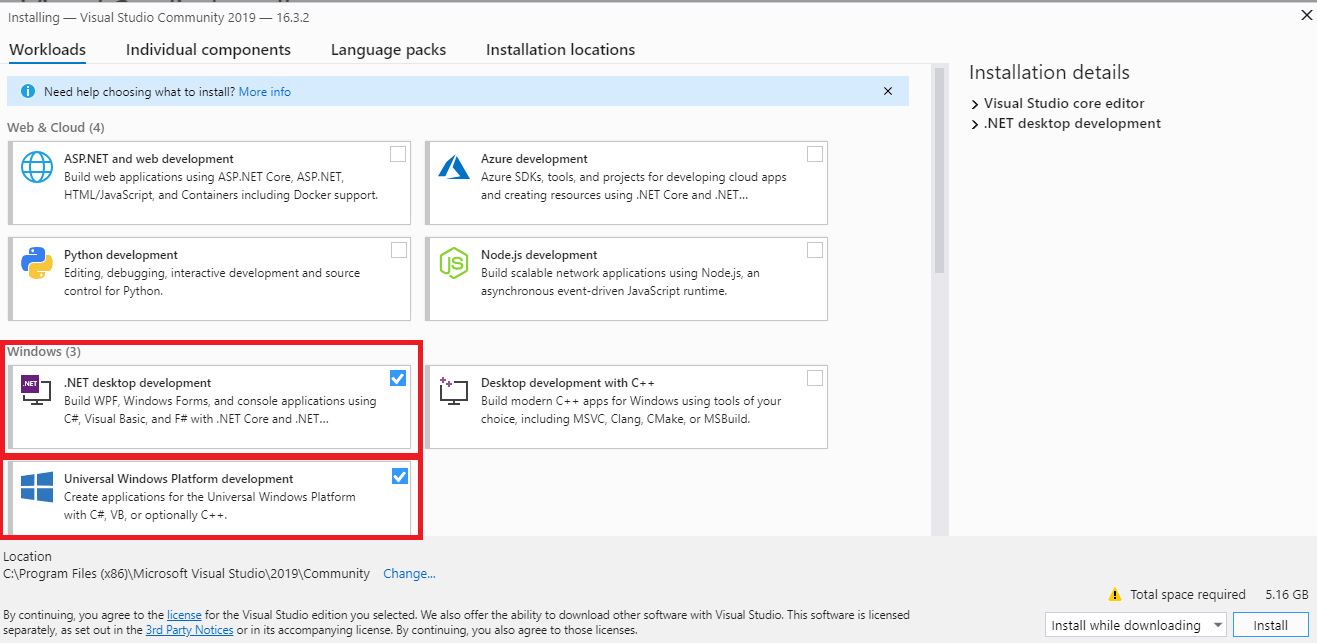
After downloading, you should sign-in using your Outlook account so that you can sync the Visual Studio settings, access the Visual Studio Dev essentials program, unlock the Visual Studio Community edition, publish your source code to your Git repository, etc.
Once the Visual Studio installation is complete, we proceed with the installation of the required packages for executing the unit tests with Selenium C# in this xUnit testing tutorial.
This xUnit Tutorial for beginners and professionals will help you learn how to use xUnit framework with Selenium C# for performing Selenium automation testing.
Install xUnit Test Framework
In order to install the required packages, we perform the following steps:
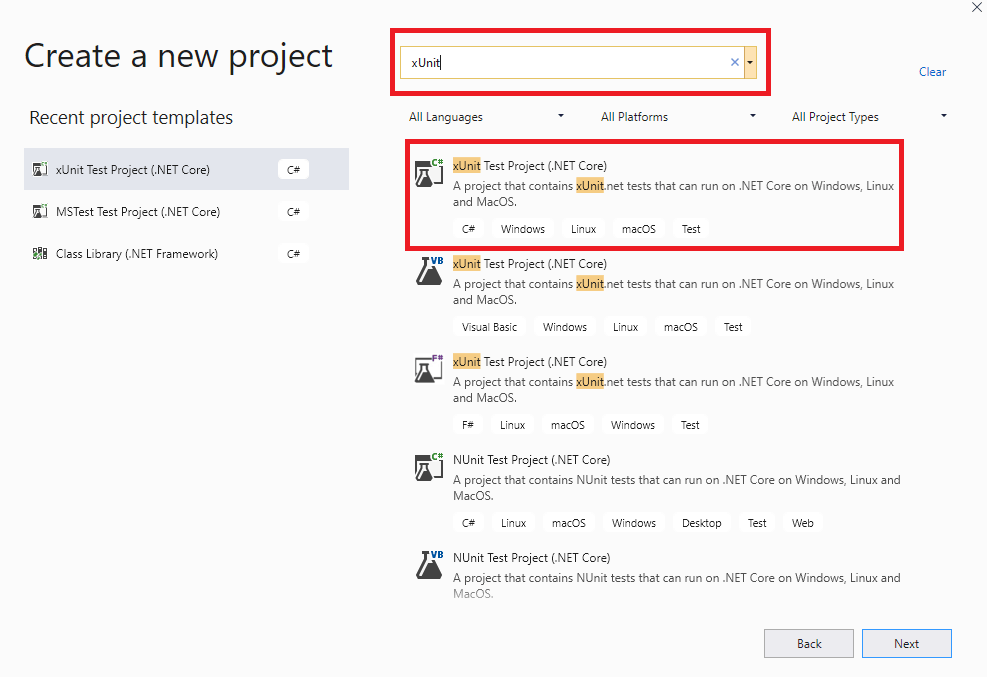
Step 1: Select ‘Create a new project’. Choose ‘xUnit Test Project (.Net Core)’.
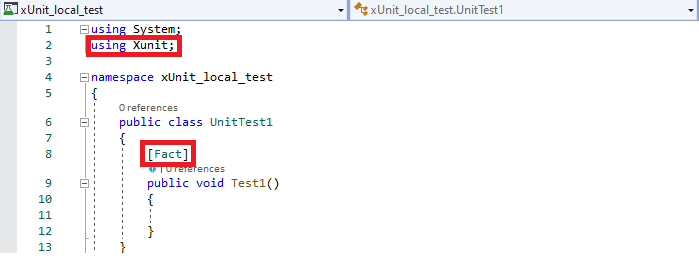
Step 2: As the project is based on the xUnit.net framework, default C# the file that comes along with the project has the [Fact] attribute in it. The namespace xUnit is also included by default into the source code.
In case you have not created a xUnit.net test project, you can install the test framework manually. You can execute NuGet package installation command (Install-Package) on the NuGet Package Manager Console or use the NuGet Package Manager GUI to perform the package installation.
You can download and install these packages by either of the two methods:
- PM (Package Manager) commands from the ‘Package Manager Console’
- NuGet Package Manager
Install XUnit with PM commands from the ‘Package Manager Console’
For executing commands from the PM console, go to ‘Tools’ -> ‘NuGet Package Manager’ -> ‘Package Manager Console’.
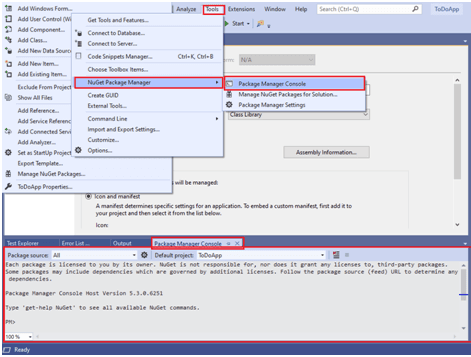
For installing the packages, use the Install-Package command with the required < package-names > as the argument to the command.
|
1 2 3 |
Install-Package xunit Install-Package xunit.runner.visualstudio Install-Package Microsoft.NET.Test.Sdk |
Here are some snapshots of package installation:
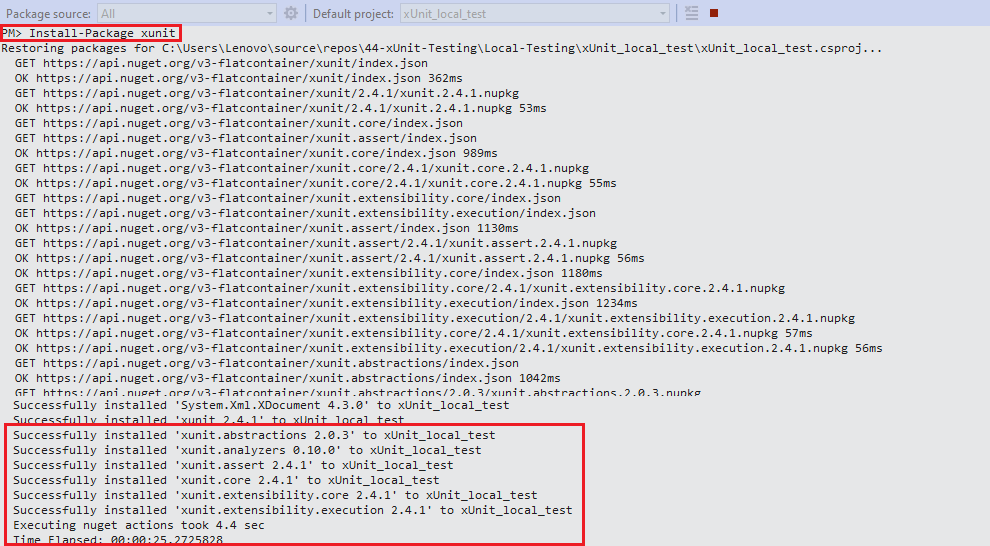

Once you have installed all the mandatory packages, you will be able to check whether those packages have been installed with the help of Get-Package command. Here is the output for command execution:
|
1 2 3 4 5 6 7 |
PM> Get-Package Id Versions -- -------- xunit {2.4.1} xunit.runner.visualstudio {2.4.1} Microsoft.NET.Test.Sdk {16.2.0} |
|
1 |
Install xUnit Test Framework With NuGet Package Manager |
To open the NuGet Package Manager, go to ‘Tools’ -> ‘NuGet Package Manager’ -> ‘Manage NuGet Packages for Solution’.
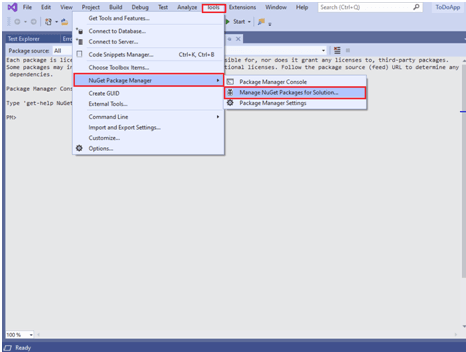
In the Browse section, search for the following packages and click Install:
- xunit
- xunit.runner.visualstudio
- Microsoft.NET.Test.Sdk
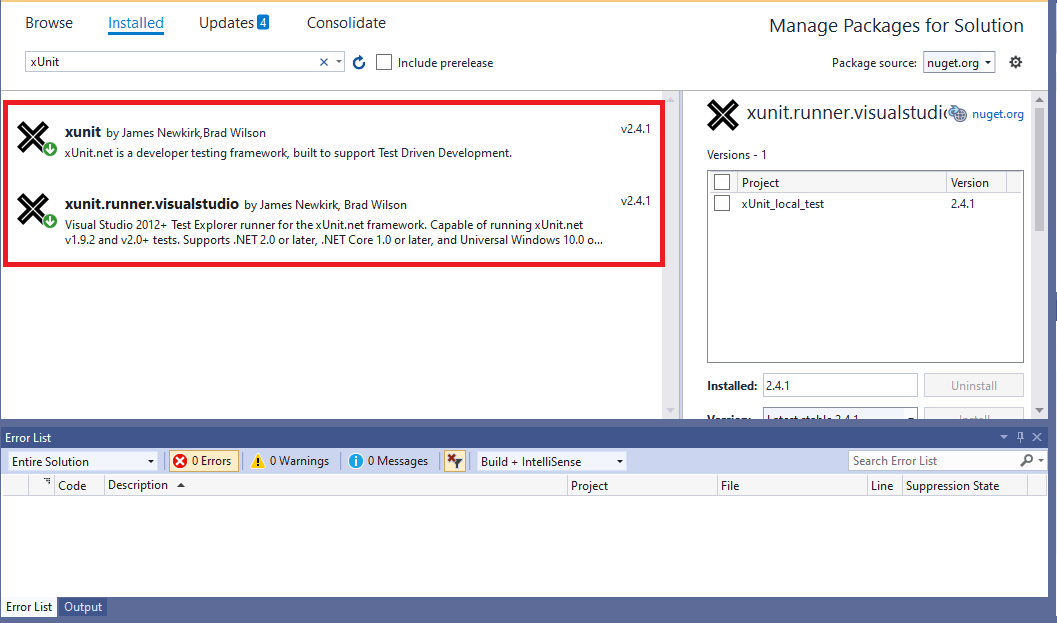
In case you want to execute the tests using xUnit ConsoleRunner, you also need to install XUnit.ConsoleRunner package by executing the Install-Package NuGet command on the Package Manager Console.
|
1 |
Install-Package Xunit.ConsoleRunner |
The latest version of xUnit.net is 2.4.1. In this xUnit testing tutorial, any reference to the xUnit framework refers to xUnit v2 i.e. 2.4.1.
|
1 |
xUnit.net – Architecture and Advantages |
As mentioned earlier in this xUnit testing tutorial; migrating the test code that uses NUnit or MSTest to the xUnit.net will involve more effort than simply replacing the Annotations. This is because there is a difference in the syntax being used by xUnit.net but the porting effort is definitely worth it, as there are significant improvements in xUnit V2.
xUnit.Net Architecture
Both NUnit and MSTest used the [TestClass] attribute/annotation to denote a class that contains the tests. This attribute is not used in xUnit testing framework, which clearly indicates that the framework is smart enough to locate test results, regardless of where they are.
Test Methods are now flagged under the [Fact] attribute rather than the [TestMethod] attribute. In other test frameworks, tests could be skipped using the [Skip] attribute without providing a reason for skipping the test. In xUnit testing, you need to specify the reasons for skipping the test with the [Skip] attribute. As shown below Skippable tests are supported directly in xUnit V2
|
1 |
[Fact (Skip = "Reason for skipping the test")] |
[SetUp] and [TearDown] attributes that are used for performing initialization & de-initialization of infrastructure required for unit testing are no longer carried forward in the design xUnit testing framework. The [TestCategory] annotation is also not a part of xUnit framework, instead it is replaced with [Trait] attribute.
On the whole, the architecture of xUnit framework is more extensible when compared to other unit test frameworks for Selenium C#.
Migration from xUnit V1 to xUnit V2
Visual Studio 2019 by default carries the latest version of xUnit test framework. We recommend using the latest version of Visual Studio i.e. VS 2019 for development & testing. In case you are using an old version that comes with xUnit V1, you can migrate to xUnit V2 by following these simple steps:
Updation of xUnit libraries
The procedure for updating the xUnit libraries depends on whether the libraries were downloaded using NuGet or CodePlex.
xUnit.net V1 was installed using NuGet
We will update the xUnit libraries using NuGet package manager console as the command line is a more convenient option. As the xUnit V1 libraries are already installed, we first need to uninstall that package using the Uninstall-Package command.
Instead of uninstalling the xUnit.net package, we can also update the same, however we would be uninstalling the old package & installing the latest package. The install command for xUnit package would install the latest version of xUnit.net library/package.
|
1 2 |
UnInstall-Package xunit Install-Package xunit |
The package xunit.extensions also needs to be uninstalled as the package is deprecated from xUnit.net V2. Execute the following command on the NuGet package manager console to uninstall the same.
|
1 |
UnInstall-Package xunit.extensions |
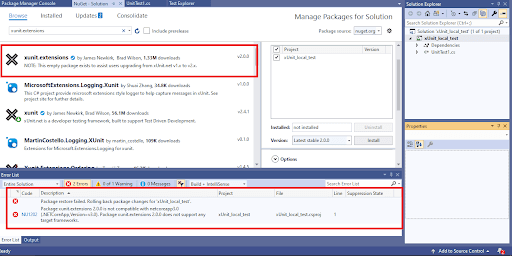
In case you are using Visual Studio 2019, you would still be able to find the package xunit.extensions but you cannot install the same due to its incompatibility with xUnit V2. This is a good thing as there might be a possibility that you accidentally try to install the xunit.extensions package.
xUnit.net V1 was installed via CodePlex
Now, remove all the references to xunit.extensions.dll and/or xunit.dll manually. Once the references are removed, the next step is to remove the older version of the xUnit library/package.
Follow the steps mentioned in the previous section to install the latest version of xUnit.net library/package. Once the latest version of the xUnit package is installed, you can confirm the installation by executing the Get-Package command on the NuGet Package Manager Console.
After following these steps, the build should go through without any compilation issues. If there are build issues, check the section titled Update the unit tests at https://xunit.net/docs/test-migration to remove the errors.
Voila! Your tests are now using the latest version of xUnit testing framework☺.
Attributes in xUnit.net
When it comes to informing the framework about an interpretation of the source code, the job is done in a test framework using Attributes (also termed as Annotations). On successful compilation of the test code, a DLL is generated and the same can be used for executing the test cases using the GUI or console.
Like other test frameworks, annotations in xUnit testing framework are also added between brackets before the method is declared. Though [Fact], [InlineData], [Theory], and [Trait] are some of the widely used xUnit annotations; the attributes being used would vary from one test case/test suite to another.
In this xUnit testing tutorial, we cover the most frequently used xUnit framework attributes:
| Attribute | Description |
|---|---|
| [Fact] | Marks a test method i.e. actual test in a class |
| Assert.Throws Record Exception | Verify the raise and raise assert, irrespective of the place in the code where the problem occurs. |
| Constructor | This is not an attribute but is an ideal replacement for the [SetUp] attribute. The constructor should be parameter-less. |
| IDisposable.Dispose |
This is not an attribute but is an ideal replacement for the [TearDown] attribute. This is where the code for performing necessary cleanup and de-initialization is included. The decision to do away with [TearDown] was made as the investors of xUnit felt that a lot of unnecessary code was run before every single test execution. |
| [Trait] | Used to set arbitrary meta-data on a test |
| [Theory] | This attribute is used when data-driven tests have to be executed. In such cases, [Theory] has to be used instead of [Fact] attribute |
| [InlineData] | This attribute is used along with the [Theory] attribute to supply a subset of data against which parameterized tests will be executed. |
| [ClassData] | This attribute is used when the parameters being passed to the [Theory] tests are not constants. [Theory] [ClassData(typeof(some-data))] |
| [MemberData] | This attribute can be used to fetch data for [Theory] from a static method. The most common approach is to load the data from the property of a test class i.e. using IEnumerable< object[] > |
Note – Constructor and iDisposable.Dispose are not attributes but they are replacements for [Setup] and [TearDown] attributes that are used in other test frameworks. Hence, they have been added to the list.
Automated Browser Testing With xUnit and Selenium WebDriver
During the process of testing a website/web application, a lot of issues might be unearthed which are related to usability. An ideal example is when a particular functionality on your website works fine in Chrome 77.0 (on Windows 10) but does not work fine in Firefox 55.0 (on Windows 10). This makes thorough cross browser testing extremely important as such usability issues can be fixed before the customer finds them!
Selenium is a powerful open-source test framework used for automated cross browser testing and GUI testing. It can be used along with xUnit.net to ensure that the behavior & experience of your product (website/web application) is consistent across a variety of browsers, operating systems, and devices. Selenium offers 4 components:
Running First xUnit Script For Unit Testing With Selenium C#
Firstly, we will need to install the Selenium WebDriver for the browsers under test. That way, the test code (which uses Selenium) can interact with the elements on the web-page (via Selenium WebDriver).
Selenium WebDriver for popular browsers like Mozilla Firefox, Google Chrome, Safari, Microsoft Edge, Internet Explorer, etc. can be downloaded from the following locations:
We recommend having the WebDriver installed in the location where the browser executable is present. Doing so would mean that you don’t need to specify the WebDriver path where the WebDriver instance is created.
Let’s use the ToDo app to demonstrate the usability of xUnit framework with the help of Selenium WebDriver.
Find the details of the test below:
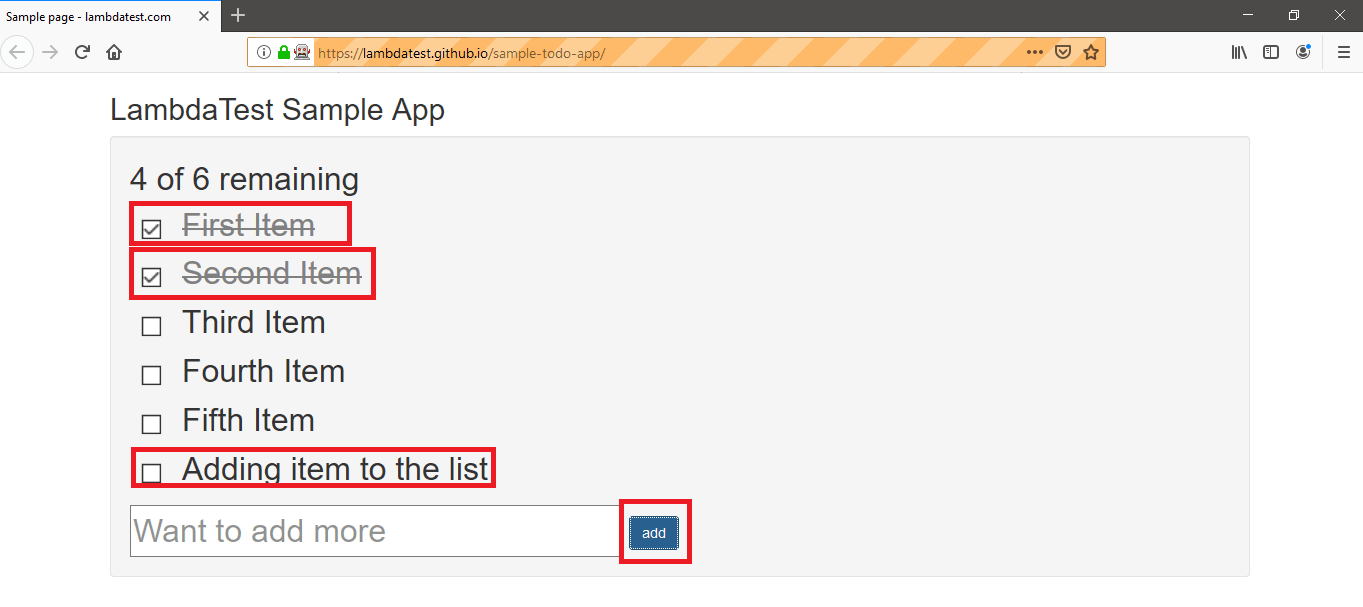
- Using Selenium ChromeDriver, move to the to-do app – https://lambdatest.github.io/sample-todo-app/
- Check the first two items in the list.
- Add the text ‘Adding item to the list’ in the text-box.
- Click the ‘Add’ button so that the new item is added to the list.
Implementation
For implementation, we create a new project of the type ‘xUnit Test Project (.Net Core)’ in Visual Studio. Doing so avoids the effort to install xunit framework related packages as they are already a part of this project. Since Selenium is used, the Selenium framework and Selenium WebDriver packages have to be installed.
To install the Selenium WebDriver packages for Visual Studio, execute the following commands on the Package Manager Console:
|
1 2 3 4 |
Install-Package Selenium.WebDriver Install-Package Selenium.WebDriver.ChromeDriver Install-Package Selenium.Firefox.WebDriver Install-Package Selenium.WebDriver.MicrosoftDriver |
As this xUnit tutorial is focused on the xUnit framework, we would not get into the minute details of Selenium WebDriver. You can find more information about Selenium WebDriver and its architecture from our detailed guide on What is Selenium?
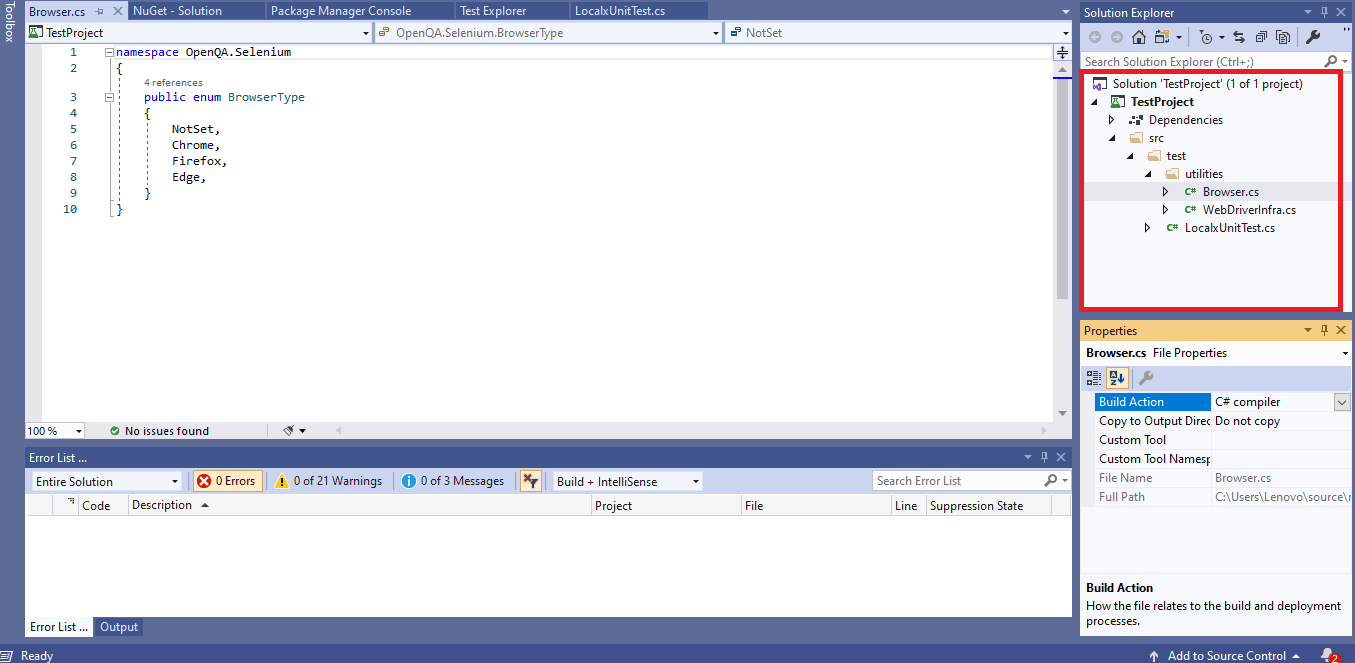
For code modularity, we separate the tasks for creating Selenium WebDrivers for different browsers in a separate file named WebDriverInfra.cs. The only implementation in the file is creation of WebDriver instances of Google Chrome, Mozilla Firefox, and Microsoft Edge browsers.
The code structure is as shown below:
Code Walkthrough
Step 1 – The ‘LambdaTest ToDo app’ is executed against two web browsers i.e. Firefox and Chrome. As the browser types would be passed as arguments to the test function, we do not use the [Fact] attribute. Instead, we make use of the [Theory] attribute, and the parameterized test is created by using the [InlineData] attribute.
|
1 2 3 4 5 6 7 8 9 10 11 12 13 14 15 16 17 |
namespace xUnit_Test_Cross_Browser { public class UnitTest { String test_url = "https://lambdatest.github.io/sample-todo-app/"; String itemName = "Yey, Let's add it to list"; [Theory] [InlineData(BrowserType.Chrome)] [InlineData(BrowserType.Firefox)] public void NavigateToDoApp(BrowserType browserType) { .............................. .............................. } } } |
Step 2 – Once browser types are available as a part of the [InlineData] attribute, we start with the actual test implementation. As seen from the implementation, there is no attribute used to indicate that we are starting with the implementation of the Test Method. This is the biggest difference (in terms of clarity) between xUnit.net and other test frameworks.
The test method is called iteratively for each browser type (Firefox and Chrome) and once the browser instance is created, the required tests are performed. The execution will happen in a serial manner i.e. initially the test will be performed on the Chrome browser and after that, it will be performed on the Firefox browser.
To locate the necessary web elements, you should make use of the Inspect Tool functionality of the web browser of your choice. Initial items on https://lambdatest.github.io/sample-todo-app/ are checked and a new item with the text ‘Yey, Let’s add it to list’ is added to the list.
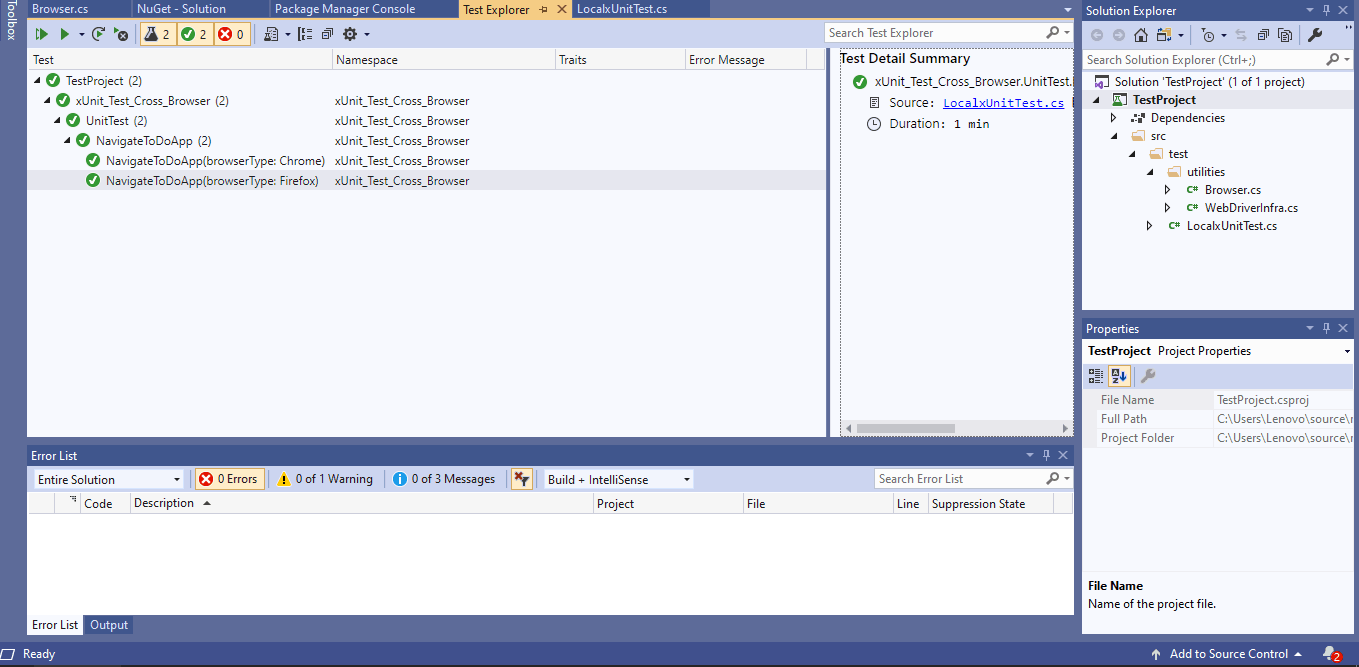
Below is the execution snapshot on the Firefox browser and screenshot from Test Explorer on Visual Studio.
Parallel Testing With xUnit & Selenium Grid
The major drawback of working with a Selenium WebDriver is the serialized execution of test cases. Just imagine the amount of time it takes to execute 1,000 tests if each test takes 3 minutes. That would be 3,000 minutes i.e. 50 hours but do we really have that much time in a release?
Of course, we don’t! Which is why we lean towards parallel testing which helps to reduce the overall test turnaround time by multiple folds. For better scalability and improved throughput, automated browser testing is recommended with Selenium Grid which allows parallel testing. There are multiple ways in which you can perform parallel testing with the xUnit testing framework and Selenium Grid.
Parallel testing in the xUnit framework can be achieved by applying assembly-level attributes.
- Test Classes are by default put into a single test collection
- Setting the maximum number of threads that should be used when tests are executed in parallel.
|
1 |
[assembly: CollectionBehavior(CollectionBehavior.CollectionPerAssembly)] |
Default: CollectionBehavior.CollectionPerClass
|
1 |
[assembly: CollectionBehavior(MaxParallelThreads = n)] |
If this feature is being used on an in-house machine, you should select an optimum number of threads i.e. something ideal for the configuration of your machine, else it would hog the CPU cores due to excessive load on it.
Default: Number of virtual processors or CPUs in that PC.
In order to demonstrate parallel testing on Selenium Grid, we just add the necessary hooks for parallel testing in the To-Do app implementation. Here are the modifications we make in the code:
- Set the maximum number of threads to be run in Parallel to ‘4’.
- Add a new Unit Test class where the same testing is performed on Chrome browser. This code is just a replica of the initial test but for demonstration, we have added the test code to a new class.
The implementation in src/Test/Utilities/WebDriverInfra.cs and src/Test/Utilities/Browser.cs remain unchanged.
Code walkthrough
Step 1 – The major change in the code is the addition of thread-level parallelism which is set to ‘4’.
|
1 |
[assembly: CollectionBehavior(MaxParallelThreads = 4)] |
Step 2 – Apart from this, a new Unit test (UnitTest2) has been added for demonstration. The implementation inside UnitTest2 is the same as the first test i.e. UnitTest.
|
1 2 3 4 5 6 7 8 |
public class UnitTest2 { String test_url = "https://lambdatest.github.io/sample-todo-app/"; String itemName = "Yey, Let's add it to list"; [Theory] [InlineData(BrowserType.Chrome)] public void NavigateToDoApp(BrowserType browserType) |
As seen in the execution snapshot, instances of Firefox (from UnitTest) and Firefox (from UnitTest2) are triggered in Parallel.
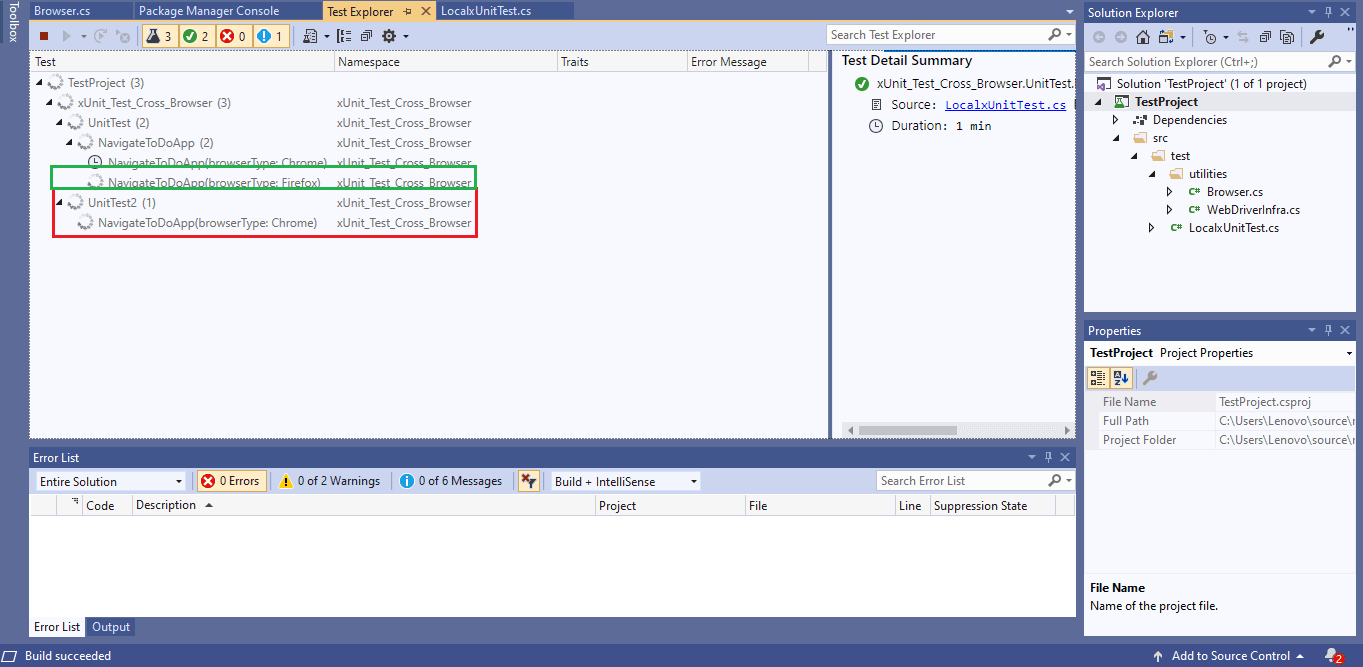
You’re awesome! Thanks for clinging onto this xUnit testing tutorial so far and successfully running xUnit script with Selenium WebDriver & Selenium Grid. I am just about to wrap this xUnit testing tutorial with a bonus tip.
Bonus Tip – Use A Selenium Grid Cloud
Parallel testing on an in-house or a local Selenium Grid can be used only till the time your tests have to be executed on ‘select few’ combinations of browsers. Would you take the effort to install an old version of Chrome, if you have the latest version installed on your machine? Maybe, yes☺. But what if you have to repeat the same procedure for dozens of different browsers, you would end up more time on installation & un-installation of browsers than on automated browser testing!
The other limitation that you face with local Selenium Grid setup is that you need to invest heavily in setting up the infrastructure and with each new project, your costs may rise! There is no running away from cross browser testing as you do not want your esteemed customers to locate bugs for you☹. It would also reduce the overall test coverage percentage for the project.

A scalable and more economical solution would be to opt for a cloud-based Selenium Grid like LambdaTest. This eliminates the headache of having countless machines with different operating systems and browsers installed on it. With the help of LamdbaTest, you can perform cross-browser testing on 2000+ browsers, operating systems and/or devices.
Moving to the cloud is beneficial only if the existing implementation can be ported to a remote Selenium grid with minimal effort i.e. code changes should only be related to the Selenium grid infrastructure. Porting effort to LambdaTest’s Selenium Grid is minimal as it majorly involves infrastructural code changes.
First, you will be needed to create an account (completely free!) on LambdaTest. Make sure that you note down your user-name and access-key for future reference and also to access the Selenium grid. This can be done from the Profile Section.
LambdaTest capabilities generator is used to create desired capabilities of the browsers & platforms on which the test has to be performed. Shown below are the capabilities for Safari on macOS Mojave platform:
|
1 2 3 4 5 6 7 8 |
DesiredCapabilities capabilities = new DesiredCapabilities(); capabilities.SetCapability("user","Your Lambda Username") capabilities.SetCapability("accessKey","Your Lambda Access Key") capabilities.SetCapability("build", "your build name"); capabilities.SetCapability("name", "your test name"); capabilities.SetCapability("platform", "MacOS Mojave"); capabilities.SetCapability("browserName", "Safari"); capabilities.SetCapability("version","12.0"); |
To demonstrate the usage of LambdaTest and the effectiveness of Parallelism on the cloud, we implement three test cases.
Test Case 1 – LamdaTest To-Do App
- Navigate to the to-do app https://lambdatest.github.io/sample-todo-app/ using selected browsers.
- Next, you’re required to check the top two items.
- Next in line, adding an item to the list, using ‘Add a new item’.
- Click on ‘Add button’ and the new item will be added to the list.
Here’s a complete list of browsers on which cross-browser testing can be performed:

Test Case 2 & 3 – Google Search for LambdaTest (using a different browser and OS combinations)
- Go to Google.com
- On the search window, enter LambdaTest
- Exit the window
Even though these test cases are the same, we will perform the execution on different web browsers.

Code Walkthrough
Step 1 – Package/namespace OpenQA.Selenium.Remote is imported as RemoteWebDriver class is defined in it.
|
1 2 |
/* For using Remote Selenium WebDriver */ using OpenQA.Selenium.Remote; |
Step 2 – As tests have to be executed in Parallel and the plan which we are using supports ‘5’ parallel executions, hence we set the ‘Max number of Parallel Threads to 4’.
|
1 |
[assembly: CollectionBehavior(MaxParallelThreads = 4)] |
Step 3 – Valid user-credentials consisting of user name & access key are declared so that LambdaTest’s remote Selenium can be accessed.
|
1 2 3 4 |
String username = "user-name"; String accesskey = "access-key"; String gridURL = "@hub.lambdatest.com/wd/hub"; ....................................................................... |
Step 4 – LambdaTest capabilities generator will generate the Browser and Device capabilities, which are then passed on to the Remote Selenium WebDriver API.
|
1 2 3 4 5 6 7 8 9 10 11 |
GlobalVar.capabilities.SetCapability("browserName", browser); GlobalVar.capabilities.SetCapability("version", version); GlobalVar.capabilities.SetCapability("platform", os); GlobalVar.capabilities.SetCapability("build", "[xUnit - 1] LT ToDoApp using Xunit in Parallel on LambdaTest"); GlobalVar.capabilities.SetCapability("name", "[xUnit - 1] - LT ToDoApp using Xunit in Parallel on LambdaTest"); ................................................................................. ................................................................................. ................................................................................. driver = new RemoteWebDriver(new Uri("https://user-name:access-key@hub.lambdatest.com/wd/hub"), capabilities, TimeSpan.FromSeconds(600)); |
Step 5 – As a part of the SetUp/Initialization process, we assign the user-name and access-key to the newly created class GlobVar (which is of public type).
The implementation under IDisposable [i.e. public void Dispose()] is empty as it was more feasible to release the resources i.e. cleanup held by the browser instances after the execution of the corresponding tests.
Step 6 – The browser capabilities generated by the LambdaTest Capabilities Generator are passed to each test scenario using the [InlineData] attribute. Since the tests accept parameters, the [Theory] attribute is used instead of the [Fact] attribute.
Each test is executed on an iterative basis till the time all the combinations in [InlineData] are exhausted. The remote web-driver is created as a part of the test-case as it uses the corresponding input parameters for creating the browser instance on the target platform.
The rest of the implementation is specific to the test scenario e.g. searching for LambdaTest on Google/Performing necessary operations on the LambdaTest To-Do App.
As seen in the execution snapshot from Visual Studio, tests are performed in parallel with one combination being picked from each Unit Test as the parallelism is at Thread Level. Tests are performed until the time all the arguments inside [InLineData] are not exhausted.
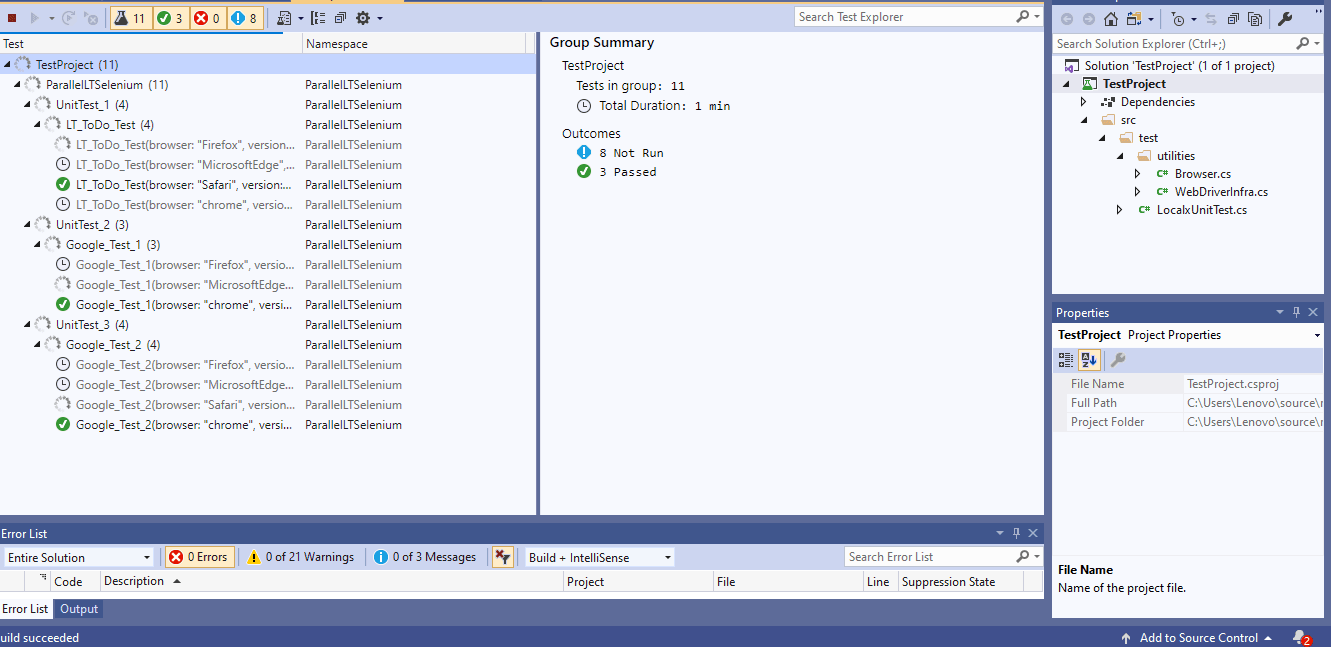
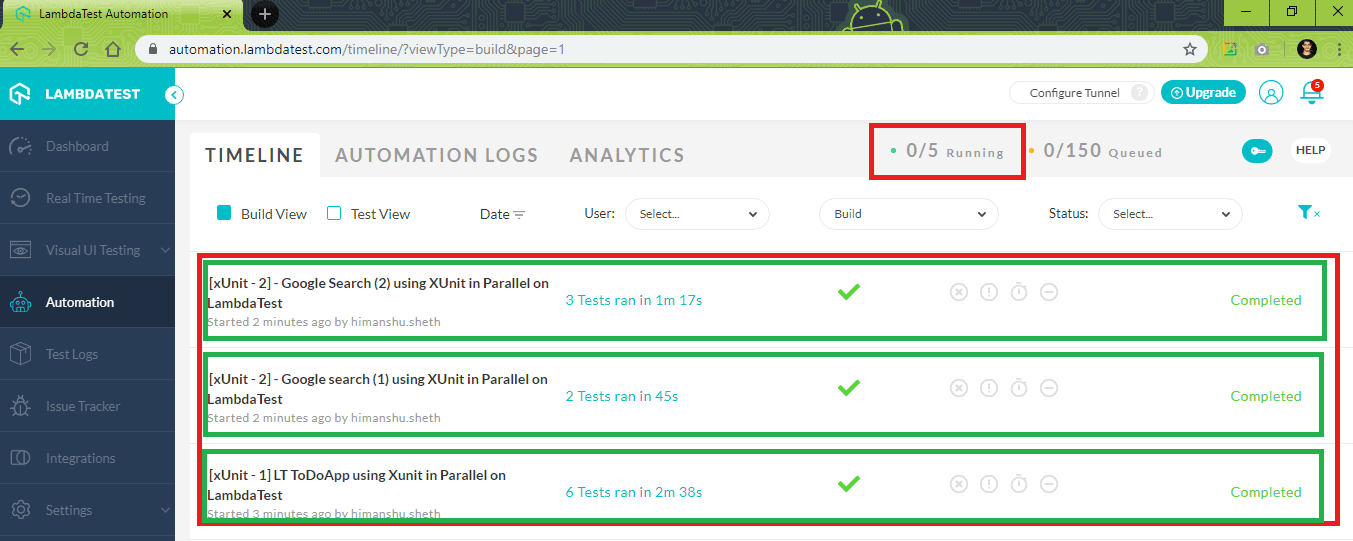
Automation dashboard on LambdaTest enables you to check the status of the tests, view screenshots of the tests, view video recording of the tests, etc.
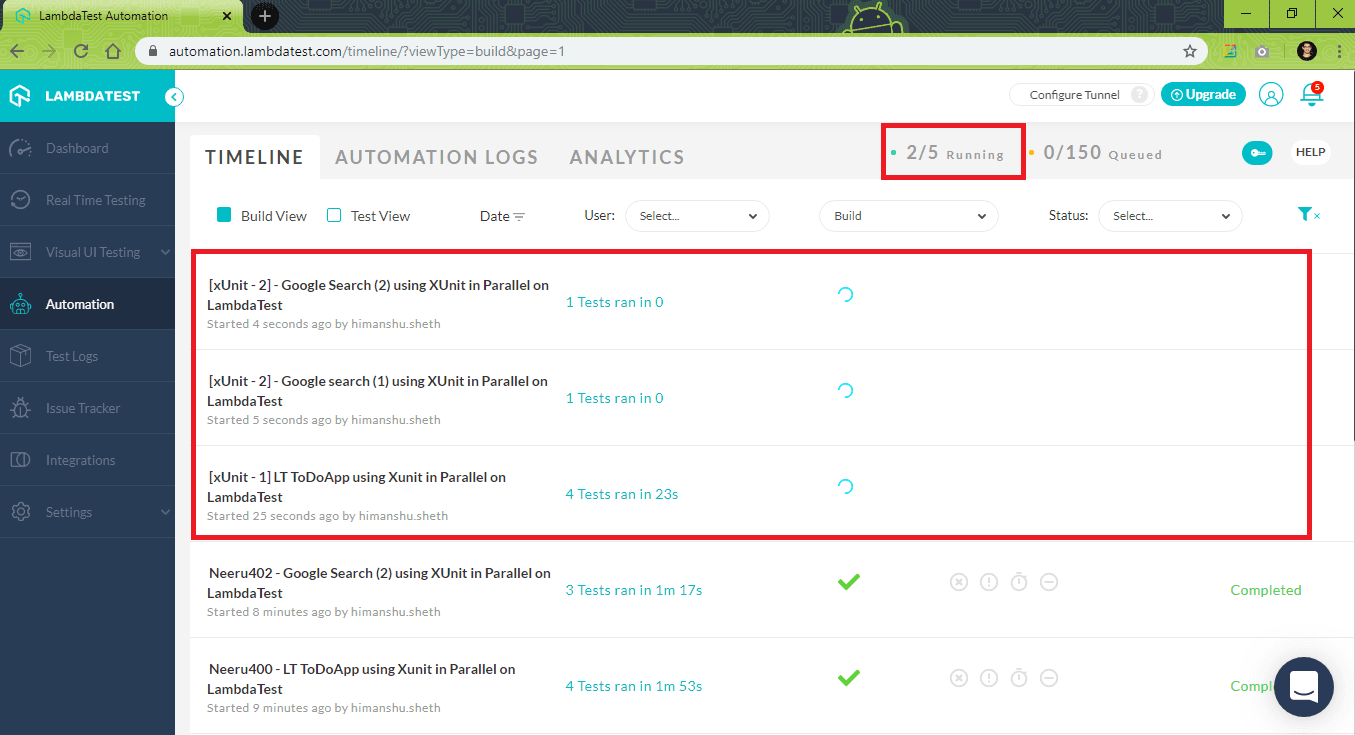
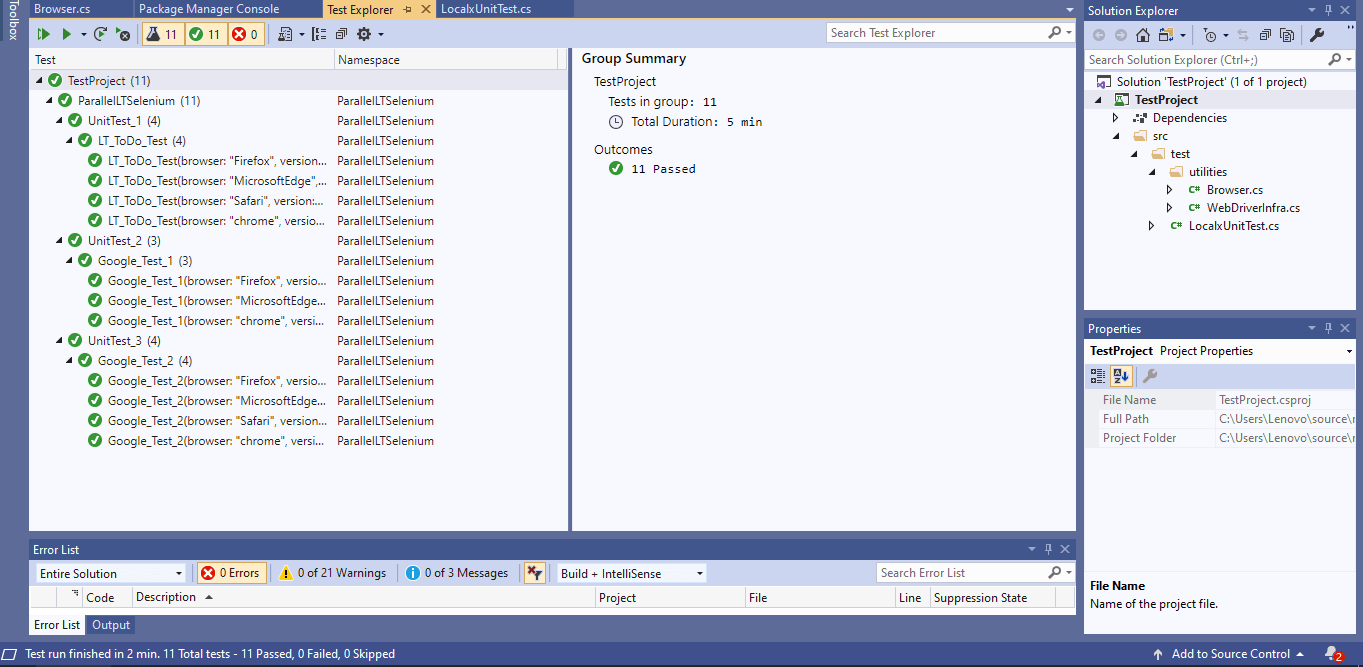
As seen in the screenshot from LambdaTest, tests are executed in parallel. Shown below is the snapshot of the test execution from the Test Explorer on Visual Studio and Automation Tab (Test Status = Completed) on LambdaTest.
Conclusion
In this xUnit testing tutorial, we had a detailed look at the xUnit framework.
- We realized the benefits of using xUnit framework for unit testing with Selenium C#. Since the xUnit framework is more community-focused, many un-necessary attributes that were a part of the NUnit framework are no longer a part of xUnit framework.
- We looked at the prerequisites of xUnit testing tutorial and installed necessary packages and libraries.
- We also gazed upon the attributes involved in the xUnit testing framework.
- We then ran our first script using xUnit and Selenium WebDriver.
- In order to avoid serial test execution, we accelerated our test process with the help of Selenium Grid and xUnit.
- As a bonus tip, we learned that switching to a cloud Selenium Grid can help you deliver faster and focus better on writing critical test automation scripts without worrying about the infrastructure maintenance.
Do leave your comments on how you leverage the xUnit testing framework with cloud Selenium Grid for improving your product testing. Until next time!
Got Questions? Drop them on LambdaTest Community. Visit now


