XPath vs CSS Selectors: A Detailed Guide
Arun Gupta
Posted On: April 3, 2023
![]() 278158 Views
278158 Views
![]() 29 Min Read
29 Min Read

Writing the locators for the web elements is like laying down the foundation of an automation testing framework. This foundation must be strong enough to hold the growing size of a framework.Otherwise, the result will be a flaky and unreliable system that will tend to fail by even the smallest changes in the Document Object Model (DOM) structure.
Though there are many locators available in Selenium, there has been a lot of debate when it comes to choosing between the XPath and the CSS Selectors. I have worked on many projects throughout my career as a Quality Engineer, and I have also seen this XPath vs CSS Selectors discussion happening across the teams. However, there is no clear winner.
CSS selectors and XPath are both used to locate elements in web pages. CSS selectors are simpler and faster, ideal for straightforward HTML element selection. XPath, however, offers more flexibility and power, capable of navigating complex and dynamic web page structures, including non-HTML elements.
While both have their unique advantages and use cases, the debate over which one is superior is ongoing in the tech community. To gain a deeper understanding of this debate, we conducted a LinkedIn poll asking professionals, ‘What is your favorite element locator in test automation?’ According to the insights that gathered from this poll, This blog aims to delve into the technicalities of XPath and CSS Selectors, enriched by the practical perspectives from our poll.
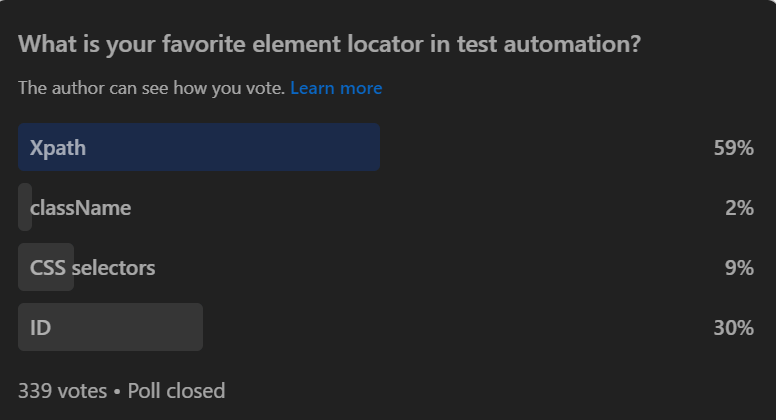
In this blog on XPath vs CSS Selectors, I will broadly talk about the best practices to follow when working with the XPath and CSS Selectors but will briefly explain the other locators as well with examples using Selenium Java.
Need to test your XPath expressions? Try Free XPath Tester tool for accurate and efficient web scraping and automation.
TABLE OF CONTENTS
- What is a locator in Selenium?
- Different locators in Selenium
- What is XPath?
- Writing the XPath expressions
- Advantages of using XPath
- Shortcomings of using XPath
- What are CSS Selectors?
- Writing the CSS Selector expressions
- Advantages of using CSS Selectors
- Shortcomings of using CSS Selectors
- XPath vs CSS Selectors – Which one is faster?
- Bonus Tip: How to write the best locator expressions?
- Best browser extensions for generating locator expression
- Frequently Asked Questions (FAQs)
What is a locator in Selenium?
While testing the functional aspects at the front-end of a website, you need to perform many operations on a web page. These operations could be clicking a button, checking a checkbox, or entering text into a textbox. You can automate these operations using Selenium WebDriver by locating the web elements in the HTML DOM.

As the name suggests, a locator in Selenium lets you find the respective WebElement. It can be defined as an address that uniquely identifies an element on a web page. Once the element is located, you can use other supporting methods to perform specific operations on the element, like clicking or entering a text.
Note: When writing this XPath vs CSS Selectors blog, the Selenium version was Selenium 4.8.0. However, the way the locators are being used is agnostic of the test automation framework (e.g., Selenium, Cypress, etc.) being used for test automation.
Different locators in Selenium
Selenium supports eight types of locators, including XPath and CSS Selectors. I will explain each locator in detail, along with examples. Here, I will use LambdaTest Selenium Playground as the AUT (Application Under Test).
LambdaTest is a cloud-based digital experience testing platform that supports manual and automated testing for web and mobile. It provides an online Selenium Grid of 3000+ real browsers and OS and eliminates the hassle you face while performing automation testing on your local grid.
Subscribe to the LambdaTest YouTube Channel and get the latest tutorials around automation testing, Selenium testing, Playwright, Appium, and more.
Run your Selenium test scripts across real desktop browsers Try LambdaTest Now!
As this blog on XPath vs CSS Selectors specifically focuses on XPath and CSS Selectors locators, I have intentionally omitted them from this list. They will be thoroughly covered in later sections of the blog on XPath vs CSS Selectors.
To jump directly to the section on XPath and CSS Selectors, click here.
ID locator
ID locator is used to find the element based on its ID attribute. When an element has an ID available, it is the most desirable locator because IDs are unique for all elements. This locator directly finds the element with a simple, non-complex locator expression.
Example:
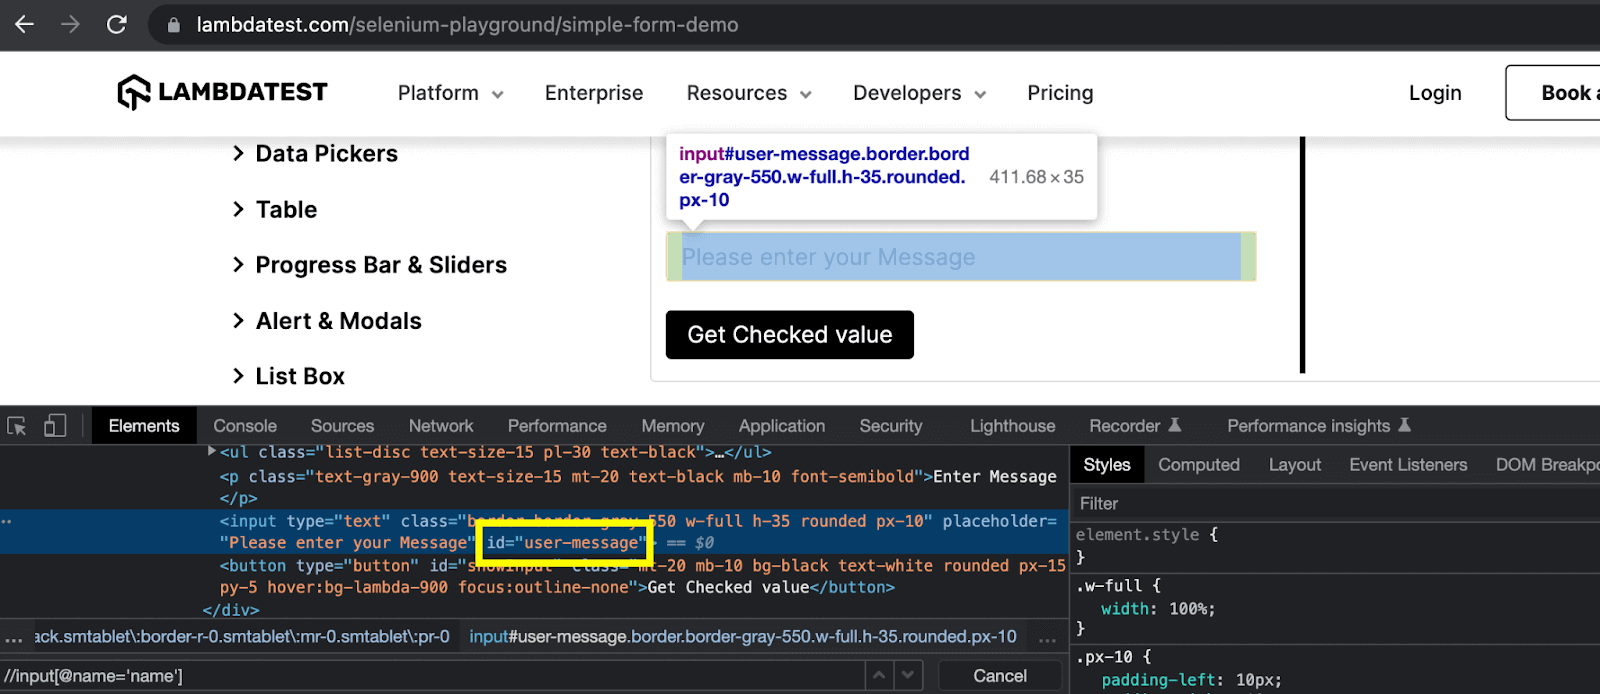
In this XPath vs CSS Selectors blog, you can see that we are trying to locate the highlighted textbox. We can do so by inspecting this element in the browser console and checking what attributes this element has.
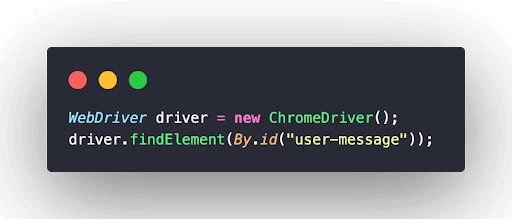
This is an input element, and we can see that it has the ID attribute with value = “user-message”. In this case, we can use a simple locator expression with driver object reference as:
Name locator
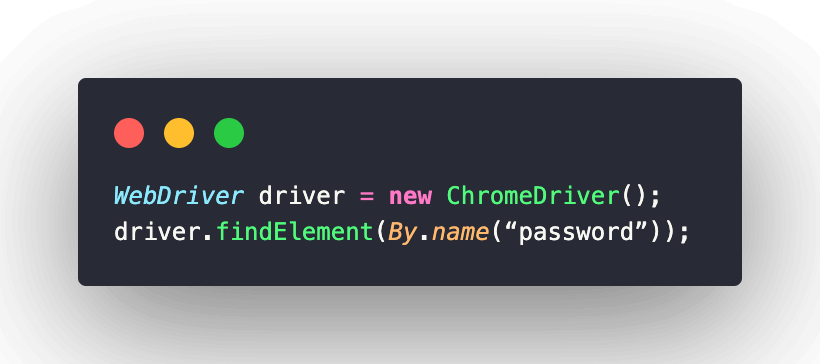
Name locator is used to find the element based on its name attribute. While it is possible to create a basic locator expression using an element’s name attribute, it’s also possible that the element may not have a name attribute at all.
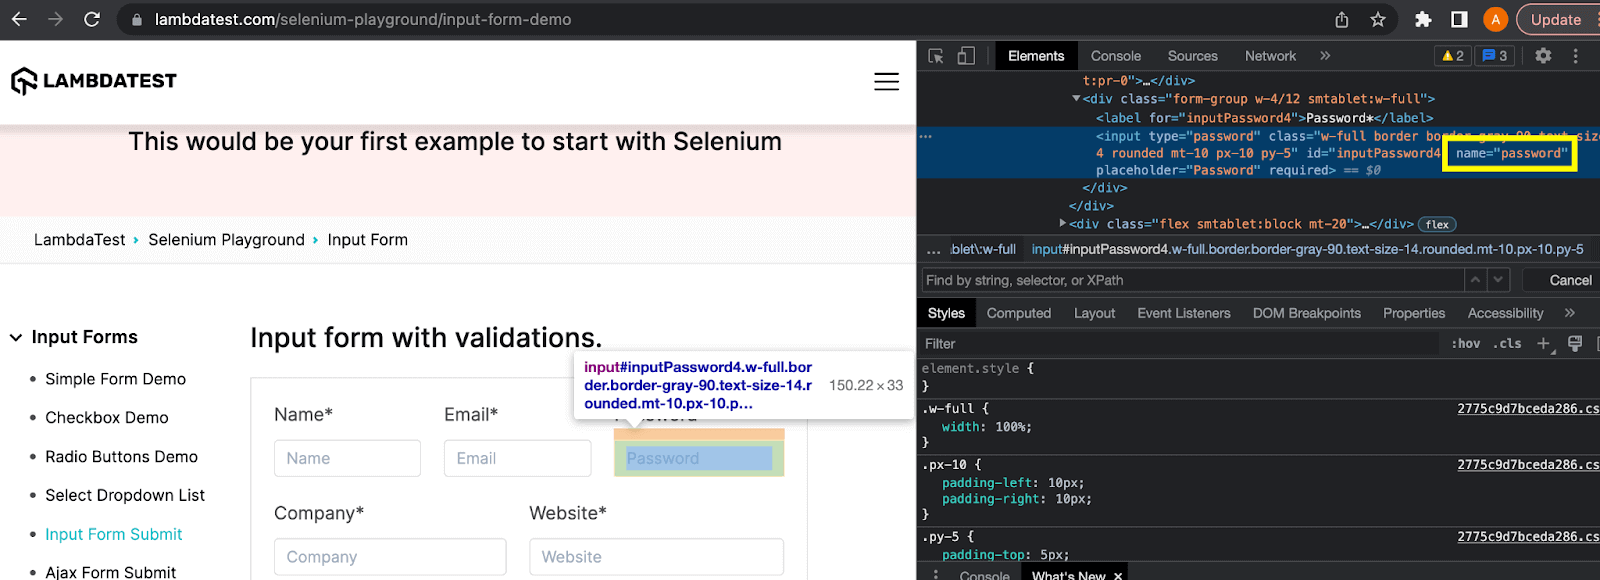
In the above example of this XPath vs CSS Selectors blog, the textbox has the value of the name attribute as “password”. Hence, the locator expression can be written as:
className locator
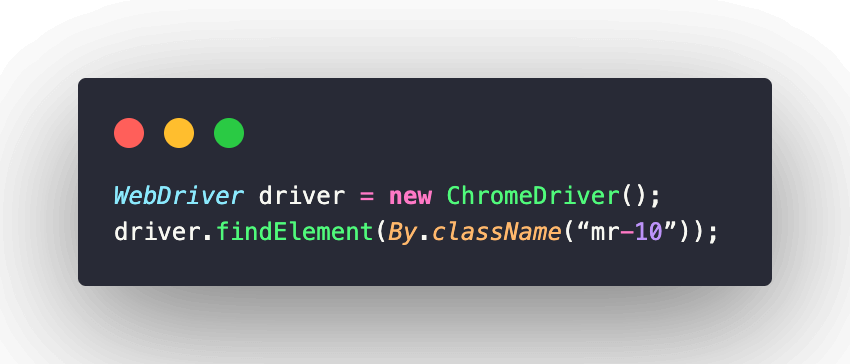
className locator is used to find the element based on its class attribute. It is also similar to the ID and name locators we discussed above.

In the above example of this XPath vs CSS Selectors blog, the checkbox element can be located using the class attribute as:
tagName locator
tagName locator is used to find the element directly using its tag name. However, this is not a preferred locator to identify the elements as it tends to return duplicate results because there can be multiple elements of a particular type on the HTML page structure. For example, input, button, div, etc.

In the above example of this XPath vs CSS Selectors blog, an input type element can be located using the tagName attribute. The locator expression can be written as:
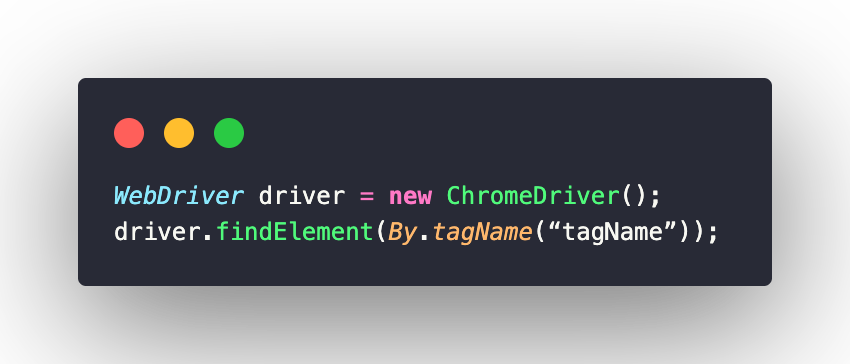
As mentioned above, this expression will identify all the input elements available on the web page.
linkText locator
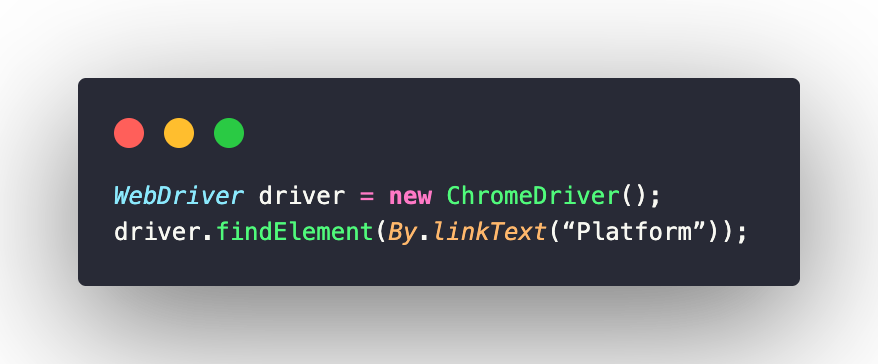
linkText locator is used to find an anchor element based on the hyperlink’s text. You don’t need to work with any attribute of the anchor tag. The element can be easily located using the visible text of the hyperlink.
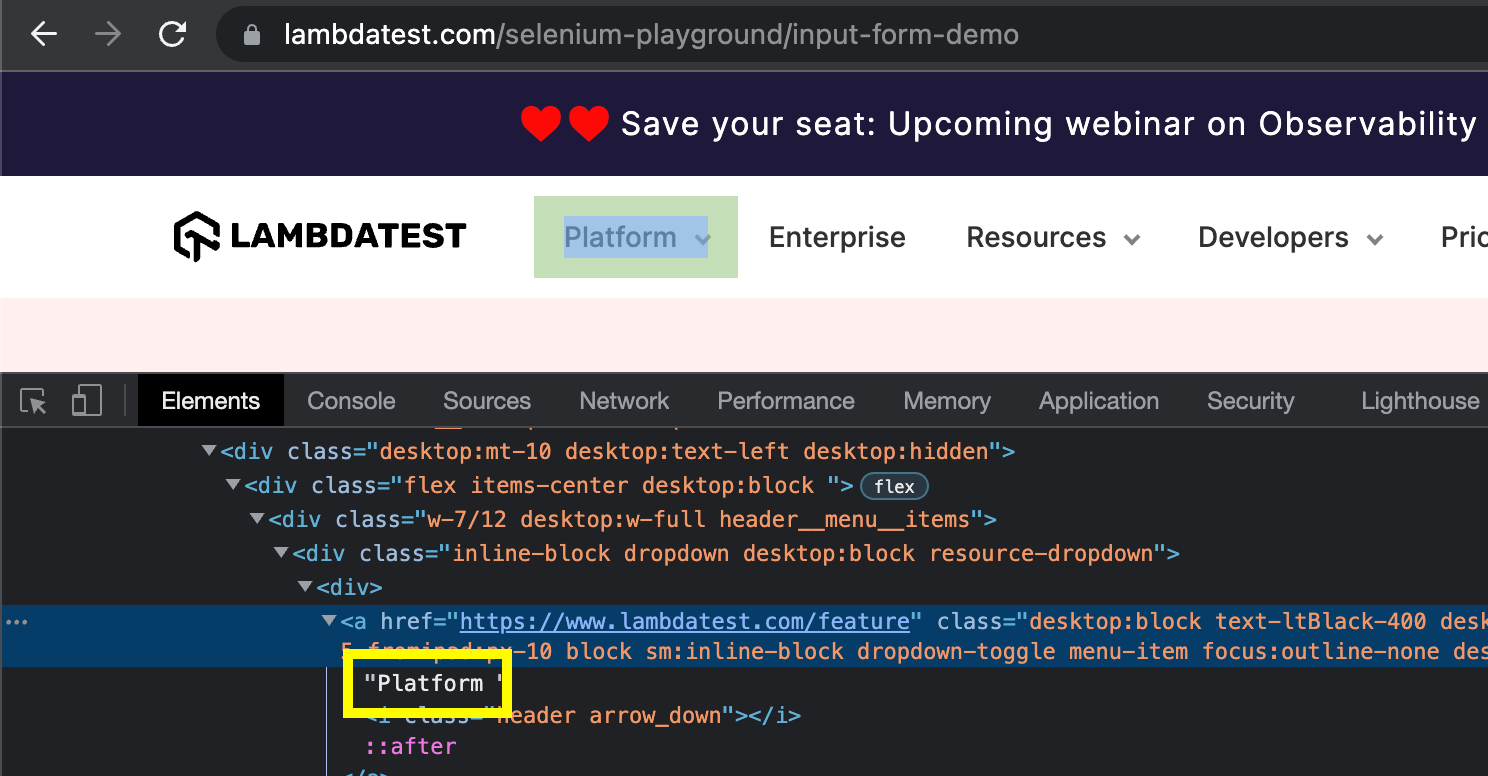
In the above example of this XPath vs CSS Selectors blog, the first menu link of the LambdaTest website can be located by the visible link text “Platform”. The resulting locator expression will look like this:
partialLinkText Locator
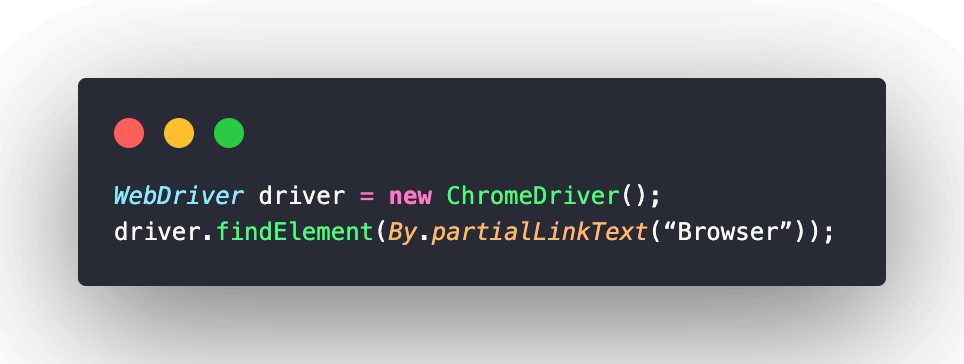
partialLinkText locator is also used to find an anchor element based on the text of the anchor link. It differs from linkText in that it can match the partial text of the hyperlink.
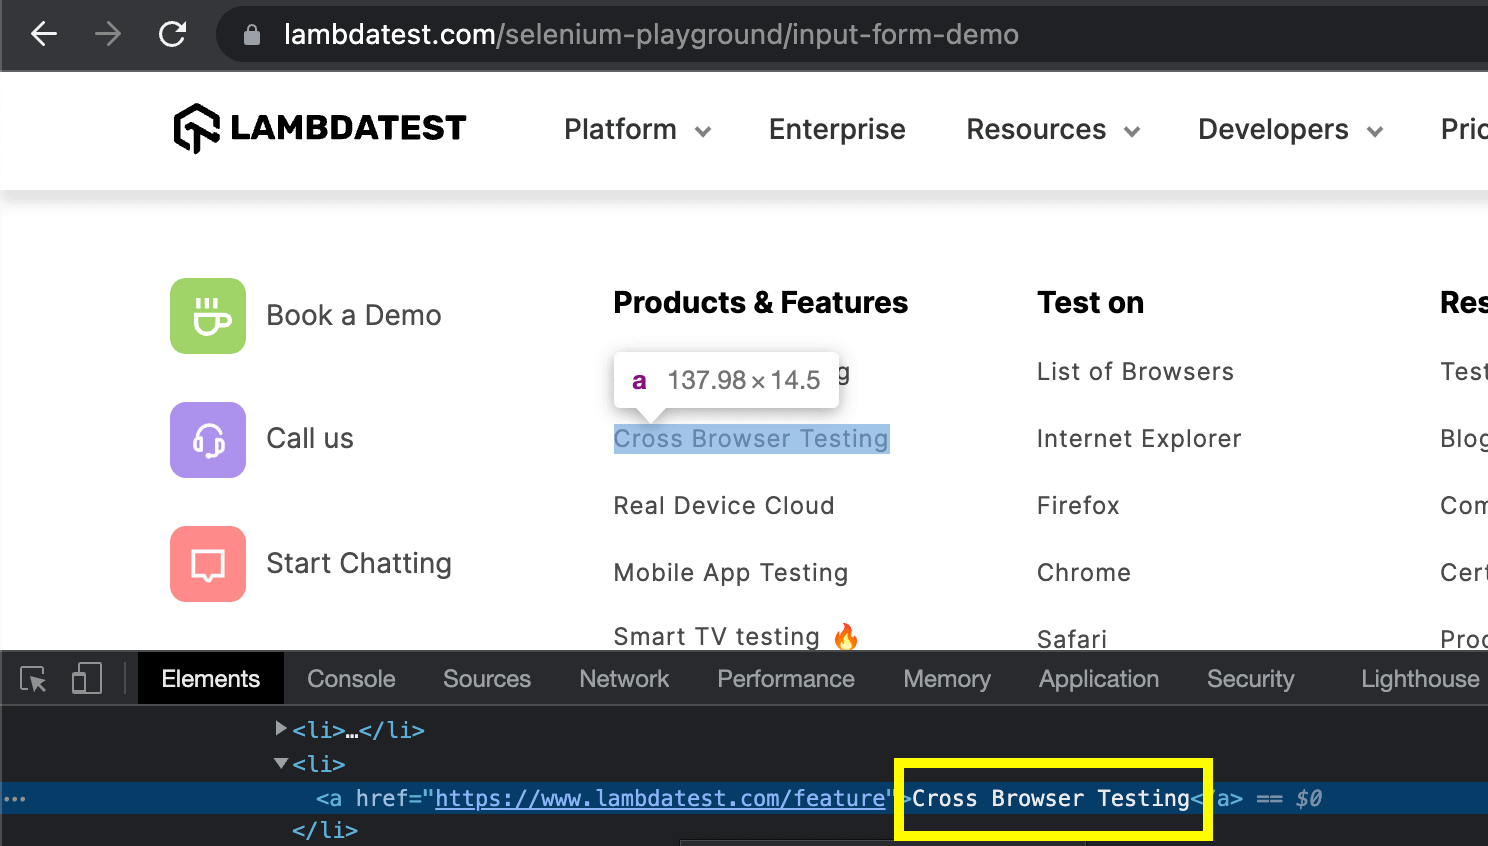
In the above example of this XPath vs CSS Selectors blog, the hyperlink text is “Cross Browser Testing”. We can locate this anchor element using the partial text of the hyperlink like:
What is XPath?
XPath, or XML Path, is a syntax expression language for finding the elements on a web page. XPath can be used to find the elements in both XML and HTML documents.
XPath is used extensively with popular automation testing frameworks like Selenium, Cypress, Playwright, etc.
Syntax:
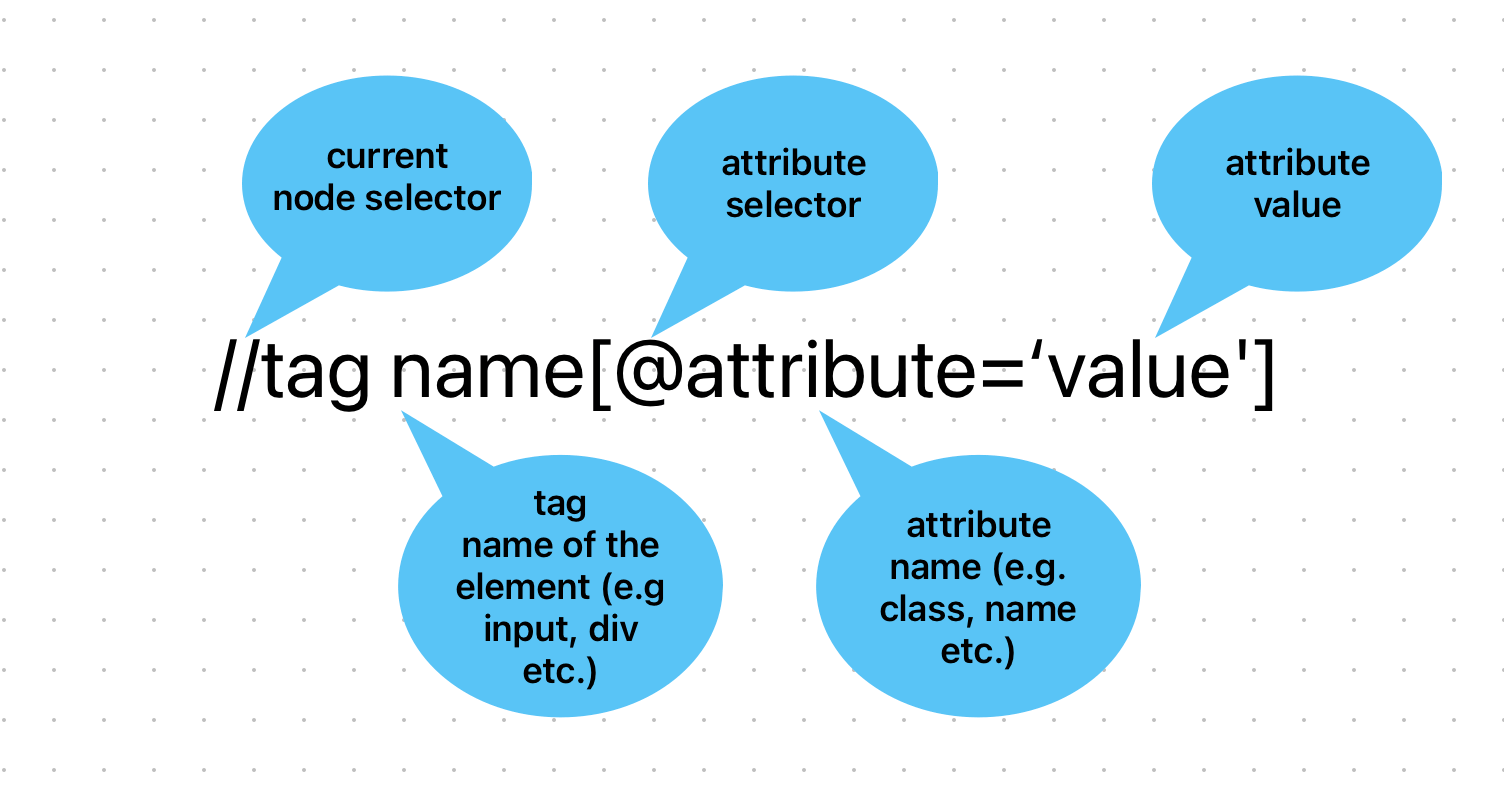
An XPath expression can traverse through the first node of the XML/HTML DOM structure to the desired element. The standard syntax of an XPath expression contains the current node selector and the element’s tag name with its attribute and the attribute’s value.
The XPath expression looks like this:
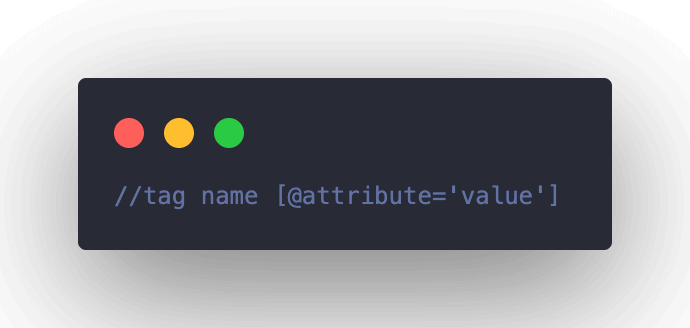
Here is the pictorial representation of the XPath expression.
Types of XPath
There are two types of XPath
- Absolute XPath
- Relative XPath
Absolute XPath
Absolute XPath is used to find the element by traversing through the entire DOM structure beginning from the starting node ( < html > tag) of the HTML page to the element to be located on the page. The main characteristic of the absolute XPath is that it begins with a single forward slash (/).
Shown below is an example of the absolute XPath of the Name textbox as shown in the image below:
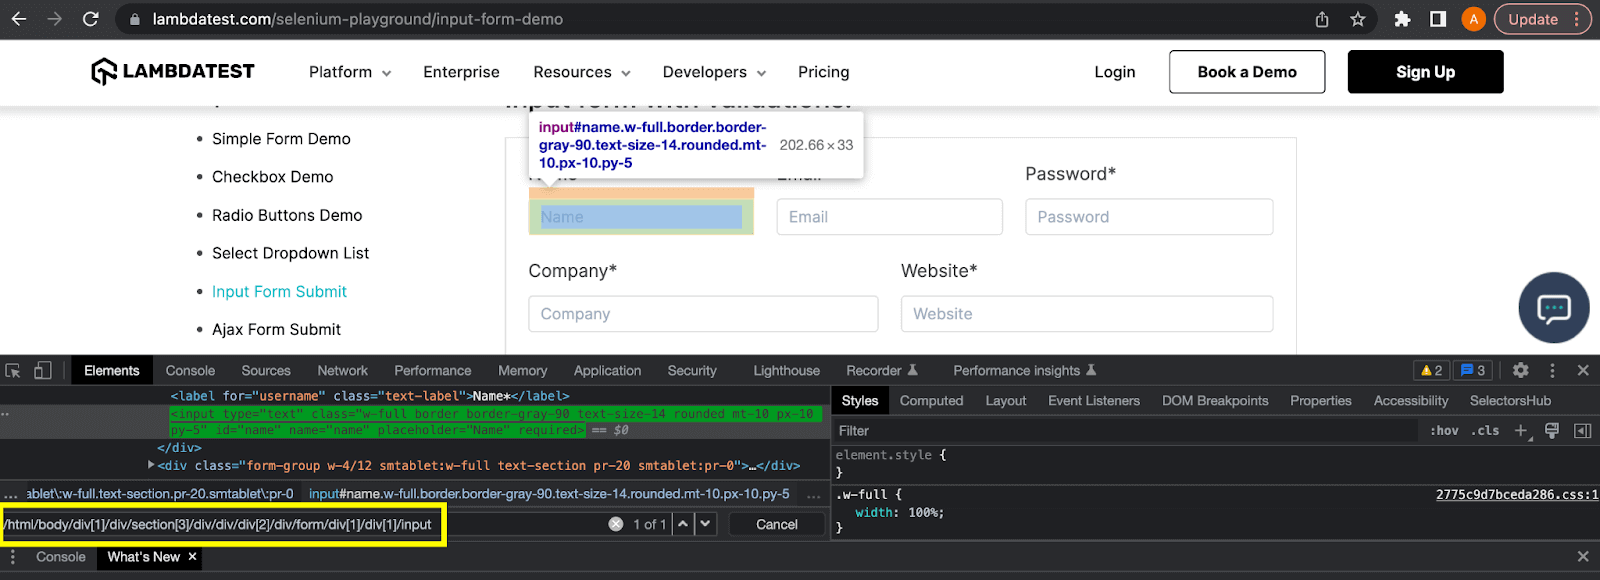

Absolute XPath is not a preferred way to locate the elements as it’s fragile and tends to break if there is any change in the DOM structure.
Let’s see a demonstration here to prove the fragility of the absolute XPath expression. In the above example of this XPath vs CSS Selectors blog, the DOM structure has been edited.
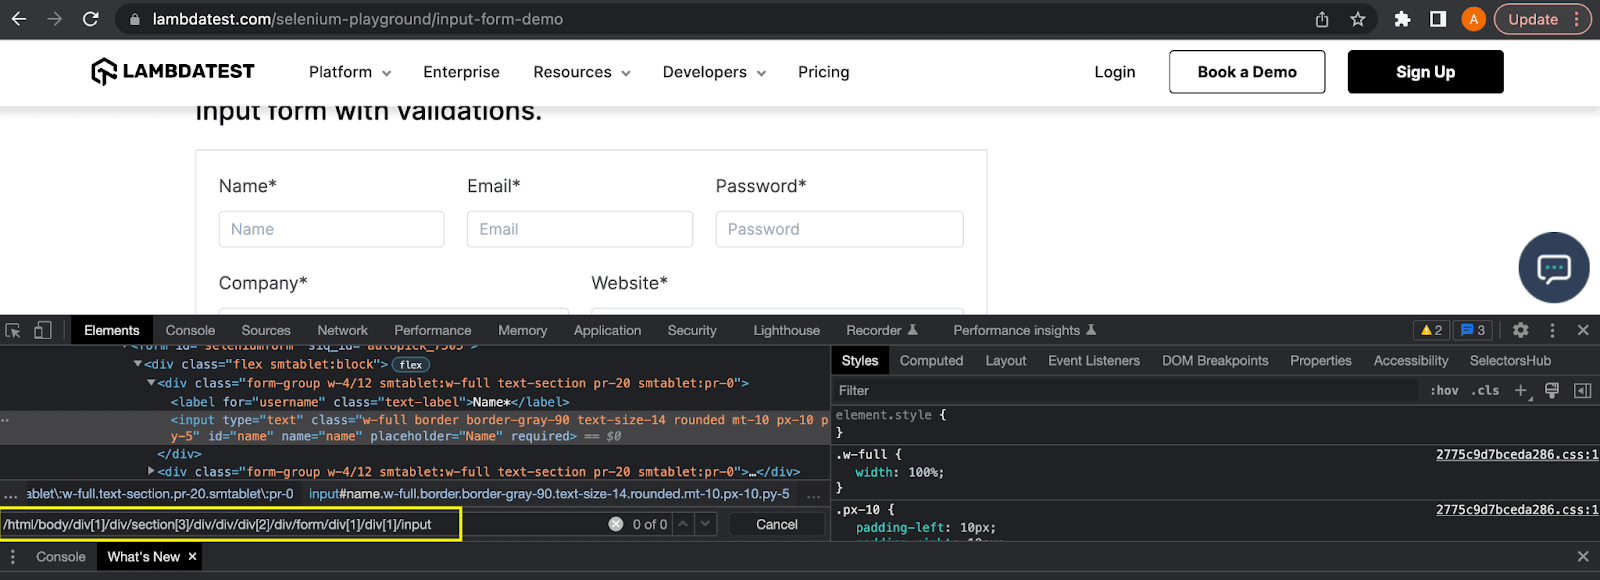
The same absolute XPath expression can now not locate the element as one div element between the starting node and the element is removed.
Relative XPath
Relative XPath does not require the starting node and can locate an element from the middle of the DOM structure. It begins with the double forward slash (//) and is the preferred XPath expression to locate the elements, as the expressions are short and robust.
Here, the relative XPath to locate the Name textbox will be:
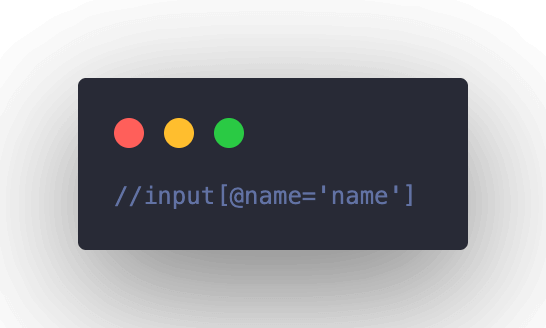
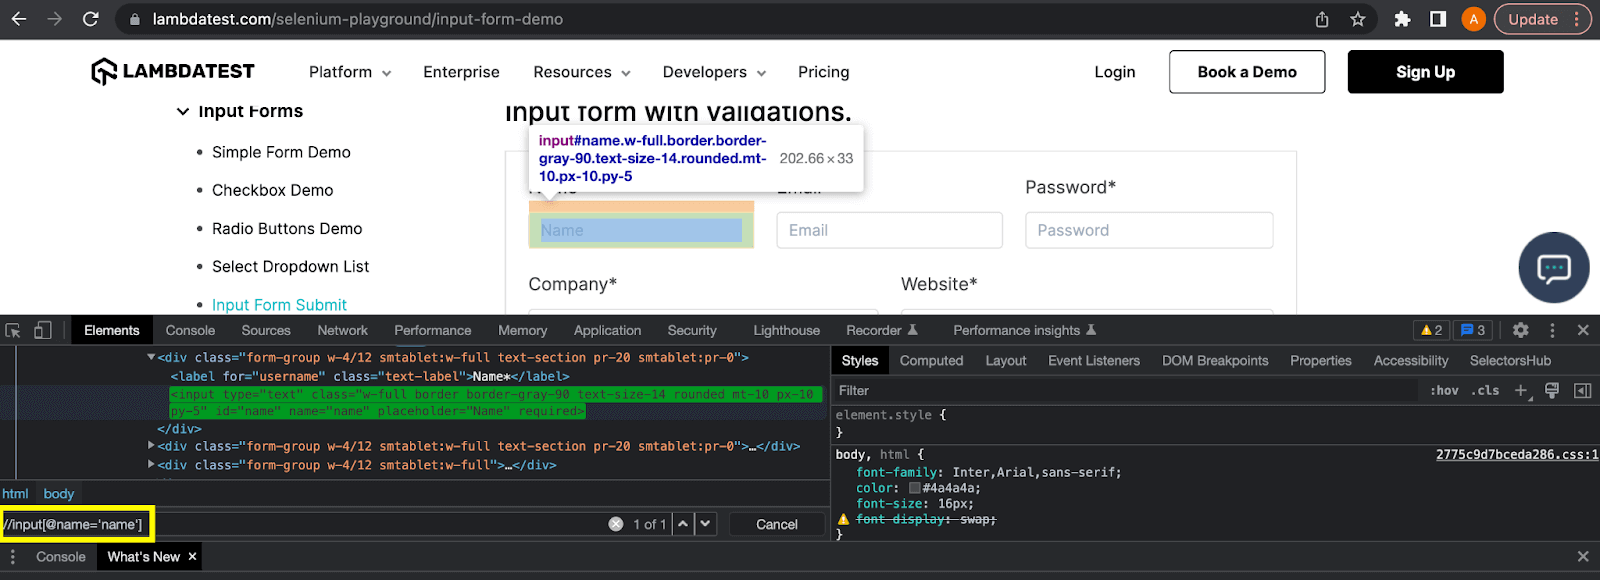
As you can see in the above example of this XPath vs CSS Selectors blog, the relative XPath expression is still locating the element even when several nodes between the starting node and the element have been removed.
Writing the XPath expressions
When working on web projects of significant size, there will likely be situations where using basic XPath expressions to locate an element is not ideal. It is so because it’s possible that the element might not have any attribute which could uniquely identify it.
Also, there could be cases where the value of the only attribute of the element keeps changing with the page refresh. Then the question is: How would you locate it?
Well, XPath provides flexibility in the form of methods to locate such dynamic elements. Let’s dive deep into it.
XPath Contains() Method
Contains() method can be used in the XPath expression to locate an element whose attribute value keeps changing with the page refresh.
This method works on the principle of finding the partial text. It is useful if you know that some part of the dynamic attribute value remains constant. It can also be used when the attribute value is lengthy and contains multiple words (e.g., a placeholder text value).
Example:
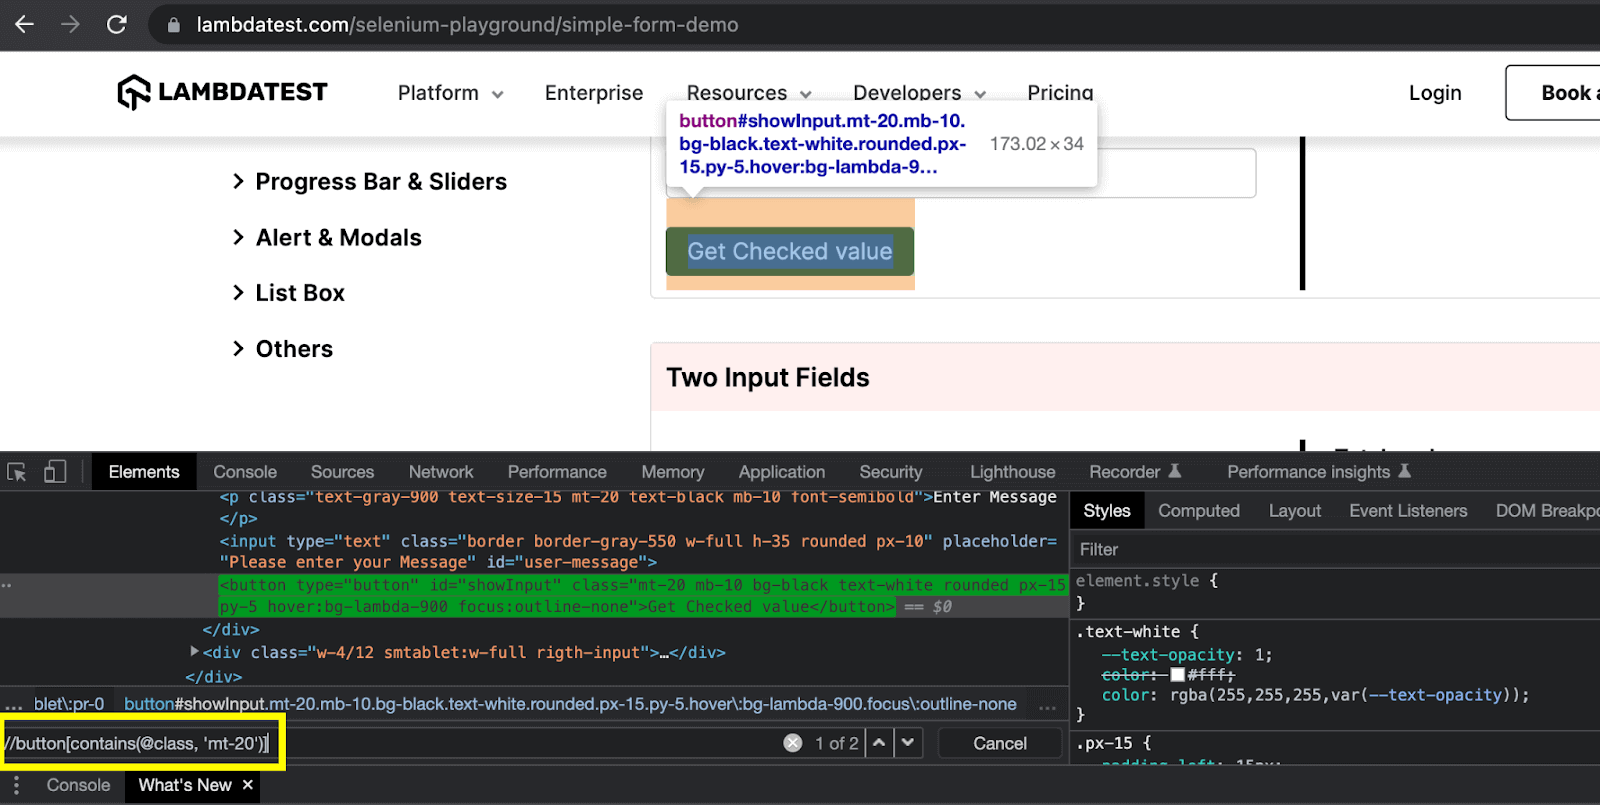
Here, in this example, the button type element is located using the class attribute. But there are multiple classes defined for this button. Therefore, it cannot be located directly using the className locator.
To find this element using the class attribute, I have used the contains() method, and the XPath expression looks like this:

XPath Starts-with() Method
Starts-with() method also works on the same principle of finding the partial text. It is different from the contains() method in that it tends to find the static text at the beginning of the attribute value.
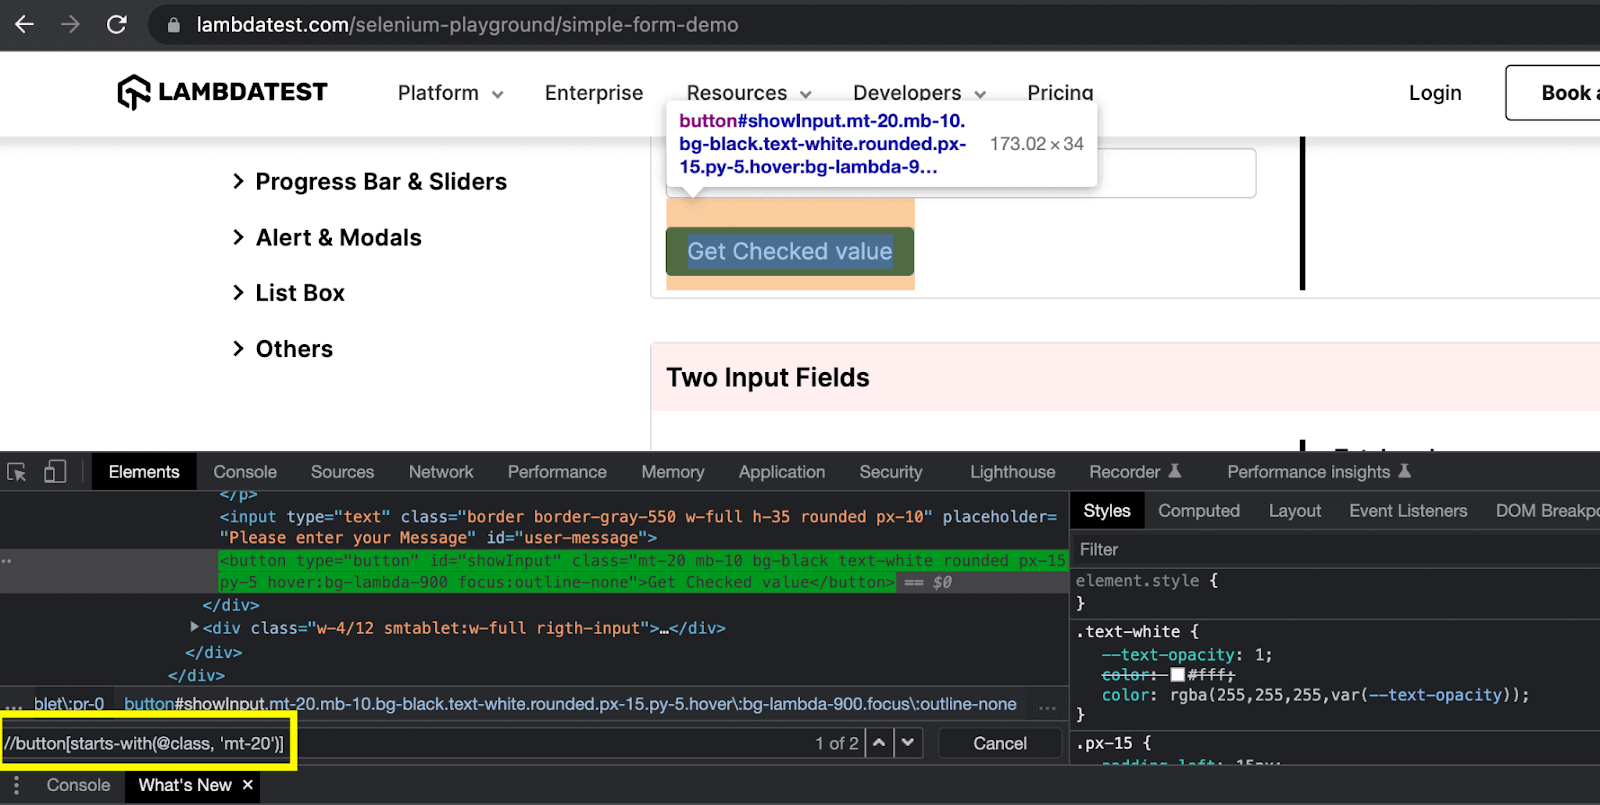
I have used the same example of the button element to demonstrate this method as well. To locate this element using the class attribute, I have used the starts-with() method in this XPath vs CSS Selectors blog, and the XPath expression looks like this:

As you can see in the above example of this XPath vs CSS Selectors blog, the class attribute value starts with the class name “mt-20”. Therefore, this expression was able to locate this element successfully.
XPath Text() Method
The text() method is used to locate the element based on its text value. This method works similarly to the linkText locator. However, this method works on any element which has the text value like a < span >, < p >, < button >, or an < div >, whereas the linkText only works with the < a > element.
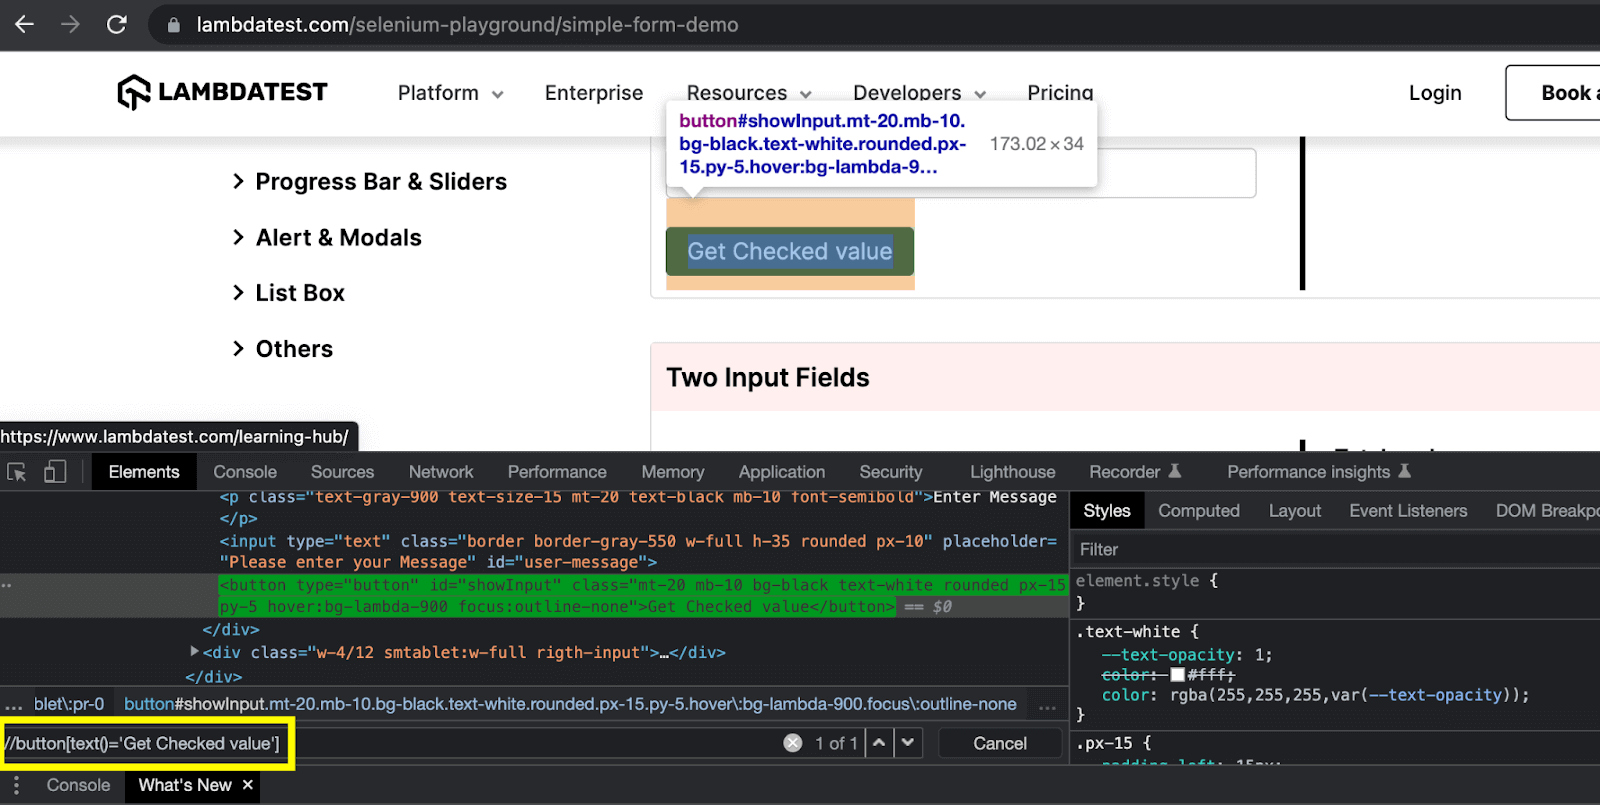
In the above example of this XPath vs CSS Selectors blog, the button element is located using its text with the help of the text() method. The simple XPath expression for this case can be written as:

XPath Logical operators
While using the logical locators (and, or), multiple attribute values of an element are compared. With “or” operator, the element will be found if any of the compared values are true. With “and” operator, both the values need to be true to find the element.
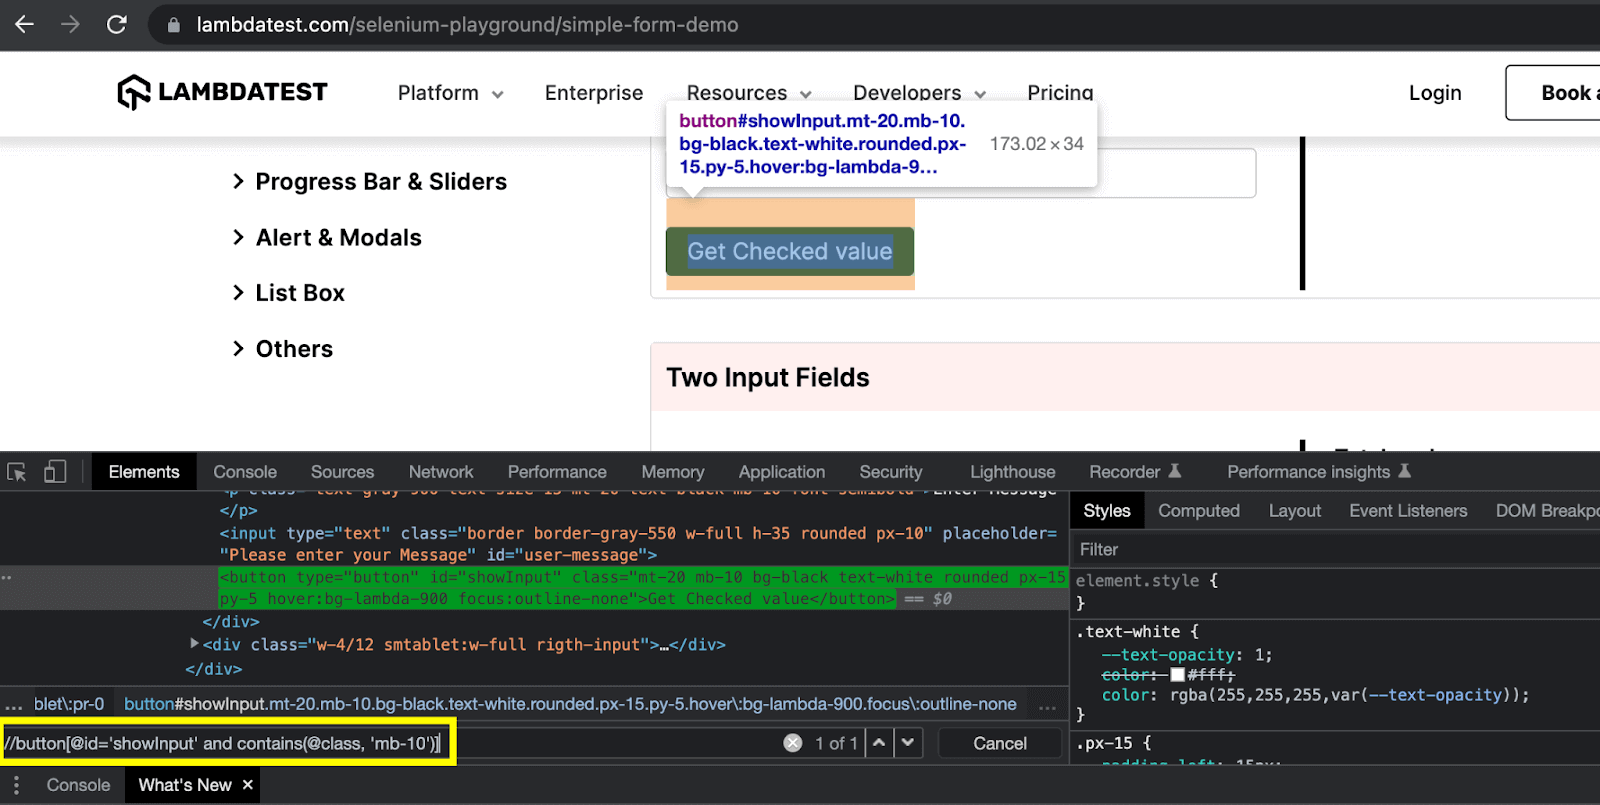
Here in this example, I have used both ID and class attributes of the button element with the ‘and’ operator. As you can see, the ID can be uniquely identified, but multiple classes are defined.
Therefore, contains() method is required for the class attribute to write the following correct expression in this case:

Similarly, the expression can be written using the or operator as well like this:

Please note that both the logical operators are case-sensitive and need to be specified in lowercase within the expression.
XPath Axes Methods
Like the methods explained in the above section of this XPath vs CSS Selectors blog, XPath provides additional methods to locate the dynamic elements. These methods are called axes methods. XPath axes methods can traverse the DOM bidirectionally and are extremely useful in locating the elements that don’t have any attributes.
There are many axes methods, but we will discuss the most common ones here.
- Following
- Preceding
- Ancestor
- Parent
- Child
Following
It selects all elements in the DOM after the closing tag of the current node.
The syntax of the Following method is following::tag name
This can be better explained with the help of the example below.
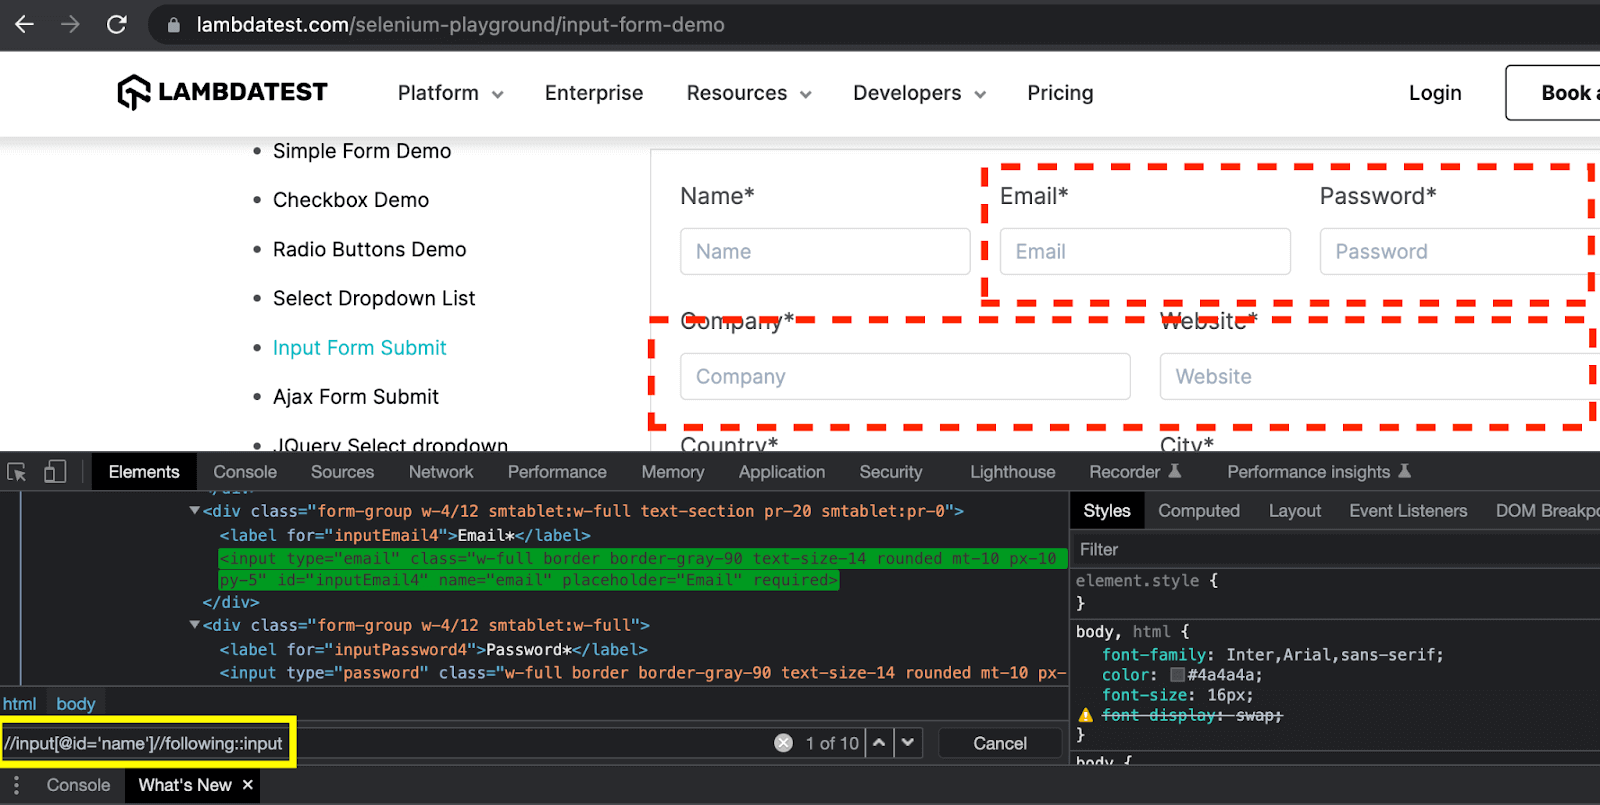
Here, the following keyword finds all the input elements, which are after the “Name” textbox e.g., “Email”, “Password”, “Company,” and “Website” textboxes. The XPath expression for this example is:

As mentioned above, this expression locates all the elements which appear after the current node. If you want to locate the first input element here in this example, you can use the index like this:

Similarly, you can use any attribute of the required element to avoid using the indexes as the best practice. Here, I have demonstrated another XPath expression using the ID attribute of the second input element i.e., the “Email” textbox.

Preceding
It selects all elements in the DOM, which come before the opening tag of the current node.
The syntax of the Preceding method is preceding::tag name
This can be better explained with the help of the example below.
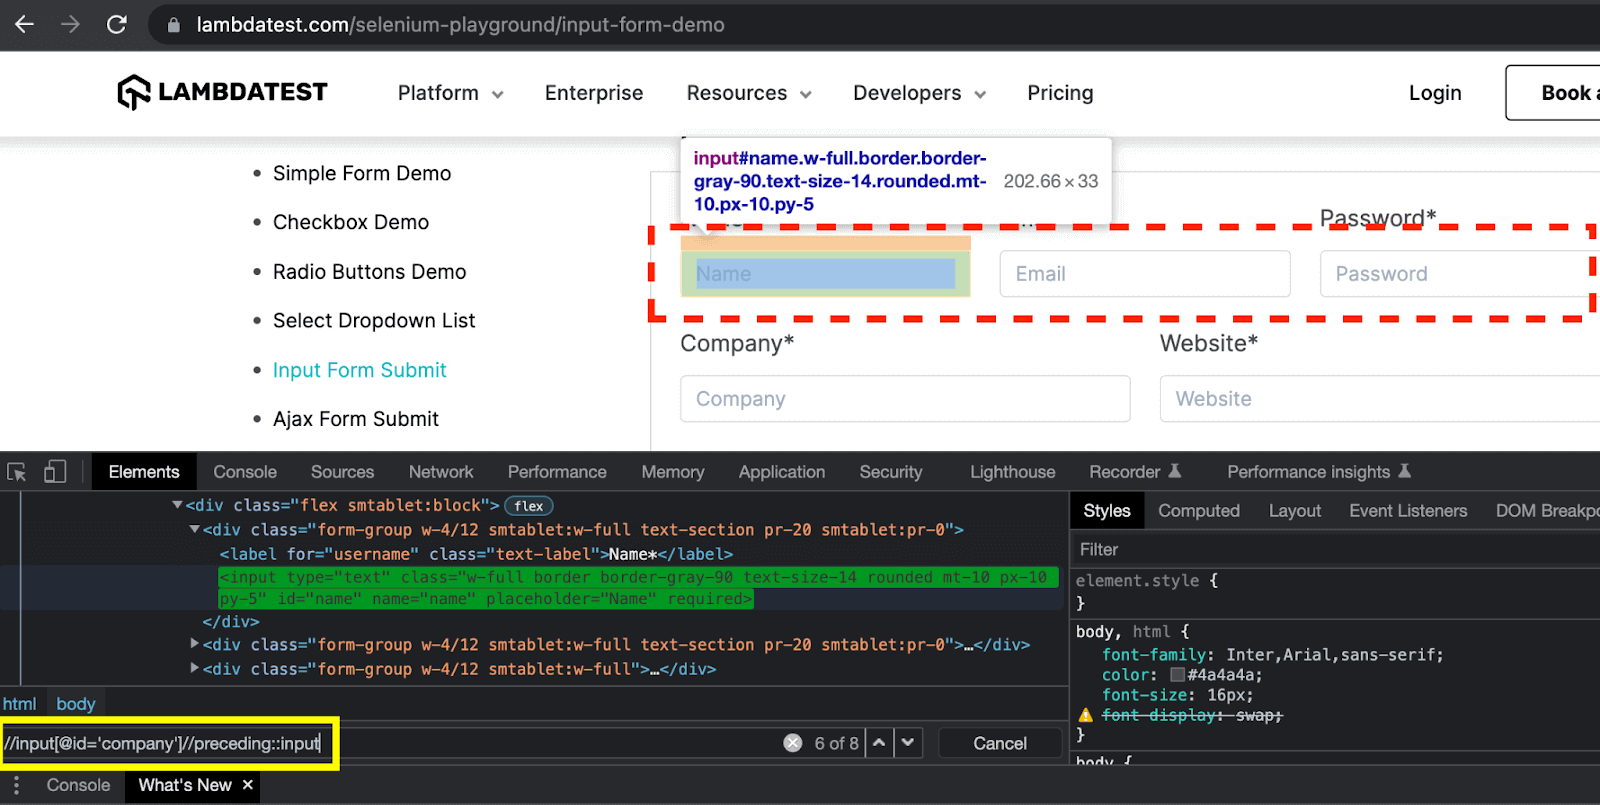
Here, the preceding keyword finds all the input elements, which are before the “Company” textbox e.g. “Name”, “Email” and “Password” textboxes. The XPath expression for this example is:

Just like the example above, you can use the index or any attribute value if you want to locate a specific element from all the elements found.
Ancestor
It selects all ancestor elements (parent, grandparent, etc.) of the current node.
The syntax of the Ancestor method is ancestor::tag name
This can be better explained with the help of the example below.
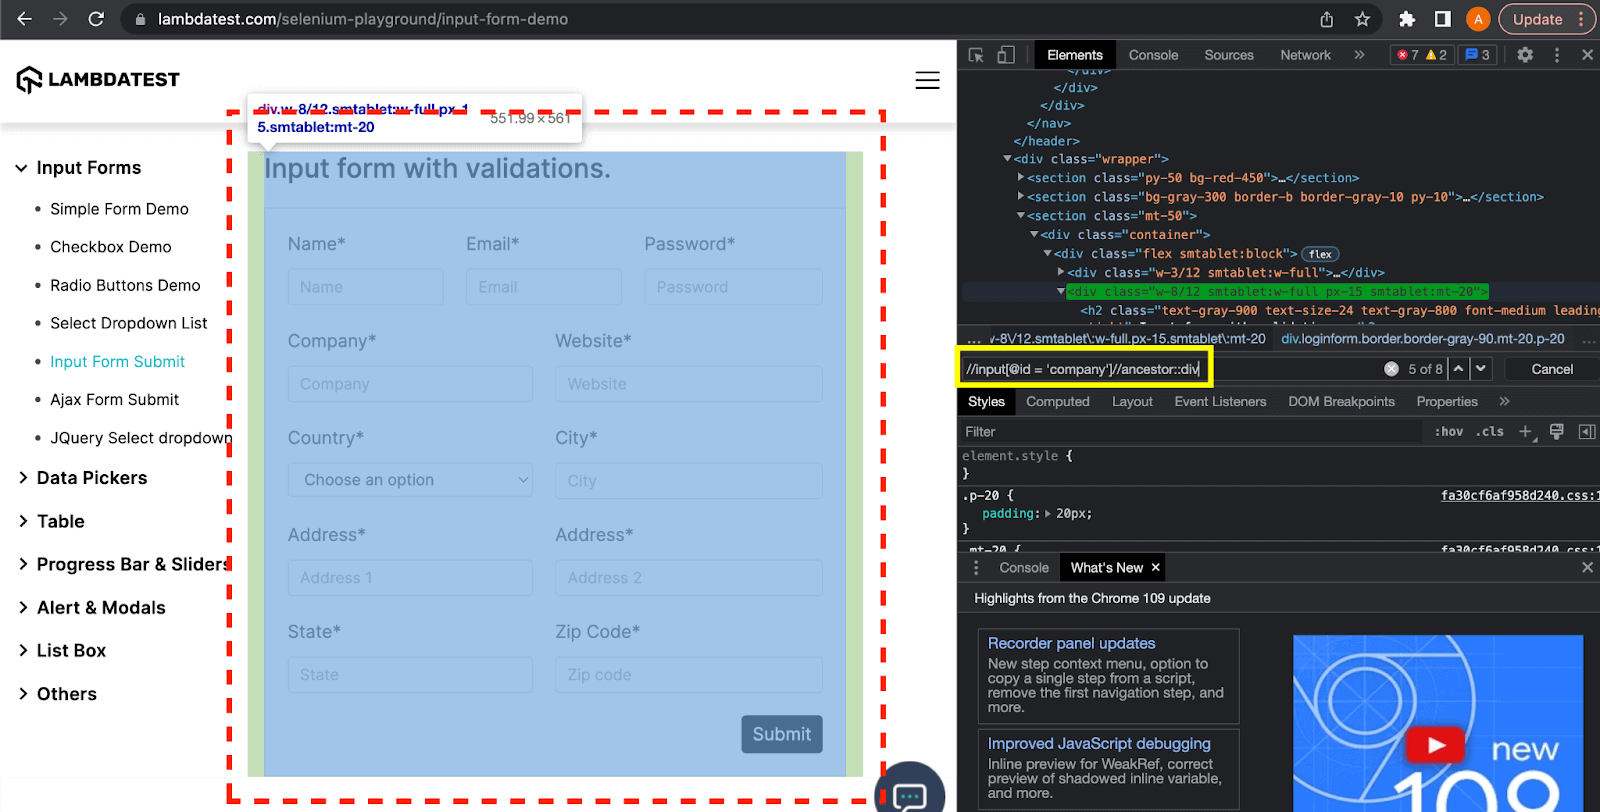
Here, the ancestor keyword finds all the div elements which are ancestors of the current node i.e. the “Company” textbox. The XPath expression for this example is:

Again, here this expression found 8 div elements which are the ancestors (i.e., parent, grandparent) of the current node. If you want to select a particular element, you can use the index or the relevant attribute value.
Parent
It selects the parent element of the current node.
The syntax of the Parent method is parent::tag name
This can be better explained with the help of the example below.
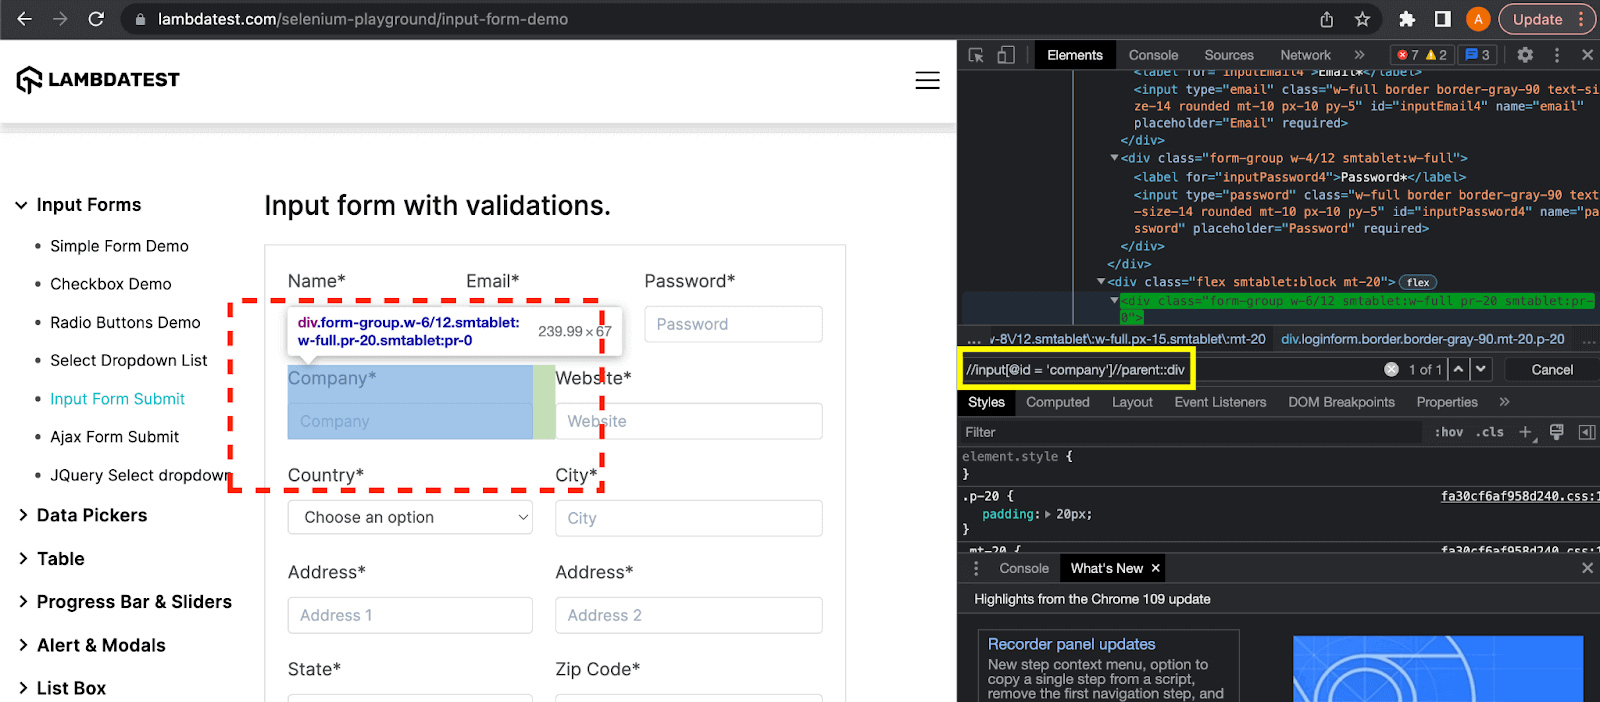
Here, the parent keyword finds the parent div element, the parent of the current node, i.e., the “Company” textbox. The XPath expression for this example is:

Child
It selects all children elements of the current node.
The syntax of the Child method is child::tag name
This can be better explained with the help of the example below.
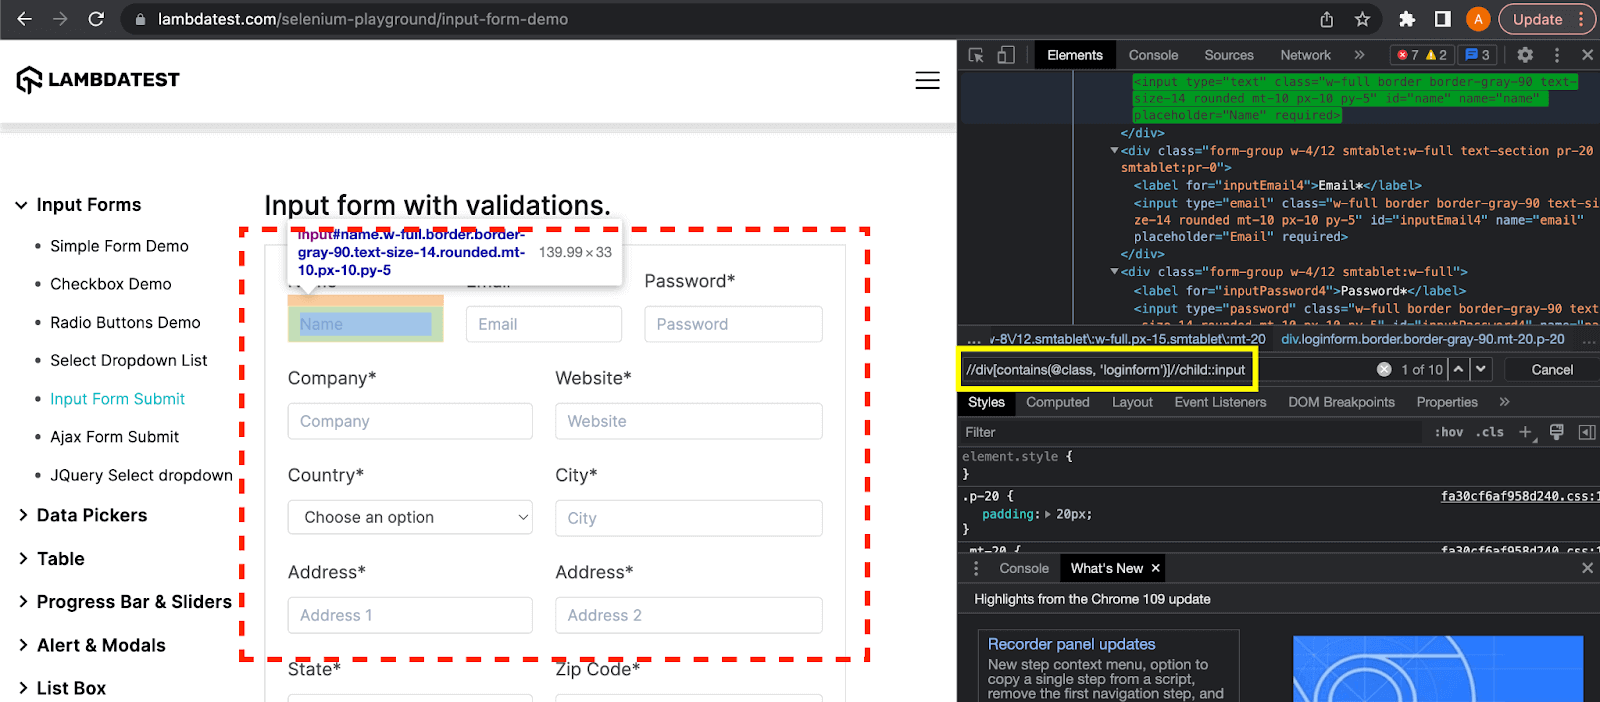
Here, the child keyword selects all the input elements which are children of the current div element. The XPath expression for this example is:

Advantages of using XPath
- XPath can locate an element at any level of the DOM structure and don’t need to traverse from the beginning of the root node to the desired element
- XPath expressions are bidirectional and can locate the element from top to bottom and from bottom to top (i.e., from parent to the child node and from child to parent node)
- XPath works with both XML and HTML documents and is supported by multiple programming languages
- XPath expressions support multiple methods to find the elements which are difficult to locate due to dynamic attribute values or limited attributes. For example, if you need to locate an element that does not have any unique attribute, then you can use XPath axes methods to establish the parent-child relationship with another unique element. In this way, the required elements can be easily located.
Shortcomings of using XPath
- XPath expressions can become difficult to write or understand when it is used to locate elements with dynamic attribute values.
- XPath tends to break if there are changes in the page structure. Though using relative XPath essentially solves this problem, there are still chances that changes in the page structure may cause the XPath to fail.
- XPath does not support the elements having multi-valued attributes.
What are CSS Selectors?
CSS (Cascading Style Sheets) Selector is a locator that uses character sequence patterns to identify the elements based on the HTML structure.
For starters, the syntax of the CSS Selector might seem a bit more complex than other locators like ID, Name, className, etc. However, it is a super-effective and preferred expression to locate elements with dynamic attribute values.
Syntax:
CSS Selector syntax is quite similar to the syntax of XPath, as discussed above. It can be represented as follows:
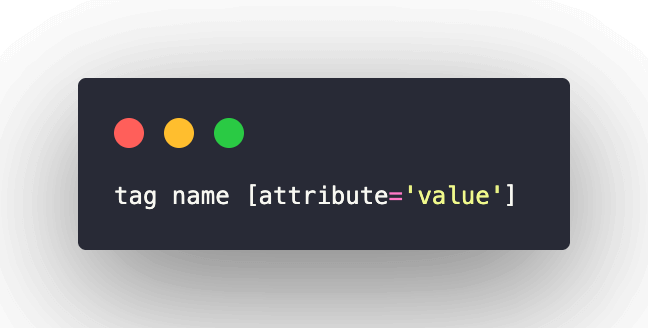
Here is a pictorial representation of the CSS syntax:
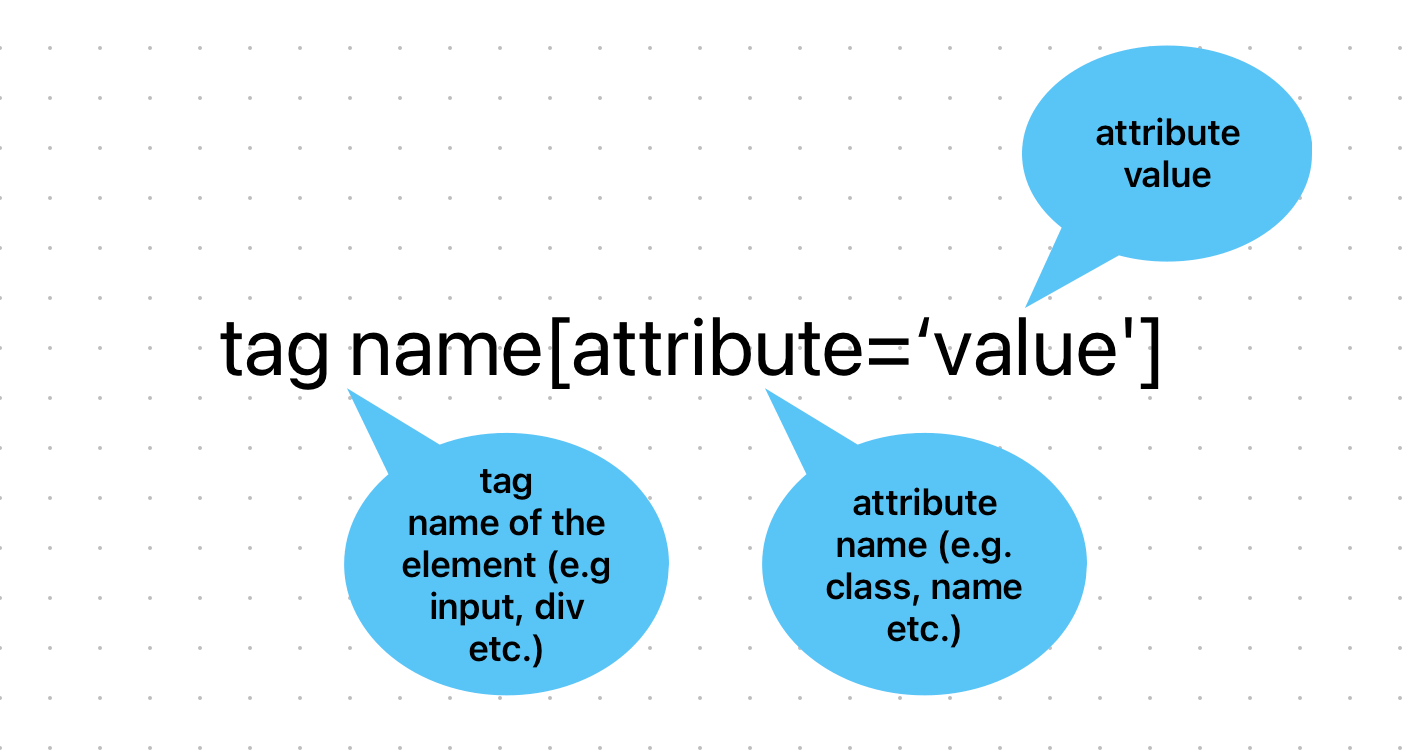
Writing the CSS Selector expressions
A CSS Selector expression can be written with multiple attributes of an element. The most common methods of writing a CSS Selector expression are:
- CSS selector with ID attribute
- CSS selector with class attribute
- CSS selector with other attributes
- CSS selector by combining different attributes
CSS Selector with ID
The ID attribute of an element can be used to write the CSS Selector expression. I will again take an example from the LambdaTest Selenium Playground website to locate an element using its ID attribute.
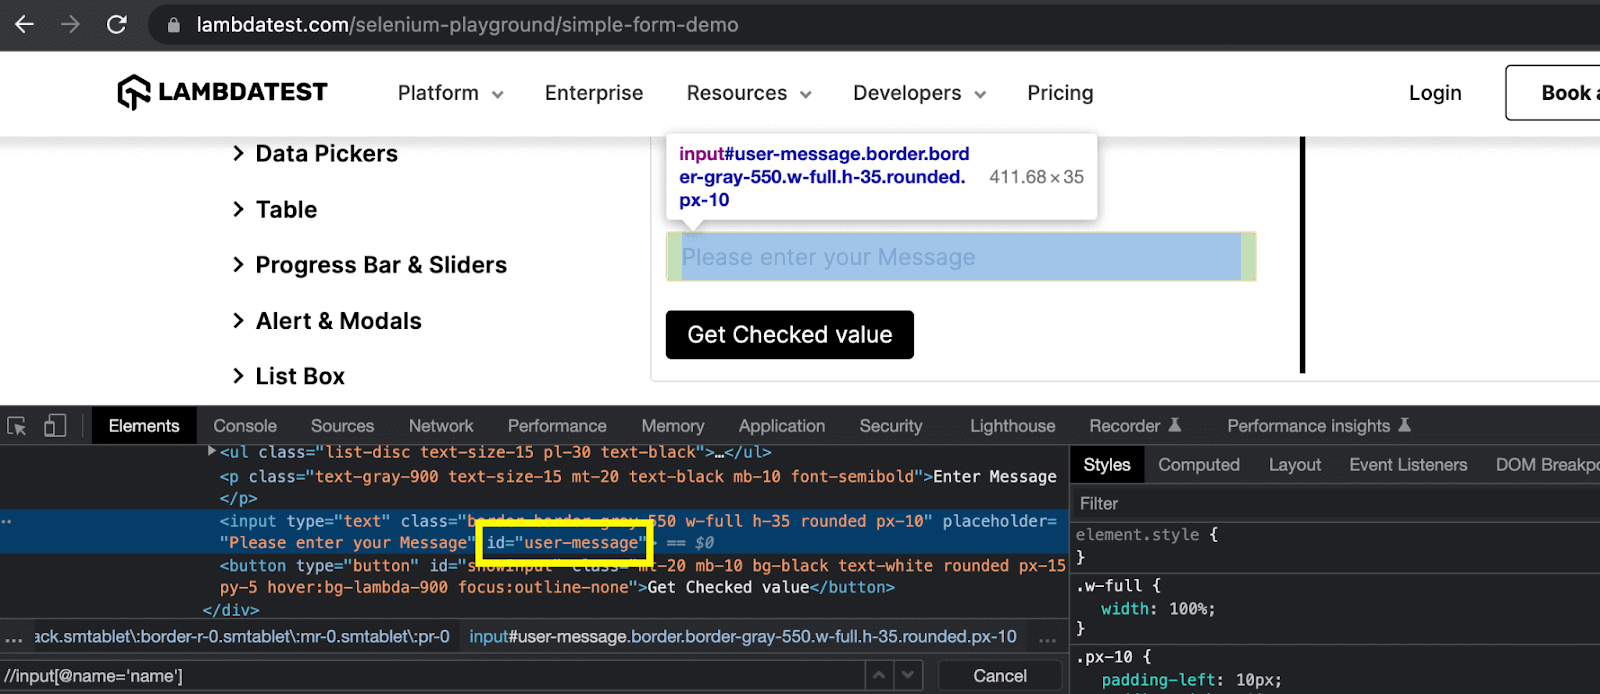
Here, you can see that the value of the ID attribute of the input element is “user-message”. Hence, the resulting CSS Selector expression according to the syntax will be:

This expression can be further simplified by using a shortcut character for the ID attribute, and this character is ‘#’. So here, the simplified CSS Selector expression will be:
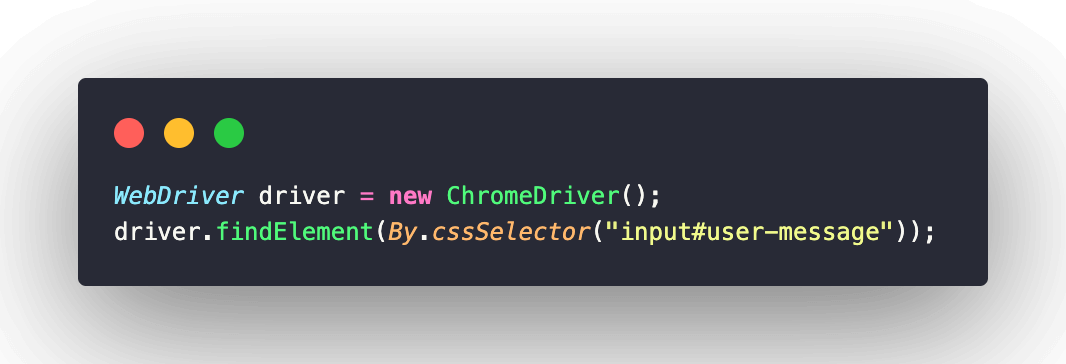
Here, I have just written the element tag name followed by the ‘#’ character and the value of the ID attribute.
CSS Selector with class
Like the ID attribute, a class attribute can also be used to write a CSS Selector expression.
Example:
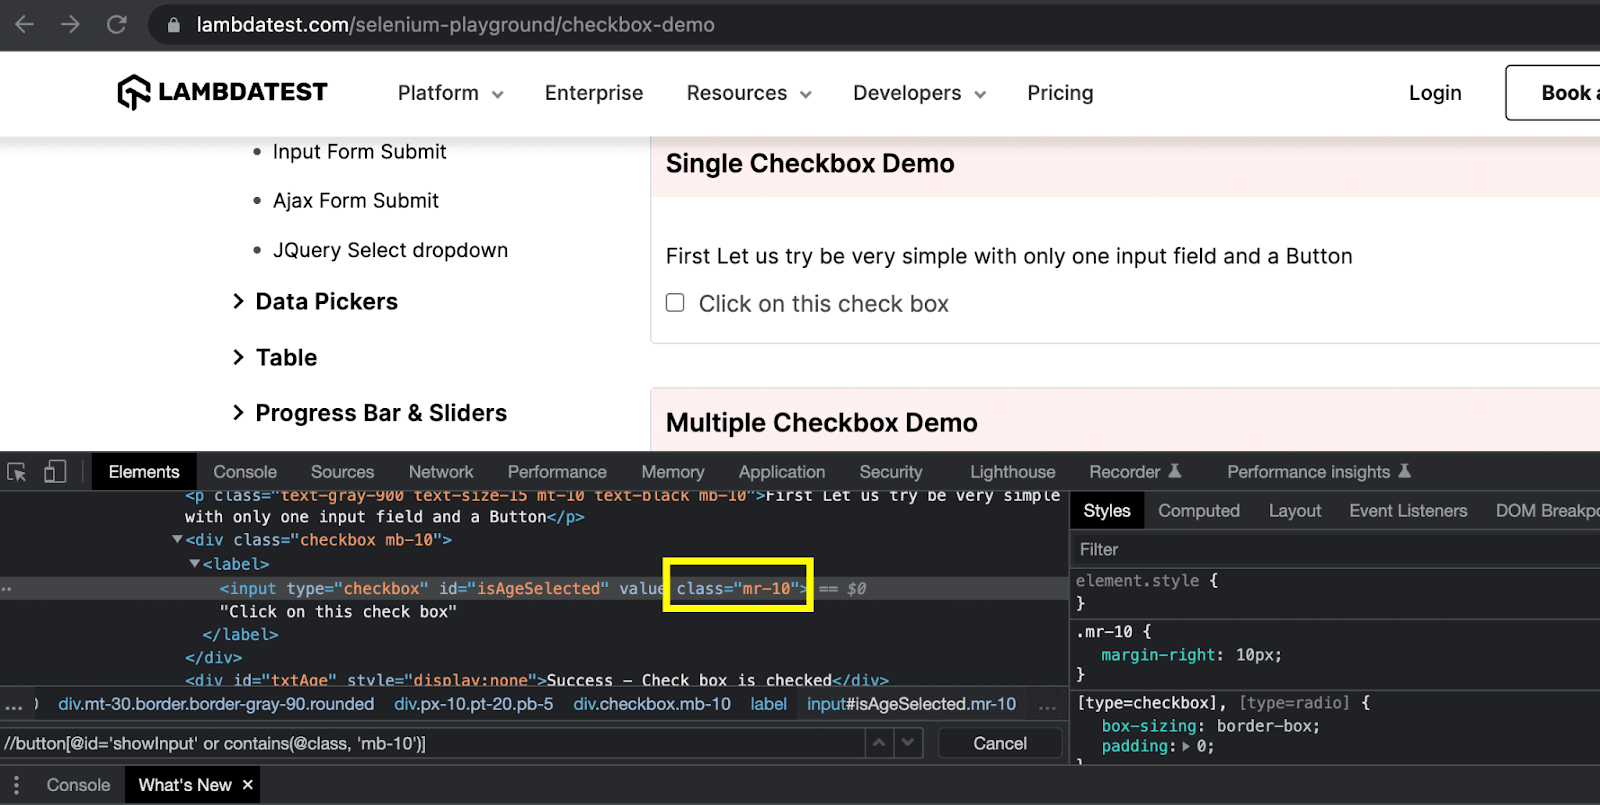
Here, the value of the class attribute of the checkbox is “mr-10”. So, the CSS Selector expression will be:

Again, like the ID attribute, the class attribute also has a shortcut character that can be used to write the simplified CSS Selector expression. Here, we can use the dot (.) character, and the resulting expression will become:
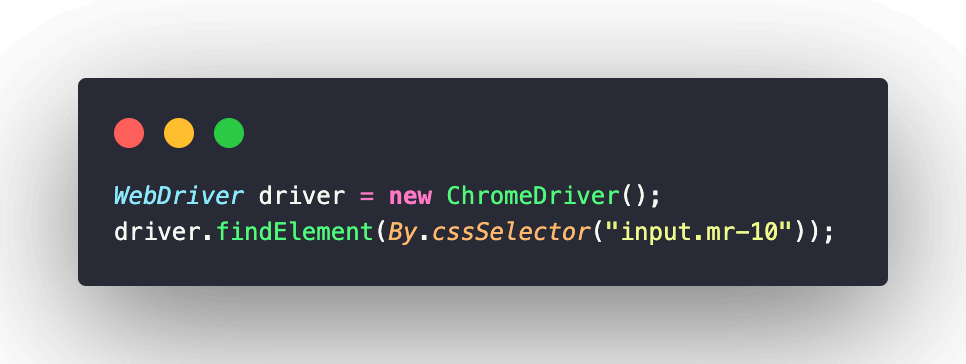
CSS Selector with other attributes
Just like the examples shared above with ID and class attributes, a CSS Selector expression can be written using any attribute of the element. As you must have noticed that the radio button element had multiple attributes.
So now, I will use a different attribute to write the locator expression:
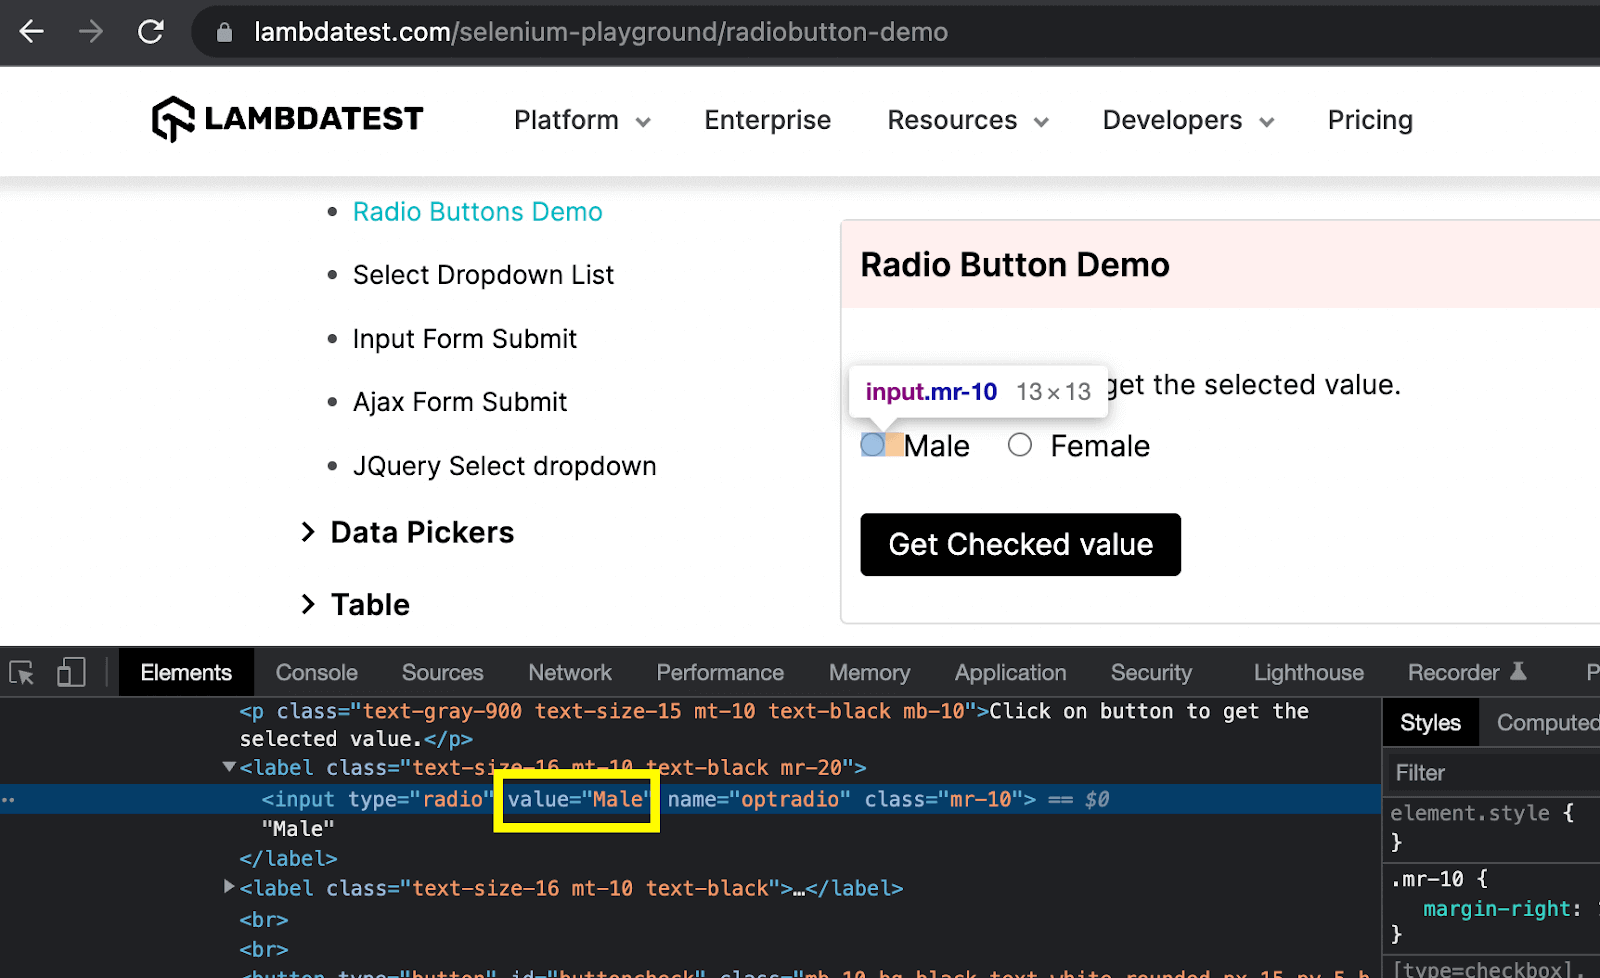
Here, we can use the value attribute, and as per the CSS Selector syntax, the expression will be:
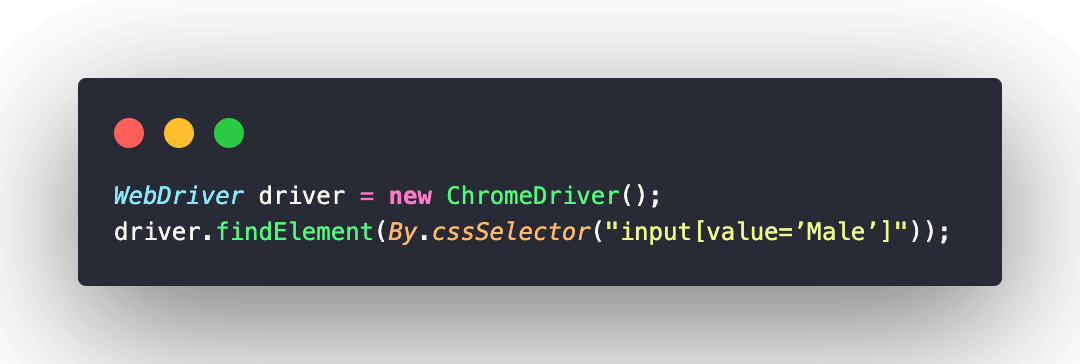
Please note that the shortcut characters are only for the ID and class attributes and not for all attributes of a web element.
CSS Selector by combining ID with different attributes
There are certain instances where you need to write the locator expression by combining different attributes of an element to identify the element uniquely.
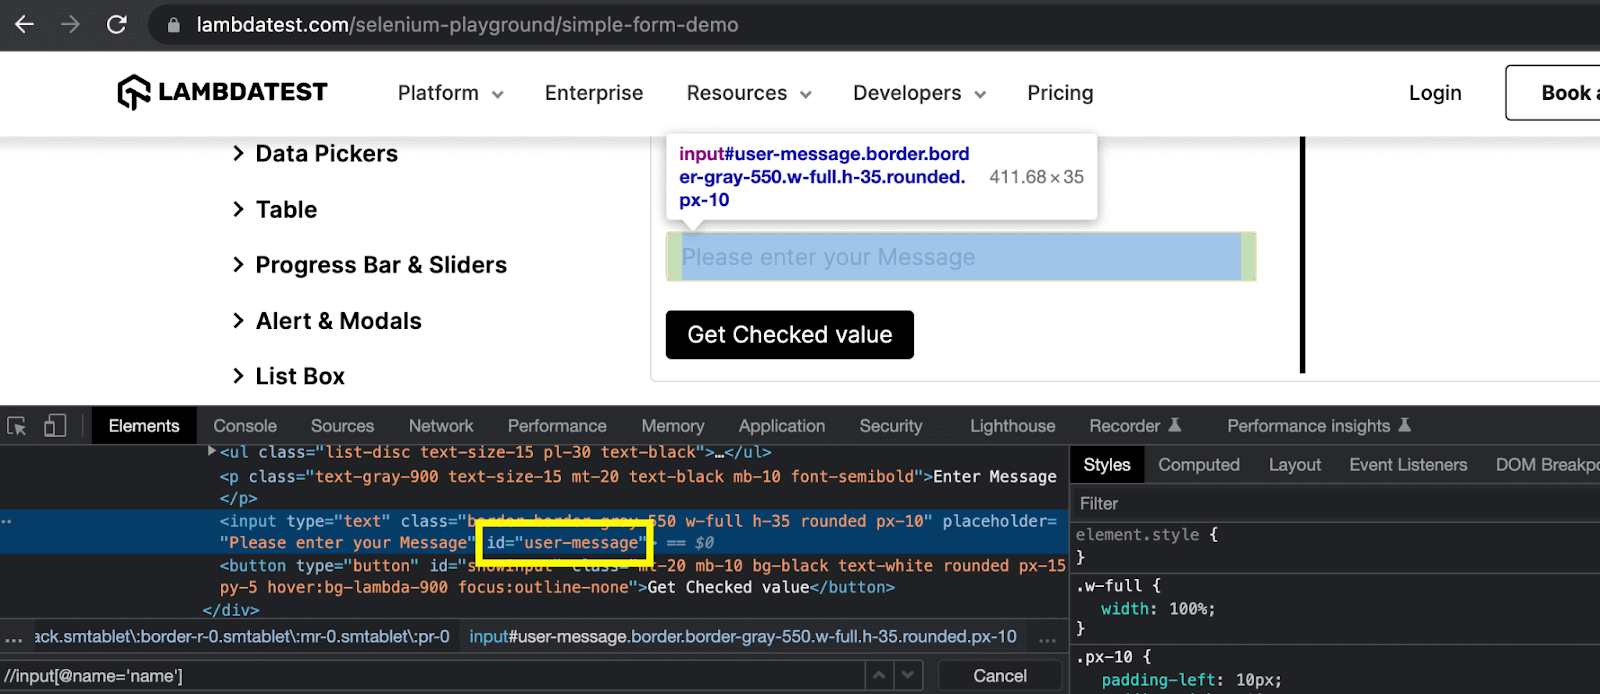
Here, the textbox element can be located by combining the ID attribute with the type attribute of the element. The resulting expression will be:

Walkthrough:
The expression starts with the tag name ‘input‘. Then the ‘#‘ character is used for the ID attribute followed by its value. And the additional attribute ‘type‘ is placed inside the square brackets with its value ‘text‘.
CSS Selector by combining class with different attributes
Similar to the example shared above, a CSS Selector expression can be written by combining the class attribute with other attributes of an element.
So for the same example, a resulting expression combining the class and value attributes can be written as:
Example:

Walkthrough:
The expression starts with the tag name ’input’. Then the ’.’ character is used for the class attribute followed by its value. And the additional attribute ‘value’ is placed inside the square brackets with its value ’Male’.
A CSS Selector expression can be written by following the same rule by combining any number of attributes of an element.
Advantages of using CSS Selectors
- CSS Selectors are the most effective locators in finding the elements having dynamic attribute values
- A CSS Selector expression offers better performance than the equivalent XPath expression
- A CSS Selector expression may look a little complicated but is easy to understand when compared with the XPath expression as it can be written in a simplified and short form.
Shortcomings of using CSS Selectors
- CSS Selector only offers a unidirectional flow, i.e., from parent to child element. It is impossible to traverse from child to parent element using a CSS Selector expression.
- CSS Selector doesn’t provide a way to locate the elements by matching the partial text of the value of their attributes.
XPath vs CSS Selectors – Which one is faster?
If we talk about performance, it has been observed that CSS Selector expressions are much better in terms of performance. Now the question arises, Why is XPath slower than the CSS Selector?
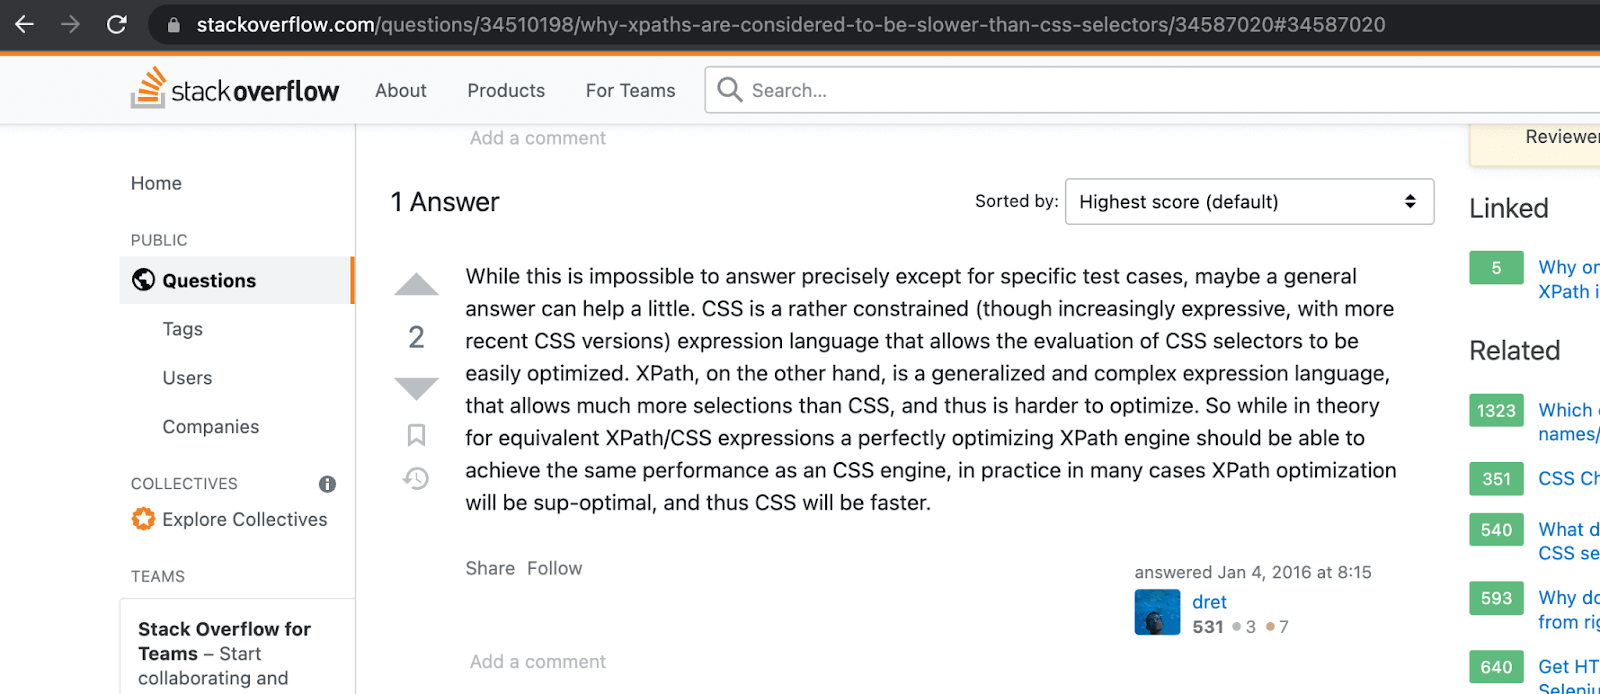
Well, there is no definitive answer to this question, but a generalized reasoning could be that the XPath expression provides much more selections than CSS Selector. It’s a complex expression language, making it harder to optimize than the CSS Selector.
In my opinion, there can be cases in your project where XPath can turn out to be quite reliable and fast. And in other cases, CSS Selector will be faster.
While searching for the answer to this question, I came across some interesting discussions on some forums, and I thought of sharing some of them with you in this blog on XPath vs CSS Selectors.
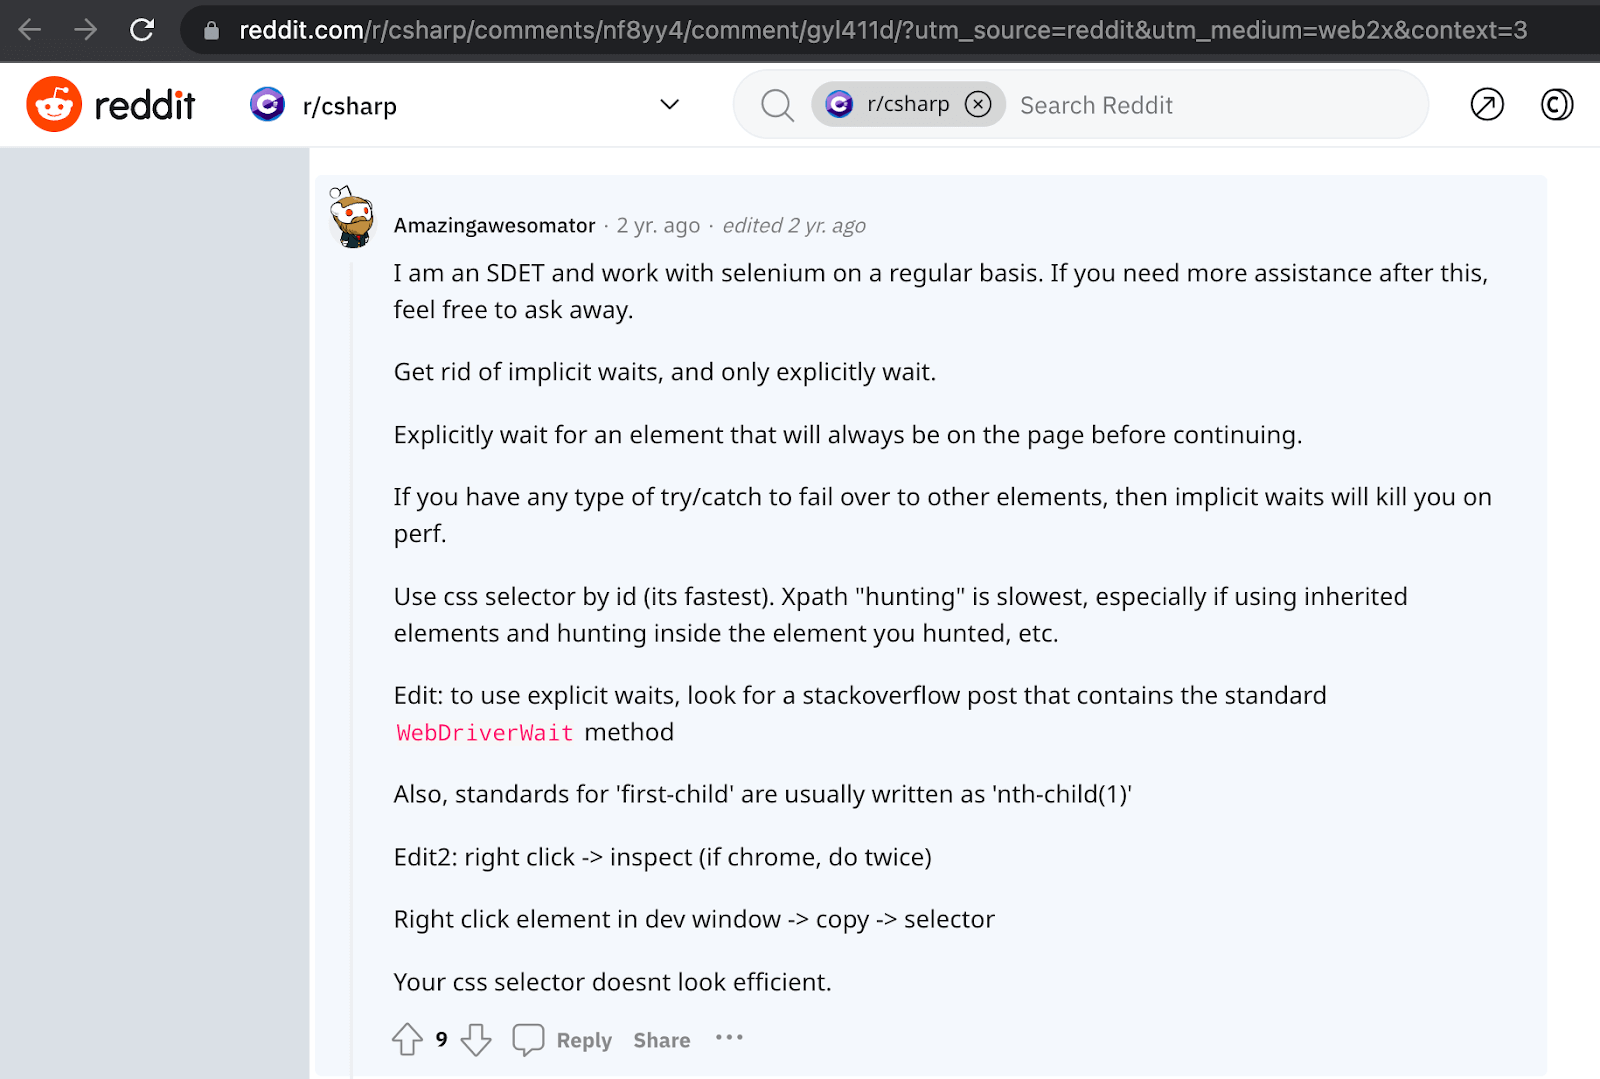
Read the full discussion here.
Read the full discussion here.
Bonus Tip: How to write the best locator expressions?
After a detailed discussion of all the locators, it is evident that each one holds significance. However, to fully harness the power of XPath and CSS Selectors, it is crucial to utilize them correctly. Here are some useful tips which you can refer to write reliable and robust locator expressions.
Avoid the absolute locator expressions
As they are the most fragile and unreliable. They tend to break as soon as any changes are made to the DOM structure within the starting node to your targeted node.
Example of Absolute XPath expression:

Example of Absolute CSS Selector expression:

Use relative locator expressions
Instead, which are robust and more reliable even in case of any changes to the DOM structure as long as your targeted node is unchanged.
Example of Relative XPath expression:
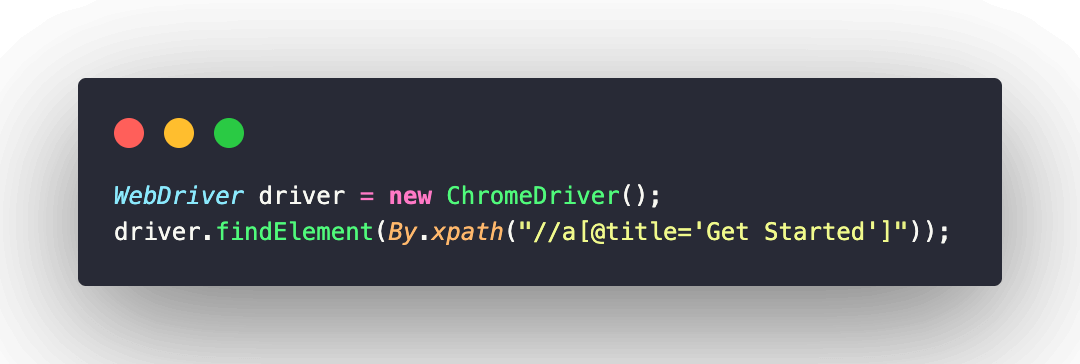
Example of Relative CSS Selector expression:

Always try to keep the locator expressions as short as possible
By using unique attribute values.
- Avoid writing your locator expressions using attributes that are likely to change in the future. For example, A label attribute of a button with a value ‘OK’ might get changed to ‘Submit’ in the future.
- Avoid writing index-based locators for selecting an element from multiple similar elements.
For example, consider the following HTML snippet:
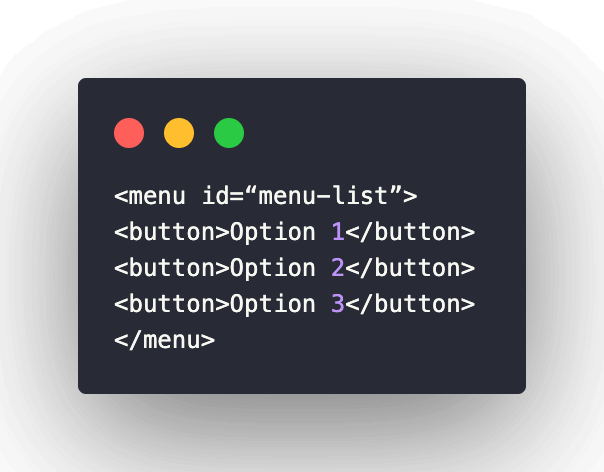
If you want to locate the first button, writing the locator as //menu/button[1] might not be a good idea. This is so because if the position of the buttons is toggled in the future, then this locator expression will give unwanted results.
The ideal locator expression, in this case, would be //menu/button[text()=‘Option 1’] which is based on the button value instead of its index.
Best browser extensions for generating locator expressions
Based on my experience, I have tried to explain the XPath and CSS Selectors in the most detailed manner so that you can write the locator expressions for the most stubborn elements you may come across in your career path.
However, it becomes time-consuming to write the locator expressions manually for hundreds of elements when you work on a large-scale project. To deal with this challenge, many browser extensions are available which can automatically create locator expressions.
SelectorsHub
SelectorsHub is a Chrome browser extension that can be used to quickly generate both XPath and CSS Selector expressions. It also lists all the available attributes of the element and eliminates the need to dig into the raw HTML. You can also right-click on the element and quickly copy the XPath or CSS Selector without opening the browser console.
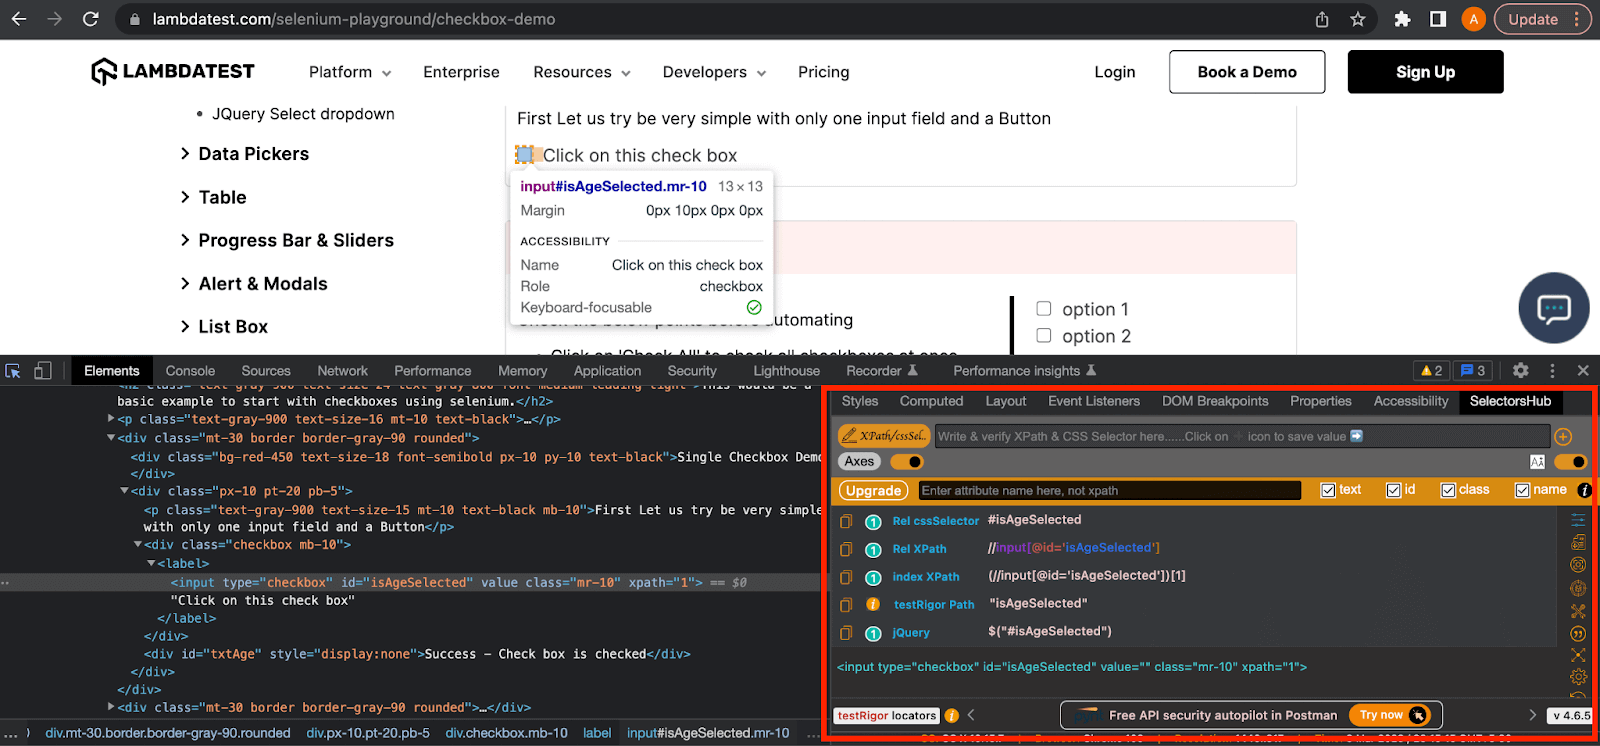
Here in this example, you can see that it is listing down all the attributes and locator expressions of the checkbox input element.
ChroPath
ChroPath is another helpful Chrome browser extension that you can use to generate your locator expressions automatically. It also automatically lists all the attributes of the element along with the XPath and CSS Selector expressions.
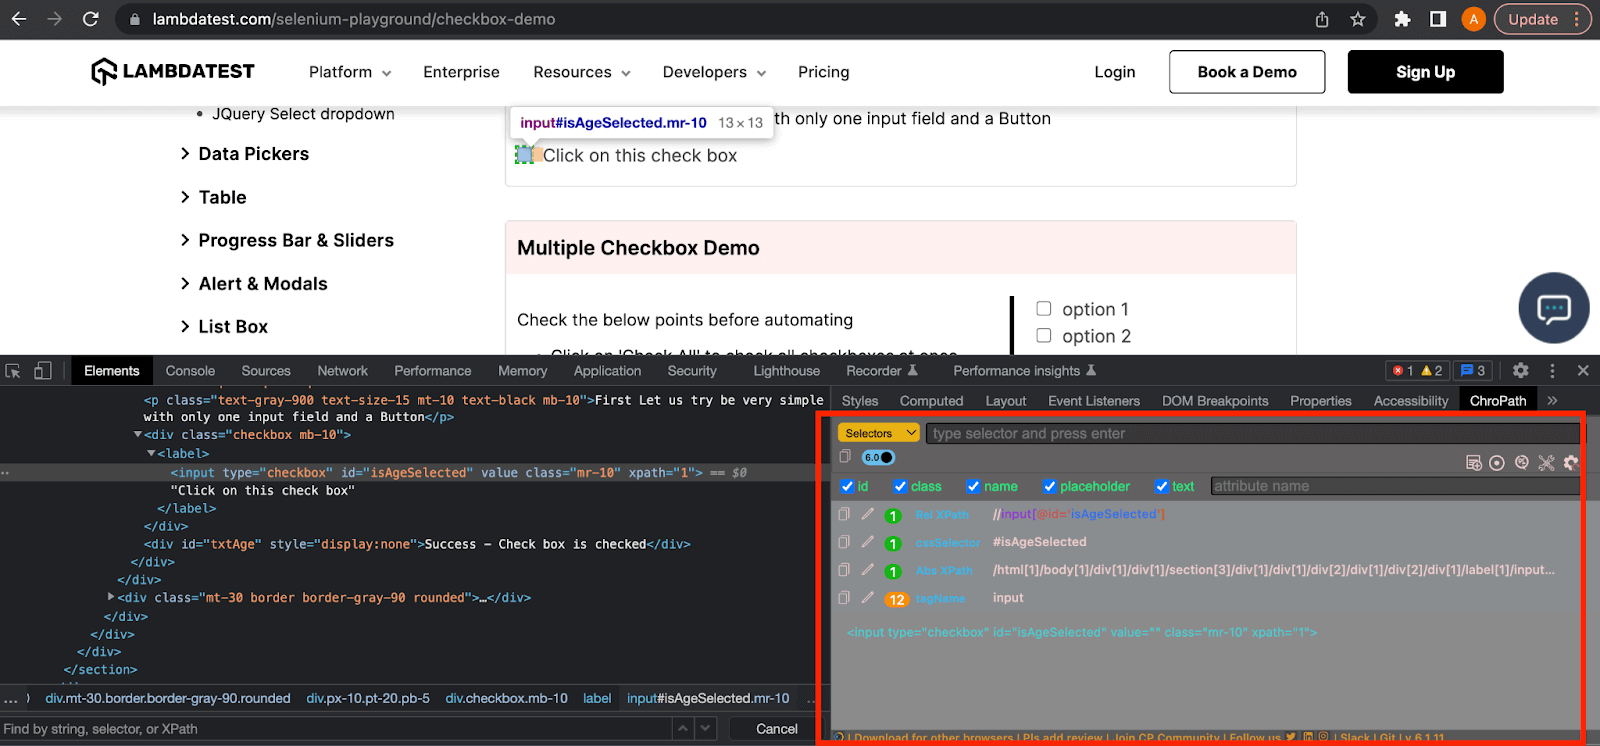
In this example, you can see that it also lists all the attributes and locator expressions of the same checkbox input element.
POM Builder
POM Builder is also a chrome browser extension that works on the same principle of directly copying the XPath or CSS Selector locator by right-clicking on the desired element.
It also recommends you the best locator based on its complexity and robustness.
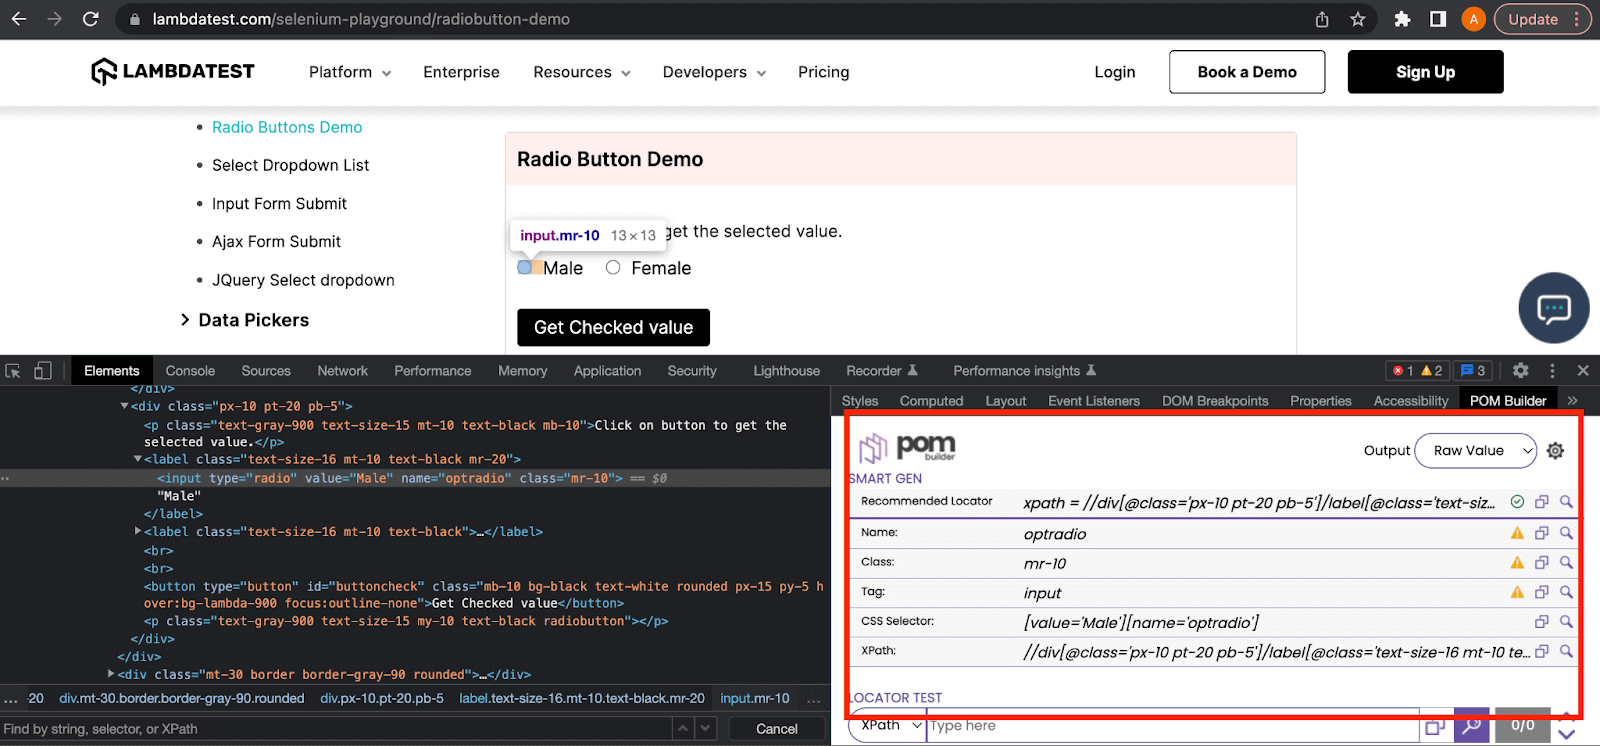
Here in this example, you can see that it lists down all the attributes and locator expressions of the radio input element. It is also showing the recommended locator at the top.
XPath vs CSS Selectors: Conclusion
So here we are at the end of the blog on XPath vs CSS Selectors, seeking the answer to the most widely asked question of the test automation community. Which one to use: XPath or CSS Selector?
Well, to be honest, there cannot be a decisive answer to this question as both are the most powerful locators capable of writing rich, robust, and complex locator expressions to find the most challenging and dynamic elements. My inclination is towards CSS Selectors as I feel it’s a marginally better-performing locator expression when compared with the XPath. I also enjoy the ease of writing the CSS Selectors expressions using the shortcut characters.
I also appreciate XPath’s ability to traverse the DOM in both directions and its extensive selection of axis methods. Therefore, it’s more of a need than a preference that becomes a deciding factor to choose between the two. Now I’ll end this blog on this final note in which I’ll urge you to experience the power of these amazing locators and choose the one which best suits your requirements.
Good Bye and keep testing in progress!
Frequently Asked Questions (FAQs)
What are CSS selectors in XPath?
CSS Selectors are not a part of XPath. They are a feature of Cascading Style Sheets (CSS), a stylesheet language used for describing the presentation of a document written in HTML or XML.
XPath, on the other hand, is a query language used for selecting elements or nodes in an XML or HTML document. XPath uses its syntax and a set of functions and operators to navigate and select elements based on their properties and relationships within the document.
While both XPath and CSS Selectors can be used to select elements in an HTML or XML document, they are distinct and separate technologies.
Why do CSS Selectors have higher priority over XPath expressions?
CSS Selectors and XPath expressions are two different ways of selecting elements from an HTML or XML document. CSS Selectors have a higher priority over XPath expressions because of how the browser rendering engine works.
When a browser renders a web page, it parses the HTML or XML document and creates a Document Object Model (DOM) tree. The browser then applies the styles defined in the CSS stylesheets to the elements in the DOM tree.
If conflicting styles are defined for the same element in both CSS and XPath, the browser will prioritize the CSS styles. This is because the browser applies CSS styles first and then applies XPath expressions to select elements.
Which XPath can be replaced by CSS Selector?
Not all XPath expressions can be replaced by CSS Selectors, as they have different syntax and capabilities. However, there are some cases where a CSS Selector can be used instead of an XPath expression to achieve the same result. Here are some examples:
- Selecting elements by tag name:
XPath: //div
CSS: div
- Selecting elements by class name:
XPath: //div[@class=’my-class’]
CSS: .my-class
- Selecting elements by ID:
XPath: //div[@id=’my-id’]
CSS: #my-id
- Selecting elements by attribute value:
XPath: //input[@type=’text’]
CSS: input[type=’text’]
- Selecting elements based on their position:
XPath: //ul/li[1]
CSS: ul li:first-child
It’s important to note that CSS Selectors have some limitations compared to XPath, such as not being able to select elements based on their relationship to other elements (e.g., selecting a parent or ancestor element), or performing complex queries involving multiple axes. In general, if the selection criteria require more complex or specific criteria, XPath is usually the better choice.
Starts-with() method also works on the same principle of finding the partial text. It is different from the contains() method in that it tends to find the static text at the beginning of the attribute value.

I have used the same example of the button element to demonstrate this method as well. To locate this element using the class attribute, I have used the starts-with() method in this XPath vs CSS Selectors blog, and the XPath expression looks like this:

As you can see in the above example of this XPath vs CSS Selectors blog, the class attribute value starts with the class name “mt-20”. Therefore, this expression was able to locate this element successfully.
XPath Text() Method
The text() method is used to locate the element based on its text value. This method works similarly to the linkText locator. However, this method works on any element which has the text value like a < span >, < p >, < button >, or an < div >, whereas the linkText only works with the < a > element.

In the above example of this XPath vs CSS Selectors blog, the button element is located using its text with the help of the text() method. The simple XPath expression for this case can be written as:

XPath Logical operators
While using the logical locators (and, or), multiple attribute values of an element are compared. With “or” operator, the element will be found if any of the compared values are true. With “and” operator, both the values need to be true to find the element.

Here in this example, I have used both ID and class attributes of the button element with the ‘and’ operator. As you can see, the ID can be uniquely identified, but multiple classes are defined.
Therefore, contains() method is required for the class attribute to write the following correct expression in this case:

Similarly, the expression can be written using the or operator as well like this:

Please note that both the logical operators are case-sensitive and need to be specified in lowercase within the expression.
XPath Axes Methods
Like the methods explained in the above section of this XPath vs CSS Selectors blog, XPath provides additional methods to locate the dynamic elements. These methods are called axes methods. XPath axes methods can traverse the DOM bidirectionally and are extremely useful in locating the elements that don’t have any attributes.
There are many axes methods, but we will discuss the most common ones here.
- Following
- Preceding
- Ancestor
- Parent
- Child
Following
It selects all elements in the DOM after the closing tag of the current node.
The syntax of the Following method is following::tag name
This can be better explained with the help of the example below.

Here, the following keyword finds all the input elements, which are after the “Name” textbox e.g., “Email”, “Password”, “Company,” and “Website” textboxes. The XPath expression for this example is:

As mentioned above, this expression locates all the elements which appear after the current node. If you want to locate the first input element here in this example, you can use the index like this:

Similarly, you can use any attribute of the required element to avoid using the indexes as the best practice. Here, I have demonstrated another XPath expression using the ID attribute of the second input element i.e., the “Email” textbox.

Preceding
It selects all elements in the DOM, which come before the opening tag of the current node.
The syntax of the Preceding method is preceding::tag name
This can be better explained with the help of the example below.

Here, the preceding keyword finds all the input elements, which are before the “Company” textbox e.g. “Name”, “Email” and “Password” textboxes. The XPath expression for this example is:

Just like the example above, you can use the index or any attribute value if you want to locate a specific element from all the elements found.
Ancestor
It selects all ancestor elements (parent, grandparent, etc.) of the current node.
The syntax of the Ancestor method is ancestor::tag name
This can be better explained with the help of the example below.

Here, the ancestor keyword finds all the div elements which are ancestors of the current node i.e. the “Company” textbox. The XPath expression for this example is:

Again, here this expression found 8 div elements which are the ancestors (i.e., parent, grandparent) of the current node. If you want to select a particular element, you can use the index or the relevant attribute value.
Parent
It selects the parent element of the current node.
The syntax of the Parent method is parent::tag name
This can be better explained with the help of the example below.

Here, the parent keyword finds the parent div element, the parent of the current node, i.e., the “Company” textbox. The XPath expression for this example is:

Child
It selects all children elements of the current node.
The syntax of the Child method is child::tag name
This can be better explained with the help of the example below.

Here, the child keyword selects all the input elements which are children of the current div element. The XPath expression for this example is:

Advantages of using XPath
- XPath can locate an element at any level of the DOM structure and don’t need to traverse from the beginning of the root node to the desired element
- XPath expressions are bidirectional and can locate the element from top to bottom and from bottom to top (i.e., from parent to the child node and from child to parent node)
- XPath works with both XML and HTML documents and is supported by multiple programming languages
- XPath expressions support multiple methods to find the elements which are difficult to locate due to dynamic attribute values or limited attributes. For example, if you need to locate an element that does not have any unique attribute, then you can use XPath axes methods to establish the parent-child relationship with another unique element. In this way, the required elements can be easily located.
Shortcomings of using XPath
- XPath expressions can become difficult to write or understand when it is used to locate elements with dynamic attribute values.
- XPath tends to break if there are changes in the page structure. Though using relative XPath essentially solves this problem, there are still chances that changes in the page structure may cause the XPath to fail.
- XPath does not support the elements having multi-valued attributes.
What are CSS Selectors?
CSS (Cascading Style Sheets) Selector is a locator that uses character sequence patterns to identify the elements based on the HTML structure.
For starters, the syntax of the CSS Selector might seem a bit more complex than other locators like ID, Name, className, etc. However, it is a super-effective and preferred expression to locate elements with dynamic attribute values.
Syntax:
CSS Selector syntax is quite similar to the syntax of XPath, as discussed above. It can be represented as follows:

Here is a pictorial representation of the CSS syntax:

Writing the CSS Selector expressions
A CSS Selector expression can be written with multiple attributes of an element. The most common methods of writing a CSS Selector expression are:
- CSS selector with ID attribute
- CSS selector with class attribute
- CSS selector with other attributes
- CSS selector by combining different attributes
CSS Selector with ID
The ID attribute of an element can be used to write the CSS Selector expression. I will again take an example from the LambdaTest Selenium Playground website to locate an element using its ID attribute.

Here, you can see that the value of the ID attribute of the input element is “user-message”. Hence, the resulting CSS Selector expression according to the syntax will be:

This expression can be further simplified by using a shortcut character for the ID attribute, and this character is ‘#’. So here, the simplified CSS Selector expression will be:

Here, I have just written the element tag name followed by the ‘#’ character and the value of the ID attribute.
CSS Selector with class
Like the ID attribute, a class attribute can also be used to write a CSS Selector expression.
Example:

Here, the value of the class attribute of the checkbox is “mr-10”. So, the CSS Selector expression will be:

Again, like the ID attribute, the class attribute also has a shortcut character that can be used to write the simplified CSS Selector expression. Here, we can use the dot (.) character, and the resulting expression will become:

CSS Selector with other attributes
Just like the examples shared above with ID and class attributes, a CSS Selector expression can be written using any attribute of the element. As you must have noticed that the radio button element had multiple attributes.
So now, I will use a different attribute to write the locator expression:

Here, we can use the value attribute, and as per the CSS Selector syntax, the expression will be:

Please note that the shortcut characters are only for the ID and class attributes and not for all attributes of a web element.
CSS Selector by combining ID with different attributes
There are certain instances where you need to write the locator expression by combining different attributes of an element to identify the element uniquely.

Here, the textbox element can be located by combining the ID attribute with the type attribute of the element. The resulting expression will be:

Walkthrough:
The expression starts with the tag name ‘input‘. Then the ‘#‘ character is used for the ID attribute followed by its value. And the additional attribute ‘type‘ is placed inside the square brackets with its value ‘text‘.
CSS Selector by combining class with different attributes
Similar to the example shared above, a CSS Selector expression can be written by combining the class attribute with other attributes of an element.
So for the same example, a resulting expression combining the class and value attributes can be written as:
Example:

Walkthrough:
The expression starts with the tag name ’input’. Then the ’.’ character is used for the class attribute followed by its value. And the additional attribute ‘value’ is placed inside the square brackets with its value ’Male’.
A CSS Selector expression can be written by following the same rule by combining any number of attributes of an element.
Advantages of using CSS Selectors
- CSS Selectors are the most effective locators in finding the elements having dynamic attribute values
- A CSS Selector expression offers better performance than the equivalent XPath expression
- A CSS Selector expression may look a little complicated but is easy to understand when compared with the XPath expression as it can be written in a simplified and short form.
Shortcomings of using CSS Selectors
- CSS Selector only offers a unidirectional flow, i.e., from parent to child element. It is impossible to traverse from child to parent element using a CSS Selector expression.
- CSS Selector doesn’t provide a way to locate the elements by matching the partial text of the value of their attributes.
XPath vs CSS Selectors – Which one is faster?
If we talk about performance, it has been observed that CSS Selector expressions are much better in terms of performance. Now the question arises, Why is XPath slower than the CSS Selector?
Well, there is no definitive answer to this question, but a generalized reasoning could be that the XPath expression provides much more selections than CSS Selector. It’s a complex expression language, making it harder to optimize than the CSS Selector.
In my opinion, there can be cases in your project where XPath can turn out to be quite reliable and fast. And in other cases, CSS Selector will be faster.
While searching for the answer to this question, I came across some interesting discussions on some forums, and I thought of sharing some of them with you in this blog on XPath vs CSS Selectors.

Read the full discussion here.

Read the full discussion here.
Bonus Tip: How to write the best locator expressions?
After a detailed discussion of all the locators, it is evident that each one holds significance. However, to fully harness the power of XPath and CSS Selectors, it is crucial to utilize them correctly. Here are some useful tips which you can refer to write reliable and robust locator expressions.
Avoid the absolute locator expressions
As they are the most fragile and unreliable. They tend to break as soon as any changes are made to the DOM structure within the starting node to your targeted node.
Example of Absolute XPath expression:

Example of Absolute CSS Selector expression:

Use relative locator expressions
Instead, which are robust and more reliable even in case of any changes to the DOM structure as long as your targeted node is unchanged.
Example of Relative XPath expression:

Example of Relative CSS Selector expression:

Always try to keep the locator expressions as short as possible
By using unique attribute values.
- Avoid writing your locator expressions using attributes that are likely to change in the future. For example, A label attribute of a button with a value ‘OK’ might get changed to ‘Submit’ in the future.
- Avoid writing index-based locators for selecting an element from multiple similar elements.
For example, consider the following HTML snippet:

If you want to locate the first button, writing the locator as //menu/button[1] might not be a good idea. This is so because if the position of the buttons is toggled in the future, then this locator expression will give unwanted results.
The ideal locator expression, in this case, would be //menu/button[text()=‘Option 1’] which is based on the button value instead of its index.
Best browser extensions for generating locator expressions
Based on my experience, I have tried to explain the XPath and CSS Selectors in the most detailed manner so that you can write the locator expressions for the most stubborn elements you may come across in your career path.
However, it becomes time-consuming to write the locator expressions manually for hundreds of elements when you work on a large-scale project. To deal with this challenge, many browser extensions are available which can automatically create locator expressions.
SelectorsHub
SelectorsHub is a Chrome browser extension that can be used to quickly generate both XPath and CSS Selector expressions. It also lists all the available attributes of the element and eliminates the need to dig into the raw HTML. You can also right-click on the element and quickly copy the XPath or CSS Selector without opening the browser console.

Here in this example, you can see that it is listing down all the attributes and locator expressions of the checkbox input element.
ChroPath
ChroPath is another helpful Chrome browser extension that you can use to generate your locator expressions automatically. It also automatically lists all the attributes of the element along with the XPath and CSS Selector expressions.

In this example, you can see that it also lists all the attributes and locator expressions of the same checkbox input element.
POM Builder
POM Builder is also a chrome browser extension that works on the same principle of directly copying the XPath or CSS Selector locator by right-clicking on the desired element.
It also recommends you the best locator based on its complexity and robustness.

Here in this example, you can see that it lists down all the attributes and locator expressions of the radio input element. It is also showing the recommended locator at the top.
XPath vs CSS Selectors: Conclusion
So here we are at the end of the blog on XPath vs CSS Selectors, seeking the answer to the most widely asked question of the test automation community. Which one to use: XPath or CSS Selector?
Well, to be honest, there cannot be a decisive answer to this question as both are the most powerful locators capable of writing rich, robust, and complex locator expressions to find the most challenging and dynamic elements. My inclination is towards CSS Selectors as I feel it’s a marginally better-performing locator expression when compared with the XPath. I also enjoy the ease of writing the CSS Selectors expressions using the shortcut characters.
I also appreciate XPath’s ability to traverse the DOM in both directions and its extensive selection of axis methods. Therefore, it’s more of a need than a preference that becomes a deciding factor to choose between the two. Now I’ll end this blog on this final note in which I’ll urge you to experience the power of these amazing locators and choose the one which best suits your requirements.
Good Bye and keep testing in progress!
Frequently Asked Questions (FAQs)
What are CSS selectors in XPath?
CSS Selectors are not a part of XPath. They are a feature of Cascading Style Sheets (CSS), a stylesheet language used for describing the presentation of a document written in HTML or XML.
XPath, on the other hand, is a query language used for selecting elements or nodes in an XML or HTML document. XPath uses its syntax and a set of functions and operators to navigate and select elements based on their properties and relationships within the document.
While both XPath and CSS Selectors can be used to select elements in an HTML or XML document, they are distinct and separate technologies.
Why do CSS Selectors have higher priority over XPath expressions?
CSS Selectors and XPath expressions are two different ways of selecting elements from an HTML or XML document. CSS Selectors have a higher priority over XPath expressions because of how the browser rendering engine works.
When a browser renders a web page, it parses the HTML or XML document and creates a Document Object Model (DOM) tree. The browser then applies the styles defined in the CSS stylesheets to the elements in the DOM tree.
If conflicting styles are defined for the same element in both CSS and XPath, the browser will prioritize the CSS styles. This is because the browser applies CSS styles first and then applies XPath expressions to select elements.
Which XPath can be replaced by CSS Selector?
Not all XPath expressions can be replaced by CSS Selectors, as they have different syntax and capabilities. However, there are some cases where a CSS Selector can be used instead of an XPath expression to achieve the same result. Here are some examples:
- Selecting elements by tag name:
XPath: //div
CSS: div - Selecting elements by class name:
XPath: //div[@class=’my-class’]
CSS: .my-class - Selecting elements by ID:
XPath: //div[@id=’my-id’]
CSS: #my-id - Selecting elements by attribute value:
XPath: //input[@type=’text’]
CSS: input[type=’text’] - Selecting elements based on their position:
XPath: //ul/li[1]
CSS: ul li:first-child
It’s important to note that CSS Selectors have some limitations compared to XPath, such as not being able to select elements based on their relationship to other elements (e.g., selecting a parent or ancestor element), or performing complex queries involving multiple axes. In general, if the selection criteria require more complex or specific criteria, XPath is usually the better choice.
Got Questions? Drop them on LambdaTest Community. Visit now


