Test Case Design Techniques for Smart Software Testing
Tanay Kumar Deo
Posted On: September 19, 2023
![]() 169866 Views
169866 Views
![]() 19 Min Read
19 Min Read
Test automation involves executing the test scripts automatically, handling test data, and using results to sweeten software quality. It’s like a quality checker for the whole team that helps ensure the software is perfect and bug-free. However, test automation is only valuable with suitable test case design techniques, as we will conduct test cases numerous times without catching the bugs in our software.
Therefore, testers or developers must first figure out some practical and reliable Test Case Design Techniques for improving the quality of the software testing process. Selecting a good test case design technique helps us design better test cases faster.
In this article on test case design techniques, we will address the fundamental notion of all test case design techniques to make our software testing smart. We will also explore various examples of these techniques to uplift understanding of the topic.
TABLE OF CONTENTS
Basics of Test Case Design Techniques
Test Cases are pre-defined sets of instructions handling the steps to be carried out to determine whether or not the end product flaunts the desired result. These instructions may retain predefined sets of conditions and inputs and their results. Test cases are the essential building blocks that, when put together, construct the testing phase. Designing these test cases can be time-consuming and may lead to some uncaught bugs if not appropriately designed.
Various test case design techniques help us design a robust and reliable test case that covers all our software’s features and functions. These design techniques implicate multiple measures that aim to guarantee the effectiveness of test cases in finding bugs or any other defects in the software.
Test case design requires a clever approach to identify missing necessities and faults without wasting time or resources. In other words, solid test case design techniques create reusable and concise tests over the application’s lifetime. These test case design techniques smoothen how test cases are written to provide the highest code coverage.
Types of Test Case Design Techniques
The test case design techniques are classified into various types based on their use cases. This classification helps automation testers or developers determine the most effective techniques for their products. Generally, test case design techniques are separated into three main types.
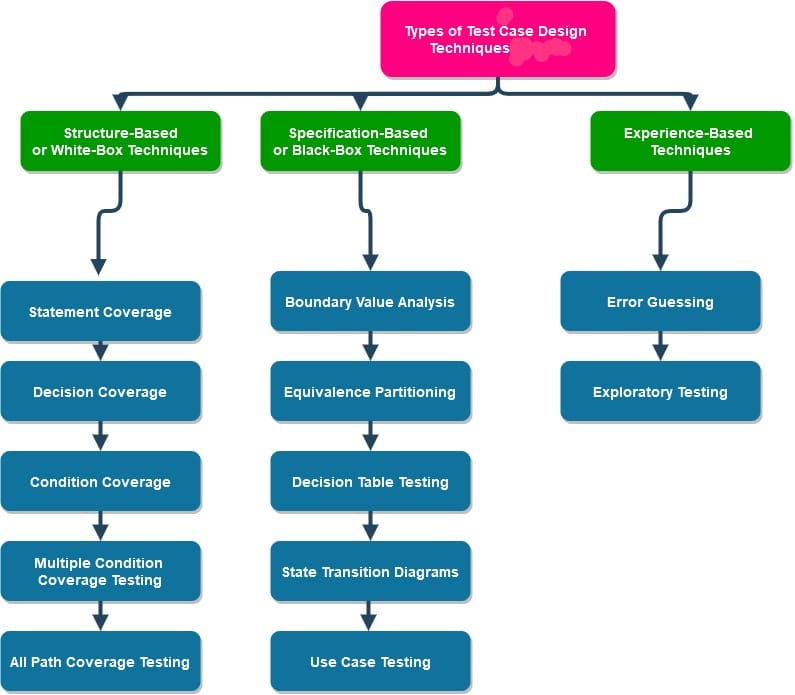
- Specification-Based or Black-Box Techniques
- Boundary Value Analysis (BVA)
- Equivalence Partitioning (EP)
- Decision Table Testing
- State Transition Diagrams
- Use Case Testing
- Structure-Based or White-Box Techniques
- Statement Coverage
- Decision Coverage
- Condition Coverage
- Multiple Condition Coverage Testing
- All Path Coverage Testing
- Experience-Based techniques
- Error Guessing
- Exploratory Testing
Specification-based testing, also known as black-box testing, is a technique that concentrates on testing the software system based on its functioning without any knowledge regarding the underlying code or structure. This technique is further classified as:
Structure-Based testing, or White-Box testing, is a test case design technique for testing that focuses on testing the internal architecture, components, or the actual code of the software system. It is further classified into five categories:
As the name suggests, Experience-Based testing is a technique for testing that requires actual human experience to design the test cases. The outcomes of this technique are highly dependent on the knowledge, skills, and expertise of the automation tester or developer involved. It is broadly classified into the following types:
 Note
NoteSimplify Testing: Opt for LambdaTest’s Selenium cloud grid with 3000+ real browsers and OS options.Try LambdaTest Today!
Specification-Based or Black-Box Techniques
Specification-based testing is a technique to test software such as Web apps, Mobile applications, and Desktop applications. It focuses on testing the features and functions of the software without needing to know the source code or structure. These test case design techniques are also known as Black-Box techniques.
The Specification-Based testing technique is an input/output-based testing technique because it considers the software as a black box with inputs and outputs. It provides some inputs to the software and then compares the outputs produced with the desired outputs.
This testing technique is widely used by automation testers and developers at all testing levels wherever any product specification exists. Because successful testing must ensure that the product is appropriately performing as it is supposed to be.
This technique is further classified into the following types:
Boundary Value Analysis (BVA)
It is usually observed that most software errors occur at the boundary values. The Boundary Value Analysis technique for designing test cases includes identifying test cases at the input domain’s boundary value.
In this technique, we design our test cases for the testing at or near the border values. Test cases often contain values from the upper boundary and the lower boundary. To make our task more manageable, BVA offers us four main test scenarios, as mentioned below.
- Minimum
- Just below the boundary values
- Maximum
- Just above the boundary values
Let’s understand this test case design technique by taking a simple example for a user age validation input form.

Test Name: Validate user age in the input form.
Test Condition: A valid adult user must be between [18 and 59 yrs], both inclusive.
Expected Behaviour: If the input age is not valid (i.e. age < 18 or age >=60), then the form must prompt a “To register, you must be between 18 yrs to 59 yrs.” alert.
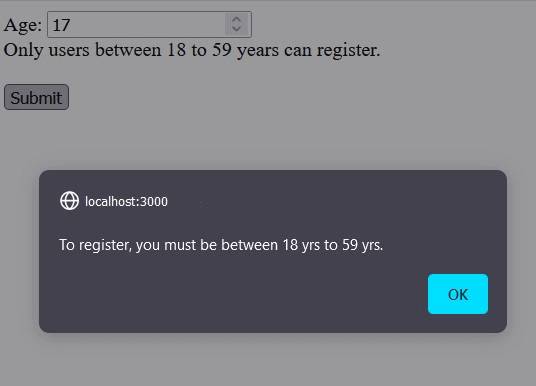
Boundary Value Analysis: To ensure this functionality works, we can test the boundaries of the possible inputs. Possible valid inputs for this test are natural numbers between 18 to 59.
Hence, based on the four test scenarios for BVA, we can design test cases as – 18(Minimum), 17 (just below the minimum), 59(maximum), and 60(just above the maximum). Using these test cases, we can test that our app must prompt a “To register, you must be between 18 yrs to 59 yrs.” alert for 17 and 60 as inputs. Also, for the other two inputs, it must accept the age. If the expected behavior is obtained, we can say that the software is bug-free at boundary values.

The above example must have clarified the Boundary Value Analysis technique for test case design. Hence the designed test cases will be as follows:
Test Case 1: (Just Below Minimum)
Input: age = 17
Expected Output: “To register you must be between 18 yrs to 59 yrs.” alert popups.
Test Case 2: (Minimum)
Input: age = 18
Expected Output: Proceed to Registration.
Test Case 3: (Maximum)
Input: age = 59
Expected Output: Proceed to Registration.
Test Case 4: (Just Above Maximum)
Input: age = 60
Expected Output: “To register, you must be between 18 yrs to 59 yrs.” alert popups.
Equivalence Partitioning (EP)
In the Equivalence Partitioning technique for testing, the entire range of input data is split into separate partitions. All imaginable test cases are assessed and divided into logical sets of data named classes. One random test value is selected from each class during test execution.
The notion behind this design technique is that a test case of a representative value of an individual class is equivalent to a test of any more value of the same class. It allows us to Identify invalid as well as valid equivalence classes.
Let’s understand this technique for designing test cases with an example. Here, we will cover the same example of validating the user age in the input form before registering. The test conditions and expected behavior of the testing will remain the same as in the last example. But now we will design our test cases based on the Equivalence Partitioning.
Test cases design Equivalence Partitioning:
To test the functionality of the user age from the input form (i.e., it must accept the age between 18 to 59, both inclusive; otherwise, produce an error alert), we will first find all the possible similar types of inputs to test and then place them into separate classes. In this case, we can divide our test cases into three groups or classes:
- Age < 18 – Invalid – ( For e.g. 1, 2, 3, 4, …, up to 17).
- 18 <= Age <= 59 – Valid – ( For e.g. 18, 19, 20, …, upto 59).
- Age > 59 – Invalid – (For e.g. 60, 61, 62, 63, …)

These designed test cases are too much for testing, aren’t they? But here lies the beauty of Equivalence testing. We have infinite test cases to pick, but we only need to test one value from each class. This reduces the number of tests we need to perform but increases our test coverage. So, we can perform these tests for a definite number only, and the test value will be picked randomly from each class and track the expected behavior for each input.
Decision Table Testing
A Decision Table is a technique that demonstrates the relationship between the inputs provided, rules, output, and test conditions. In test case design techniques, this decision table is a very efficient way for complex test cases. The decision table allows automation testers or developers to inspect all credible combinations of conditions for testing. True(T) and False(F) values signify the criteria.
Decision table testing is a test case design technique that examines how the software responds to different input combinations. In this technique, various input combinations or test cases and the concurrent system behavior (or output) are tabulated to form a decision table. That’s why it is also known as a Cause/Effect table, as it captures both the cause and effect for enhanced test coverage.
Automation testers or developers mainly use this technique to make test cases for complex tasks that involve lots of conditions to be checked. To understand the Decision table testing technique better, let’s consider a real-world example to test an upload image feature in the software system.
Test Name: Test upload image form.
Test Condition: Upload option must upload image(JPEG) only and that too of size less than 1 Mb.
Expected Behaviour: If the input is not an image or not less than 1 Mb in size, then it must pop an “invalid Image size” alert; otherwise, it must accept the upload.
Test Cases using Decision Table Testing:
Based upon our testing conditions, we should test our software system for the following conditions:
- The uploaded Image must be in JPEG format.
- Image size must be less than 1 Mb.
If any of the conditions are not satisfied, the software system will display an “invalid input” alert, and if all requirements are met, the image will be correctly uploaded.
Now, let’s try to make the decision table to design the most suitable test cases.
| Conditions | Test case 1 | Test case 2 | Test Case 3 | Test case 4 |
| Image Format | .jpg/.jpeg (T) | .jpg/.jpeg (T) | Not .jpg/.jpeg (F) | Not .jpg/.jpeg (F) |
| Image Size | < 1Mb (T) | >= 1 Mb (F) | < 1 Mb (T) | >= 1Mb |
| Output | Upload image (T) | Invalid input (F) | Invalid input (F) | Invalid input (F) |
Based on the above-formed decision table, we can develop 4 separate test cases to guarantee comprehensive coverage for all the necessary conditions.
State Transition Testing
State, Transition Diagram Testing, is a software testing technique used to check the transformation in the state of the application or software under changing input. The requirement of the input passed is varied, and the change in the state of the application is observed.
In test case design techniques, State Transition Testing is mainly carried out to monitor the behavior of the application or software for various input conditions passed in a sequential manner. In this type of testing, negative and positive input values are passed, and the behavior of the application or software is observed.
To perform State transition testing efficiently on complex systems, we take the help of the State transition diagram or State transition table. The state transition Diagram or state transition table mainly represents the relation between the change in input and the behavior of the application
State Transition Testing can only be performed where different system transitions are required to be tested. A great real-world example where State Transition Testing is performed can be an ATM machine.
Let’s understand this testing technique by considering an example of a mobile passcode verification system.
Test Name: Test the passcode verification system of a mobile to unlock it.
Expected Behavior: The Phone must unlock when the user enters a correct passcode otherwise, it will display an incorrect password message. Also, if 3 consecutive times an incorrect passcode is entered, the device will go on a cooling period for 60 sec to prevent a brute force attack.
State Transition Diagram:
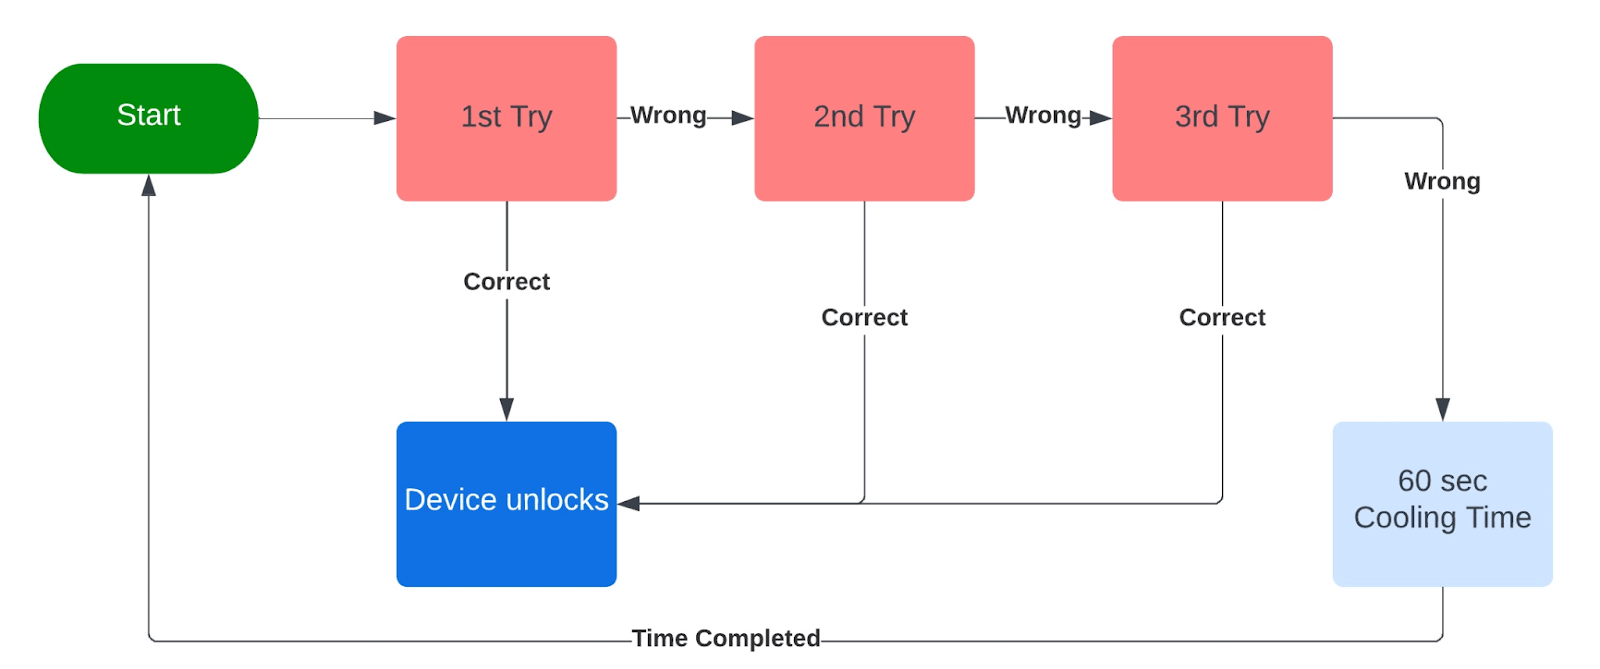
In the state transition diagram, if the user enters the correct passcode in the first three attempts, he is transferred to the Device unlock state, but if he enters a wrong passcode, he is moved to the next try, and if he repeats the same for 3 consecutive times the device will go on a 60 sec colling period.
Now we can use this diagram to analyze the relation between the input and its behavioral change. Henceforth, we can make the test cases to test our system (Mobile passcode verification system) properly.
State Transition Table:
Similar to the above state transition diagram, we can also design our test case using the state transition table. The state transition table for this particular example is as follows:
| States | Correct Passcode | Incorrect Passcode |
| 1).Start | Go to step 2. | Go to step 2. |
| 2).1st try | Go to step 5. | Go to step 3. |
| 3).2nd try | Go to step 5. | Go to step 4. |
| 4).3rd try | Go to step 5. | Go to step 6. |
| 5).Access Grant | – | – |
| 6).Cooling Period | – | – |
Use Case Testing
As the name suggests, in Use case testing, we design our test cases based on the use cases of the software or application depending on the business logic and end-user functionalities. It is a black box testing technique that helps us identify test cases that constitute part of the whole system on a transaction basis from beginning to end.
A use case testing technique serves the following objective:
- Manages scope conditions related to the project.
- Depicts different manners by which any user may interact with the system or software.
- Visualizes the system architecture.
- Permits to assess the potential risks and system reliances.
- Communicates complex technical necessities to relevant stakeholders easily.
Let’s understand the Use case testing technique using our last example of a mobile passcode verification system. Before moving on to the test case, let’s first assess the use cases for this particular system for the user.
- The user may unlock the device on his/her first try.
- Someone may attempt to unlock the user’s device with the wrong passcode three consecutive times. Provide a cooling period in such a situation to avoid brute-force attacks.
- The device must not accept a passcode when the cooling period is active.
- The user should be able to unlock the device after the expiry of the cooling period by entering a correct passcode.
Now, analyzing these use cases can help us primarily design test cases for our system. These test cases can be either tested manually or automatically.
Structure-Based or White Box Techniques
White Box Technique, also known as Structure-Based testing, is a testing technique that focuses on testing internal components or structures of software or applications. In this technique for testing, the tests interact with the code directly. The test cases are designed to confirm that the code works efficiently and correctly.
Among all test case design techniques, the white box testing technique becomes really important to check some points of the application like, security, reliability, scalability, etc., which otherwise can become difficult to test using other techniques. One of the primary advantages of white box testing is that it makes it possible to guarantee that every aspect of the software or application is tested. To achieve complete code coverage, white box testing uses the following techniques:
Statement Coverage
Statement Coverage testing is a technique for test case design that focuses on executing all the executable statements available in the source code at least once. It covers all the lines, statements, and paths of the source code for the software or application. Automation testers or developers generally use statement coverage testing to cover the following aspects of software testing:
- To test the quality of the code written.
- To decide the flow of various paths of the software or application.
- To check if the source code’s expected performance is up to the mark or not.
- Test the software’s internal code and infrastructure.
For statement coverage testing of the code, we calculate the statement coverage in percentage. Statement coverage value represents the percentage of total statements executed in the code.
Statement Coverage = (Number of statements executed/ Total number of statements in the code) * 100

To get a better understanding of software coverage let’s consider an example of a program code. Here we are considering an example of the OTP verification system. Given below is the Python code to validate the OTP input by the user by calling the isValidOTP method.
|
1 2 3 4 5 6 7 8 9 10 11 12 13 14 15 16 17 18 19 20 21 22 23 24 25 26 |
# Function to find the number of digits in a number. def no_of_digit(num): digit = 0 while num > 0: digit += 1 num = num // 10 return digit # Function to accept OTP input def accept_otp(otp): print("OTP accepted.") # Function to validate OTP input provided def is_valid_otp(otp): if no_of_digit(otp) == 4: # Length of OTP is okay to accept the input. accept_otp(otp) else: # Invalid length of OTP print("Invalid OTP. Try again.") # Test the function with an example OTP is_valid_otp(1234) |
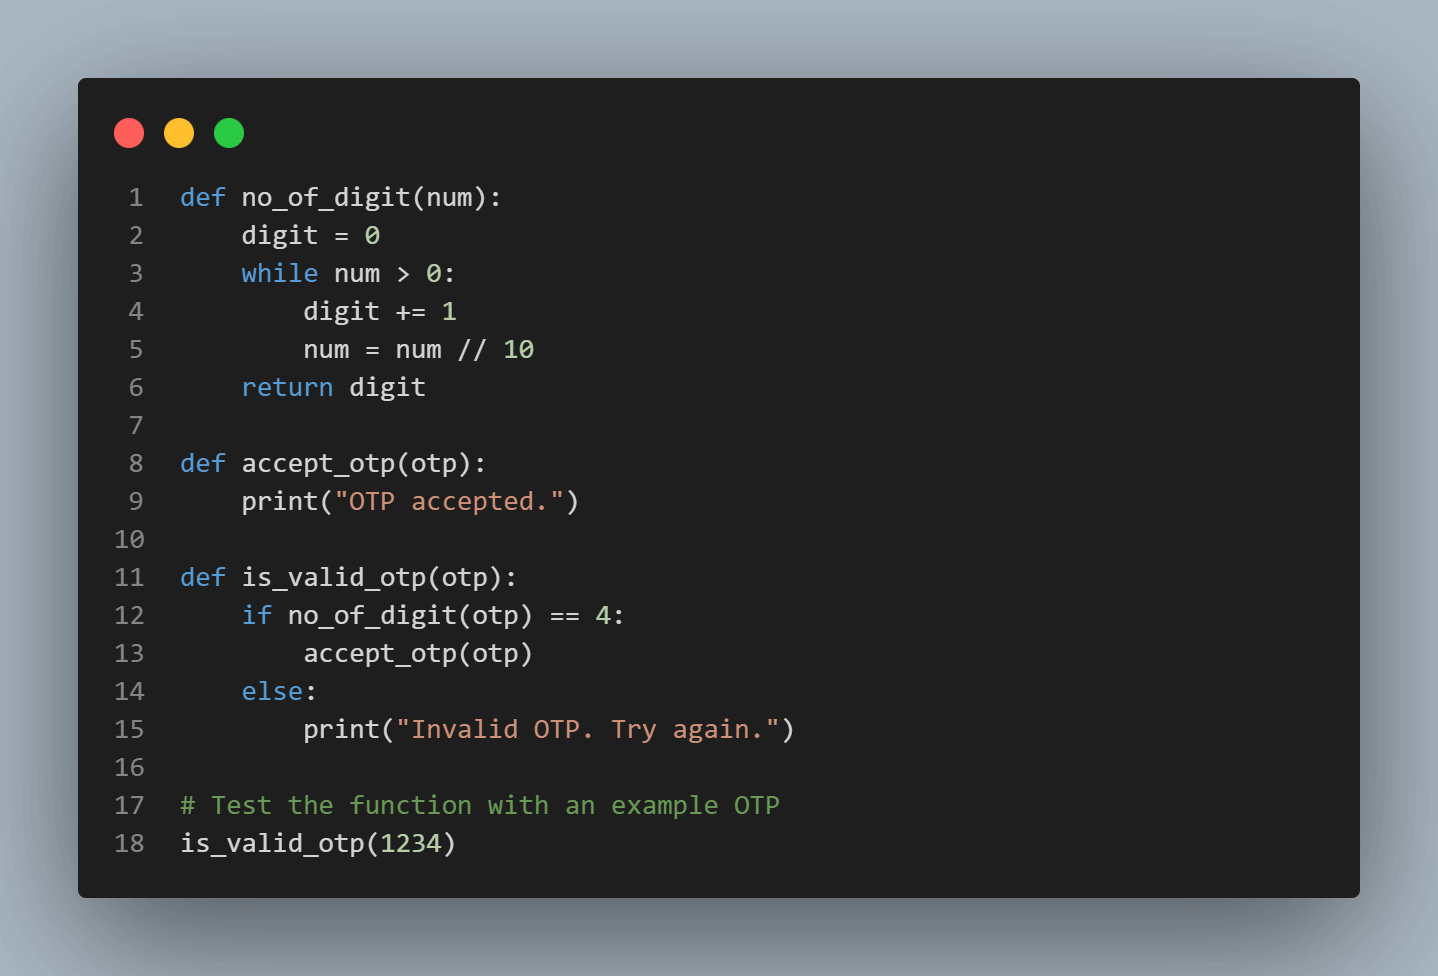
The above code basically tests if the OTP is of 4 characters or not. If it has more or less than 4 characters then it will print an invalid OTP; Otherwise, it will call the accept_otp() method. Now, let’s design our test case to check the statement coverage in different input situations.
Test Case 1: Value of OTP = 1234 (Valid 4-digit OTP).
In this test case, our code will execute all the statements except for line no: 13, 14, and 15. So we can calculate our statement coverage value as:
Statement coverage = (no. of statement executed/ total no. of statement) *100
Statement Coverage = (13/16) * 100
Statement Coverage = 81.25%
Test Case 2: Value of OTP = 123 (Invalid non-4-digit OTP).
In this test case, our code will execute all the statements except any code inside the if condition i.e. only line 12. So we can calculate our statement coverage value as:
Statement coverage = (no. of statement executed/ total no. of statement) *100
Statement Coverage = (15/16) * 100
Statement Coverage = 93.75%
Now considering both test cases one and two we can come to the conclusion that 100% Statement Coverage is reacted when we consider both a valid and invalid input. So, the statement coverage testing technique is majorly used to find the dead code, unused code, and unused branches. And considering these, we can design our test cases accordingly.
Decision Coverage
Decision Testing Coverage is one of the test design techniques that checks all the branches in the code (like if/else, ?: conditionals, switch case, etc.) by executing every possible branch from every decision point at least once. This helps testers or developers to ensure that no branch of the code leads to any unexpected application behavior.
In simple words, if a program or code requires an input and uses a conditional like an “if/else”, or a ternary operator(“?:”), or a switch/case statement to perform single or multiple checks, decision testing coverage would help us in designing test cases such that all the possible outcomes can be tested to observe the behavior of the application in all scenarios.
To understand this test case design technique, let’s consider an example that involves multiple conditional statements. How about testing a program that checks if a number is a multiple of 2, 3, or 6?
Test Name: To test a program that checks if a number is a multiple of 2, 3, or 6.
Test Conditions: Inputs (test cases) will be given by the user, and the program produces an outcome.
Expected Behaviour: If the number is a multiple of 2, then the program must print that, otherwise if it is a multiple of 3, then the program prints that; but if it is a multiple of both 2 and 3, then the program must print that it is a multiple of 6.
Before testing, let’s see the code for this program in Python.
|
1 2 3 4 5 6 7 8 9 10 11 12 13 14 15 16 17 18 19 20 |
def find_multiple(num): # Check if the number is a multiple of 2. if num % 2 == 0: # Check if the number is a multiple of 3. if num % 3 == 0: # The number is a multiple of both 2 and 3. print(f"{num} is a multiple of 6.") else: # The number is a multiple of 2 only. print(f"{num} is a multiple of 2 only.") elif num % 3 == 0: # The number is a multiple of 3 only. print(f"{num} is a multiple of 3 only.") else: # The number is not a multiple of 2 or 3. print(f"{num} is not divisible by any given number.") # Test the function with an example number find_multiple(12) |
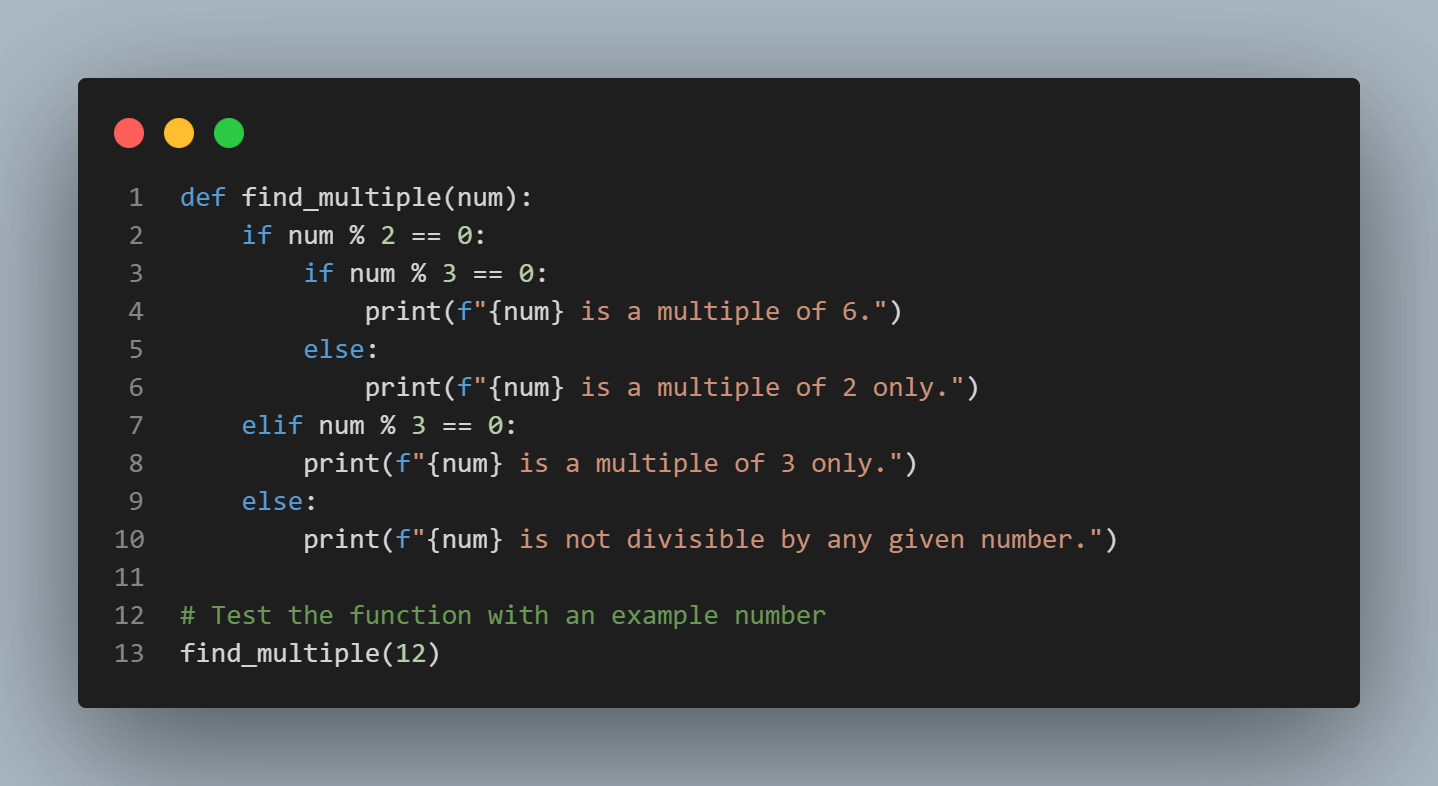
Decision Testing Coverage:
We can use the Decision Coverage value to measure if our code is executed completely or not. To find the Decision Coverage value, we can use the below method:
Decision Coverage = (No. of decision outcomes exercised / Total no. of decision outcome in the code) * 100

Now, let’s design our test cases to check the Decision Coverage in different input situations.
Test Case 1: Value of num = 8
In this test case, two decision outcomes are observed, first decision statement is if(num % 2 === 0), which produces a true outcome, and the second decision statement is if(num % 3 === 0) which produces a false outcome. No other decision outcome is covered in this particular test case. Also, the total number of possible decision outcomes is 6 (3 Decision conditional x 2 possible outcomes of each). Henceforth,
Decision Coverage = (2/6) * 100 %
Decision Coverage = 33.33%
Test Case 2: Value of num = 9
In this test case, two decision outcomes are covered, first decision statement is if(num % 2 === 0) which produces a false outcome, and the second decision statement is else if(num % 3 === 0) which produces a true outcome. Here Decision Coverage is,
Decision Coverage = (2/6) * 100 %
Decision Coverage = 33.33%
Test Case 3: Value of num = 12
In the third test case, two decision outcomes are covered, first decision statement is if(num % 2 === 0) which produces a false outcome, and the second decision statement is else if(num % 3 === 0) which also produces a false outcome. Now using this,
Decision Coverage = (2/6) * 100 %
Decision Coverage = 33.33%
Now, with all these 3 test cases, we can observe that our code has produced all the 6 outcomes, and hence that makes our total Decision Coverage to be 100%.
Condition Coverage
Condition Coverage Testing, also known as expression coverage testing, is a technique used to test and assess all the conditional statements available in the code. The primary goal of condition coverage testing is to test individual outcomes for each logical expression or condition. It offers a satisfactory sensitivity to the code’s control flow. All the expressions with logical conditions are considered collectively in this coverage testing technique.
The formula to find the conditional coverage percentage is as follows.
Conditional Coverage = (Number of Executed Condition outcome/ Total number of Condition outcome) * 100

Note: In decision coverage, all conditions (if/else, switch/case, etc. statements) must be executed at least once. While in condition coverage, all possible outcomes of all expressions or conditions must be tested at least once.
Now, let’s cover a quick simple example to understand conditional coverage better and how to design the test cases. Here, we will consider an example to check if three lines of length (a,b,c) can form a valid triangle or not. The Python program for this example is written below.
|
1 2 3 4 5 6 7 8 9 10 11 12 13 14 15 16 17 18 19 20 21 |
def is_valid_triangle(a, b, c): # Check if all sides are greater than 0 if a > 0 and b > 0 and c > 0: # Triangle Inequality Theorem: The sum of the lengths of any two # sides must be greater than the length of the third side. if a + b > c and a + c > b and b + c > a: return True return False # Get user input for the lengths of the sides side_a = float(input("Enter the length of side 'a': ")) side_b = float(input("Enter the length of side 'b': ")) side_c = float(input("Enter the length of side 'c': ")) # Check if the sides can form a valid triangle if is_valid_triangle(side_a, side_b, side_c): print("The given sides can form a valid triangle.") else: print("The given sides cannot form a valid triangle.") |
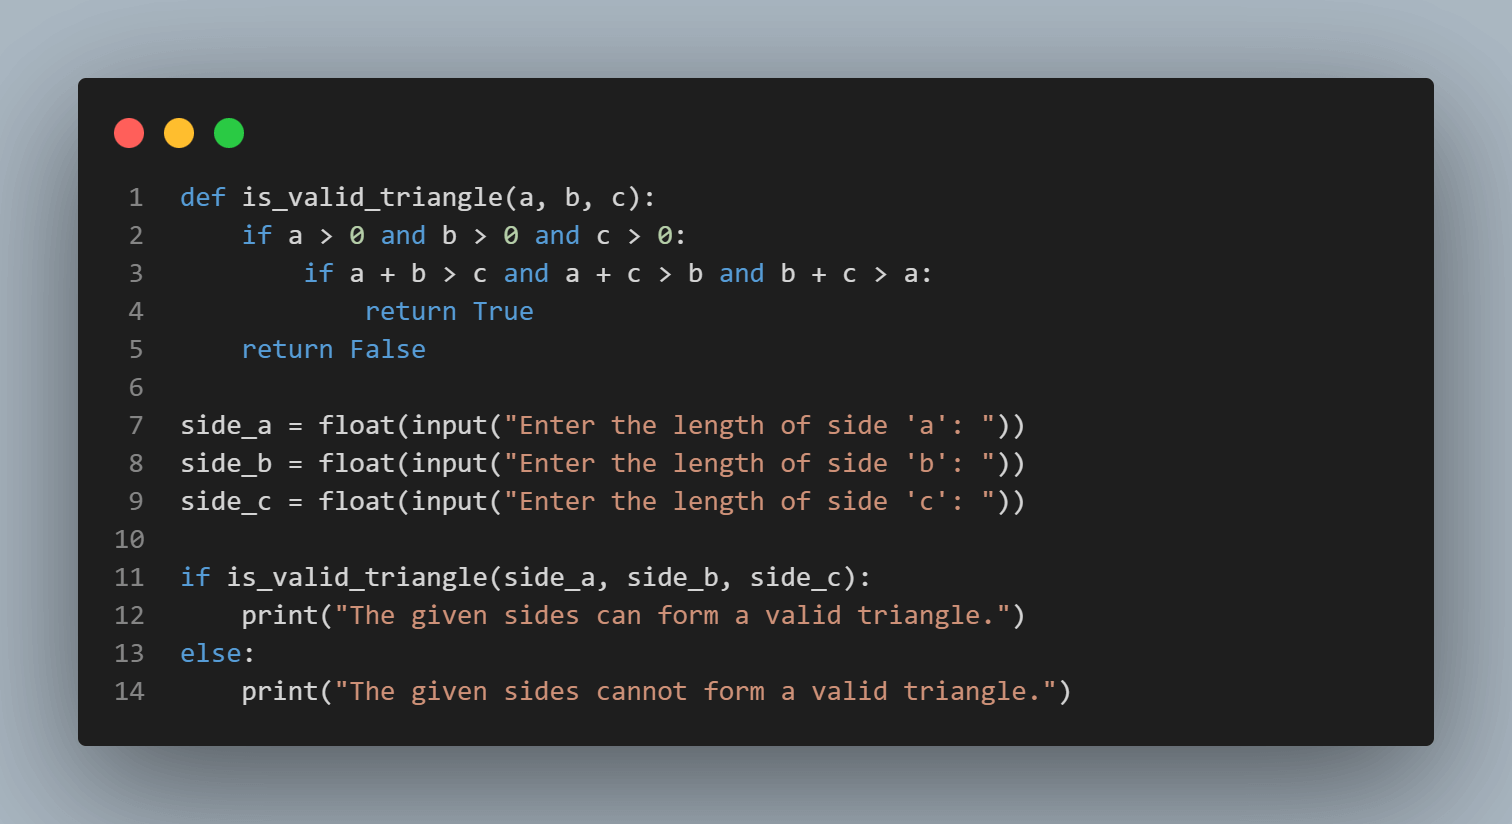
Now, let’s design our test cases to check if we can achieve 100% condition coverage using different input scenarios.
For the above program, we can have two separate conditions if a > 0 and b > 0 and c > 0 and if a + b > c and a + c > b and b + c > a. Both of these conditions can generate a True/False outcome individually. Hence we need to design our test case to get all these outcomes tested.
Test Case 1 (Condition 1-False, Condition 2-False)
Input: a = 0, b= 2, c= 3
Expected Output: The given sides cannot form a valid triangle.
Test Case 2 (Condition 1-True, Condition 2-True)
Input: a = 2, b= 2, c= 3
Expected Output: The given sides cannot form a valid triangle.
These two test cases were enough to generate a True/False outcome for both of the conditions, and therefore we will achieve 100% condition coverage.
By implementing these white box test case design techniques, automation testers or developers can ensure the software code is tested thoroughly and is free of unexpected behavior. Selecting the appropriate test case design techniques based on the project’s or software’s specific requirements is crucial.
Multiple Condition Coverage
Multiple Condition Coverage is a test case design technique, that is mainly used to design test cases considering the fact that all the possible combinations of outcomes in a condition must be tested at least once. It offers more satisfactory sensitivity to the code’s control flow than decision coverage or condition coverage testing.
Multiple condition coverage is very similar to the Condition coverage but in Multiple condition coverage, we test all the possible combinations of the condition, while in Condition coverage, we test individual outcomes for each logical condition.
In Multiple condition coverage, we generate multiple test cases for each condition separately such that all the possible combinations of outcomes can be tested. The total number of test cases that can be generated for each condition using Multiple condition coverage is 2n ; where n is the number of logical sub-conditions or sub-expressions in the condition.
To understand this type of test case design technique, let’s consider the same example to check if three lines of length (a,b,c) can form a valid triangle or not. Here, we will first generate test cases for our first condition (i.e. if a > 0 and b > 0 and c > 0), that have three sub-expressions that can produce individual True/False outcomes. Hence we will be having 23 (= 8) combinations of the outcome (T/T/T, T/T/F, T/F/T, F/T/T, F/F/T, F/T/F, T/F/F, and F/F/F).
Test Case 1: (True, True, True)
Input: a = 1, b = 1, c = 1
Expected Output: The given sides can form a valid triangle.
Test Case 2: (True, True, False)
Input: a = 1, b = 1, c = 0
Expected Output: The given sides cannot form a valid triangle.
Test Case 3: (True, False, True)
Input: a = 1, b = 0, c = 1
Expected Output: The given sides cannot form a valid triangle.
Test Case 4: (False, True, True)
Input: a = 0, b = 1, c = 1
Expected Output: The given sides cannot form a valid triangle.
Test Case 5: (False, False, True)
Input: a = 0, b = 0, c = 1
Expected Output: The given sides cannot form a valid triangle.
Test Case 6: (False, True, False)
Input: a = 0, b = 1, c = 0
Expected Output: The given sides cannot form a valid triangle.
Test Case 7: (True, False, False)
Input: a = 1, b = 0, c = 0
Expected Output: The given sides cannot form a valid triangle.
Test Case 8: (False, False, False)
Input: a = 0, b = 0, c = 0
Expected Output: The given sides cannot form a valid triangle.
Similarly, we can design 8 more test cases for the second condition. Hence, this leads to a very large number of test cases for rigorous testing of the code’s control flow.
All Path Coverage Testing
All path coverage is a test case design technique that analyzes all of the codes’ pathways. This powerful strategy assures that all program routes or paths are tested at least once. This technique’s coverage is more effective and wider than multiple-condition coverage. Automation testers or developers often use this technique to design test cases for testing sophisticated and complex applications.
Now, Let’s take a quick example to understand this technique of designing test cases. For ease of understanding, we will cover a really simple example to test if a number is positive, negative, or zero. The code for this example in Python is as follows.
|
1 2 3 4 5 6 7 8 9 10 11 12 13 14 15 |
def check_number(n): if n > 0: return "Positive" elif n < 0: return "Negative" else: return "Zero" # Input number to check num = int(input("Enter the number to test: ")) # Print output print(check_number(num)) |
Flow Chart for this code can be designed as:
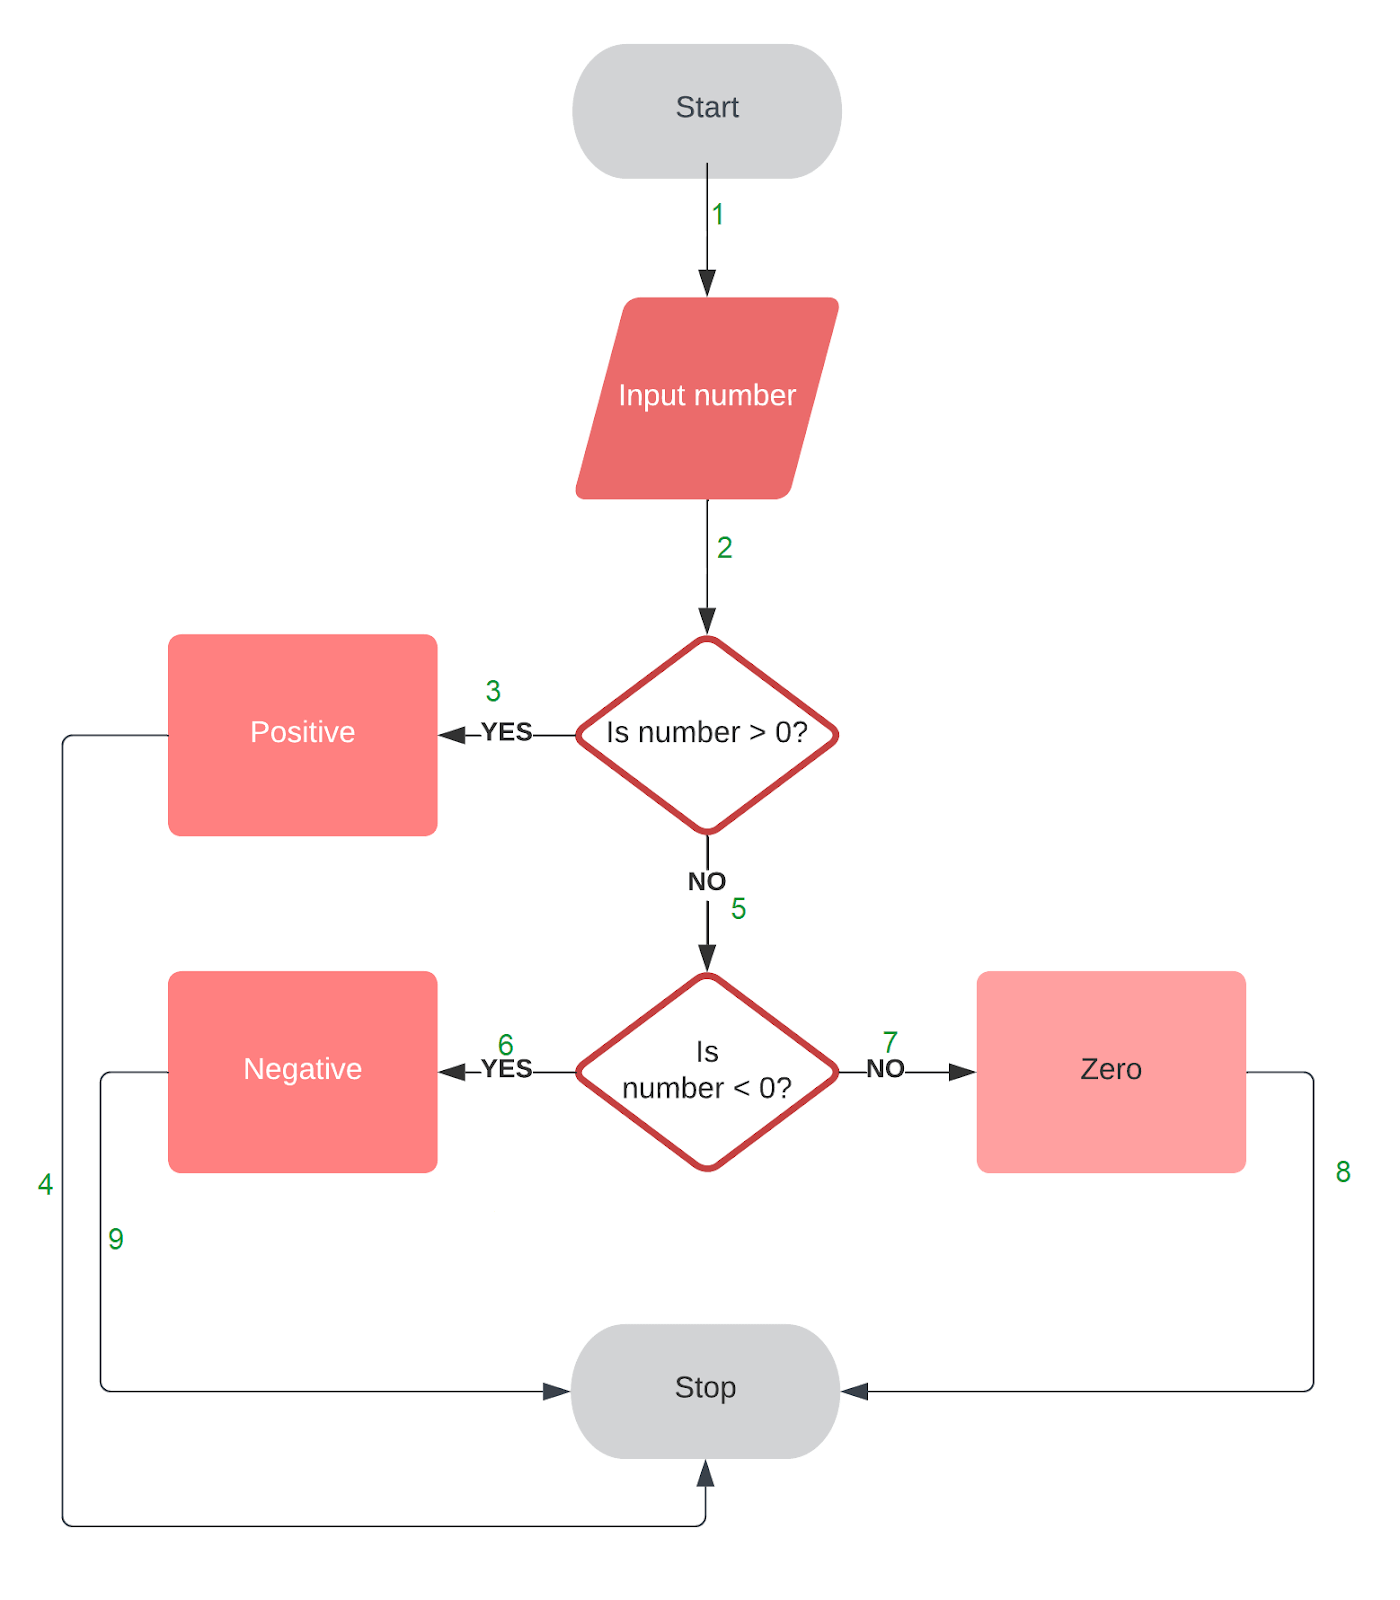
Analyzing the above flow chart we can clearly see that there are three independent paths that can be formed i.e. 1 -> 2 -> 3 -> 4, 1 -> 2 -> 5 -> 6 -> 9, and 1 -> 2 -> 5 -> 7 -> 8. Hence we can design our test cases such that all these paths are traveled at least once.
Test Case 1
Input: num = 1
Expected Output: Positive
Path Taken: 1 -> 2 -> 3 -> 4
Test Case 2
Input: num = -1
Expected Output: Negative
Path Taken: 1 -> 2 -> 5 -> 6 -> 9
Test Case 3
Input: num = 0
Expected Output: Zero
Path Taken: 1 -> 2 -> 5 -> 7 -> 8
Experience-Based Testing Techniques
Experience, skill, and instinct are the fundamentals for experience-based testing. In this testing technique, testers or developers are left free to design various test cases in advance or create them on the spot during the test implementation; mostly experienced testers will do a bit of both.
These techniques can be precious in looking out for test cases that are not easily identified by any other structured techniques. Depending on the approach, they may achieve varying degrees of effectiveness and coverage. This test case coverage can be difficult to examine and may not be measurable with structured techniques.
Some very commonly used experience-based testing techniques to design the test cases are as follows:
Error Guessing
Error Guessing is an experience-based test case design technique where automation testers or developers use his/her experience to guess the troublesome areas of the software or application. This approach necessarily requires a skilled and experienced tester.
Error guessing test case design technique proves to be very persuasive when used in addition to other structured testing techniques. This technique uncovers those errors that would otherwise be not likely to be out through structured testing. Hence, having the tester’s experience saves a lot of effort and time.
Now, let’s find out some of the guidelines to be followed for error guessing technique:
- Always Remember earlier troubled areas: During any of the automation testing tasks, whenever you encounter an interesting bug, note it down for future reference.
- Improve technical understanding: Knowing how the code is written & how error-prone concepts like null pointers, loops, arrays, exceptions, boundaries, indexes, etc., are implemented in the code helps in testing.
- Do not just look for mistakes in the code but also find errors in design, requirements, build, usage, and testing.
- Apprehend the system under test.
- Consider historical data and test outcomes.
For example, error-guessing test case design techniques can pinpoint input validation situations, such as entering uncommon characters, long inputs, or unforeseen combinations of input values. Testers or developers can catch if the system controls such inputs gracefully or exhibits any unexpected behavior or vulnerabilities.
Exploratory Testing
Exploratory Testing is a type of test case design technique for software testing where automation testers or developers do not create test cases in advance but rather check the system in real-time. They usually note down ideas and opinions about what to test before test implementation. The primary focus of exploratory testing is mainly on testing as a “thinking” activity.
Exploratory Testing is widely used by testers in QA testing and is all about learning, discovery, and investigation. It highlights the personal responsibility and freedom of the individual tester.
For example, Exploratory testing for a user login feature involves testing beyond the basics. Testers would start by verifying standard login scenarios and then delve into boundary cases, such as incorrect credentials or excessive login attempts. They would assess features like social media integration, password recovery, and session management.
Exploratory testing would cover aspects like localization, accessibility, and cross-browser/device compatibility. By taking this approach, the testing team ensures a secure, user-friendly, and comprehensive login experience for the application’s users.
 Note
NoteSimplify Testing: Opt for LambdaTest’s Selenium cloud grid with 3000+ real browsers and OS options. Try LambdaTest Today!
Bonus Point for Effective Test Case Design
Great test designs help us create applications with excellent customer experience. Following are some of the important points that can be considered while designing test cases.
- Choose design technique wisely: Although we are equipped with multiple test case design techniques, we need not select all of those techniques but instead select a good combination of them based on our software requirements.
- Define the scope and purpose of the testing: The first step in designing effective test cases is to pick the testable conditions. We must understand the testing goals as well as the features.
- Domain expertise: Before designing test cases, we need domain knowledge, which is the basis of any software. This helps in designing test cases based on the software structure.
- Assumptions should be avoided: When designing a test case, don’t make presumptions about the features and functioning of the software application. It may cause a disconnect between the client’s need and the product, affecting the business.
- Look for any non-functional requirements: Non-functional requirements are just as influential as functional ones. Identify other non-functional testing requirements, such as operating system, hardware requirements, and security features to be handled.
- Negative and positive test cases: When designing test cases, boundary value analysis, Equivalence class partitioning, and decision table testing are some test case design techniques that should be used. We should always think about negative testing, error handling, and failure situations, as these might help us find the most likely bugs in the code.
Conclusion
Writing effective test cases with all of the required details is an excellent job, and various test case design techniques can help us design them properly. In this article, we equip you with the notion of various test case design techniques, including structured and experienced testing techniques. We also included some bonus points to help you design test cases for smart software testing. Now, to conclude this article, we can say that successful usage of test case design techniques will generate test cases that guarantee the success of software testing.
Frequently Asked Questions (FAQs)
Why do we use test case design techniques?
Test case design techniques are utilized to optimize our testing process by correctly identifying crucial testing needs and designing proper test cases, thus allowing us to test our software against these robust test cases.
What are the advantages of test case design techniques?
Test case design techniques are a valuable asset in software testing. They provide a more structured approach to designing test cases, which can lead to comprehensive test coverage and higher-quality software.
These techniques help testers to identify complex scenarios, generate effective test data, and design test cases that evaluate the full functionality of the system. They also help to reduce the risk of missed defects and ensure that all software requirements are met.
What is Black Box Testing?
Black box testing is a technique for testing that concentrates on testing the software system based on its functioning without any knowledge regarding the underlying code or structure.
What is White Box Testing?
White Box testing is a test case design technique for testing that focuses on testing the internal architecture, components, or the actual code of the software system.
What is the difference between Boundary Value Analysis and Equivalence Partitioning?
In Boundary value analysis, we examine the behavior of our application using corner cases as inputs. Let’s say we have our input in the range L to R, then we will check for the boundaries, which are {L} and {R}.
Regarding equivalence partitioning, we divide our input range into equivalence data classes. For each class, we run a check, and if any class fails, then that whole class interval is considered incorrect it is considered correct.
Got Questions? Drop them on LambdaTest Community. Visit now


