xUnit Setup for Selenium WebDriver: A Complete Guide
Himanshu Sheth
Posted On: March 7, 2021
![]() 60582 Views
60582 Views
![]() 5 Min Read
5 Min Read
In the on-going ‘Selenium xUnit testing tutorial’ series, we earlier had a look at setting up the xUnit framework in Visual Studio. It was a getting started guide with a major focus on the installation of the xUnit framework for the project. Before setting up Selenium WebDriver for xUnit, we recommend that you check out the installation guide on xUnit Testing Tutorial: Environment Setup For Selenium Testing, in case you are starting up with the Selenium xUnit framework.
In this Selenium xUnit tutorial, we take a quick look at how to install Selenium WebDriver in Visual Studio for performing automation testing with C#.
Starting your journey with Selenium WebDriver? Check out this step-by-step guide to perform Automation testing using Selenium WebDriver Tutorial. If you are preparing for an interview you can learn more through Selenium interview questions.
TABLE OF CONTENTS
Creating a New C# Project in Visual Studio
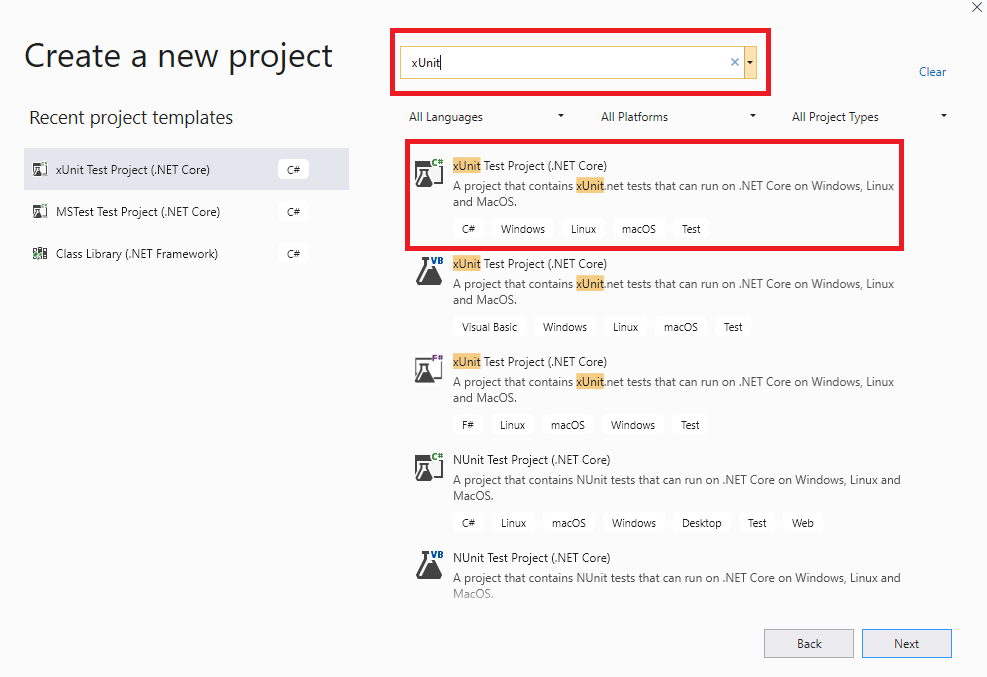
Before installing Selenium WebDriver, we create a new project in C# by following the below-mentioned steps:
- Open Visual Studio and create a new project of the type ‘xUnit Test Project (.Net Core)’.
- As the project uses the xUnit.net (or xUnit) framework, the C# file contains the [Fact] attribute.


Steps to Download Selenium WebDriver for Selenium xUnit
Before running your first script in xUnit, you need to download and set up Selenium WebDriver.
Selenium WebDriver for the xUnit project can be installed using the NuGet Package Manager (PM). NuGet is a free and open-source Package Manager (PM) designed for the Microsoft Platform.
Installation of the Selenium WebDriver can be done either using the Visual Studio IDE, and NuGet Package Manager (PM) Commands.
Take this certification to master the fundamentals of Selenium automation testing with C# and prove your credibility as a tester.
Here’s a short glimpse of the Selenium C# 101 certification from LambdaTest:
Using Visual Studio IDE
For installing Selenium WebDriver using the Visual Studio IDE, perform the following steps:
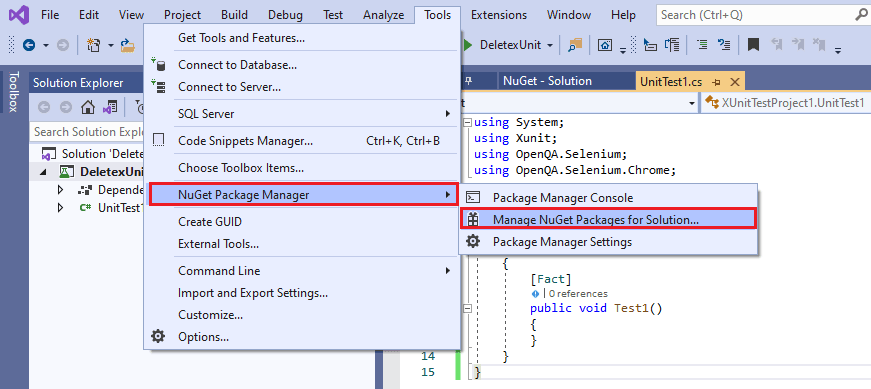
- Go to Tools -> NuGet Package Manager -> Manage NuGet Packages for Solution and search for ‘Selenium.’
- Select Selenium.WebDriver from the search list and install the package by clicking the Install button.
- For automated browser testing using Selenium xUnit, we use Google Chrome as the test browser. We install the Chrome WebDriver so that Chrome can be instantiated using the Selenium APIs. Select Selenium.WebDriver.ChromeDriver from the search list and click on the Install button.
- As seen in the implementation below, we added the Selenium (OpenQA.Selenium) and Chrome WebDriver (OpenQA.Selenium.Chrome) references in the code.


Using Package Manager (PM) Commands
If you are more comfortable with the terminal, you can install Selenium WebDriver by invoking the Package Manager (PM) commands on the terminal.
For executing commands from the PM console, go to Tools -> NuGet Package Manager -> Package Manager Console.

The Package Manager (PM) command Install-Package is used to perform the installation. Package Name is passed as an argument to the command. We also install the Selenium.Chrome.WebDriver from the terminal.
Shown below is the snapshot of the Package Manager Console:


Get-Package command is used to verify whether the command installation is successful or not.
Guide On xUnit Framework For Unit Testing With Selenium C#
This xUnit Tutorial for beginners and professionals will help you learn how to use xUnit framework with Selenium C# for performing Selenium automation testing.
Conclusion
With the installation of Selenium WebDriver and the xUnit framework, you are all set to execute the first automation testing with C#, Selenium, and xUnit.net. The steps mentioned in this Selenium C# tutorial for the installation of Selenium WebDriver in xUnit are easy to understand. Terminologies like Selenium WebDriver, Package Manager, etc., are uniform across all the C# test frameworks.
A thorough understanding of these essential things forms the base on which you can enhance automation testing skills with C# and xUnit.
Got Questions? Drop them on LambdaTest Community. Visit now


