How to Scroll to an Element in Playwright
Jaydeep Karale
Posted On: January 11, 2024
![]() 168702 Views
168702 Views
![]() 19 Min Read
19 Min Read
This article is a part of our Learning Hub. For more in-depth resources, check out our hub on Playwright Tutorial.
Creating visually stunning and interactive websites has become a norm in the dynamic landscape of web development. However, this has led to the proliferation of content-rich pages extending beyond the viewport’s confines. As a result, users often need to scroll to an element to access all the information available.
Scrolling isn’t just a technical necessity; it’s a critical aspect impacting user experience and site visits. When paired with lazy loading, efficient scrolling enhances engagement, encourages content discovery, and positively affects search engine rankings, leading to longer site visits and a more successful online presence.
In this Playwright tutorial, we’ll learn how to scroll to an element in Playwright. We’ll explore scenarios where scrolling is essential, understand the challenges it addresses, and provide practical insights into implementing effective scrolling strategies. So, let’s dive in and uncover the techniques that ensure your automated tests are as comprehensive and reliable as possible. If you’re looking to improve your playwright interview skills, check out our curated list of questions and answers at Playwright interview questions.
TABLE OF CONTENTS
- The Need to Scroll to an Element
- How to Setup Playwright?
- Scrolling to an Element in Playwright
- Demonstration: Using the scroll_into_view_if_needed() Method
- Demonstration: Using the mouse.wheel() Method
- Demonstration: Using the keyboard.press() Method
- Implementing Horizontal Scrolling in Playwright
- Conclusion
- Frequently Asked Questions (FAQs)
The Need to Scroll to an Element
For automation testers, replicating user interactions accurately is crucial to ensure the functionality and performance of these web applications.
This is where the need to scroll to an element arises in automation testing. Automation testers can utilize tools and frameworks to simulate user behavior and interactions on web pages. Scrolling, an essential aspect of user experience, becomes necessary when testing web applications. Scrolling allows testers to interact with hidden, dynamic content or lazy-loaded content, verify content, and validate the responsiveness of a website. It’s about reaching elements beyond the current viewport and ensuring the application behaves seamlessly during user navigation.
In browser automation, Playwright has emerged as a powerful automation testing framework for automating interactions with web pages. In automation testing, mastering the art of scrolling with tools like Playwright becomes pivotal for ensuring web applications’ functionality and performance. With its auto-wait feature for elements to be actionable, cross-browser compatibility, and support for multiple programming languages, Playwright empowers testers to mimic user actions and assess a website’s functionality efficiently.
How to Setup Playwright?
Playwright is an open-source, end-to-end testing and browser automation framework released by Microsoft. For this blog on how to scroll to an element in Playwright, we will use the Python API of Playwright.
Step 1: Create a dedicated virtual environment
Creating a dedicated virtual environment is a good practice when working with Python. It helps create an isolation between dependencies for various projects.
For this project, we will create a virtual environment called playwrightscroll using Python 3.10.
conda create -n playwrightscroll python=3.10

The creation of a virtual environment can also be done using the built-in venv module.
python -m venv playwrightscroll

Step 2: Activating the virtual environment and installing Playwright
Next, we activate the newly created virtual environment using the conda.
conda activate playwrightscroll
If not using conda, the command to activate it using the activate script provided within the playwrightscroll virtual environment.

Once activated, the Python API of Playwright can be installed using pip install pytest-playwright.

Step 3: Installing browsers (Required only when running tests locally)
The default Playwright installation does not come with any browser. We need to install the browsers using the playwright install command.
This will install the latest versions of Chromium, Firefox, and Webkit. This step is optional and unnecessary if we use Playwright on cloud testing platforms like LambdaTest.
LambdaTest is an AI-based test orchestration and execution platform that allows you to run Playwright tests on a scalable and reliable cloud grid. With LambdaTest, you can perform Playwright testing on over 3000 unique combinations of browsers, operating systems, and devices.
Catch up on the latest tutorial around the Playwright visual regression testing, automated testing, and more. Subscribe to the LambdaTest YouTube Channel for quick updates.
Enhance your testing strategy with our detailed guide on Playwright Headless Testing. Explore further insights into Playwright’s capabilities in this guide.

This completes the setup required.
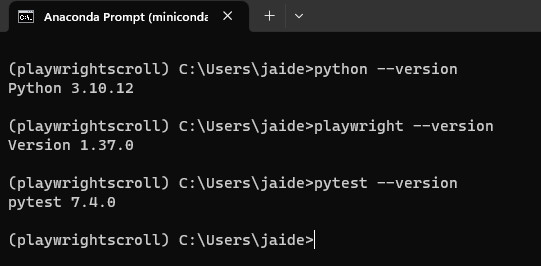
Let us do a quick version check so that replicating the setup when referring to this blog will be easy. As shown, the scenarios demonstrated in this blog hereafter are fully compatible with
- Python 3.10.12
- Playwright 1.37.0
- pytest 7.4.0
 Note
NoteRun Playwright tests on 3000+ real environments. Try LambdaTest Today!
Scrolling to an Element in Playwright
Vertical scrolling is available on most websites, from those using simple HTML and CSS to Single-Page Applications (SPA) developed using complex modern web technologies like React and Angular and so on.
Horizontal scrolling is considered bad UX and should generally be avoided (or minimized) if necessary. Don’t take my word for it; check out this usability guideline from the world leaders in Research-Based user experience.
There are three ways to scroll to an element in Playwright. Let us briefly understand each of them before moving on to the demo of each method.
scroll_into_view_if_needed() method
This method is called after locating an element using the Playwright Locator. If the element passes the actionability checks of being Stable and Attached, this method will try to scroll to an element in Playwright.
Usage
locator.scroll_into_view_if_needed(**kwargs)
Arguments
timeout float (optional): Maximum time in milliseconds; default is 3000
Mouse API wheel() method
The mouse class helps simulate the movement of the mouse, with the top left corner of the viewport considered the starting point. Each Playwright page has access to its instance of the mouse class available via page.mouse().
In the mouse class, we can call the page.mouse.wheel() method to scroll to an element in Playwright either in the upward or downward direction.
Usage
mouse.wheel(delta_x, delta_y)
Arguments
delta_x float: Pixels to scroll horizontally
delta_y float: Pixels to scroll vertically
Keyboard API press() method
The keyboard class provides an API for managing a virtual keyboard. Using this API’s press() method and supplying the arguments PageDown, PageUp, ArrowUp, ArrowDown, ArrowLeft, or ArrowRight, we can simulate scrolling in the required direction.
Usage
page.keyboard.press()
Arguments
key str: Name of the key to press or a character to generate, such as ArrowLeft or a.
delay float (optional): Time to wait between keydown and keyup in milliseconds. Defaults to 0.
Now that we know the various methods available to scroll to an element in Playwright, let us study each of them in detail using various scenarios and their implementation, starting with the scroll_into_view_if_needed() method.
Demonstration: Using the scroll_into_view_if_needed() Method
In this section, you will learn how to scroll to an element in Playwright using the scroll_into_view_if_needed() method.
The scroll_into_view_if_needed() method brings an element located using a Playwright Locator into the viewport. If the located element is already in the viewport, the method takes no action.
To understand this, let us consider a practical scenario where an element is absent in the viewport.
Test Scenario: Element not visible in the current viewport
|
Implementation
The complete test code is as follows.
Code Walkthrough
Let us now go through the test steps step-by-step.
Step 1
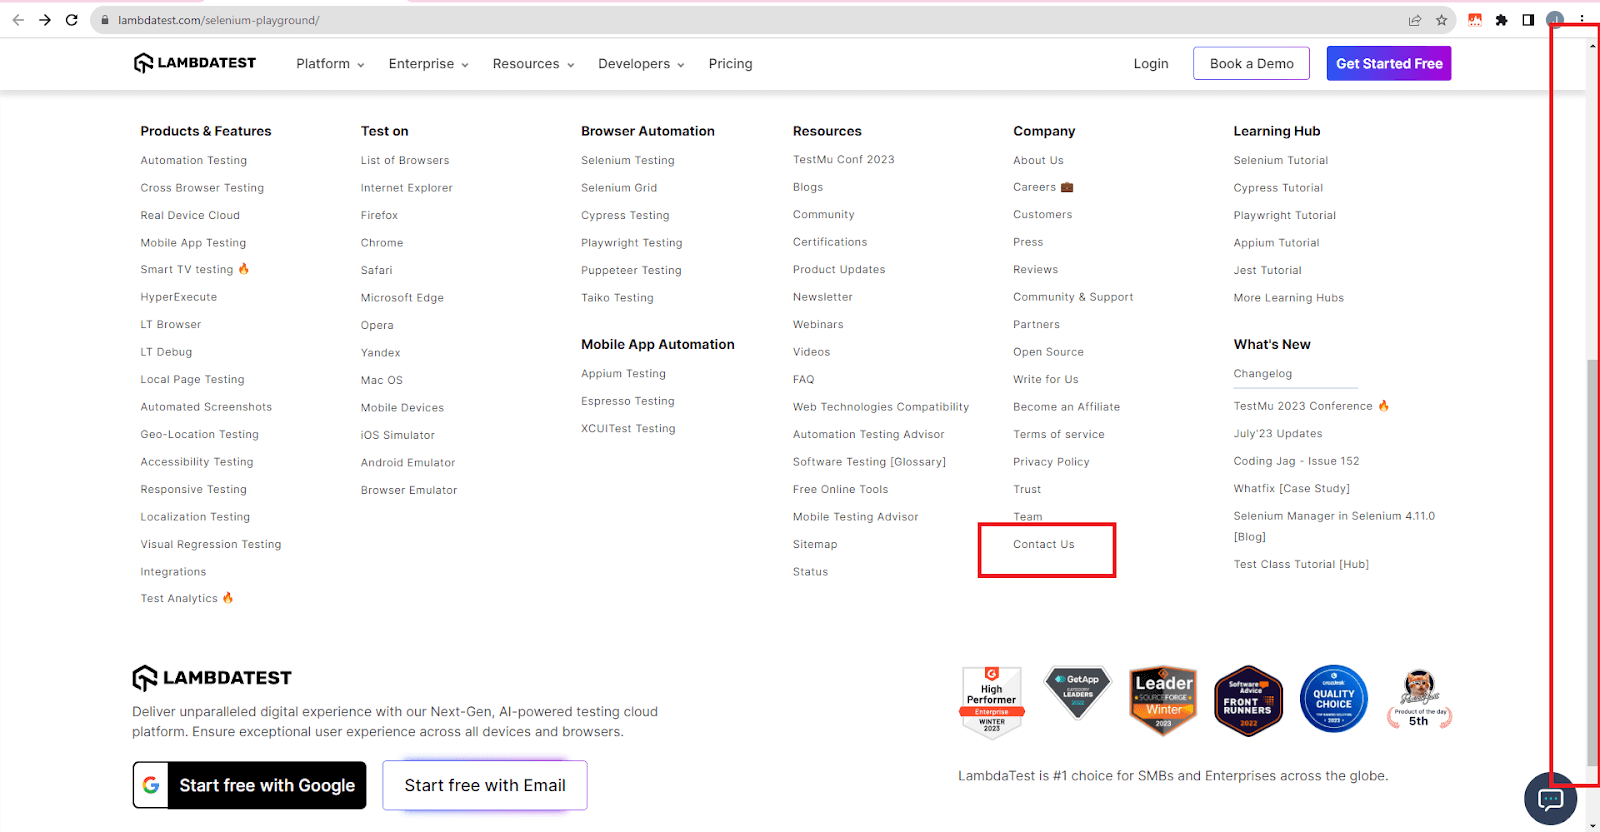
The default viewport of the website is shown below. The ‘Contact Us’ section is not visible.
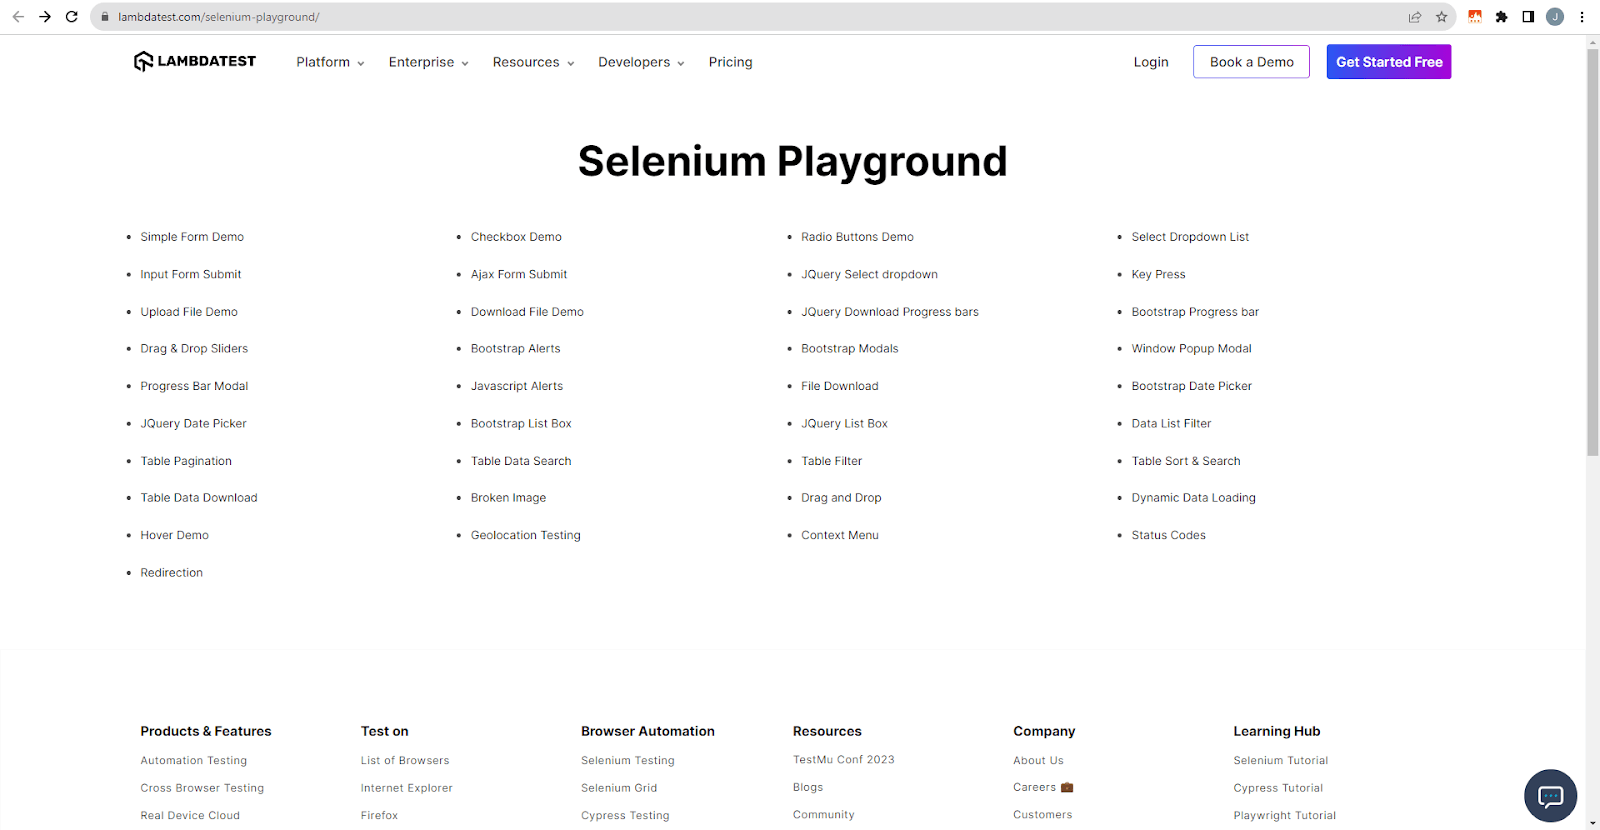
Scrolling down further reveals the ‘Contact Us’ section.
Step 2

Navigate to the website under test using the goto() method.
Step 3
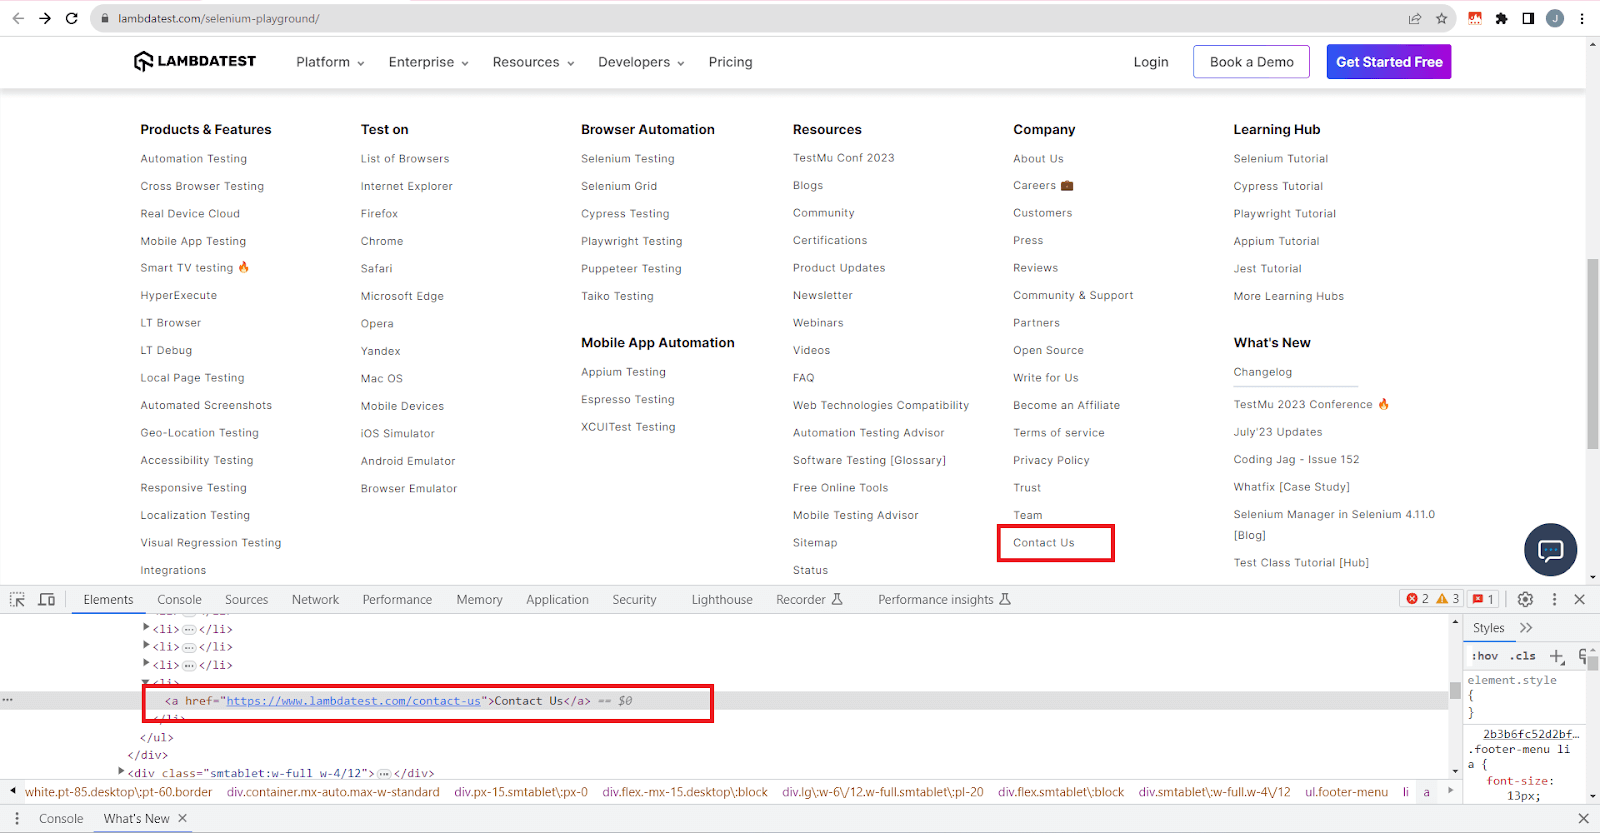

The “Contact Us” section is a link, so we use the get_by_role() Playwright Locator to locate the element.
The located element is stored in the variable base_locator.
Step 4
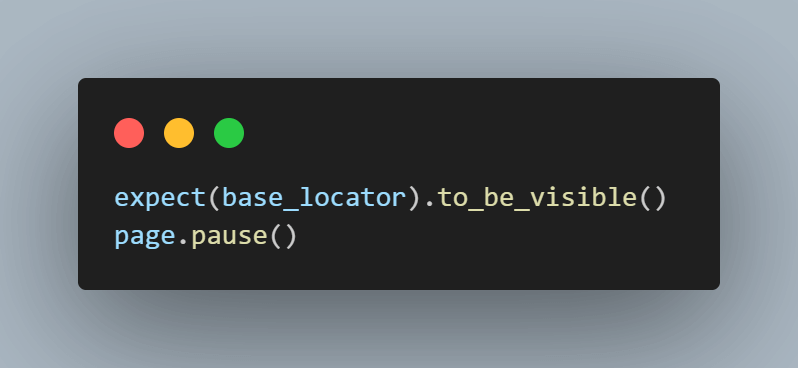
We use the Playwright expect() assertion to ensure the element ‘Contact Us’ to_be_visible().
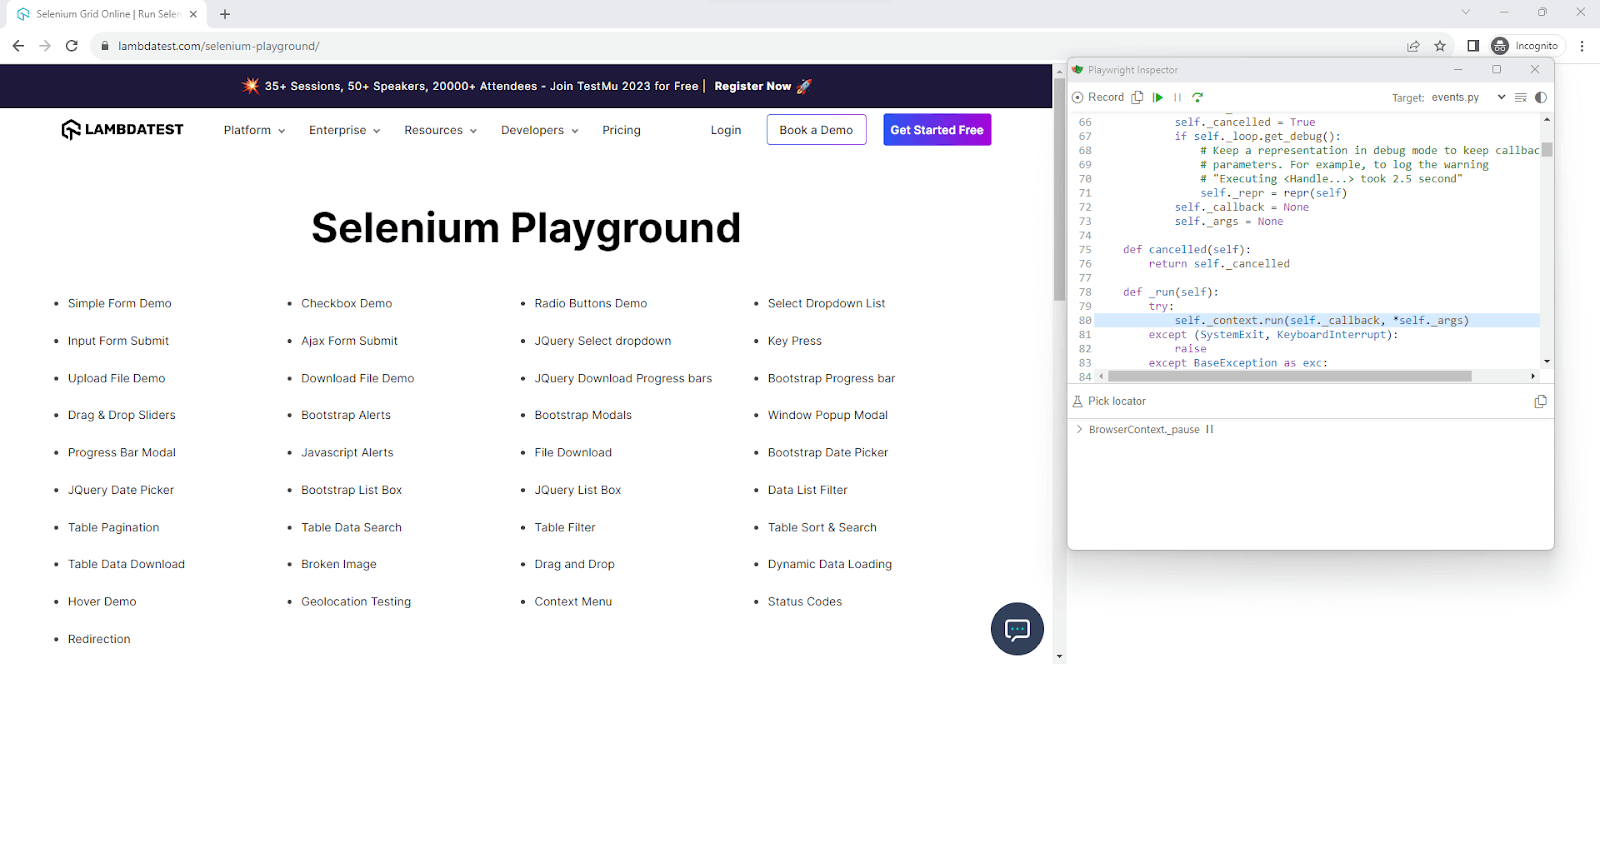
The page.pause() will pause the test execution so that we can view that before calling the scroll_into_view_if_needed() method, the element not in the viewport.
An intermediate screenshot from the execution is shown below.
Step 5
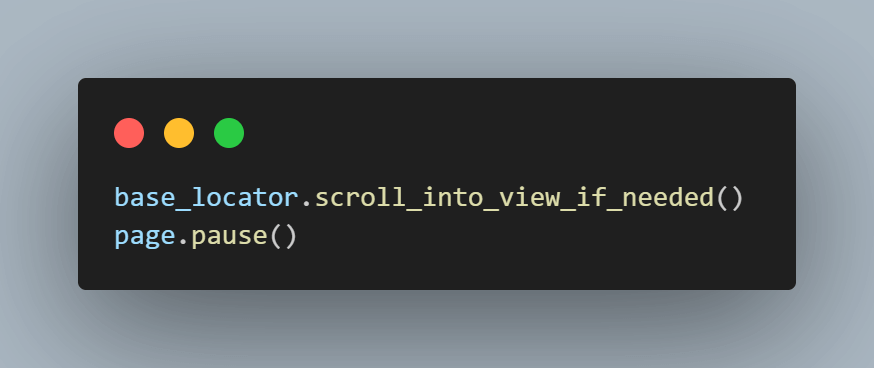
On the base_locator, we call the scroll_into_view_if_needed() method to bring the element ‘Contact Us’ into the viewport.
The page.pause() is used again to pause the test execution and ensure the browser does not close until we manually unpause it.
Here is a screenshot of the resumed test execution.
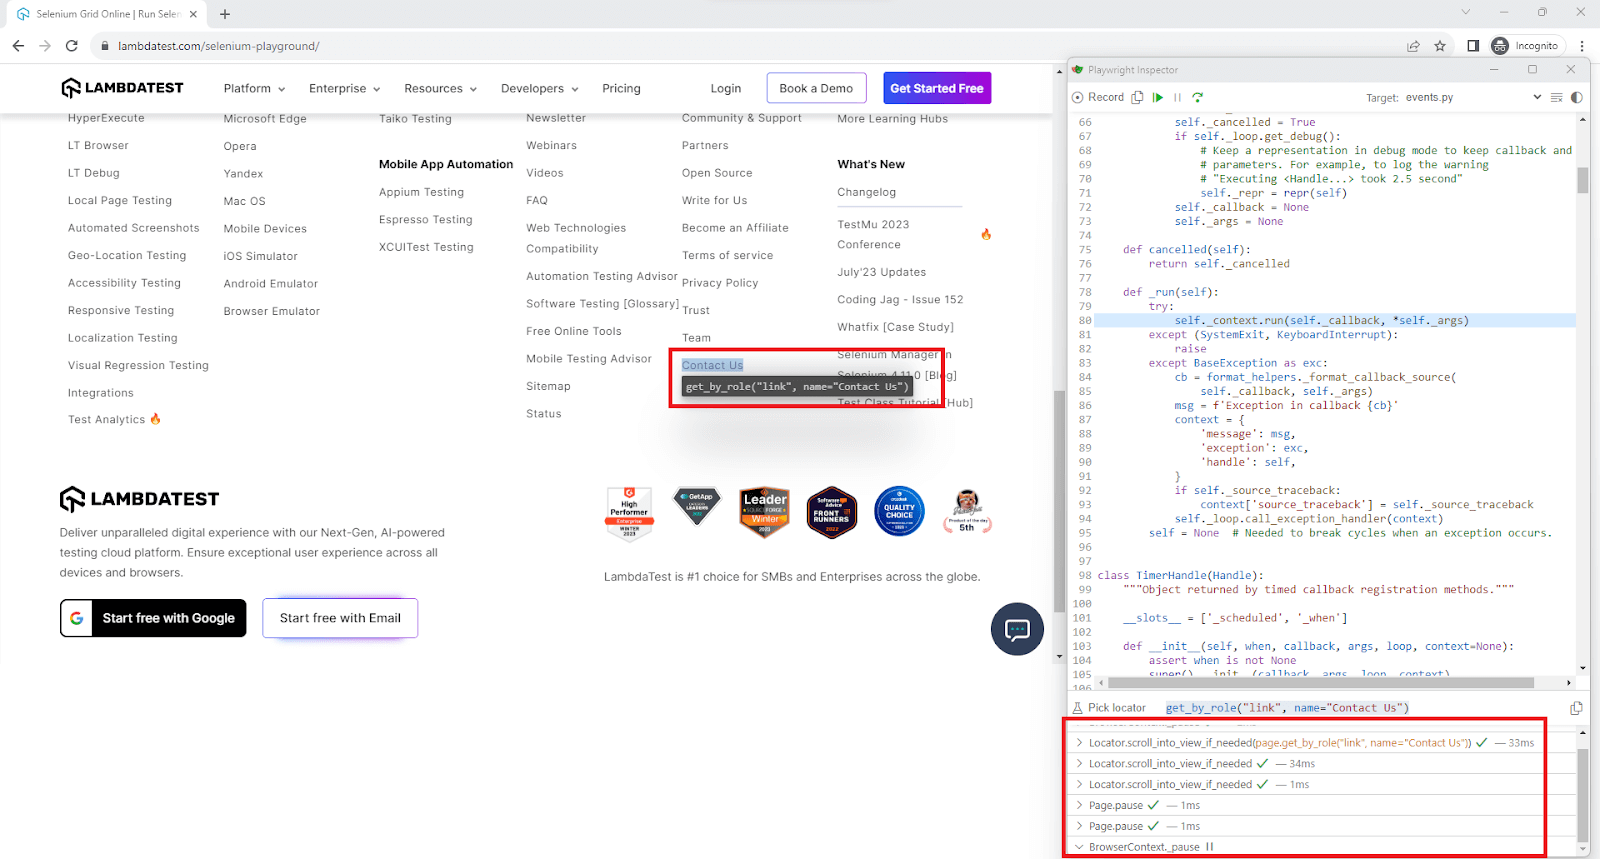
The actionability logs highlighted at the bottom right clearly show the successful scroll.
Step 6

The page.close() closes the session and completes the test.
Execution
The test can be executed using the following command.
pytest -v

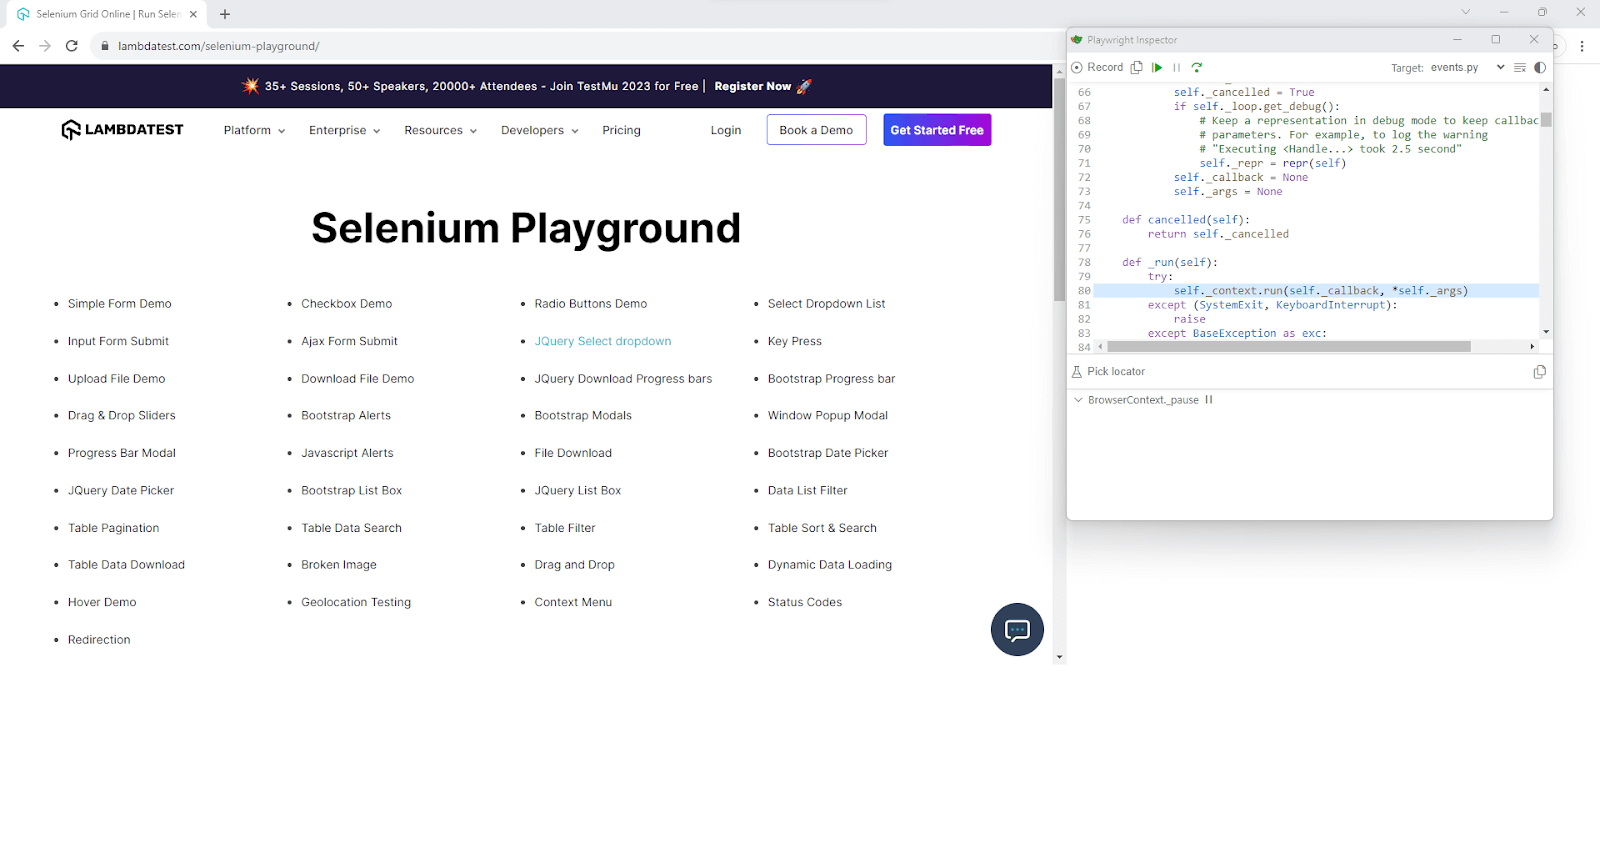
Before execution of the scroll_into_view_if_needed() method.
After execution of the scroll_into_view_if_needed() method.
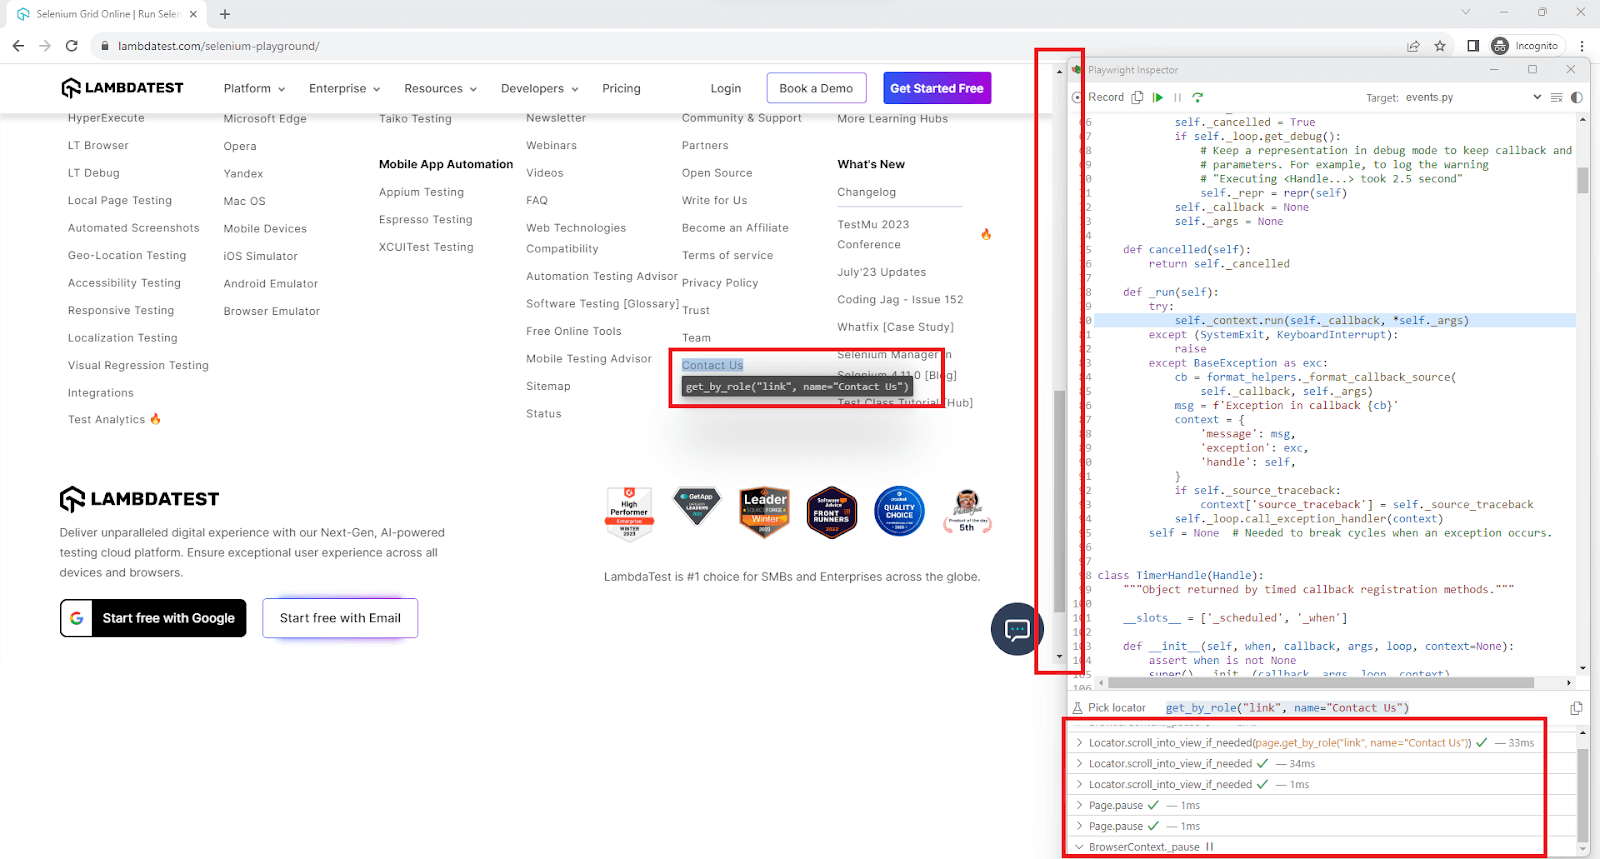
Since we also have the expect() assertion, the test passes as the ‘Contact Us’ element is visible.

Scenario: Element visible in the current viewport
|
Implementation
Here is the complete implementation of the test.
Code Walkthrough
The code for this scenario is identical to the scenario we saw before, except for the element that we are locating, which has changed to ‘Context Menu’. Let us do a walkthrough of the same.
Step 1

Navigate to the test website using the page.goto() method.
Step 2

This step changes from scenario #1 we saw above, and we look for the ‘Context Menu’ element, which is already in the viewport.
Step 3
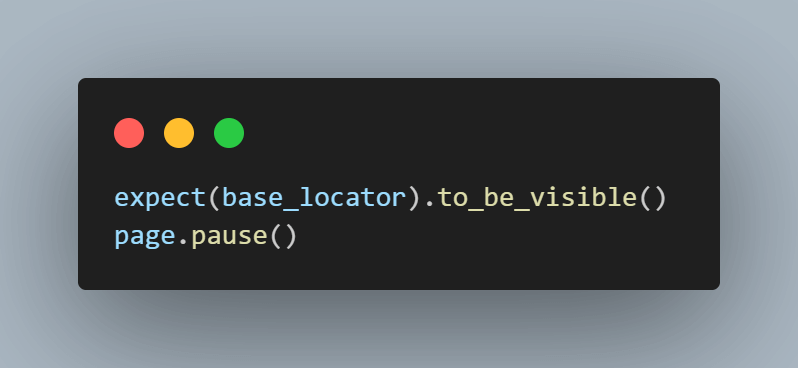
We use the Playwright expect() assertion to make the element ‘Context Menu’ visible. The page.pause() will pause the test execution.
Step 4
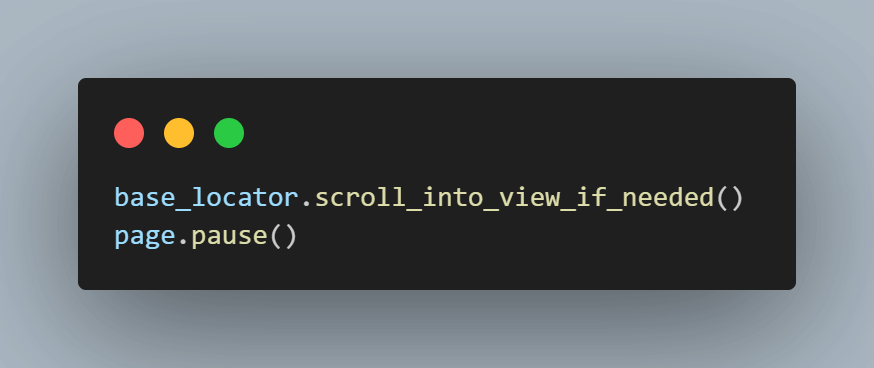
On the base_locator, we call the scroll_into_view_if_needed() method. The page.pause() is used again to pause the test execution and ensure the browser does not close.
As we can see, the ‘Context Menu’ is already presented in the viewport. So, the scroll_into_view_if_needed() will be ineffective.
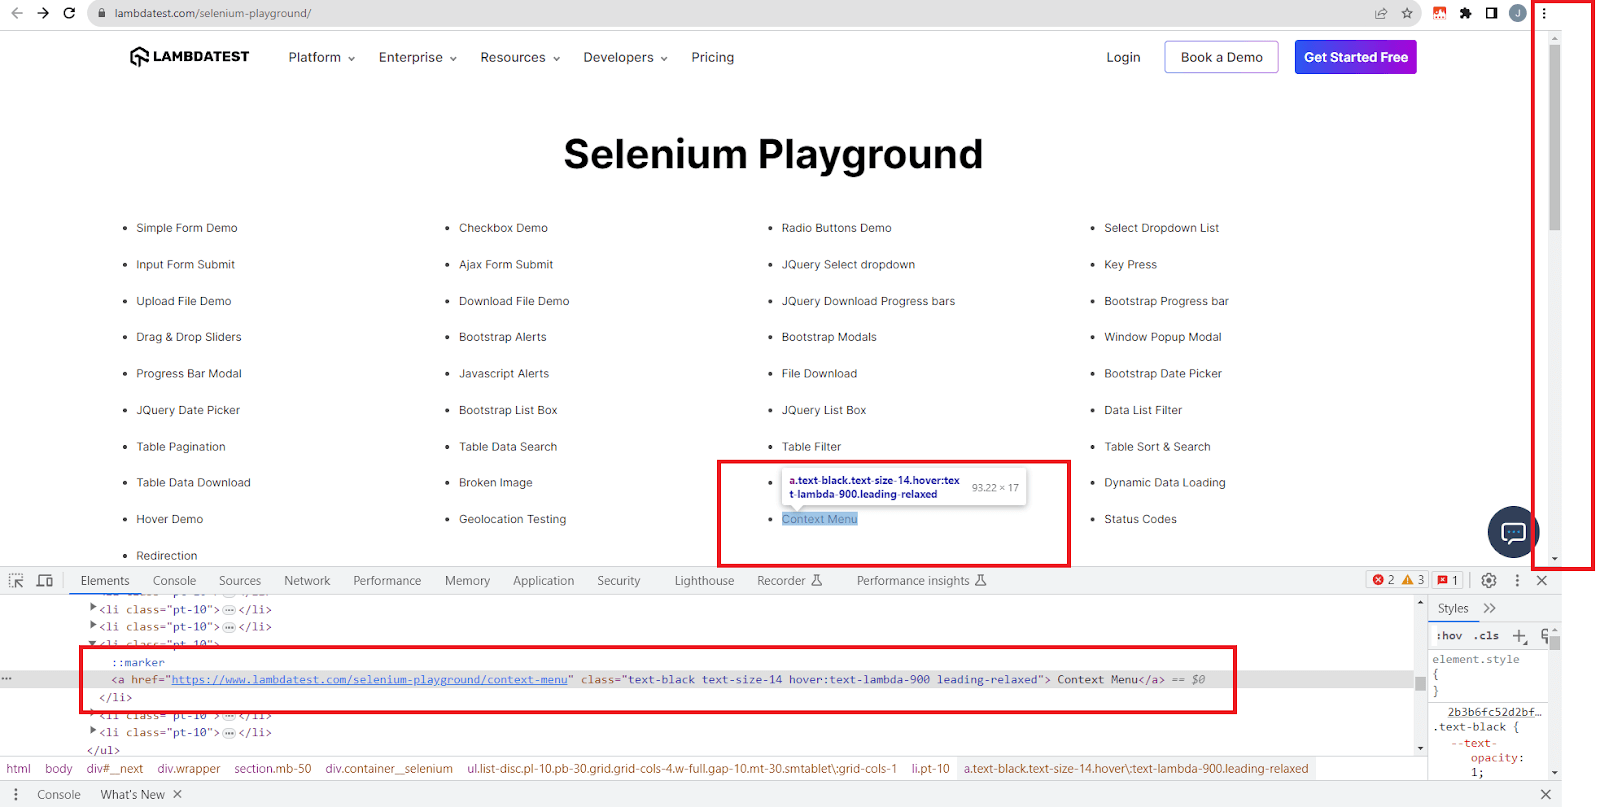
Execution
A single test uses the below command.
pytest -k test_scroll_into_view_if_needed_element_already_in_viewport
As we can see, the element has been located, but scrolling was not required since the ’Context Menu’ element is present in the viewport itself.
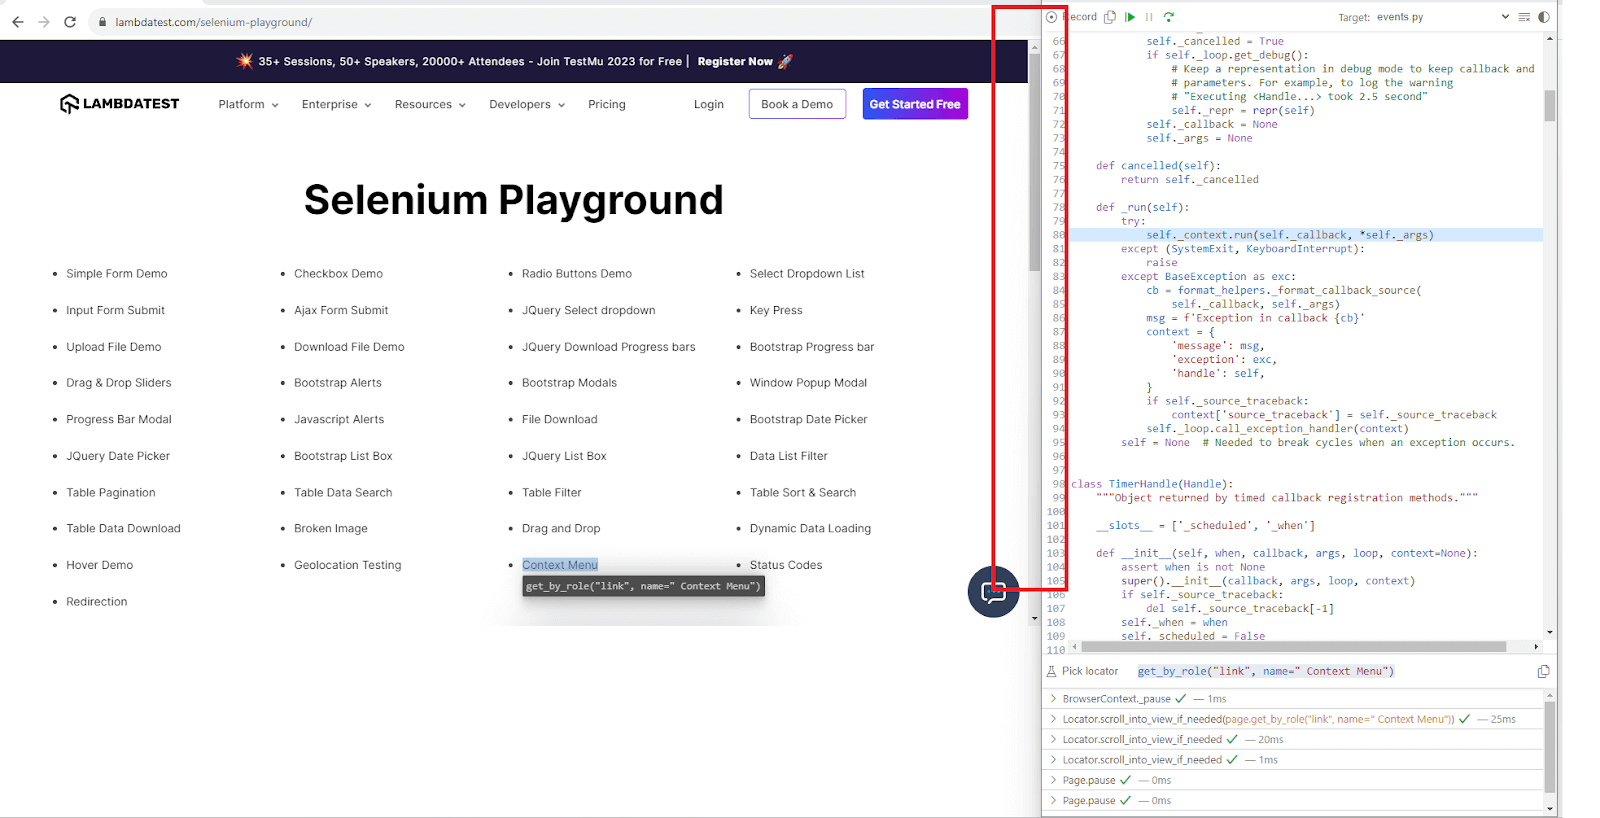
Here are the test completion logs from the VS Code terminal.

This marks the completion of the explanation of the scroll_into_view_if_needed() method. The important takeaway for this method is that the scroll to an element in Playwright happens only if the located element is not present within the viewport. If it is already present, the method takes no action.
Let us move on to the second method, which can help perform the scroll action, which is the mouse.wheel().
Demonstration: Using the mouse.wheel() Method
Using the Mouse wheel to scroll to an element in Playwright in either the downward (or upward) direction is the most preferred way users navigate the web page. Playwright provides a mouse class that helps users simulate the actions that can be performed using a mouse.
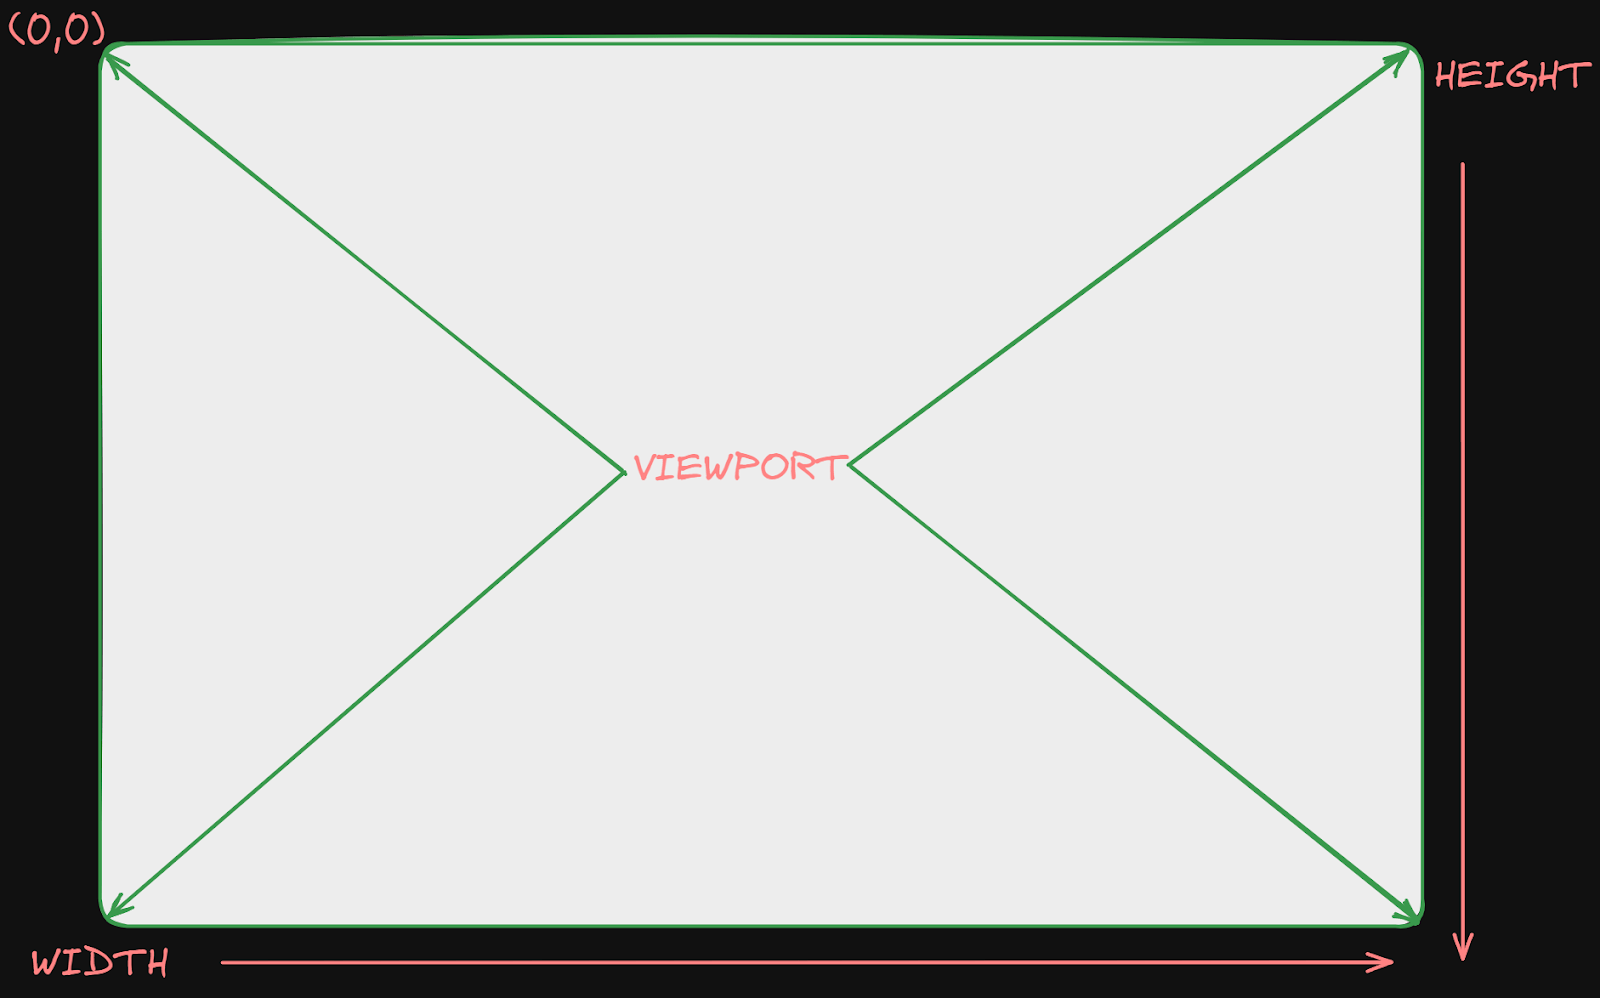
The mouse class operates relative to the top left corner of the viewport, i.e., the top left of the web page is considered the starting point or the 0,0 position.
While the mouse class API is very comprehensive and lets users perform all the actions allowed by an actual Mouse, the purpose of this blog is limited to exploring the wheel() method.
Test Scenario: Using the mouse.wheel()
Lazy-loading gained prominence with the emergence of the HTML5 specification and the proliferation of mobile devices.
It is a web development technique that aims to improve websites’ performance and user experience by deferring the loading of certain elements, such as images, until they are needed. By implementing lazy-loading, developers can optimize page loading times, reduce bandwidth usage, and enhance a website’s overall speed and responsiveness.
Consider this LambdaTest Demo eCommerce website, which uses a lazy-load tag to improve page load times by loading images outside the viewport only when the user scrolls down to them.
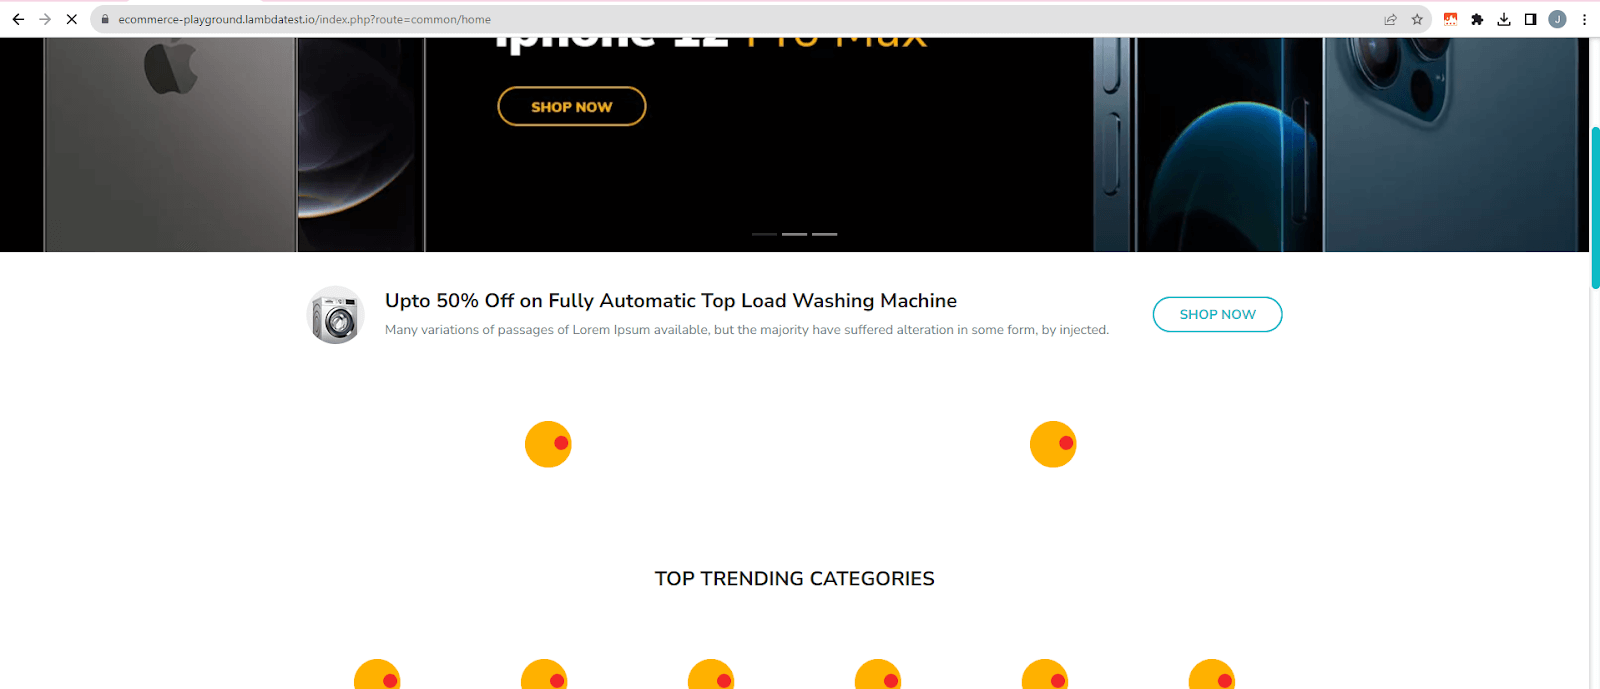
Now that we understand what lazy-loading is and what the benefits are, let us understand how to use the mouse.wheel() method to test websites that employ lazy loading.
|
Implementation
The complete test code is as below.
Code Walkthrough
Step 1

We first navigate to the website under test using the page.goto() method.
Step 2
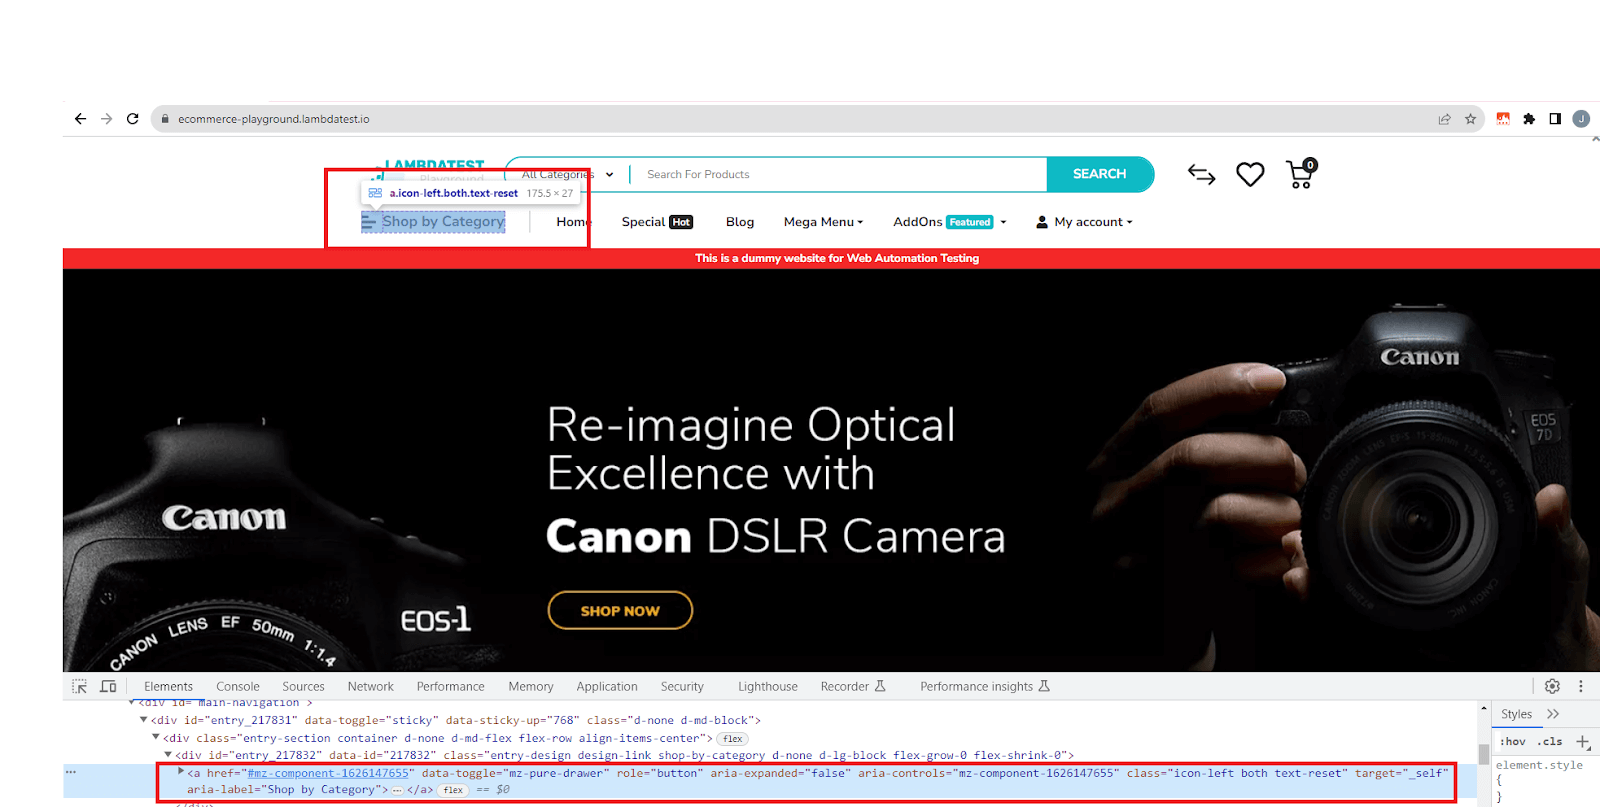
As we can see, the ‘Shop by Category’ element is a button and we use the Playwright Locator get_by_role() and perform the click() action on the located element.

Step 3
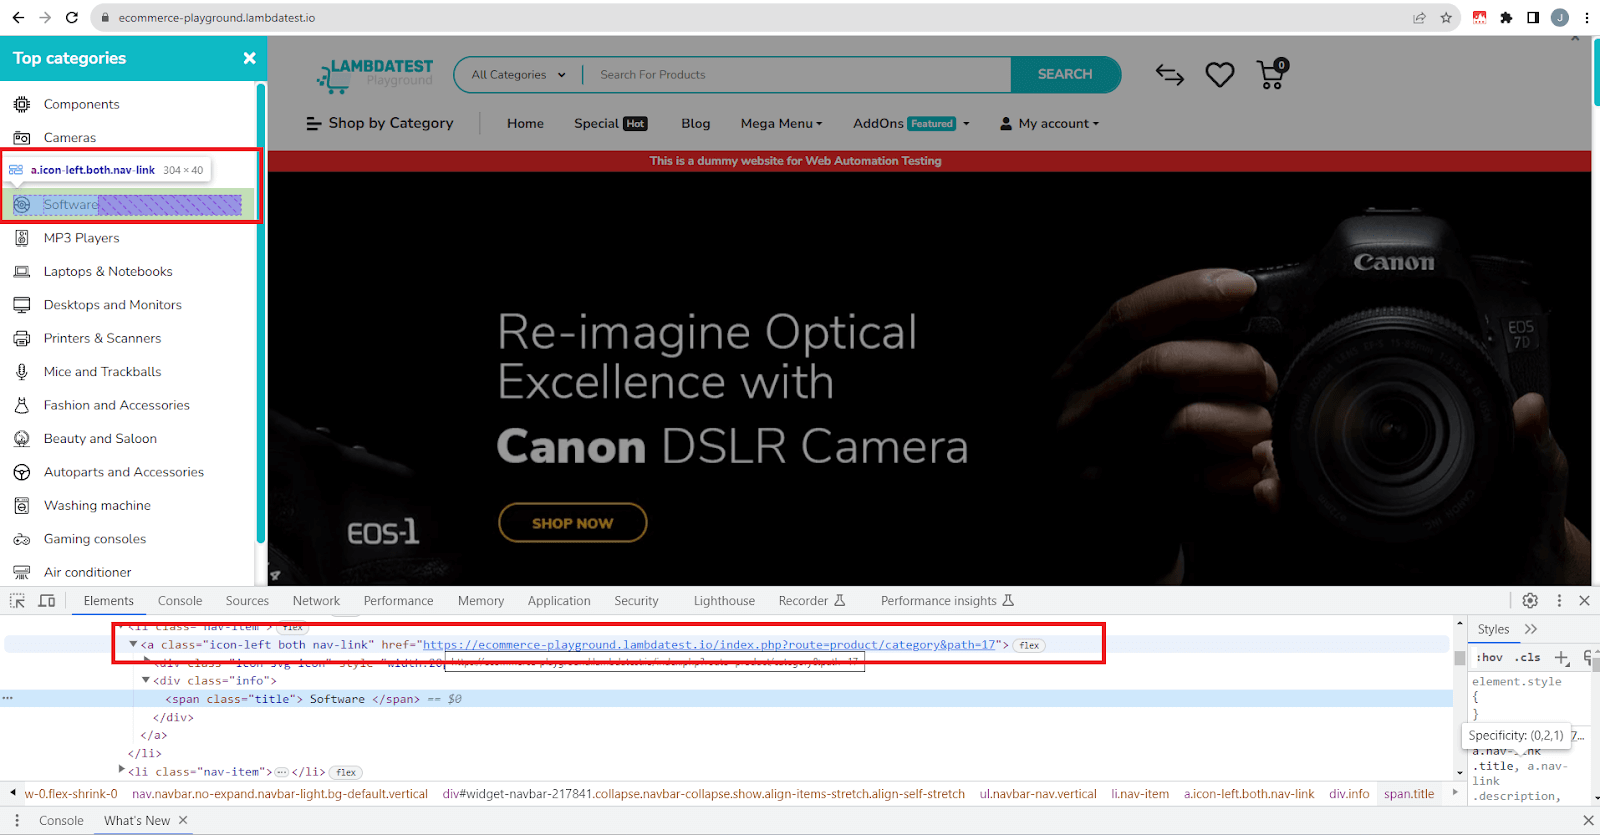

The ‘Software’ sub-menu is a link and can be accessed using the get_by_role() locator using the ‘link’ role & name=’Software’.
On the located element, we perform the click() action.
Step 4
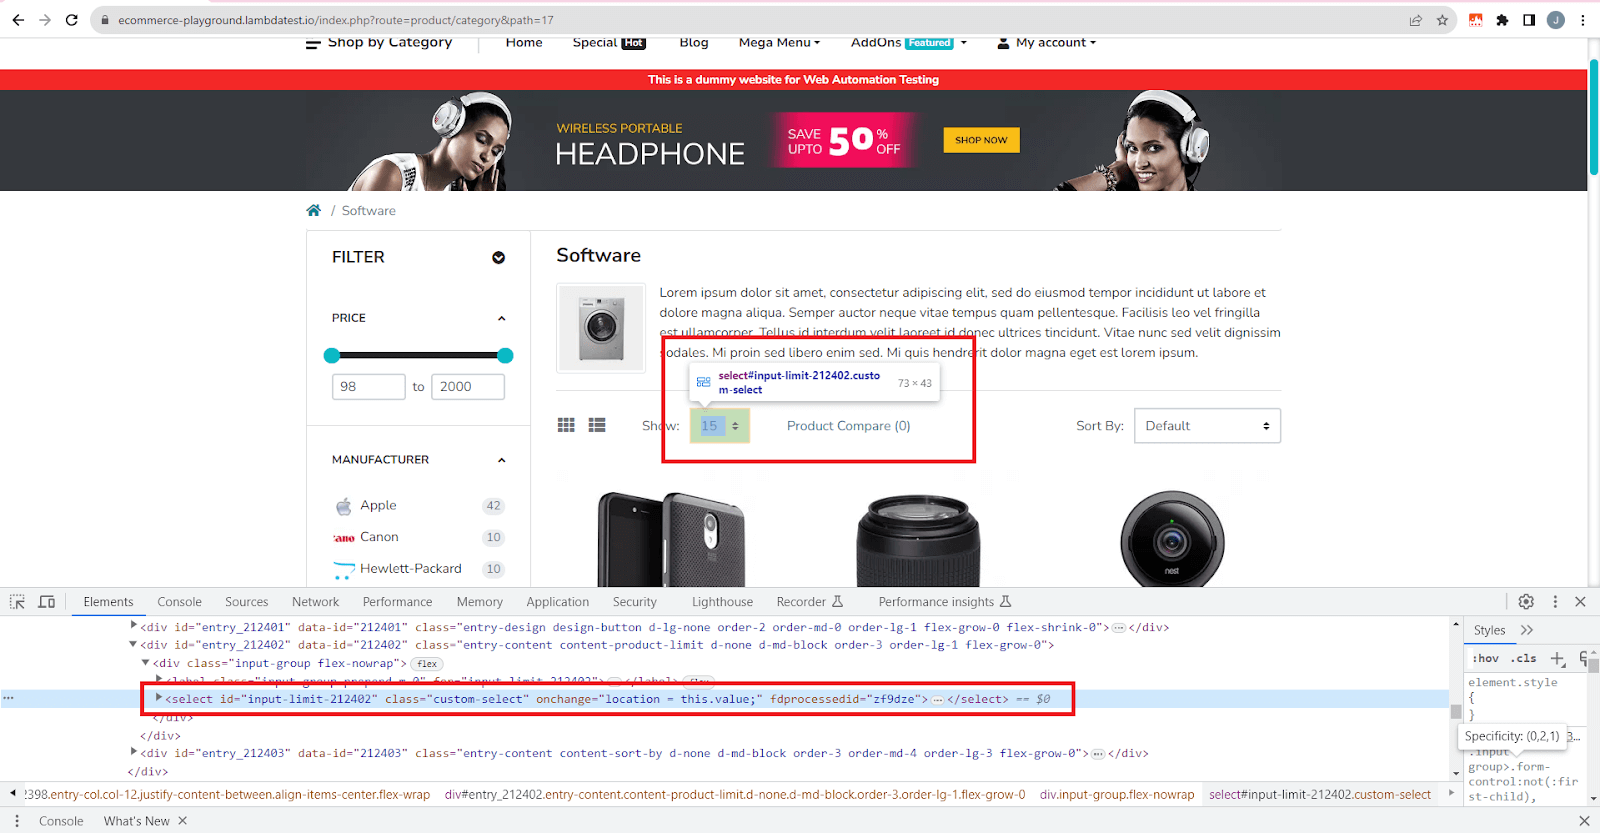
The subsequent page that opens by default displays 15 items and is present within a combobox element.
We located the combobox and increased the display option to 75.

Step 5
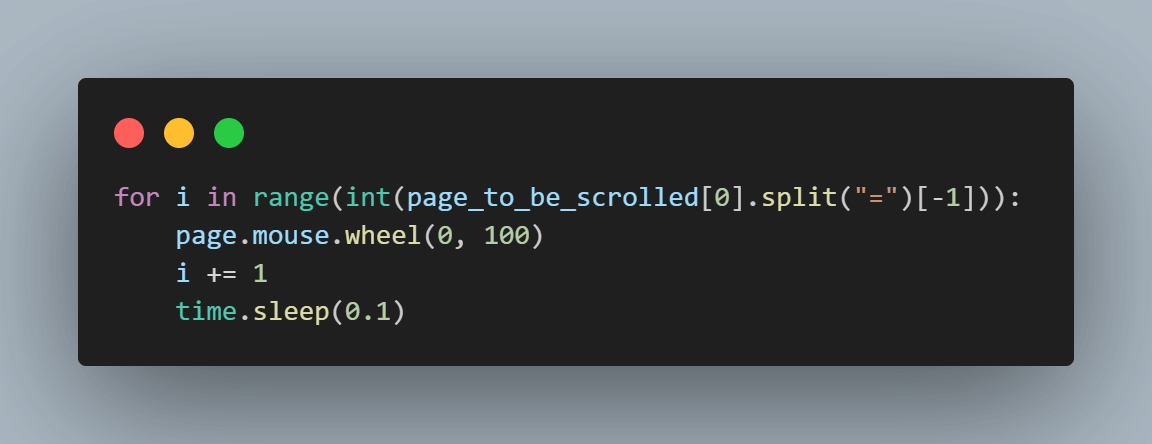
page_to_be_scrolled[0].split(“=”)[-1] extracts the value 75 from the page URL, and we use this value to decide the vertical distance of the scroll dynamically.
The page.mouse.wheel(0,100) indicates a scroll of 0 pixels horizontally and 100 pixels vertically. We can either increase or decrease this value for faster or slower scrolling.
We do this for 75 iterations based on the total number of objects on the page.
Execution
Let’s execute the single test using the following command.
pytest -k “test_scroll_using_mouse_wheel”

As we can see, the scrolling is seamless and loads the image media as we scroll to an element in Playwright downwards.
Demonstration: Using the keyboard.press() Method
The Playwright keyboard class provides an API for managing a virtual keyboard. The high-level API is keyboard.type(), which takes raw characters and generates proper keydown, keypress/input, and keyup events on your page.
We can use the keyboard.down(), keyboard.up(), and keyboard.insert_text() to simulate actions as if they were generated from a real keyboard by a user.
For this blog, we are most interested in the keyboard.press() method that takes keys such as PageDown, PageUp, ArrowUp, ArrowDown, etc, as inputs and performs the relevant action.
Test Scenario: Using the keyboard.press()
|
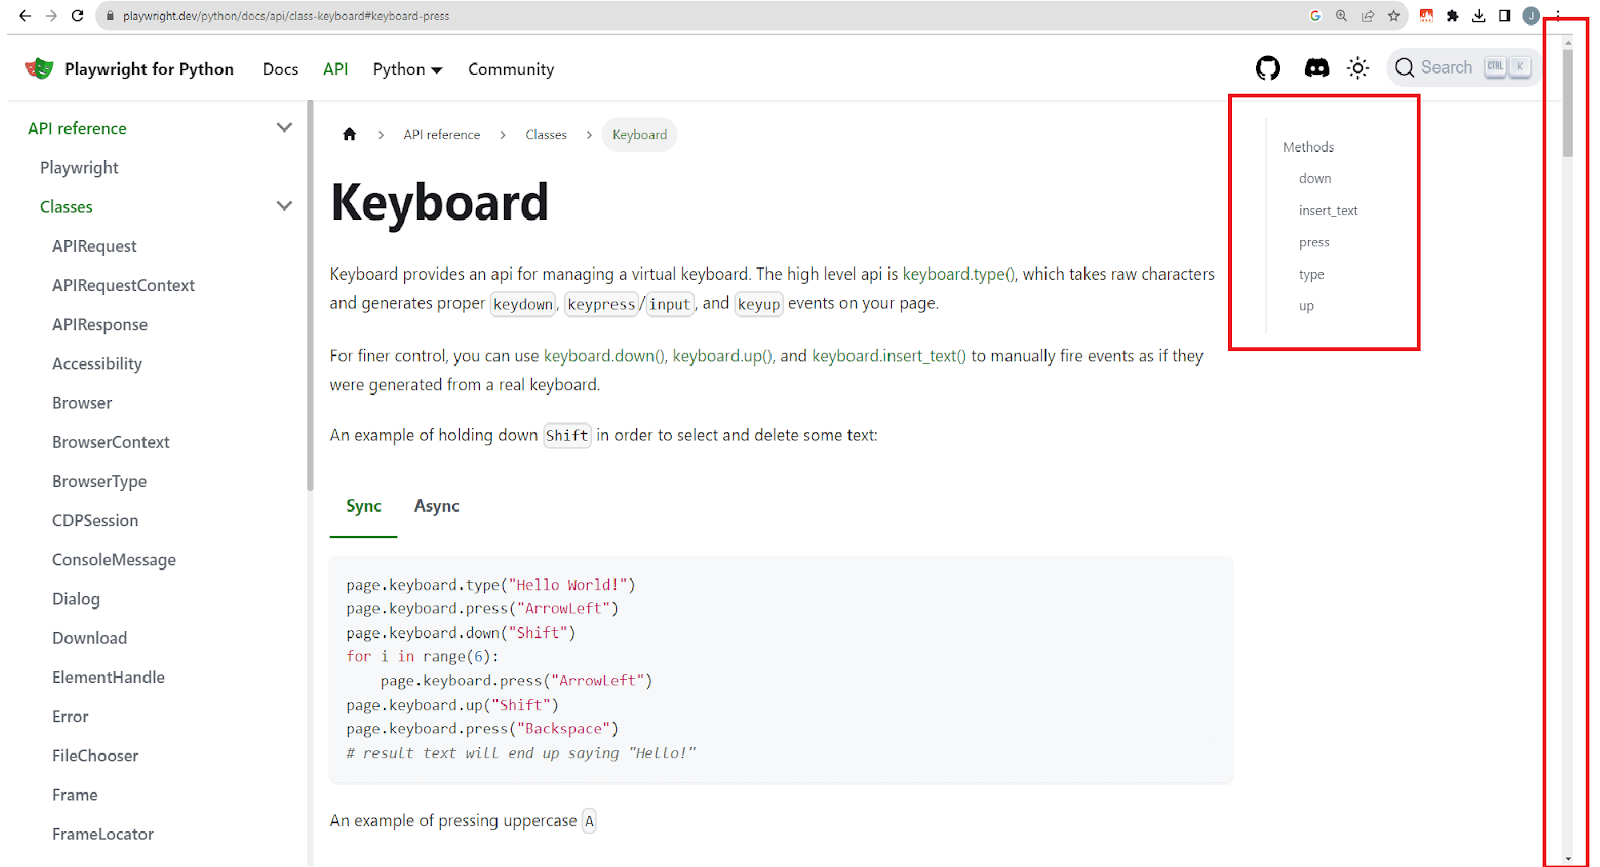
As can be seen, the keyboard API page has a few sections that extend beyond the current viewport and is a good candidate to test out the ability of the API itself to simulate scrolling.
Implementation
Let us look at the implementation of the code first.
Code Walkthrough
Let us now break down the implementation and understand it step-by-step.
Step 1

We navigate to the Playwright keyboard API page using the page.goto() method.
Step 2

On the page we call the keyboard.press() and perform the ‘PageDown’ action. The delay ensures we do not scroll to an element in Playwright too fast by introducing a 1000ms delay between the PageDown key press and release.
The for loop repeats the PageDown press five times to demo the scrolling.
Step 3
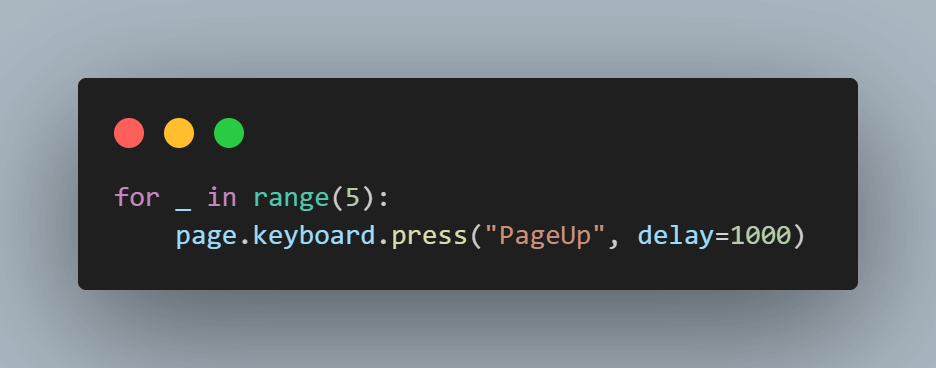
This step is similar to step 1, except we scroll to an element in Playwright in the upward direction using PageUp.
Again, the delay ensures we don’t scroll too fast and can see the scrolling in action.
Step 4
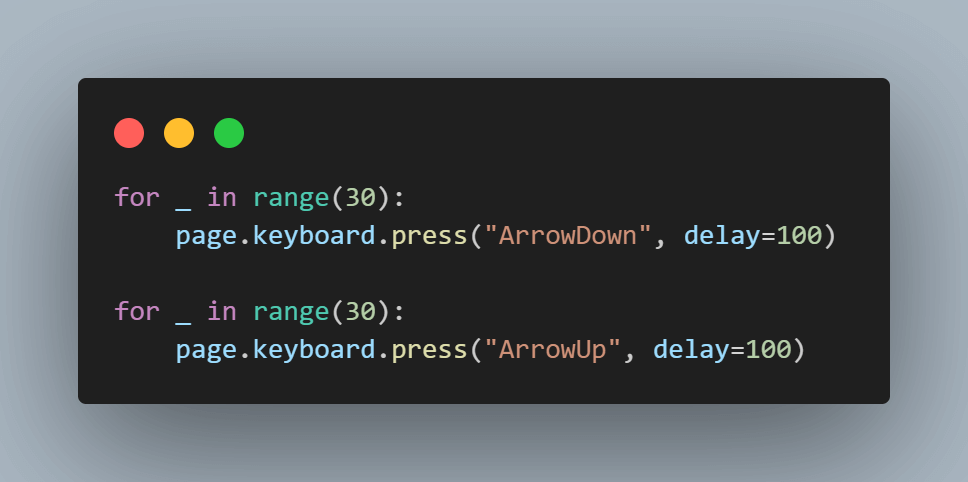
In the next step, we simulate the scroll to an element in Playwright in a downward direction, but this time using the down arrow key ArrowDown and back in the upward direction using ArrowUp.
Execution
Now, let’s execute the single test and check if the scrolling works as expected.
pytest -v “test_scroll_using_keyboard_press”

Implementing Horizontal Scrolling in Playwright
From a usability perspective, horizontal scrolling is generally considered a poor design choice. But there still may be scenarios where horizontal scrolling is necessary; hence, it’s important to test scrolling in the horizontal direction.
To demonstrate how we can achieve horizontal scrolling in Playwright, we will use this demo codepen website, which implements an image gallery.
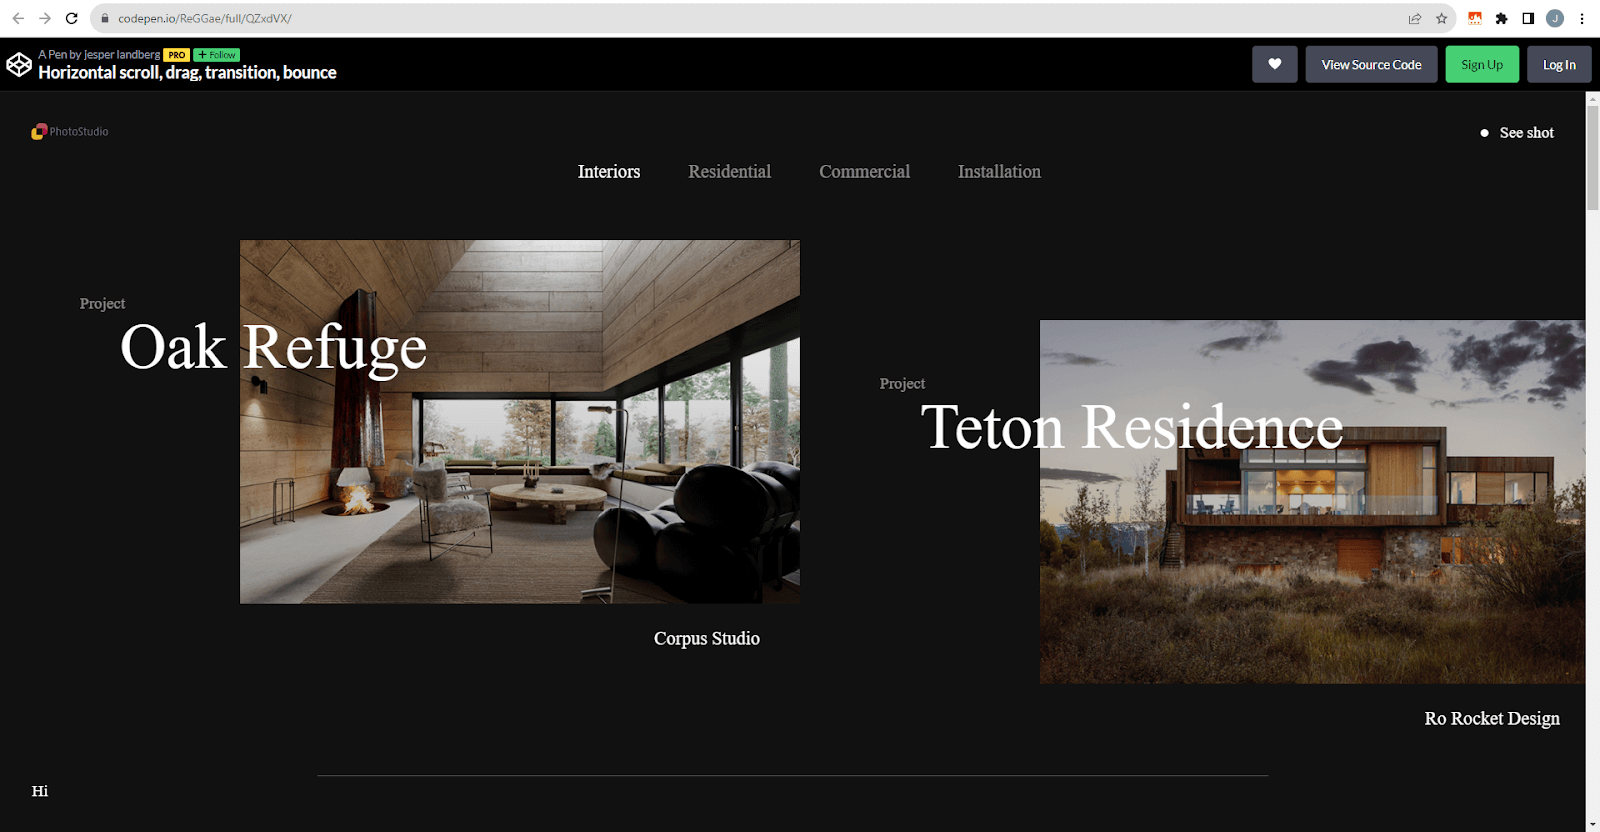
Test Scenario: Implement Horizontal Scrolling
|
Implementation
The complete test code is as below.
Code Walkthrough
Let us now break down the implementation and understand it step by step.
Step 1
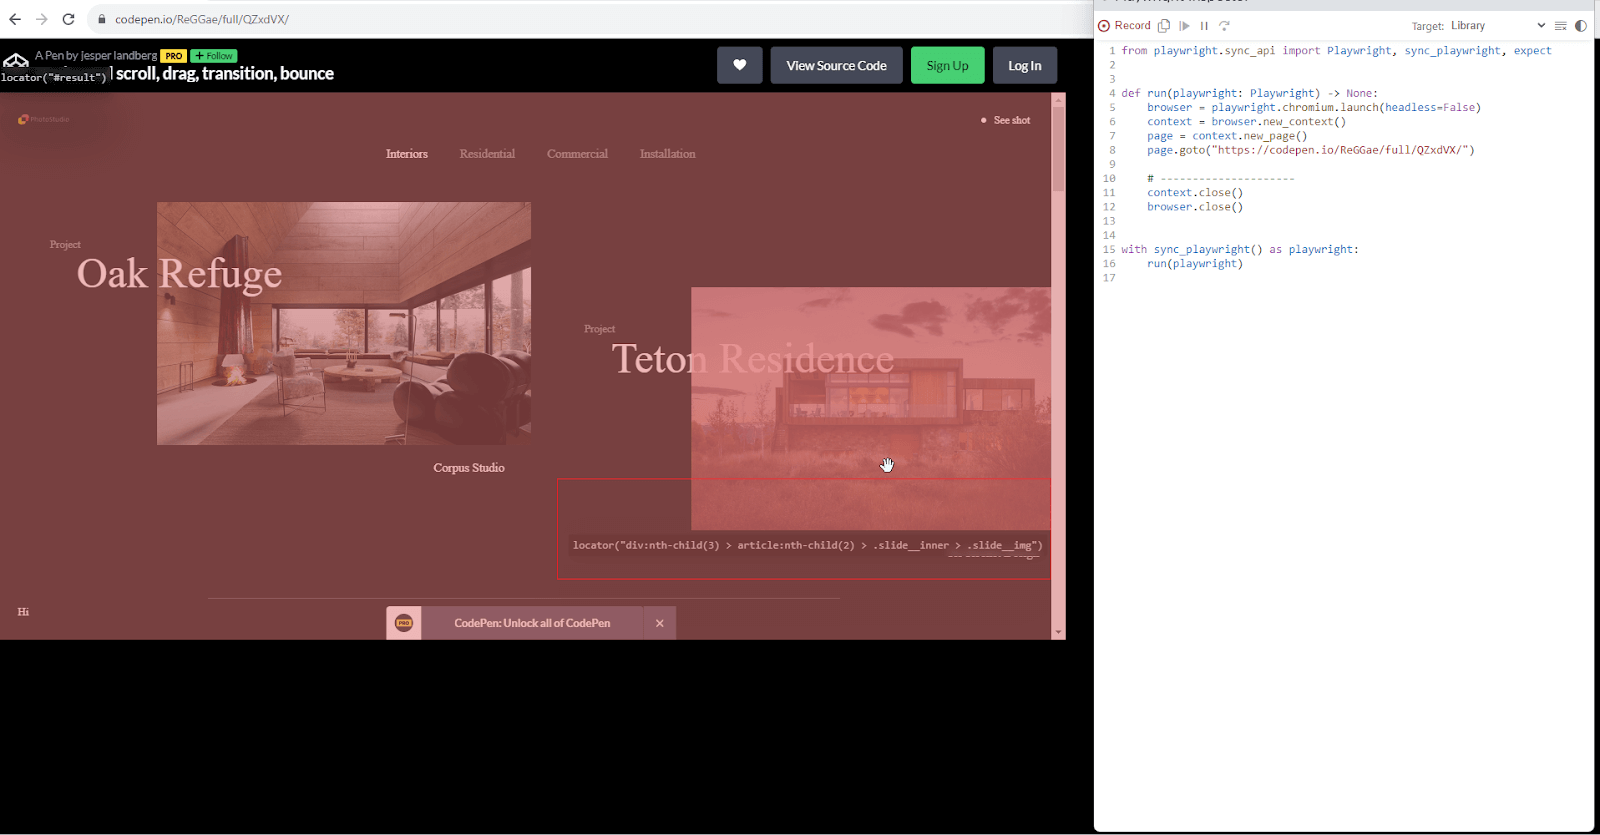
The demo website renders the image gallery within a < iframe > tag with the name result under a bunch of < article > tags.
We can use the Playwright Codegen tool to obtain the exact locator for the image gallery. It reveals that all the images are nested under div:nth-child(3) and article numbers 1,2,3,4,5.
So, the first image can be located using
div:nth-child(3) > article:nth-child(1) > .slide__inner > .slide__img"
The second image can be located using
div:nth-child(2) > article:nth-child(1) > .slide__inner > .slide__img"
and so on till article:nth-child(5) for the last image
Step 2

We use a Python for loop and combine it with the random.choice() method to randomly locate one of the images within the gallery. Then, we scroll to the located element.
The number 50 in the for loop has been chosen randomly and only serves the purpose of scrolling 50 times. It can be any arbitrary number.
The sleep is added so that we can see the scrolling in action.
Execution
Let’s execute the single test using the following command:
pytest -k “test_horizontal_scrolll”

Are you eager to showcase your skills as a Playwright automation tester? Look no further than LambdaTest’s Playwright 101 certification program! This program is designed for developers who want to demonstrate their expertise in utilizing Playwright to comprehensively test modern web applications.
Conclusion
In conclusion, scrolling stands as a fundamental bridge between users and the wealth of content that modern websites offer. It is not just a navigational tool; it’s a linchpin for user engagement, content accessibility, and, ultimately, a website’s success.
Playwright, a versatile automation tool, equips testers with a powerful arsenal to handle scrolling. Methods like scroll_into_view_if_needed(), mouse.wheel(), and keyboard.press() enables testers to mimic user scrolling actions accurately.
Whether verifying lazy-loading functionality or assessing the rendering of off-screen elements, Playwright empowers testers to conduct comprehensive and reliable automation testing of scrolling, ensuring that web applications perform optimally and deliver exceptional user experiences.
In an era where scrolling plays a pivotal role in user interaction, Playwright is an invaluable ally in the pursuit of flawless web development and testing.
Frequently Asked Questions (FAQs)
How do you scrollTo to a specific element in Playwright?
In Playwright, you can use the element.scrollIntoView() method to scroll to a specific element. This method scrolls the element into the visible area of the viewport.
How to scrollTo a specific element in JavaScript?
To scroll to a specific element in JavaScript, you can use the scrollIntoView method. This method is widely supported in modern browsers and allows you to scroll an element into the visible area of the browser window.
Got Questions? Drop them on LambdaTest Community. Visit now


