How to Generate NUnit Reports
Himanshu Sheth
Posted On: June 24, 2024
![]() 303336 Views
303336 Views
![]() 20 Min Read
20 Min Read
This article is a part of our Learning Hub. For more in-depth resources, check out our content hub on Selenium NUnit Tutorial.
Test reports help track how the activities related to automation testing have evolved over a period of time. The same principle also applies when using NUnit/xUnit/MSTest for automated browser testing. Of the lot, NUnit is the most-used test automation framework for all .Net languages. NUnit reports can serve as a considerable value addition to the tests performed using the said framework.
Let’s look at NUnit report generation and how seamlessly you can integrate the NUnit reporting tool in the test implementation. As far as Selenium C# is concerned, Extent and Allure are the preferred NUnit reporting tools. Both are third-party tools that have to be installed from the NuGet gallery, either from the Visual Studio UI or using the Package Manager Console commands.
TABLE OF CONTENT
What Are ExtentReports?
ExtentReport is a popular multi-language test reporting tool that gives in-depth information about the status of the tests. The Extent framework lets you create interactive and detailed test reports. Apart from the .NET framework, ExtentReport is also available for the Java language. ExtentReports (or Extent Reports) is an open-source reporting library, and version 5 of ExtentReports is licensed under Apache 2.0.
The Extent Framework source code is available on GitHub. As of writing this article, ExtentReports 5.0.4 was the latest version of ExtentReports for the .NET framework.
Here are the major feature upgrades in ExtentReports 4, most of which are also available for Community Edition of this NUnit report generator:
- ExtentReports 4 provides reporters for BDD/Gherkin, non-BDD, and both. Here are some of the reporters available with ExtentReports 4.
- Provision for adding base64 screenshots to logs through the CreateScreenCaptureFromBase64String method of MediaEntityBuilder class.
- Numerous layout improvements for the BDD view.
- Support for adding a Gherkin dialect other than ‘en’ or English keywords. The API for setting the dialects is inline with the dialect defined in the Gherkin spec. For example, you can set the Gherkin dialect to German (or de) by using the command extent.GherkinDialect = “de”; in the test code.
- The ExtentHtmlReporter() method, which is newly introduced in ExtentReports 4, is used for creating HTML reports. ExtentV3HtmlReporter method was earlier used for creating HTML reports with ExtentReports 3.
Why Use ExtentReports for C# Automation?
There are several advantages of using ExtentReports for automation testing using C#; the major ones are below:
- It is easy to setup and integrate ExtentReports with C# frameworks like NUnit, MSTest, and xUnit and Selenium Java frameworks like TestNG, JUnit, etc.
- It helps generate super-customizable HTML test reports that help visualize the status of the tests executed on the Selenium Grid.
- It has stepwise and pie-chart representations in the NUnit test report provide top-level information on how the tests have fared (i.e., how many passed/failed) on the execution front.
- It lets you customize the report’s look & feel through an XML based configuration file where you can input details such as report theme (Standard/Dark), report title, document title, etc.
- It makes it easy to track multiple test cases that are a part of a single test suite.
- It can be used with ease even when the test scenarios are executed parallel on a Selenium Grid.
- Each test case is accompanied by vital information like logs, results, and the overall time to execute the test.
- It lets you capture the ScreenShot with every test step. The captured screenshots can help identify the exact step at which the test has failed.
- Methods OnNodeAdded(), OnTestStarted(), OnScreenCaptureAdded(), etc., let you perform actions (e.g., adding relevant logs) when that particular ‘event’ (i.e., test has started, screenshot is captured, the test is removed, etc.) has occurred in the tests.
ExtentReports 5 is a significant upgrade over ExtentReports 4, as a lot of new features are introduced in version 5 of ExtentReports.
 Note
NoteTest Your Websites and Web Apps Using Selenium NUnit. Try LambdaTest Today!
Using ExtentReports With NUnit and Selenium
For the demonstration, we will use the Community Edition of ExtentReports 4.
The Extent framework follows an Observer pattern where the reporter (e.g., ExtentHTMLReporter) attached to the framework becomes an ‘observer’ and is notified of changes like the creation of logs and logs, etc. Some of the notified changes result in content updation in the report. Though the Extent framework offers numerous capabilities, we would require only certain classes for report generation in NUnit.
Here are the two major classes that are frequently used when creating NUnit report using the Extent framework:
- ExtentHtmlReporter (for version 4.x) or ExtentV3HtmlReporter (for version 3.x)
- ExtentReports
- ExtentTest
- MediaEntityBuilder
We would be using the ExtentHtmlReporter method in the code as our demo will be with ExtentReports 4.
The ‘ExtentHtmlReporter’ class
The ExtentHtmlReporter class is used for generating Extent Report in the HTML format in the path specified as the argument.
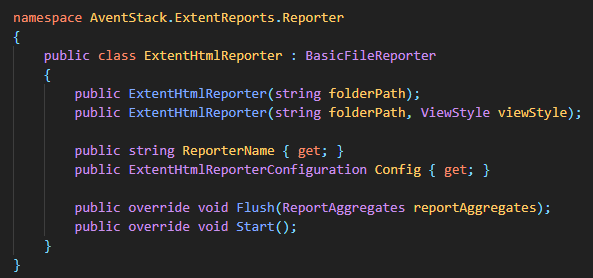
It supports two reporter configurations – Default and SPA (Single-Page Applications).

It also provides the flexibility to load the report configurations from a configuration XML file. The config XML file lets you set the theme, document encoding format (e.g., UTF-8), document title, report name, report headline, and more.
Syntax (or sample usage)
|
1 2 3 4 5 6 |
String reportPath = @";Folder-Path\\report.html"; String configPath = @";Folder-Path\\report-config.xml"; var htmlReporter = new ExtentHtmlReporter(reportPath); htmlReporter.LoadConfig(configPath); |
The first step is creating an object of the class ExtentHtmlReporter. The optional step is loading the custom report configurations from the configuration XML file. Now that we have started the reporter (i.e., Extent HTML Reporter), the next step is creating the ExtentReports and attaching the reporter(s).
The ‘ExtentReports’ class
The ExtentReports class is primarily used for logging the test steps in the generated HTML report, the path of which was configured using the instance of the ExtentHtmlReporter class.
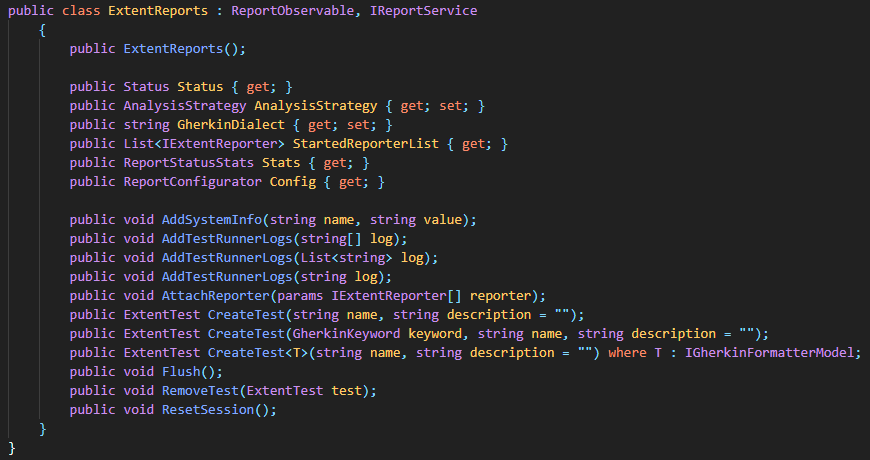
The AttachReporter method of the ExtentReports class is used for attaching the specified reporter.
|
1 2 3 |
var _extent = new ExtentReports(); /* Attach reporter(s) */ _extent.AttachReporter(htmlReporter); |
The AddSystemInfo method is used for adding system or environment-related information to the report. This information is automatically added to the started reporters (i.e., ExtentHtmlReporter).
|
1 2 3 4 |
_extent.AddSystemInfo("Host Name", "Cloud-based Selenium Grid on LambdaTest"); _extent.AddSystemInfo("Environment", "Test Environment"); _extent.AddSystemInfo("UserName", "Himanshu Sheth"); extent.AddSystemInfo("os", "Windows 10"); |
The Flush method writes (or updates) the specified reporter’s test information (i.e., Extent HTML Reporter) to the destination type. In most scenarios, the Flush method should be called only ‘once’ in the [OneTimeTearDown] attribute available in the NUnit framework.
_extent.Flush();
Syntax (or sample usage)
|
1 2 3 4 5 6 7 |
public static ExtentReports _extent; _extent = new ExtentReports(); _extent.AttachReporter(htmlReporter); _extent.AddSystemInfo("Host Name", "Cloud-based Selenium Grid on LambdaTest"); _extent.AddSystemInfo("Environment", "Test Environment"); _extent.AddSystemInfo("UserName", "Himanshu Sheth"); |
The ‘ExtentTest’ Class
The ExtentTest class contains methods for the following tasks:
- Creating tests
- Creating nodes
- Log test steps in the HTML report
- Assigning Device Category
- Adding Screen Capture from a Base64 String
- Adding Screen Capture from a local Path
The CreateTest method is an overloaded method that is used for BDD and non-BDD tests. For non-BDD tests, the CreateTest method is used for setting the test name and test description (optional). It returns an ExtentTest object. Sample usage of the CreateTest method is below:
|
1 |
_test = _extent.CreateTest("Testing Google Search for LambdaTest"); |
When creating tests using the Gherkin instance, the Gherkin keyword can be directly passed in the CreateTest method.
|
1 |
var feature = extent.CreateTest(new GherkinKeyword("Feature"), "Browser version"); |
The Log method of the ExtentTest class is used for logging the test status along with a description that needs to be printed on the resultant report. The commonly used statuses are Pass, Fail, and Skip. In totality, the following statuses are available:
- Pass
- Fail
- Fatal
- Error
- Warning
- Info
- Skip
- Debug
In terms of hierarchy, Fatal has the highest level in the hierarchy, and Pass has the lowest (and default) status in the hierarchy. Shown below is the hierarchy from Lowest to Highest:
The RemoveTest method is used to remove a test created using the CreateTest method or CreateNode method.
|
1 2 |
var _test = _extent.CreateTest("Test").Fail("reason"); extent.RemoveTest(_test); |
Screenshots serve as huge value addition in the NUnit test reports. Before ExtentReports 4, the traditional methodology for capturing page screenshots had to be used. With ExtentReports 4, you can add files and base64 snapshots to the tests.
The AddScreenCaptureFromPath method lets you add screenshots to the tests. The image is saved on the disk and referenced using the < img > attribute in the report. Screenshots can be added to the logs, irrespective of whether the test has passed or failed.
|
1 |
test.Fail("Test information").AddScreenCaptureFromPath("screenshot-name.png"); |
Syntax (or sample usage)
|
1 2 3 4 5 |
public ExtentTest _test; _test = _extent.CreateTest("Testing Google Search for LambdaTest"); _test.Log(Status.Fail, "Fail"); test.Log(Status.Fail, "fail"); |
The ‘MediaEntityBuilder’ Class
The MediaEntityBuilder class in the Extent framework lets you add screenshots to logs, as the logs do not accept image paths directly. The CreateScreenCaptureFromPath method of MediaEntityBuilder class should be used for adding a base64 encoded screenshot to the report.

The Build method is used along with CreateScreenCaptureFromPath so that it returns a MediaEntityModelProvider.
We would be covering both the ways (traditional screenshot capturing mechanism and CreateScreenCaptureFromBase64String method in ExtentReports 4) for capturing page screenshots in the demonstration of this NUnit reporting tool.
Syntax (or sample usage)
|
1 2 3 |
var mediaModel = MediaEntityBuilder.CreateScreenCaptureFromPath("screenshot-name.png").Build(); test.Fail("Test details", mediaModel); |
Now that we have covered the capabilities of ExtentReports 4 as an NUnit report generator let’s look at how we can use ExtentReports to generate with NUnit reports with Selenium on the local grid.
How to Generate NUnit Reports on Local Grid?
To generate an ExtentReport in the NUnit framework using Selenium, you can follow the steps given below:
- Install all the required dependencies for Selenium WebDriver and ExtentReports using NuGet packages. You can install these packages using the NuGet Package Manager Console.
12Install-Package Selenium.SupportInstall-Package ExtentReports
- Create a SetUpFixture class to define the SetUp() and TearDown() methods. In this class, create an instance of the ExtentReports class and specify the report file location using the same instance.
The complete file will look as shown below:
1234567891011121314151617181920212223242526using AventStack.ExtentReports;using AventStack.ExtentReports.Reporter;using NUnit.Framework;[SetUpFixture]public class ExtentManager{public static ExtentReports extent;public static ExtentTest? test;[OneTimeSetUp]public void SetUp(){ExtentSparkReporter htmlReporter = new ExtentSparkReporter("test-output/extent.html");extent = new ExtentReports();extent.AttachReporter(htmlReporter);}[OneTimeTearDown]public void TearDown(){extent.Flush();}} - Write NUnit test methods using Selenium WebDriver and log relevant information in the ExtentReport within each test method:
12345678910111213141516171819202122232425using NUnit.Framework;using OpenQA.Selenium;using OpenQA.Selenium.Chrome;[TestFixture]public class ExtentReportDemo{[Test]public void TestGoogleSearch(){ExtentManager.test = ExtentManager.extent.CreateTest("Test LambdaTest", "Verify navigation to LambdaTest");IWebDriver driver = new ChromeDriver();driver.Navigate().GoToUrl("https://www.lambdatest.com");ExtentManager.test.Pass("Navigated to LambdaTest homepage");// Perform search and assertionsdriver.Quit();ExtentManager.test.Pass("Closed the browser");}}
- Execute the created tests as NUnit tests and generate the ExtentReport, you can use your preferred method for running NUnit tests, such as through an IDE or command line. The generated report will be available in the location specified in the SetUp() method, which, in our case, is inside the test-output folder.
- Go to ‘Google.’
- Search for ‘LambdaTest.’
- Click on the first search result.
- Assert if the title of the newly opened webpage does not match with the expected title.
- Capture screenshot using GetScreenshot method of ITakesScreenshot interface (in OpenQA.Selenium Namespace).
- Capture screenshot in base64 encoded string format using CreateScreenCaptureFromBase64String method of the Extent framework. The CreateScreenCaptureFromBase64String method is only available with ExtentReports 4.
Test Execution:
Executing the above test code to generate ExtentReports in Selenium using NUnit will produce an output as shown below in the test-output folder:


How to Generate NUnit Reports on Cloud Grid?
Now, let’s demonstrate generating ExtentReports in NUnit and Selenium WebDriver on the cloud grid. To run tests, we will use cloud-based testing like LambdaTest. It is an AI-powered test execution platform that allows you to perform Selenium automation testing with NUnit at scale across 3000+ real desktop browsers.
Here is the test scenario and browser/OS combination on which the tests are executed:
| Browser | Browser version | Platform/Operating System |
|---|---|---|
| Chrome | 72.0 | Windows 10 |
| Internet Explorer | 11.0 | Windows 10 |
| Safari | 11.0 | macOS High Sierra |
We have used the test scenario mentioned in the Page Object Model Tutorial with Selenium C#.
To get started, we create a new NUnit test project by navigating to New -> Project -> NUnit Test Project (.Net Core).
Once the project is created, install the following packages using the Package Manager (PM) Console. Run the following commands on the PM console to install Selenium WebDriver, PageObjects, and other packages.
|
1 2 3 4 |
Install-Package DotNetSeleniumExtras Install-Package DotNetSeleniumExtras.PageObjects Install-Package DotNetSeleniumExtras.PageObjects.Core Install-Package DotNetSeleniumExtras.WaitHelpers |
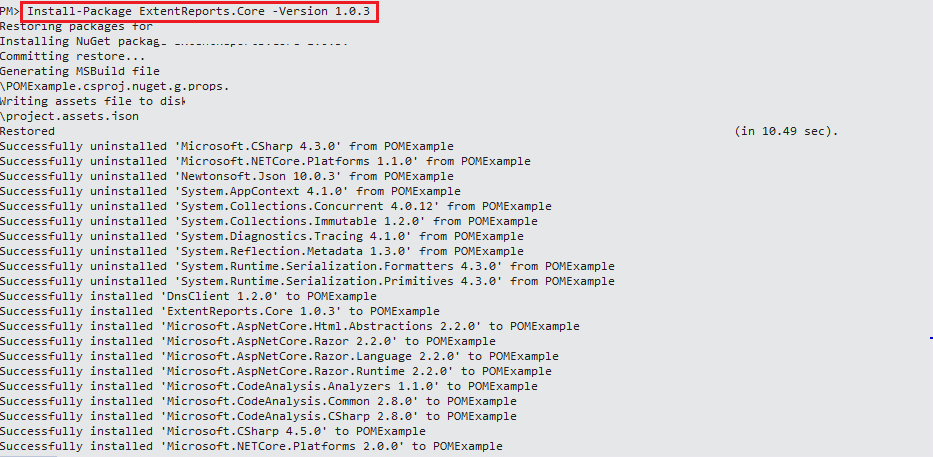
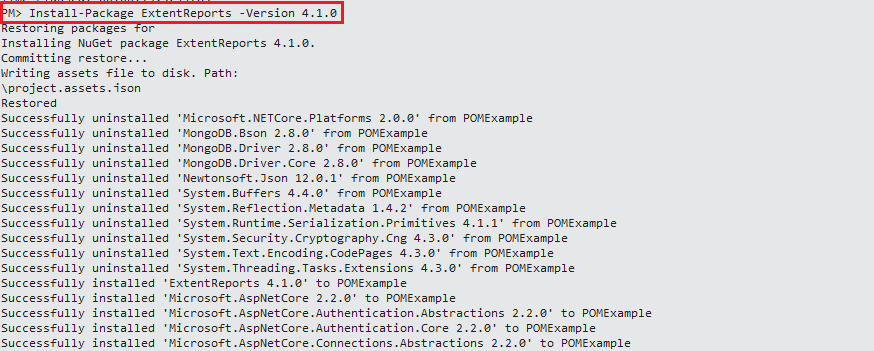
With the basic setup complete, install packages – ExtentReports.Core and ExtentReports from the PM console. At the time of this article, the latest version of ExtentReports (Core) and ExtentReports in the NuGet gallery were 1.0.3 and 4.1.0.
Run the following commands on the PM Console:
|
1 2 |
Install-Package ExtentReports.Core -Version 1.0.3 Install-Package ExtentReports -Version 4.1.0 |
Here are the installation screenshots from the PM console:
The status of the installed packages is obtained using the Get-Package PM command:
|
1 2 3 4 5 6 7 8 9 10 11 12 13 |
PM> Get-Package Id Versions -- -------- nunit {3.12.0} NUnit3TestAdapter {3.13.0} DotNetSeleniumExtras.PageObjects... {3.12.0} Selenium.Support {3.141.0} Microsoft.NET.Test.Sdk {16.2.0} DotNetSeleniumExtras.PageObjects {3.11.0} Selenium.WebDriver {3.141.0} ExtentReports.Core {1.0.3} ExtentReports {4.1.0} |
The project structure should look as shown below:
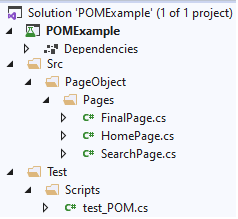
Page Classes created in < project_folder >/Src/PageObjects/Pages
Test Code created in < project_folder >/Src/Test/Scripts
Extent Report configuration :< project_folder >/report-config.xml
|
1 2 3 4 5 6 7 8 9 10 11 12 13 14 15 16 17 18 19 20 21 22 23 24 25 26 27 28 29 30 31 32 33 34 35 36 37 38 39 40 41 42 43 44 45 46 47 48 49 |
<?xml version="1.0" encoding="UTF-8"?> <extentreports> <configuration> <!-- report theme --> <!-- standard, dark --> <theme>standard</theme> <!-- document encoding --> <!-- defaults to UTF-8 --> <encoding>UTF-8</encoding> <!-- protocol for script and stylesheets --> <!-- defaults to https --> <protocol>https</protocol> <!-- title of the document --> <documentTitle>Report Demonstration with NUnit and Extent Reports</documentTitle> <!-- report name - displayed at top-nav --> <reportName>Report Demonstration with NUnit and Extent Reports</reportName> <!-- report headline - displayed at top-nav, after reportHeadline --> <reportHeadline>Report Demonstration with NUnit and Extent Reports</reportHeadline> <!-- global date format override --> <!-- defaults to yyyy-MM-dd --> <dateFormat>yyyy-MM-dd</dateFormat> <!-- global time format override --> <!-- defaults to HH:mm:ss --> <timeFormat>HH:mm:ss</timeFormat> <!-- custom javascript --> <scripts> <![CDATA[ $(document).ready(function() { }); ]]> </scripts> <!-- custom styles --> <styles> <![CDATA[ ]]> </styles> </configuration> </extentreports> |
This is how the final project structure in Visual Studio 2019 looks like:
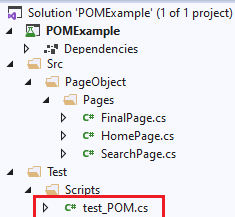
Code WalkThrough [< project_folder >/Src/Test/Scripts/test_POM.cs]
For a code walkthrough of the POM related implementation, you can refer to the Implementation section in the Page Object Model tutorial for Selenium C# (mentioned above). We would limit this code walkthrough for the NUnit report or Extent Report related implementation in the test code.
Lines (11) – (12):
Import or add the ExtentReports related namespaces to the test code.
|
1 2 |
using AventStack.ExtentReports; using AventStack.ExtentReports.Reporter; |
Lines (20)- (22):
The TestFixture annotation (or attribute) is used for passing the browser and OS combinations to the test case.
|
1 2 3 |
[TestFixture("chrome", "86.0", "Windows 10")] [TestFixture("internet explorer", "11.0", "Windows 10")] [TestFixture("Safari", "11.0", "macOS High Sierra")] |
Line (24):
The test scenario is tested in parallel on different browser and OS combinations. The Parallelizable annotation is used with the ParallelScope.All options for executing the tests and their descendants in parallel.
|
1 |
[Parallelizable(ParallelScope.All)] |
Lines (35) – (36):
Variables of type ExtentReports and ExtentTest are created. These would be further used in creating the NUnit report.
|
1 2 |
public static ExtentReports _extent; public ExtentTest _test; |
Lines (46) – (54):
The basic prerequisites for Extent Report creation is added under the [OneTimeSetUp] attribute. The method under this attribute will be called before executing any test in the fixture.
The GetCallingAssembly method returns the Assembly object of the method that has invoked ExtentStart (i.e., the currently executing method). The Uri .LocalPath converts the file path into a URI-style path.
The generated NUnit report will be stored in the Reports folder, and the report name is set to Index.html.
|
1 2 3 4 5 6 7 8 9 10 |
[OneTimeSetUp] protected void ExtentStart() { var path = System.Reflection.Assembly.GetCallingAssembly().CodeBase; var actualPath = path.Substring(0, path.LastIndexOf("bin")); var projectPath = new Uri(actualPath).LocalPath; Directory.CreateDirectory(projectPath.ToString() + "Reports"); Console.WriteLine(projectPath.ToString()); var reportPath = projectPath + "Reports\\Index.html"; |
Lines (60):
Start the ExtentHTMLReporter file in the location (i.e. reportPath) specified in the earlier step.
|
1 |
var htmlReporter = new ExtentHtmlReporter(reportPath); |
Line(61) – (62):
Create an instance of the ExtentReports class and enable (or start) the Extent HTML reporter using the AttachReporter method.
|
1 2 |
_extent = new ExtentReports(); _extent.AttachReporter(htmlReporter); |
Lines (63) – (65):
Necessary system or environment related information is added using the AddSystemInfo method to the started HTML reporter.
|
1 2 3 |
_extent.AddSystemInfo("Host Name", "Cloud-based Selenium Grid on LambdaTest"); _extent.AddSystemInfo("Environment", "Test Environment"); _extent.AddSystemInfo("UserName", "Himanshu Sheth"); |
Line(66):
The custom report configuration is loaded using the report configuration XML file (i.e., report-config.xml).
|
1 |
htmlReporter.LoadConfig(projectPath + "report-config.xml"); |
Line (84):
The Remote WebDriver object is instantiated using LambdaTest’s cloud-based Selenium Grid remote address, desired browser capabilities, and command timeout.
|
1 |
driver.Value = new RemoteWebDriver(new Uri("https://" + username + ":" + accesskey + gridURL), capabilities, TimeSpan.FromSeconds(600)); |
Lines (89) – (98):
The TestContext class in NUnit lets tests access information about the execution context. The CurrentContext property of TestContext class is used for getting the context of the currently executing test (i.e., SearchLT_Google). The test case’s name is appended with the browser name, browser version, and platform to differentiate the tests executing on different browser & OS combinations.
|
1 2 3 4 5 6 7 8 9 10 11 |
[Test] public void SearchLT_Google() { .............................................. .............................................. .............................................. String context_name = TestContext.CurrentContext.Test.Name + " on " + browser + " " + version + " " + os; String TC_Name = context_name; .............................................. .............................................. } |
Line (100):
The test is created using the CreateTest method of the Extent framework. The Test case name is passed as the argument to the CreateTest method.
|
1 |
_test = _extent.CreateTest(context_name); |
The remaining part of the implementation under the [Test] attribute is POM related, for which you can refer to the blog – POM in Selenium C#.
Line (126):
The execution status of the test scenario is obtained using the Result property in the current context.
|
1 2 3 4 5 6 7 8 |
[TearDown] public void Cleanup() { var exec_status = TestContext.CurrentContext.Result.Outcome.Status; .............................................. .............................................. .............................................. } |
Line (135):
For demonstration, we capture the page screenshot even for the PASS scenario. The filename will be a combination of the test case name, browser & OS combination, and timestamp when the snapshot was generated.
|
1 |
fileName = "Screenshot_" + time.ToString("h_mm_ss") + TC_Name + ".png"; |
Lines (137) – (172):
Based on the execution status (i.e., Passed, Failed, Skipped, etc.) of the test scenario, the next set of actions are performed. For demonstration, we capture screenshots in the Extent report for TestStatus.Passed and TestStatus.Failed statuses.
Log events are added to the Extent Report using the appropriate status (i.e., Pass, Fail, etc.).
|
1 2 3 4 5 6 7 8 9 10 11 12 13 14 15 16 17 18 19 20 21 22 23 24 25 26 27 |
switch (exec_status) { case TestStatus.Failed: screenShotPath = Capture(driver.Value, fileName); var mediaEntity = CaptureScreenShot(driver.Value, fileName); _test.Fail("ExtentReport 4 Capture: Test Failed", mediaEntity); _test.Log(Status.Fail, "Traditional Snapshot below: " + _test.AddScreenCaptureFromPath("Screenshots\\" + fileName)); break; ................. ................. case TestStatus.Passed: screenShotPath = Capture(driver.Value, fileName); var mediaEntity = CaptureScreenShot(driver.Value, fileName); _test.Pass("ExtentReport 4 Capture: Test Passed", mediaEntity); _test.Log(Status.Pass, "Traditional Snapshot below: " + _test.AddScreenCaptureFromPath("Screenshots\\" + fileName)); break; ................. ................. case TestStatus.Inconclusive: ................. ................. case TestStatus.Skipped: ................. ................. default: break; } |
The screenshots of AUT are captured using two different methods (only for demonstration):
We’ll be covering how to capture screenshots in NUnit using ExtentReports in more detail in the subsequent section.
Lines (115) – (120):
The Flush method of ExtentReports writes everything to the log file (or HTML report). It is called only ‘once’ in the [OneTimeTearDown] method. The report will not be generated if Flush is not called.
|
1 2 3 4 5 6 |
[OneTimeTearDown] protected void ExtentClose() { Console.WriteLine("OneTimeTearDown"); _extent.Flush(); } |
How to Capture Screenshots in NUnit Reports?
Screenshots of AUT during the test execution helps in identifying the potential issues in the application code. It is recommended to capture screenshots only when the test fails since screenshots might consume a lot of memory. However, for demonstration, we capture screenshots even when the test has passed.
Here are the two ways to capture screenshots in Extent Report:
Method – 1
Here we capture a screenshot of the application under test using the GetScreenshot method of the ITakesScreenshot interface. Here is the complete implementation for capturing screenshot:
|
1 2 3 4 5 6 7 8 9 10 11 12 13 |
public static string Capture(IWebDriver driver, String screenShotName) { ITakesScreenshot ts = (ITakesScreenshot)driver; Screenshot screenshot = ts.GetScreenshot(); var pth = System.Reflection.Assembly.GetCallingAssembly().CodeBase; var actualPath = pth.Substring(0, pth.LastIndexOf("bin")); var reportPath = new Uri(actualPath).LocalPath; Directory.CreateDirectory(reportPath + "Reports\\" + "Screenshots"); var finalpth = pth.Substring(0, pth.LastIndexOf("bin")) + "Reports\\Screenshots\\" + screenShotName; var localpath = new Uri(finalpth).LocalPath; screenshot.SaveAsFile(localpath, ScreenshotImageFormat.Png); return reportPath; } |
a. A variable (i.e., ts) of type ITakesScreenshot is created, and the type-casted WebDriver instance is assigned to it.
|
1 |
ITakesScreenshot ts = (ITakesScreenshot)driver; |
b. The GetScreenshot method in ITakesScreenshot returns the screenshot object that represents the image of the page on the screen.
|
1 |
Screenshot screenshot = ts.GetScreenshot(); |
c. The next set of steps create a sub-directory named Screenshots in the Reports directory where the final HTML report will be stored.
|
1 2 3 4 |
var pth = System.Reflection.Assembly.GetCallingAssembly().CodeBase; var actualPath = pth.Substring(0, pth.LastIndexOf("bin")); var reportPath = new Uri(actualPath).LocalPath; Directory.CreateDirectory(reportPath + "Reports\\" + "Screenshots"); |
d. The SaveAsFile method in Screenshot class (i.e., Screenshot.SaveAsFile) saves the screenshot to a file. It overwrites if the file already exists in that particular location. The method takes two arguments – the location where the image will be stored and ScreenshotImageFormat (which is png in our case).
In our case, the same test is executed in parallel across different browser and OS combinations. Hence, the image name includes the test name, browser(and OS combination), & timestamp when the corresponding test was executed.
|
1 2 |
screenshot.SaveAsFile(localpath, ScreenshotImageFormat.Png); return reportPath; |
Usage: This is how the Capture method is invoked in the test code for saving screenshot on the local disk and adding the same to the HTML report.
|
1 2 |
screenShotPath = Capture(driver.Value, fileName); _test.Log(Status.Fail, "Traditional Snapshot below: " + _test.AddScreenCaptureFromPath("Screenshots\\" + fileName)); |
Method – 2 (Only in ExtentReports 4)
Here we capture a screenshot of the application under test in the base64 string format using the CreateScreenCaptureFromBase64String method in ExtentReports 4. Here is the complete implementation for capturing screenshot:
|
1 2 3 4 5 6 7 |
public MediaEntityModelProvider CaptureScreenShot(IWebDriver driver, String screenShotName) { ITakesScreenshot ts = (ITakesScreenshot)driver; var screenshot = ts.GetScreenshot().AsBase64EncodedString; return MediaEntityBuilder.CreateScreenCaptureFromBase64String(screenshot, screenShotName).Build(); } |
a. A variable (i.e., ts) of type ITakesScreenshot is created, and the type-casted WebDriver instance is assigned to it.
|
1 |
ITakesScreenshot ts = (ITakesScreenshot)driver; |
b. The screenshot image is captured using the GetScreenshot method of the ITakesScreenshot interface. The value of the screenshot image is fetched as a Base64-encoded string.
|
1 |
var screenshot = ts.GetScreenshot().AsBase64EncodedString; |
c. The screenshot image (in Base64-encoded string format) is added to the logs using CreateScreenCaptureFromBase64String method of MediaEntityBuilder class in ExtentReports 4. The Build method returns the screenshot image as MediaEntityModelProvider type.
|
1 |
return MediaEntityBuilder.CreateScreenCaptureFromBase64String(screenshot, screenShotName).Build(); |
ExtentTest.Pass, ExtentTest.Fail, ExtentTest.Skip, etc. used for logging respective events in the HTML report have the second argument as MediaEntityModelProvider.
Usage: This is how the CaptureScreenShot method is invoked in the test code for adding base64 screenshots to logs.
|
1 |
var mediaEntity = CaptureScreenShot(driver.Value, fileName); _test.Fail("ExtentReport 4 Capture: Test Failed", mediaEntity); |
Execution
As shown below, the test scenario (SearchLT_Google) is run against different browser and OS combinations in parallel.


As seen below, the tests have executed successfully.


The following screenshots are generated in the Reports\Screenshots folder. These screenshots were generated using Method – 1 described in the Capture Screenshots in the NUnit Extent Report section.

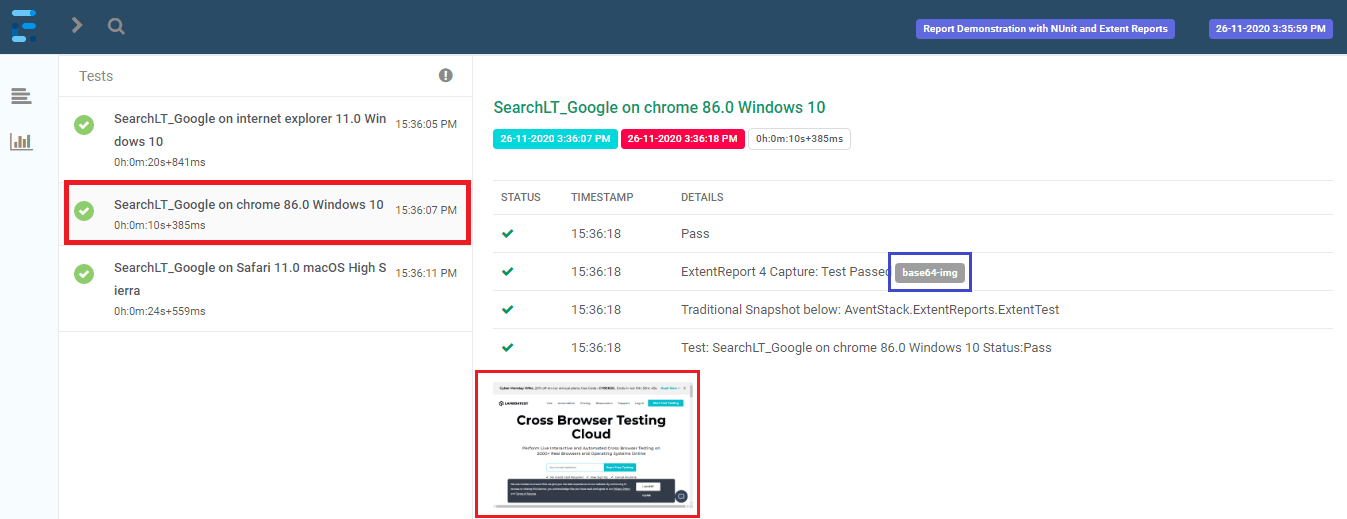
Shown below is the Extent Report snapshot (taken from the report file) generated for the tests:
Test 1 (Chrome 86.0 on Windows 10):
Test 2 (IE 11.0 on Windows 10):

Test 3 (Safari 11.0 on macOS High Sierra):
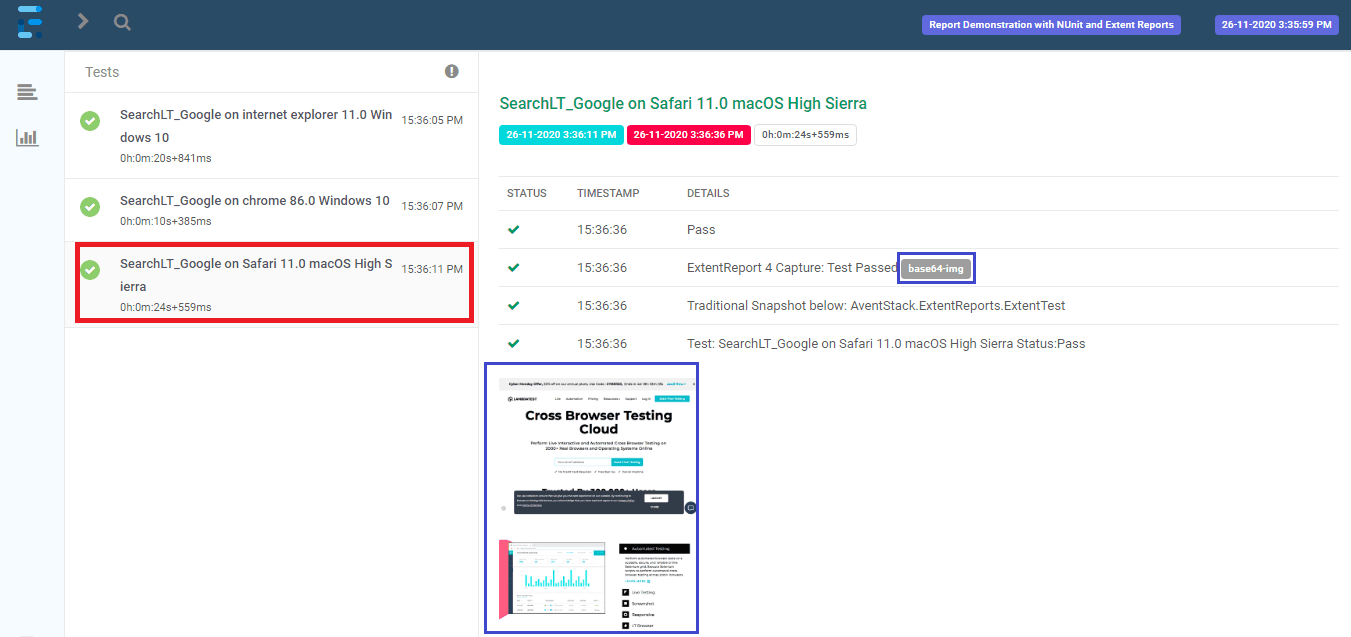
As seen in the report, the base 64 screenshot is shown as “base64 img” with a link to the captured screenshot. The screenshot captured using the GetScreenshot is shown at the bottom of the corresponding test logs.
Conclusion
Reports play an integral part in keeping track of the test execution. Extent Report is used as a preferred NUnit reporting tool since the Extent Framework lets you generate customizable HTML test reports. The NUnit report generated using the Extent Framework provides insightful information about the tests, environment values, devices against which tests were conducted, and more. It also lets you create Gherkin-style tests, due to which ExtentReports can be used as an NUnit report generator for BDD tests. In particular, ExtentReports 4 has several new features like the simplified generation of base64 screenshots to be added to the logs, selecting a Gherkin dialect, etc.
Which NUnit reporting tool do you use for your Selenium tests? Do leave your preference in the comments section below!
Frequently Asked Questions (FAQs)
How do I create a test report in NUnit?
Here are the high-level steps to create a test report in NUnit:
Step-1: Install Visual Studio Extensions for Nunit.
Step-2: Create a Class Library project.
Step-3: Install NuGet packages for Selenium, NUnit, and ExtentReports.
Step-4: Edit and update the project for Report, Test Cases, and Page Methods.
Step-5: Build and execute the project as NUnit.
What is NUnit used for?
NUnit is a testing Framework just like JUnit, which enables test-driven development. With NUnit, you can define your test cases, test suites, and assertions. NUnit can run all the tests and also show you a report.
What is NUnit in C#?
NUnit is a unit testing framework for .NET based applications. Here, the application is isolated into different modules and is tested independently to meet the objective. Moreover, the NUnit Framework has a range of attributes that are used during unit tests.
Got Questions? Drop them on LambdaTest Community. Visit now


