React Testing Tutorial: How to Test React Apps
Gifthiya Begum
Posted On: February 5, 2025
![]() 51390 Views
51390 Views
![]() 10 Min Read
10 Min Read
React is one of the most popular JavaScript libraries in use today. With its declarative style and emphasis on composition, React has transformed how we build modern web applications. However, as your application grows in size and complexity, you will want to write tests to avoid any future bugs.
Moreover, building large-scale applications with React requires careful planning and organization to avoid some common pitfalls. Although testing React applications is not as straightforward as other libraries or frameworks, it’s possible.
In this article on React Testing, we’ll explore some methods of testing React components by first looking at a basic test, and then we’ll dive into some more advanced testing principles and best practices.
TABLE OF CONTENTS
Why Perform React Testing?
So, why do we need to test React apps? Here are the some of the reasons:
- In today’s distributed processing-based application world, it is not wise to assume that every piece of the software stack will work 24*7 in a reliable manner. When we introduce a change or update an existing piece of code, things might or will break, and it is wise to expect the worst.
- Secondly, the process of Test Driven Development (TDD) tends to help the testers to write efficient code. If not before, at least we must have the test cases developed to cover the failures. Having some test codes is always better than having no test-related code in the application.
- Last but not least, introducing testing into your application development lifecycle means the organization can release the latest feature into their apps more frequently and confidently.
However, as a software development team, we can be prepared and play our role to minimize how our application can fail by carrying out tests based on our assumptions.
Furthermore, by means of Continuous Integration (CI) or Continuous Deployment (CD) tools, one can ensure testing is carried out as part of the application deployment process. The high-level idea is that if the tests get passed, the latest version of the application gets deployed to whatever instances run the application.
What Aspects to Test in React Applications?
The React application that you are dealing with might be simple or quite complex at times. In any case, it is always good to have priorities identified before carrying out React testing.
However, the following are some good items to start with:
- Identify the features which add more business value to your application and carry out testing. For example, in the case of the Netflix application, searching for a movie and playing the video is an important feature. So, consider that area as a prioritized feature to test.
- Execute border case/edge case scenarios in those high valued features.
- Identify the most used React components in your application and test those.
- If your application serves a large user base, such as Netflix or Amazon, ensure to test the application for stress and performance load.
- Include the testing scope for basic React component testing, which includes user interactions with the components, such as OnClick or OnSubmit events. Then, conditional renderings such as impact due to state changes or prop changes.
- Test React hooks to check if they are defined in your React apps.
Test React applications across 3000+ environments. Try LambdaTest Now!
React Testing Tools
Testing a web application/mobile app requires other software and tools. However, there is no need for us to invent/develop these testing libraries/tools now. The developers of the open-source community have already contributed an incredible amount of effort to build a large number of libraries and efficient tools for this purpose. Here are a few of such libraries and tools to aid in React testing:
Test Runner
A Test Runner is software that aids in running the tests of the React application either by an individual selection of React script files by choice or in groups or as a whole test suite. Once the test run is completed, it also reports back the success or failure information in a human-readable manner.
The React team recommends using the Jest library for this purpose. It provides the ability to access the DOM elements of your web application through jsdom, which is close enough to mimic the behavior of browsers in several cases. One could also use Mocha and Jasmine for React testing. However, Jest is the widely used test runner by the React community.
Mocking Library
While developing tests for your React application, you might want to focus only on components of interest instead of including other variable factors that could deviate from your unit test goals. This is where a mocking library comes in handy to unit test your React components.
Testing this way aids to have a focus built on the component under test and promote modularity. Again, in this case, Jest comes with out-of-the-box support for creating test doubles, but other libraries support such mocking features, example: Sinon (http://sinonjs.org/)
Assertion Library
Often it is required to test the outcome of conducted tests, such as does length equal breadth for a square? This is where the assertion library’s role comes into play. Once we start getting involved in making assertions, sooner we will get into the need for sophisticated “Assertion Matchers” and in a React ecosystem, Jest comes with built-in assertion methods to make the React testing code developers’ job easy with Jest assertions.
Libraries Aligned to the Framework
To make testing of React components easier, the open-source community has developed some good libraries such as React Testing Library and Enzyme.
Both these libraries offer a set of helper methods that can be utilized to test React components without depending on how these components are implemented. The React team’s recommendation is to use the React testing library for React testing.
While we are at this juncture, I would like to highlight a key difference between the Enzyme and React testing library. Enzyme library allows one to carry out either a shallow component testing (a way to test a component without considering its children/dependent components) or complete component testing (a way to test component including its children/dependent components).
React testing library does not support a direct way to shallow test the React components. However, the developers could use Jest for faking the dependent or child components and could indirectly achieve the shallow component testing in React.
Browsers
Running the application in a browser and carrying out the testing matters a lot in the case of a web application. Performing browser testing is a march towards the goals of end-to-end testing of any web application, and it helps to identify/prevent regression in the workflows.
End-to-End Test Frameworks
Frameworks like Selenium, Cypress, and Puppeteer provide an easy, fast, and efficient way to test any application that runs on browsers. These frameworks enable you to set up and write tests, navigate through application routes to test various user interfaces, and monitor tests as they execute while making changes to the web application. They come with built-in tools for easier debugging and record test results for thorough analysis.
How to Test React Applications?
As far as testing goes, React has a few different types of tests you can write: unit tests, integration tests, and end-to-end (E2E) tests. For demonstration, we will look at how to run end-to-end tests.
There are multiple approaches to handle end-to-end React application testing: manual and automated. For this blog, we will explore automated end-to-end React testing approach.
Prerequisites
- We’ll create a simple React Task Tracker project for demonstration purposes. This project lets users add tasks, mark them as done, and delete tasks.
- Create a new React project using the following command:
- Go to the newly created project folder and open it in your preferred code editor. We have used VS Code in this example.
- Install all the required dependencies using the below command:
- Preview your React app project by running the below command:
- Open the App.js file and replace its content with the following code snippet:
- Install Cypress using the below command:
- Open and configure Cypress using the below command:
- React: https://legacy.reactjs.org/docs/testing.html
- Cypress: https://www.cypress.io/
|
1 |
npm create vite@latest react-task-tracker -- --template react |
|
1 2 |
cd react-task-tracker code . |
|
1 |
npm install |
|
1 |
npm run start |
|
1 2 3 4 5 6 7 8 9 10 11 12 13 14 15 16 17 18 19 20 21 22 23 24 25 26 27 28 29 30 31 32 33 34 35 36 37 38 39 40 41 42 43 44 45 46 47 48 49 50 51 52 53 54 55 56 57 58 59 60 61 |
import { useState } from "react"; import AddTask from "./components/AddTask"; import Header from "./components/Header"; import Tasks from "./components/Tasks"; function App() { const [tasks, setTasks] = useState([ { id: 1, text: "Doctors Appointment", day: "Feb 5th at 2:30pm", reminder: true, }, { id: 2, text: "Meeting at school", day: "Feb 5th at 1:30pm", reminder: true, }, { id: 3, text: "Food Shopping", day: "Feb 5th at 2:30pm", reminder: false, }, ]); const [showAddTask, setShowAddTask] = useState(false); // Delete a task const deleteTask = (id) => { setTasks(tasks.filter((task) => task.id !== id)); }; // Add task const addTask = (task) => { const id = Math.floor(Math.random() * 10000) + 1; setTasks([...tasks, { ...task, id }]); }; // Toggle reminder const toggleReminder = (id) => { setTasks( tasks.map((task) => task.id === id ? { ...task, reminder: !task.reminder } : task ) ); }; return ( <div className="container"> <Header onShowAddTask={() => setShowAddTask(!showAddTask)} /> {showAddTask && <AddTask onAddTask={addTask} />} {tasks.length > 0 ? ( <Tasks tasks={tasks} onDelete={deleteTask} onToggle={toggleReminder} /> ) : ( "No tasks found" )} </div> ); } export default App; |
After that, you will notice a demo React task tracker application as shown below:
Install Cypress
|
1 |
npm install cypress --save-dev |
|
1 |
npx cypress open |
You can refer to the instructions on the Cypress official website and choose E2E Testing for this project setup.
Next, create a new folder named tests/e2e inside the src directory.
Finally, open the cypress.config.js file located in the root directory and replace its content with the following code snippet.
|
1 2 3 4 5 6 7 8 9 10 11 12 13 14 15 16 17 18 19 20 21 22 |
const { defineConfig } = require("cypress"); module.exports = defineConfig({ component: {}, env: { // HINT: here we read these keys from .env file, feel free to remove the items that you don't need baseUrl: process.env.FE_URL ?? "http://localhost:3000", }, e2e: { supportFolder: false, supportFile: false, specPattern: "src/tests/e2e/**/*.spec.js", // eslint-disable-next-line no-unused-vars setupNodeEvents(on, config) { // implement node event listeners here }, baseUrl: process.env.FE_URL ?? "http://localhost:3000", }, }); |
The key configuration here involves setting the default location for Cypress to find the E2E test files using specPattern and defining the baseURL for running the tests.
Create Test Files
Create a new file named tasks.spec.js inside the src/tests/e2e folder and add the following test script:
|
1 2 3 4 5 6 7 8 9 10 11 12 13 14 15 16 17 18 19 20 21 22 23 24 25 26 27 28 29 30 31 32 33 34 35 36 37 38 39 40 41 42 43 44 45 46 47 48 49 50 51 52 53 54 55 56 57 58 59 60 61 62 63 64 |
/* eslint-disable jest/valid-expect */ /* eslint-disable testing-library/await-async-utils */ /* eslint-disable no-undef */ const afterLoginFunction = () => { cy.visit('${Cypress.env("baseUrl")}'); }; describe("Tasks tests", () => { beforeEach(() => { afterLoginFunction(); cy.wait(5000); }); // Add task it("can add a new task", () => { cy.get("header .btn").click(); cy.wait(1000); cy.get('.add-form input[placeholder="Add Task"]').type("Cypress Task 1"); cy.get('.add-form input[placeholder="Add Day & Time"]').type( "March 18 at 4:00pm" ); cy.get(".add-form").then(() => { cy.get('.add-form input[type="submit"]').click(); cy.wait(1000); cy.get(".task h3").each(($el) => { return cy.contains("Cypress Task 1"); }); }); }); // Delete task it("can delete a task", () => { cy.get(".task h3").then(() => { cy.get(".task h3 svg").first().click(); cy.wait(1000); cy.get(".task") .each(($el) => { return $el; }) .then(($el) => expect($el).to.have.length(2)); }); }); // Mark task it("can mark a task", () => { cy.get(".task:first ").then(() => { cy.get(".task").last().dblclick(); cy.wait(1000); cy.get(".reminder") .each(($el) => { return $el; }) .then(($el) => expect($el).to.have.length(3)); }); }); }); |
Run React E2E Tests
Now that everything is set up and the test cases are written, it’s time to run the tests to ensure they pass as expected.
To run your tests, update the scripts section in your package.json file with the following snippet:
|
1 2 |
"test:e2e": "cypress open --e2e", "test:e2e:ci": "cypress run --e2e", |
If you want to run the tests from the terminal or in an automated pipeline, such as LambdaTest, use the second script, which executes your tests via the CLI.
LambdaTest is an AI-powered test execution platform that supports automated testing for websites and mobile apps on its React testing cloud. You can automate React testing using popular test automation frameworks like Cypress and Jest across various browsers and operating systems.
Now, run the following command in your terminal to run your test:
|
1 |
npm run test:e2e |
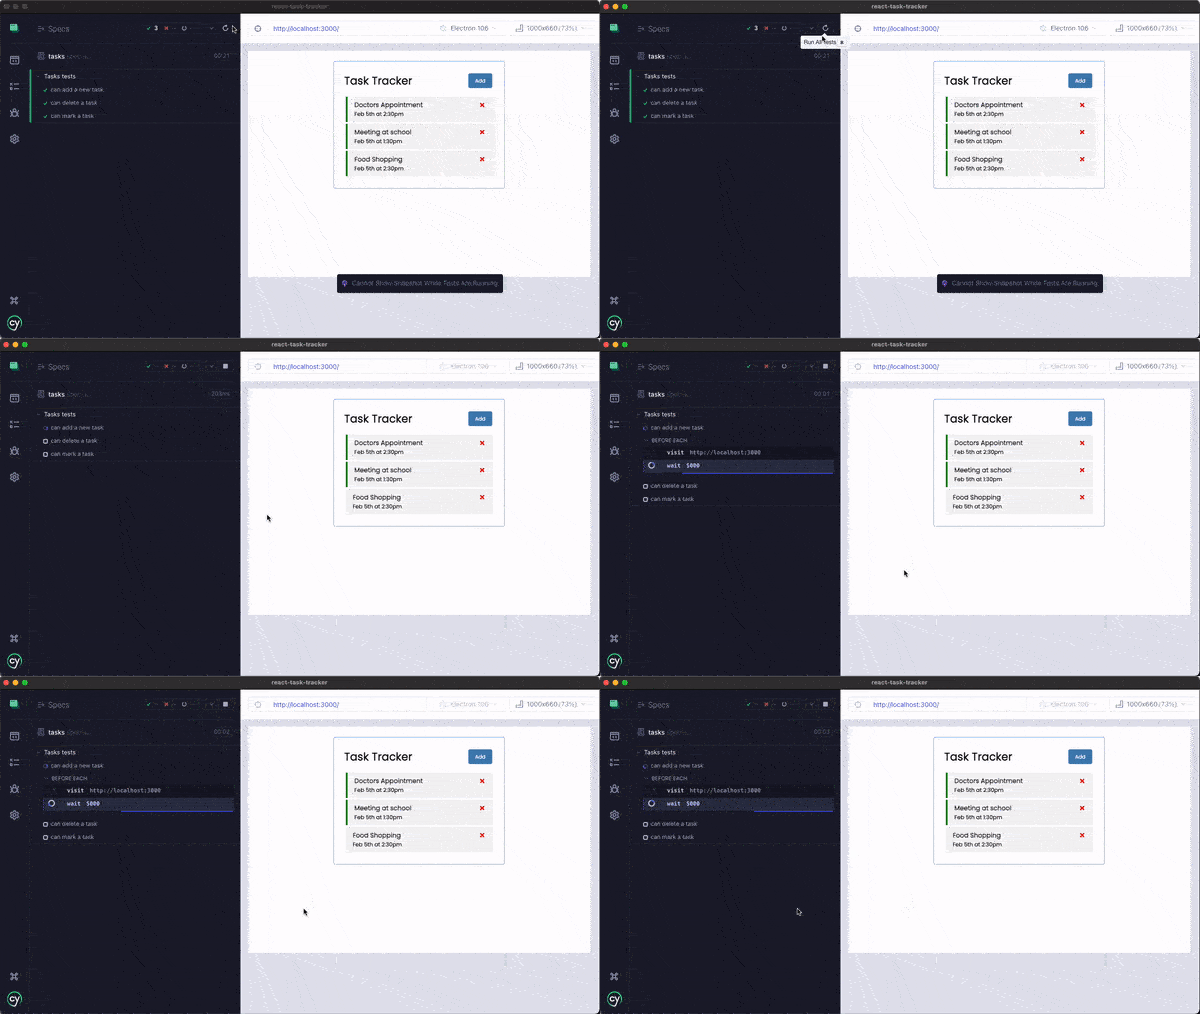
You can then notice a successful test execution, as shown in the short video:

Conclusion
This blog on testing React applications covered the essentials of React testing, including its importance and what aspects to test in a React app. We explored the tools and libraries commonly used for React testing and demonstrated how to perform React end-to-end testing using frameworks like Cypress.
Frequently Asked Questions (FAQs)
How is testing done for React?
The Testing Pyramid is a framework that can assist both developers and quality assurance professionals to create high-quality software. It shortens developers’ time to determine whether a change they made breaks the code. It can also aid in the development of a more dependable test suite.
Where can I test React code?
Testing can be a challenge, and finding the right tool that fits your workflow can be even more of a challenge. When it comes to testing React applications, there are a few testing options available, of which the most common ones known are Enzyme and React Testing Library (RTL).
Is React testing library Jest?
React Testing Library, in contrast to Jest, is a state-of-the-art React testing library. It’s the best way to write tests for your components.
Citations
Got Questions? Drop them on LambdaTest Community. Visit now


