How to Use Python URL Decode() Method In Selenium
Paulo Oliveira
Posted On: May 10, 2024
![]() 139505 Views
139505 Views
![]() 23 Min Read
23 Min Read
URLs play a crucial role in ensuring the functionality and reliability of online platforms, yet the importance of managing URLs is often overlooked. URL errors can result in complications such as broken links, incorrect page load and data retrieval, and potential security vulnerabilities, making managing URLs a critical task.
Python provides an advanced solution for managing URL decoding challenges. By utilizing the Python URL decode() method, you can overcome URL-related issues, ensuring the integrity of online platforms. It also enhances the accuracy of path traversal, content delivery, and dynamic data handling. This approach improves test precision, aligning test environments more closely with user experiences. It also enhances the reliability and security of web-based services.
In this blog, we will learn some advanced URL decoding techniques and demonstrate using the Python URL decode() method in Selenium.
So, let’s get started.
Basics of Uniform Resource Locators (URLs)
URLs are the addresses used to locate resources on the web. They consist of several components, including the protocol (such as HTTP or HTTPS), the domain name (e.g., www.example.com), the path to the specific resource on the server (/path/to/resource), and optional query parameters (?key1=value1&key2=value2).
URL encoding is a method to convert special characters in URLs to a format that can be safely transmitted over the internet. For example, spaces are converted to %20, and ampersands (&) are converted to %26.
Understanding URL encoding is important for various tasks in web development and digital technology. For web developers, it is crucial to construct URLs correctly, especially when generating URLs dynamically based on user input or data from a database. For professionals working with APIs, it is essential to format URLs when making requests and interpreting responses correctly.
URL construction and encoding are essential for anyone working with web technologies, as they ensure the proper functioning and security of web applications and services.
Four confusing concepts of web development explained.
– CORS
– Structure of a URL
– How CORS Works
– CSS Positioning pic.twitter.com/aT0yfLd8Mo— Pratham (@Prathkum) July 6, 2023
URLs are crucial links to online resources, but their complex composition, filled with special characters, can complicate their transmission over the web. This is where URL decoding becomes important.
The URL decode() method in Python converts encoded URL data back to its original state. When creating a URL, specific characters like spaces, symbols, or non-Latin script characters are substituted with percent-encoded equivalents.
For instance, a space is represented as %20, and an ampersand (&) becomes %26. This encoding ensures the safe and consistent transmission of URLs over the Internet.
| https%3A%2F%2Fwww.lambdatest.com%3Fname%3DYour%20name |
The Python URL decode() method helps convert the encoded characters to their original form. This renders the URL understandable and functional for both end-users and digital applications.
| https://www.lambdatest.com?name=Your name |
Anatomy of a URL
Think of a URL as a precise directional map that guides a web browser to a specific Internet resource. This map is structured into several distinct segments, each serving its unique function.
- Protocol: At the beginning of a URL, you will typically find a protocol, such as HTTP (Hypertext Transfer Protocol) or HTTPS (HTTP Secure). The protocol specifies the method by which data is transmitted over the web.
- Domain: Following the protocol is the domain name, which serves as the readable identifier of the website’s hosting server.
- Path: After the domain, the path further specifies the location, indicating a particular page or resource on the website.
- Query Parameters: These optional elements appear after the path, starting with a question mark (?). They send additional information to the server through key-value pairs, aiding in content sorting, filtering, or specification.
In the below section of this blog on using the Python URL decode() method, you will learn the basics of URL encoding and decoding.
Discover the top Python frameworks to watch out for in 2025. Stay updated on the tools shaping the future of development.
What is URL Encoding and Decoding?
URL encoding is a crucial process that ensures the secure transfer of URLs across the Internet. Due to the limited character set allowed in URLs (alphanumeric and select special characters), any additional characters require encoding. This process converts characters into a web-safe format. For example, spaces become %20, while special symbols are represented by a percent sign followed by their hexadecimal value.
URL Decoding is the counter-process, where these encoded characters are reverted to their original state. This step is vital as it allows the original characters to be retrieved and utilized, which is critical for comprehending and interacting with the URL’s content or functionality.
The primary encoding technique in URLs is percent-encoding, where specific characters are replaced with a percentage symbol (%) followed by two hexadecimal numbers. This method ensures that only web-safe characters are used in URLs, averting potential misinterpretations by various web systems.
While other encoding forms exist, such as HTML character entities (like for space), these are less frequently used in URLs.
For example, using the previously mentioned encoded URL:
| https%3A%2F%2Fwww.lambdatest.com%3Fname%3DYour%20name |
The decoding process involves mapping each character to its corresponding representation character.
Below is a table listing some of the most common characters found in a URL.
| Character | From UTF-8 |
| space | %20 |
| ! | %21 |
| “ | %22 |
| # | %23 |
| $ | %24 |
| % | %25 |
| & | %26 |
| ‘ | %27 |
| ( | %28 |
| ) | %29 |
| * | %2A |
| + | %2B |
| , | %2C |
| – | %2D |
| . | %2E |
| / | %2F |
| : | %3A |
| ; | %3B |
| < | %3C |
| = | %3D |
| > | %3E |
| ? | %3F |
| @ | %40% |
When decoding the above URL, we have:
- %3A is mapped to :
- %2F is mapped to /
- %3F is mapped to ?
- %3D is mapped to =
- %20 is mapped to space
So, we get the below-decoded URL:
| https://www.lambdatest.com?name=Your name |
 Note
NoteRun Python tests across 3000+ browsers and OS combinations. Try LambdaTest Today!
In the below section of this blog on using the Python URL decode() method, you will learn some key Python libraries for decoding URLs.
Python for URL Decoding
Python’s capabilities in web protocol interaction and string manipulation make it well-suited for URL decoding tasks. This includes extracting query parameters from URLs and managing data received from web APIs to ensure correct URL formatting within web applications. Though various tools are available for URL decode, Python’s extensive tools and libraries simplify the encoding and decoding of URLs, supporting various web-related activities, from basic web scraping to complex web application development.
In the Python ecosystem, handling URLs, particularly decoding them, is facilitated by two significant libraries: urllib and requests. These key libraries are fundamental in dealing with URLs, offering innate functionalities for parsing, encoding, and decoding URLs, thereby streamlining URL management for developers.
urllib for URL Decoding
urllib is a module within Python’s standard library, primarily used for URL manipulation and retrieval. For Python URL decode(), the relevant submodule is urllib.parse, which offers the unquote method.
| Method | Description |
| unquote() | This method is designed to decode percent-encoded parts of the URL, converting them back to their original form. |
Steps for Decoding with urllib:
- Import unquote from urllib.parse.
- Pass the encoded URL as a parameter to the unquote method.
Example using urllib:
In the above code example, unquote() method takes an encoded URL and returns a more readable, decoded version, translating percent-encoded components back to their original characters.
requests for URL Decoding
While requests are predominantly known for simplifying HTTP requests, they also include utilities for URL handling, including decoding.
| Method | Description |
| unquote() | Similar to urllib, this function in the requests library decodes percent-encoded URL parts. |
Steps for Decoding with requests:
- Import unquote from requests.utils.
- Provide the encoded URL to the unquote function.
Example using requests:
In the above code example, the unquote() method from the requests library is used to decode a URL. It effectively translates the percent-encoded query parameters back to their original state.
Comparison and Use Cases
While both urllib and requests offer similar functionalities regarding Python URL decode(), their usage might differ based on the context.
- Use urllib where there’s no need to make HTTP requests. For example, in URL manipulation, data scraping, or working with file paths.
- Opt for requests in scenarios involving extensive web request handling, especially if you already use requests for other purposes, such as making HTTP requests to APIs. Using requests provides consistency in your codebase.
In both sample codes, the encoded URLs are decoded to be more human-readable and ready for further processing, such as extracting query parameters or using the URLs in web requests.
Whether you choose urllib or requests depends on your specific needs and the context of your Python project. urllib is suitable for basic URL manipulation and decoding within standard Python applications. On the other hand, requests are more appropriate for scenarios involving extensive web request handling, especially if you are already using requests for other purposes, such as making HTTP requests to APIs. Both libraries provide robust solutions for Python URL decode(), ensuring you can handle even the most complex URLs effectively.
In the below section of this blog on using the Python URL decode() method we will learn some advanced URL decoding techniques, building upon the basic uses of Python URL methods covered in the above section.
Advanced URL Decoding Techniques
Learning the Python URL decode() method goes beyond the basics, involving custom decoding functions, sophisticated error handling, and performance optimization.
This section explores these advanced techniques, offering insights and practical advice for handling complex URL decoding scenarios.
Custom Decoding Functions
While standard libraries like urllib provide basic decoding functionalities, certain situations demand custom decoding solutions. These are designed for specific use cases, such as decoding nested or non-standard encoded URLs.
Creating Custom Functions
- Assessing Specific Needs: Begin by identifying the unique requirements of your URL decoding task. This could include handling non-standard encodings or decoding URLs within URLs.
- Function Design: Write a Python function that takes a URL string as input. Within this function, use standard decoding methods as a base and add custom processing logic as needed.
- Regular Expressions: Utilize regular expressions (regex) for pattern matching if your decoding task involves identifying and transforming specific patterns in URLs.
Error Handling
Robust error handling is crucial in URL decoding to manage unexpected inputs or encoding anomalies.
Common Errors in URL Decoding
- Invalid Encoding: Errors can occur if the URL contains improperly percent-encoded characters.
- Incomplete Encoding: It can happen if only certain parts of the URL are encoded while others are left as-is. Handling such cases may require a more sophisticated decoding approach.
Performance Optimization
Efficient URL decoding is vital, especially when dealing with large volumes of URLs or in performance-critical applications. Python URL decode() method operations are streamlined and optimized and can significantly improve overall application performance.
Optimizing Decoding Functions
- Avoid Repeated Decoding: Ensure URLs are not decoded multiple times unnecessarily.
- Use Efficient Data Structures or Parameterization: For operations involving collections of URLs, use data structures like sets or dictionaries for faster access and manipulation or parameterize your tests to improve efficiency by allowing you to modify and reuse test configurations easily.
- Minimize Regular Expressions: While regex is powerful, it can be resource-intensive. Use it judiciously and optimize your regex patterns. Using simpler string manipulation functions possibly reduces the reliance on regex.
Caching Decoded URLs
- Implement Caching for Decoded URLs: This approach avoids re-decoding the same URL multiple times. For instance, you can use Python’s functools.lru_cache decorator to cache the results of functions that decode URLs easily. This built-in decorator automatically handles caching and retrieval based on the function’s input parameters, and you can specify a maximum cache size to control memory usage.
- Use TTL or Size-Limited Cache: Use a dedicated caching library such as cachetools, which offers advanced features like Time-To-live (TTL) policies. Implementing a TTL cache ensures that entries are automatically invalidated after a specified duration, thus keeping the cache fresh and managing memory efficiently.
To ensure optimal performance of your Python URL decode() method, regular benchmark testing is crucial. This process helps pinpoint any performance bottlenecks that could hinder efficiency. Additionally, profiling tools, such as Python’s cProfile, offer invaluable insights into the execution time of various code segments.
By understanding where most of the time is spent, you can make targeted improvements, enhancing overall performance. Together, benchmarking and profiling form a powerful duo for fine-tuning your code’s efficiency.
URL Decoding in Test Automation
In the specialized test automation field, the Python URL decode() method plays a pivotal role. Automation testing often requires interaction with web applications, which involves navigating URLs, submitting forms, and handling responses. Python’s URL management capabilities can be utilized in test scripts to ensure precise and effective interactions.
For example, in web application testing, automated scripts often need to verify the accuracy of redirection URLs or ensure that query parameters are correctly transmitted and interpreted by the application. In such cases, the Python URL decode() method is essential for accurately comparing the expected and actual URL values.
Additionally, in API testing, which often involves extensive data transmission via URLs, correctly decoding URLs is crucial for validating responses and requests. Errors in interpreting URL-encoded data can lead to failed tests or incorrect positive results, where a test passes incorrectly due to mishandled URL data.
To summarize, the Python URL decode() method is more than just a part of URL management; it is a fundamental aspect of web development and test automation.
In the below section of this blog, you will learn how to use the Python URL decode() method while performing automation testing of web applications. However, before you begin writing the test scripts and understanding various Python URL decode() methods, you must first prepare the test environment.
Preparing the Test Environment
In this section, you will learn how to set up the basic environment, from setting up the programming language to configuring the files into your test scripts.
We will use Python to write test scripts, Selenium WebDriver to automate web browser interactions, and pytest to execute tests in Python. We will also be leveraging the capabilities of cloud testing platforms like LambdaTest for scalability and better testing insights.
Basic Environment Setup
To be able to run the code, ensure that you have the following elements in place:
Python
Verify that Python is installed on your system. If it isn’t already set up on your machine, you can download Python from its official website.
Search for the version designed for your OS and proceed with the guided setup. During this phase, ensure you Include Python in PATH for effortless accessibility via the terminal or command interface.
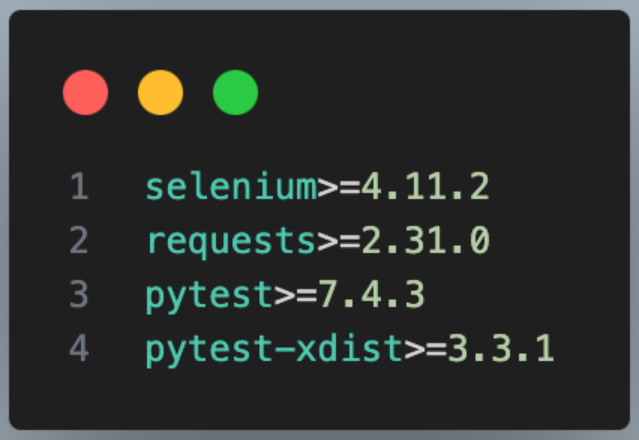
Once Python is installed, use the Python package manager, pip, to install Selenium and pytest by just running the following command:
|
|
requirements.txt contains the dependencies we want to install.
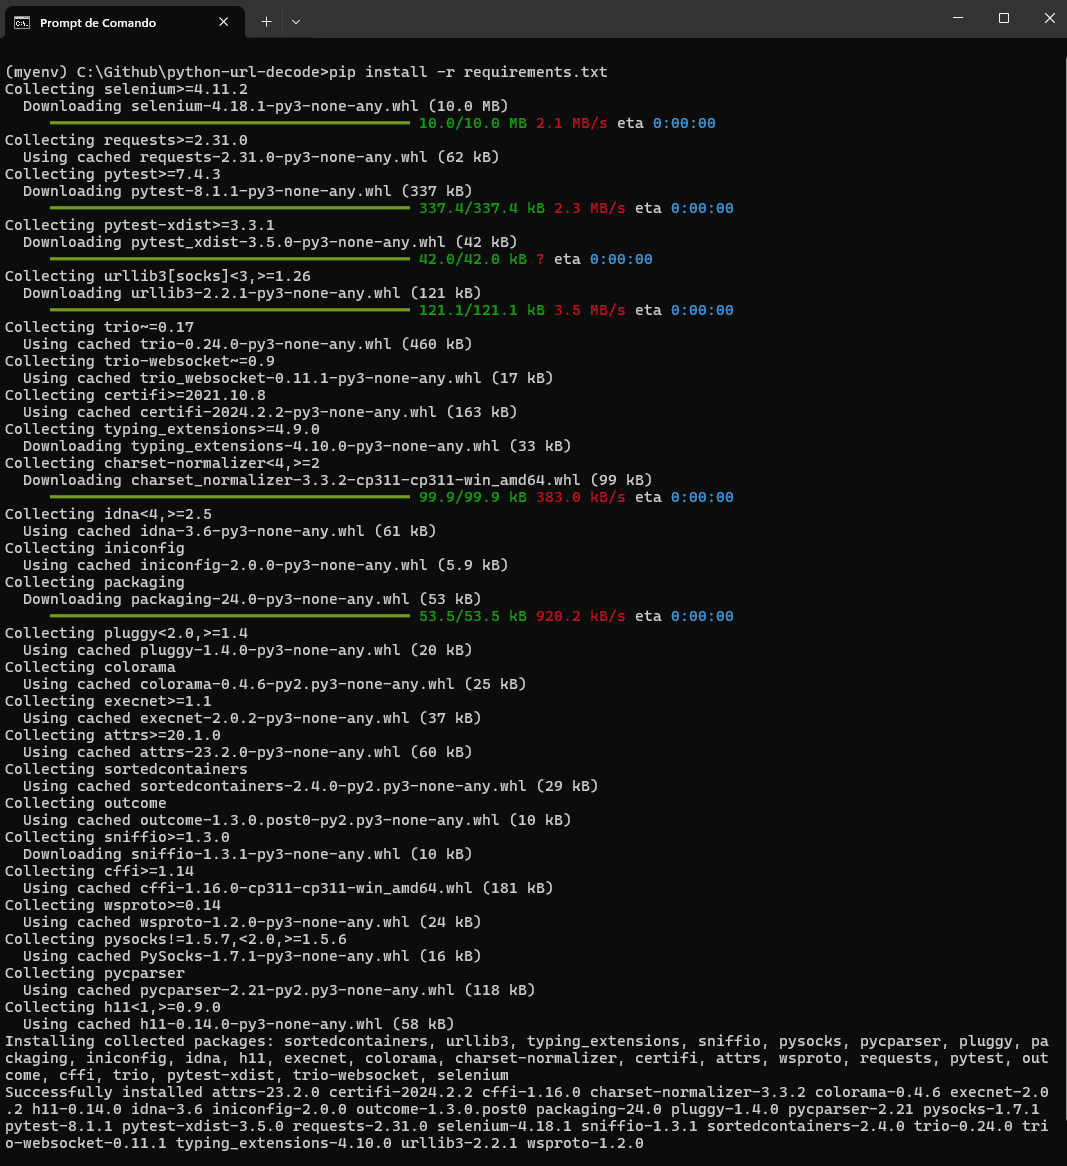
After running, you can see the below output:
Integrated Development Environment (IDE)
Select a suitable code editor or IDE to develop your Python test scripts. Popular options are Visual Studio Code or PyCharm. In this blog on using the Python URL decode() method, we will use Visual Studio Code for its user-friendly interface and robust features.
Now that we have installed the programming language, testing framework, and other related dependencies to run the tests, we will add the configurations necessary to run tests over the cloud platform in the section below.
Since we will be executing the test on LambdaTest, you must follow some steps to set up and obtain the necessary configuration details to connect your test script to LambdaTest.
- Create an account on LambdaTest.
- To find your Username and Access Key, go to your Profile avatar on the LambdaTest Dashboard and select Account Settings from the menu.
- To obtain your Username and Access Key from the LambdaTest Dashboard, navigate to the Password & Security tab and copy them.
- Once you get the Username and Access key from the LambdaTest platform, you must set it up in your test environment.
- Use the LambdaTest Capabilities Generator to create capabilities that specify your preferred browser and its supported operating systems based on your needs.
![]()


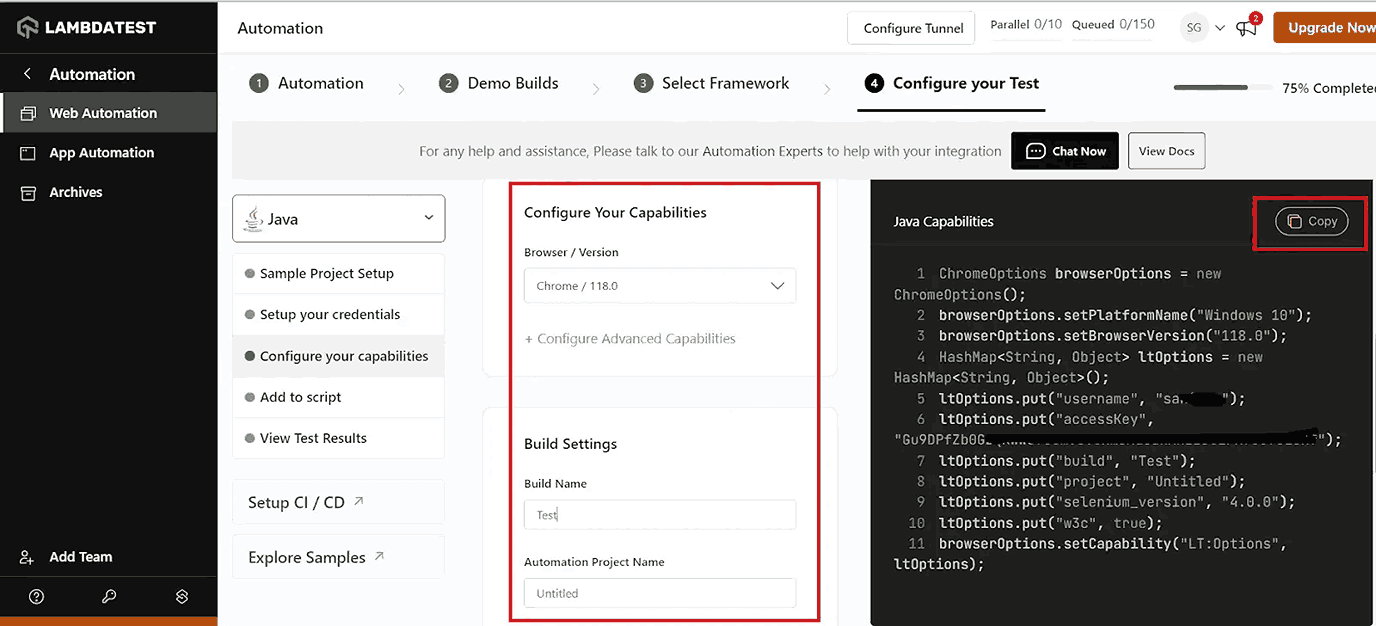
Now that you know where to get the details to connect your local test script to the cloud platform, you will learn how to add this collected data to your project setup in the section below.
Configuration Files
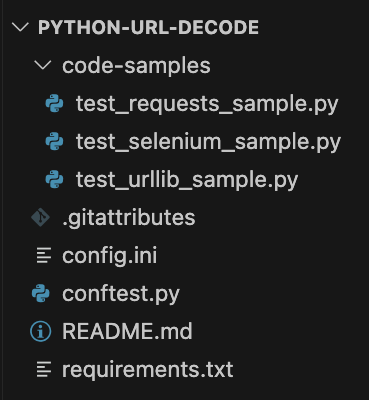
In order to run the code you will need two files in the root folder of the project: config.ini and conftest.py. These files are essential in configuring the Selenium WebDriver for automation testing purposes and ensuring seamless integration with the LambdaTest cloud grid.
The final project structure should be as follows:
config.ini
The config.ini file stores important parameters and settings for a Selenium automation script. It contains browser configurations, timeouts, URLs, and other settings the script needs to function correctly.
It is divided into two sections, each serving a specific purpose:
- [CLOUDGRID]: The [CLOUDGRID] section defines LambdaTest cloud grid settings, including grid_url, build_name, test_name, browser_version, selenium_version, and visual settings.
- [ENV]: The [ENV] section defines platform and browser_name configurations for the tests.
conftest.py
The conftest.py file sets up pytest fixtures and configurations shared across multiple test cases. It plays a crucial role in setup and teardown.
In the below section of this blog on using the Python URL decode() method, you will understand code actions better.
Code Walkthrough:
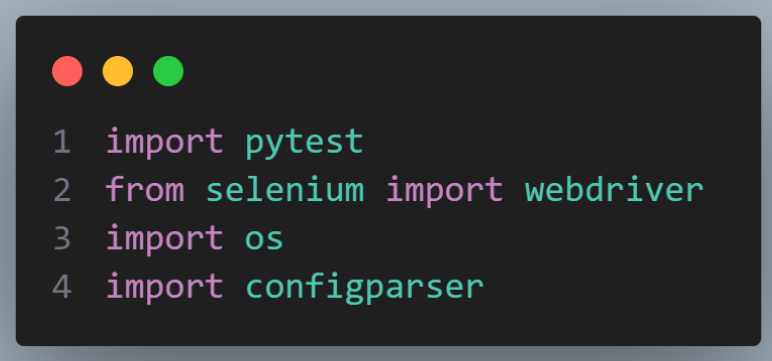
It imports essential modules like pytest, from selenium import webdriver, os, and configparser for handling configurations.
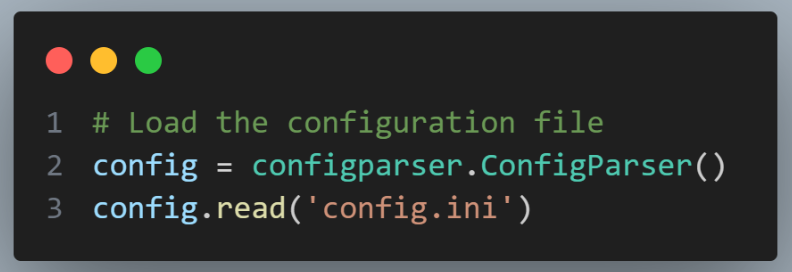
The config.ini file is read using the configparser module to retrieve values such as LambdaTest username, access key, grid URL, platform, browser name, and other capabilities required for the test configuration.
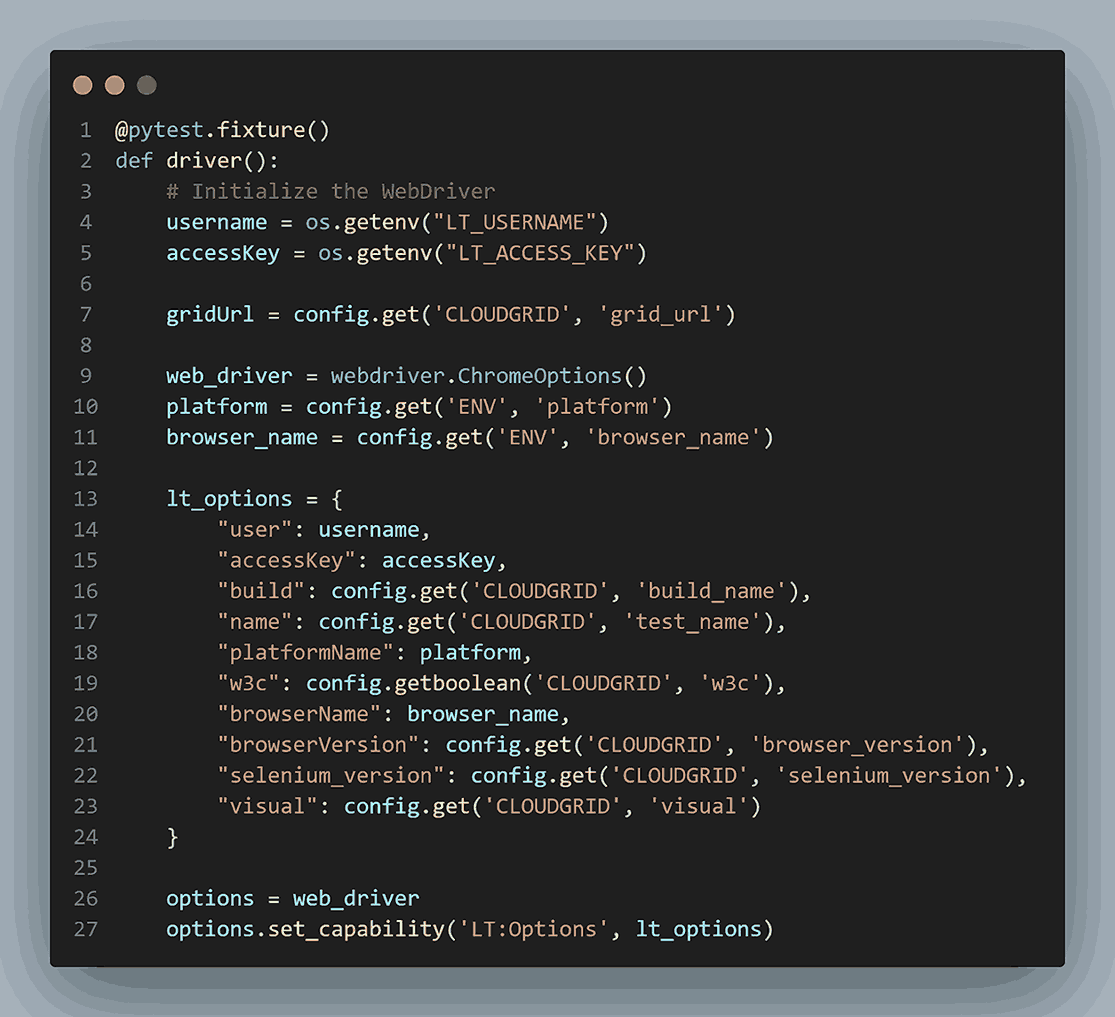
It creates WebDriver options, including LambdaTest-specific capabilities, by creating a dictionary named lt_options. These options ensure the tests run on LambdaTest’s cloud infrastructure with the specified configurations.
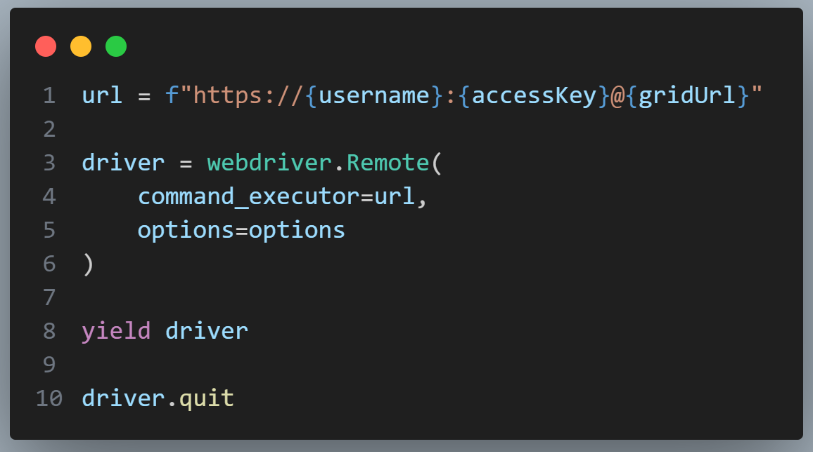
It then builds the URL to connect to the LambdaTest hub with the appropriate username, access key, and grid URL. The WebDriver instance is created using webdriver.Remote() by passing the command_executor (the LambdaTest hub URL) and the options with desired capabilities.
The yield driver allows the test functions using this fixture to access the WebDriver instance and use it for testing. After the test function(s) have been completed, the fixture will execute the driver.quit() statement to close the WebDriver and release any associated resources.
Once you have fulfilled these essential requirements, you will be ready to start testing!
In the below section of this blog on using the Python URL decode() method, you will learn how to implement the test for decoding the URL in detail.
Demonstration: Using Python URL Decode() In Selenium
Automating web applications for testing purposes often requires handling URLs that contain various encoded characters. This section explains how to use Selenium and Python’s urllib library for URL decoding.
Below is the test scenario for which we will run the test.
Test Scenario: Configuring a test to have an image as a baseline
Repeat these steps for two different encoded URLs. Additional Information: The URLs that need to be used in this test are:
|
Below is the code implementation of the given test scenario above.
Code Implementation:
Before jumping into the results, let’s understand the above code in detail.
Code Walkthrough:

We start importing the necessary libraries. pytest, the testing framework for writing and running tests, and urllib.parse.unquote a function for decoding percent-encoded parts of the URL.

Parameterization in pytest enables executing a single test function multiple times with varied arguments. Specifically, it was employed to evaluate three distinct URLs against the expected decoded results. By utilizing parameterization, the test_selenium_sample function is annotated to receive a series of parameters: the URL under test, the expected decoded URL, and an instance of the Selenium WebDriver (driver).
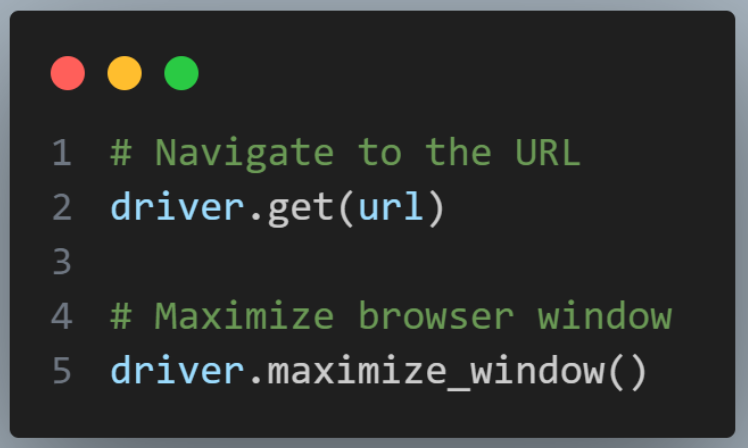
driver.get(url) directs the browser to the specified URL and driver.maximize_window() maximizes the browser window to ensure all elements are visible and interactable.
One of the Selenium best practices for web testing is to maximize the browser window before interacting with elements to ensure consistent behavior across different screen resolutions.
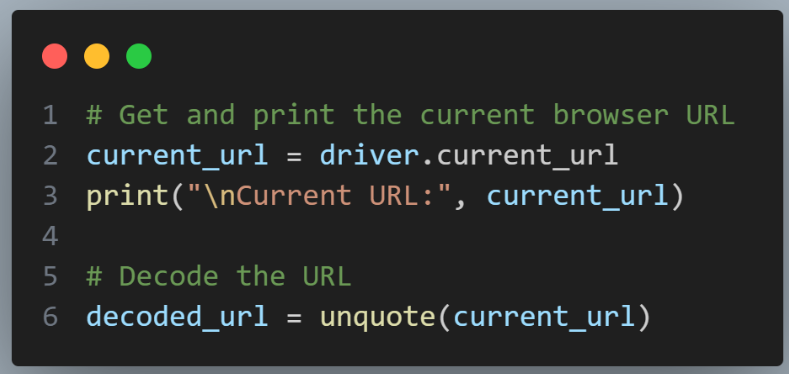
Now, we retrieve and print the current URL from the browser window. This URL is still in its encoded form, following the W3 Schools ASCII Encoding Reference. Then, the unquote() function decodes the current URL, transforming percent-encoded characters back to their original representation.
We implement assertion in Python by checking if the decoded URL matches the expected decoded URL passed to the test. This step is crucial for validating the correctness of the Python URL decode() method process.
You can learn more about assertions through this blog on using assertions in Selenium.

Finally, the decoded URL is printed.

Given we have more than one URL to decode, we can run it in parallel using the pytest plugin pytest-xdist.
Running tests concurrently can significantly decrease the total duration required for test suites to complete, which is particularly relevant for extensive test collections or when tests involve web interactions with varying delays. Utilizing the pytest-xdist plugin, an enhancement for pytest that enables concurrent test execution can drastically reduce testing durations.
Using the command pytest -n 3 triggers pytest to distribute tests across three parallel workers, allowing up to three tests to run simultaneously. This distribution is based on the total number of tests in the suite.
You can run the above code just by running the below command:
|
|
Below is the output.

The pytest-xdist plugin can significantly reduce testing durations by distributing tests across multiple CPUs or machines. However, having multiple CPUs or machines may be impossible for all. To overcome this challenge, you can use a cloud-based platform like LambdaTest. It is an AI-powered test orchestration and execution platform that lets you run manual and automated tests at scale with over 3000+ real devices, browsers, and OS combinations.
Subscribe to the LambdaTest YouTube Channel and stay updated with the latest tutorials on automation testing frameworks like Selenium, Cypress, Playwright, Appium, and more.
The combination of Selenium WebDriver and Python, especially with the urllib.parse.unquote function provides a straightforward solution for handling URL decoding in automated web tests. This approach simplifies working with complex URLs and ensures that automated tests can accurately reflect user interactions with web applications.
By following the structured approach demonstrated in the provided code sample, QAs can effectively incorporate URL decoding into their Selenium automation testing workflows, enhancing both the reliability and comprehensiveness of their test suites.
In the below section of this blog on Python URL decode(), you will learn some of the best particles to follow for URL decoding.
Discover the top Python frameworks to watch out for in 2025. Stay updated on the tools shaping the future of development.
Best Practices For URL Decoding
The complexities of URL decoding in Python extend beyond straightforward translation, necessitating adherence to best practices and an awareness of common pitfalls. These include correctly handling percent-encoded ambiguities, interpreting plus signs (+) as spaces or literal characters, managing reserved characters, respecting original character encodings, and robustly dealing with incomplete or malformed encodings.
Addressing these challenges ensures the accuracy and safety of the decoding process and enhances the operation’s overall efficiency.
- Use Standard Libraries: Third-party libraries like furl and purl offer a way to decode URLs. However, leveraging standard and well-established libraries is a best practice for handling the complexities and nuances of the process efficiently.
- Validate Input URLs: Validate the input before decoding. Ensure the URL format is correct and does not contain malicious or unexpected data. Utilizing regular expressions to match URLs against known safe patterns or employing dedicated URL validation functions from libraries can significantly mitigate risks.
- Handle Unicode Characters Carefully: URLs might contain Unicode characters. Ensure your decoding logic correctly handles such cases, keeping in mind the character encoding.
Conclusion
Understanding URL decoding is crucial for QA professionals, providing the foundation for efficient web navigation and data manipulation. This blog on using the Python URL decode() method explores advanced techniques for effective URL handling using Python’s urllib, requests, and Selenium. Custom decoding functions and best practices for error handling and performance optimization are highlighted as essential skills for modern web development.
Leveraging Selenium for automation testing, combined with pytest-xdist for parallel test execution, exemplifies the practical application of these concepts, significantly enhancing testing efficiency. This synergy streamlines web development workflows and accelerates the testing process, which is crucial for continuous integration and deployment pipelines. Mastering these areas will be essential for testing frameworks as web technologies evolve.
Frequently Asked Questions (FAQs)
What are the four types of URLs?
Four types of URLs are Absolute URL, Relative URL, Uniform Resource Name (URN), and Uniform Resource Locator (URL).
How to put a link in Python?
In Python, you can create a link in a string using HTML syntax. For example, to create a link to “https://example.com” with the text “Click here”, you can use:
| link = <a href=”https://example.com”>Click here</a> |
How does Python’s urllib.parse module handle URL decoding?
Python’s urllib.parse module uses the unquote() function to decode URL-encoded strings, translating percent-encoded components back to their original characters.
What are some advanced techniques for handling complex URL decoding in Python?
Advanced techniques for handling complex URL decoding in Python may involve using regular expressions for pattern matching or implementing custom decoding logic for specific use cases.
Got Questions? Drop them on LambdaTest Community. Visit now


