How to Perform Playwright Screenshot Comparison
Jaydeep Karale
Posted On: November 6, 2023
![]() 153455 Views
153455 Views
![]() 26 Min Read
26 Min Read
This article is a part of our Learning Hub. For more in-depth resources, check out our hub on Playwright Tutorial.
In the ever-evolving digital landscape, accessing the Internet and browsing websites has undergone significant transformations. With the rise of laptops, mobile devices, and an array of screen sizes and resolutions, how we engage with the web has evolved considerably. Furthermore, the multitude of browsers available for web browsing has added further complexity to web development and testing.
It is crucial to prioritize the consistent rendering of web content across a diverse range of devices and screen sizes. Ensuring that web pages and applications appear and function flawlessly across different viewports has become a paramount concern in web development practices.
To ensure faster and defect-free delivery, it has become increasingly important to reduce the time spent doing manual testing, be it functional or visual. Whilst functional testing helps ensure that the features work correctly, visual testing ensures that the website is rendered correctly as per the design.
Visual testing can be done manually, but it’s time-consuming, and it’s absolutely not possible to catch all changes with the naked eye. One way to reduce human errors and speed up the testing is by leveraging web automation frameworks. Playwright is one such framework that enables reliable end to end testing for web apps.
Playwright provides screenshot comparison out of the box with its TypeScript and JavaScript API, which can help visit a website, take a screenshot, and compare it with a baseline or last good known screenshot to detect any visual differences reliably.
Screenshot comparison using Playwright is a critical approach in software testing, ensuring visual consistency, improving user experience and maintaining software quality.
By incorporating Playwright screenshot comparison into the testing process we can identify and address visual issues promptly, enhancing the overall reliability and appeal of the applications and websites.
In this article, we will demonstrate how to perform screenshot comparisons in Playwright.
TABLE OF CONTENTS
- Why Playwright Screenshot Comparison?
- What is Playwright?
- How to Setup Playwright?
- How does Playwright Screenshot Comparison Work?
- How to Capture Screenshots Using Playwright?
- How to Perform Screenshot Comparison Using Playwright?
- How to Perform Playwright Screenshot Comparison on Cloud?
- Frequently Asked Questions (FAQs)
Why Playwright Screenshot Comparison?
Playwright screenshot comparison falls under visual testing which is a critical aspect of software quality assurance that focuses on validating the visual appearance and consistency of websites and mobile apps.
It involves comparing visual representations, such as screenshots or designs of a rendered website with the expected rendering as per product design and specification. By validating the pixel-level details, visual testing aims to identify any visual discrepancies, layout issues, or unintended changes that may impact the user experience.
Let us now see a business scenario that highlights the importance of visual testing.
An organization recently gave its website a facelift, hoping to make it look better and provide a more user-friendly experience. However, after these changes, the organization noticed a significant drop in key performance indicators like how many users were sticking around, how often people were leaving the site after viewing just one page (bounce rate), and the amount of time users spent on the site. These drops in performance raised concerns among the people in charge.
To determine what was causing these problems and make things right, the organization decided to use visual testing as a part of its quality control process. Visual testing would help them find any issues with the website’s appearance or issues that had come up due to the design changes. These problems might be why users were engaging less with the website.
To put this into context, the organization had already tried A/B testing, which showed that the new design was probably causing issues with user engagement. Visual testing was the next step in their quality control process to find the specific visual issues that made users less engaged with the website.
In a nutshell, visual testing is a vital part of the software testing process, focusing on the visual aspects that contribute to a seamless user experience. By employing visual testing techniques and leveraging the right tools, we can ensure the consistent and visually appealing delivery of their software, enhancing user satisfaction and overall quality.
Automated visual testing tools, such as Playwright, provide powerful capabilities to capture screenshots, compare pixel differences, and generate detailed reports. And talking about leveraging the right tools, let’s understand Playwright, which we will use to compare screenshots.
What is Playwright?
Playwright is an end-to-end web testing and browser automation framework by Microsoft. The Playwright API is available in multiple languages, such as Python, Java, .Net, JavaScript, and TypeScript, making it a strong candidate for end-to-end web testing.
Check out this video tutorial to elevate your skills in Playwright Java with this complete 5-hour guide!
At the time of writing this article on screenshot comparison in Playwright, the latest stable version of Playwright is 1.35.1, and as evident from npm trends, its popularity has been on the rise consistently since its release in 2020.
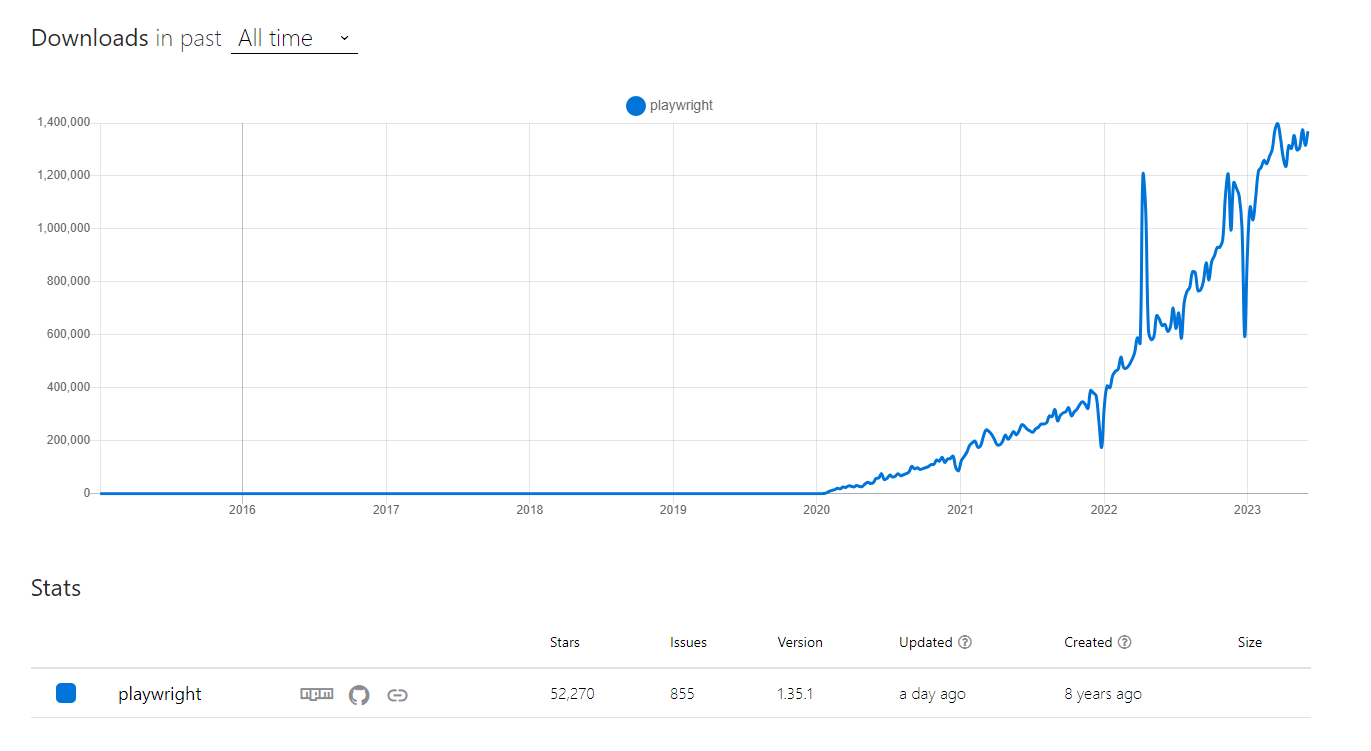
The reason for the rise in the popularity of Playwright is the easy-to-use API support for multiple languages, making adoption by developers of various tech stacks easy. This makes Playwright the perfect choice for end to end testing of web applications.
Key features of Playwright
- Cross browser compatibility and multi-platform support.
- Reliable testing with intelligent wait and web-specific assertions.
- Complete isolation and lightning-fast execution.
- Advanced tooling
Enhance your testing strategy with our detailed guide on Playwright Headless Testing. Explore further insights into Playwright’s capabilities in this guide.
How to Setup Playwright?
Before we move on to comparing screenshots using Playwright, let’s set up our development environment. Playwright is flexible and allows working with various languages such as Python, NodeJs, Java, .NET, JavaScript, and TypeScript.
For this blog, we will use the TypeScript API to perform a Playwright screenshot comparison.
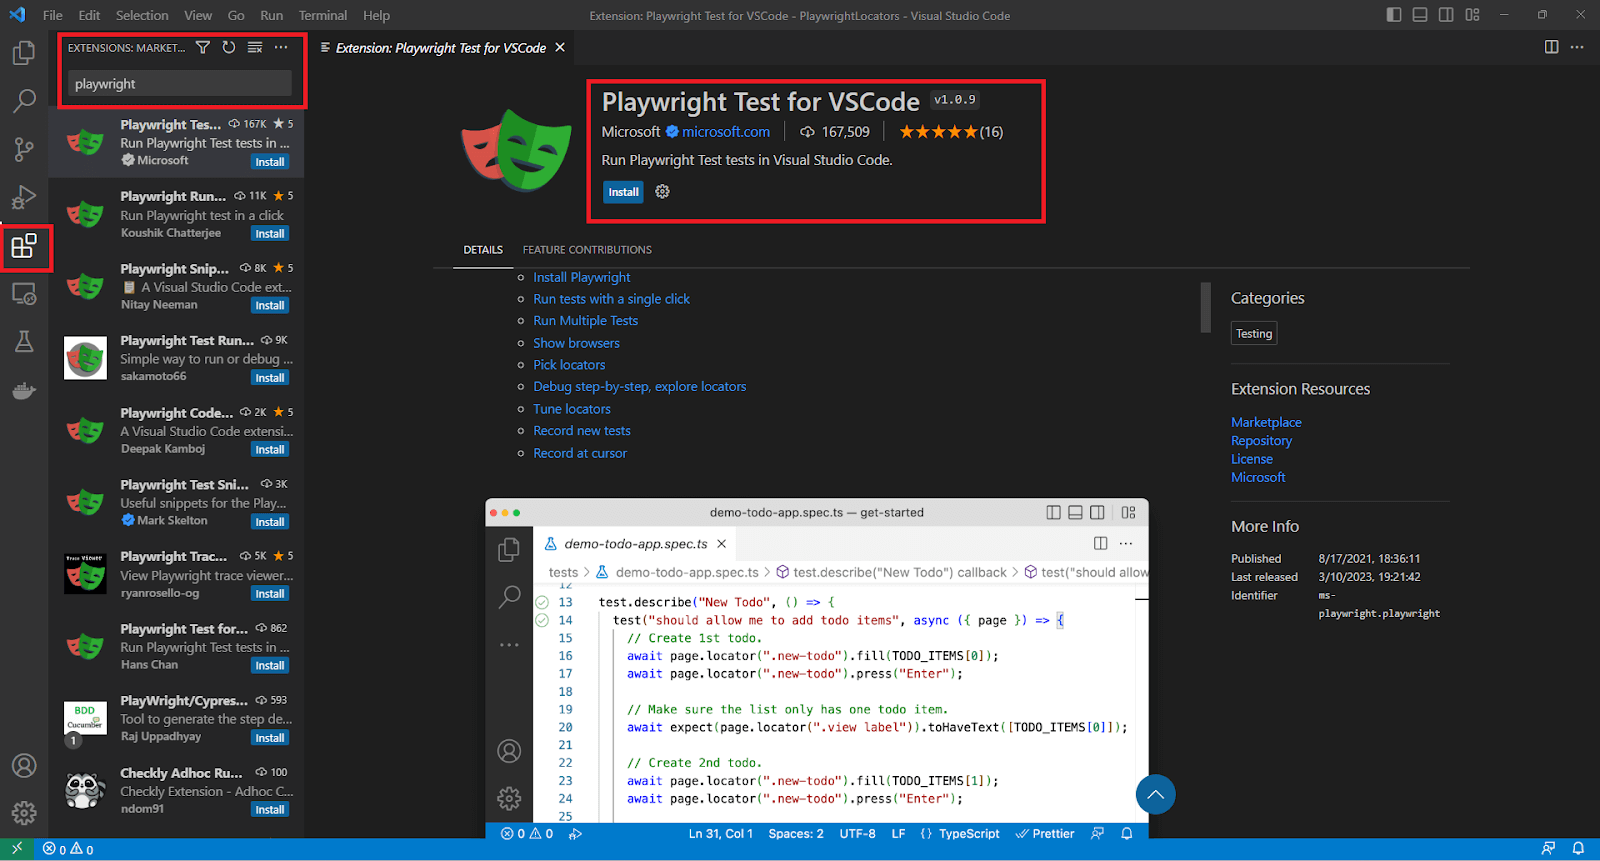
Using Playwright with its Typescript API has its own advantages. In terms of installation, there are two ways in which Playwright can be installed. One of them is using the Node.js package manager like npm. The second method is using the Playwright VS Code extension.
Navigate to the extension manager on VS Code and search for Playwright. Then, install the official Playwright Test for VS Code, as shown in the image below.
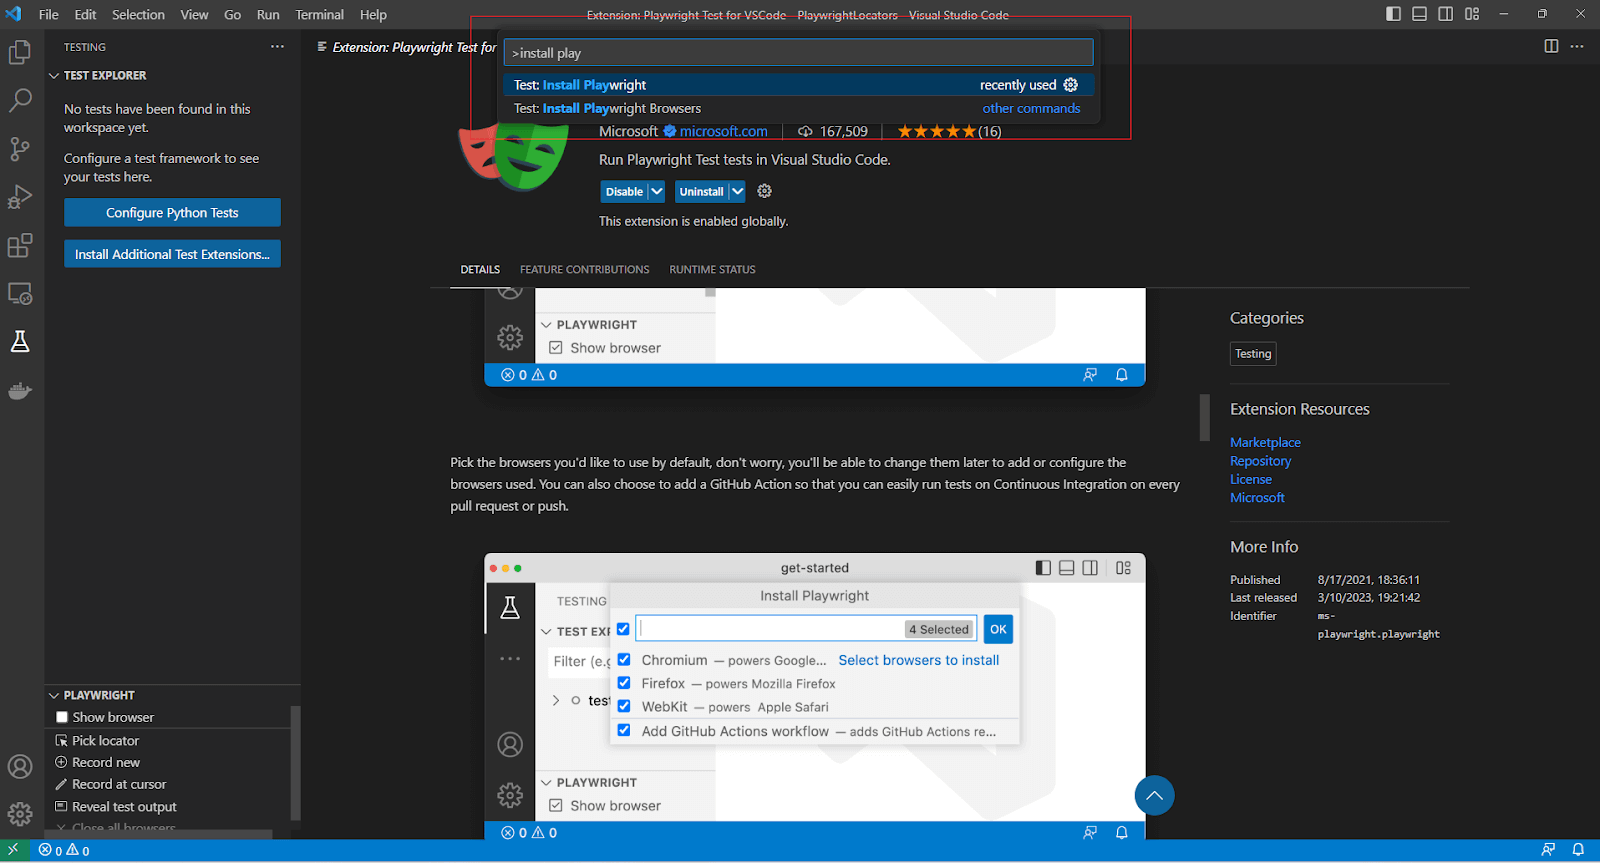
Once the official extension is installed, use the Install Playwright action from the command panel to get started.
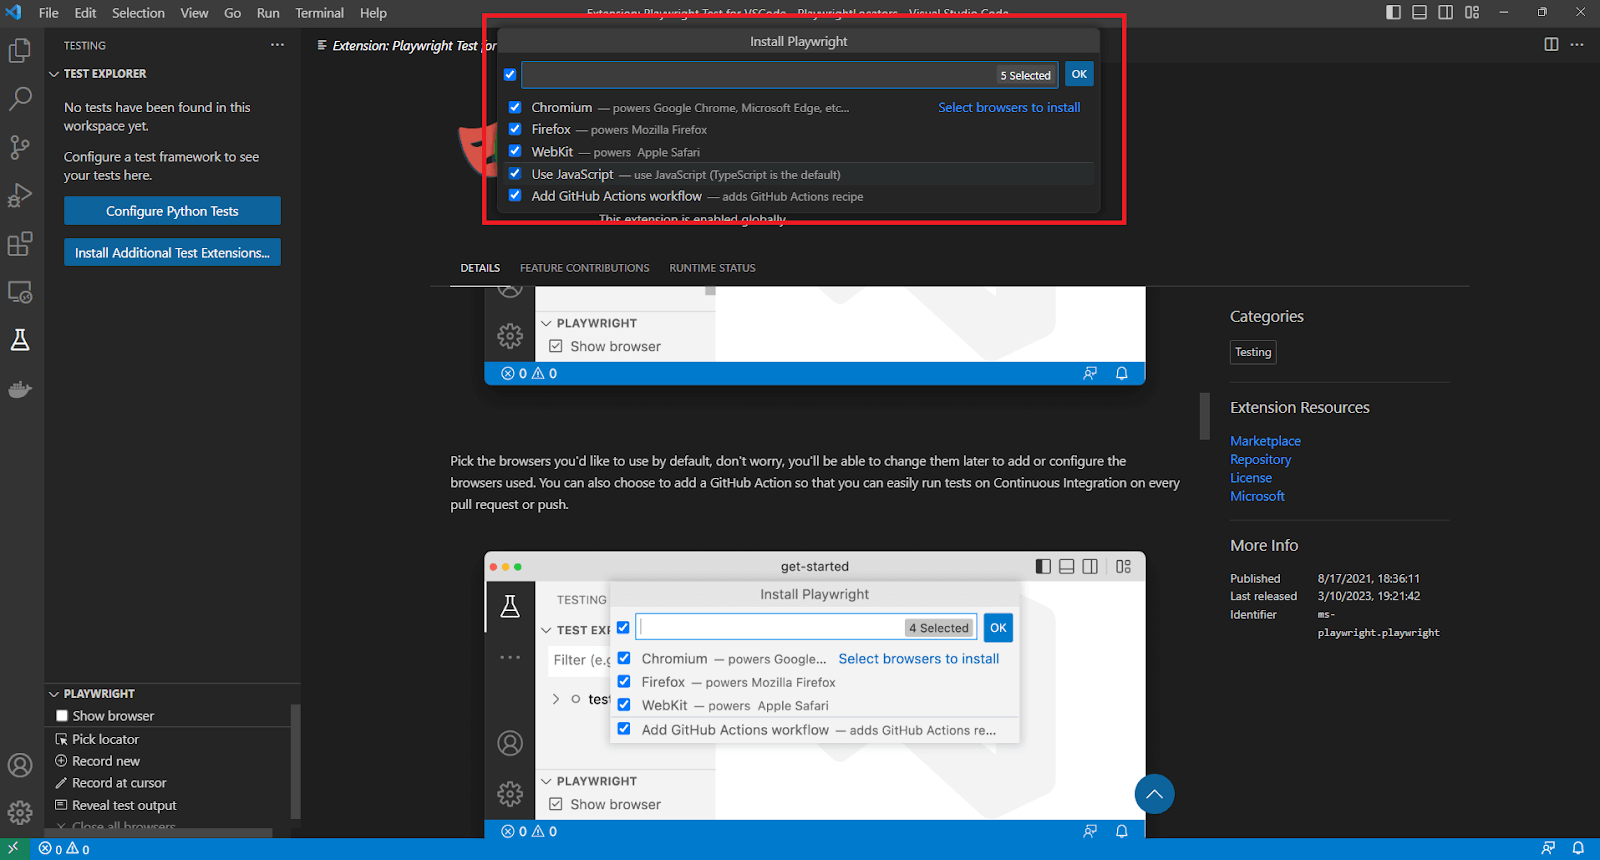
Successful installation will result in logs that look like the below image.
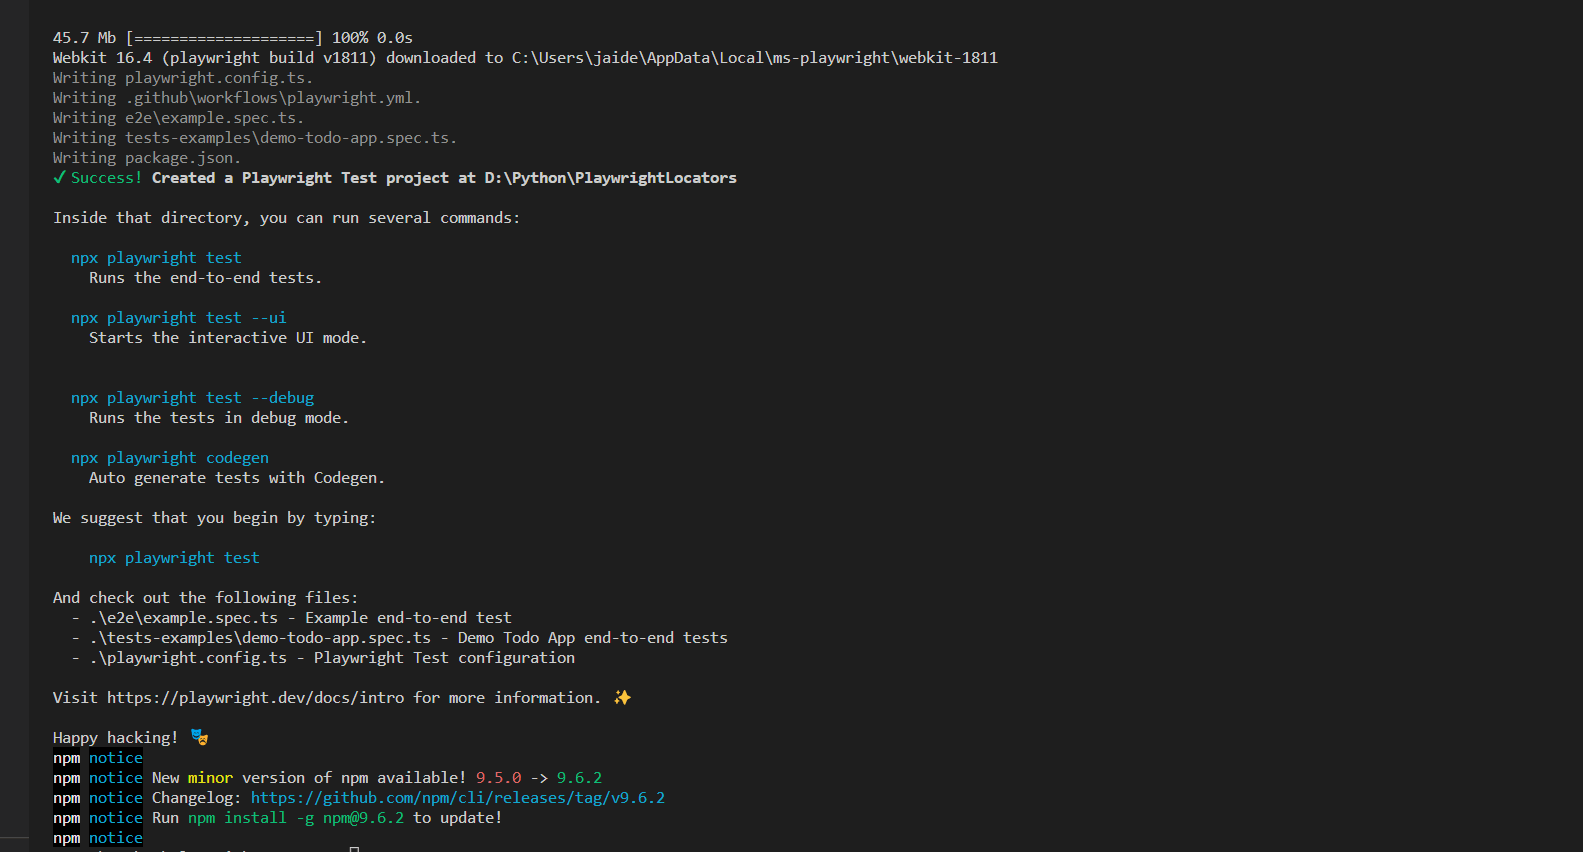
All the test scenarios used for the demo in this blog are compatible with Playwright version 1.32.2, Node.js version v18.15.0, and npm version 9.5.0.
How does Playwright Screenshot Comparison Work?
Under the hood, Playwright uses the pixelmatch library, a pixel-level image comparison library. When running the test for the first time, Playwright generates a reference or baseline screenshot.
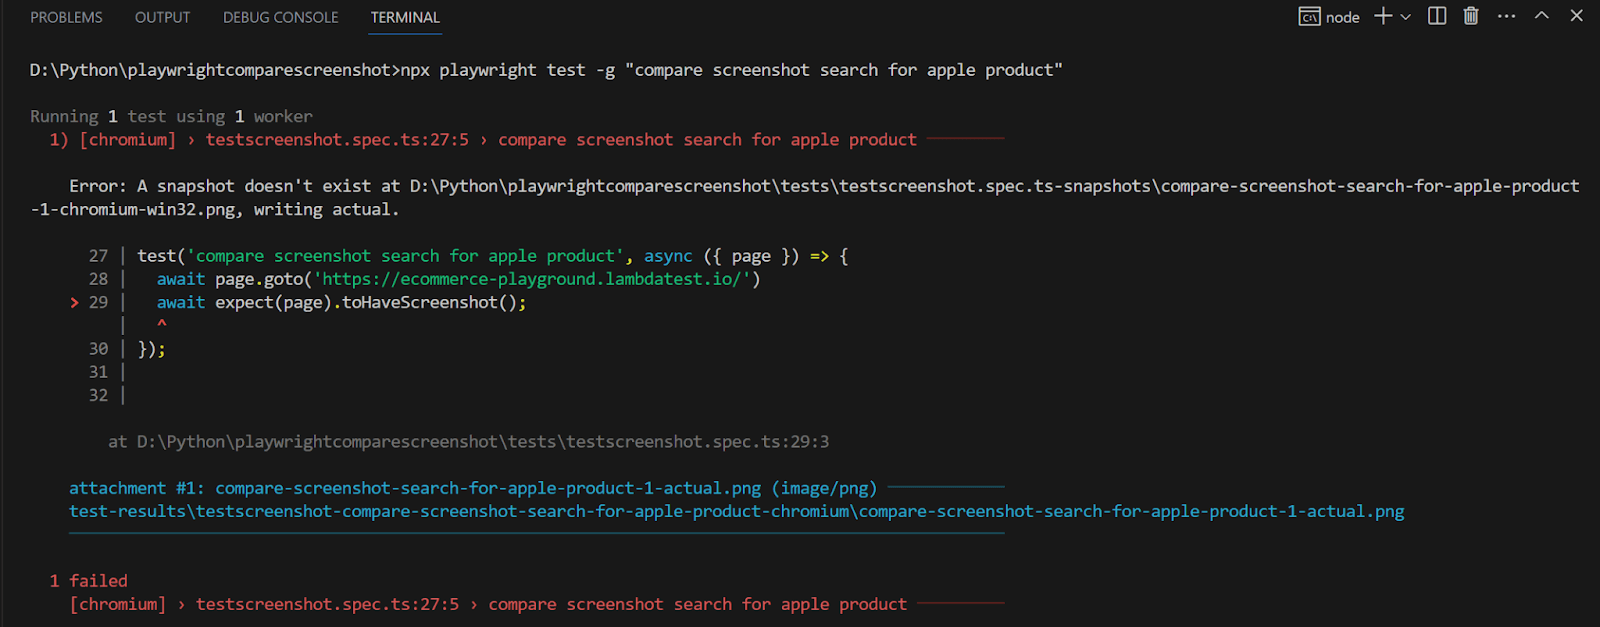
This is also the reason why the first test will always fail with an error “Error: A snapshot doesn’t exist at … writing actual”. The complete error is shown in the image below.
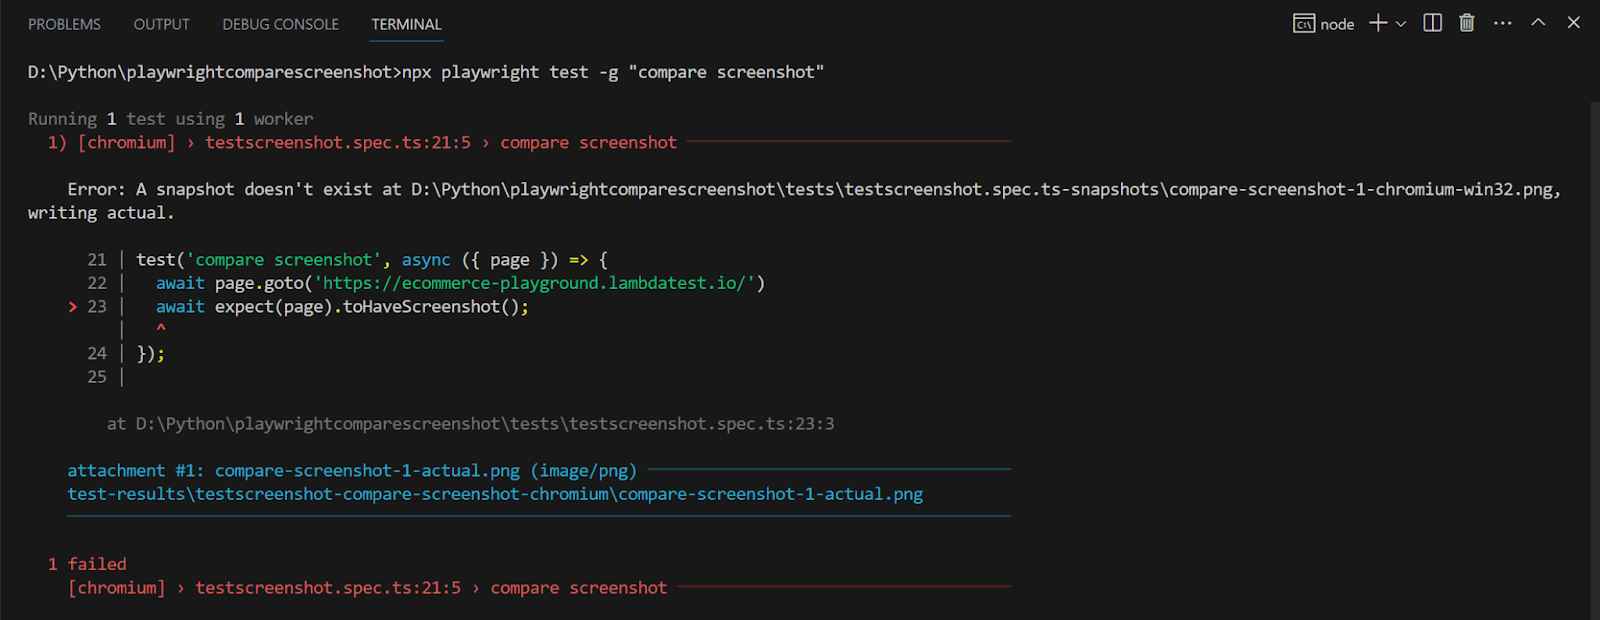
This step generates the reference/baseline screenshot at a location that is prepared using the naming convention test-results\< testscreenshot-name-of-test-browser>\
To provide a predefined reference screenshot, we need to create a folder with the name < filename_containing_tests-snapshots > under tests and save the reference file with the name < testname-1-browser-operating_system.png >
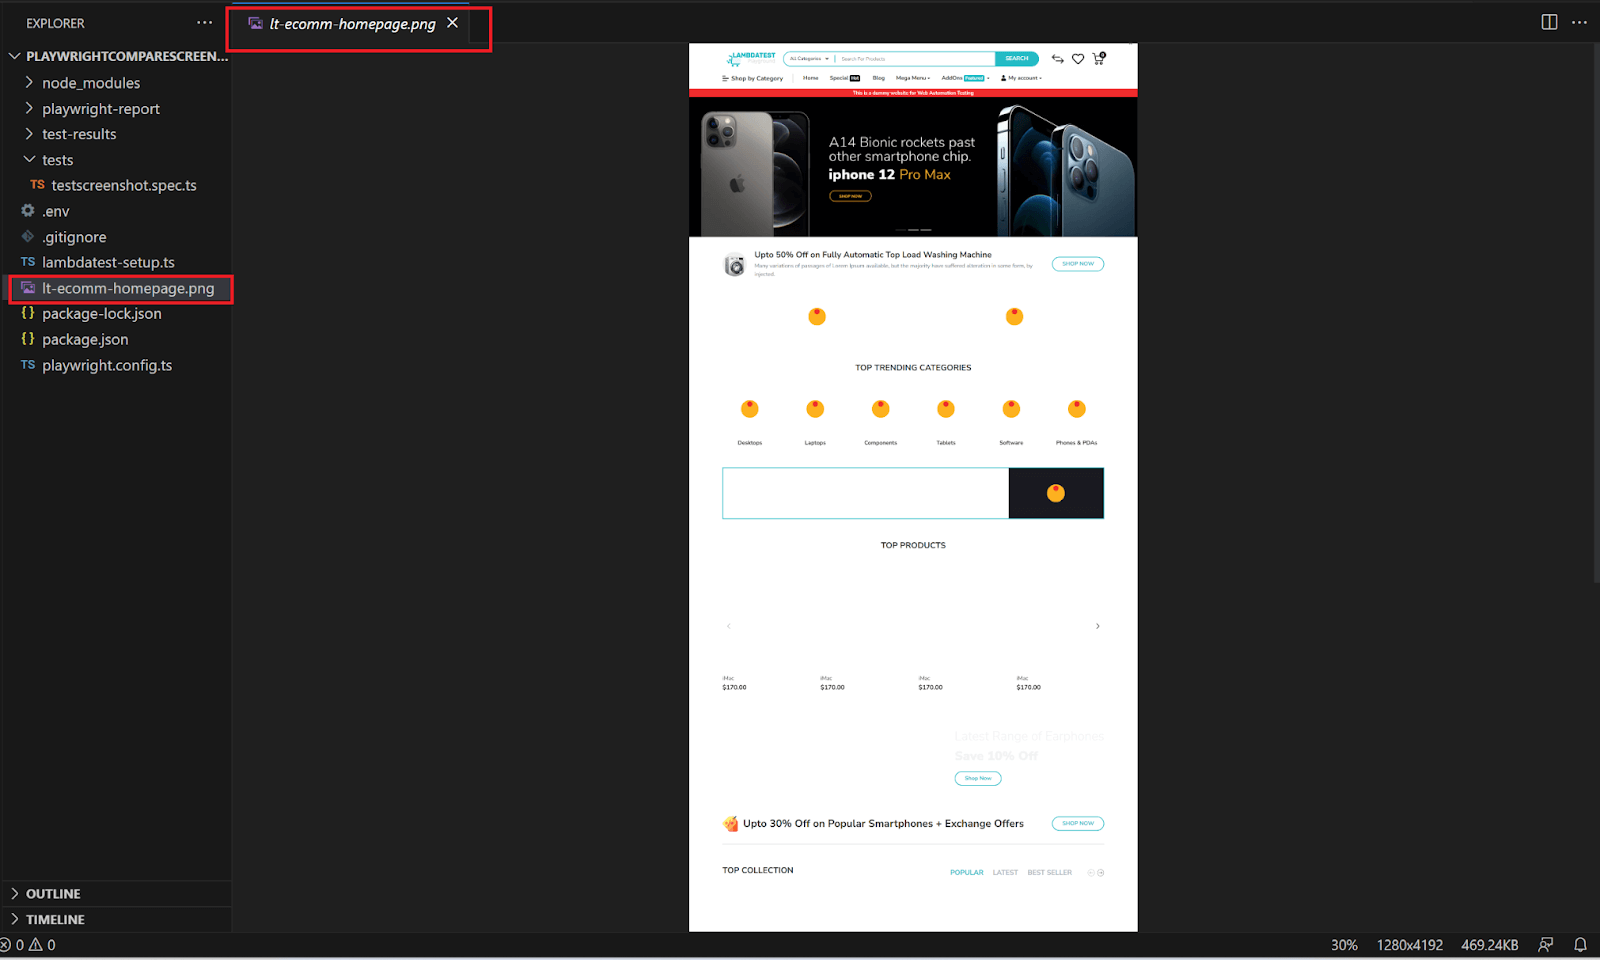
In our case, this is how the reference screenshot would look like if we chose to provide it.

This is extremely helpful when running testing pipelines in a continuous integration setup. All well-known screenshots can be configured so that each test run compares against the expected result. This helps ensure that our pipeline can identify any deviation from the ideal results.
In the next section, we will look at how to run a screenshot comparison in Playwright.
How to Capture Screenshots Using Playwright?
To explore screenshot comparison in Playwright, we first need to understand how to capture screenshots using Playwright. The main API to capture screenshots is the page.screenshot(), shown below, is the method information:
Syntax:
page.screenshot()
Parameters
- type: (string, default: png) – Decides the file extension of the saved screenshot
- path: (string) – The file path to save the image. If the path is a relative path, then it is resolved relative to the current working directory. If no path is provided, the image won’t be saved to the disk
- mask: (Array< Playwright Locator >) – Used to specify the locators that should be masked when the screenshot is taken. The default overlay color is pink, but it can be customized with the help of the maskColor parameter
- maskColor: (string) – Used to customize the color of the masked locators.
- clip: (x: number, y: number, width: number, height: number) – An object that allows clipping of the resulting screenshot
Parameters (Optional)
Shown below are some other optional configurable parameters that can be further used with the page.screenshot() method in Playwright:
animations: (string, default: allow)
When set to disabled, it stops CSS animations, CSS transitions, and web animations.

caret: (string, default: hide)
When set to hide, the screenshot will hide text caret.

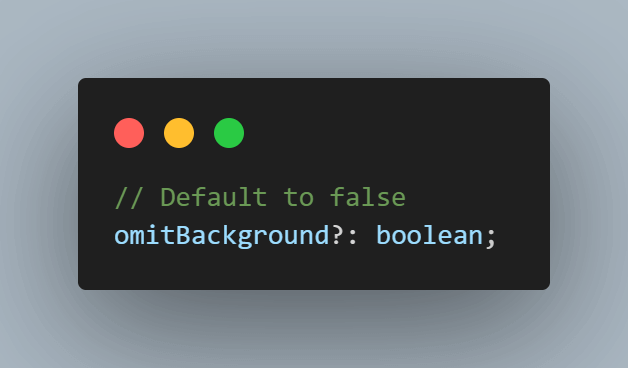
omitBackground: (boolean, default: false)
It hides the default white background and allows capturing screenshots with transparency. Not applicable to jpeg images.
scale: (string, default: device)
Adjust the screenshot depending on devices with high dpi.

timeout: (number, default: device)
Adjust the screenshot depending on devices with high-dpi.

Let us now demo how we can configure its behavior to capture full-page screenshot, element screenshot, and capture the data into a buffer, which can be passed to third-party pixel comparison tools.
To demonstrate the Playwright screenshot comparison, we will be using the LambdaTest eCommerce playground.
Full-Page Screenshot Comparison Using Playwright
Let us see how to perform a full-page screenshot comparison in Playwright. We will do this by capturing a full-page screenshot of the LambdaTest eCommerce playground homepage.
Step 1: Navigate to the URL of the LambdaTest eCommerce demo website using the page.goto() method.
Step 2: Once on the page, use page.screenshot() to capture a full page screenshot by setting the parameter fullPage: true. The path parameter is used to set the name and location of the captured file.

Here is what the generated screenshot looks like.
Element Screenshot Comparison Using Playwright
The overall appearance and user experience of a website may not change entirely on a regular basis, but it’s a common occurrence for specific elements to be modified or updated. In such a case, we can combine Playwright locators and the page.screenshot() method.
For example, consider that on the demo eCommerce website, we have to capture the screenshot of the search field before and after the search operation is performed. For implementing such a test, we will need first to locate the search field and then capture the screenshot.
Step 1: To locate the search field, we use the Playwright locator getByRole(‘textbox’, {name: ‘Search For Products’}).
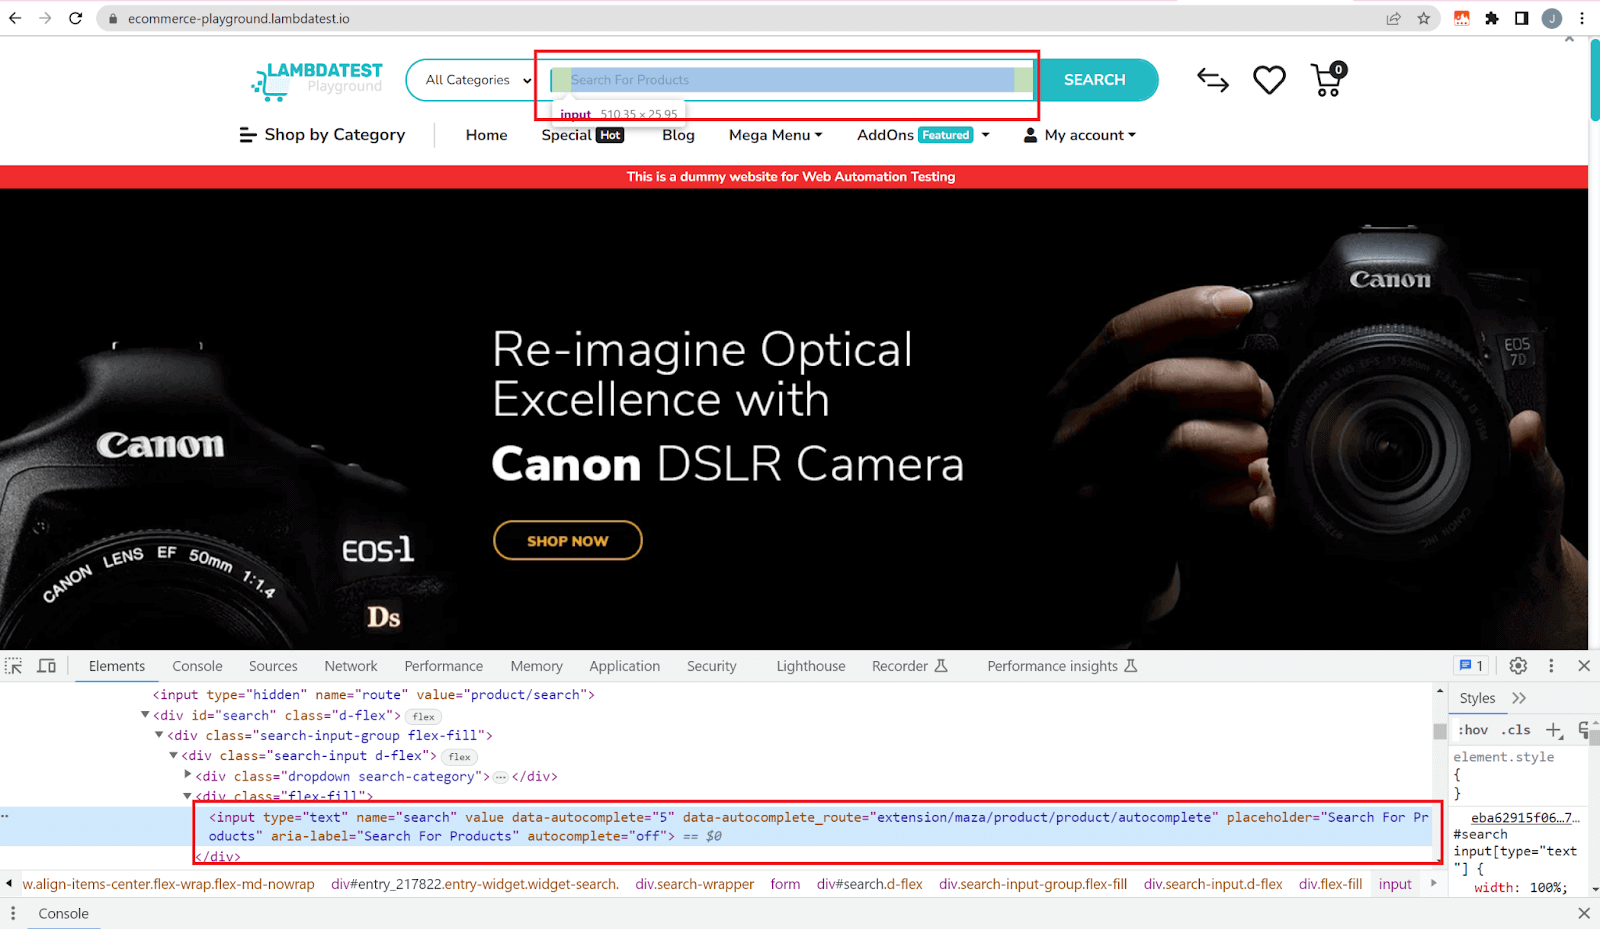
Step 2: On the located element, call the screenshot() method by using chaining.
The path is the file path to save the image. The screenshot type will be inferred from the file extension. If the path is a relative path, then it is resolved relative to the current working directory. If no path is provided, the image won’t be saved to the disk.

Execution
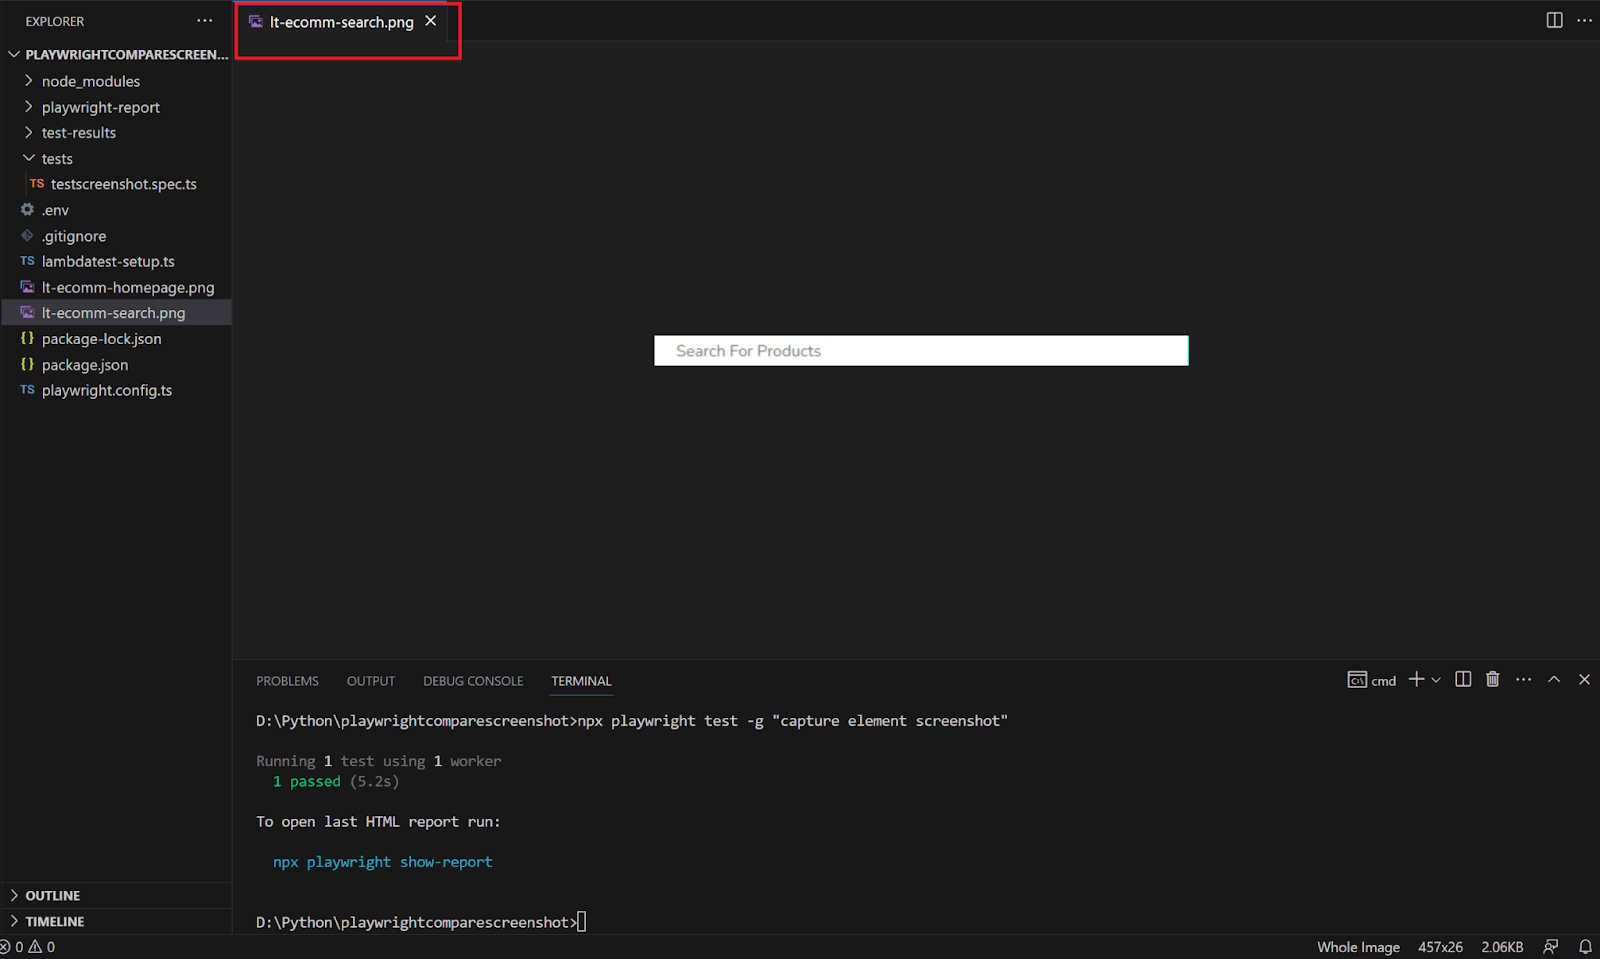
Capture Screenshot Into Buffer Using Playwright
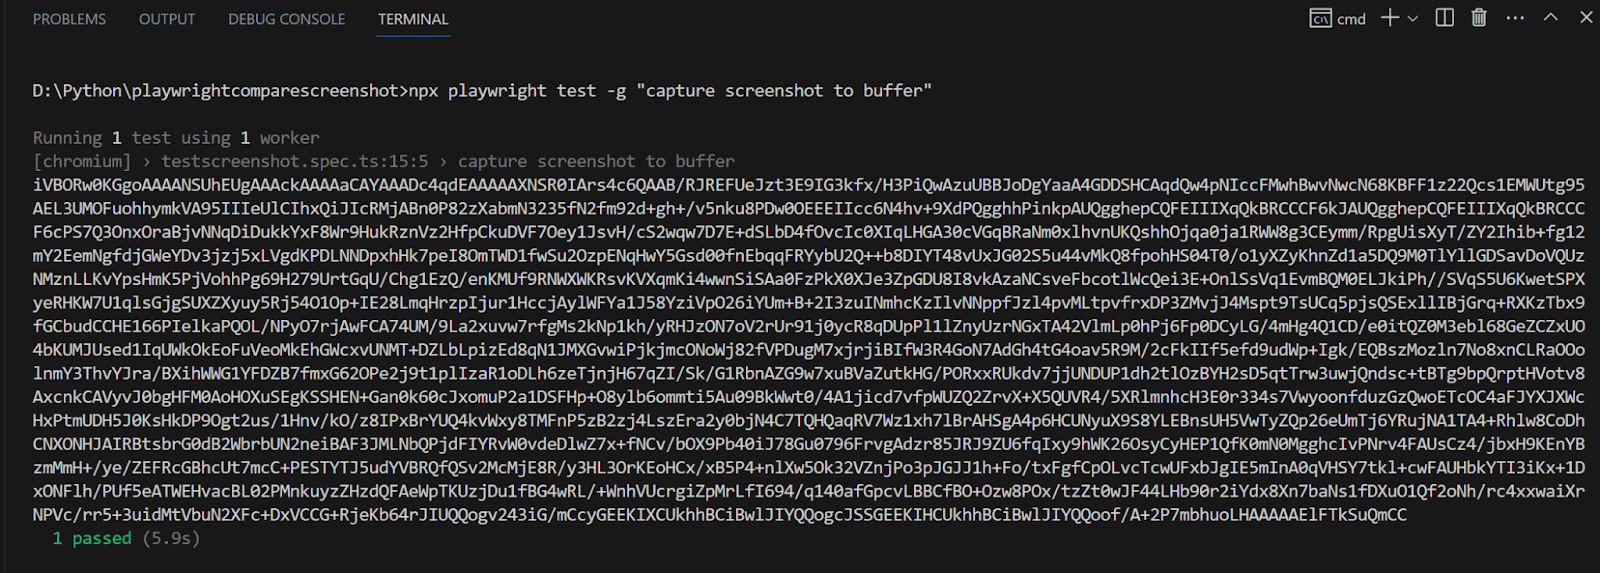
We can also leverage third-party image comparison or post-processing tools by capturing the image data into a buffer.
We use the same example of locating the Search field, but instead of capturing a screenshot, we write the data to a variable called buffer.

Execution
Now that we have seen how to capture screenshots using Playwright let us move on to understand how visual regression testing can be performed using screenshot comparison in Playwright.
How to Perform Screenshot Comparison Using Playwright?
In this section on performing screenshot comparison using Playwright, we will use the LambdaTest eCommerce website.
Test Scenario:
|
Implementation for Generating Baseline Screenshot
|
1 2 3 4 |
test('compare screenshot', async ({ page }) => { await page.goto('https://ecommerce-playground.lambdatest.io/') await expect(page).toHaveScreenshot(); }); |
- Call the goto() method on the page object to navigate to the demo website.
- Use the expect() Playwright assertion on the page object to call toHaveScreenshot() method to capture the baseline.
Execution
We run the single test using the npx playwright test -g “compare screenshot” command on Chromium.
As expected, the test fails since we only capture the baseline screenshot for subsequent comparison.
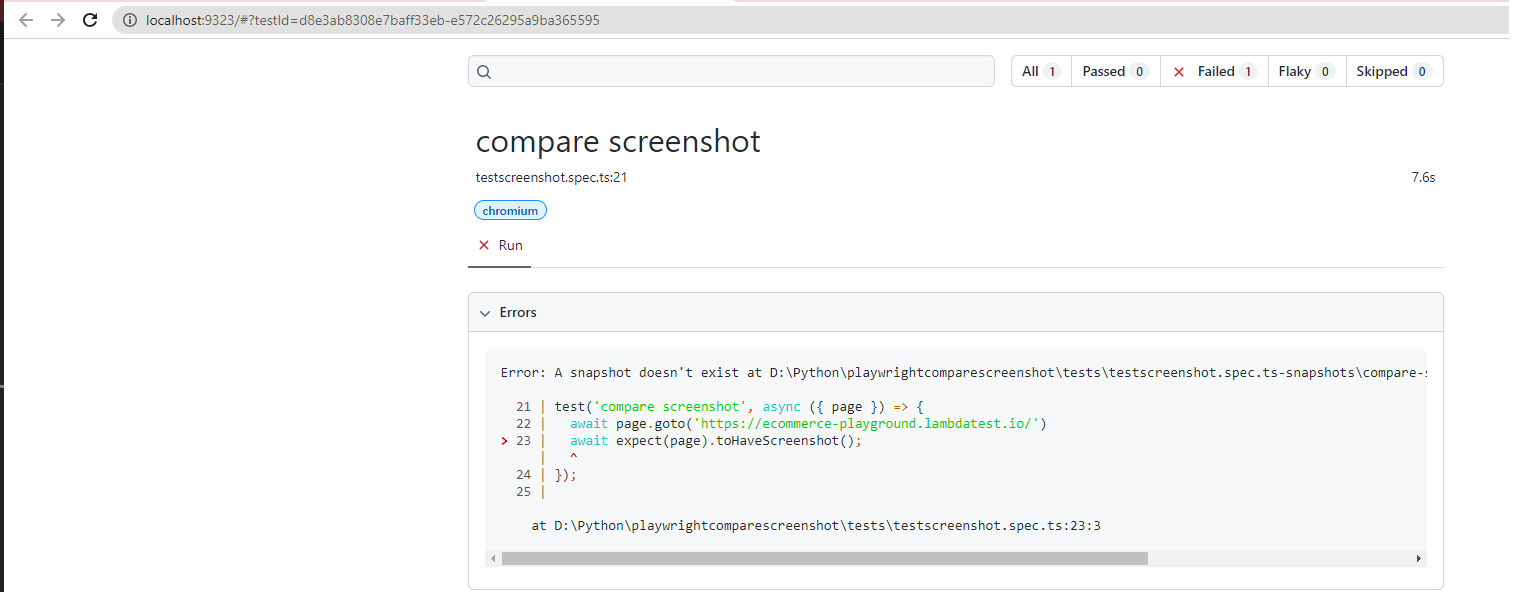
The capture baseline screenshot is created in the directory test-results\testscreenshot-compare-screenshot-chromium\ based on the name of the test and the browser being used.
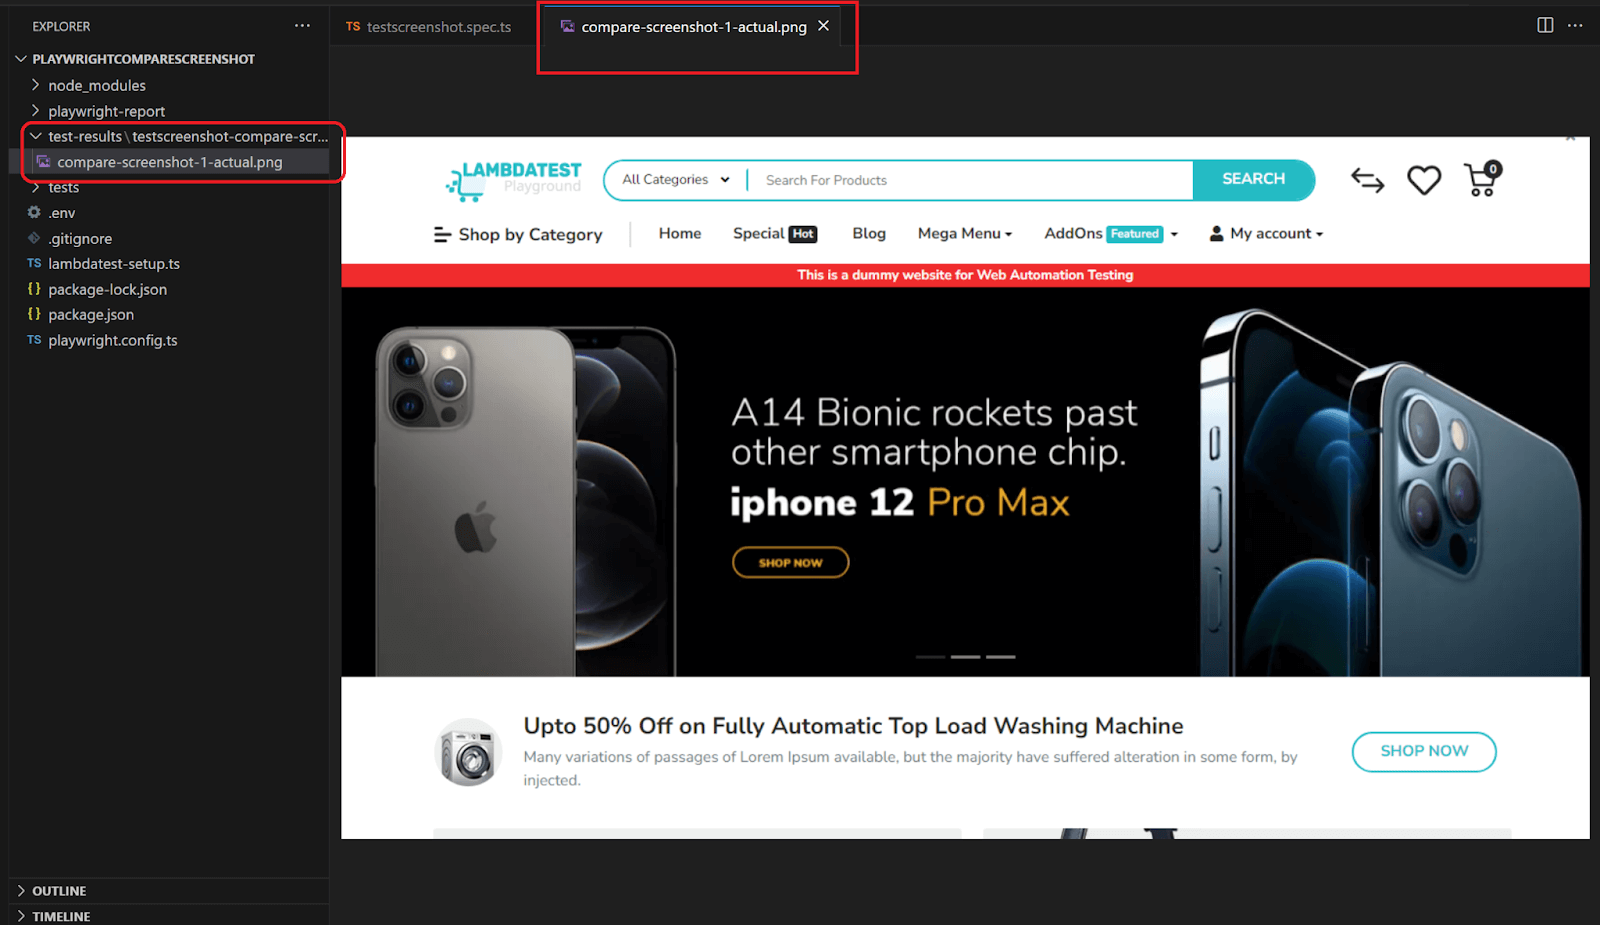
Implementation for Introducing Difference
|
1 2 3 4 5 |
test('compare screenshot', async ({ page }) => { await page.goto('https://ecommerce-playground.lambdatest.io/') await page.getByRole("textbox", {name : "Search For Products"}).fill('test compare screenshot') await expect(page).toHaveScreenshot(); }); |
The steps to navigate to the demo website remain the same.
On the page, we use the getByRole() Playwright locator to find the search input field. We use fill() in the located search field with ‘test compare screenshot’ arbitrary text to introduce a difference.
We then capture the screenshot using toHaveScreenshot() and the expect() assertion.
Execution
Run the test using the npx playwright test -g “compare screenshot” command on Chromium.
The command does the following things:
- Show the difference in the number of pixels between the baseline and the latest screenshot.
- Generate two more screenshots, one named “compare-screenshot-1-expected.png,” representing the expected output according to Playwright, and the other named “compare-screenshot-1-diff.png,” illustrating the disparity between the baseline and the captured screenshot.
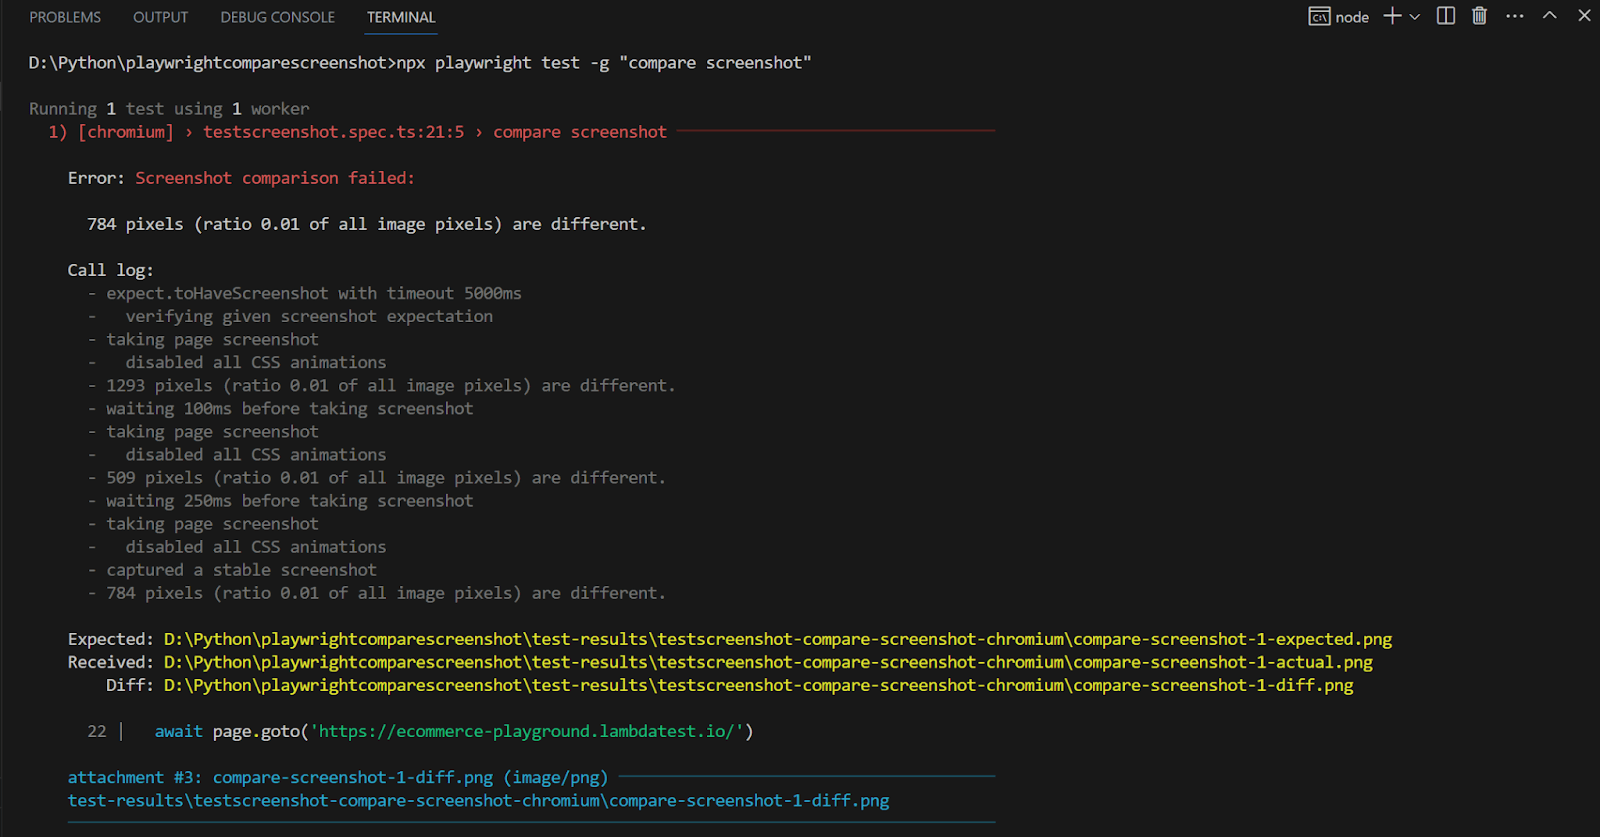
Here is what the test-results folder looks like after command execution, and it contains all the screenshots, i.e., the baseline, the expected, and the difference.

Shown below is compare-screenshot-1-diff.png, which highlights the difference between the expected and actual image. It is clear that in addition to the text we introduced, our demo website also has some other font-related issues.
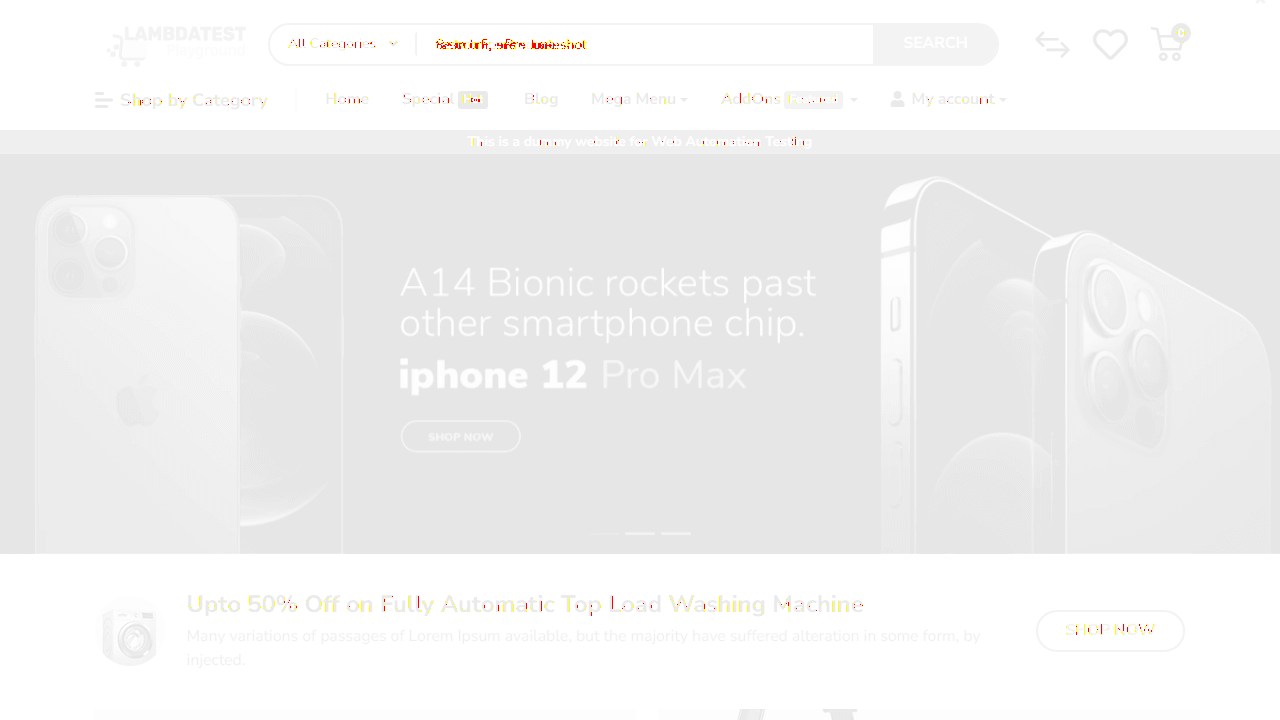
Here are all three images, i.e., the baseline, the screenshot captured, and the difference, all presented side-by-side to get a better idea.
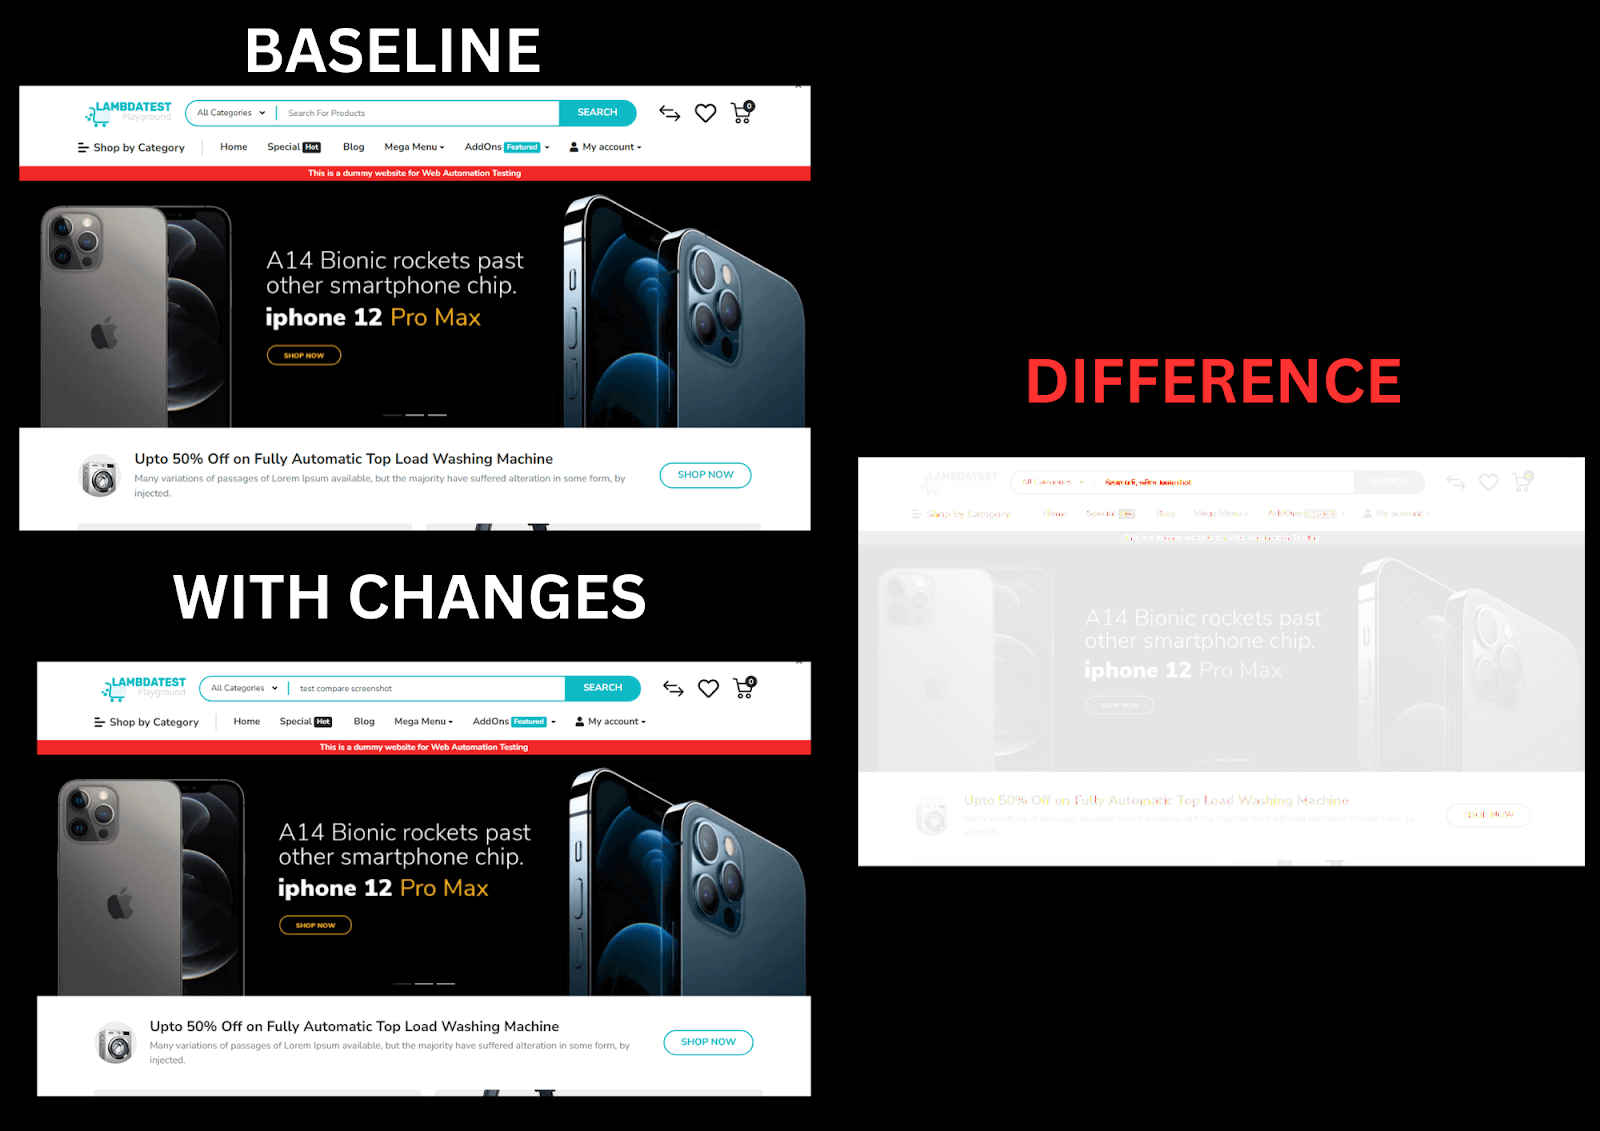
Let us repeat the test, but instead of searching for an arbitrary text, this time, search for an actual product in the database.
Test Scenario:
|
Implementation for Generating Baseline Screenshot
|
1 2 3 4 |
test('compare screenshot search for apple product', async ({ page }) => { await page.goto('https://ecommerce-playground.lambdatest.io/') await expect(page).toHaveScreenshot(); }); |
We will write a new test named ‘compare screenshot search for apple product.’
The page.goto() method is used to navigate the demo website under test. The toHaveScreenshot() method is used to capture the baseline screenshot.
Execution
The test can be run using the command npx playwright test -g “compare screenshot search for apple product.”
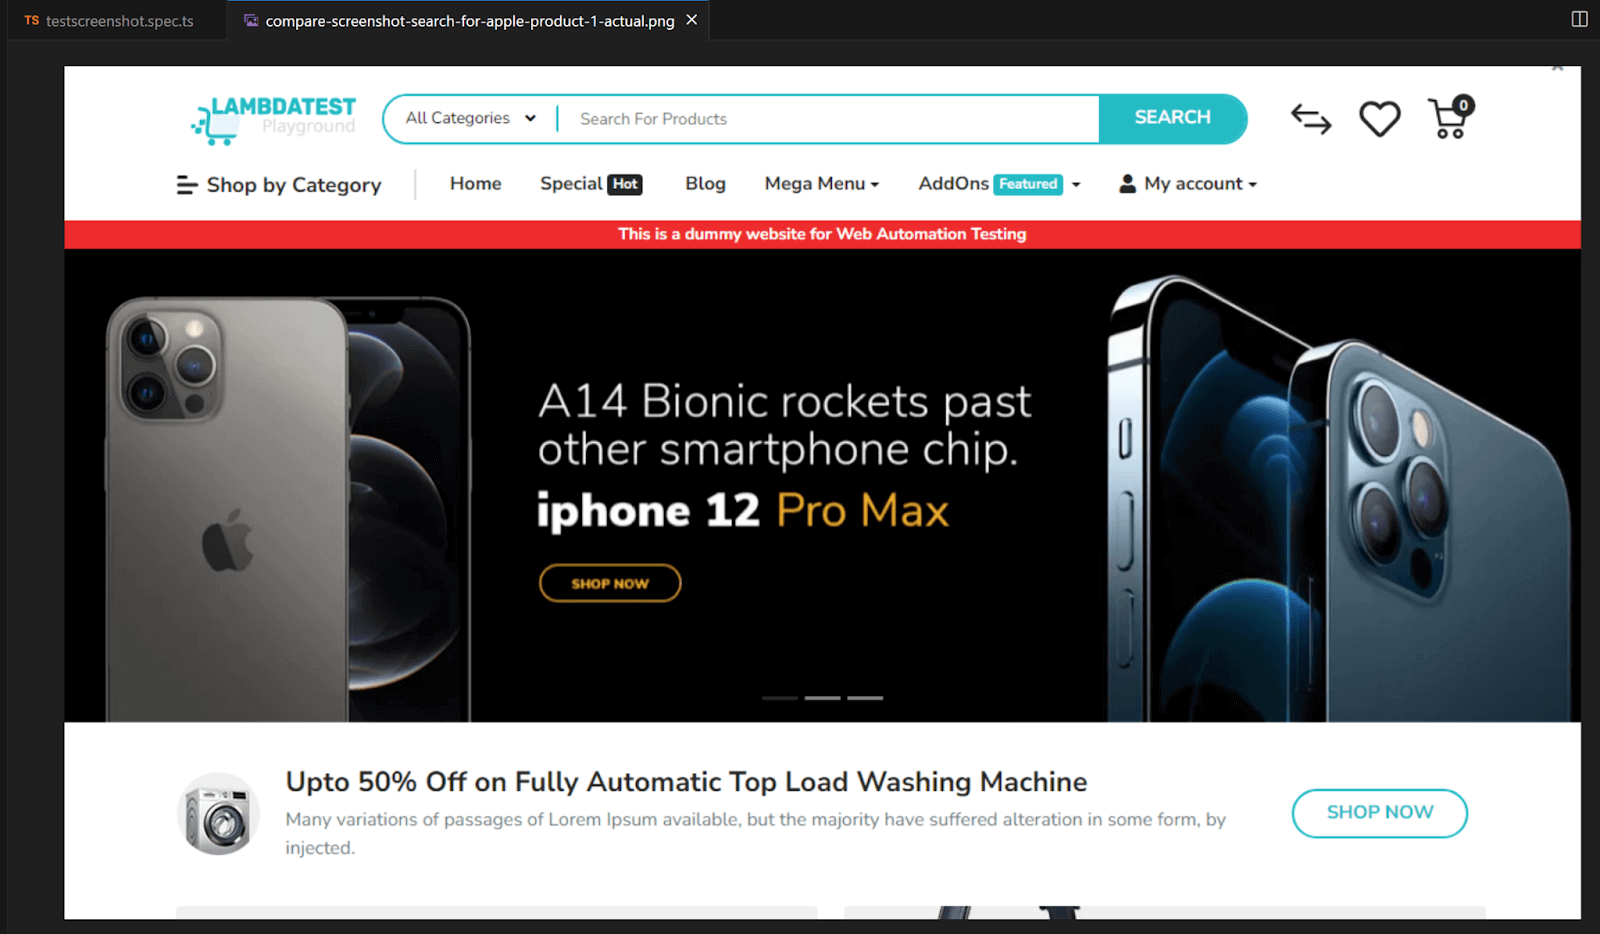
As expected, the test fails and generates the baseline screenshot under the test-results directory but in a newly created folder based on the name of the test, compare screenshot search for apple product.
Shown below is the generated baseline screenshot.
Implementation for Generating Apple Product Search Screenshot
|
1 2 3 4 5 |
test('compare screenshot search for apple product', async ({ page }) => { await page.goto('https://ecommerce-playground.lambdatest.io/') await page.getByRole("textbox", {name : "Search For Products"}).fill('apple') await expect(page).toHaveScreenshot(); }); |
We use the Playwright locator to find the ‘search’ field and fill() with the search term ‘apple.’
Capture the screenshot after the search by calling the toHaveScreenshot() method on the page.
Execution
Run the test using the command npx playwright test -g “compare screenshot search for apple product”.
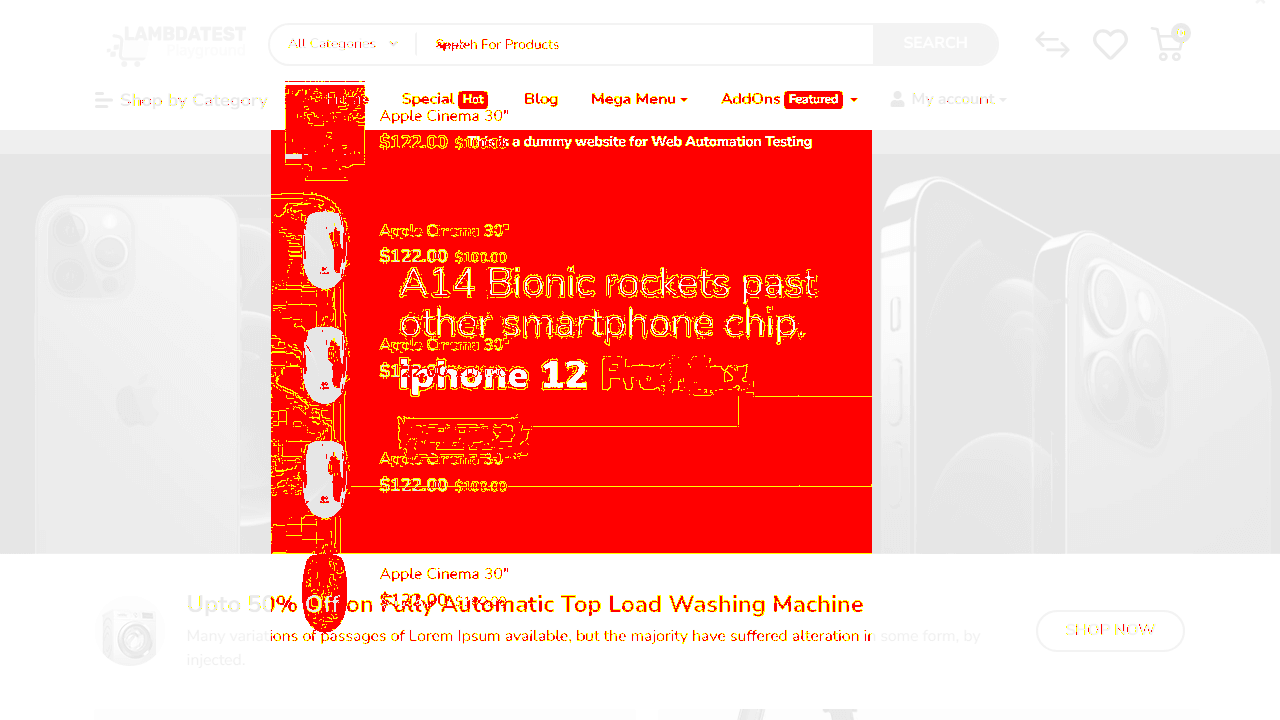
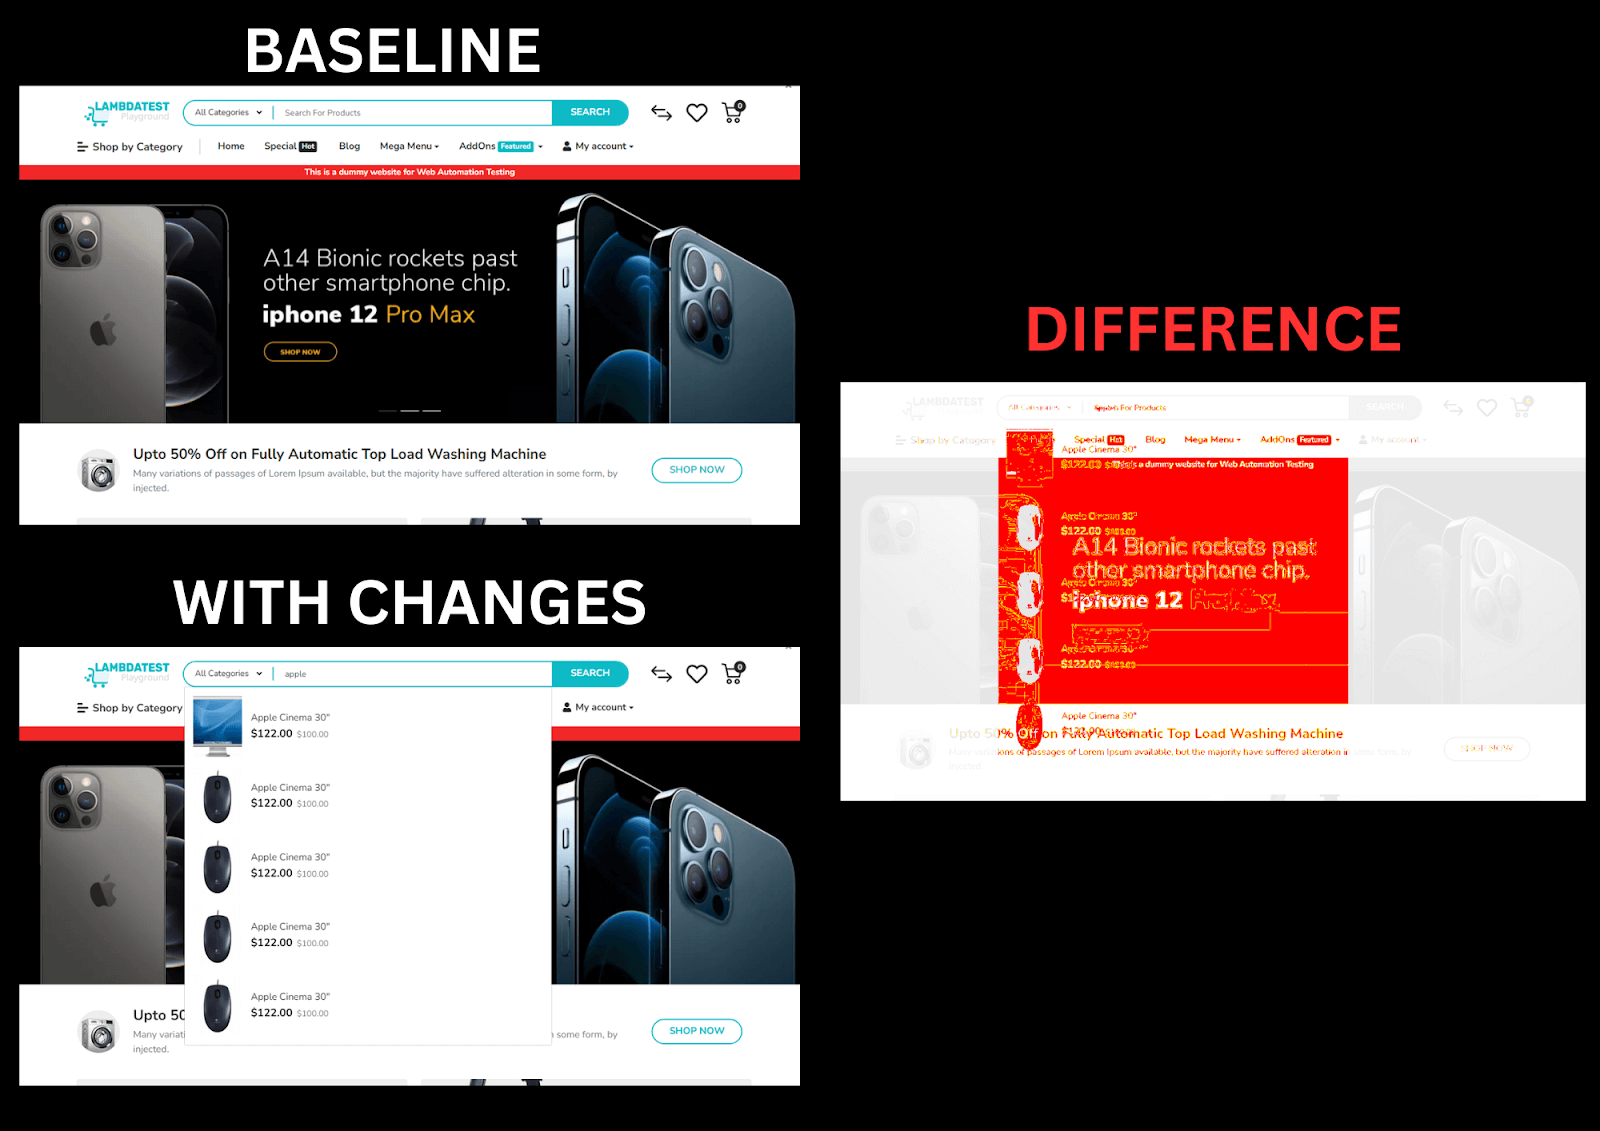
The output of the test run indicates the difference in the number of pixels, which is significant this time and also generated the expected and the diff images.
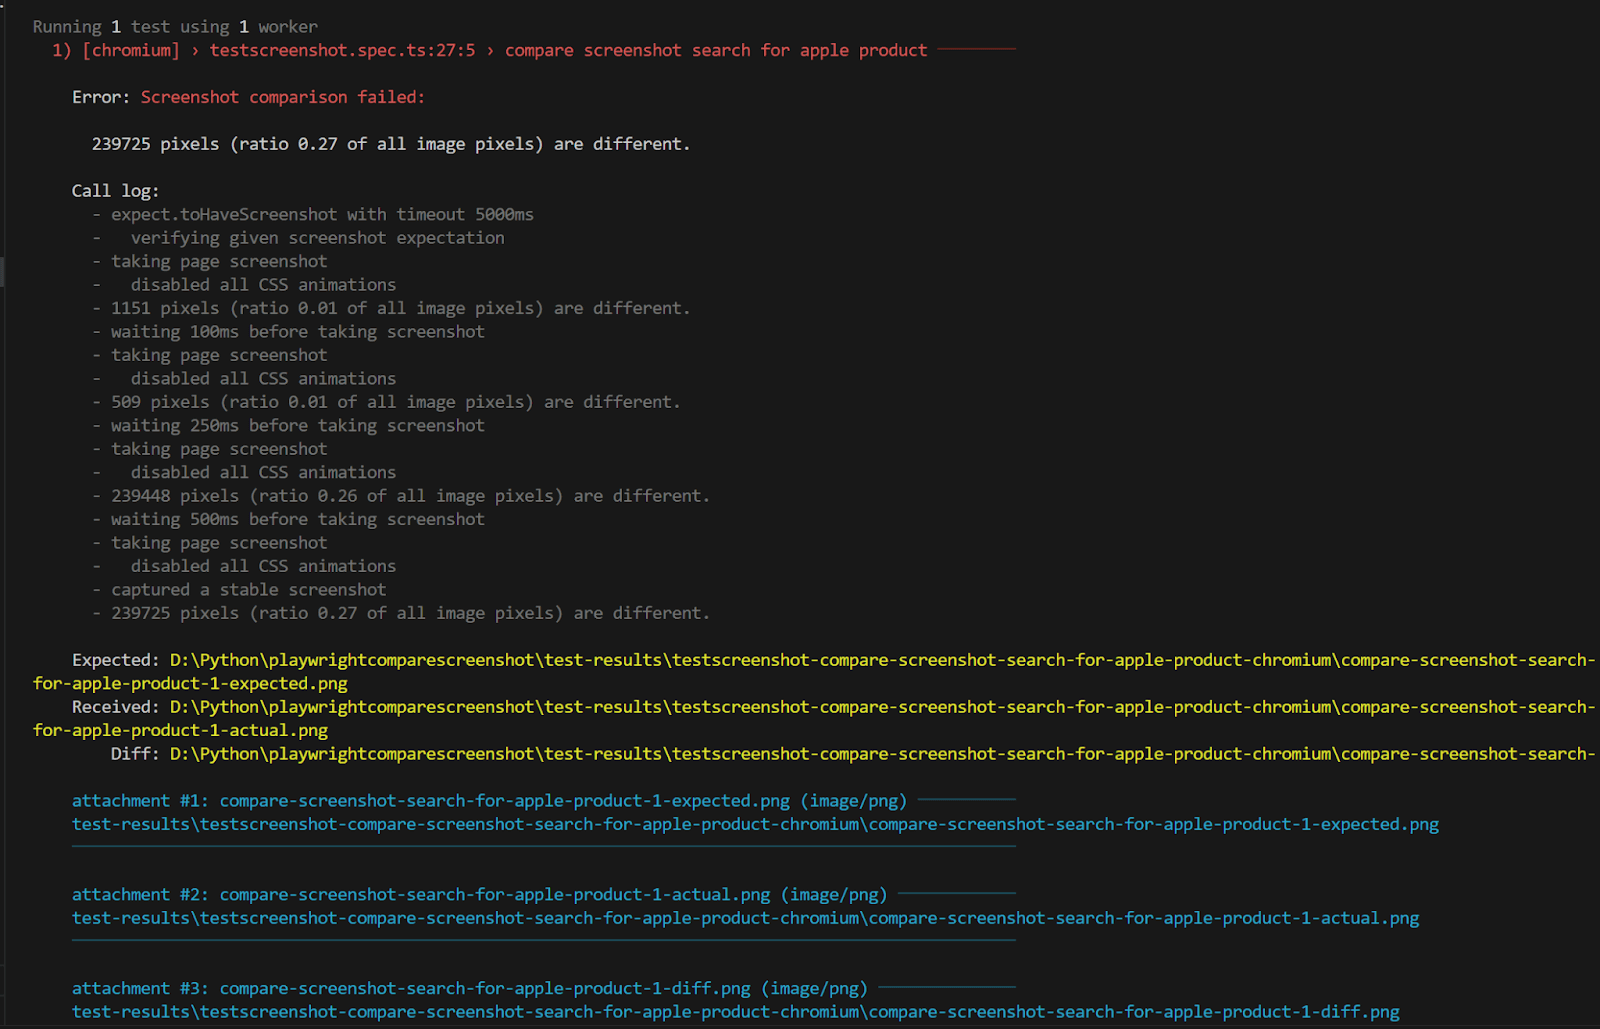
Here is the folder structure where all the screenshots are stored.

And the image showing the pixel difference between the baseline and the captured screenshot below shows considerable differences.
Here are all three images, i.e., the baseline, the captured, and the difference shown side-by-side.
So far, we have been using the toHaveScreenshot() method with its default configuration. But since, under the hood, it uses the PixelMatch library, the method has a few configurations available to customize the test.
How to Allow Acceptable Pixel Difference?
There are two ways in which we can configure an acceptable pixel difference when comparing screenshots with Playwright using the maxDiffPixelRatio and maxDiffPixels parameters of the toHaveScreenshot() method.
maxDiffPixelRatio is any number between 0 and 1, whereas maxDiffPixels is any number value as per the project requirement.
These parameters can be set either at each test level or can be configured as a global default inside the playwright.config.ts file within expect.
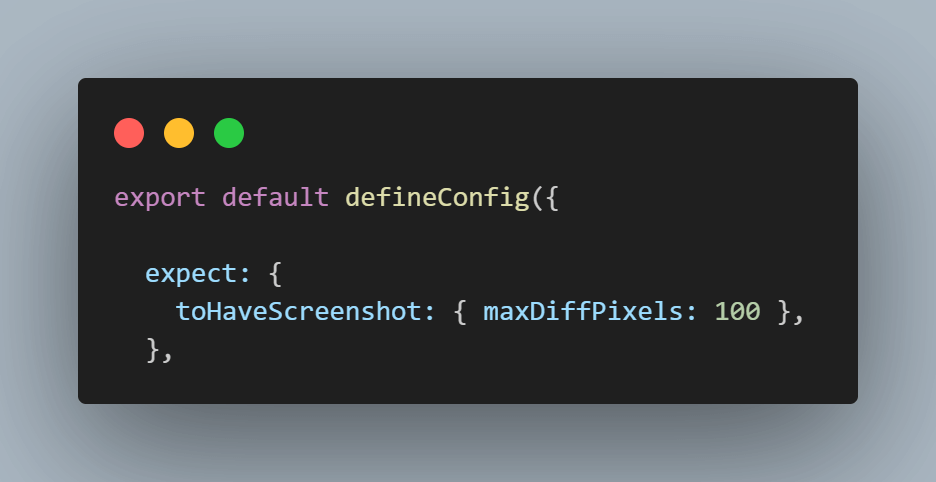
For example, to set a global default max pixel difference of 100, we would add the below line in the playwright.config.ts file.
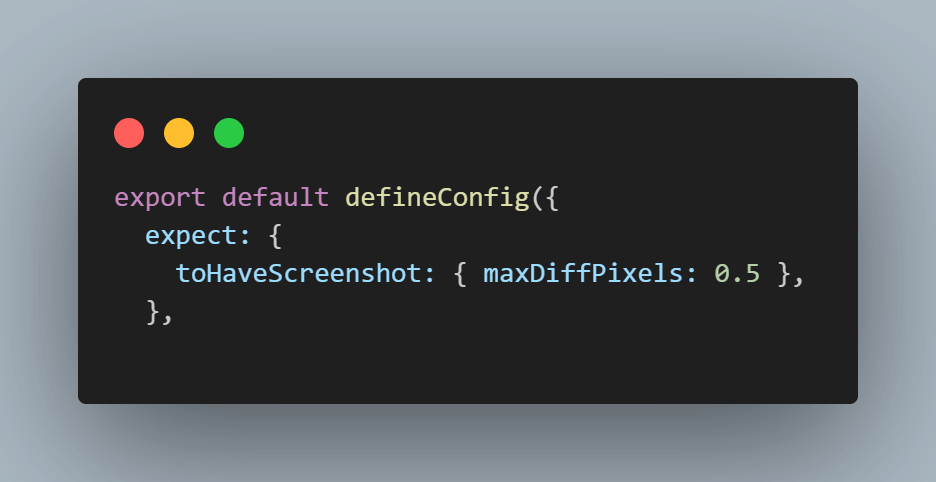
To set a global default max pixel difference ratio of 0.5, we would add the below line in the playwright.config.ts file.
For the demo, we will repeat the scenario where we added arbitrary text in the search field of the demo website homepage.
The test result had a pixel difference of 784. Let us repeat the test to allow a pixel difference of 800 to be acceptable and rerun the test.

Test Scenario:
|
Implementation for Generating Baseline Screenshot
|
1 2 3 4 |
test('allow max pixel diff while compare screenshot', async ({ page }) => { await page.goto('https://ecommerce-playground.lambdatest.io/') await expect(page).toHaveScreenshot(); }); |
Execution
Run the test using npx playwright -g “allow max pixel diff while compare screenshot” command.
As expected, the test fails and generates the baseline screenshot.

Implementation for Generating Screenshot With MaxDiffPixels
|
1 2 3 4 5 |
test('allow max pixel diff while compare screenshot', async ({ page }) => { await page.goto('https://ecommerce-playground.lambdatest.io/') await page.getByRole("textbox", {name : "Search For Products"}).fill('test compare screenshot') await expect(page).toHaveScreenshot({maxDiffPixels : 800}); }); |
On the page, locate the search input field using Playwright locator getByRole() by supplying the role as a textbox and the name of the field, which is Search For Products. Fill the text ‘test compare screenshot’ in the located input field.
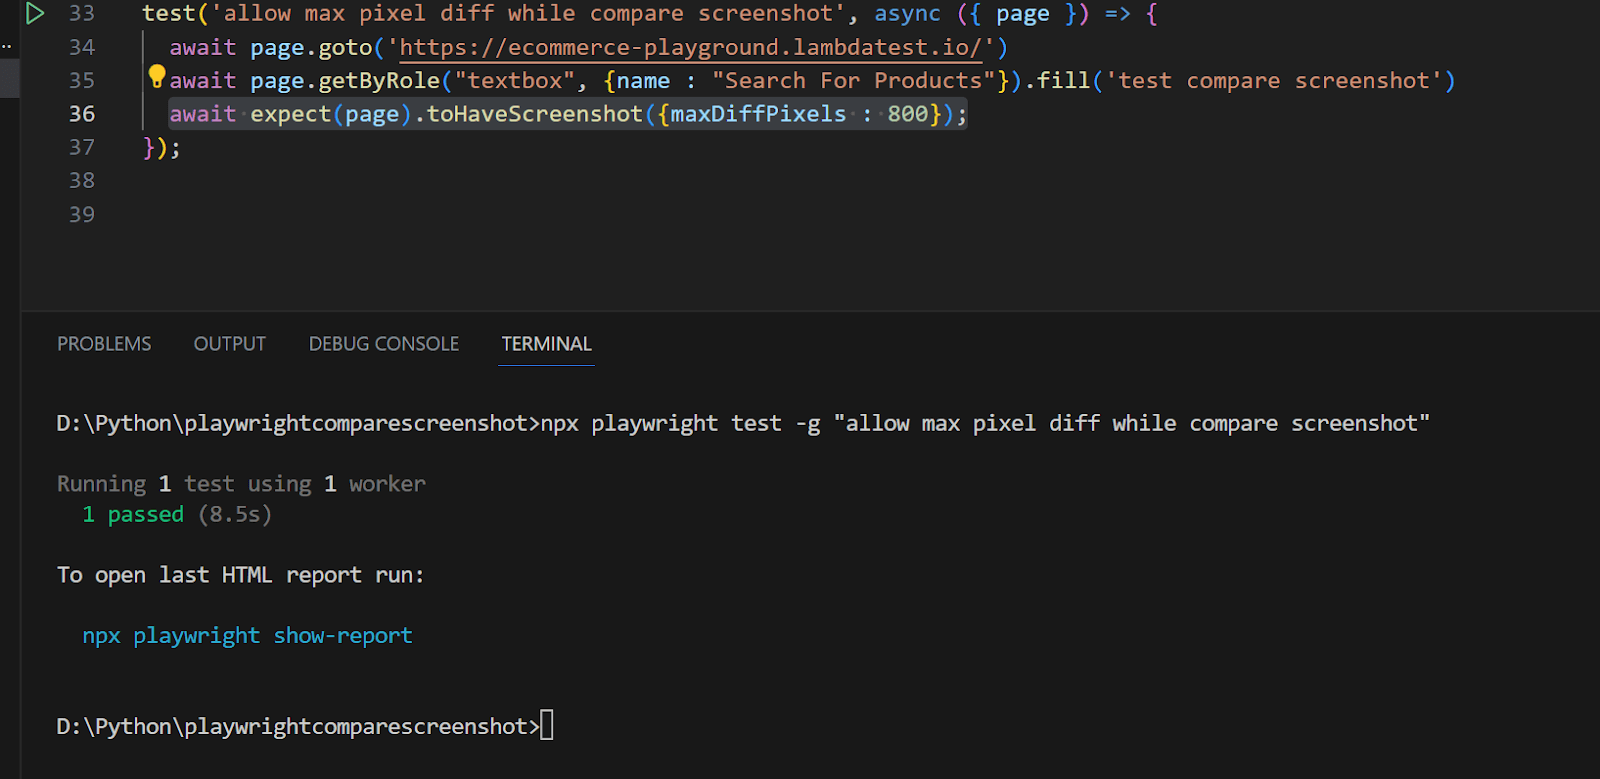
Post filling in the text, capture a screenshot of the page using the toHaveScreenshot() method, but this time setting maxDiffPixels parameter 800, which means that if the actual and expected image differ by less than 800 pixels, it is okay to pass the test.

Execution
Run the test using npx playwright -g “allow max pixel diff while compare screenshot” command.
As expected, the test passes since the pixel difference is 784, which is less than the 800 acceptable limit we set.
There are other parameters available to customize and configure the Playwright screenshot comparison. Do check the official documents for the same.
We have primarily used the Chromium browser to run our tests. This configuration is done in the playwright.config.ts file. However, based on the requirement, alternate browsers and mobile viewports can be enabled in the file, which by default are commented out.
The screenshot of the complete file is provided below, and as we can see, only Chromium is enabled, but that can be changed easily by uncommenting the required browser and viewport.
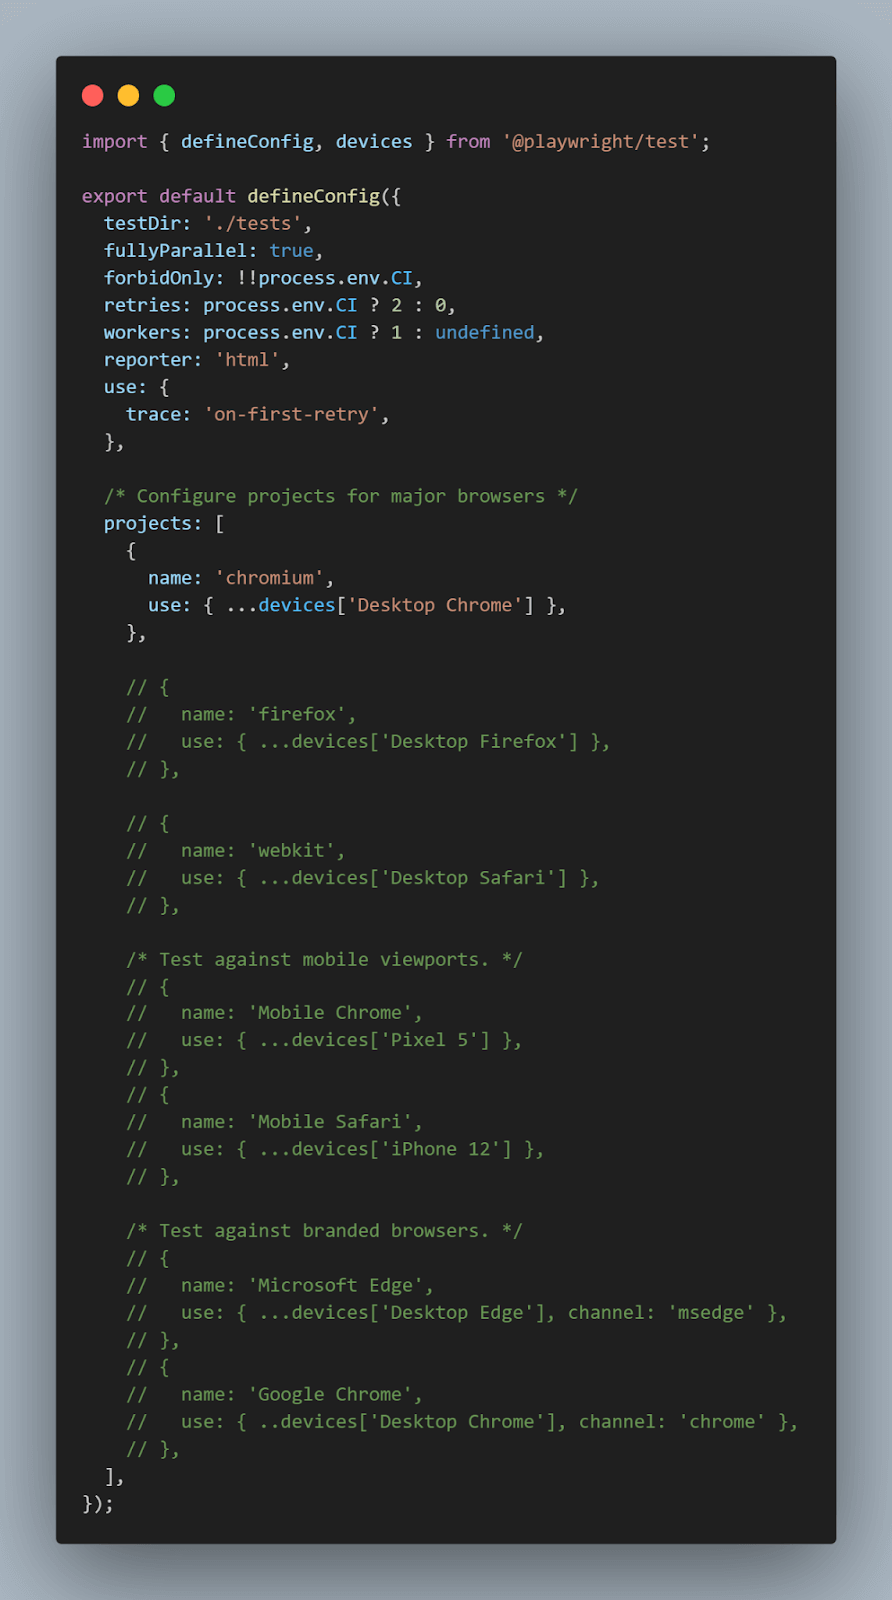
The downside of this approach is that we have to install all the required browsers locally. Installing browsers is not a big deal, but then comes the question of running the tests against different operating systems and a combination of operating systems and browsers.
To overcome this hindrance, we will leverage the cloud grid provided by LambdaTest, an AI-powered test orchestration and execution platform, and run the tests on a cloud-based scalable infrastructure. Using a cloud grid removes the dependency of installing various browser engines and setting up multiple operating system based infra to run the tests.
LambdaTest helps in Playwright screenshot comparison using its AI-powered SmartUI platform to ensure the quality and accuracy of your web application across various browsers and devices.
Catch up on the latest tutorial around the Playwright visual regression testing, automation testing, and more. Subscribe to the LambdaTest YouTube Channel for quick updates.
It provides an AI-powered Smart UI testing platform to run automated visual tests across 3000+ desktop and mobile environments. It uses AI algorithms to compare screenshots and detect differences in layout, text, graphics, or other elements. This ensures your web application looks and functions consistently on different devices and browsers.
Refer to the documentation to get started with Smart UI testing with Playwright.
Let us now see the Playwright screenshot comparison on the cloud grid provided by LambdaTest.
 Note
NoteRun Playwright screenshot comparison on 3000+ real environments. Try LambdaTest Today!
How to Perform Playwright Screenshot Comparison on Cloud?
To power our screenshot comparison, we will be leveraging the LambdaTest Smart UI platform, where we can access various different browsers and operating systems versions. The ready availability of infra also helps perform testing at scale with minimum hassle.
To leverage the LambdaTest cloud grid, we first need to configure the username and API access key, which can be obtained from your LambdaTest Profile. To configure the username and API access key for our project to do so, we will store them in a .env file.
|
1 2 |
LT_USERNAME=<LT_USERNAME> LT_ACCESS_KEY=<LT_ACCESS_KEY> |
Remember to replace the < LT_USERNAME > and < LT_ACCESS_KEY > with proper credentials when running the tests.
Next, we need to set up the playwright.config.ts to be able to leverage the infrastructure on the cloud. For this demo, we will be using Windows 11 and Chrome (latest).
| import { defineConfig, devices } from '@playwright/test'; | |
| export default defineConfig({ | |
| testDir: './tests', | |
| fullyParallel: true, | |
| forbidOnly: !!process.env.CI, | |
| retries: process.env.CI ? 2 : 0, | |
| workers: process.env.CI ? 1 : undefined, | |
| reporter: 'html', | |
| use: { | |
| trace: 'on-first-retry', | |
| }, | |
| /* Configure projects for major browsers */ | |
| projects: [ | |
| { | |
| name: "chrome:latest:Windows 11@lambdatest", | |
| }, | |
| /* Comment the above lines & Uncomment the below lines to run on local */ | |
| // { | |
| // name: 'chromium', | |
| // use: { ...devices['Desktop Chrome'] }, | |
| // }, | |
| ], | |
| }); |
To connect to the LambdaTest cloud grid info we have amended the projects array to add the Windows 11 and Chrome setup and added the keyword ‘@lambdatest’.
If we want to run the tests locally, we will simply comment the LambdaTest line and uncomment the Chromium browser or add any other browser on which you intend to run the tests.
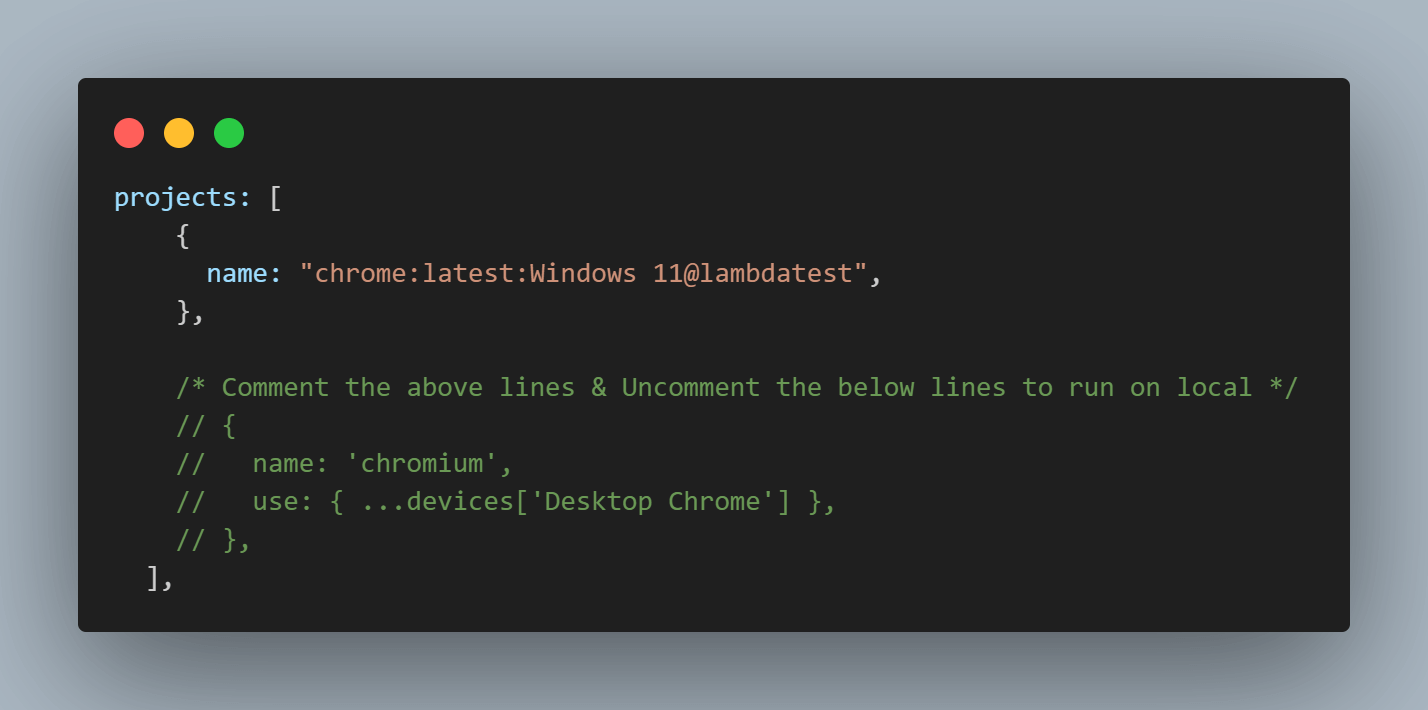
The next file needed to leverage the LambdaTest cloud grid, which we will look at, is the lambdatest-setup.ts. Here is how the complete file looks like.
| import * as base from "@playwright/test"; | |
| import path from "path"; | |
| import { chromium } from "@playwright/test" | |
| import dotenv from 'dotenv'; | |
| dotenv.config(); | |
| // LambdaTest capabilities | |
| const capabilities = { | |
| browserName: "Chrome", // Browsers allowed: `Chrome`, `MicrosoftEdge`, `pw-chromium`, `pw-firefox` and `pw-webkit` | |
| browserVersion: "latest", | |
| "LT:Options": { | |
| platform: "Windows 11", | |
| build: "Playwright SmartUI Build", | |
| name: "Playwright Compare Screenshots", | |
| user: process.env.LT_USERNAME, | |
| accessKey: process.env.LT_ACCESS_KEY, | |
| network: true, | |
| video: true, | |
| console: true, | |
| geoLocation: "" ,// country code can be fetched from https://www.lambdatest.com/capabilities-generator/ | |
| "smartUIProjectName": "Playwright-SmartUI-Project", | |
| }, | |
| }; | |
| // Patching the capabilities dynamically according to the project name. | |
| const modifyCapabilities = (configName, testName) => { | |
| let config = configName.split("@lambdatest")[0]; | |
| let [browserName, browserVersion, platform] = config.split(":"); | |
| capabilities.browserName = browserName | |
| ? browserName | |
| : capabilities.browserName; | |
| capabilities.browserVersion = browserVersion | |
| ? browserVersion | |
| : capabilities.browserVersion; | |
| capabilities["LT:Options"]["platform"] = platform | |
| ? platform | |
| : capabilities["LT:Options"]["platform"]; | |
| capabilities["LT:Options"]["name"] = testName; | |
| }; | |
| const getErrorMessage = (obj, keys) => | |
| keys.reduce( | |
| (obj, key) => (typeof obj == "object" ? obj[key] : undefined), | |
| obj | |
| ); | |
| const test = base.test.extend({ | |
| page: async ({ page, playwright }, use, testInfo) => { | |
| // Configure LambdaTest platform for cross-browser testing | |
| let fileName = testInfo.file.split(path.sep).pop(); | |
| if (testInfo.project.name.match(/lambdatest/)) { | |
| modifyCapabilities( | |
| testInfo.project.name, | |
| `${testInfo.title} - ${fileName}` | |
| ); | |
| const browser = await chromium.connect({ | |
| wsEndpoint: `wss://cdp.lambdatest.com/playwright?capabilities=${encodeURIComponent( | |
| JSON.stringify(capabilities) | |
| )}`, | |
| }); | |
| const ltPage = await browser.newPage(testInfo.project.use); | |
| await use(ltPage); | |
| await ltPage.close(); | |
| await browser.close(); | |
| } else { | |
| // Run tests in local in case of local config provided | |
| await use(page); | |
| } | |
| }, | |
| }); | |
| export default test; |
Code Walkthrough
Let us now understand the individual components of the file in detail one by one.
Step 1: Understand Imports
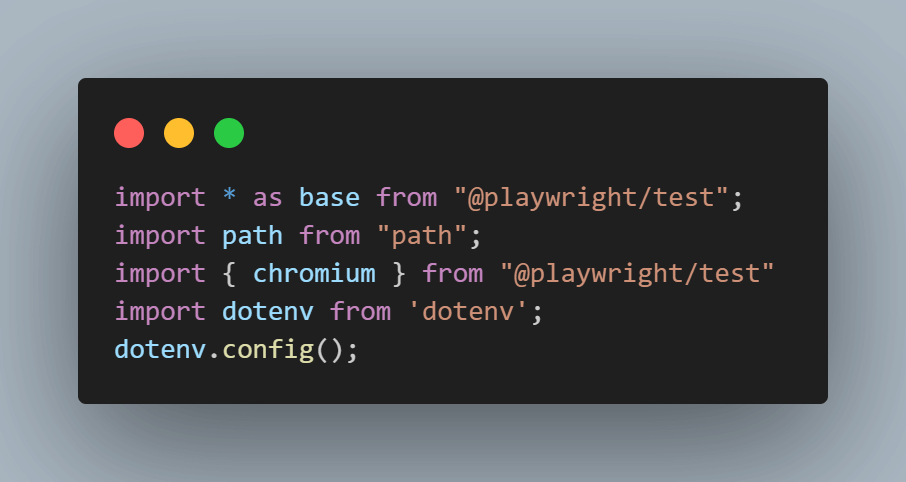
The imports are standard apart from the dotenv package, which we use to read the USERNAME and ACCESS_KEY from the.env file.
Step 2: Understanding the JSON capabilities
The capabilities JSON object is where we configure the behavior of the LambdaTest cloud grid.

Set the default browser and version to be used on the cloud grid.
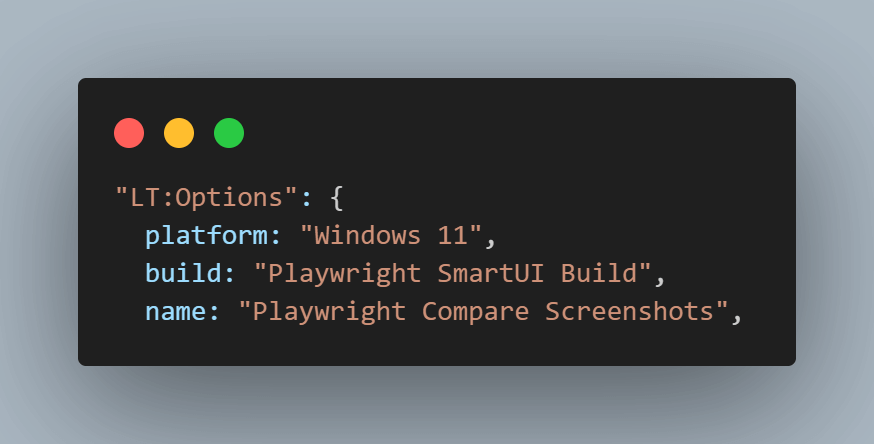
- platform: Used to set the default operating system.
- build: Specifies the name of the current build under which all tests will be grouped.
- name: Specifies the test name.
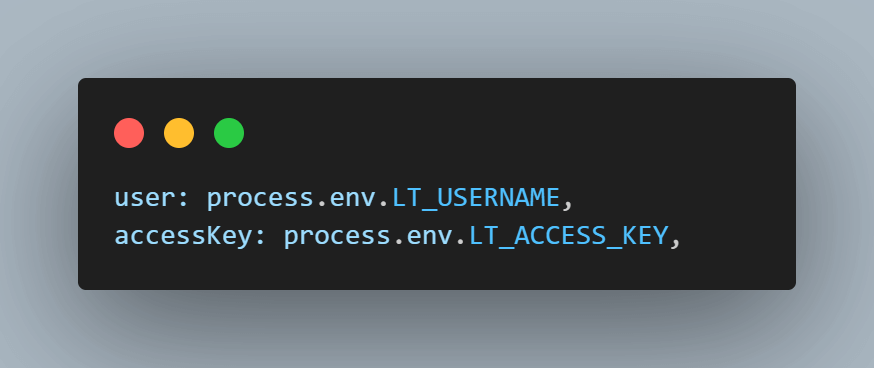
The USERNAME and ACCESS_KEY required to connect to the LambdaTest cloud grid are read from environment values.
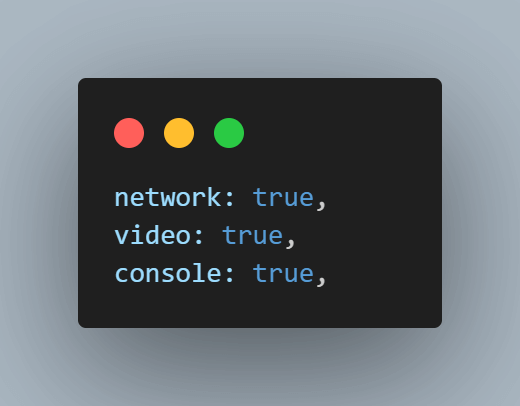
- network: Used to configure if the cloud grid captures network logs.
- video: Used to configure if the cloud grid captures video of test execution
- console: Used to configure if the cloud grid captures console logs

geoLocation is used to configure the geographic location used to run the test.

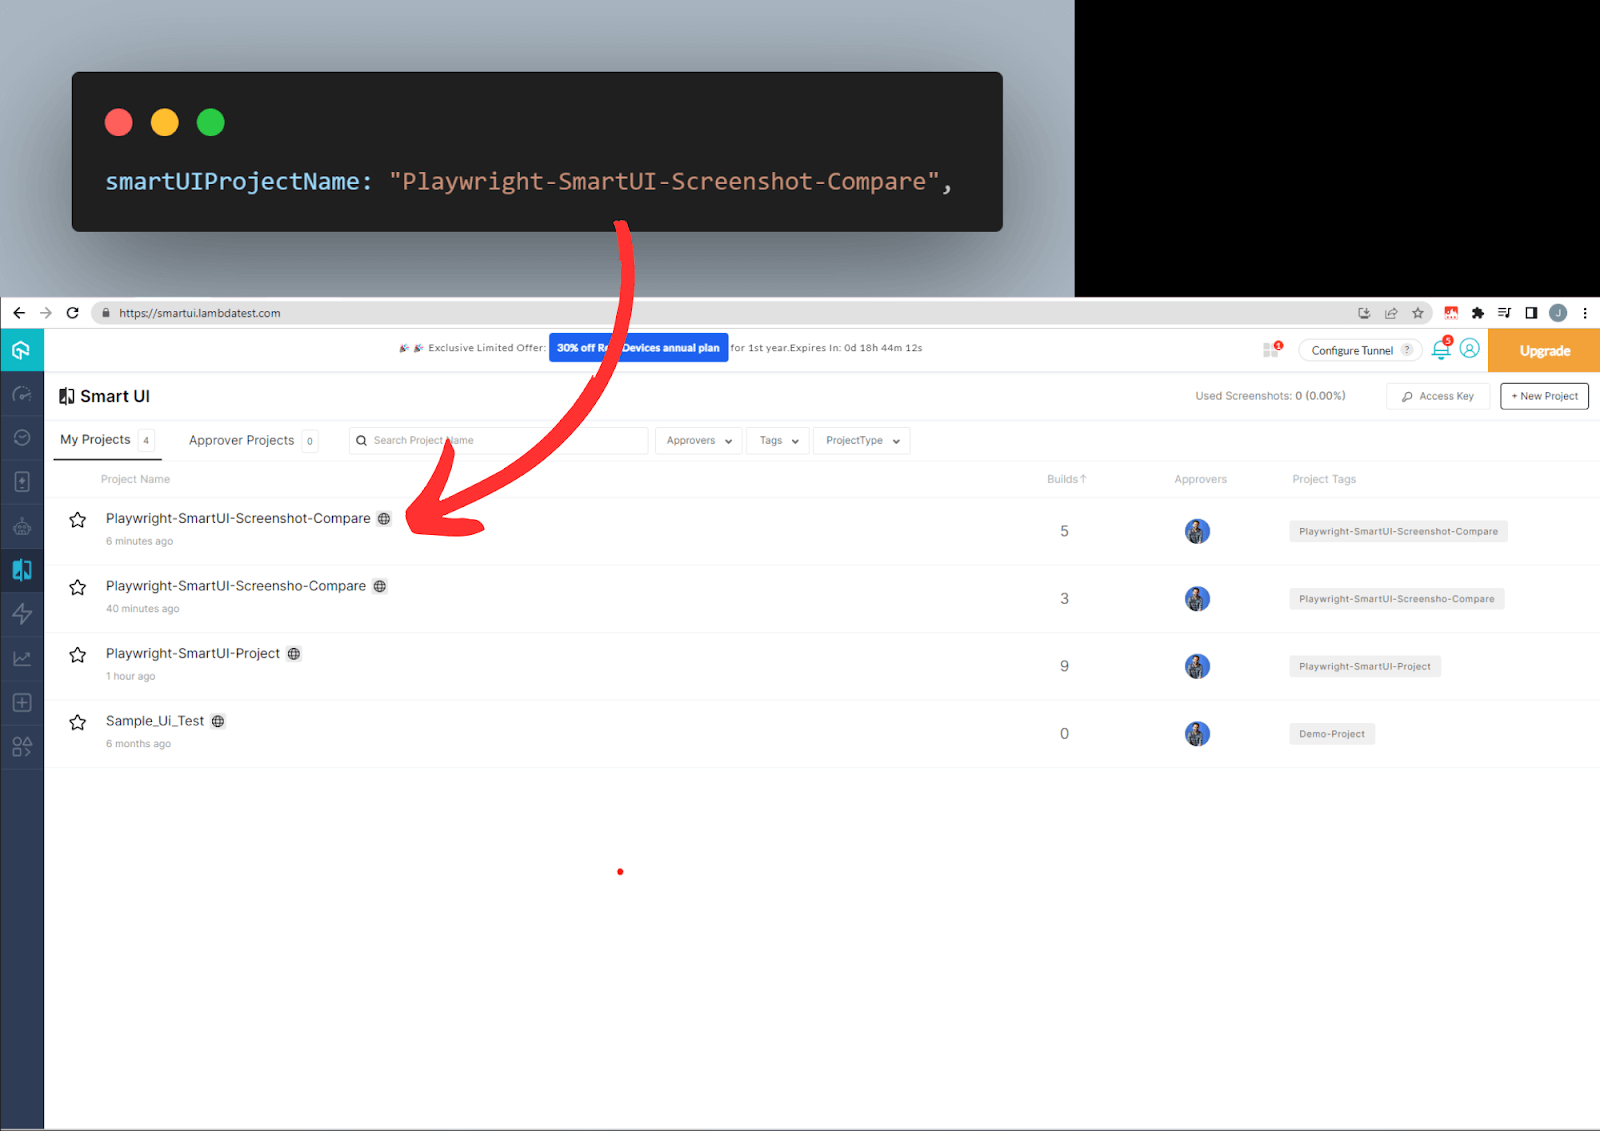
smartUIProjectName is the name of the Smart UI project on the LambdaTest dashboard.
Here is the complete JSON object for reference.
|
1 2 3 4 5 6 7 8 9 10 11 12 13 14 15 16 17 |
// LambdaTest capabilities const capabilities = { browserName: "Chrome", // Browsers allowed: `Chrome`, `MicrosoftEdge`, `pw-chromium`, `pw-firefox` and `pw-webkit` browserVersion: "latest", "LT:Options": { platform: "Windows 11", build: "Playwright SmartUI Build", name: "Playwright Compare Screenshots", user: process.env.LT_USERNAME, accessKey: process.env.LT_ACCESS_KEY, network: true, video: true, console: true, geoLocation: "" ,// country code can be fetched from https://www.lambdatest.com/capabilities-generator/ smartUIProjectName: "Playwright-SmartUI-Screenshot-Compare", }, }; |
Step 3: Overriding the @playwright/test method to facilitate LambdaTest cloud grid connection
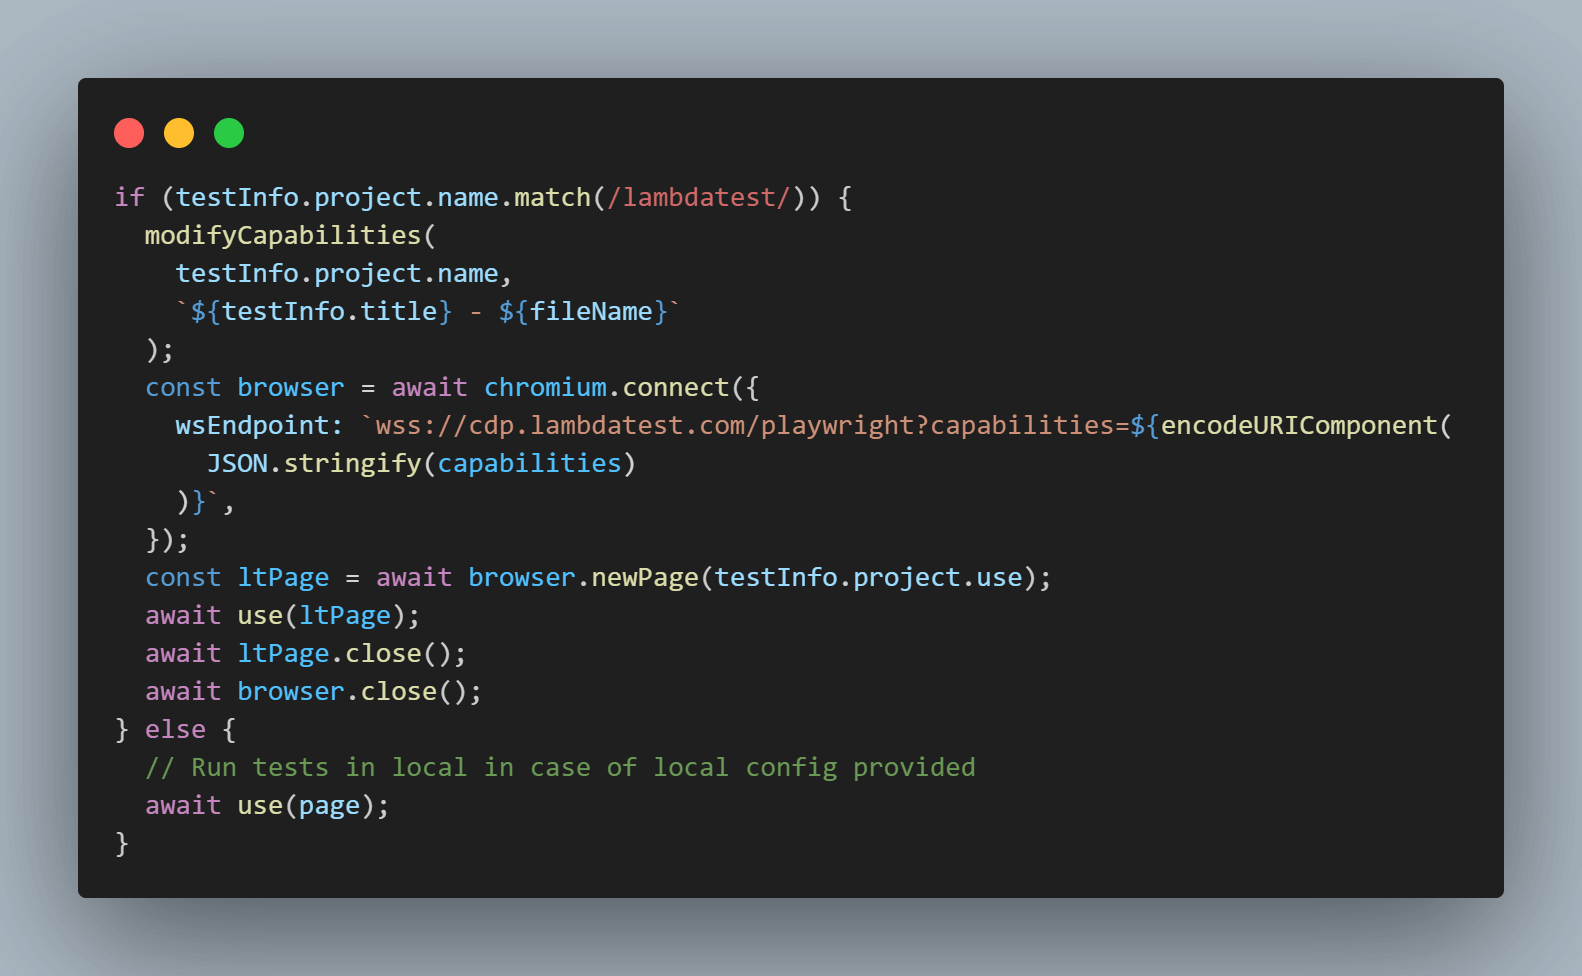
The next part of the lambdatest-setup.ts file is to override the @playwright/test method to ensure that we can run the tests either on the cloud grid or locally.
We check the playwright.config.ts file to see if the project’s array contains the keyword lambdatest. If it does perform a connection using the capabilities object to LambdaTest Smart UI and initialize the page object using cloud infrastructure.
For connecting to the cloud grid infrastructure, a WebSocket connection using the CDP (Chrome DevTools Protocol) endpoint is used. A CDP endpoint refers to the URL or address that allows communication between a client (such as a web browser) and the Chrome DevTools Protocol server.
The Chrome DevTools Protocol is a debugging protocol used by various browser developer tools to interact with and control a web browser instance programmatically.
To establish a WebSocket connection with the Chrome DevTools Protocol server, you need to specify the CDP endpoint. The endpoint typically follows the format: wss://{host}:{port}/devtools/{pageTarget}. More details below:
- {host}: Refers to the host or IP address where the Chrome DevTools Protocol server is running. It can be a local or remote address.
- {port}: Represents the port number used by the Chrome DevTools Protocol server for WebSocket connections. The default port is usually 9222.
- {pageTarget}: Specifies the target page or tab in the web browser for which you want to establish a DevTools Protocol connection. This can be a unique identifier or a specific page URL.
By connecting to the CDP endpoint via a WebSocket, you can send commands, receive responses, and listen for various events related to the web browser’s behavior, network activity, debugging, and more. This enables developers and tools to automate tasks, analyze performance, debug code, and gather information about the web page or application being inspected.
If the keyword is not detected, a local instance of the Playwright page is returned using the browser configured in playwright.config.ts
This completes the setup required to leverage the LambdaTest Smart UI. Now, we’ll craft the test scenario, closely resembling the one employed previously during our local screenshot comparison testing.
Test Scenario
|
Implementation
|
1 2 3 4 5 6 7 |
import test from "../lambdatest-setup"; test('capture full page screenshot using SMARTUI', async ({ page }) => { await page.goto('https://ecommerce-playground.lambdatest.io/') await page.evaluate((_) => {}, 'lambdatest_action: {"action":"smartui.takeScreenshot","arguments":{"fullPage":true,"screenshotName":"homepage-without-search.png"}}') await page.evaluate(_ => {}, 'lambdatest_action: {"action":"setTestStatus","arguments":{"status":"passed","remark":"Screenshot captured"}}') }); |
Let us see a step-by-step walkthrough of the code.
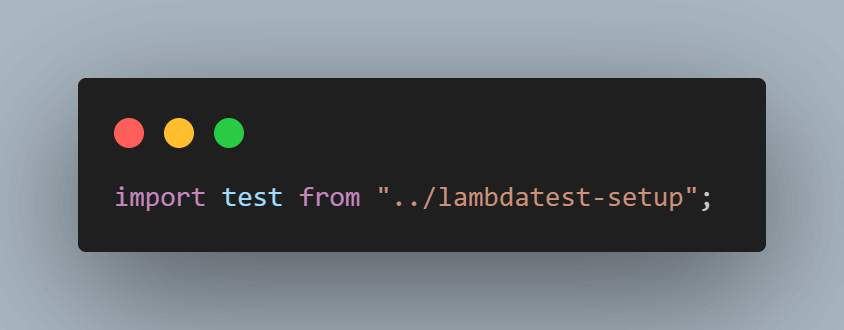
Step 1: The test method being used now is from lambdatest-setup.ts instead of @playwright/test.
Step 2: Navigate to the demo website homepage using the page.goto() method.

Step 3: The evaluate() function requests the SmartUI to trigger the takeScreenshot function. Additional arguments are used to dictate the function to take a fullPage screenshot and also specify the screenshotName.

Step 4: Finally, we run evaluate() again, this time to mark the test successful, saying the screenshot has been captured.

Execution
Run the test using npx playwright test -g “capture full page screenshot using SMARTUI”.
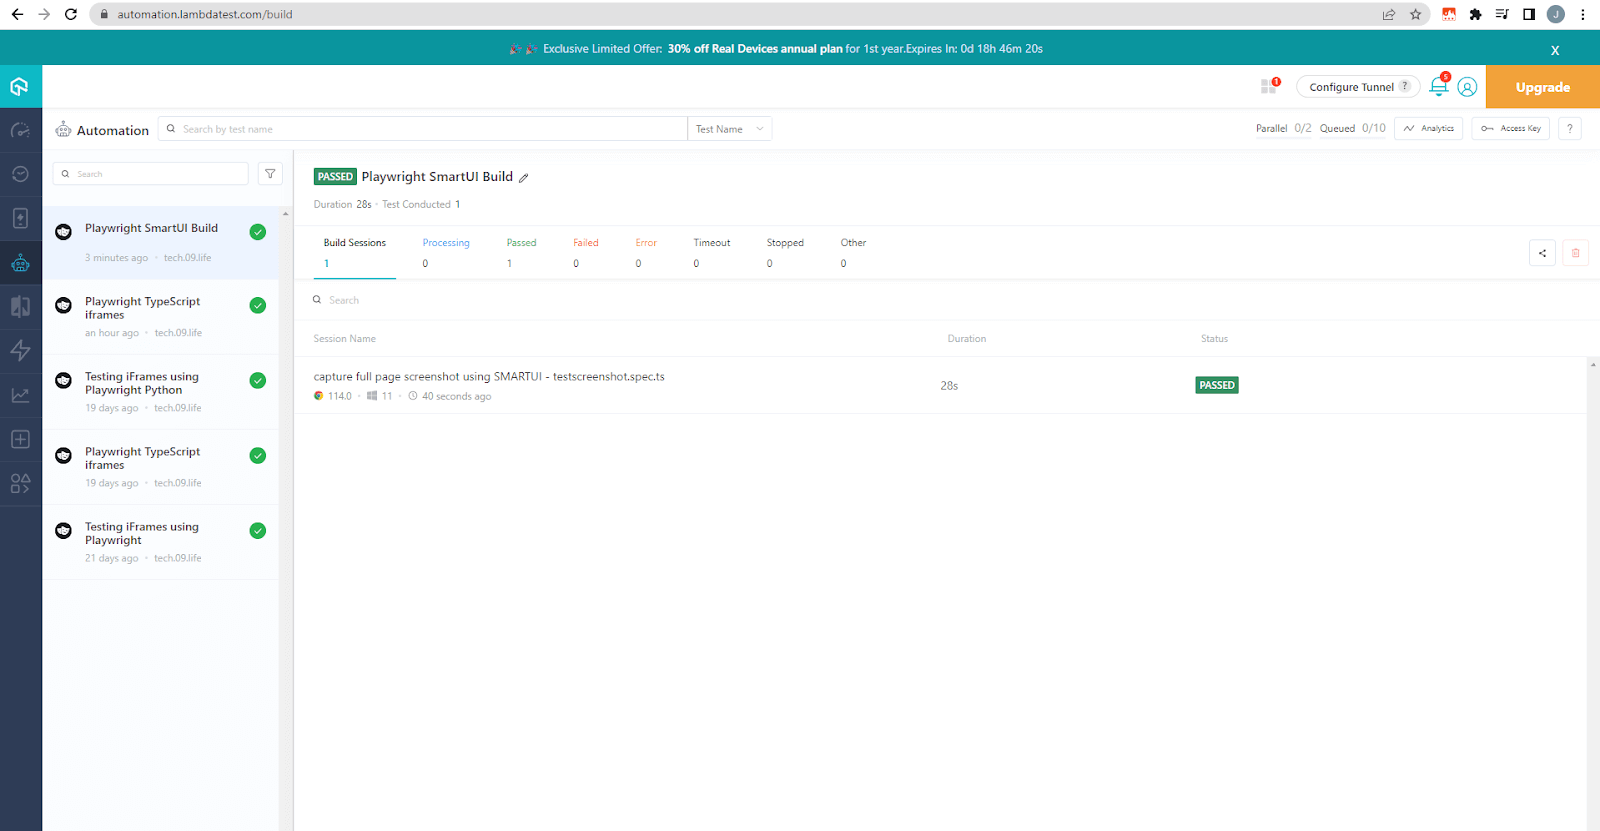
The build gets passed successfully, which can be seen on the LambdaTest Web Automation Dashboard.
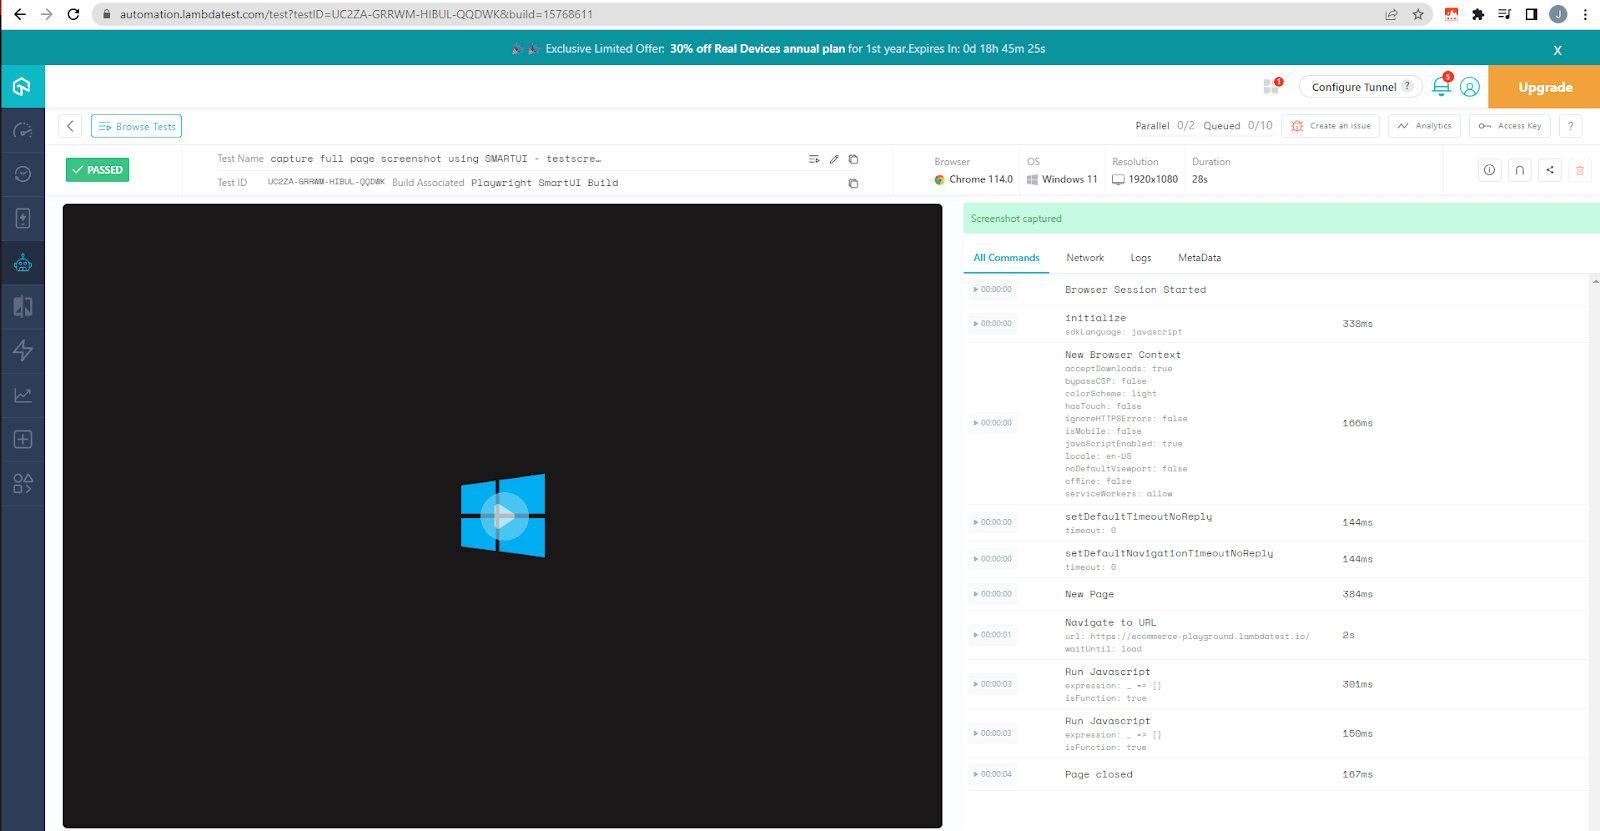
On clicking the name of the test, we can also see detailed execution logs.
The LambdaTest Smart UI page also reflects the details under the name we configured in the capabilities object in lambdatest-setup.ts.
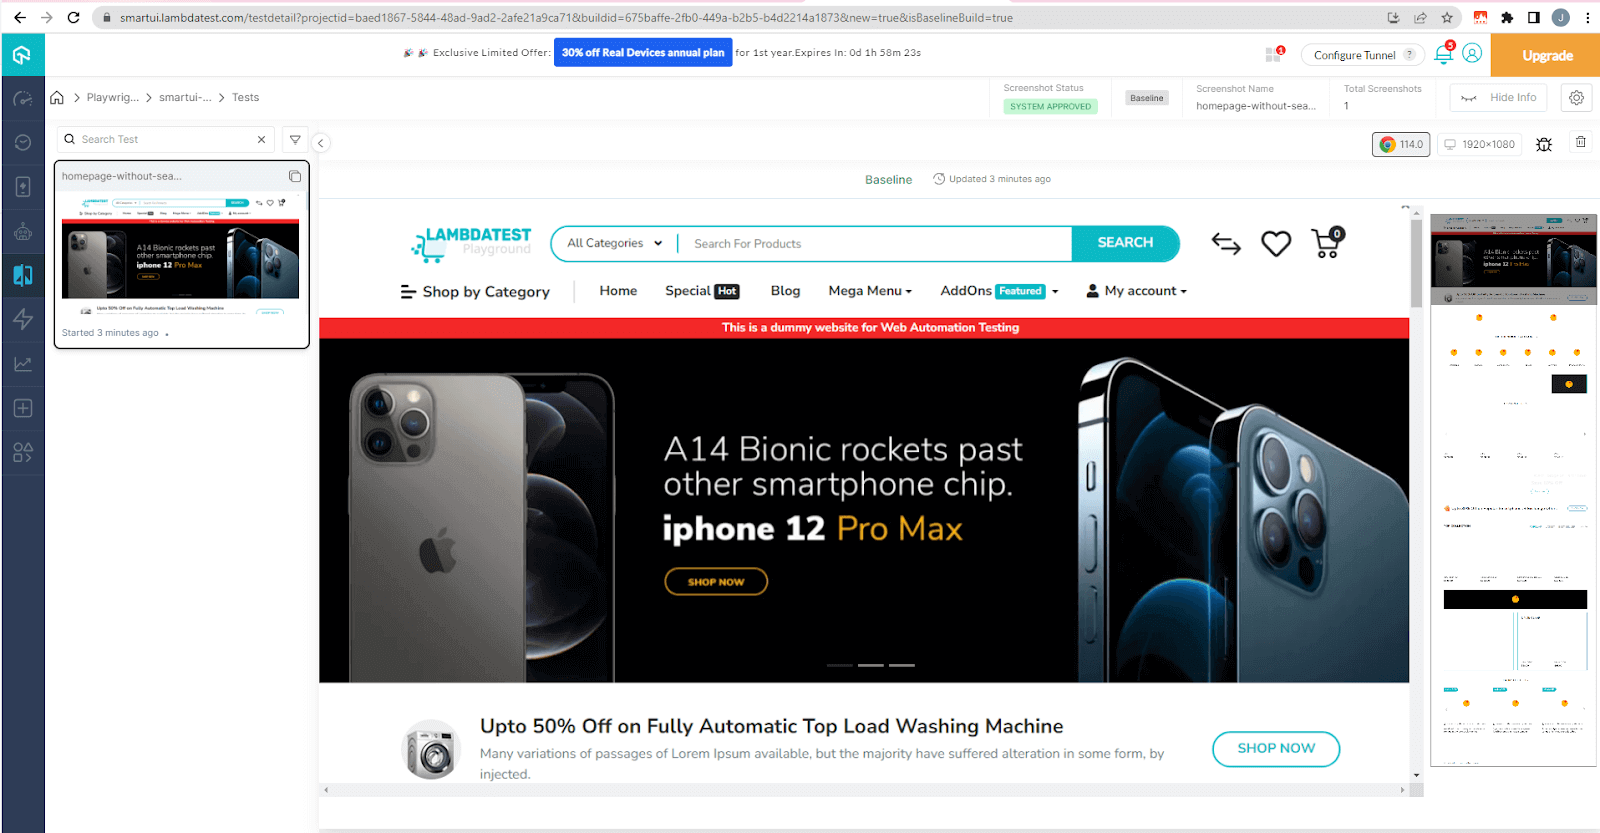
When the test passes, the screenshot captured is treated as a baseline for future comparisons.

If the captured screenshot fails for some reason, such as a timeout network issue or any other reason, a screenshot of a subsequent run can be manually marked as the baseline.

This is what the baseline screen looks like.
Now that a baseline is established, let us amend the test to search for Apple products.
|
1 2 3 4 5 6 7 |
test('capture full page screenshot using SMARTUI', async ({ page }) => { await page.goto('https://ecommerce-playground.lambdatest.io/') await page.getByRole("textbox", {name : "Search For Products"}).fill('apple') await page.evaluate((_) => {}, 'lambdatest_action: {"action":"smartui.takeScreenshot","arguments":{"fullPage":true,"screenshotName":"homepage-without-search.png"}}') await page.evaluate(_ => {}, 'lambdatest_action: {"action":"setTestStatus","arguments":{"status":"passed","remark":"Screenshot captured"}}') }); |
The modified test code has one line of change, i.e., locating the search field and filling in the text apple.

We run the test again using the command npx playwright test -g “capture full page screenshot using SMARTUI”.
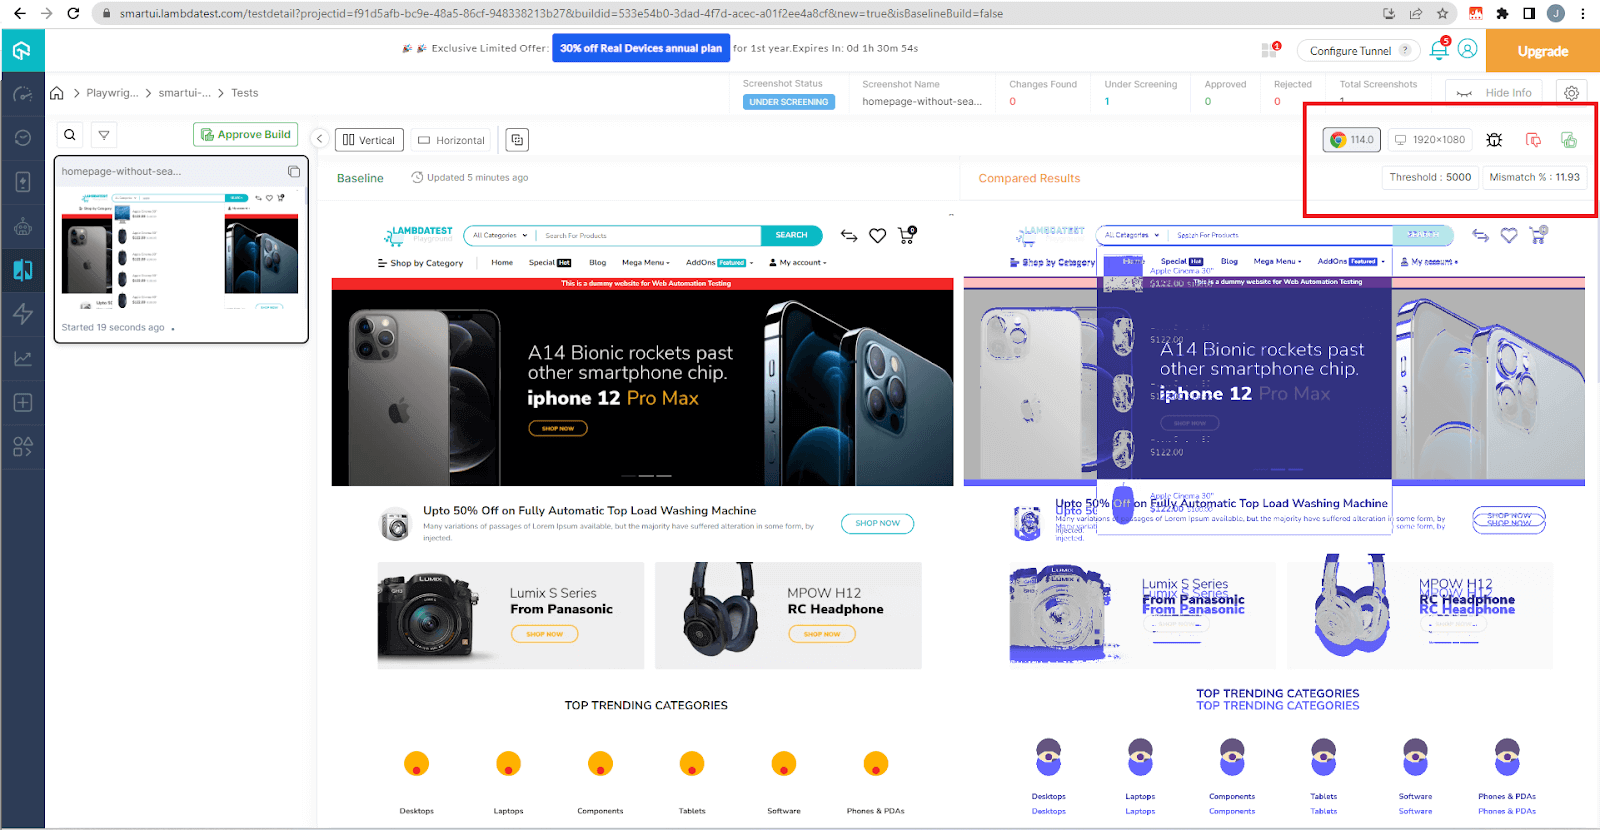
Smart UI has found issues as expected since we introduced it for demo purposes by searching Apple products.

The highlighted section shows the thresholds and the % mismatch. It also has the option to approve/reject the changes.
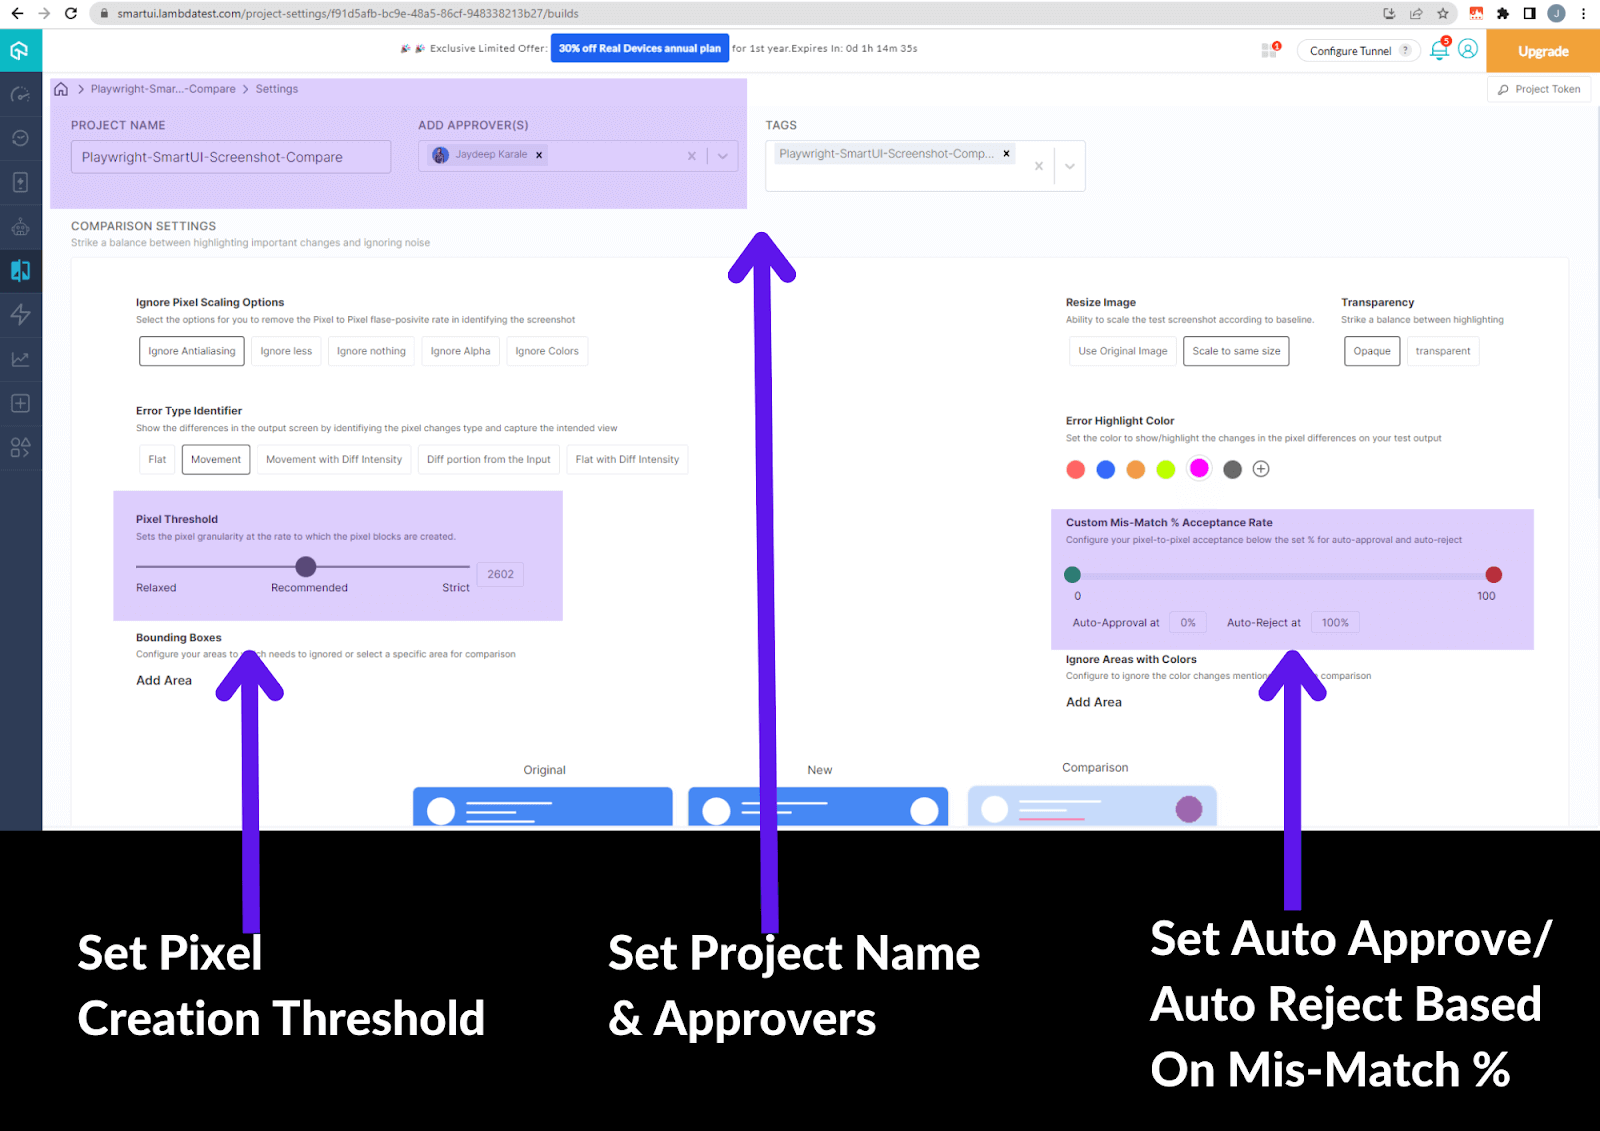
The Smart UI project is also configurable from the LambdaTest Smart UI Dashboard.

Some important settings have been highlighted & explained below
- The addition of an Approver allows the configuration of test approvers.
- Project Name can be configured in SmartUI and within the capabilities of JSON in the lambdatest-setup.ts file.
- The Pixel Threshold establishes the granularity at which pixel blocks are generated.
- The Custom Mis-Match % Acceptance Rate allows the configuration of pixel-to-pixel acceptance below the specified percentage for automatic approval and rejection.
Conclusion
In summary, Playwright offers a robust solution for screenshot comparison, helping teams effectively manage visual regression and maintain the visual consistency of their apps and websites.
With Playwright’s robust API and wide browser compatibility, developers and testers can effortlessly automate browser interactions and capture screenshots. By utilizing Playwright’s screenshot comparison features, teams can create baseline screenshots and compare them to test runs or production updates later.
This enables the identification of visual regressions stemming from code modifications, layout discrepancies, or unexpected rendering differences across various browsers and devices.
We have also seen how we can leverage the Smart UI platform of the LambdaTest cloud grid to compare screenshots. Using a cloud grid allows us to perform screenshot comparisons on various browsers and versions. This helps make the test suite more robust and scalable. If you’re looking to improve your playwright interview skills, check out our curated list of questions and answers at Playwright interview questions.
Frequently Asked Questions (FAQs)
What is the threshold for Playwright screenshot comparison?
The default threshold for Playwright screenshot comparison is 0.2. This means that up to 20% of the pixels in the two screenshots can be different without the test failing.
Can Playwright take screenshots?
Yes, Playwright can take screenshots. To take a screenshot of the entire page, you can use the page.screenshot() method. To take a screenshot of a specific element, you can use the element.screenshot() method.
Got Questions? Drop them on LambdaTest Community. Visit now


