NUnit Test Automation Using Selenium C# (with Example)
Himanshu Sheth
Posted On: November 6, 2019
![]() 123862 Views
123862 Views
![]() 17 Min Read
17 Min Read
This article is a part of our Content Hub. For more in-depth resources, check out our content hub on Selenium C# Tutorial and Selenium NUnit Tutorial.
C# is objected-oriented and provides all the popular features supported by OOPS namely encapsulation, polymorphism, and inheritance. Using C#, you can develop web-based, develop windows, and console applications. Development is not all you can do with C#, you can also leverage C# for test automation with top frameworks like NUnit, along with language bindings for Selenium.
Selenium is an open-source test automation framework for automated cross browser testing. It supports popular web browsers – Firefox, Chrome, Microsoft Edge, Internet Explorer, Safari, etc. To interact with the underlying web browser, a collection of language specific bindings to drive the browser called Selenium WebDriver is used. If this is the first time you are hearing about Selenium, then I recommend you follow our earlier blog on Selenium WebDriver tutorial where we talked about Selenium architecture in great detail for automated browser testing.
Today, I am going to help you run your first test automation script for Selenium C# framework i.e. the NUnit testing framework. By the end of this NUnit testing tutorial, you will be well versed with:
If you’re new to Selenium and wondering what it is then we recommend checking out our guide – What is Selenium?. If you’re looking to improve your NUnit interview skills, check out our curated list of NUnit interview questions and answers.
- Testing With NUnit – A Selenium C# Framework
- Advantages Of NUnit Testing For Selenium C# Automation
- NUnit and Selenium – Installation and Setting up with Visual Studio
- Automated Browser Testing With NUnit For Selenium C# Scripts
- Parallel Testing Using A Remote WebDriver On Cloud
- TestFixture Attribute
Testing With NUnit – A Selenium C# Framework
NUnit is an open-source unit testing framework in C# that is ported from JUnit automated testing framework. It is a member of the .Net Foundation and is used for development and execution of unit tests with .Net programming language. As of October, 2019; the latest version of NUnit is NUnit3.
Advantages Of NUnit Testing For Selenium C# Automation
NUnit is preferred over other test frameworks as it is compatible with Selenium testsuite. NUnit testing for Selenium automation is widely used due to the following advantages over other test frameworks:
- Annotations used in NUnit help in speeding up test development & execution as tests can be executed with numerous input values.
- TDD is primarily useful as unit tests are instrumental in finding issues/bugs during the early stages of product development. NUnit test framework can be used with Selenium if you plan to use TDD (Test Driven Development) for the test activity.
- Provides you the ability to run your test cases in parallel.
- Using NUnit, you can execute test cases from console runner by either a third-party automation testing tool or by the NUnit Test Adapter inside the Visual Studio.
Now, in this Nunit testing tutorial, we will look into installation and set up required to run your first test automation script in Selenium C# framework.
Take this certification to master the fundamentals of Selenium automation testing with C# and prove your credibility as a tester.
Here’s a short glimpse of the Selenium C# 101 certification from LambdaTest:
NUnit and Selenium – Installation and Setting up with Visual Studio
Since this is the first article focusing on C# and Selenium, we have a look at the detailed steps for installation of Visual Studio IDE. To execute NUnit testing for Selenium automation scripts, we make use of the Visual Studio IDE for development and execution. Using Visual Studio, developers can come up with test cases/test suites for different platforms like Windows, Android, iOS, Web, Cloud, etc.
Set Up Visual Studio for Development
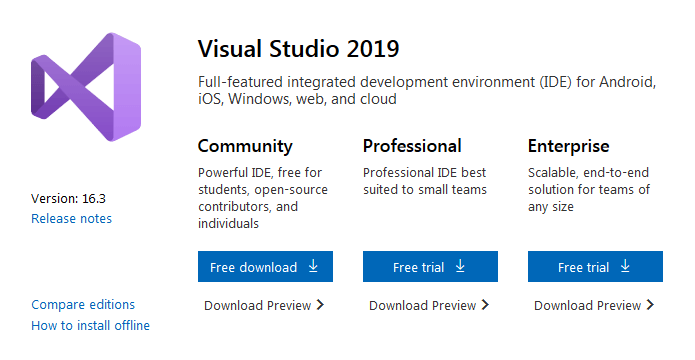
Step 1: Download the latest version of Visual Studio i.e. Visual Studio 2019 from here. Feature comparison of different Visual Studio 2019 editions can be used for reference. Depending on the requirement, you can download the Community/Professional/Enterprise edition of Visual Studio 2019.
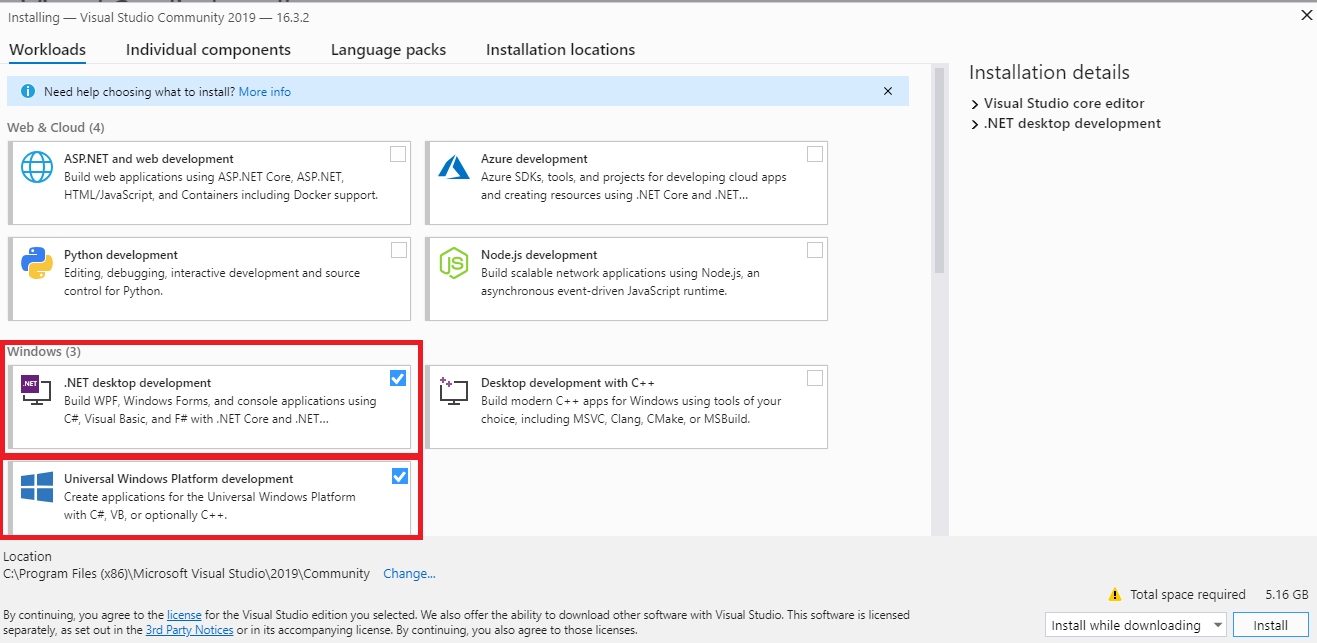
Step 2: Since the intent with this NUnit testing tutorial is to use Visual Studio for Selenium C# automation, we select the required packages for development on Windows operating system.
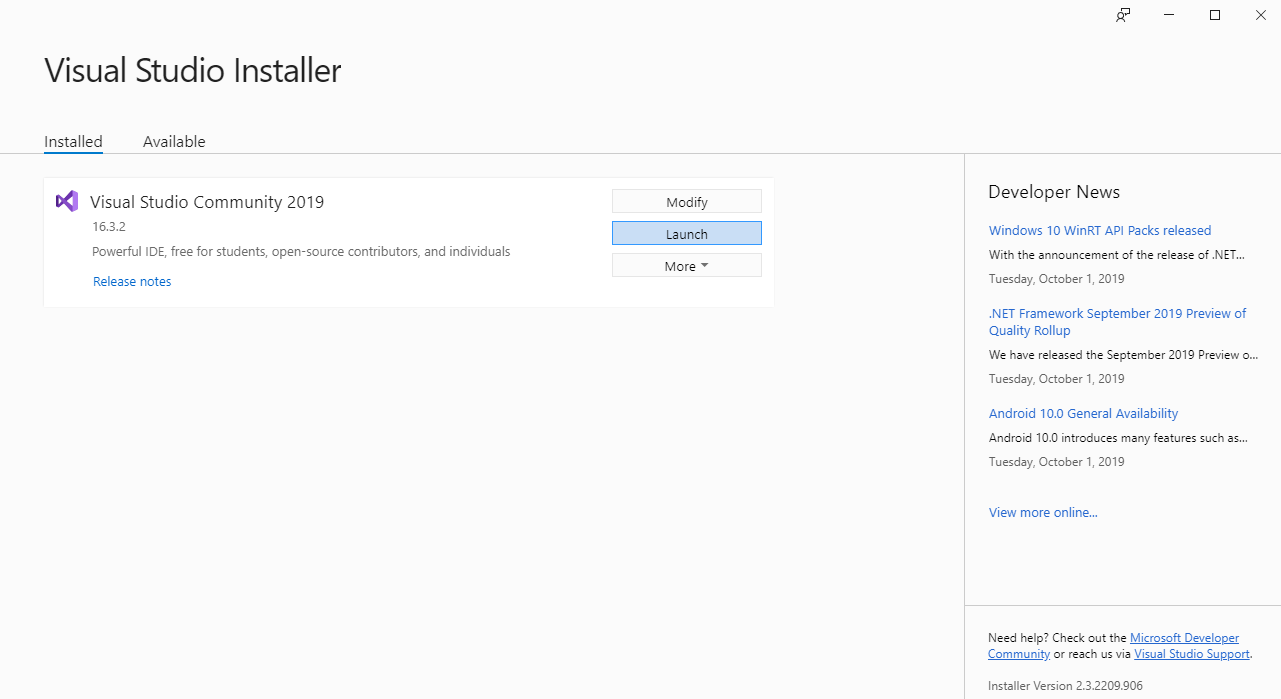
Step 3: Once the installation is complete, you will be prompted to restart the machine before Visual Studio 2019 can be used.
Step 4: You may opt to sign-in to publish code to private Git repository, sync settings, unlock the IDE, etc.
Now, that the Visual Studio is setup for development. Next in this NUnit testing tutorial, we need to install the Selenium C# framework i.e. NUnit, along with the NUnit Test Adapter for Selenium automation.
This NUnit Tutorial for beginners and professionals will help you learn how to use NUnit framework with Selenium C# for performing Selenium automation testing.
Installation of NUnit Framework & NUnit Test Adapter
Step 1: To start off with NUnit testing, you need to first create a new project in Visual Studio. Go to Visual Studio → New → Project.
Step 2: Add Console.WriteLine(“Selenium C#”) to the newly created .cs file.
Step 3: Navigate to Tools→ NuGet Package Manager→ Manager NuGet Packages for Solution and search for “NUnit & NUnit Test Adapter”.


Step 4: Click on Install and Press OK to confirm the installation. With this installation, NUnit can be used as a Selenium C# framework for Web UI automation testing.
Setup Selenium WebDriver with Visual Studio in C#
With NUnit testing framework configured, you can now create NUnit Test Project in Visual Studio for C#. Below are the steps to setup your Selenium and C# in Visual Studio.
Step 1: Create a new NUnit test Project in C# by navigating to New → Project → NUnit Test Project (.Net Core).

Step 2: The newly created project will have the basic test ready with NUnit annotations being used in the source code.
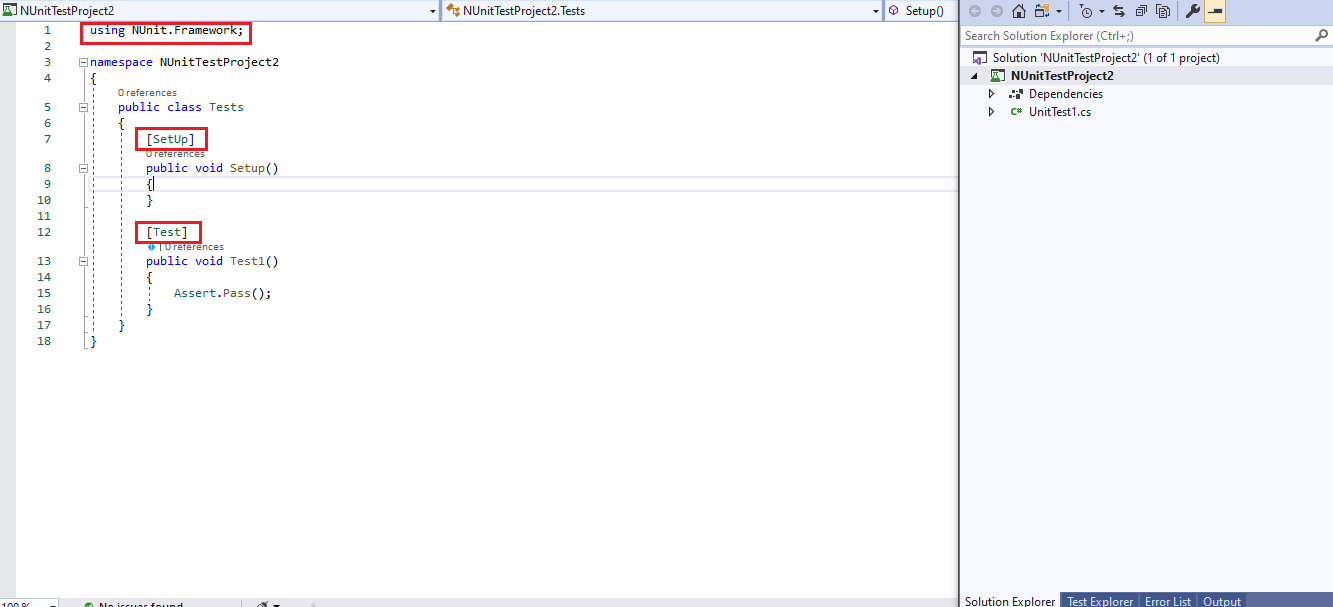
Step 3: Navigate to Tools → NuGet Package Manager → Manager NuGet Packages for Solution and search for ‘Selenium’.

Step 4: Click on Install to setup the Selenium WebDriver interface.
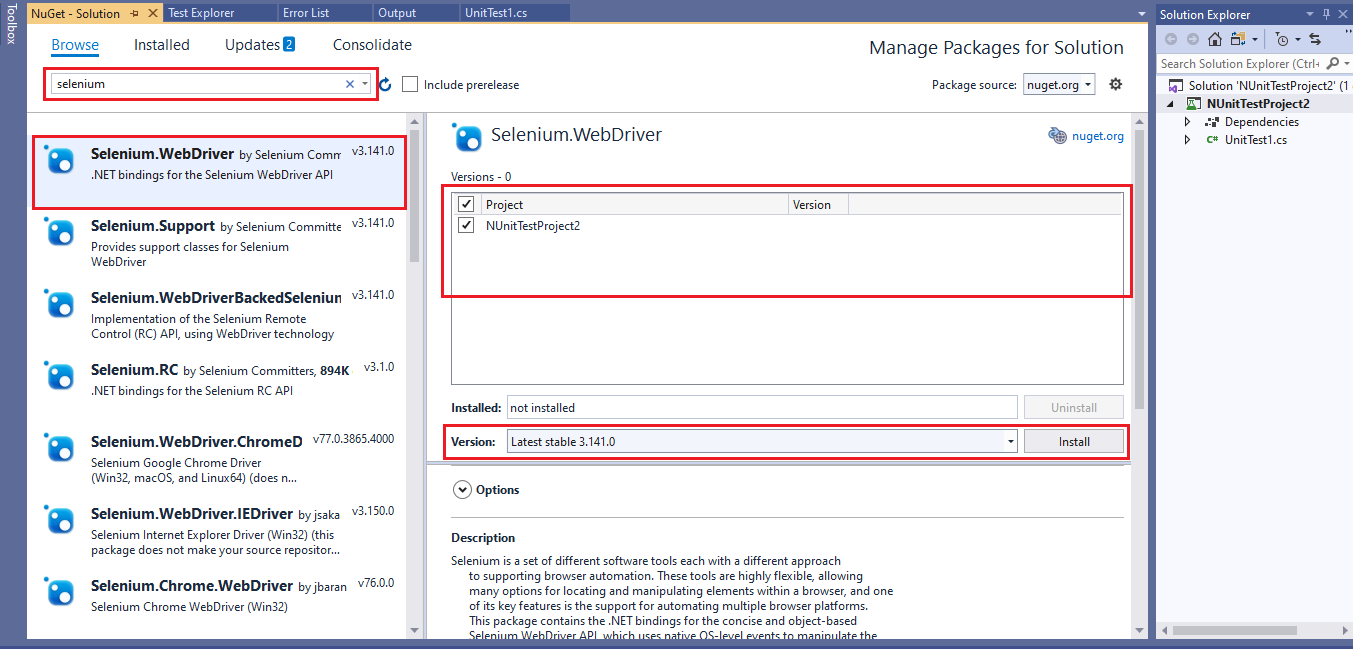
The latest stable version as of November 2019 is 3.141.0.
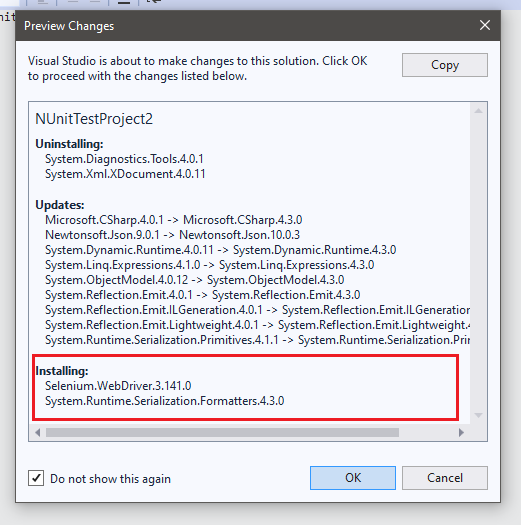
Step 5: After the successful installation of Selenium WebDriver, you can start automation testing using NUnit, a Selenium C# framework for test automation.

Now, that we are done configuring the Visual Studio for Selenium C# framework in this NUnit testing tutorial. It is time to deep dive into action and runs our first automation scripts for automated browser testing.
Automated Browser Testing With NUnit For Selenium C# Scripts
Automated browser testing is one of the key components of Web UI testing. It is pivotal to ensure that your website or web application offers a consistent UI or UX across different browsers. Verifying whether the functionalities would work as expected on different browsers and browser versions can be tricky and time-consuming. This is where automation testing with Selenium comes into play.
Now, in this NUnit testing tutorial, we will run our first automation script for the Selenium C# framework with examples. But before we do that, you need to have a look at the basic types of commands used for Selenium automation.
Types Of Commands Used For Selenium Automation
The interaction of the Selenium C# Framework with the web browser happens via the Selenium WebDriver. Before you can make use of Selenium WebDriver commands in C#, the development environment should be setup i.e. Selenium WebDriver for the corresponding web browser should be installed on the machine.
Make sure to download the Selenium WebDriver file for the browsers with which you wish to perform cross browser testing from the links mentioned below:
Like other programming languages such as Python, C# also uses a particular interface to interact with the browser. The interface used is called the IWebDriver. With that said, we now look into actions involved in Automated browser testing.
- Actions on the web browser (e.g. open, close, maximize, etc.)
- Actions on the web elements in the current window (e.g. checking a button, entering text in a textbox, click a button, etc.
- Actions on the drop-down elements in the current window (e.g. select particular value from drop-down window, deselect the selected value from the drop-down window, etc.).
Based on these distinct actions/interactions, Selenium WebDriver Commands in C# are divided in three broad categories:
- Web Browser commands
- Web Element commands
- Drop-down commands
We will be working with such commands in this NUnit testing tutorial as we work our way with test automation using Selenium C# framework.
Now, we run our first NUnit testing automation script for web UI. Validation of the code and its corresponding functionalities can be done either locally or remotely.
NUnit Testing With Local WebDriver
You have the key functionalities of the web product ready and want to test those features on a select set of browsers installed on your machine. Once you have tested the website over different browsers to ensure compatibility, you should make sure that any upcoming code change will not disturb the UI and UX?
Now, in this NUnit testing tutorial, we will execute Selenium C# automation from the perspective of automated browser testing using simple test cases.
Test Case 1 – Below is the break-up of the things that we plan to achieve in the test:
- Open DuckDuckGo in Chrome browser.
- Locate search box.
- Enter search query ‘LambdaTest’.
- Execute the search operation.
- Free up the resources.
As we are making use of local Selenium WebDriver, you should first download the Selenium WebDriver for Chrome and install/copy it in the location where the Chrome web browser (Chrome.exe) is located.
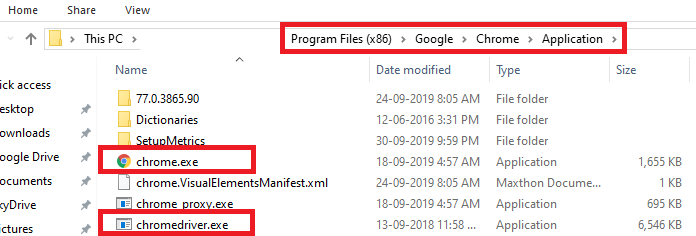
If the WebDriver executable is present in the location where web browser executable is present, you need not specify the path when the WebDriver instance is created in the source code.
Running The NUnit Testing Script For Test Case 1 On Local WebDriver
Let’s have a code walkthrough to understand how we executed our Test Case 1.
A class named Browser_ops of public scope is created with methods for creation of Chrome WebDriver instance, getting the Title of the page (under test), navigating to a particular URL, etc.
A class named NUnit_Demo_1 uses the methods that were defined in the Browser_ops() class. Chrome WebDriver instance for automated browser testing is created under the [SetUp] annotation. The implementation of locating the SearchBox on the DuckDuckGo homepage, entering LambdaTest i.e. search term and submitting the search is performed under [Test] annotation. XPath of the search box is found using the Inspect Tool in Chrome browser.

The resources used by the Chrome WebDriver are freed as a part of [TearDown].
To build and execute the test/project, you can perform a Right click on the class name that contains the test implementation i.e. NUnit_Demo_1

Test status and details about test execution time are available in the Test Explorer. If there are build errors, the errors can be seen from the Error List Window.

Test Case 2 – Your website is working fine with one combination i.e. DuckDuckGo on Chrome. Great! What if you want to test using Google on Firefox? All you need to do is execute both the tests serially.
Below is the breakup of the activities that needs to be carried out as a part of the test.

Running The NUnit Testing Script For Test Case 2 On Local WebDriver
As tests need to be carried out in two different browsers, one instance of Chrome WebDriver and one instance of Firefox WebDriver is created. For simplifying this implementation that demonstrates NUnit testing for Selenium automation, we create two separate classes:
NUnitDemo_1 – Implementation for performing automated browser testing on Chrome browser with DuckDuckGo as test URL.
NUnitDemo_2 – Implementation for performing automated browser testing on Firefox browser with Google as test URL.
Both the test cases have their respective methods of initialization, testing on browser, and de-initialization/cleanup under separate [SetUp], [Test], and [TearDown] attributes as the tests have to be performed in a serial manner.
However, what happens when you have to run a test case of say 50 or more browser combinations? Relying on serial combination is going to take up a lot of your time. Local testing using serial execution will not be effective as it would require significant cost to setup the test infrastructure and execution time will be significantly higher!
If only we could run the same test case on 2, 5, or maybe 10 different browsers simultaneously then our overall test execution time could have trimmed down significantly, right?
Well, this is where the Selenium Grid comes in to rescue. Using a Selenium Grid, you can perform parallel testing with Selenium C# framework to validate your website’s browser compatibility.
Guide: Setup Selenium Grid For Parallel Execution In Different Browsers
In the next section of this Nunit testing tutorial, we will leverage Parallel testing using a remote WebDriver on cloud.
Parallel Testing Using A Remote WebDriver On Cloud
We now know that serial execution using Selenium Webdriver is not going to be enough to help you pass your release cycles on time with flying colors. However, a Selenium Grid is going to be a different story.
Using a Selenium Grid you can run a test case over different test configurations of browsers + OS, simultaneously. However, there is a downside to that as well. You can only access the browsers you have on your machine as you configure the hub and nodes of the Selenium Grid. Now, you can’t go ahead and download hundreds of browsers and buying a device lab can be a not so pocket-friendly option. So what can you do?
A scalable model is using a cloud-based browser compatibility testing tool on which NUnit testing for Selenium C# automation can be performed on a remote, scalable, online Selenium Grid with zero downtime. LambdaTest is one such cloud-based automated browser testing platform on which offers 3000+ real browsers hosted on the cloud servers. That way, you don’t have to worry about downloading or maintaining any browser or device lab, as we do it for you to help you provide with a wider test coverage.
How Do I Run My Selenium C# Automation Script On LambdaTest?
Porting an existing NUnit testing suite that makes use of Local Selenium WebDriver to LambdaTest infrastructure requires minimal effort. All you need are LambdaTest authentication credentials i.e. username and access key, and LambdaTest Hub URL. You can find all of these details from your LambdaTest Automation Dashboard.
To declare your desired capabilities class, you can use LambdaTest Desired Capabilities Generator. It auto-generates the code for Capabilities Class based on your testing requirements, in all of the programming languages.

Apart from scalability, the other advantages of using NUnit testing for Selenium automation on a remote Selenium Grid is that you can perform Parallel Testing on the test cases. Parallel testing allows you to execute numerous automation test cases altogether simultaneously. Parallel testing with Selenium testing tool can reduce the overall execution time of the tests.
The number of parallel tests depends on the number of concurrent sessions under the opted plan. More the number of concurrent plans, the better the throughput which eventually leads to shortened release cycles.

Automated browser testing with NUnit and Selenium when used in parallel testing mode can greatly reduce the test execution time.
Test Case – Leveraging the advantages of parallel testing with Selenium testing tool, we perform search test using DuckDuckGo on 4 different combinations of (browsers + browser versions + platform) using 2 parallel test sessions. This means that I would be running the test cases on 2 different combinations at the same time.
Implementation
Code Walkthrough
Since Remote WebDriver is used, we first import the types defined in the OpenQA.Selenium.Remote namespace.
The combination of user-name & access-token is used for logging on to the platform.
The browser and platform capabilities for C# are generated using the LambdaTest capabilities generator.
The combination of user-name and access key are passed to the remote URL on which the test will be performed.
Multiple parameters that represent the browser, browser version, & platform are passed to the TestFixture class. The TestFixture class is a part of the NUnit.Framework.Internal namespace.
The Parallelizable attribute is addressed with the ParallelScope as All. This implies that the test case will run in parallel with the descendant test cases, at the same level. Changing the ParallelScope at Children may impact the ability to execute test cases in parallel.
The ThreadLocal class that belongs to the System.Threading namespace provides thread-local storage of data. The instance of IWebDriver is the data that is stored per-thread.
As tests will be executed in parallel threads, value argument in iWebDriver-Instance i.e. driver.Value is used to get the value of the instance for the current thread.
Rest of the implementation remains unchanged. Hence, you can achieve parallelism for the tests with minimal code changes. As per the current plan, we can have two concurrent sessions i.e. 4 tests should be executed in 2 test runs.

You may have noticed that 2 of our test cases are in queue, as I was using 2 parallel sessions to run my Selenium C# automation script. Once the running test cases are passed, the ones queue are also tested.

The overall execution time of these four tests is around 128 seconds, this is when I was going with 2 parallel sessions. If I had run the test cases with 4 parallel test sessions, my overall execution time would have been 64 seconds. As seen in the snapshot below, the parameters passed to the TextFixture class are considered as the DesiredCapabilities for automated browser testing.

Conclusion
Though there are a lot of test frameworks in C#, NUnit is one of the most popular ones. The main advantage of the NUnit test framework is that it is compatible with Selenium testsuite and is effective in performing TDD (Test Driven Development). NUnit testing for Selenium automation with C# is widely used for automated browser testing.
In this NUnit testing tutorial, we learned to automate web UI testing using Selenium C# framework called NUnit. We also learned that testing using Local Selenium WebDriver has scalability issues, hence it is better to use Selenium testing tool on a cloud based cross browser testing platform like LambdaTest.
Parallel Testing should be used when testing is performed on a remote Selenium Grid since it reduces the overall execution time thereby shortening the release cycles. It is always better to use an effective test framework like NUnit on powerful and scalable Selenium Grid as it can have a huge impact on the deliverables of the project. Kudos on running your first NUnit testing script.
In case you haven’t gone through the previous article of this series on setting up Visual Studio, I’d urge you to do so. I will see you in the next tutorial of this Selenium C# tutorial series where I’ll show you how to use implicit wait in Selenium C#. Until next time. Ciao! 🙂
Update: We’re now done with the Selenium C# tutorial, so we’ve compiled a whole list of tutorials.
Selenium C# Tutorials With Examples
- Selenium C# Tutorial: Setting Up Selenium In Visual Studio
- Running First Selenium C# Script With NUnit
- Selenium C# Tutorial: Using Implicit Wait in Selenium
- Selenium C# Tutorial: Using Explicit and Fluent Wait in Selenium
- Selenium C# Tutorial: Handling Alert Windows
- Selenium C# Tutorial: Handling Multiple Browser Windows
- Selenium C# Tutorial: Handling Frames & iFrames With Examples
- Selenium C#: Page Object Model Tutorial With Examples
Got Questions? Drop them on LambdaTest Community. Visit now


