How to Run Multiple NUnit Test Cases
Andreea Draniceanu
Posted On: October 9, 2023
![]() 265888 Views
265888 Views
![]() 17 Min Read
17 Min Read
This article is a part of our Content Hub. For more in-depth resources, check out our content hub on Selenium NUnit Tutorial.
When it comes to automated testing in .NET, the NUnit framework is a go-to choice due to its simplicity and robust set of features. In this blog, I will show you how to run multiple test cases in NUnit and Selenium.
When working on complex projects, having multiple NUnit test cases to cover various scenarios and edge cases is common. NUnit provides methods to automate the execution of multiple test cases, saving time and effort while maintaining high code quality.
In the following sections, we will explore how to organize and structure test cases and execute them in bulk using attributes and data-driven testing. We will cover what NUnit is, how to run the same test with different test data, and how to run multiple NUnit test cases in parallel. Ultimately, we’ll have a short example of how all this information can be put together. If you are preparing for an interview you can learn more through NUnit interview questions.
TABLE OF CONTENTS
What is NUnit?
Before demonstrating how to run multiple test cases in NUnit, let’s understand what NUnit is and why it’s a popular framework for automation testing.
NUnit is an open-source unit testing framework for .NET languages, including C# and VB.NET. When writing this blog on running multiple NUnit test cases, the latest version is 3.13.3. NUnit provides a simple and intuitive way to write and execute tests, allowing you to verify the behavior and code correctness.
NUnit follows the xUnit testing framework pattern, separating test setup, execution, and assertions.
One of NUnit’s main benefits is its compatibility with popular development environments like Visual Studio, which makes it a practical option for testing frameworks in .NET.
We will discuss its range of properties and NUnit assertions that help organize and structure tests. To increase flexibility and test coverage, NUnit also offers additional features like:
- parameterized tests
- test fixtures
- test suites
Now that we have a basic understanding of this framework, let’s look at what are annotations in NUnit. After that, we will see how to run multiple NUnit test cases.
Getting started with Selenium testing with NUnit? Watch the tutorial below and expedite your learning.
Subscribe to our LambdaTest YouTube Channel for the latest updates on tutorials around Selenium testing, Cypress testing, and more.
Annotations in NUnit
NUnit annotations, also called NUnit attributes, are special instructions or metadata that can be applied to test methods, classes, or assembly files to modify code execution or provide additional information, like descriptions and test case links (for integration with test management tools like TestRail).
The most common NUnit annotations are:
- OneTimeSetup: This annotation marks a method that will run once before the entire test run.
- OneTimeTearDown: This annotation marks a method that will be executed once after the entire test run.
- Setup: This annotation marks a method that will run once before each test case.
- TearDown: This annotation marks a method that will execute after each test case.
- Test: This annotation marks test methods. Each test marked as such will be displayed in the Test Explorer panel of Visual Studio.
- Ignore: This annotation marks a test method to be ignored – when the tests are automatically run, tests marked with ‘Ignore’ will not be executed.
- Explicit: This annotation marks a method that will be ignored unless explicitly selected to run.
- TestCase: An annotation we use for data-driven testing, i.e., for tests that run multiple times with different data sets.
- Category: This annotation can be used to group tests, which can be run together by specifying their category.
- Parallelization: This annotation marks a class or a method for parallelization.
The order in which the methods are executed is as follows:
 Note
NoteRun your Selenium NUnit tests across 3000+ real environments. Try LambdaTest Today!
Data-Driven Testing to Run Multiple NUnit Test Cases
Data-driven testing is an approach to testing a software application using multiple input data sets. Instead of writing separate test methods for each data set, we can leverage NUnit’s data-driven testing feature to run a single test method with different inputs. This technique is especially useful when we want to test code against various scenarios or validate different data combinations, for example, cross browser testing.
Here’s an example of how to perform data-driven testing with NUnit using the TestCase attribute:
In the above code, we have a Tests class with a TestOnMultipleBrowsers method containing code we want to run on multiple browsers. Instead of writing separate tests for each input/output pair, we use the [TestCase] attribute to specify multiple sets of input and expected output. NUnit will run the TestAddMethod test method three times, once for each test case.
The [TestCase] attribute also supports a variety of data sources, such as arrays, data tables, and CSV files. Here’s an example of using a data table with the TestCaseSource attribute:
In this example, we have a class with a test method that uses a data table to define multiple browsers and browser versions.
We then use the TestCaseSource attribute to specify that NUnit should use the ItemData field as the data source for the test method. Again, NUnit will run the test method three times, once for each set of inputs.
How to Run Multiple Tests in Parallel Using NUnit?
By default, test cases in NUnit are run sequentially, meaning that a new test will only run after the previous one has completed its execution. This is all good when we don’t have a lot of tests, but as the projects get more complex, we want to save time on the test execution. To do this, we can run the tests in parallel.
For parallelization, NUnit offers the annotation [Parallelizable] annotation, which can be used at the class level or at the method level. We, the designers of the tests, are in charge of ensuring that the tests are thread safe when executed concurrently.
Otherwise, unexpected behavior can result from concurrent tests that edit instance fields or properties without locks, just like it would in a multi-threaded program. This applies to scenarios where one test case can change the data used in a different test case. Keeping the tests as independent as possible is always a good practice.
When using the [Parallelizable] annotation, we need to specify the scope of the parallelization. Here are the available options:
- ParallelScope.Self: When the test can run in parallel with other tests. This scope can be applied to classes and methods.
- ParallelScope.Children: When the child tests can run in parallel with one another. This scope can be applied to the assembly and classes.
- ParallelScope.Fixtures: When the fixtures (test classes) can run in parallel with one another. This scope applies to the assembly and classes.
- ParallelScope.All: When the test and its descendants can run in parallel with others at the same level. This scope can be applied to classes and methods.
Demonstration: Running Multiple NUnit Test Cases in Parallel
In the next section of this NUnit tutorial, I will demo how we can use data-driven testing with Selenium and run multiple NUnit test cases in parallel, saving a lot of execution time. We will be using the already-mentioned annotations, assertions, and data-driven testing. This is equivalent to executing multiple NUnit test cases.
Test Scenarios
Scenario 1:
- Navigate to the webpage: LambdaTest eCommerce Playground.
- Open the Shop by Category menu.
- Click on a category under the section Top Categories.
- Validate that the correct page is loaded with the correct title.
- Repeat the test for multiple categories.
Scenario 2:
- Navigate to the webpage: LambdaTest eCommerce Playground.
- Enter invalid credentials for the username and/or password.
- Validate that the correct message is displayed: “No match for E-Mail Address and/or Password.
Implementation (Local Test Execution)
When writing this article, the latest version of Selenium is 4.10.0. One of the standout features in Selenium 4 is the adoption of the W3C WebDriver protocol, which takes the place of the JSON wire protocol used in Selenium 3. This shift has been a game-changer, making Selenium 4 distinct and more advanced compared to Selenium 3.
To know the difference between Selenium 3 and 4 versions, we recommend checking our article on Selenium 3 vs Selenium 4.
Let’s see how to run multiple NUnit test cases on a local machine. There are a few prerequisites before we start writing the tests.
First, create a new NUnit project:
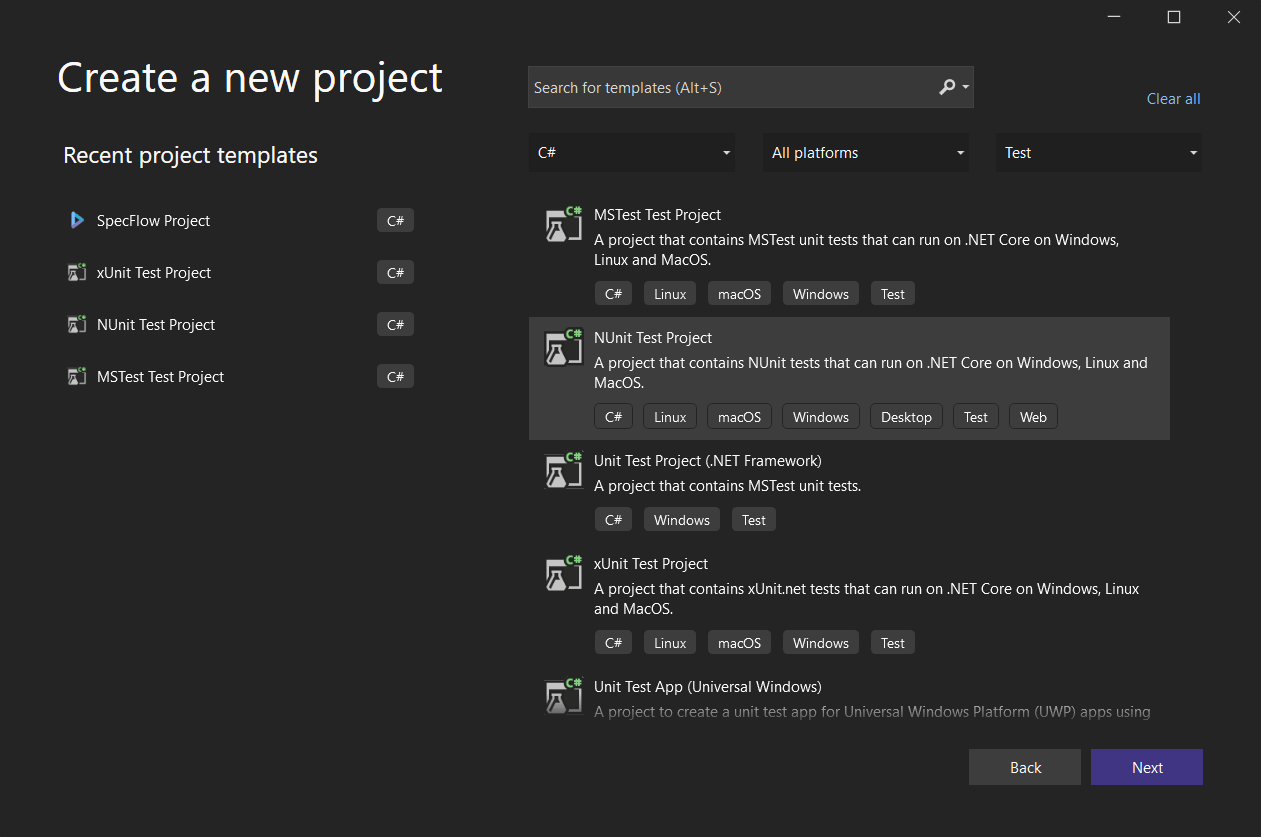
Next, add the Selenium.WebDriver Nuget package. Also, add a NuGet package for the desired browser. As I use the Chrome browser, I will now add the Selenium.WebDriver.ChromeDriver package. I am also adding the package DotNetSeleniumExtras, which will be used for explicit waits in Selenium.
Once we are done with the above prerequisites, the next step is to write the test script.
Code Walkthrough
The first part is the same for all C# classes and contains the references to namespaces and packages to be used:
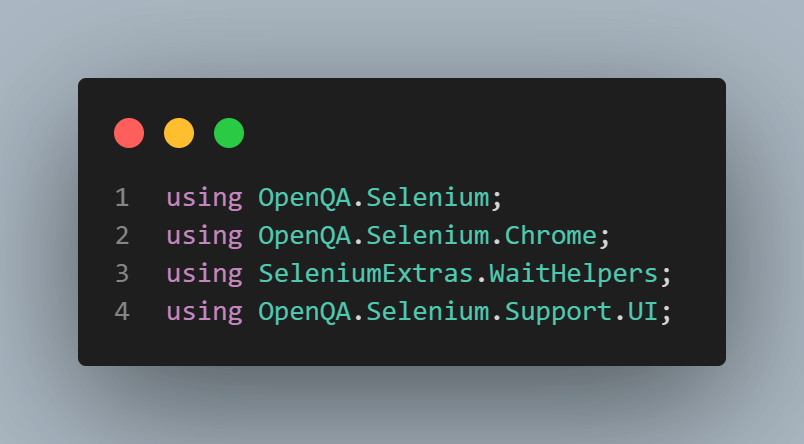
Then, we have the driver variable declared in the first part of the class using the IWebDriver Selenium interface:
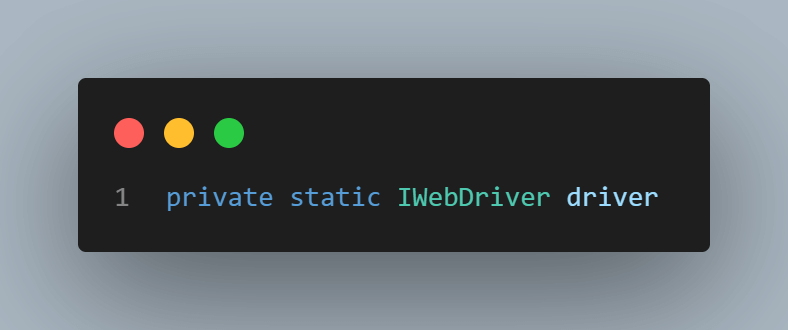
We don’t need any other variables for this example, so we can go straight to the tests. However, we can use a common setup for all our tests to avoid code repetition in each test. We’ll do this using the [SetUp] annotation, so the code inside will execute before each test case. This line of code simply starts the Chrome browser.

Next, we can get started on the tests. We have two scenarios that will be executed with various test data. So we will have the [Test] annotation to instruct the test runner that the code inside is test code and the [TestCase] annotation, once for each set of data.
Let’s look at them individually:
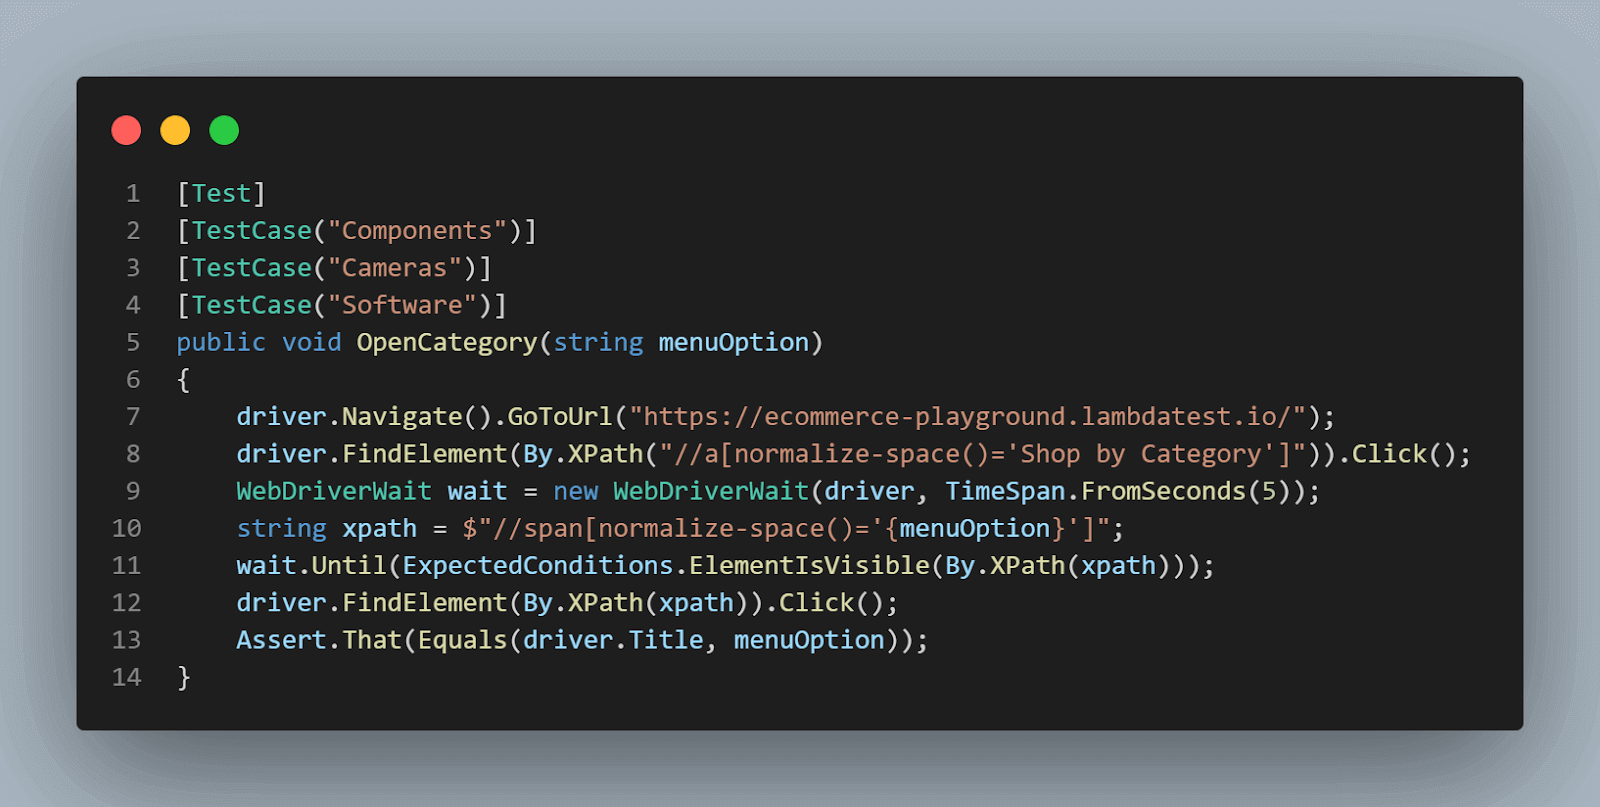
In this test, we need to declare a string variable for selecting the menu option. We can call it menuOption, and inside each test case annotation, we need to pass the string value to use.
The first step of the test is to navigate to the desired URL using the Navigate Selenium command. After the page is loaded, we need to click the Shop by Category link – for this, we will use the FindElement() command to identify the web element using its XPath and the Click() command to perform the click.
Next, we want to click the category, but we can instruct Selenium to wait for the link to be visible before clicking it. For this, we can use an explicit wait, and the click will not be performed before the element is loaded on the page. We can use XPath again to identify the element and the Click() command to click on it.
The last step is the assertion, using the NUnit class Assert, and we want to validate that the correct page is loaded. For this, we compare the page title with the menu option, and these two strings should be equal.
In the second test case, we will need two variables – one for the user email and one for the password, and we will pass the values the same way we did in the previous test.
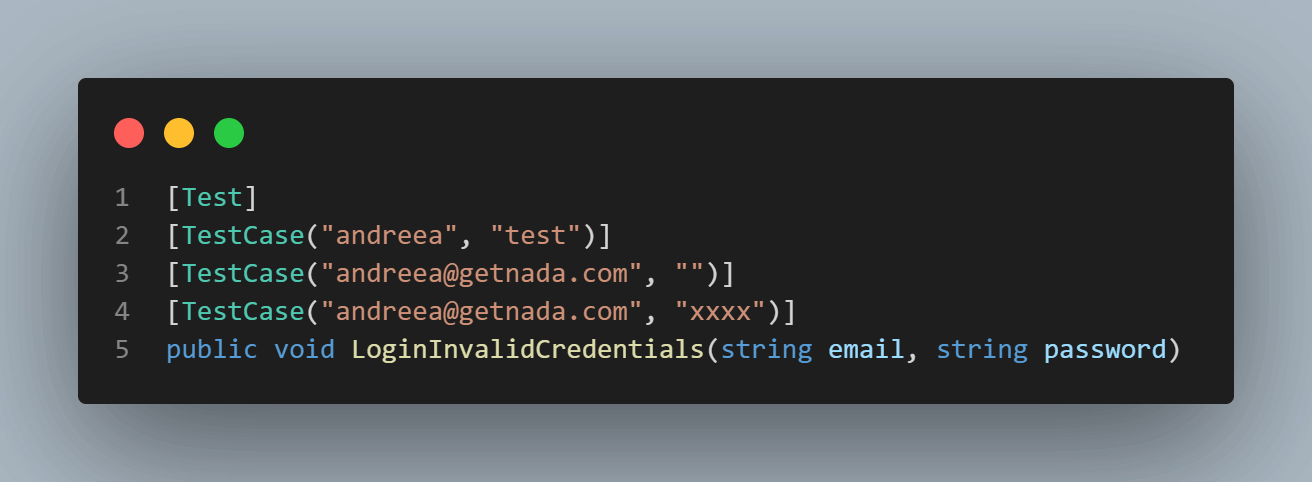
The first line is the same as in the other test, except we navigate to a different URL.

Next, we need to identify the email and password fields, enter their values, and click the Login button. We can use Locators in Selenium to find the elements, such as Name, ID, or CSS Selectors.

Next, we again need Selenium Waits to ensure that the validation is not done before the warning is visible on the web page.

The last line is an assertion, which contains the validation that the correct message is displayed.

And last but not least, we have a teardown method that executes after each test case due to the [TearDown] annotation. We are closing the browser after each execution, using the Quit() command.
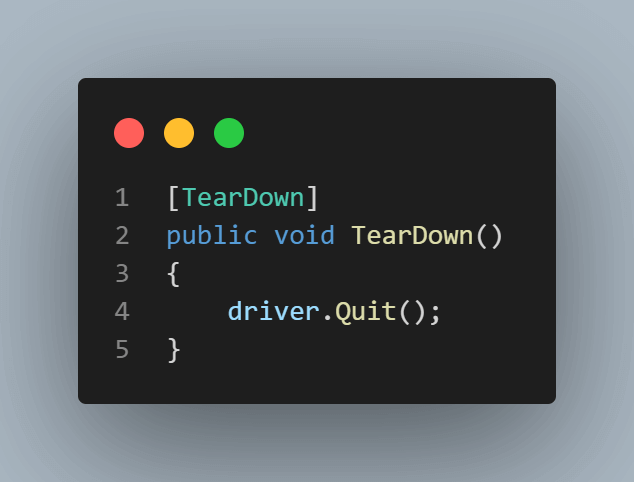
Local Test Execution
The tests can be run from the Test Explorer panel – you can see that each set of data is displayed as a separate test and can be run independently.
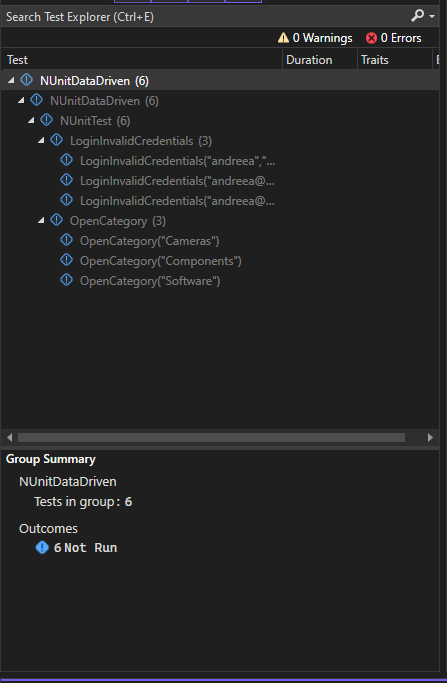
If you run all the tests, they will run sequentially, each test opening a new Chrome browser window. Running them in parallel can cause issues because each test tries to interact and simulate mouse and keyboard actions.
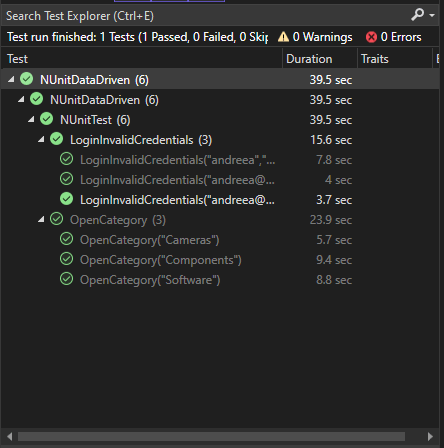
After running the tests, you can see the total time is almost 40 seconds – not more, but this is a sample project with simple tests. The more tests the project has, the longer it will take to execute them locally, and this means that the local machine cannot be used during this time.
 Note
NotePerform NUnit automation testing on cloud Selenium grid. Try LambdaTest Today!
Running Multiple NUnit Test Cases on the Cloud
Let’s see how to write the tests, but this time for running them on the online Selenium grid offered by LambdaTest – an AI-powered test orchestration and execution platform to perform automated testing with NUnit at scale on over 3000+ real browsers and operating systems. With LambdaTest, you can run multiple NUnit test cases in parallel, reduce test execution time, and ramp up the feedback loop for deploying quality builds.
Looking to get started with Selenium automation with NUnit? Check out the documentation – NUnit with Selenium.
So you can test remotely and not on a local machine. To run the test on LambdaTest, first, we need to use the Capabilities Generator to set up the browser capabilities.
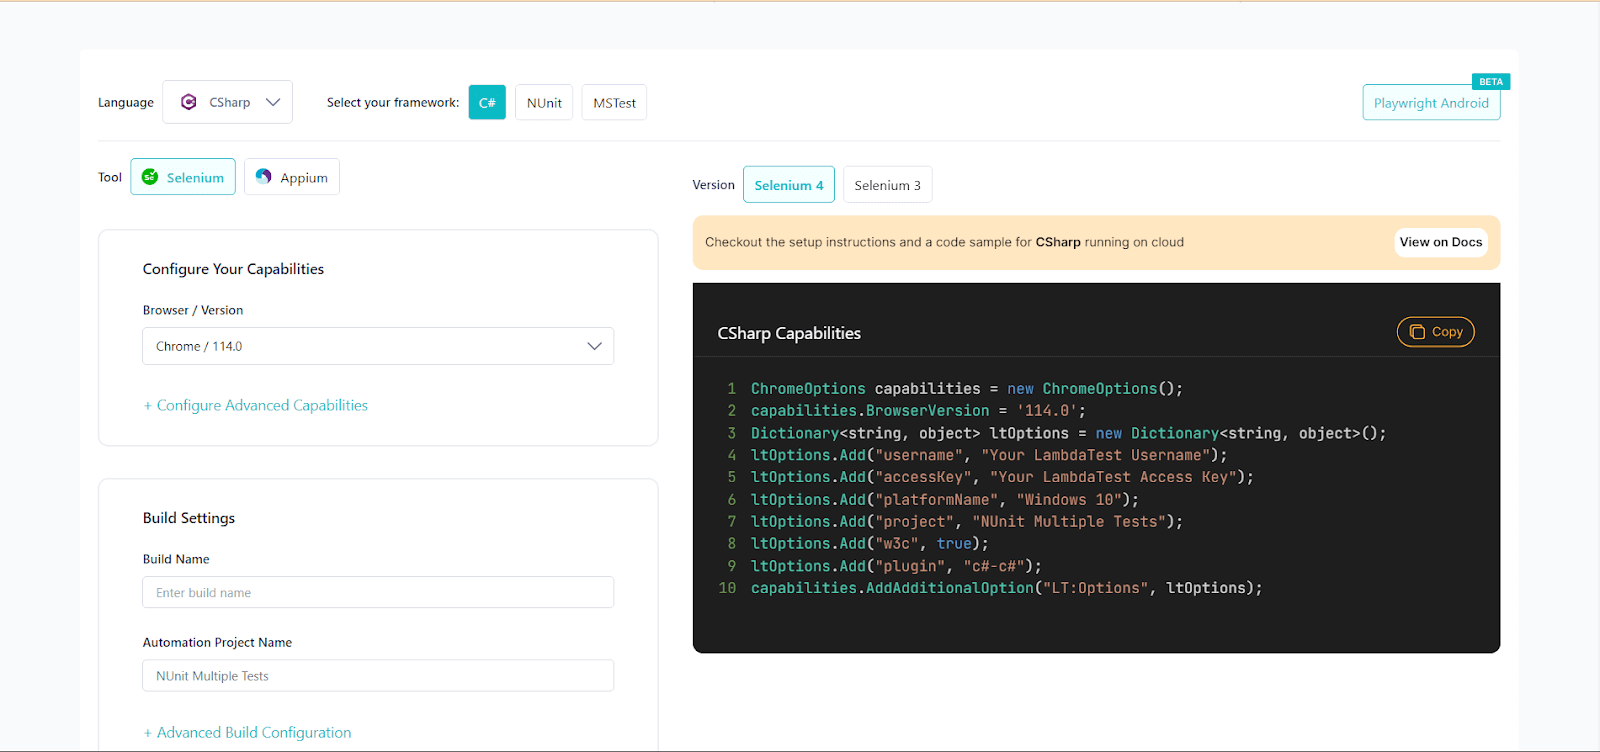
Here is how the code looks this time.
Code Walkthrough
Just like before, the first lines of code contain the references used in the class – this time, we need an additional reference, OpenQA.Selenium.Remote, which allows us to run the tests remotely:

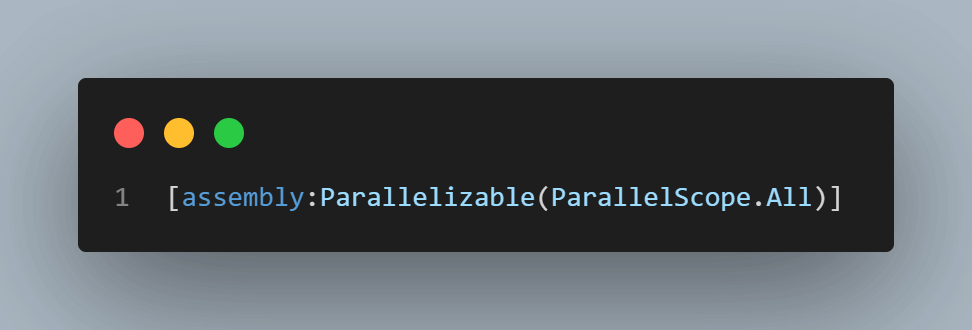
Before the class name, we use the [assembly:Parallelizable(ParallelScope.All)] attribute, which will instruct the tests contained in the class to run in parallel with each other.
Next, we have the variables declaration for the variables we will use: the driver, the test URLs, your LambdaTest username and access key, which are stored as environment variables, and the grid URL.

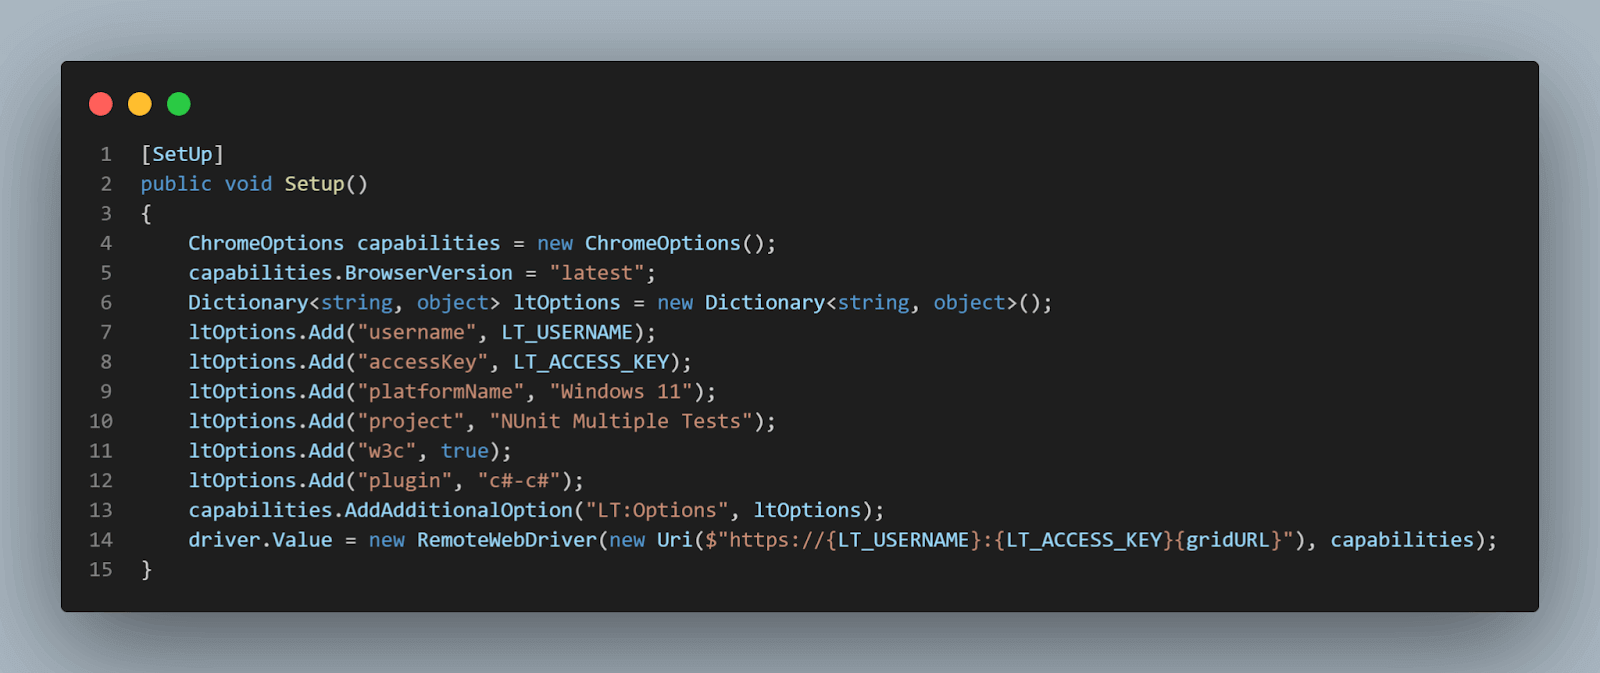
Then, there is the [Setup]. In this method, we define the capabilities used when running the tests.
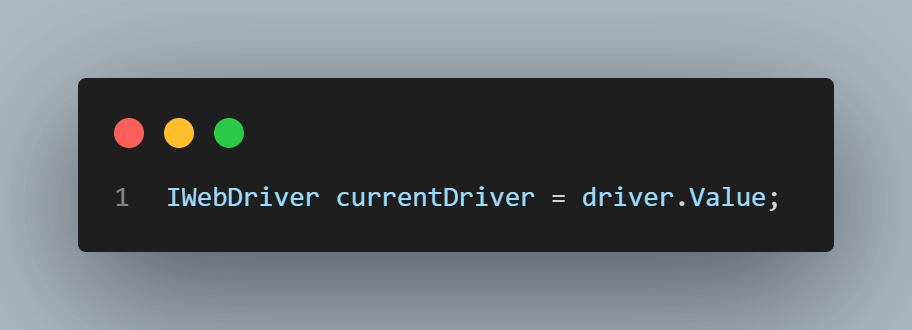
In the test, the only change is that we need to create a new variable for the current instance of the driver and use it in the interactions with the browser:
And in the teardown, before closing the browser, we also want to make sure that the results are saved to LambdaTest:
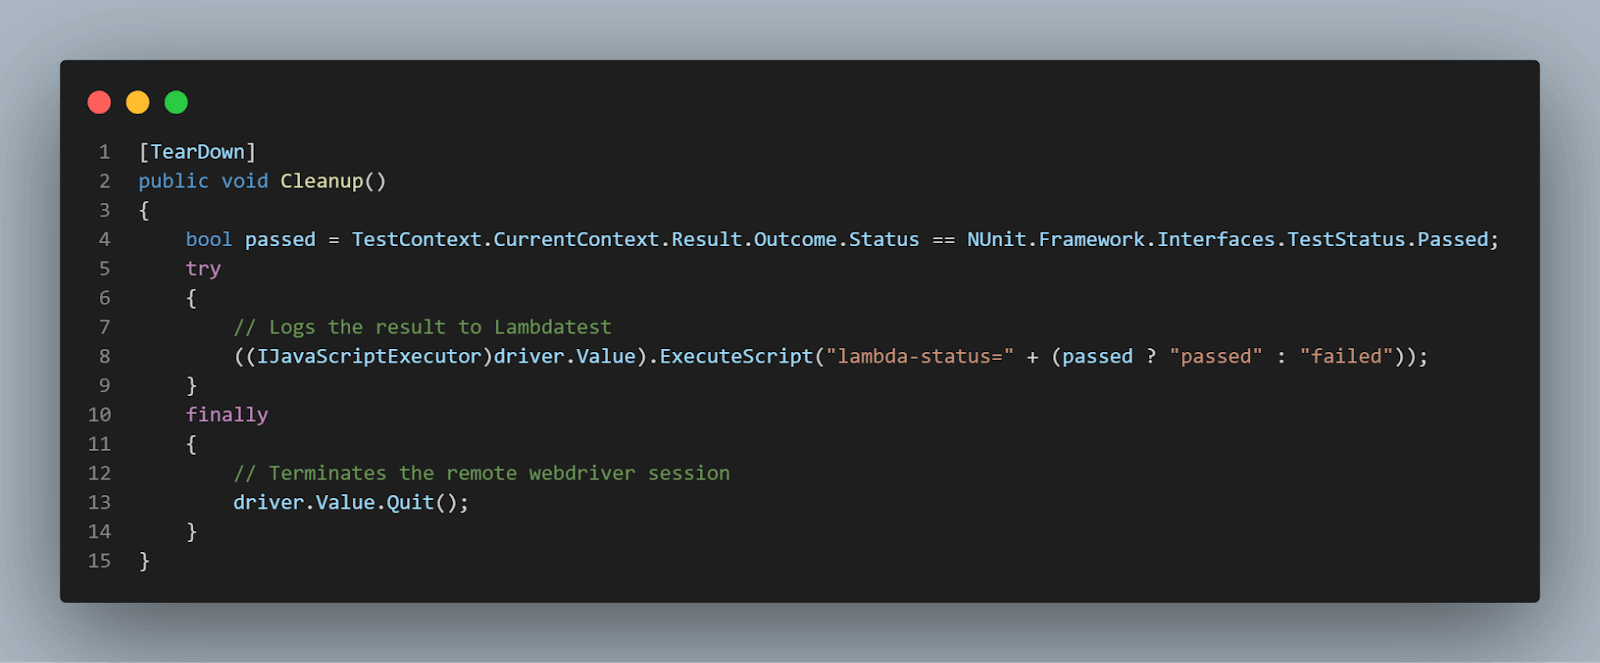
The rest of the code is the same.
Running multiple NUnit test cases in parallel on LambdaTest will help you reap the following benefits:
- We can run the tests on different configurations from the ones we have on our local machines (browsers and browser versions).
- Running multiple NUnit test cases in parallel saves time.
- Running the multiple NUnit test cases in parallel on the local machine can be tricky if multiple tests interact simultaneously with different browser instances. This issue is avoided if the tests run on a scalable and reliable cloud grid like LambdaTest.
Test Execution on Cloud
Starting the test execution on the LambdaTest cloud grid can be done the same way as the local execution by selecting to run the tests from the Test Explorer. This time, the execution will be done on the remote server, leaving the local machine available for other work.
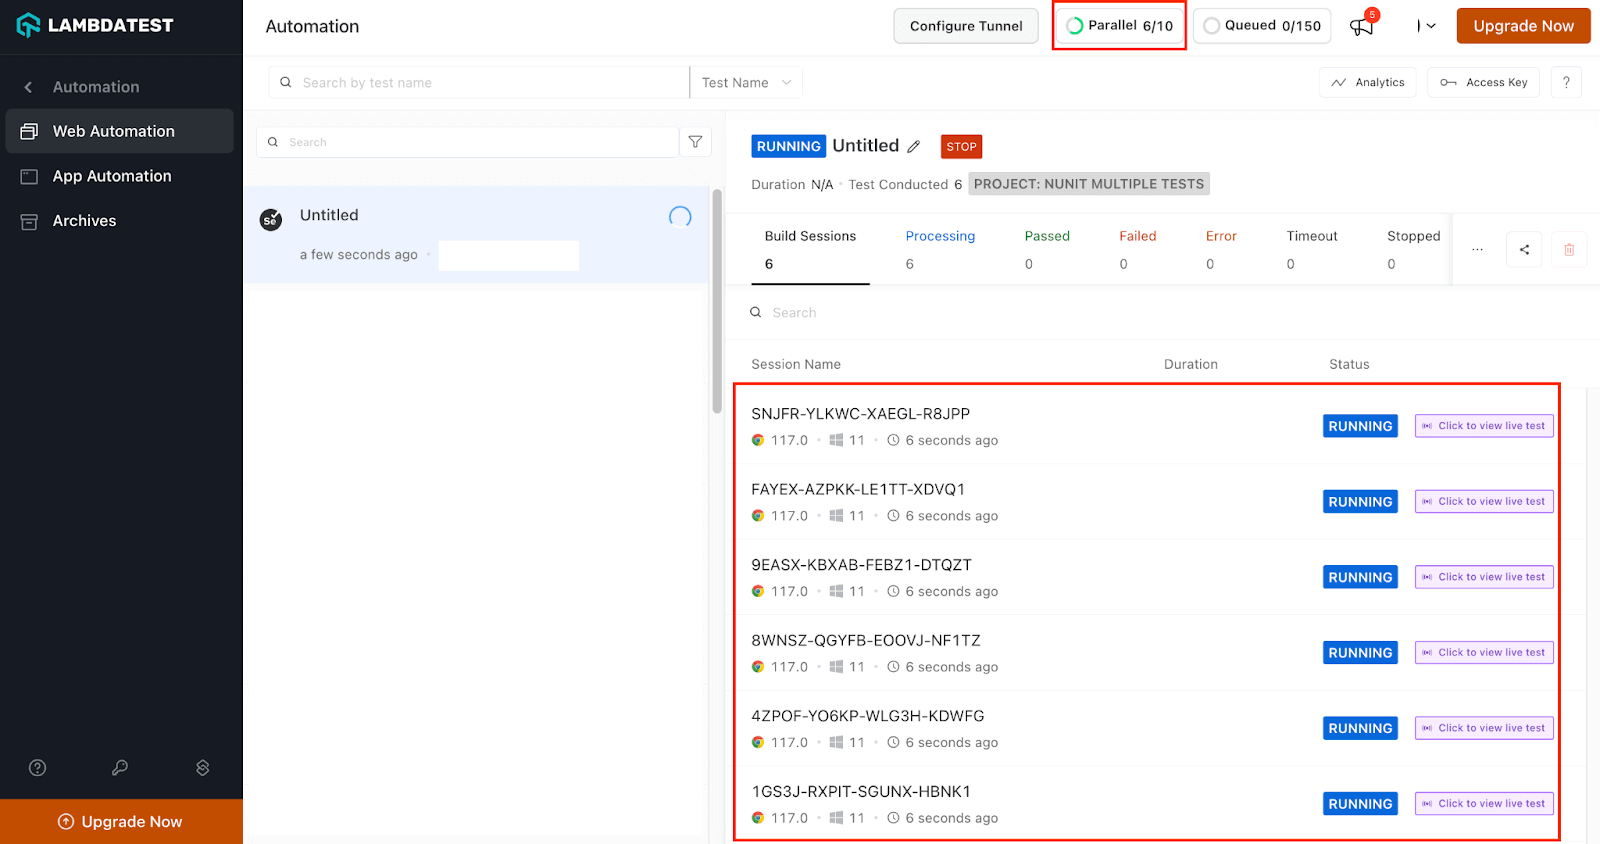
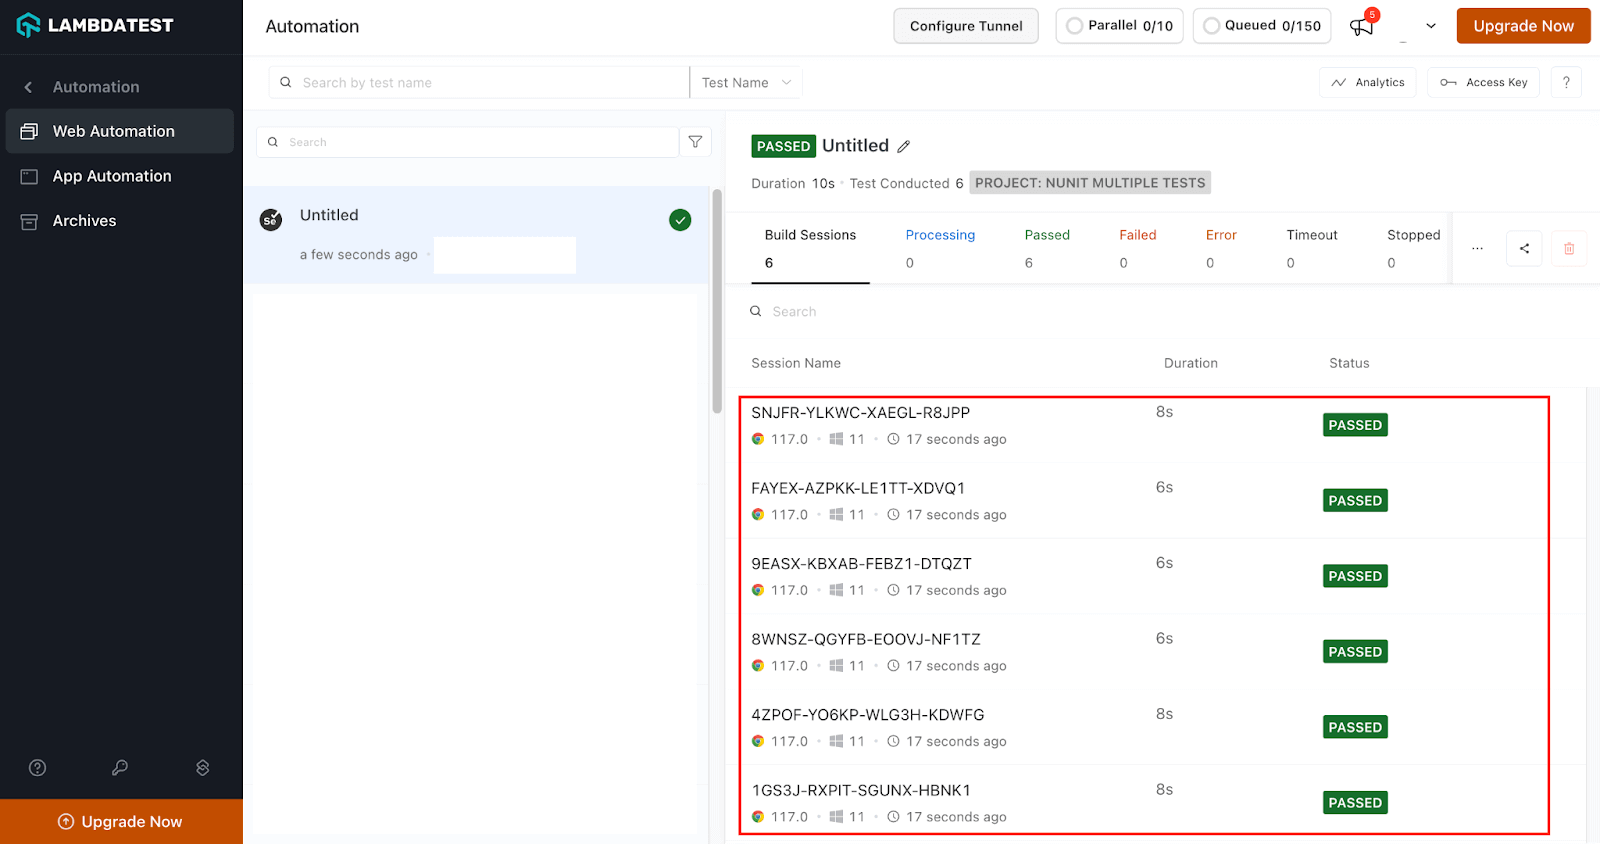
Also, parallel execution of multiple NUnit test cases will depend on the number of allowed parallel tests in your LambdaTest account.
After running the multiple NUnit test cases in parallel, you can see both results in the Test Explorer. You can also see them in the browser, including a video recording of the test and details about the Selenium WebDriver NUnit commands that were sent.
Conclusion
In this blog on running multiple NUnit test cases, we explored the powerful capabilities of NUnit for running multiple tests using data-driven testing and parallelization. By leveraging these features, we can write more efficient and comprehensive test suites that cover a wide range of scenarios and data combinations.
Data-driven testing allows us to test our code with multiple input datasets without writing separate test methods for each case. Using the [TestCase] attribute, we can pass different test case data and quickly validate the expected results.
This approach saves time and effort and promotes maintainability by keeping our test code concise and focused. Additionally, with NUnit, we can run our tests in parallel, which significantly reduces the overall test execution time, especially if we have a large number of tests.
By utilizing multiple threads or processes, NUnit can distribute the workload and execute tests concurrently, leading to faster feedback and quicker test cycles.
Remember, when using parallelization, it’s important to ensure that the tests are thread-safe and do not have any unintended dependencies or side effects.
In conclusion, NUnit offers robust features for running multiple tests using data-driven testing and parallelization. By adopting these techniques, we can enhance the efficiency and effectiveness of the test suite, resulting in improved code quality and faster delivery cycles. So go ahead, explore these features, and unlock the full potential of NUnit for your testing needs!
Frequently Asked Questions (FAQs)
How to run NUnit tests in parallel?
NUnit does support running tests in parallel. You can enable parallel test execution by using the [Parallelizable] attribute at various levels of your test fixtures or individual test methods. This attribute allows you to specify how you want NUnit to parallelize your tests, whether at the test fixture, assembly, or method level.
Got Questions? Drop them on LambdaTest Community. Visit now


