Different Types of Locators in Selenium WebDriver
Faisal Khatri
Posted On: March 1, 2024
![]() 584177 Views
584177 Views
![]() 33 Min Read
33 Min Read
When writing automated tests with Selenium WebDriver, the first step is locating the WebElements using the browser developer tools window. To achieve this, different types of locators in Selenium WebDriver, like ID, Name, TagName, ClassName, XPath, CSS Selector, etc., can interact with those respective WebElements.
Selenium locators are like the building block of a test script that helps testers interact with the elements in the Document Object Model (DOM). Choosing the best-suited locators in Selenium WebDriver is one of the keys to ensuring that the tests are less flaky (or brittle).
In this tutorial, we deep dive into the multiple locators in Selenium WebDriver, along with demonstrating the usage of those locators. If you are preparing for an interview you can learn more through Selenium interview questions.
TABLE OF CONTENTS
- What are Locators in Selenium WebDriver?
- What are Locators Used for?
- Advantages of Locators in Selenium WebDriver
- How to Locate WebElements in DOM?
- Different Types of Locators in Selenium WebDriver
- Identify WebElements Using Locators in Selenium WebDriver
- Relative Locators in Selenium WebDriver
- Demo: Relative Locators in Selenium WebDriver
- Best Practices to Use Locators in Selenium WebDriver
- Frequently Asked Questions (FAQs)
What are Locators in Selenium WebDriver?
Selenium is a test automation framework that lets you automate the interactions with the WebElements on the DOM. Interactions (or actions) can be a click, type, double click, etc. For example, the Action class in Selenium provides appropriate methods to perform keyboard and mouse actions on the elements in the DOM.

However, the first operation is identifying those WebElements on the document (or page) under test. This is where locators in Selenium WebDriver come into the picture.
Locators in Selenium WebDriver provide mechanisms for identifying HTML elements on the page. Selenium supports several web locators, and you have to choose the one that meets your test requirements.
Let’s consider a simple example from the LambdaTest Selenium Playground website’s Input Form Demo page. You need to devise a test scenario using Selenium and enter the email value in the Email text box field.
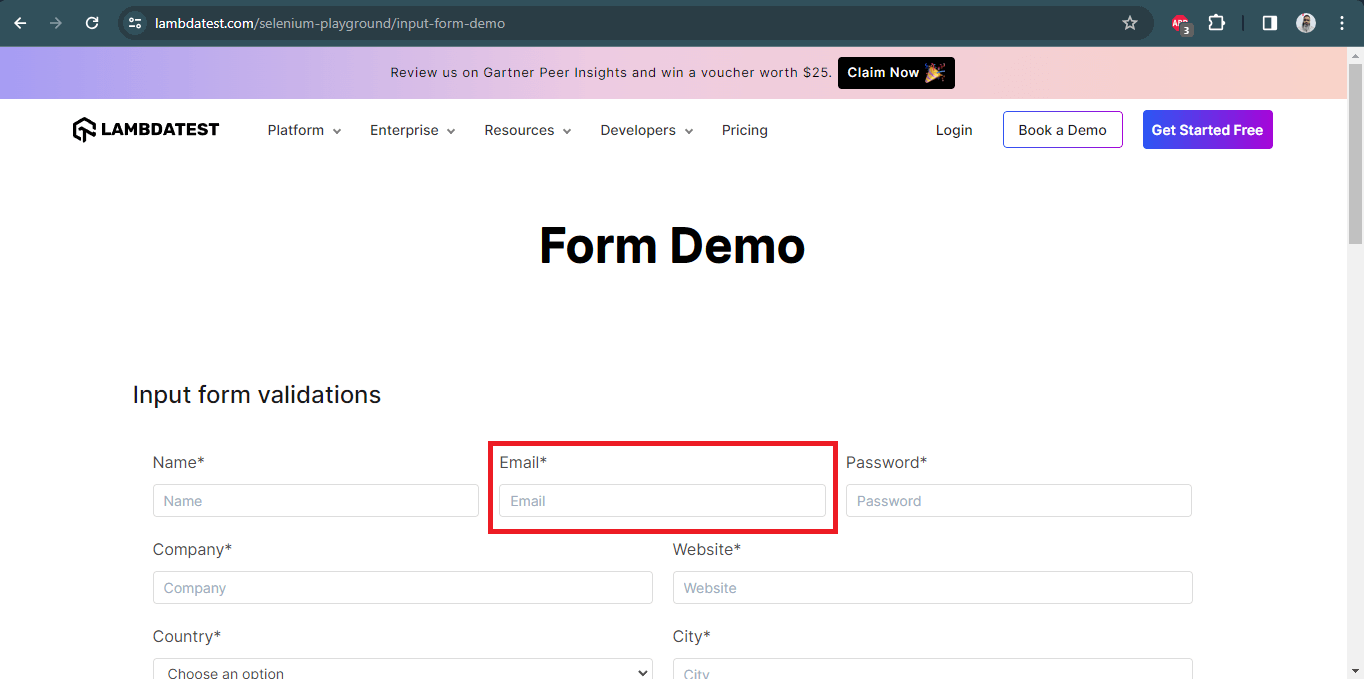
The first task in your Selenium automation script is to identify the web element of the Email field and later use the sendKeys() method in Selenium to enter the email address. The web element (or HTML element) is identified using locators in Selenium WebDriver.
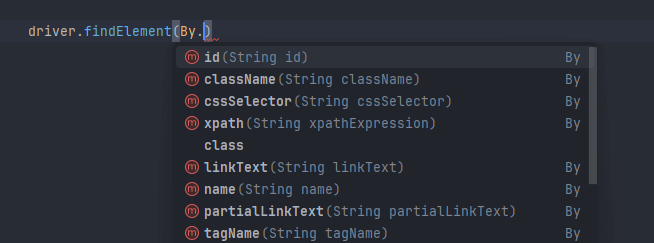
Selenium WebDriver provides the findElement() and findElements() methods to locate the WebElements using the appropriate web locator. Shown below is an example of how to use locators in conjunction with the findElement() [or findElements()] method when using Selenium Java for web automation testing.
For more information on locators, please refer to this Selenium Locators Cheat Sheet.
What are Locators Used for?
The primary usage of a locator is to locate a web element on the web page. The locators can then be used in Selenium WebDriver test scripts to interact with the web element and perform different actions such as clicking, entering keys, opening a dropdown, ticking a checkbox, etc.
Using the combination of these actions, the appropriate functionality of the web pages can be tested. Locators help us verify the presence of the web element and its visibility and check the state of the web element, whether it is enabled or disabled.
Locators are an essential part of the test scripts, without which the automated testing can not perform the desired output. If the right locators are not used, it may result in failures and flaky tests. Understanding the locator strategies is necessary as it can help save time and effort in writing the automated tests.
Advantages of Locators in Selenium WebDriver
There are multiple advantages of locators in Selenium WebDriver, some of which are listed below:
- Once the web element is located on the web page, it can run the same tests on different browsers installed on various platforms. Thus, helping to perform the cross browser testing efficiently.
- A web element can be located using different locator strategies in Selenium WebDriver. If the web element has an ID and name, it can be located using its ID, Name, XPath, or CSS Selector. Similarly, the respective tagName or the className can locate the same WebElement. Hence, there is a lesser chance that the tester might face difficulty locating a WebElement.
- Once a WebElement is located, it can be reused in the tests, thus saving the tester effort and time while writing the test script. This also helps remove redundancy and create robust test scripts.
- CSS Selectors can locate the WebElement in multiple ways, such as using ID and tagName, className, ID, other attributes, etc. Similarly, XPaths could also locate the WebElements using relative or absolute path. ID is the fastest of all locators; however, it requires that the WebElement should contain the ID attribute. The same applies to the Name locator as well.
The point here is that every locator serves different needs, so if ID and Name are not available in the WebElement, CSS Selector or XPath could be used to locate the WebElement, thus making the way out for testers so they don’t get blocked.
How to Locate WebElements in DOM?
Before any interaction can be performed on the WebElements in the DOM, the first step is to locate the elements in the DOM. Follow the below-mentioned steps to locate WebElements in the DOM (Document Object Model).
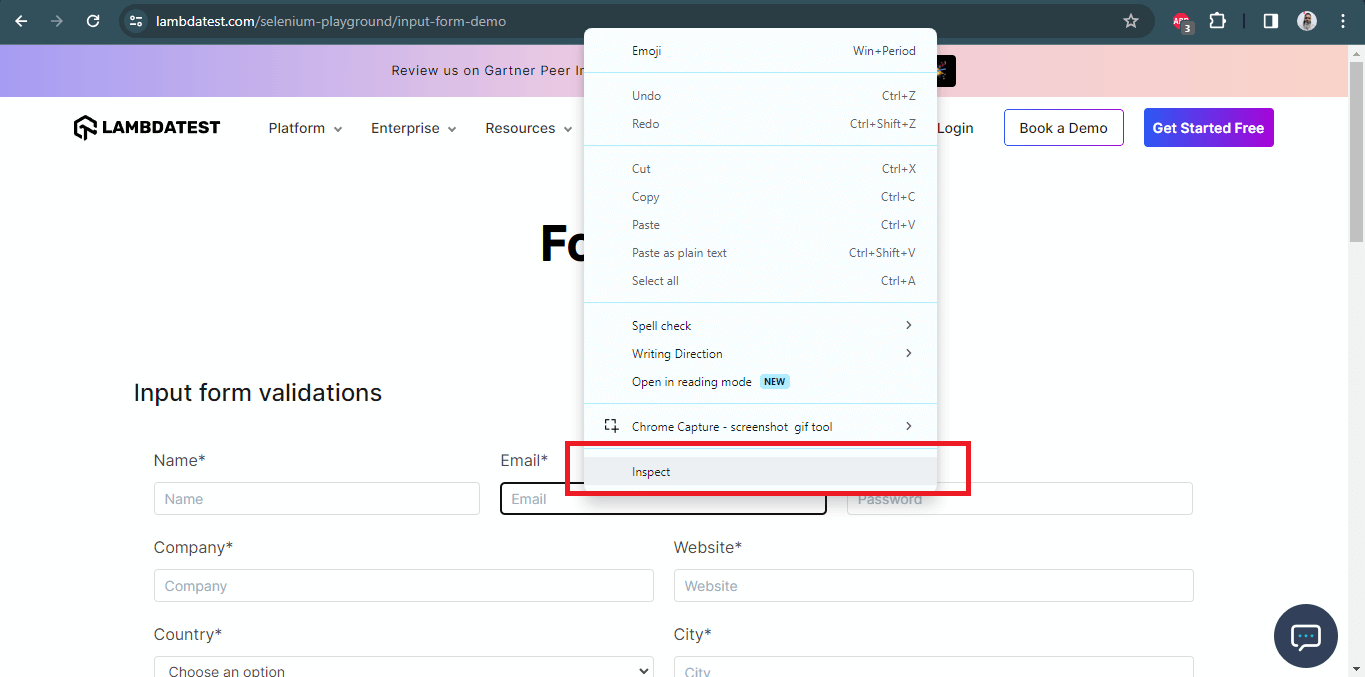
- Open the website and click on F12, or right-click and select Inspect.
- A Chrome Developer Tools console will launch.
- There is a mouse icon on the leftmost side of the Developer Tools console. Once you hover over it, a message titled Select an element in the page to inspect it will appear.
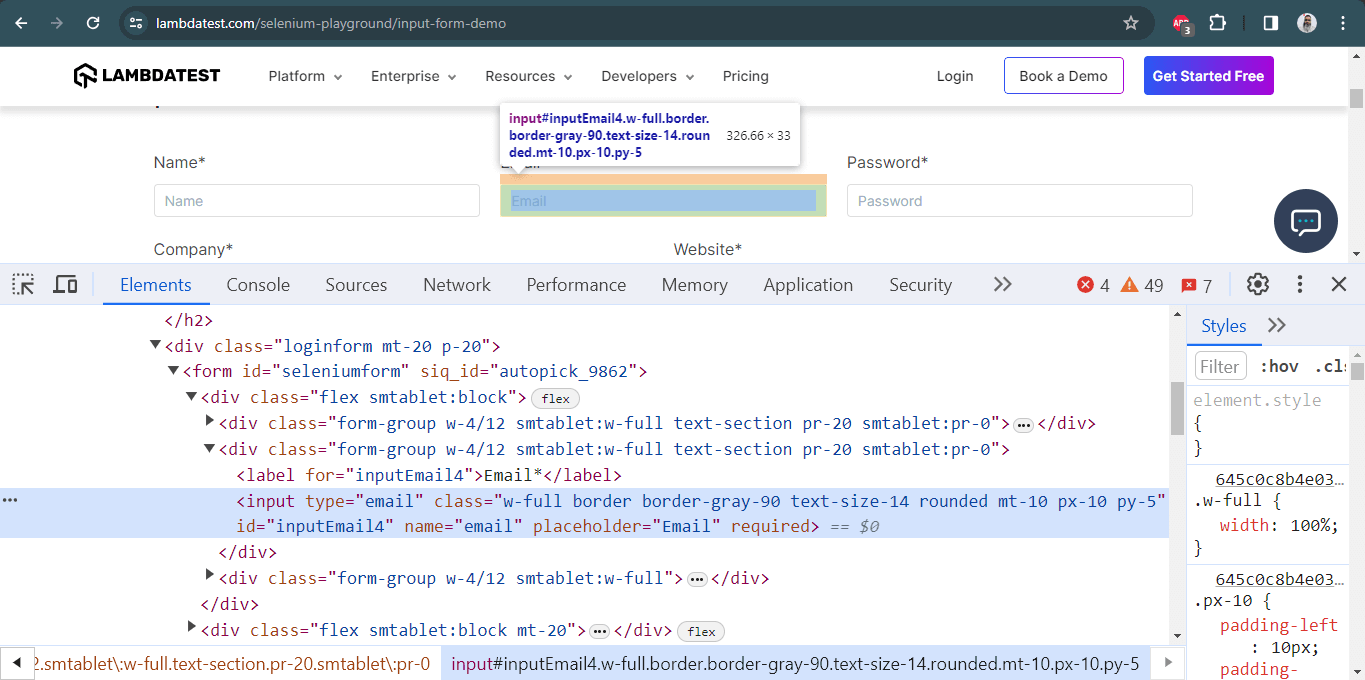
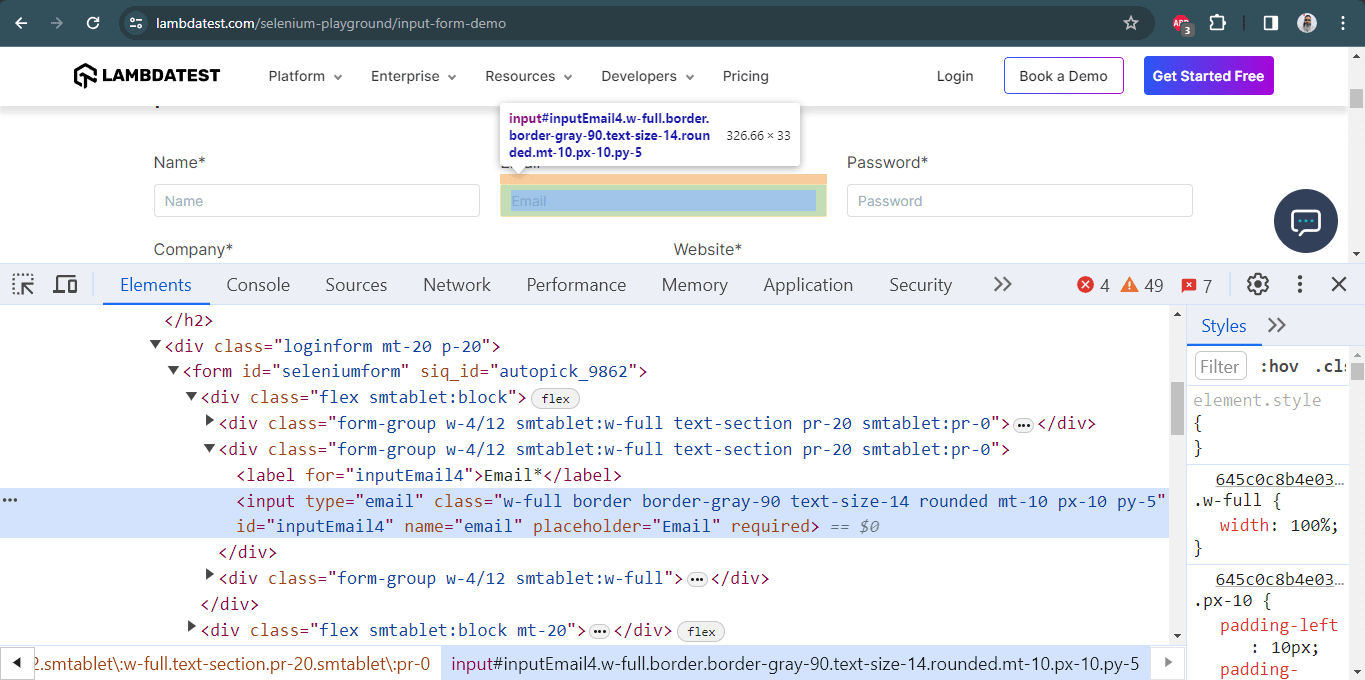
Click on it and navigate to the element you wish to locate. Once you click on the element, the DOM will be highlighted for that element, as shown below.
- The selected row in the DOM is the context from where you want to fetch the values. For example, the highlighted DOM value is shown below.
|
1 |
<input type="email" class="w-full border border-gray-90 text-size-14 rounded mt-10 px-10 py-5" id="inputEmail4" name="email" placeholder="Email" required=""> |
Now, you can choose the id, i.e., inputEmail4, to locate the desired Email text box element. The above technique will be used throughout this blog to demonstrate the usage of different locators in Selenium WebDriver.
Different Types of Locators in Selenium WebDriver
Below is the list of these locators of Selenium WebDriver:
- ID
- Name
- ClassName
- LinkText
- Partial LinkText
- TagName
- CSS Selector
- XPath
As mentioned, Selenium WebDriver provides different web locators for locating WebElements on the page. Here are the different locators in Selenium WebDriver that I will cover in-depth in the latter part of the blog:
| Locators | Description | Syntax (in Java) |
|---|---|---|
| id | Identify the WebElement using the ID attribute. | driver.findElement(By.id(“IdValue”)); |
| name | Identify the WebElement using the Name attribute. | driver.findElement(By.name(“nameValue”)); |
| className | Use the Class attribute for identifying the object. | driver.findElement(By.className(“classValue”)); |
| linkText | Use the text in hyperlinks to locate the WebElement. | driver.findElement(By.linkText(“textofLink”)); |
| partialLinkText | Use a part of the text in hyperlinks to locate the WebElement. | driver.findElement(By.partialLinkText(“PartialTextofLink”)); |
| tagName | Use the tagName to locate the desired WebElement. | driver.findElement(By.tagName(“htmlTag”)); |
| cssSelector | CSS used to create style rules in the web page is leveraged to locate the desired WebElement. | driver.findElement(By.cssSelector(“cssValue”)); |
| xpath | Use XPath to locate the WebElement. | driver.findElement(By.xpath(“xpathValue”)); |
Using locators in Selenium 4 is a treat due to the introduction of relative locators in Selenium 4. The introduction of locators like above(), below(), toLeftOf(), toRightOf(), and near() makes it easy to locate WebElements in relation to a particular WebElement.
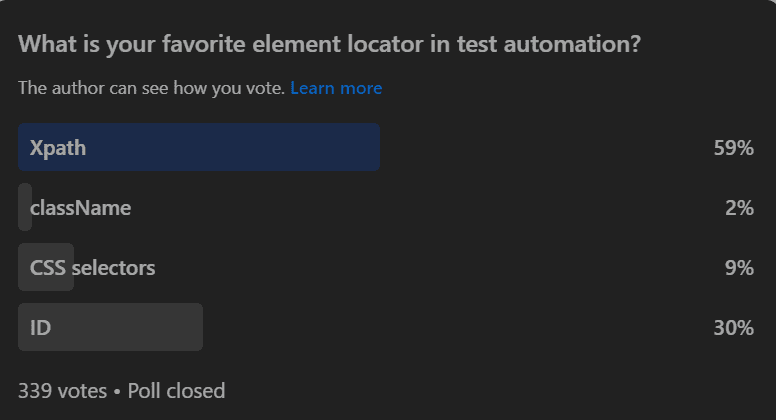
We carried out a poll on LinkedIn to get insights into the testing community’s preferences, particularly regarding locators in Selenium WebDriver. We asked, ‘What is your favorite element locator in Selenium WebDriver for test automation?’ The responses showed a clear preference for XPath among professionals. This finding emphasizes the important role of XPath as a locator in Selenium WebDriver for test automation.
Identify WebElements Using Locators in Selenium WebDriver
Now that you know the essentials of Selenium locators (including the additions in Selenium 4) let me deep-dive into each locator in Selenium WebDriver in more detail.
ID Locator in Selenium
ID locator in Selenium is the most preferred and fastest way to locate desired WebElements on the page. ID locators are unique for each element in the DOM.
Since IDs are unique for each element on the page, it is considered the fastest and safest method to locate elements. Unfortunately, developers may or may not follow this rule as browsers do allow bypassing this rule.
Specifically, in the case of a table or list, the IDs may populate incrementally or dynamically depending on the data in the table. In such cases, testers use other locators in Selenium WebDriver to locate the desired element on the page.
One of the Selenium best practices is to leverage the capabilities offered by the ID locator in Selenium since it is the fastest locator of the entire lot. Therefore, choosing the ID locator over other locators in Selenium WebDriver will go a long way to speed up Selenium test case execution.
Below is an example of the LambdaTest eCommerce Playground showcasing how the E-Mail Address field can be located using the id locator:
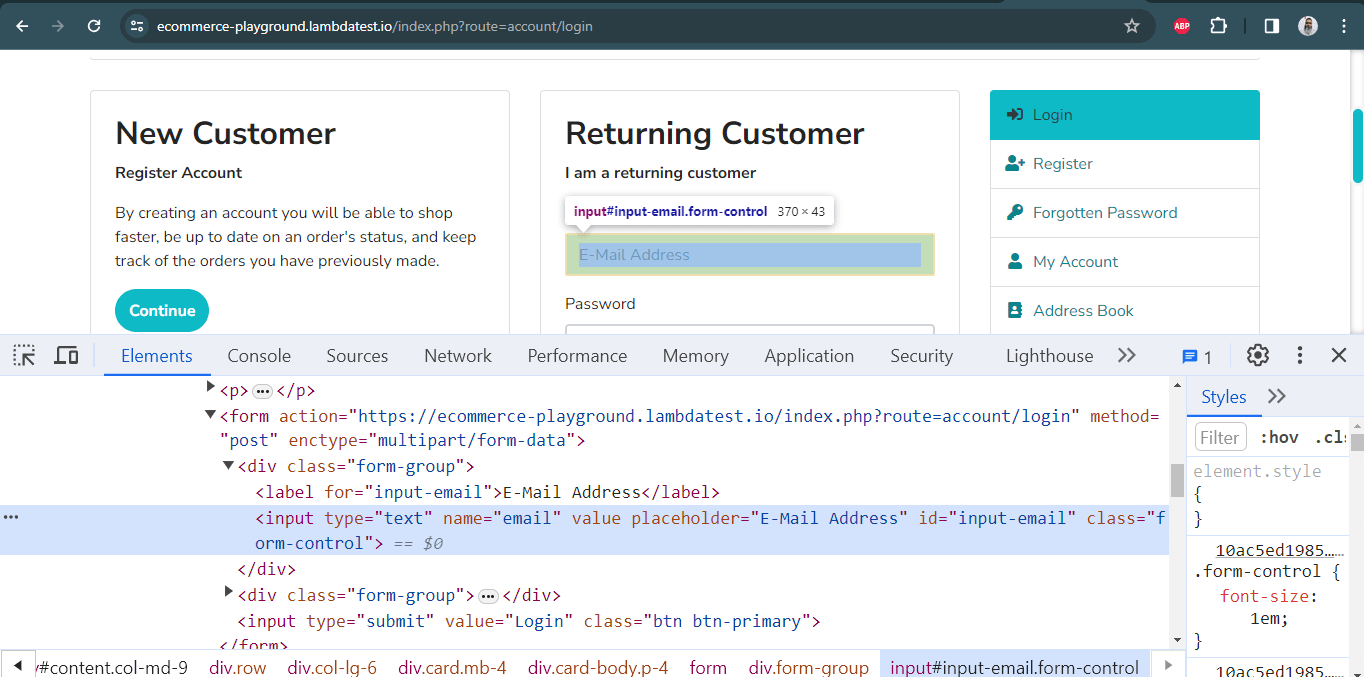
I have used the Chrome Developer Tools menu to locate the WebElement using the id locator. Below is the DOM structure of the element:
|
1 |
<input type="text" name="email" value="" placeholder="E-Mail Address" id="input-email" class="form-control"> |
The below method is used for locating the desired element using the id locator:
|
1 |
driver.findElement(By.id("input-email")) |
If no DOM element matches the required id, NoSuchElementException is thrown. Therefore, it is important to have a good know-how of the common exceptions in Selenium to build a more robust Selenium test suite.
Name Locator in Selenium
An element can be defined via multiple attributes, one such attribute is Name. A Name locator in Selenium WebDriver can also locate elements like an ID locator.
Unlike ID locators, which are unique for a page, the Name locator may or may not have a unique value. If there are WebElements with the same name, the locator selects the first element with that Name on the page.
In case no such name matches with the defined attribute value, NoSuchElementException is raised.
To demonstrate the usage of the Name locator in Selenium WebDriver, we will identify the same E-Mail Address fields that were located using the ID locator.
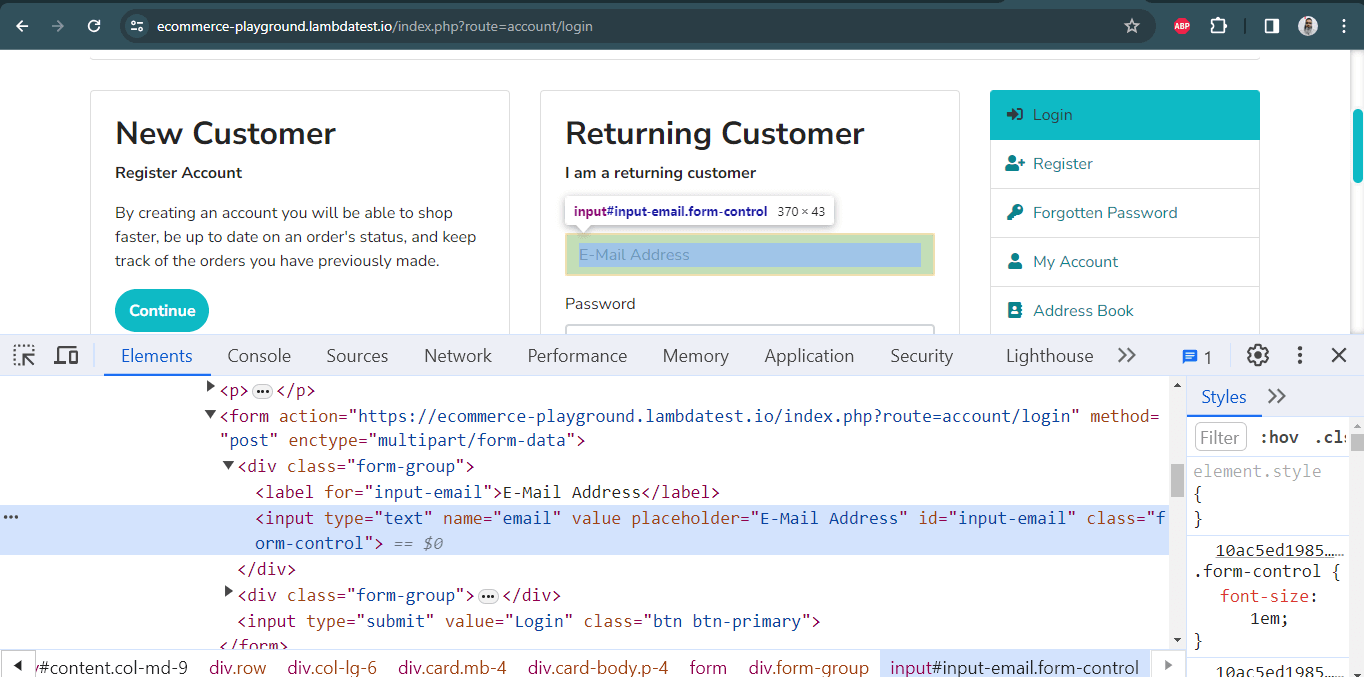
|
1 |
<input type="text" name="email" value="" placeholder="E-Mail Address" id="input-email" class="form-control"> |
Here is how the desired WebElement can be located using the name locator in Selenium:
|
1 |
driver.findElement(By.name("email")); |
LinkText Locator in Selenium
Elements can be located by LinkText, which is present in the hyperlinks. For example, the first link would be selected in a scenario with multiple links of the same text.
However, this identifier strategy can only be used for elements with an anchor( < a > ) tag.
Below is an example of the LambdaTest Selenium Playground website showcasing the selection of the Ajax Form Submit link that is available on the home page. The DOM below shows the highlighted element:
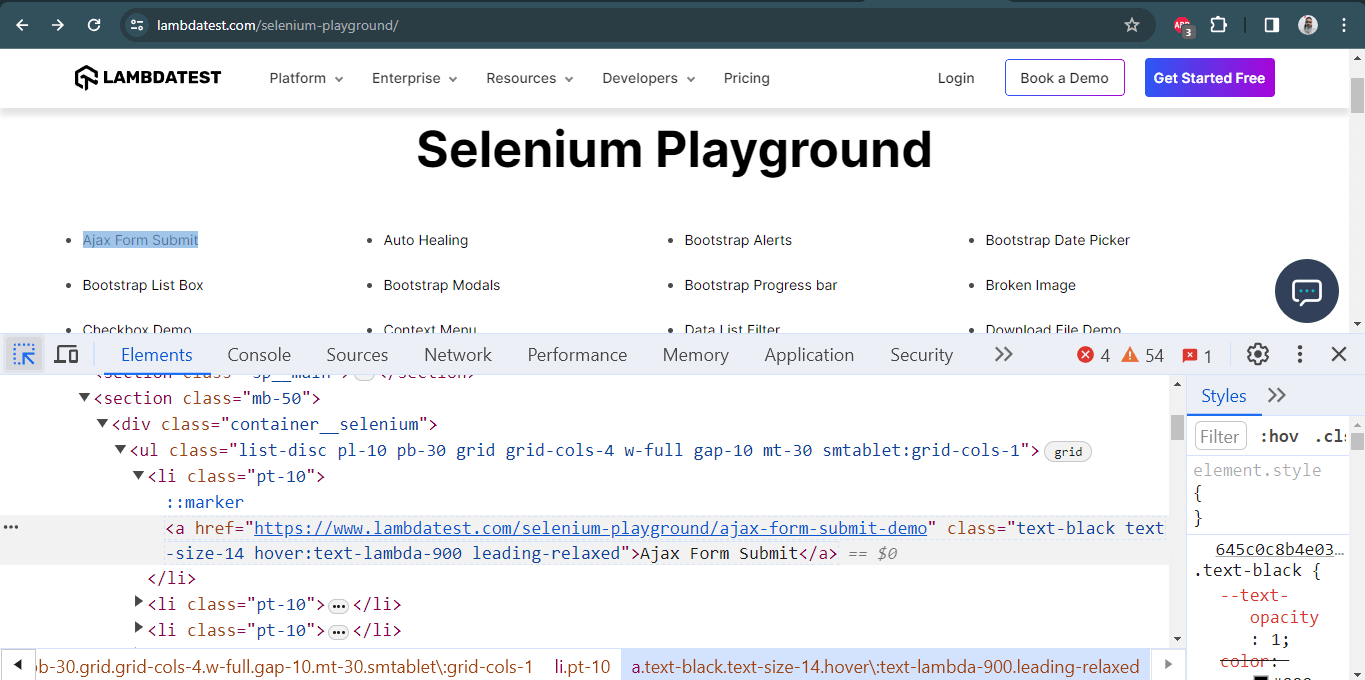
Below is the DOM structure of the same:
|
1 |
<a href="https://www.lambdatest.com/selenium-playground/ajax-form-submit-demo" class="text-black text-size-14 hover:text-lambda-900 leading-relaxed">Ajax Form Submit</a> |
Here is how the desired WebElement was located using the linkText locator in Selenium:
|
1 |
driver.findElement(By.linkText("Ajax Form Submit")); |
Partial LinkText Locator in Selenium
There is a provision to locate a WebElement using Partial LinkText akin to the normal LinkText locator in Selenium. Locating WebElements using Partial LinkText is preferred when the link text is too long.
Here, the partial text helps identify and use a unique element to perform further actions on it. Sometimes, this can also be locating multiple links on a page with a common partial text.
Below is a snapshot of the LambdaTest DOM highlighting the element with the link name as Auto Healing. Instead of using the complete link text, I used the partial link text locator to locate the element using the Healing link text.
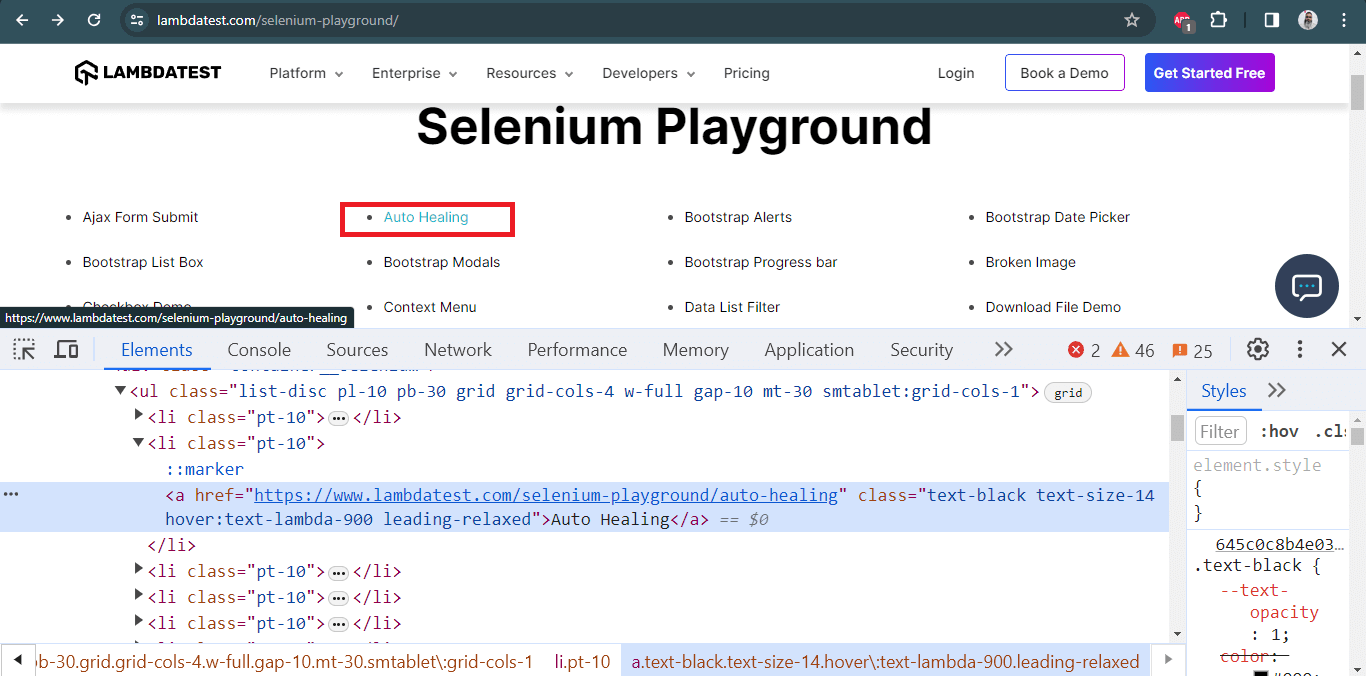
Here is the DOM structure of the element:
|
1 |
<href="https://www.lambdatest.com/selenium-playground/auto-healing" class="text-black text-size-14 hover:text-lambda-900 leading-relaxed">Auto Healing</a> |
Here is how the desired WebElement was located using the partialLinkText locator in Selenium:
The syntax for locating elements by partialLinkText is:
|
1 |
driver.findElement(By.partialLinkText ("Healing")); |
For more information on Link Text and Partial LinkText locators, we recommend you check this article to find elements with linkText and partialLinkText in Selenium.
TagName Locator in Selenium
As the name specifies, this CSS locator in Selenium WebDriver is used to identify elements using tag names like div, table, h1, etc.
The TagName locator in Selenium is commonly used to identify all the links on a page and identify broken links in Selenium. It is also used to get the header or the title of the web pages.
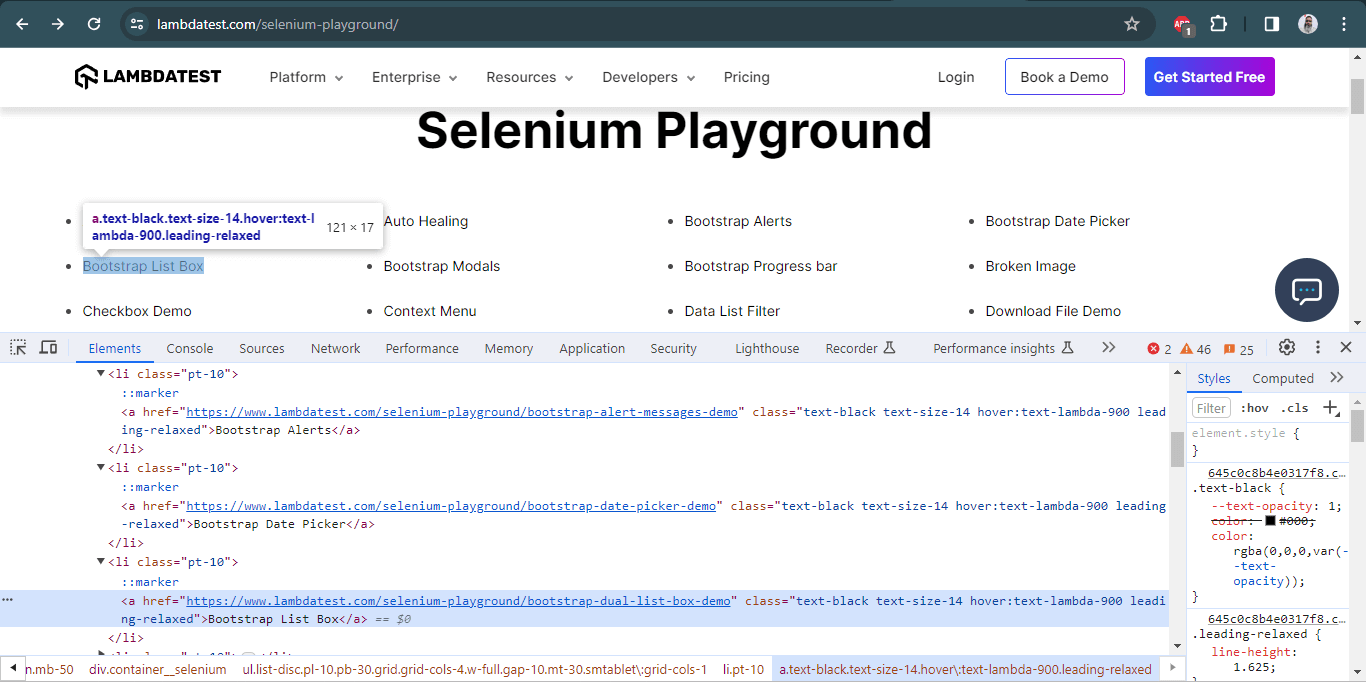
Here is the syntax for locating all the links on the LambdaTest Selenium Playground homepage. Notice here that the findElements method is used. It will return a list of all the WebElements with the tagName ”a” that normally holds the links:
|
1 |
driver.findElements(By.tagName("a")); |
Watch this video to learn the Actions class in Selenium and how to use it.
ClassName Locator in Selenium
ClassName locator is used for locating WebElements defined using the class attribute. Below is the DOM snapshot of the Ajax Form Submit page that is available on the LambdaTest Selenium Playground website.
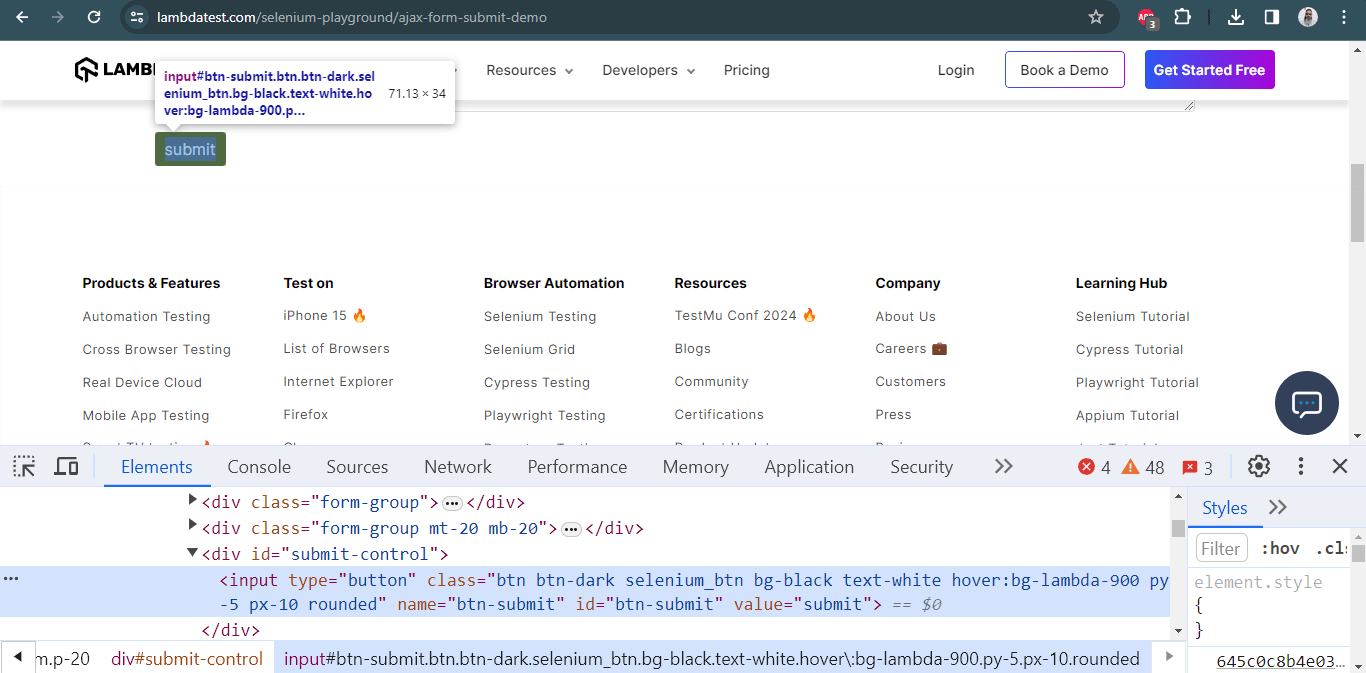
For locating the WebElement of the Submit button via the className locator in Selenium, we use the class attribute in the following DOM structure:
|
1 |
<input type="button" class="btn btn-dark selenium_btn bg-black text-white hover:bg-lambda-900 py-5 px-10 rounded" name="btn-submit" id="btn-submit" value="submit"> |
Here is how the desired WebElement was located using the className locator in Selenium:
|
1 |
driver.findElement(By.className("btn-dark")); |
XPath Locator in Selenium
XPath locator in Selenium helps locate elements on the web page using XML expressions. The basic syntax used for using XPath as a CSS locator in Selenium WebDriver is shown below:
|
1 |
XPath: //tagName[@attribute = 'value'] |
Here, tagName in Selenium signifies the tag in the DOM structure you are targeting to locate the desired WebElement. tagName can be an input tag, anchor tag, etc.
Attributes are defined via the prefix @ and their corresponding value. Thus, attributes like name, id, class, etc., can be used along with tagName.
XPath in Selenium can be used in multiple ways, as shown below:
- Standard XPath: As the name indicates, this is the most basic (or standard) way of writing an XPath. To demonstrate the usage of a standard XPath locator in Selenium, let’s locate the WebElement of the E-Mail Address field on the LambdaTest eCommerce Playground website.
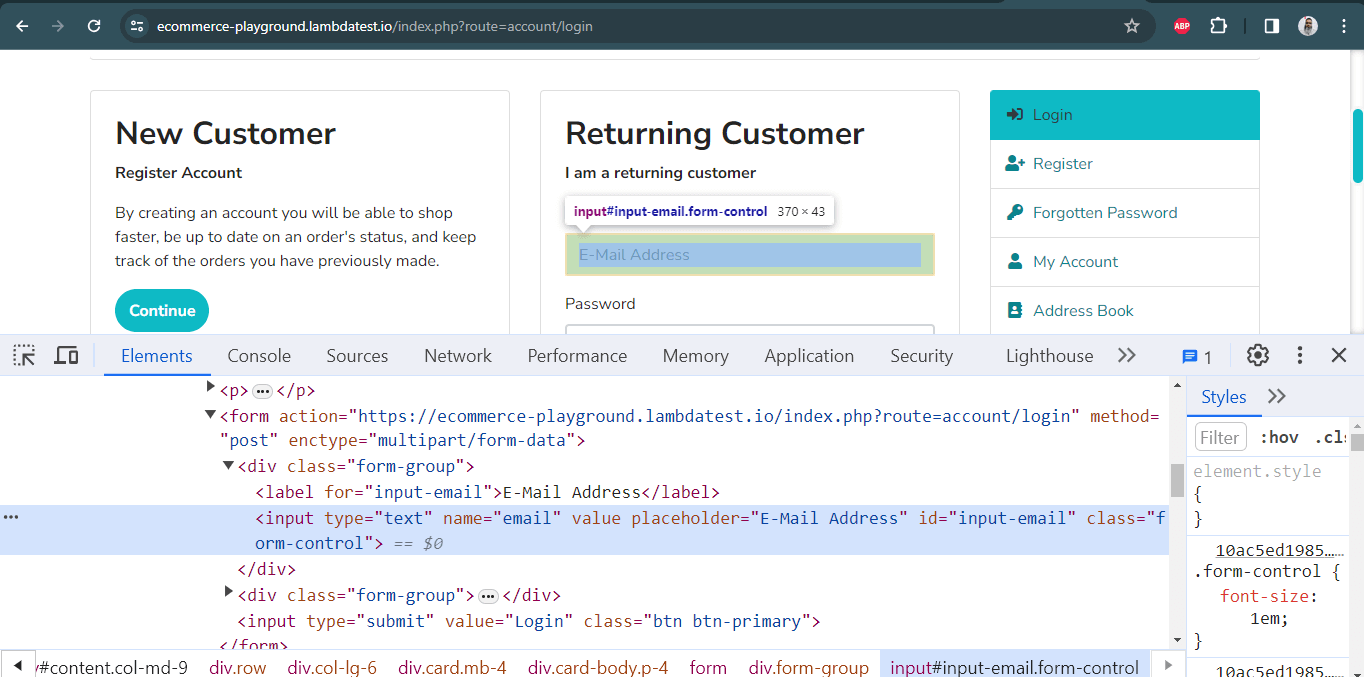
Below is the DOM structure of the element:
|
1 |
<input type="text" name="email" value="" placeholder="E-Mail Address" id="input-email" class="form-control"> |
The standard XPath of the desired WebElement is //input[@name= ’email’]. Here is how the XPath is used with the findElement() method to locate the element.
|
1 |
driver.findElement(By.xpath("//*[@id="input-email"]")); |
- XPath Contains: XPath similarly contains works like CSS Selector contains. It is extensively used on WebElements, whose value changes dynamically. Consider an example where the value of the login changes after appending the login text.
Here, XPath contains will be super-helpful in locating the desired WebElement.
Syntax:
1//tagname[contains(@attribute, 'partial value of attribute')]Below is the DOM structure of the element:
1<input type="text" placeholder="Full Name*" name="name" value="" class="form-control sign-up-input-2 ">Here is how the desired WebElement was located using the XPath contains locator in Selenium:
1driver.findElement(By.xpath("//input[contains(@class, 'form-control')]"))
XPath Using AND and OR
The AND, and OR operators in the XPath selector in Selenium are used when locating a WebElement based on certain condition sets. In the case of AND, both conditions should be true. On the other hand, either of the two conditions can be true for OR in operator XPath.
Syntax of OR operator in XPath:
|
1 |
//input[@id='login_1' OR @name='login'] |
Syntax of AND operator in XPath:
|
1 |
//input[@id='login_1' AND @name='login'] |
Let’s locate the email address field’s element on the LambdaTest eCommerce Playground Account Login page using the AND and OR operators.
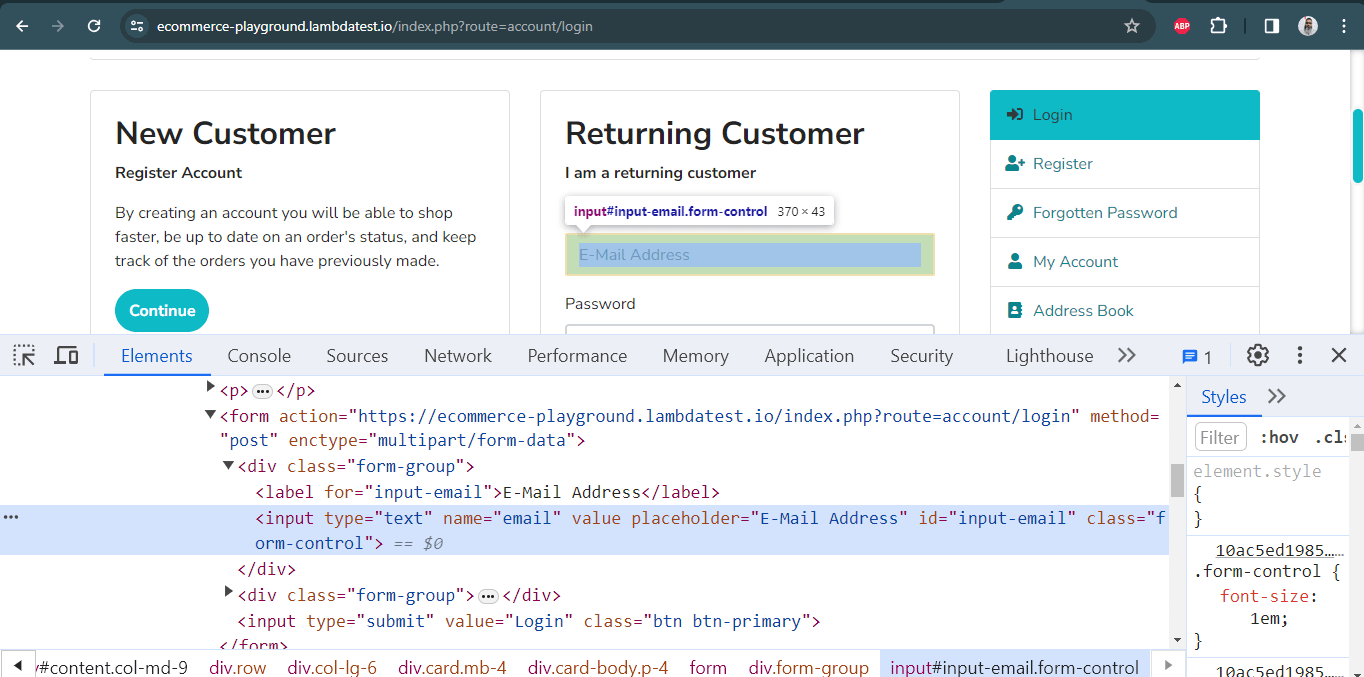
Below is the DOM structure of the element:
|
1 |
<input type="text" name="email" value="" placeholder="E-Mail Address" id="input-email" class="form-control"> |
Here is how we used the OR operator with the XPath locator in Selenium:
|
1 |
driver.findElement(By.xpath("//input[@id=\"input-email\" or @name=\"email\"]")); |
Here is how we used the AND operator with the XPath locator in Selenium:
|
1 |
driver.findElement(By.xpath(""//input[@id=\"input-email\" AND @name=\"email\"]")); |
starts-with() Method in XPath
The starts-with() method in XPath offers functionalities similar to the CSS Selector in Selenium. It helps in locating elements that start with a specified attribute value. The starts-with() method in XPath is majorly used for locating WebElements whose value changes on the refresh of a page.
Syntax:
|
1 |
//tagname[starts-with(@attribute,'starting name of the attribute value')] |
Shown below is the DOM structure for locating the Password field on the LambdaTest eCommerce Playground website’s Account Login page:
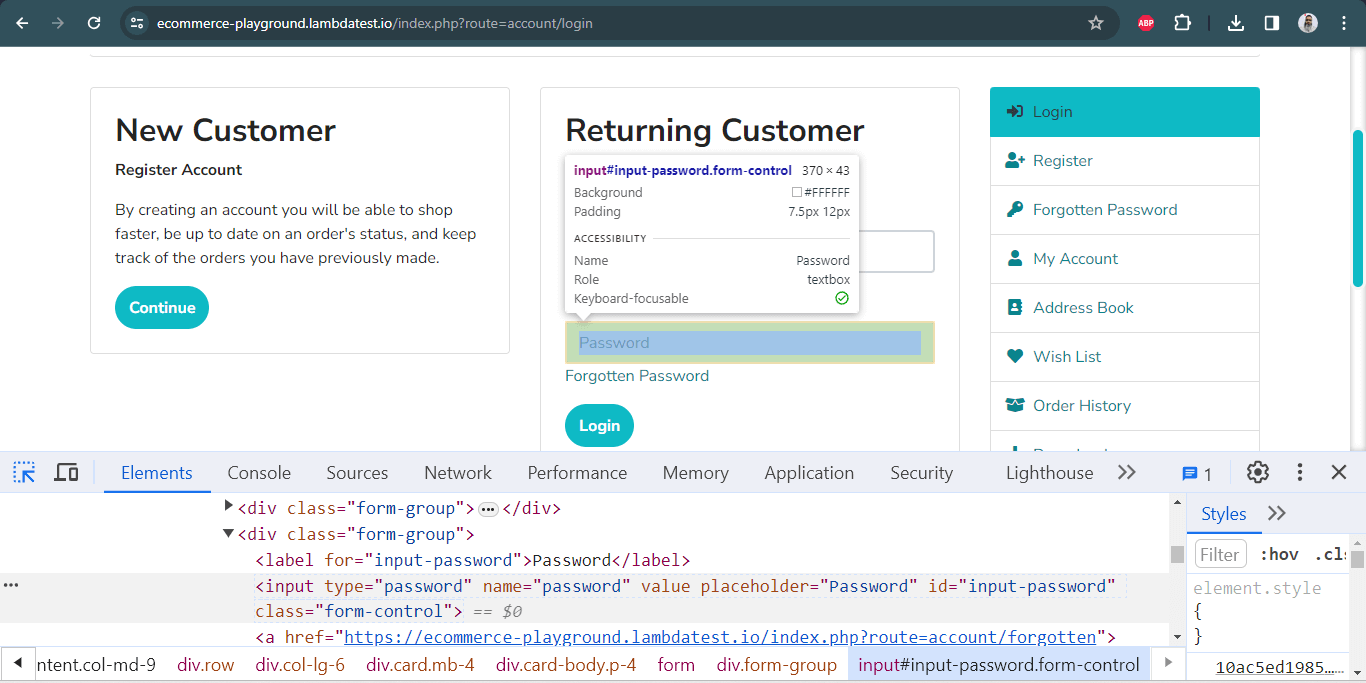
Below is the DOM structure of the element:
|
1 |
<input type="password" name="password" value="" placeholder="Password" id="input-password" class="form-control"> |
Here is how we locate the Password element using the starts-with() method with xpath in Selenium:
|
1 |
driver.findElement(By.xpath("//input[starts-with(@name,'pass')]")); |
XPath Text
Text in the XPath locator in Selenium helps locate WebElements via XPath using exact text match. It can be used when elements have to be located by looking into the tags containing certain text.
Syntax:
|
1 |
//div[text()='Logged In'] |
To demonstrate XPath text usage, we will locate the Submit button on the Auto Healing page on the LambdaTest Selenium Playground website.
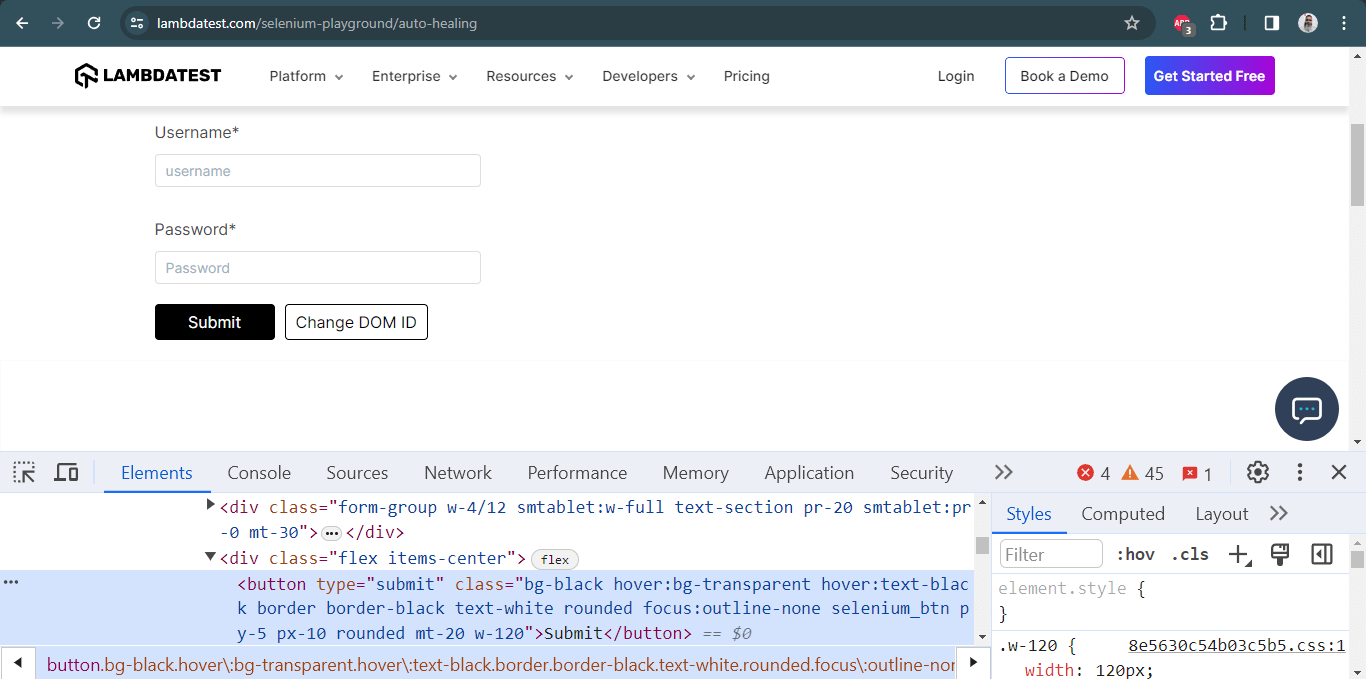
Here is the DOM structure of the required WebElement:
|
1 |
<button type="submit" class="bg-black hover:bg-transparent hover:text-black border border-black text-white rounded focus:outline-none selenium_btn py-5 px-10 rounded mt-20 w-120">Submit</button> |
Here is how we locate the Submit button element using the xpath text:
|
1 |
driver.findElement(By.xpath("//button[text()='Submit']")); |
Both CSS Selector and XPath are helpful when running complex Selenium test automation scenarios. The choice between XPath and CSS Selector purely depends on the scenario complexity and your convenience in locating WebElements using the corresponding locator.
When choosing, always look into the maintainability aspects of the locators, as that can make your job easier!
CSS Selector Locator in Selenium
CSS (Cascading Style Sheets) is used to style web pages. At the same time, CSS is also one of the widely-used ways to locate WebElements in the DOM.
The CSS Selector in Selenium should be chosen if you cannot locate an element using ID or Name locators. It can be chosen over the XPath locator.
Since multiple debates go around the corner for both of them, their usage may depend on the complexity of the scenario. However, most people prefer using CSS Selectors since those are faster than XPath.
Here are the different ways in which QA engineers can make use of CSS Selectors in Selenium:
Tag and ID in CSS Selector
To locate elements by Tag and ID, you have to use the following components:
- HTML tag: It provides the tag we wish to locate (e.g., input tag).
- #: It is used to represent the ID attribute. Remember that when you wish to locate an element via ID through a CSS Selector, it must have a hash sign on the same. For other attributes, we need not use the hash sign.
- Value of the ID attribute: This represents the ID value we use to locate the element.
Syntax:
|
1 |
css=(Html tag )(#) (value of the ID attribute) |
Example:
Below is the DOM part indicating the First Name field on the Register Account page of the LambdaTest eCommerce Playground website.
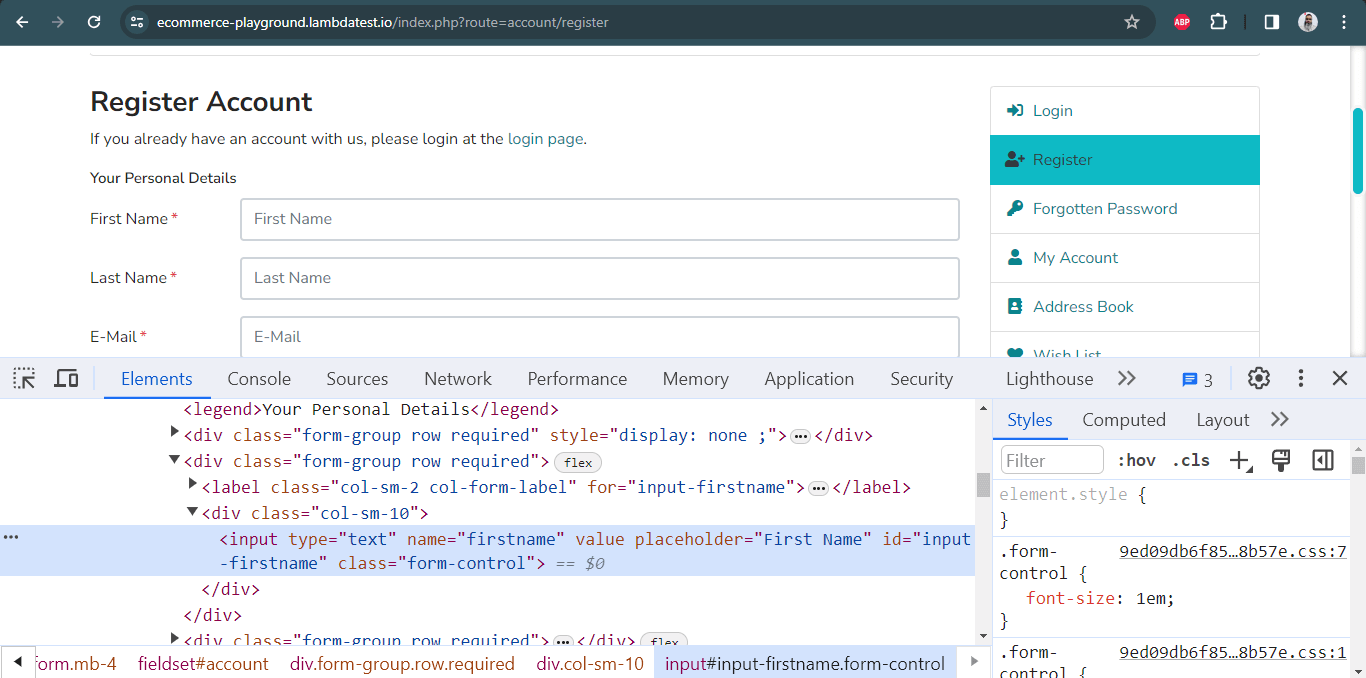
|
1 |
<input type="text" name="firstname" value="" placeholder="First Name" id="input-firstname" class="form-control"> |
Here is how you can locate the required WebElement using the cssSelector:
|
1 |
driver.findElement(By.cssSelector("input#input-firstname")) |
Tag and Class in CSS Selector
Apart from the syntax (or format) difference, the tag and class locator are identical to the ID locator. A dot (.) is used when denoting the class attribute value rather than hash (#) in the case of class.
Syntax:
|
1 |
css=(HTML tag)(.)(Value of Class attribute) |
Example:
Here is the DOM snapshot and the corresponding command to access the required WebElement using CSS Selector in Selenium for the Login button on the Account Login page of the LambdaTest eCommerce Playground website.
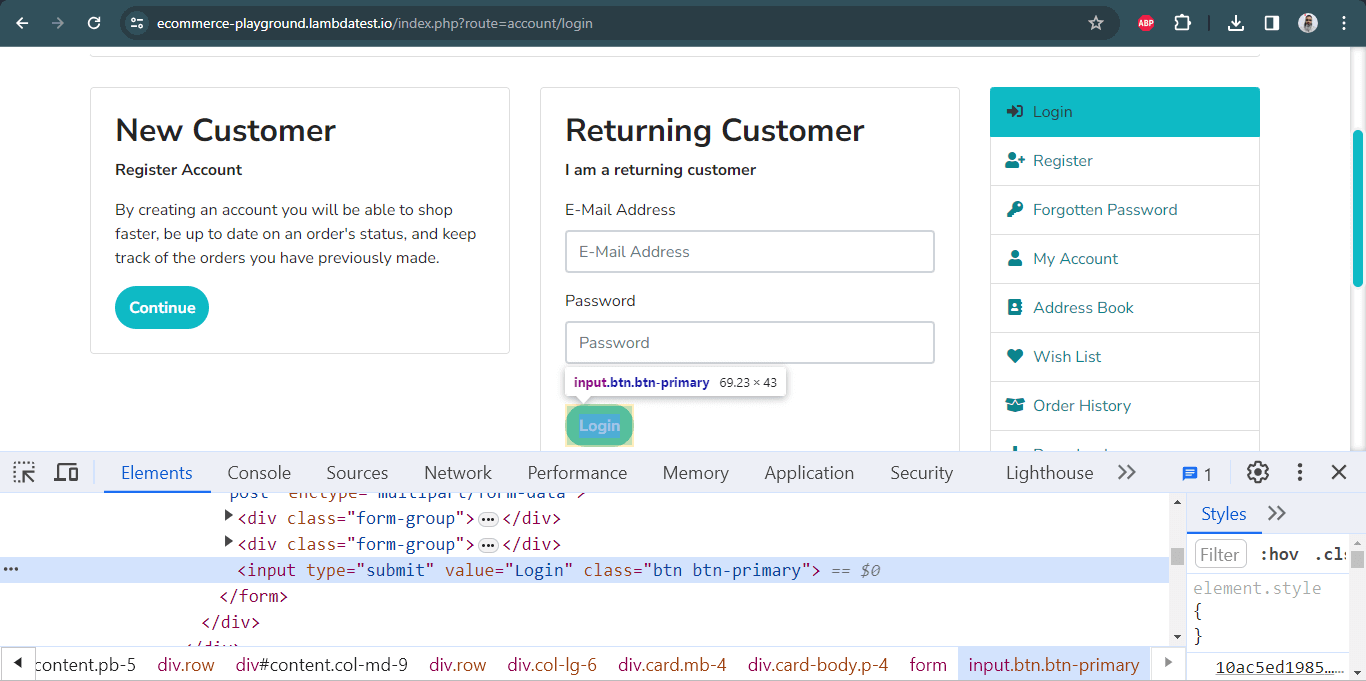
|
1 |
<input type="submit" value="Login" class="btn btn-primary"> |
Tag and Attribute
The element can be located via tag name, and the corresponding attribute is defined using its value. The first one will be selected if multiple elements have the same tag and attribute.
Syntax:
|
1 |
css=(HTML Page)[Attribute=Value] |
Example:
Here is the DOM structure:
|
1 |
<input type="phone" placeholder="Phone*" name="phone" value="" class="form-control sign-up-input-2 "> |
Here is how the WebElement – ‘phone’ can be located using the cssSelector in Selenium.
|
1 |
driver.findElement(By.cssSelector("input[name=\"phone\"]")) |
Tag, Class, and Attribute
This locator is used with the class name and other attribute values.
Syntax:
|
1 |
css=(HTML tag>)(. )(Class attribute value)([attribute=Value of attribute]) |
Let’s locate the Submit button on the Input Form Demo page on the LambdaTest Selenium Playground website.
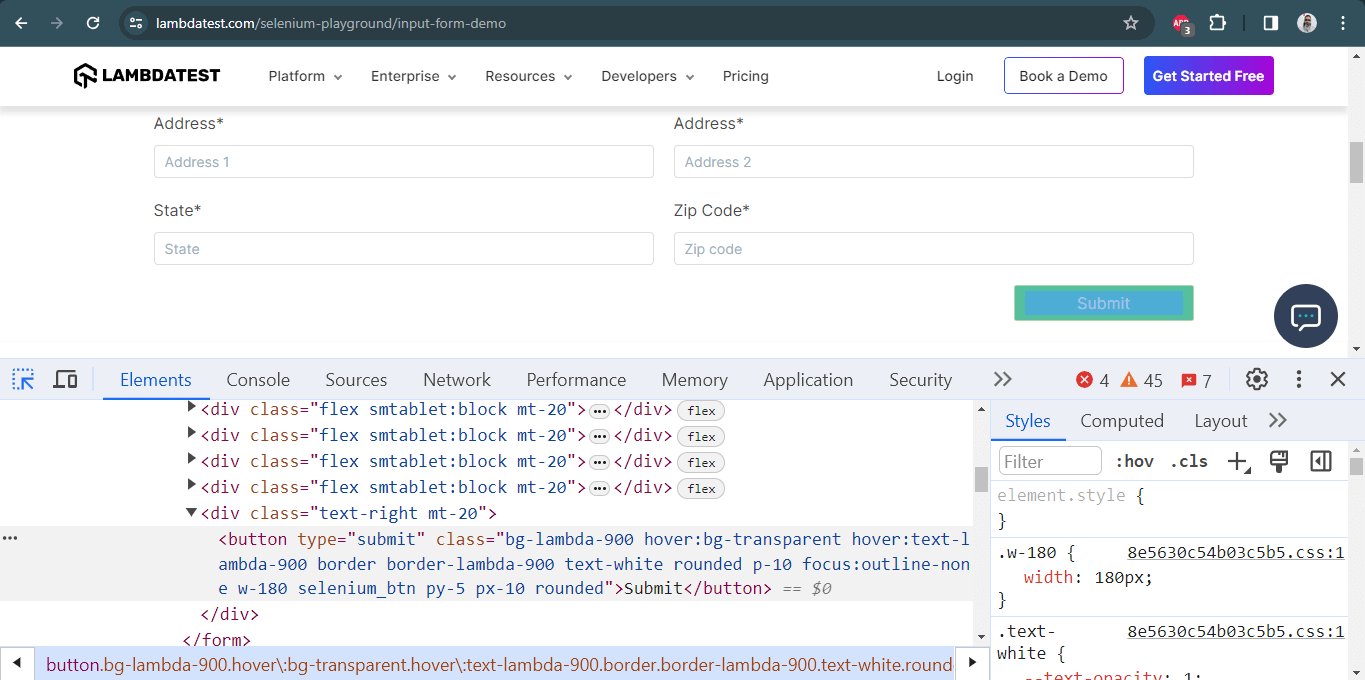
Here is the DOM structure of the WebElement for the Submit button.
|
1 |
<button type="submit" class="bg-lambda-900 hover:bg-transparent hover:text-lambda-900 border border-lambda-900 text-white rounded p-10 focus:outline-none w-180 selenium_btn py-5 px-10 rounded">Submit</button> |
Here is how you can locate the Submit button:
|
1 |
driver.findElement(By.cssSelector("button.bg-lambda-900[type="submit"]")); |
This combination can also be implied on ID. The only difference is to use a hash (#) rather than a dot (.) when using an ID attribute and defining its ID value in place of the Class value.
Wild (*, ^ and $) in CSS for Classes
CSS Selector in Selenium helps in matching multiple strings through the use of multiple patterns like ^, $, *. Wildcard selectors in CSS are used to select various elements simultaneously.
Here is how wild cards can be effectively used with the CSS Selector in Selenium:
- Starts-With in CSS Selector
- Ends-With in CSS Selector
- Contains in CSS Selector
The starts-with helps locate elements when we try to match elements with a string that starts with a designated value.
Syntax:
|
1 |
css=(HTML tag)([attribute^=start of the string]) |
Example:
Here is the DOM structure for locating the WebElement:
|
1 |
<input type="email" name="email" value="" placeholder="Email" required="required" autofocus="autofocus" class="form-control mt-3 form-control-lg"> |
Here is how the CSS [attribute^=value] Selector is used for locating the desired WebElement:
|
1 |
driver.findElement(By.cssSelector("input[name^='em']")); |
This helps locate elements when we try to match elements with a string that ends with a designated value.
Syntax:
|
1 |
css=(HTML tag)([attribute$=end of the string]) |
Example:
Here is the DOM structure of the element:
|
1 2 3 4 |
<input type="email" name="email" value="" placeholder="Email" required="required" autofocus="autofocus" class="form-control mt-3 form-control-lg"> </li> </ul> |
Here is how ends-with in CSS Selector is used for locating the required WebElement:
|
1 |
driver.findElement(By.cssSelector("input[name$='ail']")); |
This helps locate elements when we try to match elements with a string containing a designated value.
Syntax:
|
1 |
css=(HTML tag)([attribute*=partial string]) |
Example:
Here is the DOM structure to locate the element:
|
1 |
<input type="email" name="email" value="" placeholder="Email" required="required" autofocus="autofocus" class="form-control mt-3 form-control-lg"> |
Here is how contains in CSS Selector is used for locating the required WebElement:
|
1 |
driver.findElement(By.cssSelector("input[class*='control']")); |
With the use of child elements, we can locate elements inside other elements. Child elements in CSS Selector are particularly useful when accessing data from a table, list of details, and more.
Example:
To demonstrate the use of child elements in CSS Selector, we will locate the menu links on the LambdaTest Selenium Playground home page.
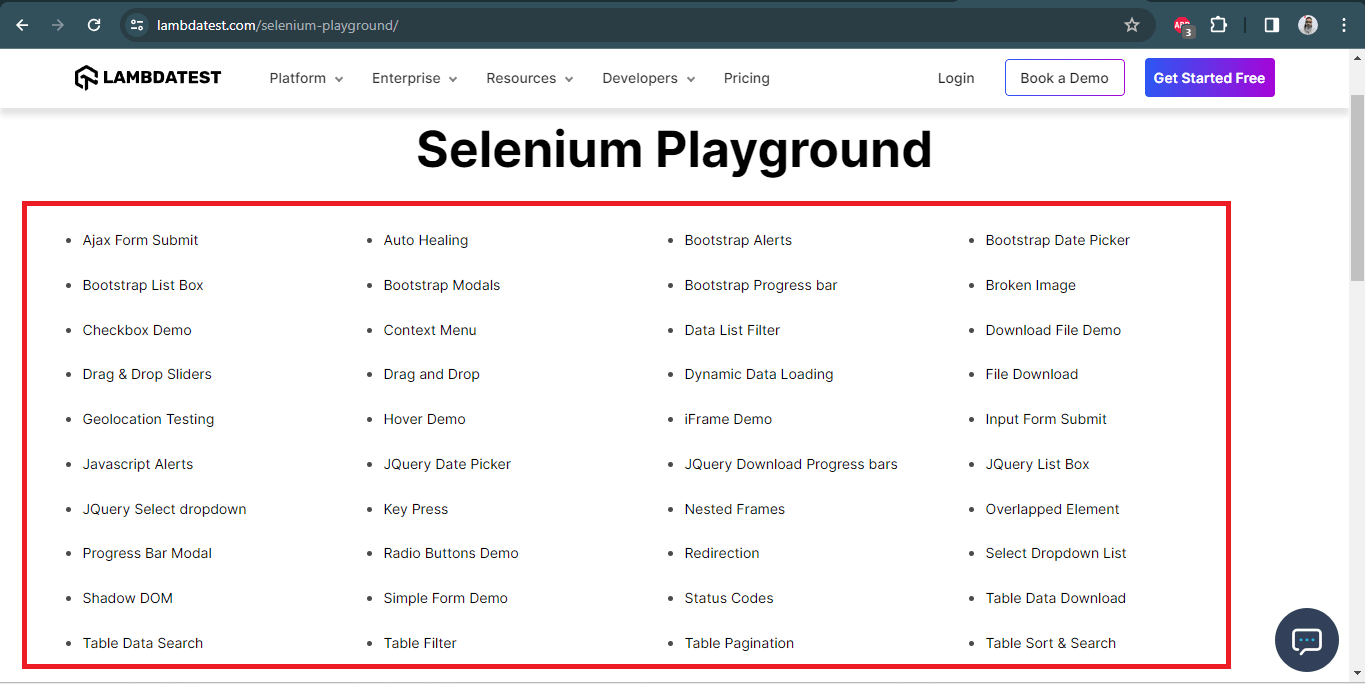
Here is the DOM structure to locate the element:
|
1 |
<ul class="list-disc pl-10 pb-30 grid grid-cols-4 w-full gap-10 mt-30 smtablet:grid-cols-1"><li class="pt-10"><a href="https://www.lambdatest.com/selenium-playground/ajax-form-submit-demo" class="text-black text-size-14 hover:text-lambda-900 leading-relaxed">Ajax Form Submit</a></li><li class="pt-10"><a href="https://www.lambdatest.com/selenium-playground/auto-healing" class="text-black text-size-14 hover:text-lambda-900 leading-relaxed">Auto Healing</a></li><li class="pt-10"><a href="https://www.lambdatest.com/selenium-playground/bootstrap-alert-messages-demo" class="text-black text-size-14 hover:text-lambda-900 leading-relaxed">Bootstrap Alerts</a></li><li class="pt-10"><a href="https://www.lambdatest.com/selenium-playground/bootstrap-date-picker-demo" class="text-black text-size-14 hover:text-lambda-900 leading-relaxed">Bootstrap Date Picker</a></li><li class="pt-10"><a href="https://www.lambdatest.com/selenium-playground/bootstrap-dual-list-box-demo" class="text-black text-size-14 hover:text-lambda-900 leading-relaxed">Bootstrap List Box</a></li><li class="pt-10"><a href="https://www.lambdatest.com/selenium-playground/bootstrap-modal-demo" class="text-black text-size-14 hover:text-lambda-900 leading-relaxed">Bootstrap Modals</a></li><li class="pt-10"><a href="https://www.lambdatest.com/selenium-playground/bootstrap-download-progress-demo" class="text-black text-size-14 hover:text-lambda-900 leading-relaxed">Bootstrap Progress bar</a></li><li class="pt-10"><a href="https://www.lambdatest.com/selenium-playground/broken-image" class="text-black text-size-14 hover:text-lambda-900 leading-relaxed">Broken Image</a></li><li class="pt-10"><a href="https://www.lambdatest.com/selenium-playground/checkbox-demo" class="text-black text-size-14 hover:text-lambda-900 leading-relaxed">Checkbox Demo</a></li><li class="pt-10"><a href="https://www.lambdatest.com/selenium-playground/context-menu" class="text-black text-size-14 hover:text-lambda-900 leading-relaxed"> Context Menu</a></li><li class="pt-10"><a href="https://www.lambdatest.com/selenium-playground/data-list-filter-demo" class="text-black text-size-14 hover:text-lambda-900 leading-relaxed">Data List Filter</a></li><li class="pt-10"><a href="https://www.lambdatest.com/selenium-playground/download-file-demo" class="text-black text-size-14 hover:text-lambda-900 leading-relaxed">Download File Demo</a></li><li class="pt-10"><a href="https://www.lambdatest.com/selenium-playground/drag-drop-range-sliders-demo" class="text-black text-size-14 hover:text-lambda-900 leading-relaxed">Drag & Drop Sliders</a></li><li class="pt-10"><a href="https://www.lambdatest.com/selenium-playground/drag-and-drop-demo" class="text-black text-size-14 hover:text-lambda-900 leading-relaxed">Drag and Drop</a></li><li class="pt-10"><a href="https://www.lambdatest.com/selenium-playground/dynamic-data-loading-demo" class="text-black text-size-14 hover:text-lambda-900 leading-relaxed">Dynamic Data Loading</a></li><li class="pt-10"><a href="https://www.lambdatest.com/selenium-playground/generate-file-to-download-demo" class="text-black text-size-14 hover:text-lambda-900 leading-relaxed">File Download</a></li><li class="pt-10"><a href="https://www.lambdatest.com/selenium-playground/geolocation-testing" class="text-black text-size-14 hover:text-lambda-900 leading-relaxed">Geolocation Testing</a></li><li class="pt-10"><a href="https://www.lambdatest.com/selenium-playground/hover-demo" class="text-black text-size-14 hover:text-lambda-900 leading-relaxed">Hover Demo</a></li><li class="pt-10"><a href="https://www.lambdatest.com/selenium-playground/iframe-demo" class="text-black text-size-14 hover:text-lambda-900 leading-relaxed">iFrame Demo</a></li><li class="pt-10"><a href="https://www.lambdatest.com/selenium-playground/input-form-demo" class="text-black text-size-14 hover:text-lambda-900 leading-relaxed">Input Form Submit</a></li><li class="pt-10"><a href="https://www.lambdatest.com/selenium-playground/javascript-alert-box-demo" class="text-black text-size-14 hover:text-lambda-900 leading-relaxed">Javascript Alerts</a></li><li class="pt-10"><a href="https://www.lambdatest.com/selenium-playground/jquery-date-picker-demo" class="text-black text-size-14 hover:text-lambda-900 leading-relaxed">JQuery Date Picker</a></li><li class="pt-10"><a href="https://www.lambdatest.com/selenium-playground/jquery-download-progress-bar-demo" class="text-black text-size-14 hover:text-lambda-900 leading-relaxed">JQuery Download Progress bars</a></li><li class="pt-10"><a href="https://www.lambdatest.com/selenium-playground/jquery-dual-list-box-demo" class="text-black text-size-14 hover:text-lambda-900 leading-relaxed">JQuery List Box</a></li><li class="pt-10"><a href="https://www.lambdatest.com/selenium-playground/jquery-dropdown-search-demo" class="text-black text-size-14 hover:text-lambda-900 leading-relaxed">JQuery Select dropdown</a></li><li class="pt-10"><a href="https://www.lambdatest.com/selenium-playground/key-press" class="text-black text-size-14 hover:text-lambda-900 leading-relaxed">Key Press</a></li><li class="pt-10"><a href="https://www.lambdatest.com/selenium-playground/nested-frames" class="text-black text-size-14 hover:text-lambda-900 leading-relaxed">Nested Frames</a></li><li class="pt-10"><a href="https://www.lambdatest.com/selenium-playground/overlapped-element" class="text-black text-size-14 hover:text-lambda-900 leading-relaxed"> Overlapped Element</a></li><li class="pt-10"><a href="https://www.lambdatest.com/selenium-playground/bootstrap-progress-bar-dialog-demo" class="text-black text-size-14 hover:text-lambda-900 leading-relaxed">Progress Bar Modal</a></li><li class="pt-10"><a href="https://www.lambdatest.com/selenium-playground/radiobutton-demo" class="text-black text-size-14 hover:text-lambda-900 leading-relaxed">Radio Buttons Demo</a></li><li class="pt-10"><a href="https://www.lambdatest.com/selenium-playground/redirection" class="text-black text-size-14 hover:text-lambda-900 leading-relaxed"> Redirection</a></li><li class="pt-10"><a href="https://www.lambdatest.com/selenium-playground/select-dropdown-demo" class="text-black text-size-14 hover:text-lambda-900 leading-relaxed">Select Dropdown List</a></li><li class="pt-10"><a href="https://www.lambdatest.com/selenium-playground/shadow-dom" class="text-black text-size-14 hover:text-lambda-900 leading-relaxed"> Shadow DOM</a></li><li class="pt-10"><a href="https://www.lambdatest.com/selenium-playground/simple-form-demo" class="text-black text-size-14 hover:text-lambda-900 leading-relaxed">Simple Form Demo</a></li><li class="pt-10"><a href="https://www.lambdatest.com/selenium-playground/status-code" class="text-black text-size-14 hover:text-lambda-900 leading-relaxed"> Status Codes</a></li><li class="pt-10"><a href="https://www.lambdatest.com/selenium-playground/table-data-download-demo" class="text-black text-size-14 hover:text-lambda-900 leading-relaxed">Table Data Download</a></li><li class="pt-10"><a href="https://www.lambdatest.com/selenium-playground/table-search-filter-demo" class="text-black text-size-14 hover:text-lambda-900 leading-relaxed">Table Data Search</a></li><li class="pt-10"><a href="https://www.lambdatest.com/selenium-playground/table-records-filter-demo" class="text-black text-size-14 hover:text-lambda-900 leading-relaxed">Table Filter</a></li><li class="pt-10"><a href="https://www.lambdatest.com/selenium-playground/table-pagination-demo" class="text-black text-size-14 hover:text-lambda-900 leading-relaxed">Table Pagination</a></li><li class="pt-10"><a href="https://www.lambdatest.com/selenium-playground/table-sort-search-demo" class="text-black text-size-14 hover:text-lambda-900 leading-relaxed">Table Sort & Search</a></li><li class="pt-10"><a href="https://www.lambdatest.com/selenium-playground/upload-file-demo" class="text-black text-size-14 hover:text-lambda-900 leading-relaxed">Upload File Demo</a></li><li class="pt-10"><a href="https://www.lambdatest.com/selenium-playground/virtual-dom" class="text-black text-size-14 hover:text-lambda-900 leading-relaxed"> Virtual DOM</a></li><li class="pt-10"><a href="https://www.lambdatest.com/selenium-playground/window-popup-modal-demo" class="text-black text-size-14 hover:text-lambda-900 leading-relaxed">Window Popup Modal</a></li></ul> |
To locate elements, the following syntax would be used:
|
1 |
Css= tagname.class name li:nth-of-child(index of the referenced child which in our case is 3) |
Here is how you can get the blog link from the page:
|
1 |
driver.findElement(By.cssSelector(".container__selenium ul > li:nth-child(1) > a"); |
Similarly to access responsive we can use, last-child reference as below:
|
1 2 |
Css= .container__selenium ul li driver.findElement(By.cssSelector(".container__selenium ul li:last-child"); |
Relative Locators in Selenium WebDriver
One of the major features of Selenium 4 is the introduction of relative locators. Relative locators in Selenium 4 help you search for WebElements in relation to the other elements.
For example, using toLeftOf Selenium 4 relative locator, WebElements to the left of a certain element can be easily located. This results in a few findElement calls primarily used for locating elements on the page.
The difference between Selenium 3 and Selenium 4 is a good starting point to know the immense potential the Selenium 4 framework offers. Here is a short gist of relative locators in Selenium 4:
| Locator Type | Description | Syntax (in Java) |
| above | WebElement is above the specified element | driver.findElement(with(By.tagName(“TagName”)).above(ElementName)); |
| below | WebElement is below the specified element | driver.findElement(with(By.tagName(“TagName”)).below(ElementName)); |
| toLeftOf | WebElement is to the left of an element | driver.findElement(with(By.tagName(“TagName”)).toLeftOf(ElementName)); |
| toRightOf | WebElement is to the right of an element | driver.findElement(with(By.tagName(“TagName”)).toRightOf(ElementName)); |
| near | WebElement is within 50 pixels of an element | driver.findElement(with(By.tagName(“TagName”)).near(ElementName)); |
 Note
NoteAutomate your Selenium testing across 3000+ real environments.Try LambdaTest Today!
Demo: Relative Locators in Selenium WebDriver
To demonstrate the usage of relative locators in Selenium 4, we will locate the WebElements on the LambdaTest eCommerce Playground page. The following test scenario will be automated using the relative locators in Selenium WebDriver. The tests will be run on the LambdaTest cloud grid on the latest version of Chrome browser on the Windows 10 platform.
LambdaTest is an AI-powered test orchestration and execution platform that lets developers and testers perform automation testing at scale on an online browser farm of 3000+ real browsers and operating systems.
Test Scenario
|

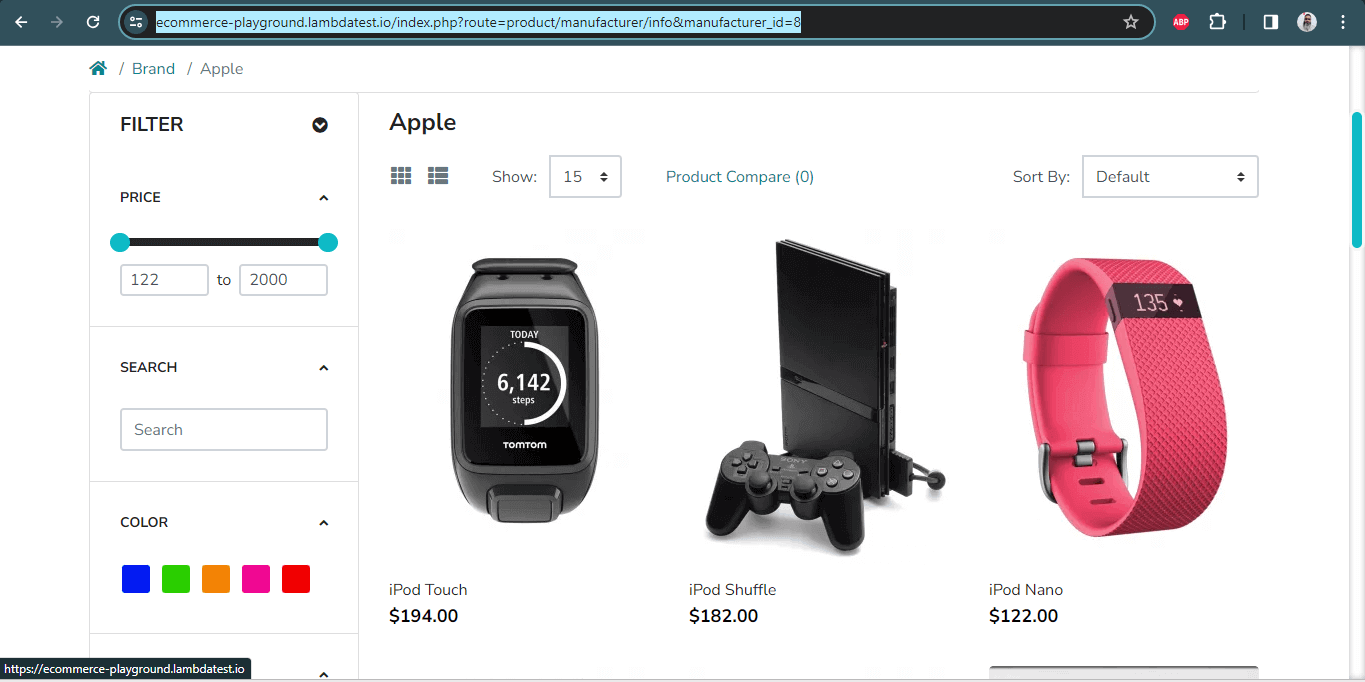
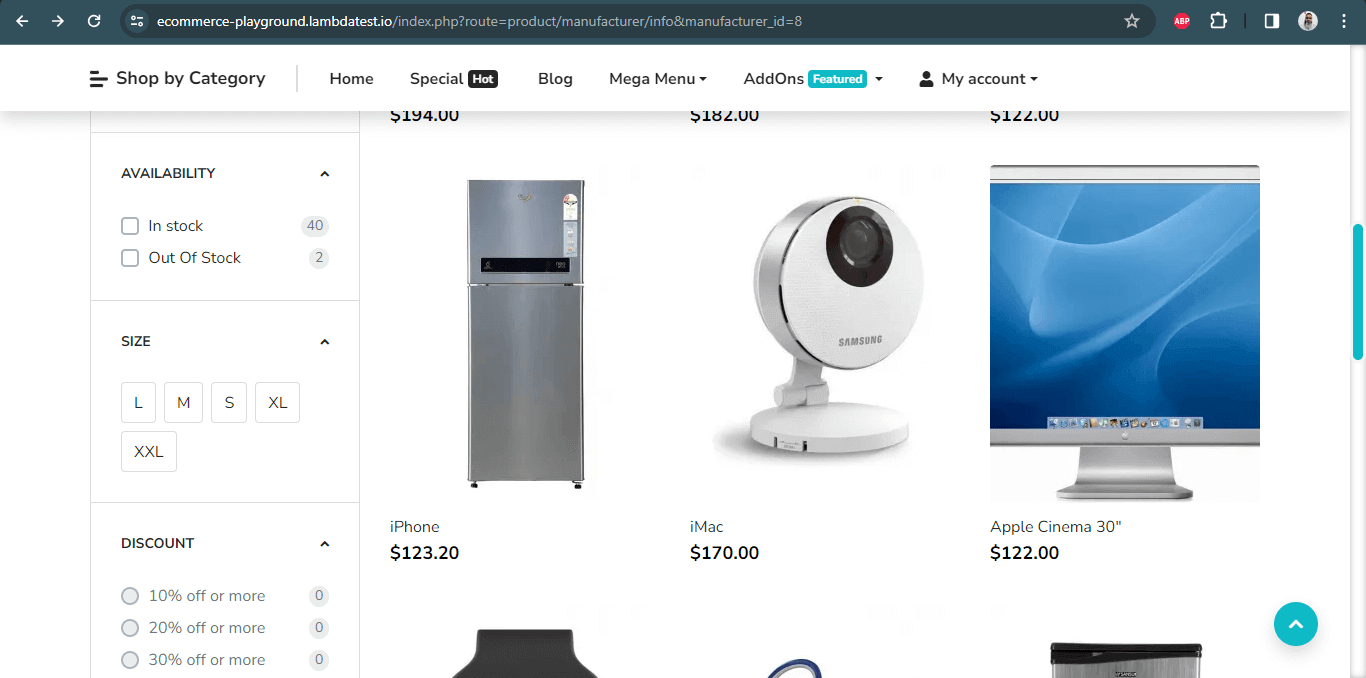
The first unique WebElement on the page is located using the following method:
|
1 |
WebElement FirstElement = driver.findElement(By.Id("idvalue")); |
Here is how the relative locator in Selenium 4 is used to locate the element below the element we searched earlier:
|
1 |
1driver.findElement(with(By.tagName("tagName")).below(FirstElement)); |
The next set of WebElements on the page is identified using the above, below, toLeftOf, and toRightOf relative locators in Selenium 4.
Here is the code snippet that showcases the usage of relative locators in Selenium 4:
|
1 2 3 4 5 6 7 8 9 10 11 12 13 14 15 16 17 18 19 20 21 22 23 24 25 26 27 28 29 30 31 32 33 34 35 36 37 38 39 40 41 42 43 44 45 46 47 48 49 |
public class LocatorTests { WebDriver driver; String username = System.getenv("LT_USERNAME") == null ? "LT_USERNAME" : System.getenv("LT_USERNAME"); String accesskey = System.getenv("LT_ACCESS_KEY") == null ? "LT_ACCESS_KEY" : System.getenv("LT_ACCESS_KEY"); String gridURL = "@hub.lambdatest.com/wd/hub"; @BeforeTest public void setup() throws MalformedURLException { ChromeOptions browserOptions = new ChromeOptions(); browserOptions.setPlatformName("Windows 10"); browserOptions.setBrowserVersion("122.0"); HashMap<String, Object> ltOptions = new HashMap<String, Object>(); ltOptions.put("project", "Selenium Locator Demo"); ltOptions.put("w3c", true); ltOptions.put("plugin", "java-testNG"); ltOptions.put("build", "Demonstration: Selenium Locator Demo on LambdaTest"); browserOptions.setCapability("LT:Options", ltOptions); driver = new ChromeDriver(); driver = new RemoteWebDriver(new URL("https://" + username + ":" + accesskey + gridURL), browserOptions); } @Test public void testRelativeLocator() { driver.get("https://ecommerce-playground.lambdatest.io/index.php?route=product/manufacturer/info&manufacturer_id=8"); WebElement iMac = driver.findElement(By.linkText("iMac")); WebElement iMacPriceViaBelow = driver.findElement(with(By.cssSelector("div.price> span")).below(iMac)); assertEquals(iMacPriceViaBelow.getText(), "$170.00"); WebElement fetchToTheRight = driver.findElement(with(By.tagName("h4")).toRightOf(iMac)); assertEquals(fetchToTheRight.getText(), "Apple Cinema 30\""); WebElement fetchViaAbove = driver.findElement(with(By.tagName("h4")).above(fetchToTheRight)); assertEquals(fetchViaAbove.getText(), "iPod Nano"); WebElement fetchViaToLeftOf = driver.findElement(with(By.tagName("h4")).toLeftOf(fetchViaAbove)); assertEquals(fetchViaToLeftOf.getText(), "iPod Shuffle"); } @AfterTest public void teardown() { driver.quit(); } } |
Code Walkthrough
As the tests will run on the LambdaTest cloud platform, we need to provide the LambdaTest Username and Access Key. These credentials can be found on your LambdaTest Profile > Account Settings > Password & Security.

The credentials are confidential values that should not be hardcoded in the code. The following line of code will help set the Username and Access Key using the environment variables. The gridURL helps connect the remote session to the LambdaTest cloud grid.

Next, we need to set the LambdaTest automation capabilities to set the platform, browser and its version, build name, test name, and other mandatory options required for running the tests on the LambdaTest platform.
The LambdaTest Capabilities Generator helps in easily setting the capabilities by selecting the desired options from the UI. It provides the auto-generated code that can be used directly in the code.
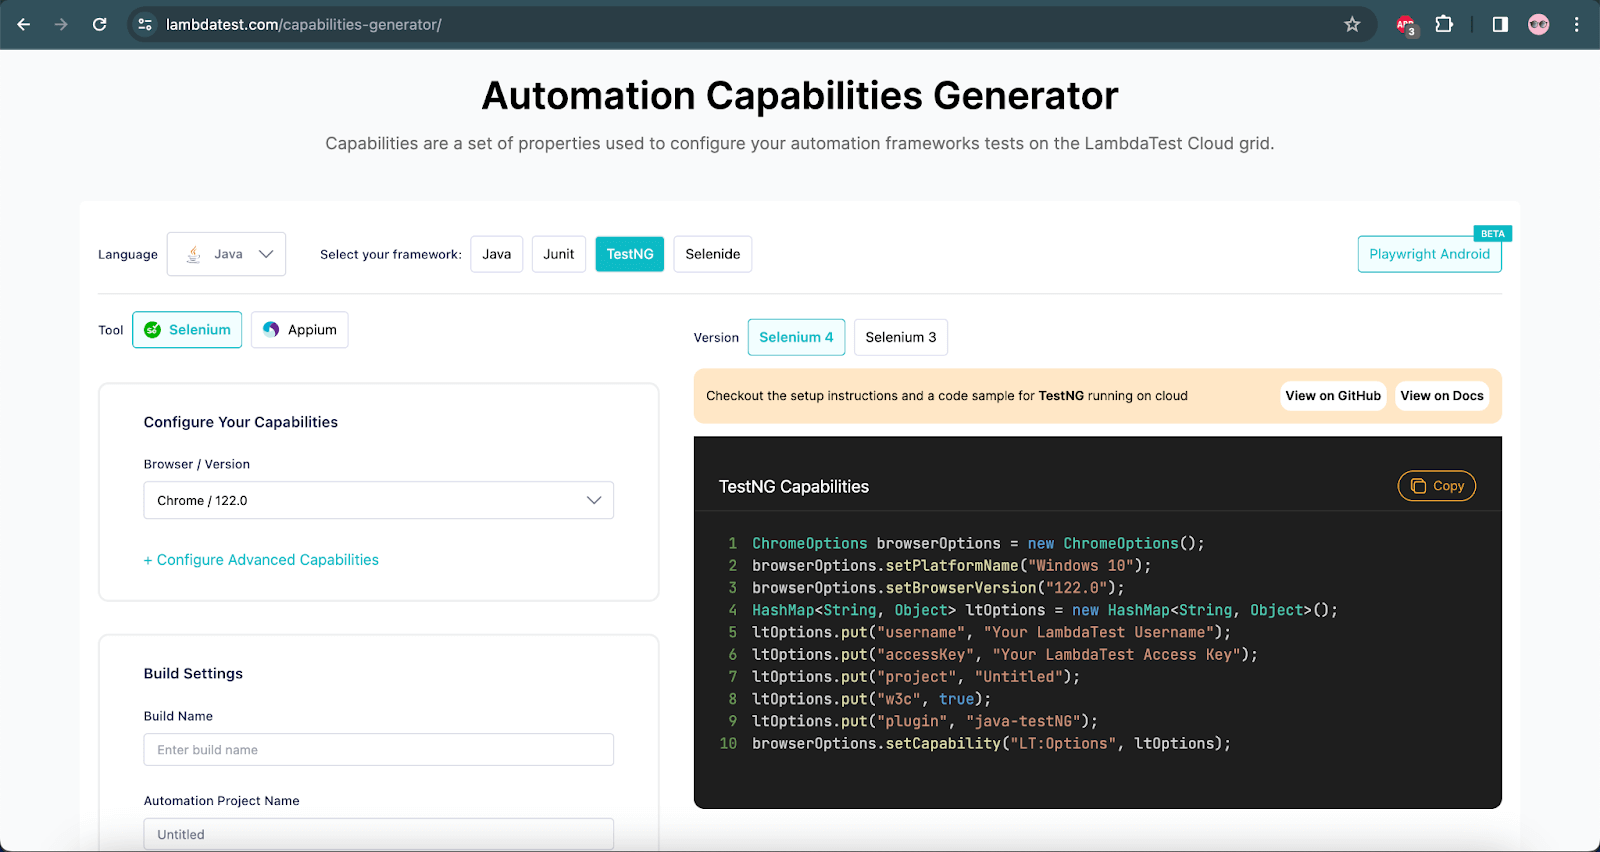
The following lines of code sets the capabilities for running the test on Chrome browser version 122.0 on the Windows 10 platform.
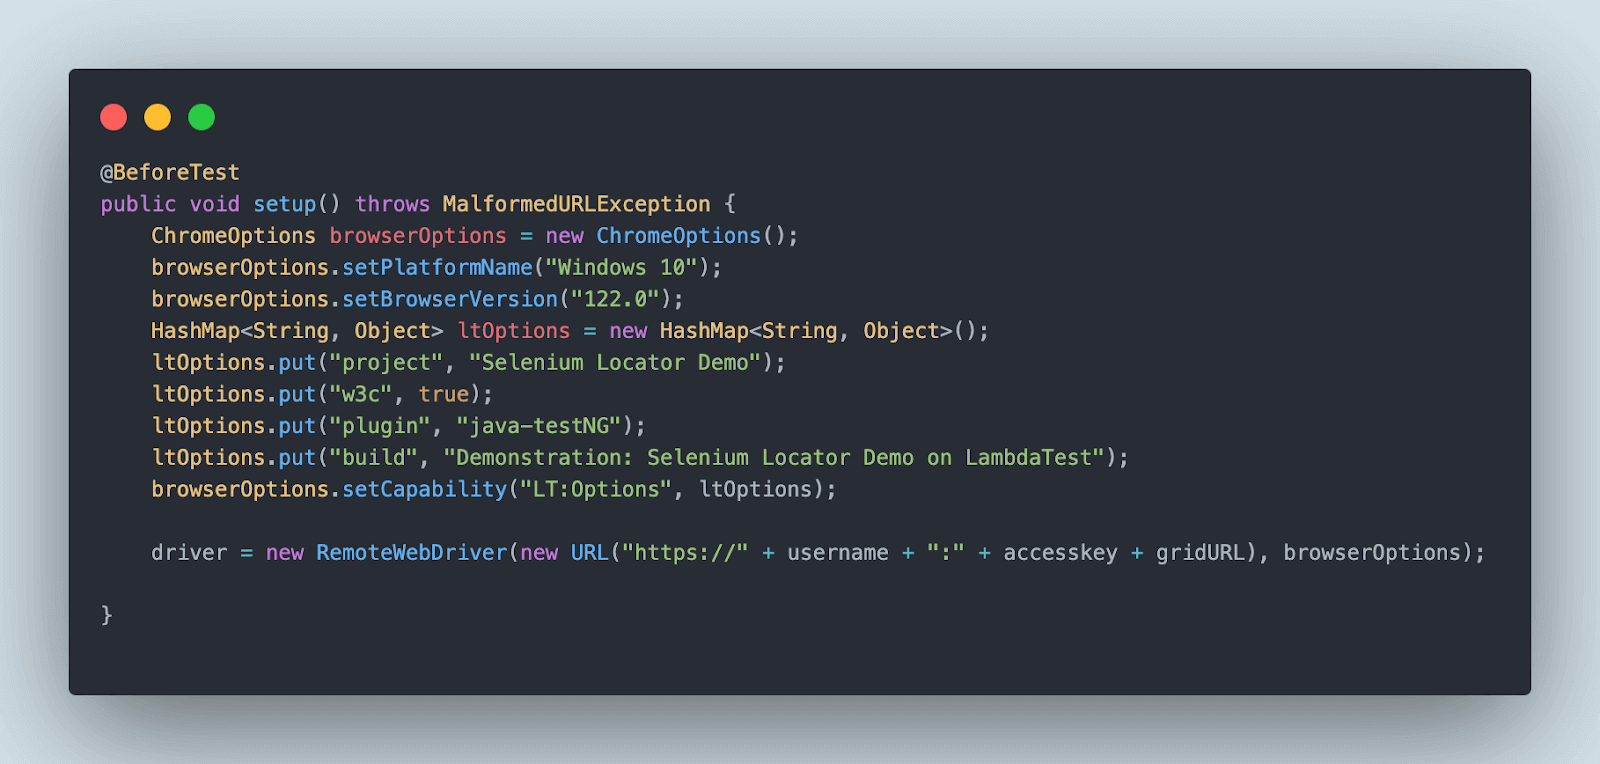
ChromeOptions class is used as we need to run the tests on the Chrome browser. Similarly, if we need to run the tests on Edge browser, we can use EdgeOptions and likewise for other browsers. Finally, a new instance of RemoteWebDriver is created by supplying the username, accesskey, and gridURL with the browserOptions variables.
The @BeforeTest annotation in TestNG placed on the top of the setup() method will run this method before any of the tests, so the configuration for running the test on the LambdaTest platform is set correctly.
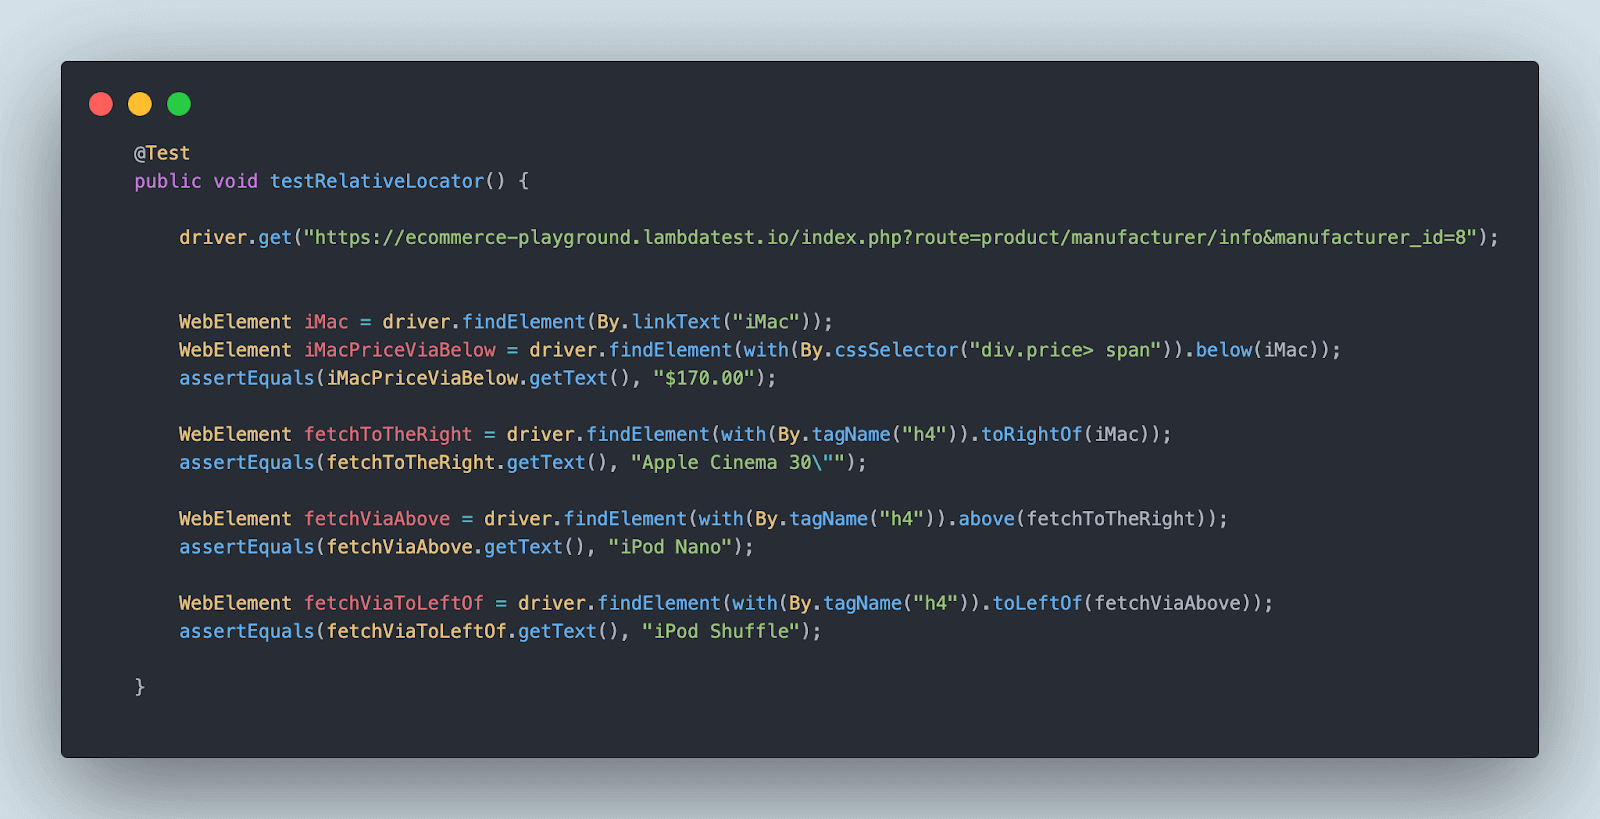
The testRelativeLocator() method will run the test by locating the WebElements using the below, toRightOf, above, and toLeftOf relative locators, as discussed in the test scenarios.
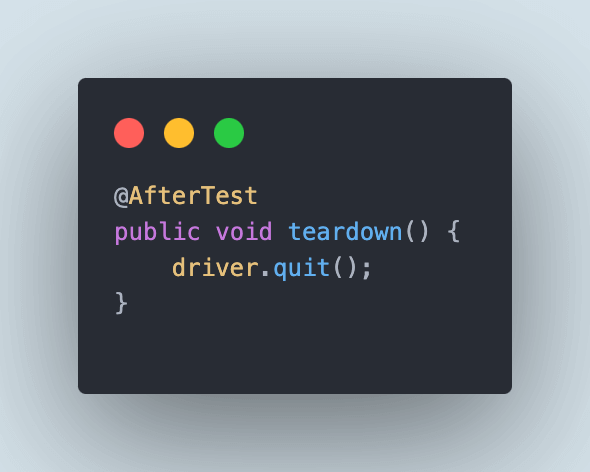
After all the tests are run successfully, the driver session will be closed when the driver.quit() statement is invoked. This statement will be called after each test as the @AfterTest annotation of TestNG has been used above the tearDown() method.
Test Execution
The following screenshot shows the output of the test execution performed using IntelliJ IDE:

You can also use a combination of relative locators to locate the desired WebElement.
|
1 |
WebElement fetchwithmutipleRelative=driver.findElement(with(By.tagName("h4")).below(fetchviatoLeftOf).toRightOf(fetchviaabove)); |
The above code identifies an element below a given WebElement and to the right of the newly searched element.
Also, subscribe to the LambdaTest YouTube Channel and get detailed tutorials around Selenium automation, Appium automation, and more.
Best Practices to Use Locators in Selenium WebDriver
The main challenge in writing test scripts lies in locating the right identifier for the target element. Following certain best practices will ensure that the team uses strategy efficiently to locate elements used in automation scripts.
- Use a unique ID for element identification: The first and foremost reason to use a unique ID is that it makes it simpler to identify a particular element. If you have two elements with the same ID, it becomes difficult to determine which element you want to use in your scripts. This may lead to issues such as selecting an incorrect or non-existent element. To avoid this, always assign a unique ID for each element you wish to utilize in your web application to avoid this.
- Avoid using IDs that change locations: Selenium WebDriver locators depend on IDs because they match the ID attribute assigned by browsers, which is used as identifiers for each HTML tag on your page. The value of these IDs remains static as long as the browser window remains open. However, if you close and reopen the browser, these values change their position due to the fact that they now identify different objects on the page.
- Keep your locators short: Your locator should always identify the target element you want to click or locate, not other elements on the same page. The benefit of this is that you’re reducing the chance of your script breaking because the number of elements on a page has changed (and thus, where they appear in the HTML code). Also, if your locator is short, it’s easier to see if it’s affecting more than one element.
- Avoid elements that depend on auto-generated values: If you are using locators such as ID, CSS, and XPath, Selenium WebDriver provides a way to navigate to elements through the browser’s address bar.
- Don’t use XPath or CSS Selector provided by the developer tools: Choosing locators in Selenium is an important step, especially when you are new to it. There are many tips and tricks available on the web regarding this topic. However, most suggest using XPath or CSS Selectors provided by the browser developer tools.
- Avoid using the locators that change dynamically on page refresh: While working on some websites, it can be observed that the locators, such as ID or class name, change dynamically on page load or refresh. It should be noted that in such situations, the ever-changing locators, i,e. IDs and class names should not be used.
- Avoid using XPaths heavily in the project: Many testers blindly keep on using the XPaths heavily in the project. Testers make the mistake of adding test scripts containing XPath to locate the WebElement, which internally calls the ID locator itself.
- Use explicit waits: Explicit waits in Selenium WebDriver should ensure that the WebElement is present and visible before the automated tests interact with that WebElement. This can help in avoiding test flakiness.
For example, if the locator is dependent on a single entity like class, name, id, etc., which, if changed, can be repaired, but complex locators like By.XPath(“//div[@class=”class-form_6180″]/div[5]/h3”) may lead to frequent breakage if any of the div or the class name changes.
So, while using locators in Selenium WebDriver, do not locate elements that depend on auto-generated values. This is one of the key rules that one needs to keep in mind about locators in Selenium WebDriver for writing better automation code.
Secondly, if you are trying to look out for multiple matches (using findElements()), ensure it matches all the desired elements you are looking for.
This is accomplished using the locateElement() or locateElementBy*() methods. You can navigate to any element on the page using the browser’s address bar, locator parameters, and values, as well as this method. However, if you use IDs (e.g., “id=”tooltip””) as locators, it might not work quite as you expect. This is because IDs are auto-generated and do not always change when we expect them to.
As a best practice, use locators such as CSS and XPath instead of IDs, as they never change their value. The second thing you should do is watch those values after each run. So, if we want to locate an element with an ID of the tooltip using the browser’s address bar, we should run and watch the values of those IDs to identify whether they are auto-generated.
However, if you use XPath or CSS Selectors provided by the browser developer tools, your tests will not work if the source code changes. To have stable tests, you should use locators independent of HTML structure.
Locators such as CSS Selector or XPath should be used here to avoid test flakiness. Using these locators can help in creating more robust test scripts.
Moreover, you can also leverage the SmartWait feature by LambdaTest as well. LambdaTest SmartWait executes a series of actionability checks on webpage elements before executing any actions. These checks include verifying elements for visibility and intractability to ensure they are ready for actions like clicking or typing.
Conclusion
With this, we come to the end of the tutorial on Selenium locators. In this tutorial on locators in Selenium WebDriver, we first looked at different ways of locating WebElements in DOM. We also looked at various locators and relative locators used in Selenium and ways to locate elements using the ID, Name, Class, and attribute selectors.
Selenium locators can be used as a handy resource when you are performing Selenium automation testing. Now that you have learned how to use locators and relative locators in Selenium WebDriver, you should be able to work with locators effectively. Hope this tutorial has helped you learn everything there is to know about using locators in the Selenium WebDriver.
Frequently Asked Questions (FAQs)
What are the 8 locators in Selenium?
Selenium supports eight different locators for finding elements: ID, Name, className, tagName, linkText, partialLinkText, CSS Selector, and XPath.
Which is the best locator in Selenium WebDriver?
IDs are the most reliable locator option in web design in that they are guaranteed to be unique on the page by W3C standards. You can’t have two elements with the same ID within one page.
Is XPath a locator in Selenium?
XPath is used to locate elements on a web page using the HTML Document Object Model (DOM) structure.
What are the criteria for using locators?
Here are the criteria for choosing the locators:
- Must match the desired element.
- Must not match any other element.
- Avoid information that can change.
- Depend on the minimal required information.
How do you define locators?
Locators provide a way to access an HTML element from a web page. In Selenium, locators can perform actions on the text boxes, links, checkboxes, and other WebElements. They are necessary for us to explore and manipulate a website by its components.
Is DOM a locator in Selenium?
No, DOM is the underlying mechanism allowing Selenium to locate elements using various strategies.
What is the difference between locator and WebElement?
A WebElement is essentially an HTML element on a web page, whereas a locator is a way to find and locate the WebElement on the web page. A WebElement can be a textbox, checkbox, dropdown box, label, header, title, button, etc., on the web page.
Got Questions? Drop them on LambdaTest Community. Visit now


