How To Select Dropdown In Selenium C#
Andreea Draniceanu
Posted On: July 8, 2022
![]() 312512 Views
312512 Views
![]() 15 Min Read
15 Min Read
Dropdowns and multi-selects are extremely common in today’s web pages. Dropdowns can be a great option to allow your users to choose from several options without having to scroll through a whole page. In HTML, these web elements are defined by the tag < select >, with multiple < option > child tags representing the available options to choose from.
In this Selenium C# tutorial, I’ll show you how to select dropdown in Selenium C# and multiple select menus. Here, I will be running tests with different test data and demonstrate how to run them in parallel on the cloud Selenium Grid.
If you are preparing for an interview you can learn more through Selenium interview questions.
So, let’s get started!
TABLE OF CONTENTS
How to get started with a Selenium project?
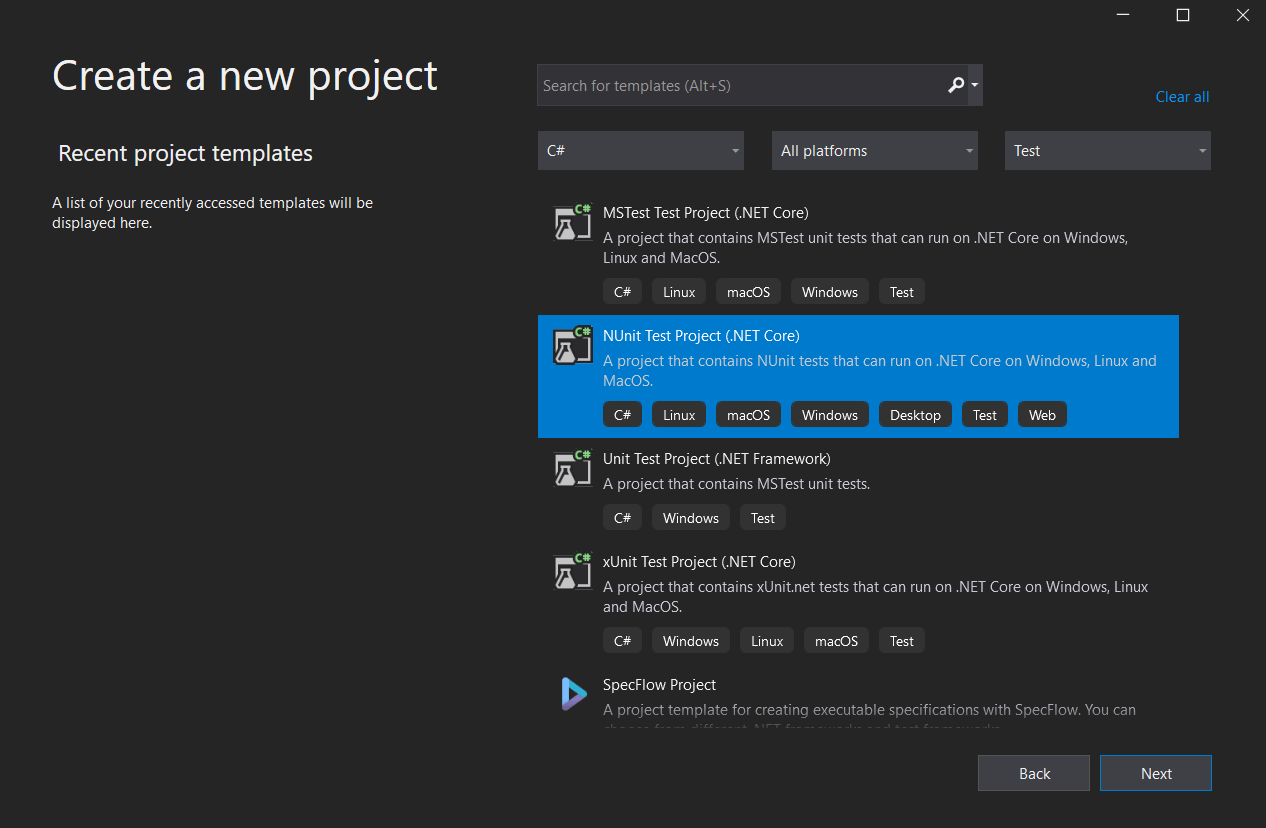
We first need to set up a new Selenium project in Visual Studio (or Visual Studio Code). For this Selenium C# tutorial, I will be using NUnit as a test framework. However, there are other frameworks available, such as XUnit or MSTest.
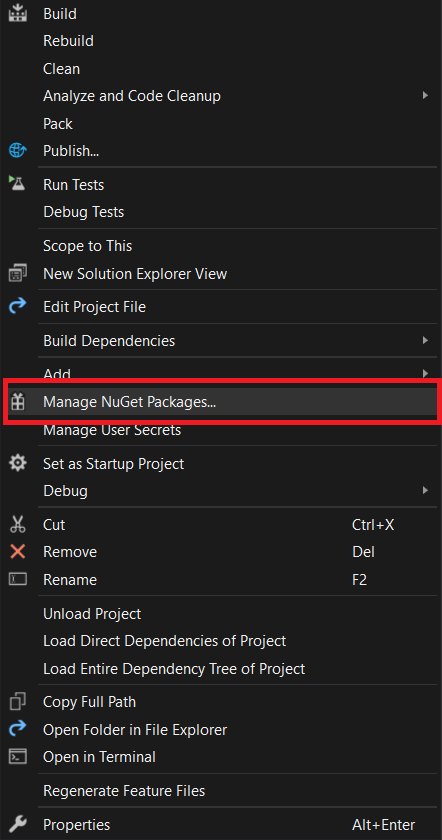
Step 1: Add the Selenium packages we will use in the project. To do this, right-click on the project name in the Solution Explorer pane, and select Manage NuGet packages:
Step 2: Search for and install:
- Selenium.WebDriver: we need it to interact with the WebElements on the page.
- Selenium.Support: it’s the package that enables us to work with dropdowns in Selenium.
- Selenium.WebDriver.ChromeDriver (or a different driver if you want to test on another browser): allows the interaction with the browser.
You will then have them in the list of installed packages:

In the next section of this article on how to select dropdown in Selenium C#, we will learn about the SelectElement Class in Selenium.
Run C# Automation Testing Online. Try LambdaTest Now!
The SelectElement Class in Selenium C#
The SelectElement class in Selenium C# is part of the Selenium.Support NuGet package. It allows us to interact with the dropdown and multiple select menus on web pages.
It also allows you to select and deselect options from the dropdown, validate if it allows multiple selections, see all the available options, and see what options are currently selected.
To understand how to select dropdown in Selenium C#, let me show how a dropdown looks in the Inspector from Developer Tools:

This is a simple dropdown that allows you to choose a day of the week.
Methods in the SelectElement class:
- SelectByValue(): will select the option based on the value from the HTML.
- SelectByText(): used to select the dropdown option based on the displayed text.
- SelectByIndex(): selects the option based on index. The index starts from 0, not 1!
- SelectedOption(): returns the selected WebElement.
- AllSelectedOptions(): returns a list of the selected WebElements. It should be used only on multiple selections.
- IsMultiple(): a boolean attribute with the value True if the selection allows multiple selections and False if it doesn’t.
- DeelectByValue(): will deselect the option based on its value.
- DeselectByText(): used to deselect the dropdown option based on the text.
- DeselectByIndex(): deselects the option based on index.
- DeselectAll(): will deselect all previously selected options.
These are the main things you need to know while you are learning how to select dropdown in Selenium C#. Now let’s see it in action.
How to select dropdown in Selenium C# with an example?
I’m going to demonstrate how to select dropdown in Selenium C# with a simple scenario.
Test Scenario
- Navigate to the LambdaTest Playground Dropdown Demo page.
- Select Wednesday from the dropdown.
- Validate that the text displays the selected day of the week.
Implementation
Before you get started, make sure you create a new NUnit test project in Visual Studio or Visual Code, and add the following NuGet packages:
- Selenium.WebDriver – I’m using version 3.141.0 in this tutorial.
- Selenium.Support – should have the same version as Selenium.WebDriver.
- Selenium.Support.ChromeDriver, Selenium.WebDriver.IEDriver, Selenium.Firefox.WebDriver, etc. – depending on the browser you want to use in your test. Going forward, I will use Google Chrome for my tests, but feel free to choose your favorite browser.
Then, in a new class, we need to write the following Selenium C# code to perform the dropdown test:
Code Walkthrough
Now let me guide you through the lines of code to get a clear picture of how to select dropdown in Selenium C#.
|
1 2 3 4 5 |
using NUnit.Framework; using OpenQA.Selenium; using OpenQA.Selenium.Support.UI; using System; using OpenQA.Selenium.Remote; |
This part contains the packages used in the class.
|
1 2 3 4 |
private static IWebDriver driver; public static string gridURL = "@hub.lambdatest.com/wd/hub"; public static string LT_USERNAME = "LT_USERNAME"; public static string LT_ACCESS_KEY = "LT_ACCESS_KEY"; |
The first line, above, is where I declare the WebDriver, and the next variables are related to my LambdaTest account.
LambdaTest is a cloud-based cross browser testing platform that allows you to perform Selenium C# automation testing at scale over an online browser farm of 3000+ browsers and operating systems. With LambdaTest, you can run your automated C# test scripts faster and more efficiently by running them in parallel on the fastest cloud-based infrastructure. Therefore, you can test more in less time and ship quality products faster.
You can also Subscribe to the LambdaTest YouTube Channel and stay updated with the latest tutorials around automated browser testing, Selenium testing, CI/CD, and more.
Replace LT_USERNAME and LT_ACCESS_KEY with your own credentials, i.e., username and the access key from your LambdaTest Profile Section.
|
1 2 3 4 5 6 7 8 9 10 11 12 13 14 |
[SetUp] public void Setup() { var desiredCapabilities = new DesiredCapabilities(); desiredCapabilities.SetCapability("browserName", "Chrome"); desiredCapabilities.SetCapability("platform", "Windows 11"); desiredCapabilities.SetCapability("version", "101.0"); desiredCapabilities.SetCapability("screenResolution", "1280x800"); desiredCapabilities.SetCapability("user", LT_USERNAME); desiredCapabilities.SetCapability("accessKey", LT_ACCESS_KEY); desiredCapabilities.SetCapability("build", "Selenium C-Sharp"); desiredCapabilities.SetCapability("name", "Selenium Test"); driver = new RemoteWebDriver(new Uri($"https://{LT_USERNAME}:{LT_ACCESS_KEY}{gridURL}"), desiredCapabilities, TimeSpan.FromSeconds(600)); } |
Using the [SetUp] annotation in NUnit, I let my code know that this method needs to be run before each of my tests. Then, inside it, I set the driver’s capabilities based on the browser type, version, OS, and screen resolution I want to use in my tests.
I use the Capabilities Generator from LambdaTest, so I don’t have to enter them by hand:

This way, I just select my configuration, select the C# language, and simply copy them into my code.
Then, in the new driver instance, I use the capabilities I copied before and the URL created by combining my username, access key, and the LambdaTest Selenium Grid URL. I like using string interpolation because it reads much easier than concatenation.
Moving on to the test, let me break it down a bit more:
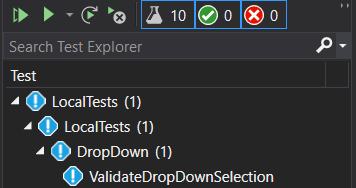
The [Test] annotation marks the method beneath it as a test method. After the project is built, I can see this test in the Test Explorer and run it from there:
|
1 |
string dayOfTheWeek = "Wednesday"; |
This one is pretty straightforward. I created a string variable to store the value I want to test because I am using it in more than one place, and I don’t want to update it in multiple places if the value changes.
|
1 |
driver.Navigate().GoToUrl("https://www.lambdatest.com/selenium-playground/select-dropdown-demo"); |
The Navigate() method in Selenium C# instructs the browser to navigate to a specific location, in my case, to the given URL (using the GoToUrl() method).
The next part is the actual dropdown selection, which shows how to select dropdown in Selenium C#.
|
1 2 |
SelectElement dropDown = new SelectElement(driver.FindElement(By.Id("select-demo"))); dropDown.SelectByValue(dayOfTheWeek); |
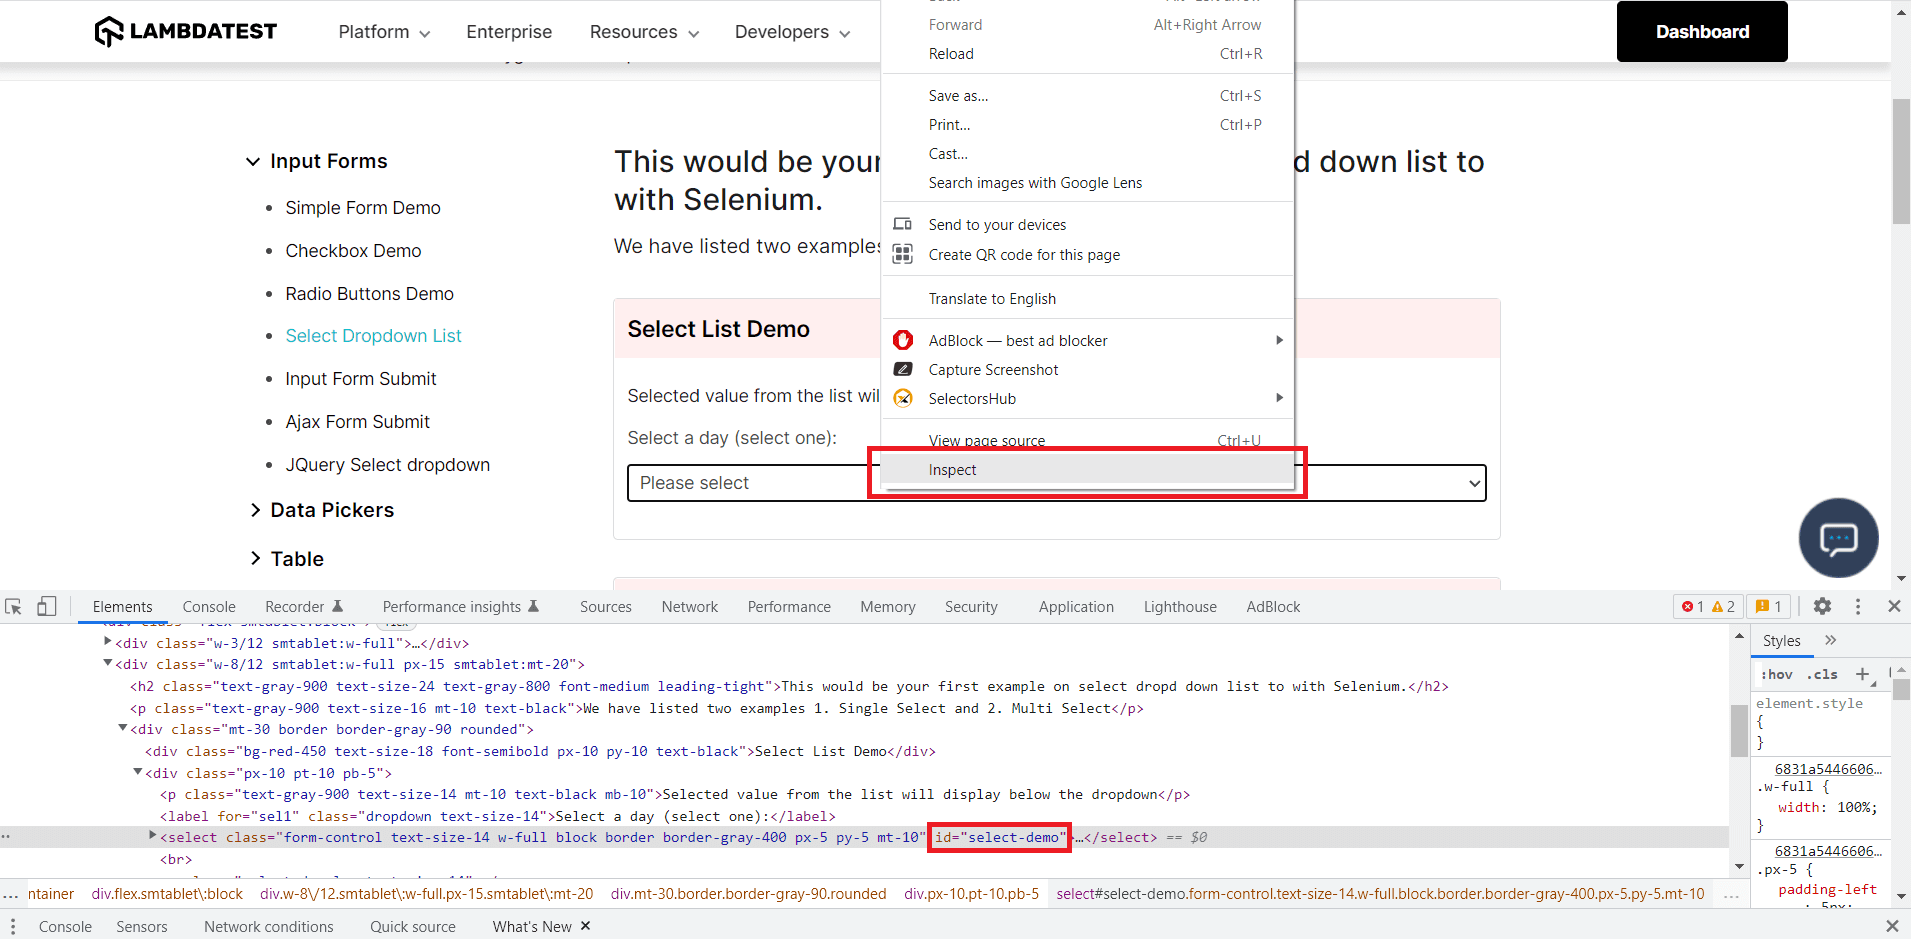
The dropdown web element in Selenium C# has the type SelectElement and has to be declared as a new instance of the SelectElement class. The dropdown web element has an Id value, so I will use the Id locator.
You can use the browser’s Developer Tools to inspect an element (right-click on the element and select Inspect, and you will see its HTML attributes):
If you’re not familiar with Selenium C# element interaction, you can check out my previous tutorial on automation testing with Selenium C#.
I prefer to use SelectByValue() or SelectByText() for selecting the dropdown value, which in this particular case would accept the same parameter. Using SelectByIndex() also works, but then I would need to know the exact order of the options and ensure that the order doesn’t change. For a day of the week dropdown, that’s fine, but in most cases, the available options might change.
The last part is the validation, where I verify that the app works as expected:
|
1 2 |
string actualText = driver.FindElement(By.CssSelector(".selected-value.text-size-14")).Text; Assert.True(actualText.Contains(dayOfTheWeek), $"The expected day of the week {dayOfTheWeek} was not selected. The actual text was: {actualText}."); |
I identified the text displayed based on its CSS Selector, then used the Assert class from NUnit to check that it contains the day of the week I previously selected. In case the NUnit assertion fails, the test will display a message – I am using string interpolation to insert the string variables in the text.
The final method is executed after each test, and what it does is close all driver instances:
|
1 2 3 4 5 |
[TearDown] public void TearDown() { driver.Quit(); } |
Accelerate C# Automated Scripts with Parallel testing. Try LambdaTest Now!
How to select dropdown in Selenium C# and run the test in parallel?
In this section of this article on how to select dropdown in Selenium C#, I will show you how you can run the same test with different data. The steps will remain the same, so we want to use the same method with different parameters.
With NUnit, this is achieved with the TestCase attribute. And since we will have more tests now, it’s a good idea to perform parallel testing, so they don’t take so long to execute. For this, we have the Parallelizable attribute. However, NUnit parallelization is not thread-safe, so the tests in a class share the same instance of the driver which might result in unexpected failures.
So the test method now should look like this:
Code Walkthrough
|
1 2 3 4 5 6 7 8 9 |
[Test] [TestCase("Monday")] [TestCase("Tuesday")] [TestCase("Wednesday")] [TestCase("Thursday")] [TestCase("Friday")] [TestCase("Saturday")] [TestCase("Sunday")] [Parallelizable(ParallelScope.All)] |
With these lines of code, we instruct the test to run once for each day of the week string value.
The [Parallelizable(ParallelScope.All)] line means that the test can be run in parallel with other tests at the same level – in our case, the method level.
There are other scopes of parallelization in NUnit:

- All: the test and its children can run in parallel with others at the same level.
- Children: the scope is defined at the class or assembly level, and child tests of the class or assembly can run in parallel.
- Fixtures: fixtures can run in parallel.
- Self: the test itself can run in parallel with other tests.
|
1 |
public void ValidateDropDownSelection(string dayOfTheWeek) |
The test method also takes a parameter now. You can see I removed the line:
|
1 |
string dayOfTheWeek = "Wednesday"; |
This is because the value of the dayOfTheWeek variable now comes from the TestCase attribute.
Everything else stays the same. Now you will see seven tests available in the Test Explorer. When you run them on the Selenium Grid, they will also run in parallel:

You can see the tests in LambdaTest in real-time while they are running and also see the video recordings afterwards:
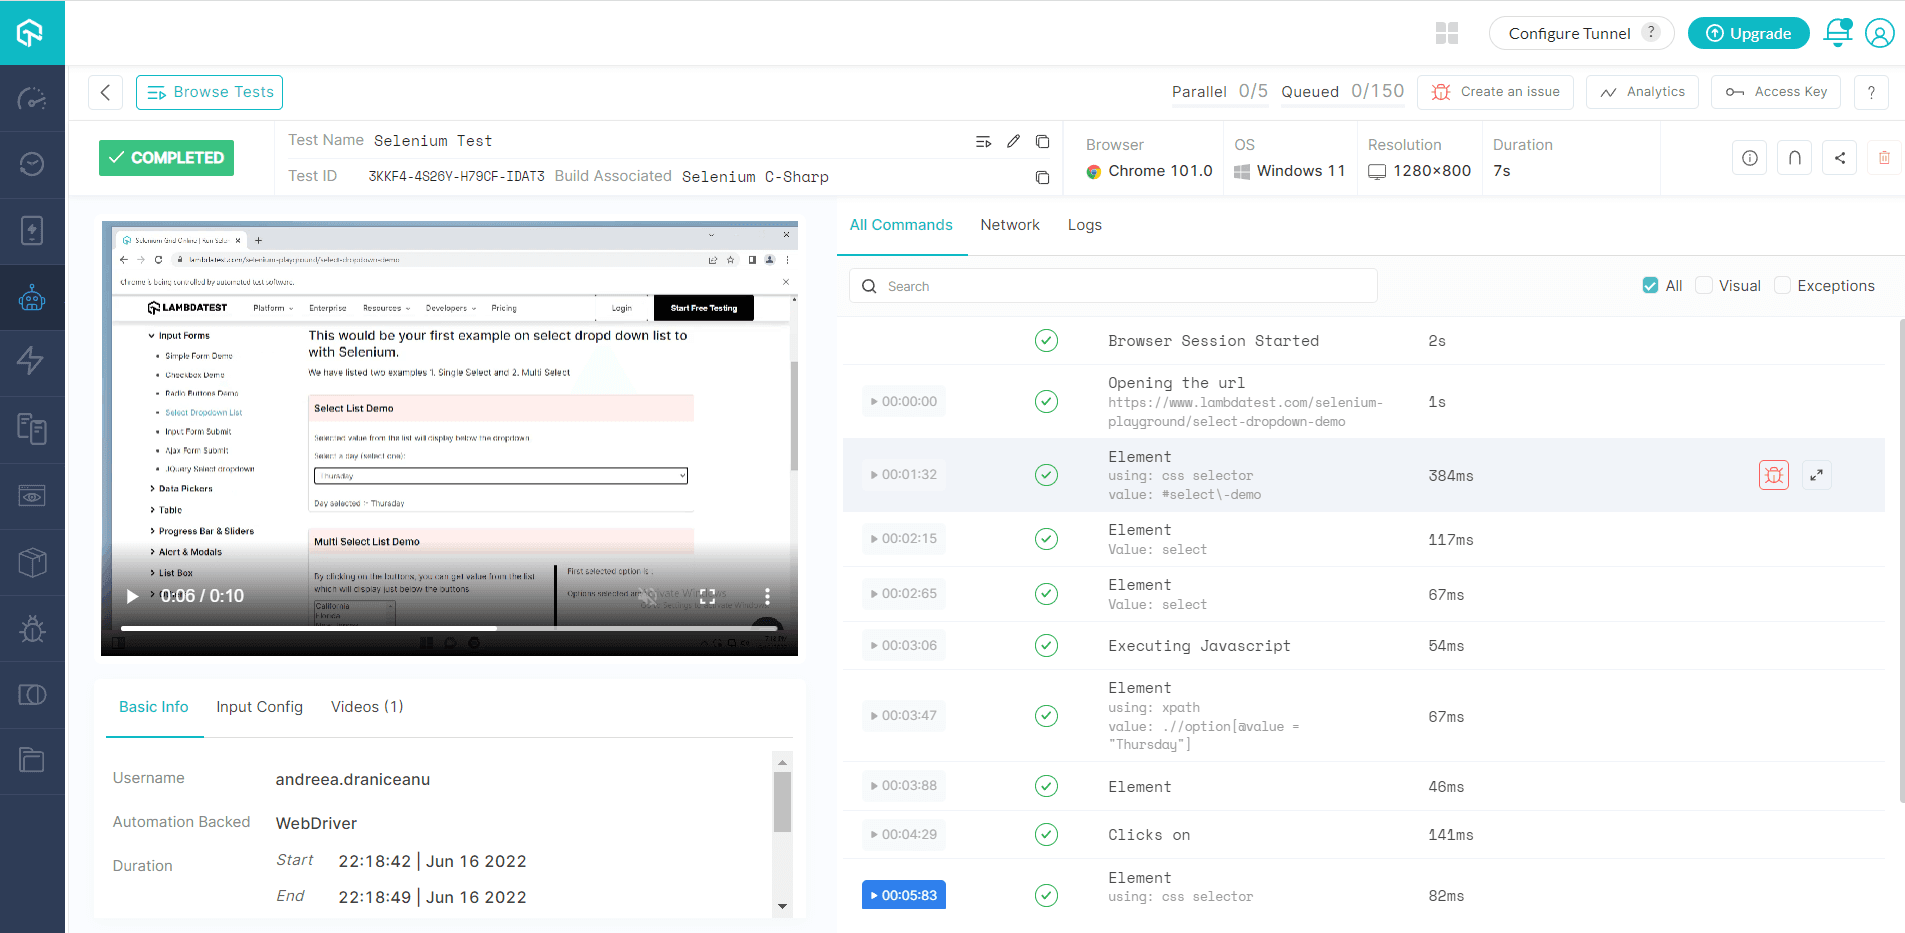
On the left-hand side, there is the recording, and the right side displays the test steps, the step duration, and the result. If you click on the timestamp of a step, the video will jump to that point so you can see the action in the recording.
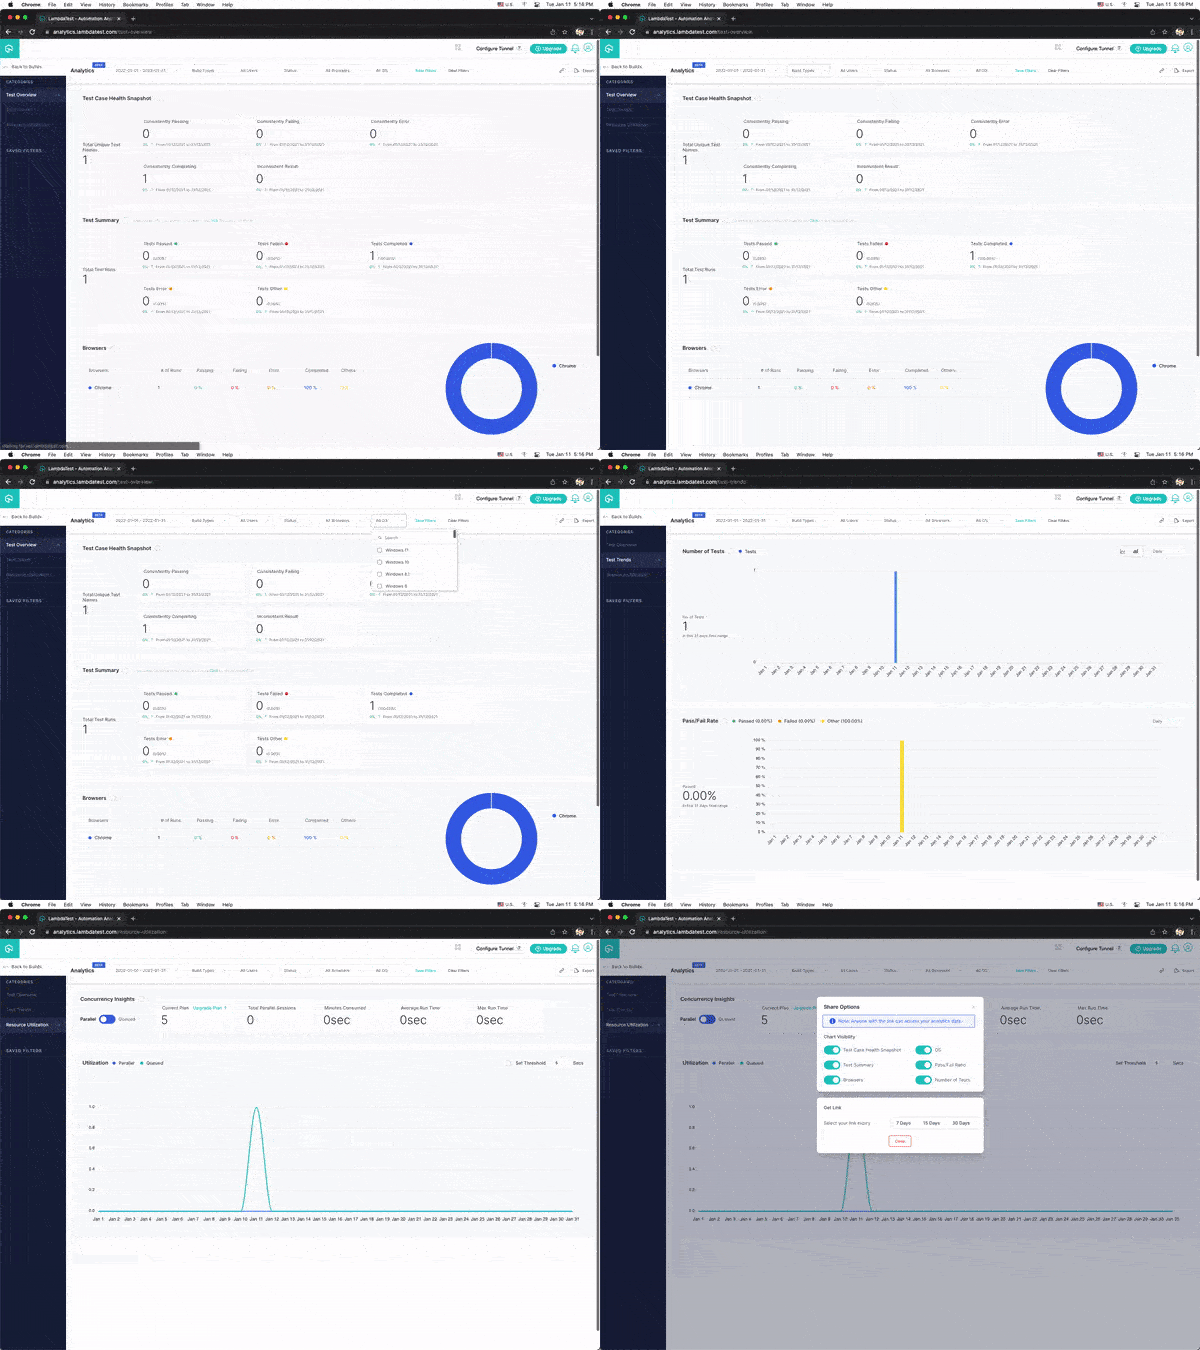
You can analyze your test performance through the LambdaTest Analytics Dashboard. The Test Summary section shows all test results, their status, and the total number of tests passed or failed. The Test Overview section shows snapshots of recently executed test runs.
LambdaTest also provides some advanced features like HyperExecute, which helps in achieving up to 70% faster execution of your Selenium NUnit test cases. HyperExecute is a blazing fast test end-to-end test orchestration cloud that allows you to group and distribute tests intelligently across runner environments.
So far, we have seen how to select dropdown in Selenium C#. In the next section, we will learn to handle multiple select menus.
How to handle multiple select in Selenium C#?
In this section of this article on how to select dropdown in Selenium C#, I want to show you how to work with a multi select dropdown using Selenium C#. We’ve already discussed the available methods, so let’s jump in.
Test Scenario
- Navigate to the LambdaTest Playground Dropdown Demo page.
- Verify that the Multi-Select List Demo allows multiple selections – if not, display a message.
- If it does allow multiple selections, select Florida, New York, and Texas
- Deselect all values.
Implementation
The SetUp and TearDown methods are the same as before, so I will just show you the test method code:
Code Walkthrough
The first few lines don’t have anything new. We need to navigate to the web page (the same as before), create an array of strings with the values we want to select, and declare the multiSelect dropdown using the FindElement() method in Selenium.
|
1 2 3 |
driver.Navigate().GoToUrl("https://www.lambdatest.com/selenium-playground/select-dropdown-demo"); string[] selectedStates = { "Florida", "New York", "Texas" }; var multiSelect = new SelectElement(driver.FindElement(By.Id("multi-select"))); |
In Developer Tools, you can see that the select element has an ID, which I used above:

Next, I want to validate that the SelectElement allows multiple selections. As I previously mentioned, the IsMultiple attribute will let me know if I can select multiple options or not.
|
1 |
Assert.IsTrue(multiSelect.IsMultiple, "The Select does not allow multiple selection."); |
If this assertion fails, the test will simply fail and stop executing the following steps. Of course, I expect it to pass, and if multiple selections is allowed, I want to perform the next actions:
|
1 2 3 4 |
foreach (var state in selectedStates) { multiSelect.SelectByText(state); } |
This is a simple loop that goes through each value of the selectedStates array, and then selects the value, using the text this time – once again, the text and the value of the options are the same.
The last step deselects all the previously selected values:
|
1 |
multiSelect.DeselectAll(); |
Are you a tester looking to hone your craft? Prove your worth by earning the Selenium C# 101 certification from LambdaTest:
Here’s a short glimpse of the Selenium C# 101 certification from LambdaTest:
Conclusion
If you followed this tutorial blog on how to select dropdown in Selenium C#, you should now know how to select or deselect a dropdown value using Selenium C#, how to work with multiple selects, and also how to run the same test with different test data in NUnit.
And as a bonus, you could also see how to parallelize the tests and run them on the remote Selenium grid to save the test execution time.
Frequently Asked Questions (FAQs)
How do I select multiple drops in Selenium?
The Selenium WebDriver provides a Select class to interact with the multi-select dropdown. We first need to get the reference of the select control and then call the set values method to set the options in it.
How do I select a list in Selenium?
The Selenium WebDriver Select class assists in functionalities related to dropdown components identified with the < select > tag in HTML code.
What is select in Selenium?
In Selenium WebDriver, the ‘Select’ class facilitates selection and deselection of dropdown options. It’s initialized with a dropdown webElement passed as a parameter to its constructor. This class is essential for managing dropdown interactions.
Where is select class in Selenium?
The Select class in Selenium WebDriver is a part of Selenium’s Support.UI package. It embodies the functionality of the HTML SELECT tag, offering methods to select and deselect options within dropdowns. It’s a crucial element for dropdown interaction.
How to get select value in Selenium?
To obtain the selected value in Selenium:
- Create a “Select” instance:
1Select select = new Select(driver.findElement(By.id("oldSelectMenu"))); - Retrieve selected options:
1List<WebElement> selectedOptions = select.getAllSelectedOptions();
By using this approach, you can gather selected options from a dropdown, whether it’s single-select or multi-select.
What is select and action class in Selenium?
In Selenium, the “Select” class is used to interact with dropdown menus and options, enabling selection and deselection. The “Actions” class, on the other hand, deals with complex user interactions, like mouse and keyboard actions, useful for versatile web testing scenarios.
Got Questions? Drop them on LambdaTest Community. Visit now


