Handling “Element is Not Clickable at Point” Exception in Selenium
Faisal Khatri
Posted On: March 28, 2024
![]() 374498 Views
374498 Views
![]() 10 Min Read
10 Min Read
In Selenium automation testing, locators help identify and interact with any element on the web page. For example, ID, Name, ClassName, XPath, CSS Selector, TagName, LinkText, and Partial LinkText are widely used to help you interact with the elements on the web page.
Identifying the elements may be an easy task, but your tests might fail due to the state of the WebElement (e.g., the element is not visible or the element is not clickable at point, etc.). In such cases, the tests might throw different Selenium exceptions such as NoSuchElementException, ElementNotVisibleException, etc.
This is often caused as the WebElement on the web page is not found, is not interactable, or can be another issue with the corresponding WebElement.
In this blog, you will learn one of those exceptions – “element is not clickable at point”. By the end of the tutorial, you would be in a position to handle this exception like a pro!
TABLE OF CONTENTS
Why is an Element Not Interactable?
When the automated tests are run, the WebElement may be located successfully based on the selector provided in the test scripts. However, there is a chance that the WebElement will not be interactable.
There are multiple reasons why the WebElements are not interactable.
- WebElement is disabled: Based on the feature or the functionality of the web application, some of the fields or buttons remain disabled until a certain condition is met. The WebElement is not interactable when it is disabled. Hence, when running the tests, if it tries to click on the WebElement, it will show an “element is not clickable at point” exception.
- WebElement is not visible: Another cause of WebElement not being interactable is that it may not be visible on the page. This may be due to WebElement being overlapped by another WebElement, for example a pop-up covering the button so it is not clickable.
- WebElement loading time: It may take some time for the WebElements to load on the page due to the scripts running on the page, and in case if the test is not using the waits correctly, it may try to click on the WebElement before it is completely loaded on the web page.
The above ones are the reasons why an element is not interactable. In the next section, let’s discuss what is the “element is not clickable at point” exception.
What is the “Element is Not Clickable at Point” Exception?
The “element is not clickable at point” exception typically arises when the targeted WebElement cannot be clicked at its current position. This means attempting to click it will trigger an exception.
Let’s take an example of the home page of the LambdaTest eCommerce Playground website. Here, while running the automated tests using Selenium WebDriver, when you try to click on the Blog menu on the menu bar when the Shop by Category side menu bar is already open, you will get the “element is not clickable at point” exception.
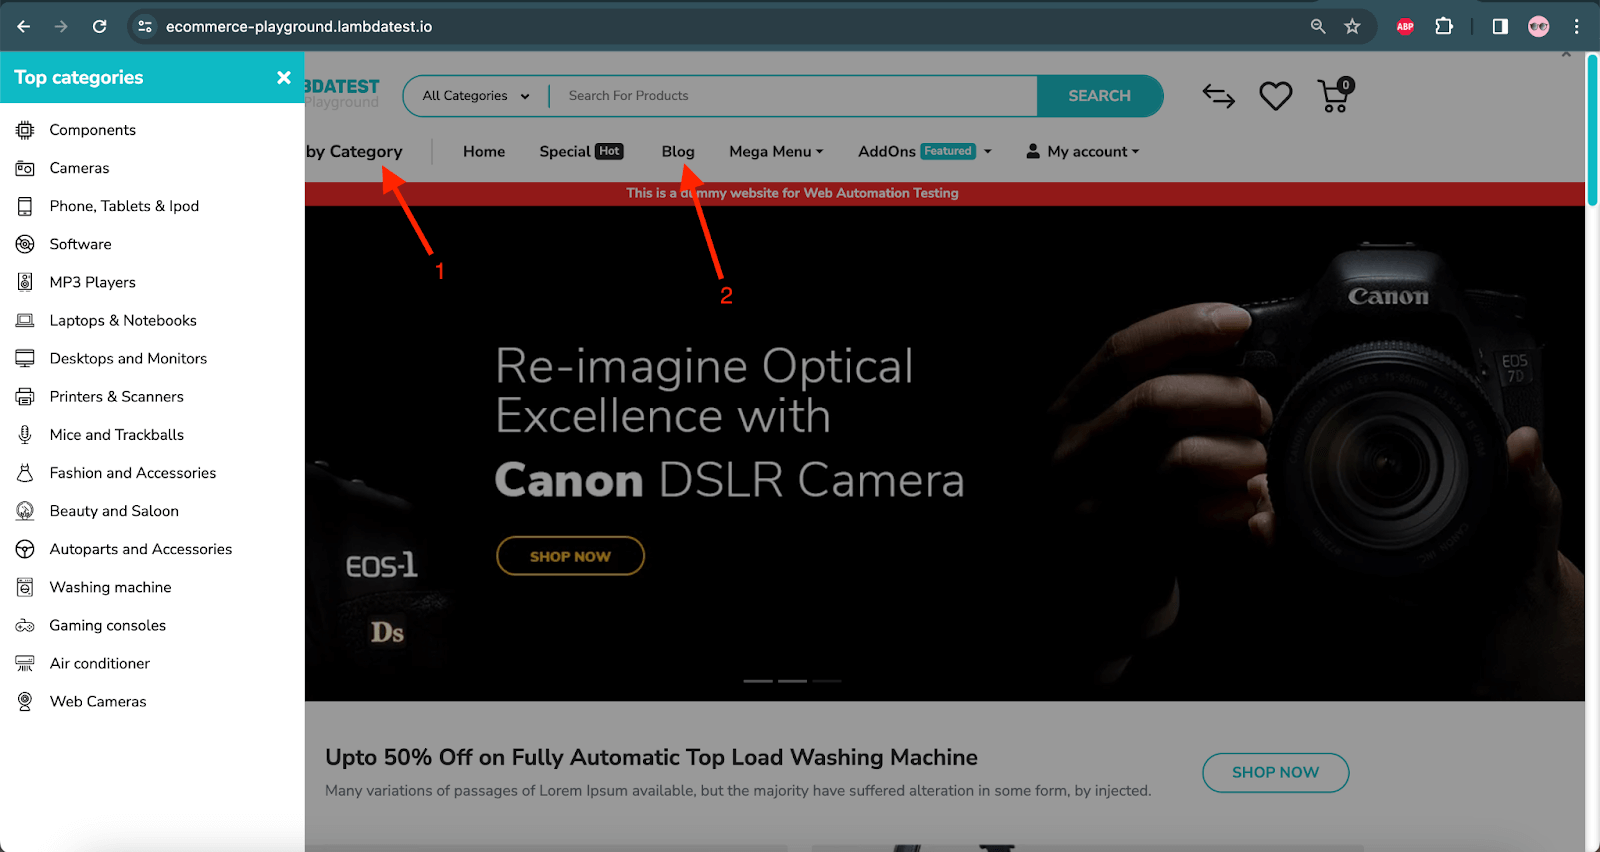
Below is the excerpt of the exception that was thrown by Selenium as it was unable to click on the Blog menu:
The error message displayed in the exception is self explanatory that Selenium was unable to click the element.
There is a higher probability of getting this exception with the Chrome browser, as Chrome never calculates the exact location of any WebElement. Instead, it tries to perform a click in the middle of the WebElement. Hence, you might get the “element is not clickable at point” exception when running tests on Chrome.
Does this mean that there is zero probability of witnessing this exception when running automation tests with Selenium on Firefox, Microsoft Edge, or any other web browser? The underlying implementation differs from one browser to another. Hence, sometimes, you may encounter this exception when clicking an element at a specific point (or coordinate).
To assist with such browser-specific challenges, Kane AI, offered by LambdaTest, is a valuable tool. This GenAI native testing assistant helps developers and testers identify and resolve issues efficiently across various browsers.
By analyzing failed tests and providing actionable insights, Kane AI helps reduce the time spent troubleshooting exceptions like “element is not clickable at point” in browsers such as Chrome, Firefox, or Edge. With features that suggest improvements for element visibility, locators, and timing, Kane AI streamlines the debugging process and ensures smoother test executions.
So, what are the causes of the exception? Let’s dive deep into the various causes behind the “element is not clickable at point” exception.
Causes of the “Element is Not Clickable at Point” Exception
In this section, let us understand the major causes of the “element is not clickable at point” exception.
Below are the major causes why the “element is not clickable at point” exception:
- WebElement to be clicked is disabled.
- WebElement is not yet available (or loaded) on the web page.
- WebElements overlap with each other.
- Failure in locating WebElement using coordinates on the page.
Let us see the above causes in detail.
Cause 1: WebElement to be Clicked is Disabled
In a web application, if you skip filling out any mandatory fields in a form or while creating an account, you will come across the submit (or create account) WebElement in a disabled state.
When trying to interact with such a WebElement, the “element is not clickable at point” exception pops up.
Cause 2: WebElement is not yet Available (or Loaded)
Most websites use AJAX for the dynamic loading of web content. Therefore, the test cases should be implemented considering this dynamism. You will encounter the said exception if the test script is trying to interact with the WebElement, which is not yet available in the Document Object Model (DOM).
Cause 3: WebElements Overlap With Each Other
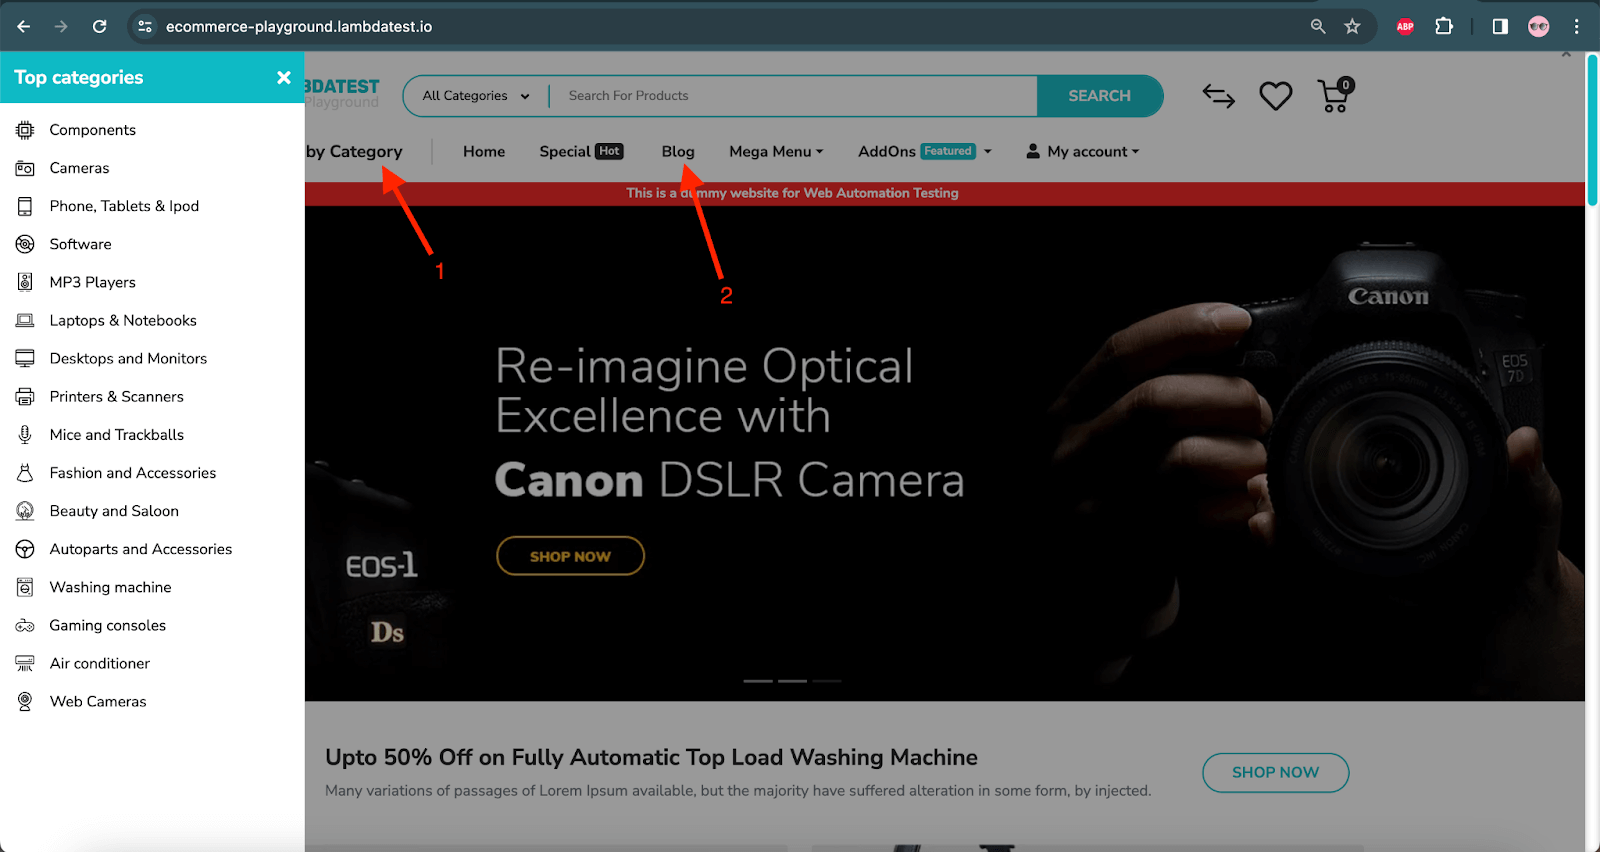
You might have overlapping WebElements on a webpage, which poses significant challenges when running Selenium automated tests on the page. For example, when trying to interact with an element with another element overlapping, it would throw the exception “element is not clickable at point”.
Since this makes an interesting scenario, let’s look at this with an example. We will run the tests on an online Selenium Grid by LambdaTest.
LambdaTest is an AI-powered test orchestration and execution platform that lets developers and testers perform automation testing using Selenium at scale, thereby attaining better browser coverage, faster test execution, and accelerated software release cycles. Furthermore, parallel test execution is one of the major advantages of running tests on a cloud-based platform like LambdaTest.
The following test scenario will be used for demonstration purposes.
Test Scenario
|
The following code will run the test scenario using Selenium WebDriver on Chrome 122 and Windows 10 on the LambdaTest cloud platform.
Code Walkthrough:
As the tests are run on the LambdaTest cloud platform, it is mandatory to provide the required capabilities. These capabilities can be generated from the LambdaTest Automation Capabilities Generator.
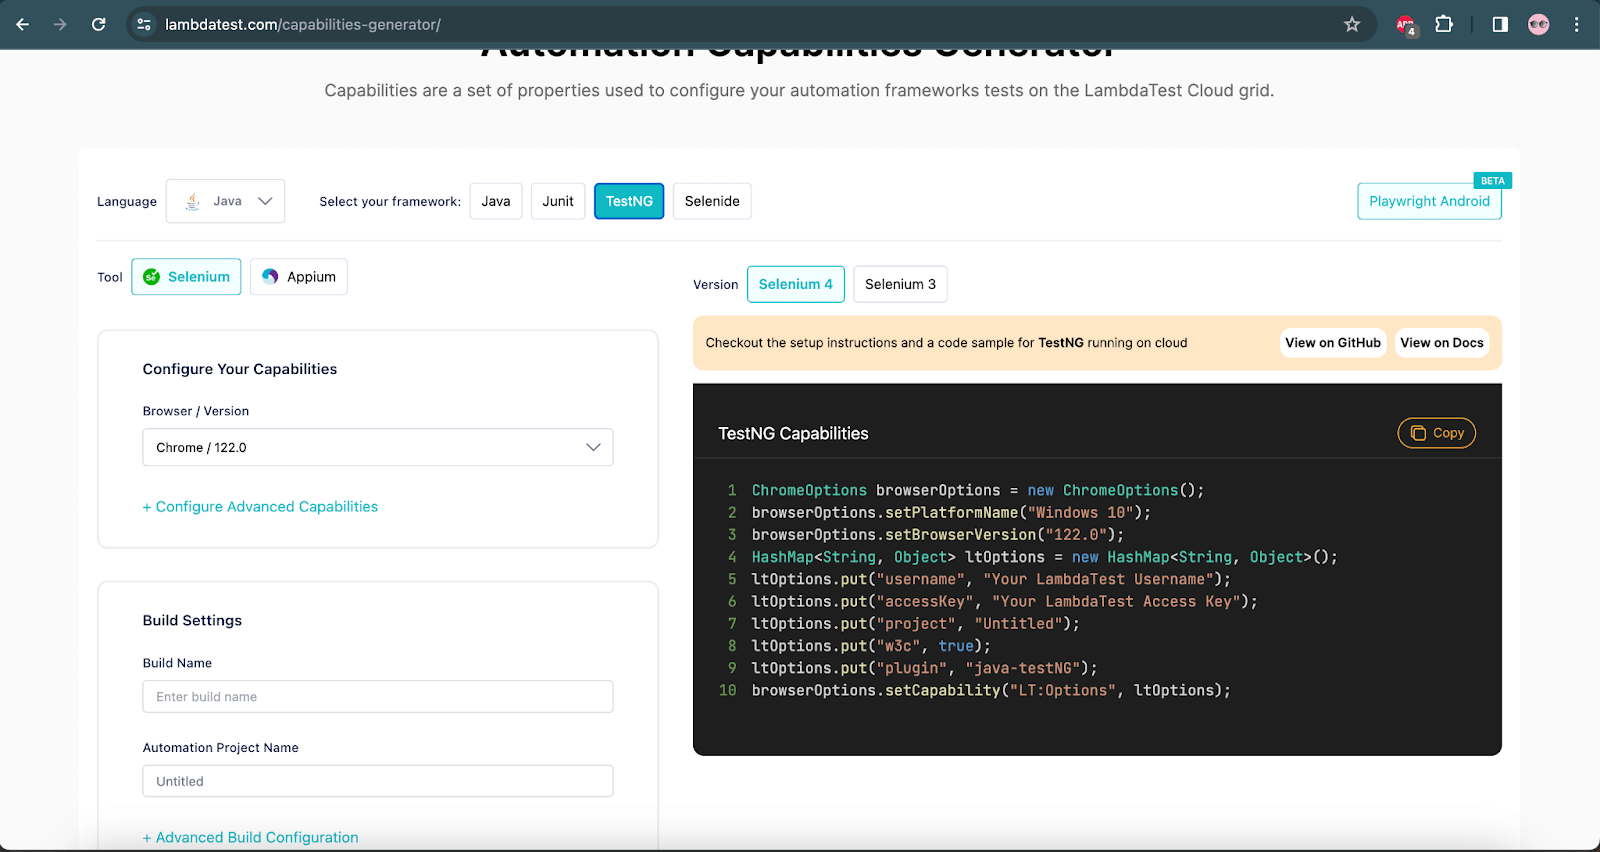
Based on the capabilities selected, the capabilities generator website automatically generates the required configuration code to help us run the code on the LambdaTest cloud grid.
Next important thing that is required is the LambdaTest Username and Access Key, that can be found on the Profile > Account Settings > Password & Security once we log into the LambdaTest.

As the Username and Access Key are confidential values, you should not hardcode them within the code. Therefore, it is recommended to set the Username and Access Key in the environment variables.

Next, the capabilities need to be provided for which the getChromeOption() method is created. It has all the required capabilities to run the test successfully on Chrome Browser 122 version on the Windows 10 platform.
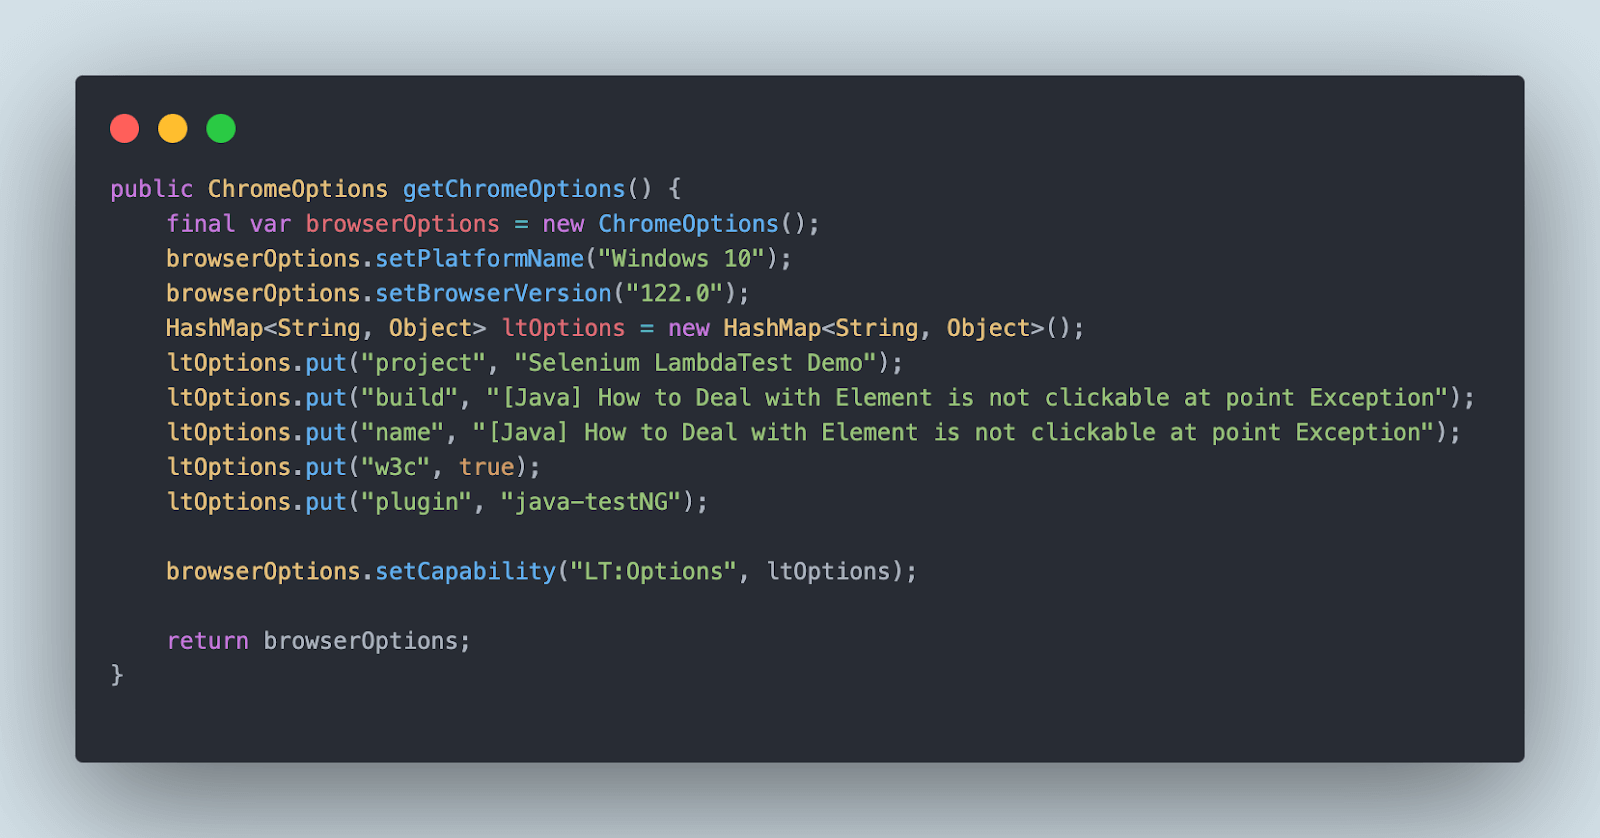
We will use the RemoteWebDriver() instance to instantiate the WebDriver instance using the setup() method to run the test on the LambdaTest platform.
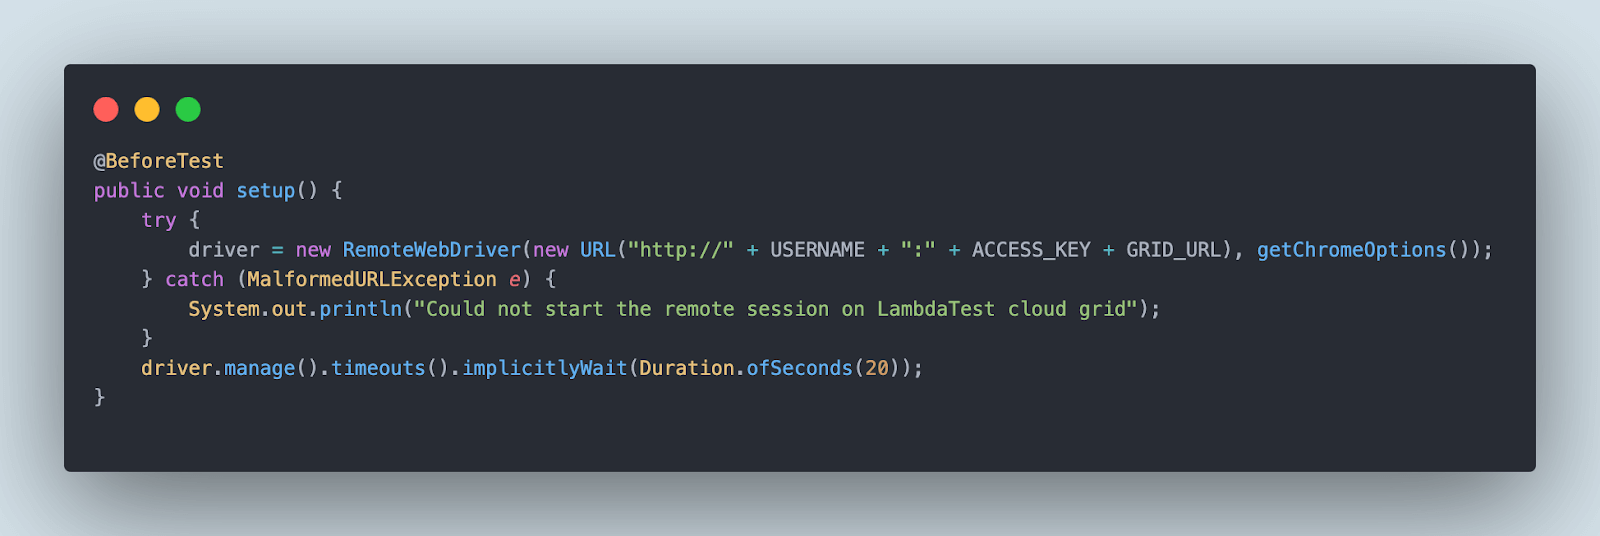
This method also implements implicit waits so all WebElements load correctly before the actual test execution begins.
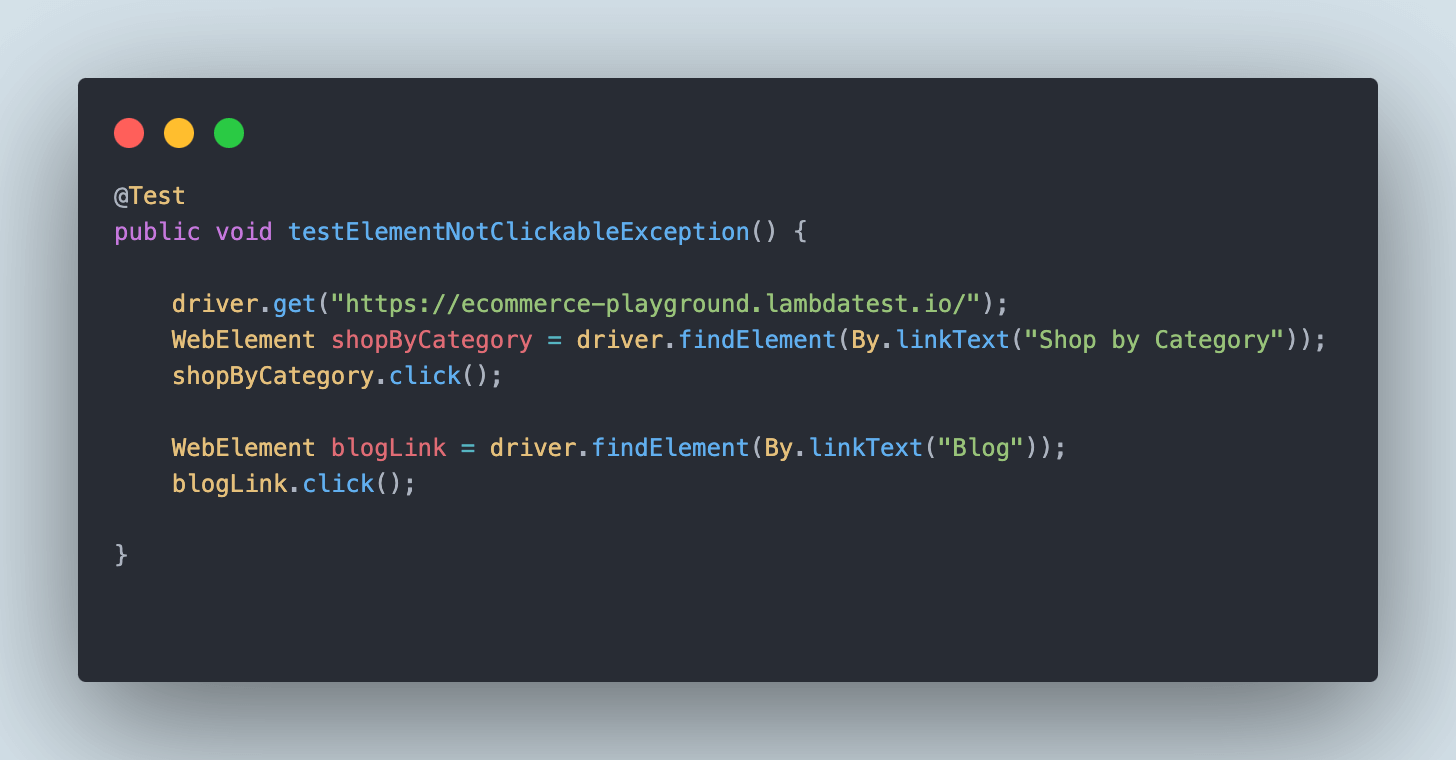
Finally, the test method testElementNotClickableException() will be executed. It will first navigate to the LambdaTest eCommerce Playground website and click on the Shop by Category menu. Next, it will locate the Blog menu and try to click on it.
Let’s execute this test and check out the result.
Test Execution:
On executing the test on LambdaTest, it is expected that Selenium should throw the “element is not clickable at this point” exception.
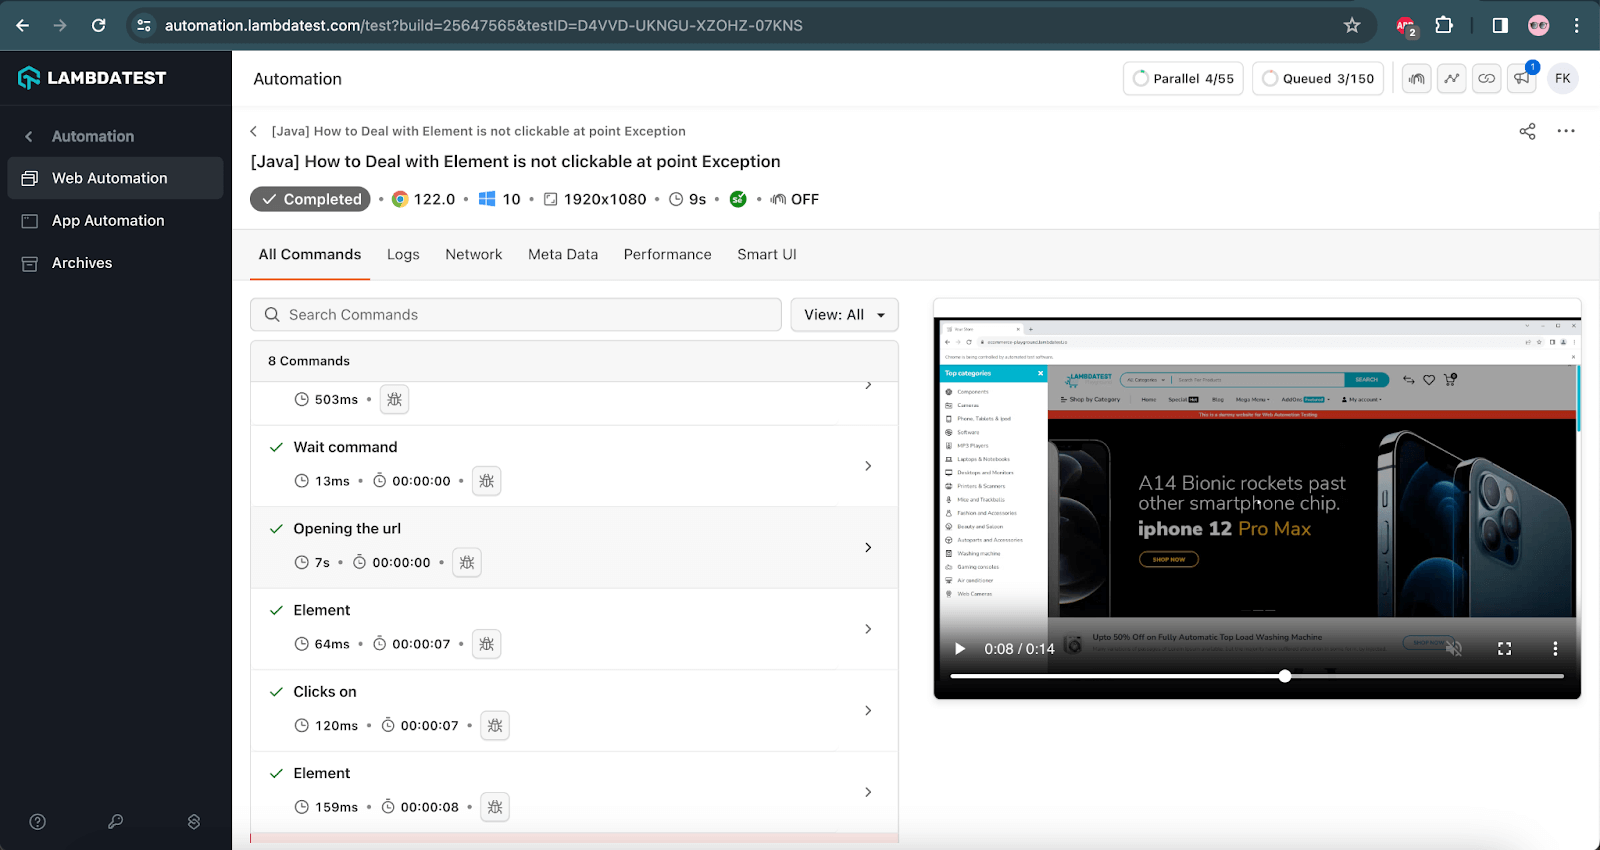
The following screenshot of the test execution performed using IntelliJ IDEA shows the exception in the console log.
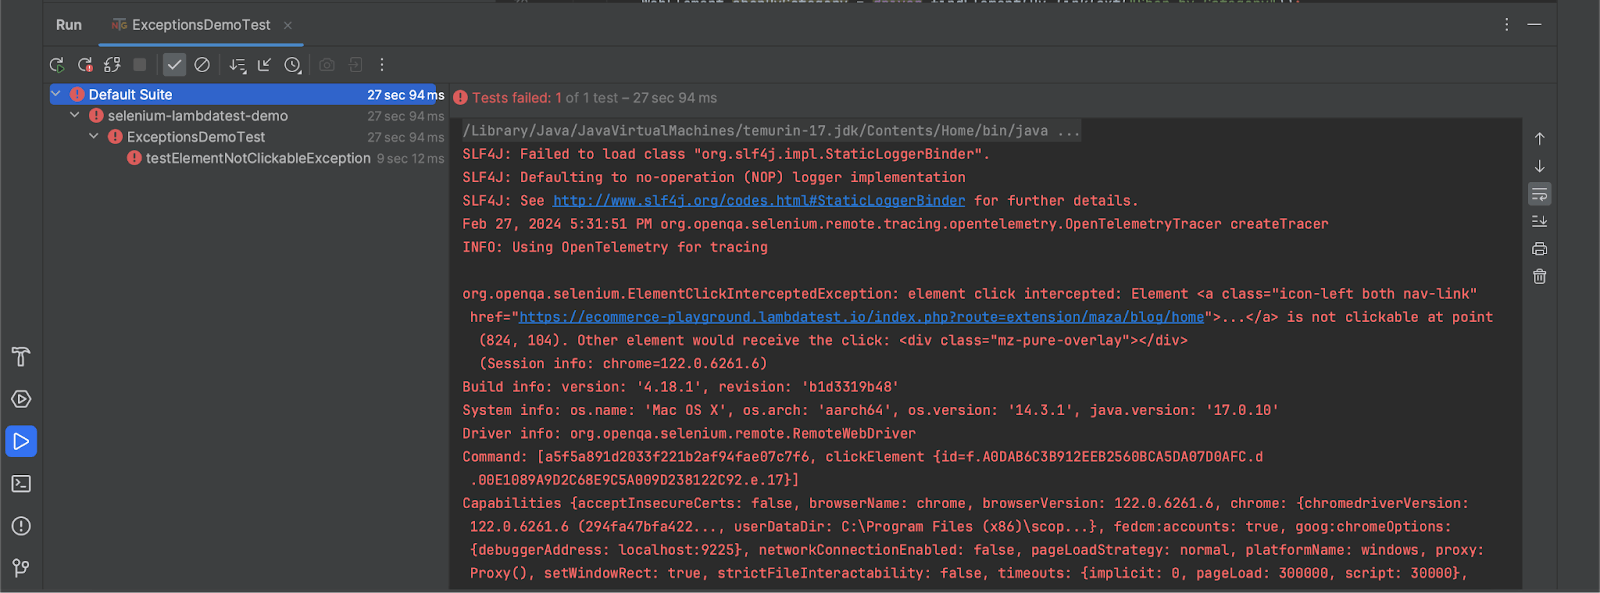
Below is the stack trace of the error:

Many times, you would need to identify the Selenium locators using their coordinates. The coordinates of the elements would differ depending on the window size. Hence, maximizing the browser window when performing Selenium testing is a good practice. You can read our detailed blog on Selenium best practices to avoid issues you may encounter when running Selenium tests.
Now that we have covered the different causes of the “element is not clickable at point” exception, it’s time to dive deep into the fixes to avoid this exception.
How to Fix the “Element is Not Clickable at Point” Exception?
There are some simple yet effective ways to resolve the“element is not clickable at point” exception. Let’s look at some of the ways to fix this exception.
Fix 1: Adding Waits to Selenium Tests
To handle elements that take some time to load on the web page, you may add waits in Selenium. The added delay helps ensure that the WebElement to be interacted with is available on the web page. Have a look at the different Selenium waits that can help you achieve this task.
You can consider adding implicit waits, explicit waits, or fluent waits, depending upon the requirement. This would add some wait time for the WebElement(s) to load before performing interactions on the same.
For example, we can add an explicit wait for a specific element so that it loads completely and is identified to be clickable.
Subscribe to the LambdaTest YouTube Channel to catch up with the latest tutorials on automated testing, Selenium testing, and more.
Fix 2: Maximizing the Browser Window
When coordinates are used to identify the elements in the tests, it is always considered good practice to maximize your browser window. This ensures that the coordinates defined in your tests match with those on the page, as the browser is in the maximized state. Here is how you can avert the “element is not clickable at point” exception by simply maximizing the web browser window:
Fix 3: Using JavaScriptExecutor to Perform Mouse Clicks
When the waits don’t help resolve the issue, you can use the JavaScriptExecutor to perform the click operation.
JavaScriptExecutor is a key interface that allows you to run JavaScript on the window or page of the browser using Selenium WebDriver. In addition, it provides methods to run JavaScript against the window (or page) from your test script.
Fix 4: Using Actions Class in Selenium
The exception “element is not clickable at point” might be thrown when the element is not under focus or the action is being performed on the incorrect WebElement. In such cases, you have to switch to the actual element and perform the click action.
To handle this scenario, use the Actions class in Selenium to switch to the specific element and performing the click operation as shown below:
The following test scenario is an extension to the test scenario we previously discussed while learning about the “element is not clickable at this point” exception.
Test Scenario
- Navigate to the LambdaTest eCommerce Playground website.
- Click on the Shop by Category menu.
- Navigate to the Blog menu link using the Actions class in Selenium.
- Click on the Blog menu link.
- Verify that the page header on the Blog page is displayed as LATEST ARTICLES.
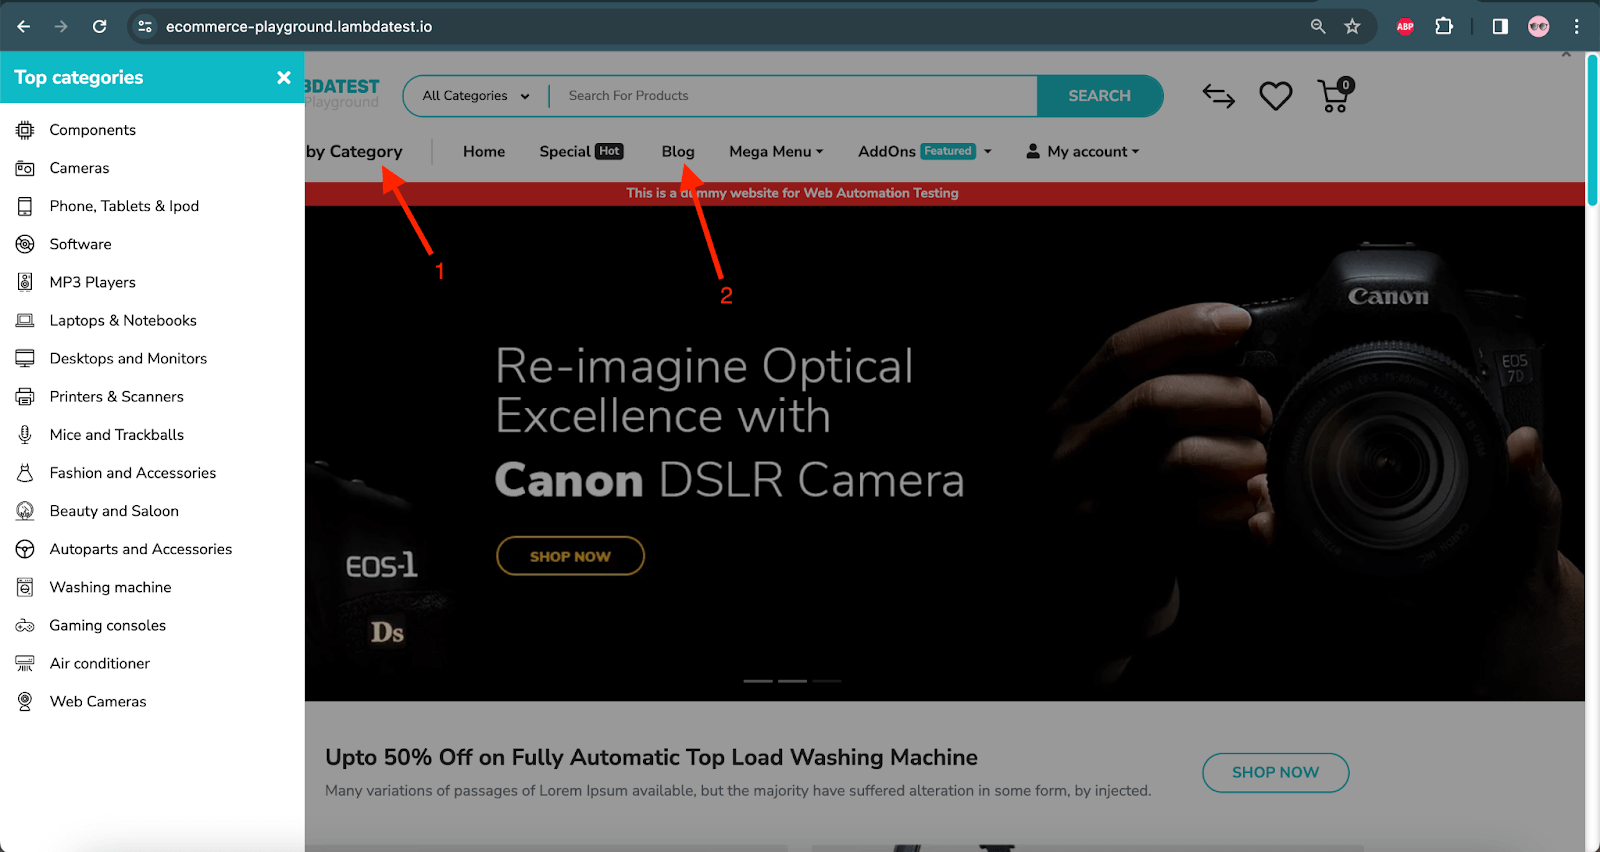
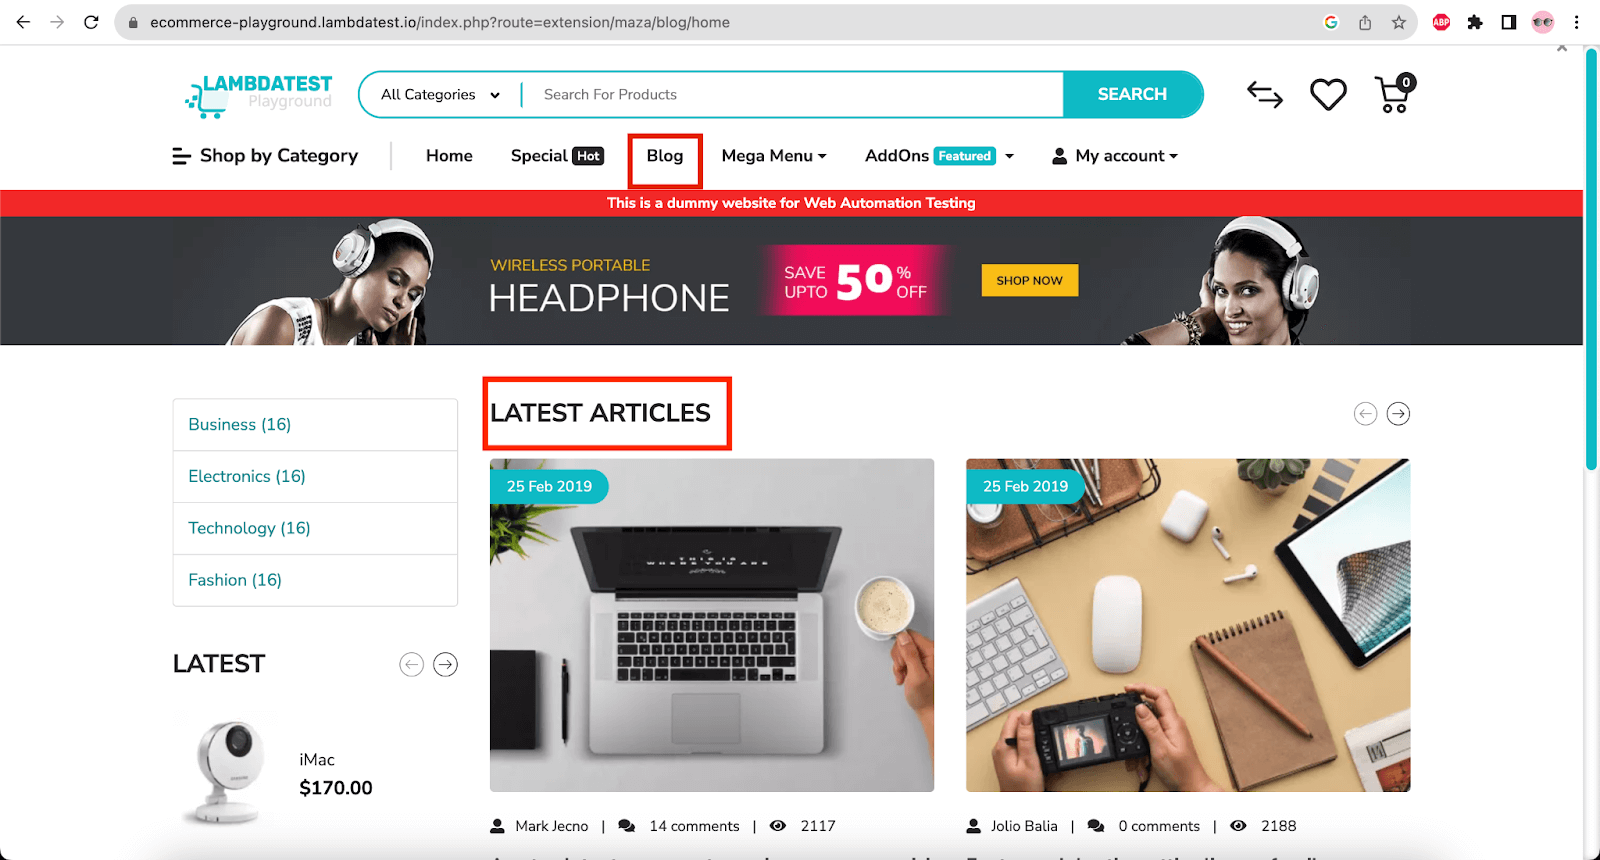
While we ran the code previously, it threw the exception; the code below is to handle the exception in Selenium.
Code Walkthrough:
The following lines of code will help you navigate the LambdaTest eCommerce website, search for the Shop by Category link, and click on it.

Next, it will locate the menu bar that has the Blog menu displayed in it. Using the Actions class in Selenium, the focus will be moved to the menu bar, and a click will be performed on it. Once the focus is on the menu bar, the Blog menu will be located and clicked.
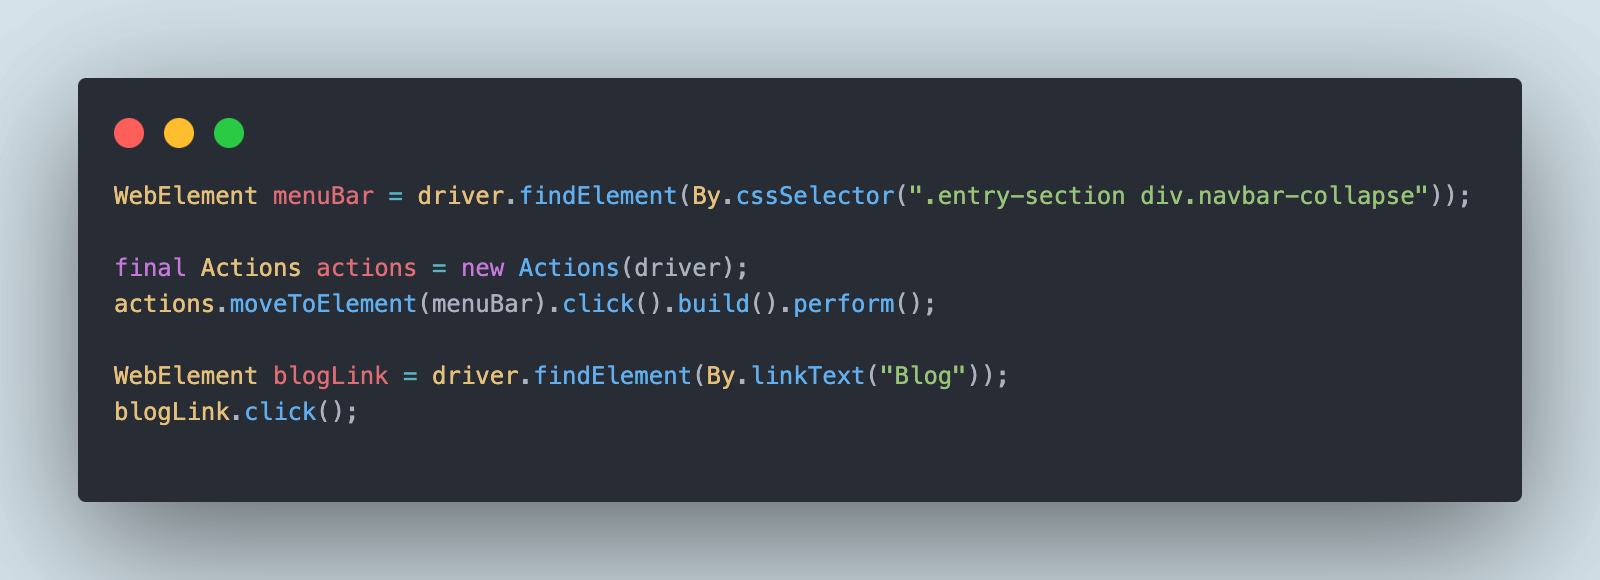
After the Blog web page is opened, the assertion will be performed to check that the title LATEST ARTICLES is displayed on the page.

Let’s execute the test on the LambdaTest cloud platform and check the results.
Test Execution:
The following is the screenshot of the tests executed using IntelliJ IDEA.
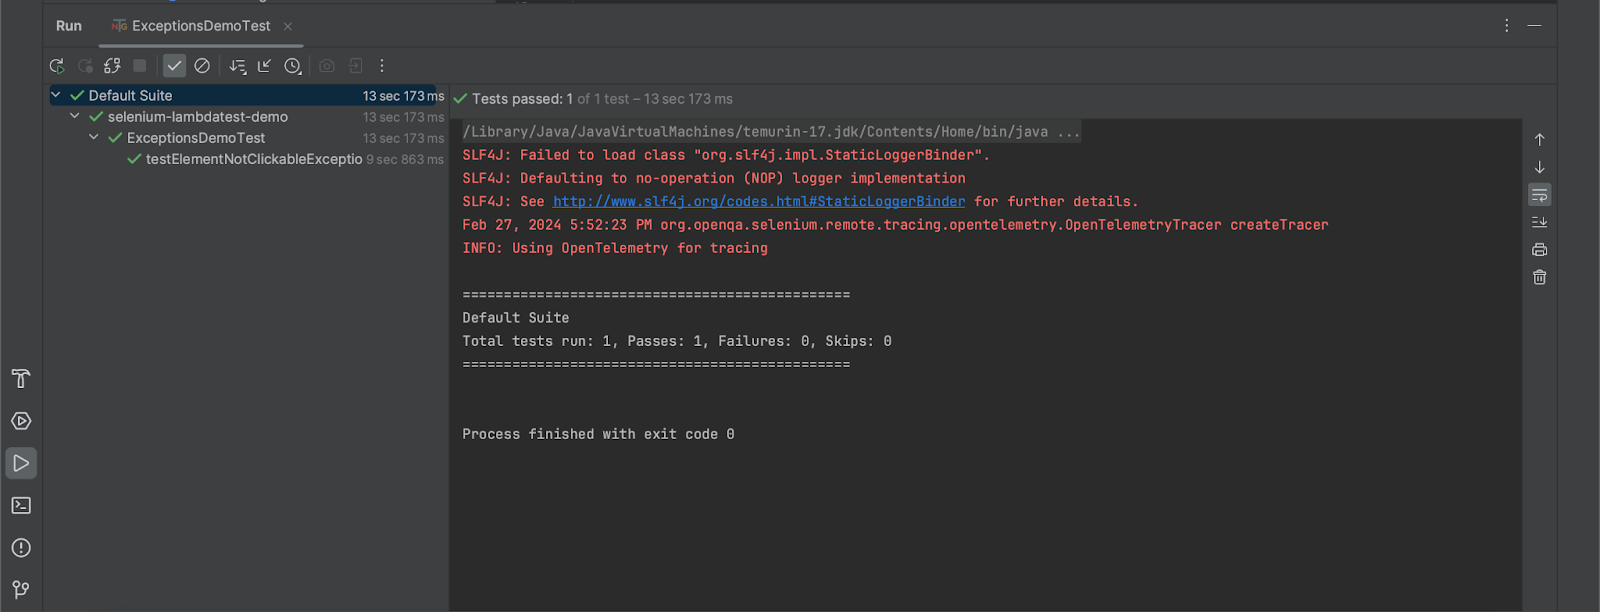
This test execution ensures that the Actions class can be used to handle the “element is not clickable at this point” exception in Selenium.
The details of the test execution can be viewed on the LambdaTest Web Automation Dashboard, which provides details like Selenium logs, test execution video, screenshots, and step-by-step test execution details.
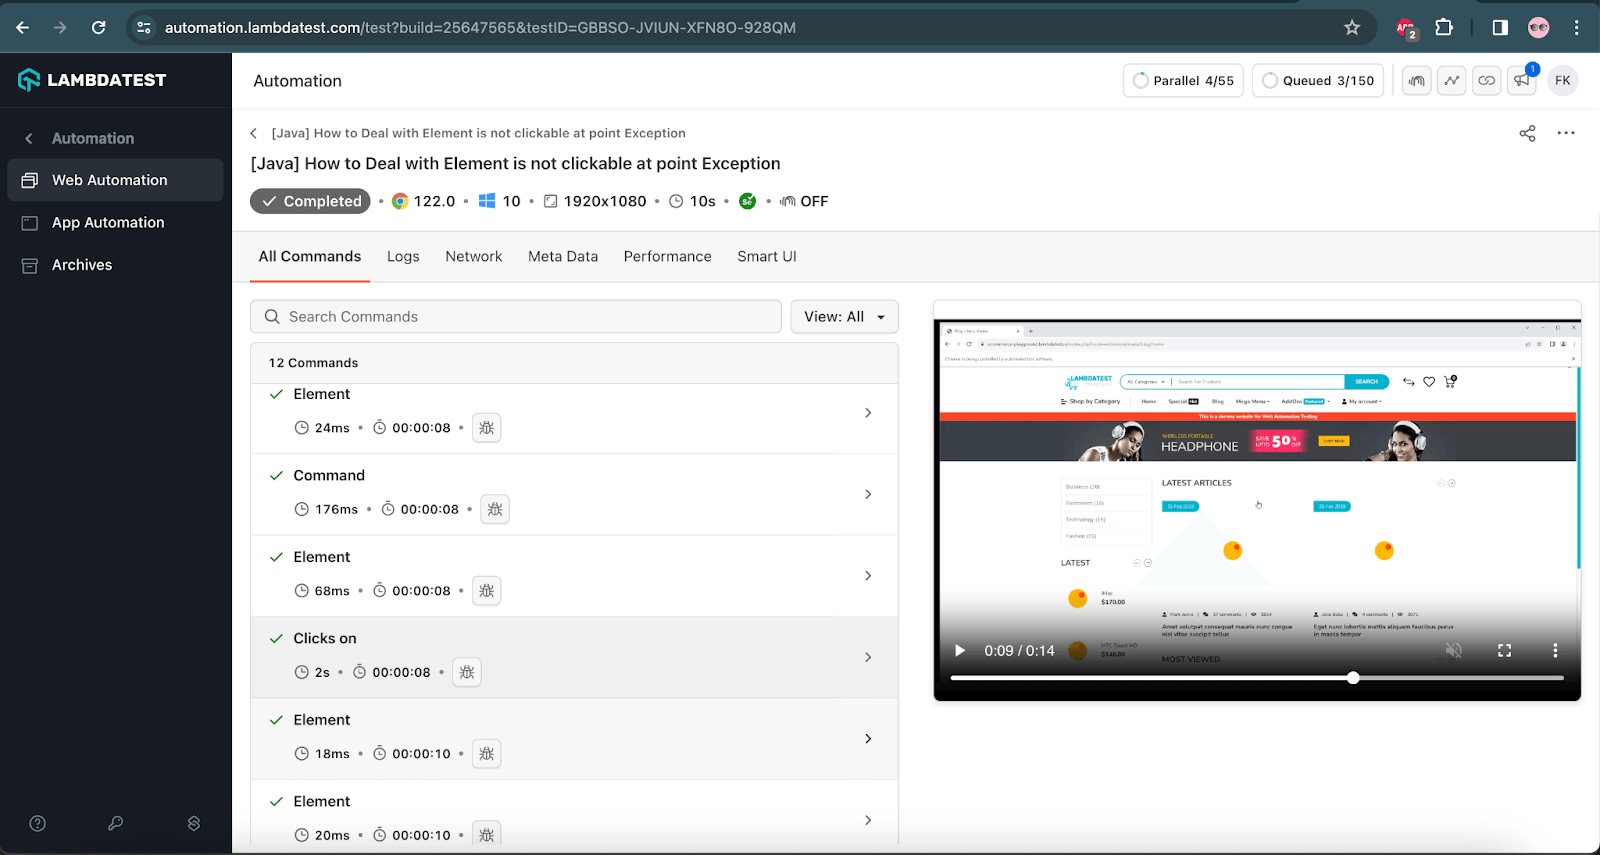
You can also log onto the LambdaTest Community to get answers to questions like the “element is not clickable at point” error and more. It’s time to leverage the expertise of the community to solve real-world problems at an expedited pace.
 Note
Note
Run your Selenium tests across 3000+ desktop browsers. Try LambdaTest Today!
Conclusion
In this blog, we have seen how handling the “element is not clickable at point” exception in tests helps you successfully execute your tests. Every one of us would have faced multiple exceptions while executing our automation test suite and might have found a resolution to fix it. Hope this article helps you in handling this exception.
Happy Testing 🙂
Frequently Asked Questions (FAQs)
How to check whether the element is clickable or not?
You can use the elementToBeClickable() method for checking whether an element is visible and enabled such that you can click it.
How to click on a non-clickable element in Selenium?
To click a non-clickable element, first make sure that the overlapping element is closed. For example, to click an item in a column chart, close the column containing it. Another solution is to switch to the layer that contains the element you want to click.
How to click a given point of an element in Selenium?
The moveByOffset() method of the Actions class in Selenium can be used to click a given point of an element in Selenium.
How to validate if an element is not clickable in Selenium?
A WebElement can be validated if it is clickable or not using the elementToBeClickable() method of ExpectedConditions class from explicit wait in Selenium.
Many times, you would need to identify the Selenium locators using their coordinates. The coordinates of the elements would differ depending on the window size. Hence, maximizing the browser window when performing Selenium testing is a good practice. You can read our detailed blog on Selenium best practices to avoid issues you may encounter when running Selenium tests.
Now that we have covered the different causes of the “element is not clickable at point” exception, it’s time to dive deep into the fixes to avoid this exception.
How to Fix the “Element is Not Clickable at Point” Exception?
There are some simple yet effective ways to resolve the“element is not clickable at point” exception. Let’s look at some of the ways to fix this exception.
Fix 1: Adding Waits to Selenium Tests
To handle elements that take some time to load on the web page, you may add waits in Selenium. The added delay helps ensure that the WebElement to be interacted with is available on the web page. Have a look at the different Selenium waits that can help you achieve this task.
You can consider adding implicit waits, explicit waits, or fluent waits, depending upon the requirement. This would add some wait time for the WebElement(s) to load before performing interactions on the same.
For example, we can add an explicit wait for a specific element so that it loads completely and is identified to be clickable.
Subscribe to the LambdaTest YouTube Channel to catch up with the latest tutorials on automated testing, Selenium testing, and more.
Fix 2: Maximizing the Browser Window
When coordinates are used to identify the elements in the tests, it is always considered good practice to maximize your browser window. This ensures that the coordinates defined in your tests match with those on the page, as the browser is in the maximized state. Here is how you can avert the “element is not clickable at point” exception by simply maximizing the web browser window:
Fix 3: Using JavaScriptExecutor to Perform Mouse Clicks
When the waits don’t help resolve the issue, you can use the JavaScriptExecutor to perform the click operation.
JavaScriptExecutor is a key interface that allows you to run JavaScript on the window or page of the browser using Selenium WebDriver. In addition, it provides methods to run JavaScript against the window (or page) from your test script.
Fix 4: Using Actions Class in Selenium
The exception “element is not clickable at point” might be thrown when the element is not under focus or the action is being performed on the incorrect WebElement. In such cases, you have to switch to the actual element and perform the click action.
To handle this scenario, use the Actions class in Selenium to switch to the specific element and performing the click operation as shown below:
The following test scenario is an extension to the test scenario we previously discussed while learning about the “element is not clickable at this point” exception.
Test Scenario
|


While we ran the code previously, it threw the exception; the code below is to handle the exception in Selenium.
Code Walkthrough:
The following lines of code will help you navigate the LambdaTest eCommerce website, search for the Shop by Category link, and click on it.

Next, it will locate the menu bar that has the Blog menu displayed in it. Using the Actions class in Selenium, the focus will be moved to the menu bar, and a click will be performed on it. Once the focus is on the menu bar, the Blog menu will be located and clicked.

After the Blog web page is opened, the assertion will be performed to check that the title LATEST ARTICLES is displayed on the page.

Let’s execute the test on the LambdaTest cloud platform and check the results.
Test Execution:
The following is the screenshot of the tests executed using IntelliJ IDEA.

This test execution ensures that the Actions class can be used to handle the “element is not clickable at this point” exception in Selenium.
The details of the test execution can be viewed on the LambdaTest Web Automation Dashboard, which provides details like Selenium logs, test execution video, screenshots, and step-by-step test execution details.

You can also log onto the LambdaTest Community to get answers to questions like the “element is not clickable at point” error and more. It’s time to leverage the expertise of the community to solve real-world problems at an expedited pace.
 Note
NoteRun your Selenium tests across 3000+ desktop browsers. Try LambdaTest Today!
Conclusion
In this blog, we have seen how handling the “element is not clickable at point” exception in tests helps you successfully execute your tests. Every one of us would have faced multiple exceptions while executing our automation test suite and might have found a resolution to fix it. Hope this article helps you in handling this exception.
Happy Testing 🙂
Frequently Asked Questions (FAQs)
How to check whether the element is clickable or not?
You can use the elementToBeClickable() method for checking whether an element is visible and enabled such that you can click it.
How to click on a non-clickable element in Selenium?
To click a non-clickable element, first make sure that the overlapping element is closed. For example, to click an item in a column chart, close the column containing it. Another solution is to switch to the layer that contains the element you want to click.
How to click a given point of an element in Selenium?
The moveByOffset() method of the Actions class in Selenium can be used to click a given point of an element in Selenium.
How to validate if an element is not clickable in Selenium?
A WebElement can be validated if it is clickable or not using the elementToBeClickable() method of ExpectedConditions class from explicit wait in Selenium.
Got Questions? Drop them on LambdaTest Community. Visit now


