How Smashtest Is Changing The Way You Write Selenium Tests?
Himanshu Sheth
Posted On: September 5, 2019
![]() 79865 Views
79865 Views
![]() 32 Min Read
32 Min Read
When it comes to automated website testing, one parameter that is extremely important is the intellect gathered from the output of your automation test execution i.e. number of bugs reported, percentage of pass/failed test cases, test coverage, etc. If there are frequent releases in your project, the throughput achieved via testing can be adversely affected if the tests are performed on a frequent basis. The down-side of less frequent testing is that the bugs might be unearthed during the later stages of development which can postpone the product release. At some point in time, the test team will integrate Automation testing as part of the testing phase so that throughput can be improved and manual resources can be used for some other tasks.
But wait. Have you heard? There is a new language in the town! This programming language is called Smashtest and is specifically designed for automation testers to help them automate their test cycles upto 10 times faster. Interesting, isn’t it?
In this article, I will help you walkthrough the entire process of running automation testing with Selenium using the Smashtest. This is going to be a rather lengthy journey but by the time we are done, you will be writing test cases in a jiffy. Below is an image of an example test from Smashtest’s official website.
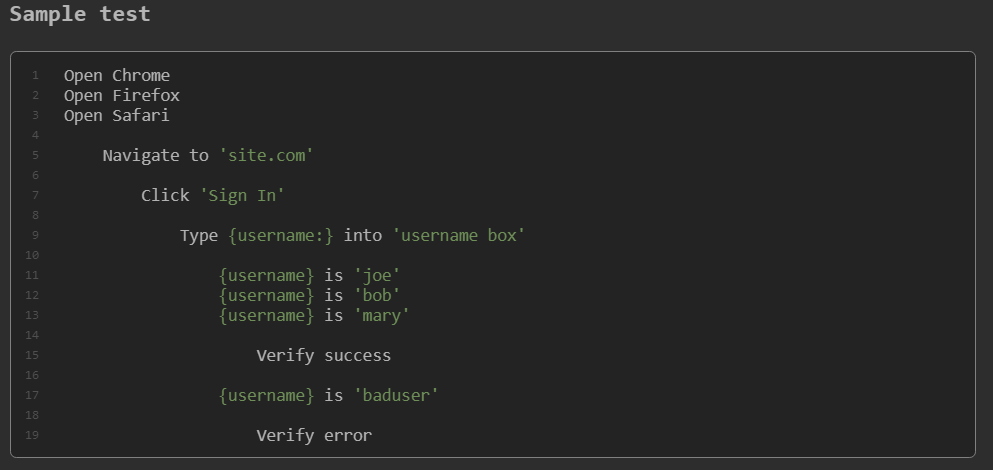
See how easy it is going to be? Now, without further ado, let us get started.
Automation Testing with Selenium
Automation testing with Selenium is very popular since many popular programming languages (Python, C#, Java, PERL, etc.) can be used with that framework. Automation tests require more advanced infrastructure than manual tests since the tests might be performed in parallel to maximize the throughput. When it comes to testing of web products, automated cross browser testing becomes important as the behavior may not be the same on different browsers, operating systems, and devices. For example, a web page may render correctly on Chrome installed on Windows but might not render properly on Chrome installed on macOS.
In the past we have covered a number of topics related to automation testing with Selenium framework, many of them focused on performance, parallel testing, detailed reporting, etc. You can check them out through our Selenium tutorials. The duration taken by the tests to execute not only depends on the efficiency of the test cases (from an implementation point of view) but also depends on the infrastructure on which the tests are being executed. A very-well written test can take more time to execute if executed on a less powerful machine.
Though you can make use of cloud based infrastructure for automated cross browser testing, wouldn’t it better if the overall performance of automation testing with Selenium can be enhanced for rapidly deploying test cases. This is where Smashtest steps in to help you test even faster.
If you’re looking to improve your Selenium interview skills, check out our curated list of Selenium interview questions and answers.
Smashtest – Develop and Deploy Test Cases Rapidly
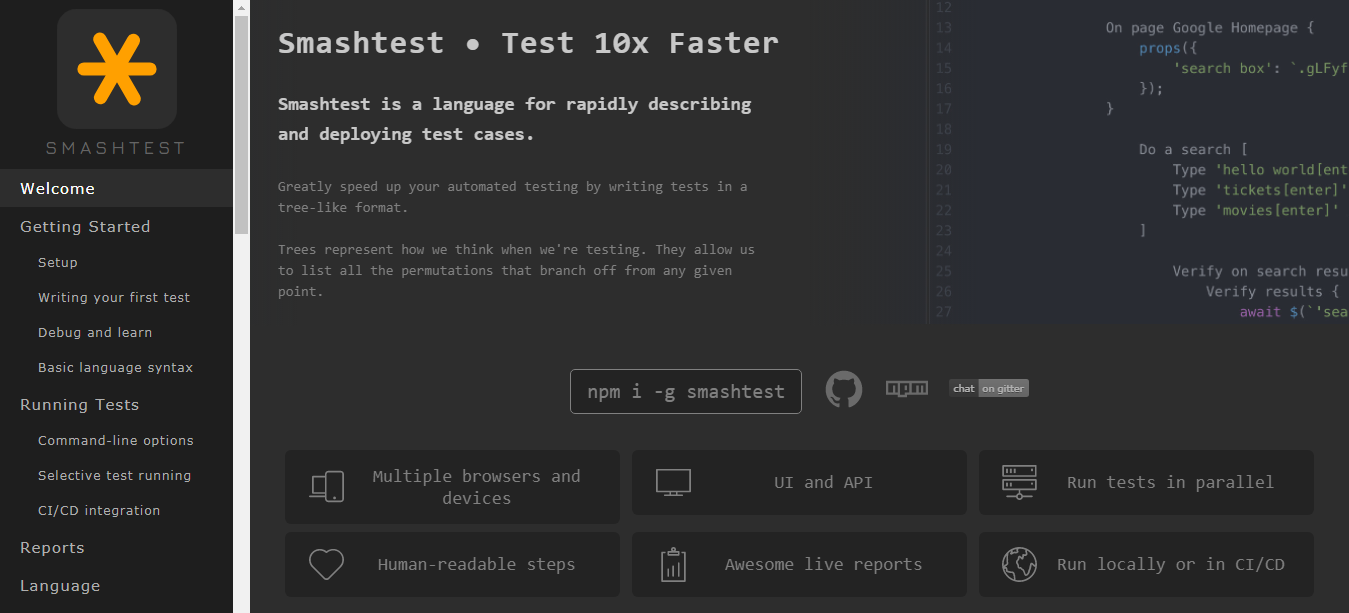
Smashtest is a programming language that allows you to speed up your automation testing cycle by writing tests in a tree-like format.
Trees loosely represent the thinking in writing a test case/test scenario. For example, the task ‘Open google.com in Chrome web browser’ is written as the following in Smashtest programming language.
|
1 2 3 |
Open Chrome Navigate to 'google.com' |
As programming instructions in Smashtest are simple English statements; it becomes easier to rapidly describe and deploy your test cases.
Here are some of the advantages of using Smashtest:
- Automation testing on multiple browsers and devices
- UI and API level testing
- Run multiple tests in parallel
- Live reports that details the execution result at each step
- Easy to understand and human-readable steps
- Tests that can be executed locally or in the CI/CD pipeline
Now, we will dig deep into Smashtest programming language and how it can be used in collaboration with Selenium for automated cross browser testing scenarios.
Setup and Prerequisites
1. NodeJS – Smashtest makes use of NodeJS. It is required to execute the npm (Node Package Manager) command through which smashtest package is installed. npm is a package manager for Node.js with thousands of packages. NodeJS can be downloaded from here.
2. Selenium WebDriver – As automated cross browser testing with Smashtest makes use of Selenium framework, it is important to have the Selenium WebDrivers in place before testing. Selenium WebDriver for popular browsers like Internet Explorer, Chrome, Firefox, Microsoft Edge, etc. can be downloaded from the locations mentioned below:
Once the WebDriver is downloaded, the same should be placed in your system’s PATH (C:\Windows\system32 on Windows and /usr/local/bin on Linux & macOS). You can also copy the corresponding WebDriver in the directory from where the test is being performed.
Read More: Selenium WebDriver Tutorial For Cross Browser Testing
3. Smashtest – As NodeJS is already installed, you can install Smashtest using the npm command. You can execute the following command from the terminal to install Smashtest.
|
1 2 3 4 |
npm install smashtest // Use sudo in case you get permission issue sudo npm install smashtest |
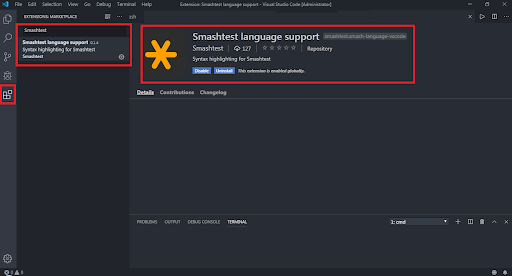
4. Install Grammar for Smashtest – As Smashtest is a different programming language, you need to install the corresponding grammar which will highlight the code and makes the coding job using Smashtest more comfortable. VSCode and Atom are the two IDEs on which Smashtest grammar is available.
5. VSCode – Visual Studio Code (VSCode) from Microsoft is the source-code editor for Windows, Linux, and macOS. VSCode can be downloaded from here. Once VSCode is installed, you should install the Smashtest language support from here. Alternately, you can also download the Smashtest language support extension by visiting the Extensions MarketPlace from the VSCode IDE.
6. Atom – Atom can be downloaded from here. Once installed, you should download & install the Smashtest package from here. To enable the configuration of smash files (.smash), make sure to follow the below steps:
- Ctrl/Cmd + Shift + P in the Atom IDE.
- Type open config and hit enter. This command will open the config.cson file.
- Now, you would need to add the following piece of code to the bottom of the file.
|
1 2 3 4 5 |
".smash.source": editor: autoIndentOnPaste: false commentStart: "//" tabLength: 4 |
For development, we will make use of the VSCode IDE installed on Windows 10. We have a look at the coding practices used when programming with Smashtest and some of the frequently used commands/instructions.
Smashtest – Language & Instruction Set
It doesn’t matter if you are using are using Smashtest for automated cross browser testing or for some other automation testing, one thing that needs to be looked at is the indentation of the source code. One additional indent can lead to the instruction/statement being executed in the next branch.
Best Practices For Writing Automation Scripts In SmashTest
Here are some of the best practices that should be followed when programming with Smashtest.
Indents – Spaces (no tabs) should be used for indentation. Four spaces to be used for each indent. In the example shown below, four instructions [Instruction 1 ~ Instruction 4] will be executed as a part of branch-1 whereas Instruction 5 will be executed as a part of branch-2
|
1 2 3 4 5 |
Instruction 1 Instruction 2 Instruction 3 Instruction 4 Instruction 5 |
Blank Lines – Blank lines should be used for code organization and grouping similar steps. Blank lines should be used with utmost care in a Step Block. A step block should not have blank lines between members whereas blank line should be used if it has children.
In the example below, Lambdatest homepage would be opened on three browsers – Chrome, Firefox, and Edge.
|
1 2 3 4 5 |
Open Chrome //step block Open Firefox Open Edge Navigate to 'lambdatest.com' |
Scope – During runtime, all the files that are passed to smashtest are concatenated in one long piece of text. Everything declared at indent 0 is accessible in all other .smash files.
|
1 2 3 4 5 |
// a.smash // ----------- * Open google Navigate to 'google.com' Click '.gNO89b' |
|
1 2 3 4 |
// b.smash // ----------- Open Chrome Open google // declared in a.smash |
In the example shown above, a function Open google is declared in a.smash and the same is accessible from b.smash.
Step Blocks
There are two types of step blocks – simple step block and multi-level step block. We have already covered an example of simple step block where navigation to lambdatest.com will be performed on Chrome and Edge browsers as shown below
|
1 2 3 4 5 |
Open Chrome //step block Open Firefox Open Edge Navigate to 'lambdatest.com' |
Multi-level step blocks can be with/without an identifier/label. The commands after a multi-level step block are repeated for each branch. As shown in the example below, we navigate to google.com and perform a search for Lambdatest & Testing in two separate operations. We also name the multi-level step for easier identification.
|
1 2 3 4 5 6 7 8 9 10 11 12 13 |
open chrome navigate to 'google.com' // Naming the search block for easier identification enter search criteria [ type 'Lambdatest[enter]' into 'input[name=q]' type 'Testing' into 'input[name=q]' click 'search' ] // This operation will be performed for both the search operations verify search results |
The operation verify search results will be performed after both the searches. The block is named as enter search criteria for easy identification.
Functions
Functions that are declared at indentation 0 can be accessed by all the steps under that parent. The function can also be used in other .smash files. Like other programming languages, function calls can be used with & without input parameters. Input parameters can be a combination of strings, variables, etc. Examples of function calls are below
|
1 2 3 4 5 6 7 |
Function call 1 Function call 2 with 'strings' and "strings" and [strings] as inputs Function call 3 with {variables} and {{variables}} as inputs Function call 4 with '{variables} inside strings' as inputs |
Functions declarations can be public, have inputs, have brackets, have branches, etc. A sample function declaration is below
Public declaration
|
1 2 3 4 5 6 |
* Public Function declaration Navigate to 'xyz.com' Click 'button' // This function call with navigate to the website and clicks button Function declaration here |
With bracket
|
1 2 3 4 5 |
* Search operation [ Navigate to 'searchengine.com' Type 'search-term' into 'search-box' Click 'search button' ] |
With input arguments
|
1 2 3 4 5 6 7 |
// Input arguments should always be {{local variables}} * Function declaration that {{takes}} in {{input-arguments}} Navigate to 'xyz.com/{{takes}}/{{input-arguments}}' Click 'search button' // Function call Function declaration that 'input string' in {input variable} |
There are many other ways in which function declaration can be done however; covering all those variants is beyond the scope of this article. While performing automation testing with Selenium, you can use these options for function declarations or the ones mentioned in the Functions section of Smashtest.io .
Variables
Like other programming languages, variables in Smashtest programming can be local, global, and persistent in nature.
Global variables – Global variables as we are already aware are mostly declared over the top of your program & can be accessed from inside & outside of function calls. Offering a global scope, these variables are made accessible for every step derived from the rest of the branch.
|
1 2 3 4 5 |
{variable} = 'some-variable' // variable scope is global F * F Type {variable} into 'text-box' // accessing the variable |
Local Variables – These variables have local scope which means that the variables are only accessible from within the functional call.
|
1 2 3 4 5 6 |
{{variable}} = 'some-string-value' // local variable declaration F Type {{variable}} into 'some-textbox' * F // Type {{variable}} into 'some-textbox' // Unlike global variables, local variables are not accessible here |
Code Blocks
You can have code blocks through which you can pass variables between different functions, raise assert, take actions when errors are encountered (normal error, Error.continue, Error.fatal), capture stack trace, etc.
Statements/Instructions between { } are considered a part of the code block. The important thing to note is that the start and end indentation of the code block should be the same.
|
1 2 3 4 5 |
* Function name { // Operations supported by js and nodejs can be added here. // Match the indentation of the closing brace with the opening brace } |
You can also have Steps for one-time execution which can supersede or precede a code block.
|
1 2 3 4 |
Name of the step { // Step implementation // Called only once } |
Errors (Normal Error)
|
1 2 3 |
Step that is failing { throw new Error("error message here"); // assert is raised and the execution ends here } |
Errors (Error.continue)
|
1 2 3 4 5 |
Step that is failing { let err = new Error("verification failed but we still continue the execution"); err.continue = true; // Step failure happends here and it will branch throw err; // The branch will continue running/executing } |
Errors (Error.fatal)
|
1 2 3 4 5 |
Failing step { let err = new Error("error has occured"); err.fatal = true; // test execution ends here throw err; } |
Comments
Comments can be added inside the code blocks and can also be added to ignore lines. The core fundamentals of comments in Smashtest programming language are the same as in other programming languages.
Standard comments
|
1 2 3 |
// comment - This line will be ignored Step // Comment to explain the purpose of the implementation |
Comments inside code blocks
|
1 2 3 |
Piece of code { /* Implementation here */ } |
Groups and Freq (#)
Group is used to execute test cases that are grouped under a label. There are built-in groups as well as user-defined groups. Groups are useful when you have to execute a certain set of test cases from the test case/test suite.
|
1 2 3 4 5 6 7 8 |
Open Chrome Open Safari Navigate to 'duckduckgo.com' #duckduckgo #search // perform search on duckduckgo Navigate to 'google.com' #google #search // perform search google |
Built-in group Safari can be executed using the following command
smashtest --groups=safari
Implementation under duckduckgo and search branches can be executed using the following command
smashtest --groups=”duckduckgo, search”
Frequency is used when you want to execute test cases as per priority. For example, when doing automated cross browser testing; you may want to execute test cases on browsers that are considered of high priority and rest can be considered either medium priority. This option can be used in automation testing with Selenium to make sure that time & resources are spent on test cases that matter the most.
|
1 2 3 4 5 6 7 8 9 |
Open Edge Navigate to 'duckduckgo.com' Priority-1 test case #high // can be used for smoke tests Priority-2 test case #med // normal test suites Priority-2.1 test case // default priority - #med Lowest priority test cases #low |
Conditional Tests
Conditional tests can be used if you plan to execute tests based on some conditions. if..else, if the browser is, and if the viewport is are some of the ways through which you can achieve conditional testing based on conditions, browser type, and device type respectively.
If Step
|
1 2 3 4 5 |
If cond_1 then cond_2 { if (cond_1) { cond_2(); } } |
If browser is
|
1 2 3 4 5 6 7 8 9 |
- Do something Do not allow Edge { if(browser.params.name == 'Edge') { // Enters here only if the browser is Edge } } - Enters here only if the browser is not Edge |
If viewport is
|
1 2 3 4 5 6 7 8 9 |
- Do something if Desktop { if(!runInstance.currBranch.groups.includes('desktop')) { runInstance.currBranch.markBranch('pass'); } } - Enters here only if the viewport is desktop |
Collapse & Hidden (+, +?)
As the symbol signifies, the content i.e. function calls, prints, etc. inside the collapse sign (+), will be disintegrated by default, during the time of report generation. The content inside the collapse sign automatically un-collapses if there is any error or the function is currently in execution.
|
1 2 3 4 5 |
* Some operation on text box + // This will be collapsed in the report Click 'text box' // Do something Collapse-2 + // This will also be collapsed in the report |
Function calls within the Hidden symbol (+?) will stay hidden in the report. Similar to the Collapse symbol, in case there is any error while executing the function within the +? symbol; the content will be made visible in the generated report.
|
1 2 3 4 |
* Function_1 +? // calls here will be hidden Do something This will also be hidden in the repotr +? |
Debug (~ and ~~)
Normal Debug modifier and Express debug modifier are the two types of debug modifiers. In normal debug modifier, the testing is paused depending on where the debug symbol (~) is used i.e. leading or trailing to a statement.
|
1 2 3 4 5 6 7 8 9 10 11 |
// Example of Debug Modifier used as Leading debug symbol Navigate to 'duckduckgo.com' ~ Click 'something' // Leading debug symbol - isolate this branch, run in REPL, and pause before this step Click 'some other thing' // Example of Debug Modifier used as Trailing debug symbol Navigate to 'duckduckgo.com' Click 'something' ~ // Trailing debug symbol - isolate this branch, run in REPL, and pause after this step Click 'some other thing' |
In express debug modifier (~~), execution does not pause when the ~~ symbol is encountered since it doesn’t run in REPL (read–eval–print loop).
|
1 2 3 |
Navigate to 'duckduckgo.com' ~~ Click 'some thing' // only run this branch, no pausing and don't run in REPL (read–eval–print loop) Click 'some other thing' |
There are many other options like Hooks (***), Sequential (..), Non-parallel (!, !!), etc. that can be used with the Smashtest programming language, however covering every option is beyond the scope of this article. You can refer to the Language section of Smashtest for more information.
Automated Cross Browser Testing With Selenium For A Seamless UI
One of the primary objectives of using automation testing with Selenium is to perform UI testing for websites/web applications. The Selenium framework is widely used for automated cross browser testing since generated browser capabilities can be used for testing on different browser combinations. Also, you get the ability to perform parallel testing with Selenium Grid.
Smashtest programming language has different js functions that can be used to perform UI testing. These functions can be used for automated cross browser testing since they are compatible with the Selenium framework. Before using Selenium Webdriver, you need to ensure that the Selenium framework is installed on your machine and Selenium Webdriver for the browser under test is present in the directory where the browser executable is located.
Below are some of the commonly used Smashtest commands that can be used for automation testing with Selenium.
Open Different Browsers
Browsers for which Selenium WebDriver are available and can be opened using Open [browser] command.
|
1 2 3 4 5 |
Open Chrome // Open Chrome browser Open Safari // Open Safari browser Open IE // Open Internet Explorer browser Open Firefox // Open Firefox browser Open Edge // Open Edge browser |
Once the tests are complete, the browser instance is destroyed automatically thereby releasing the resources used by the web browser. This is the reason there is no Close equivalent of the Open command.
Browser Capabilities and Options
Browser capabilities are indispensable if you aim to perform cross browser testing with Selenium. In some cases, browser capabilities have to be set to test your source code on a specific version of web browser installed on an operating system like Windows 10, Windows 8, etc. Using local Selenium Webdriver for Selenium Grid in your local network, automated cross browser testing can be performed on different combinations of browsers, operating systems, and devices.
The withCapabilities() method of the Capabilities object can be used to set the browser capabilities. In the example shown below, the browser under test is set to Microsoft Edge 18.0 on Windows 10.
|
1 2 3 4 5 6 7 8 9 |
Set custom capabilities { g('browser capabilities', { 'build' : "SmashTest Implementation on MicrosoftEdge", 'name' : "SmashTest Implementation on MicrosoftEdge", 'platform': "Windows 10", 'browserName' : "MicrosoftEdge", 'version' : "18.0", }); } |
Browser custom options can be used in conjunction with browser capabilities object when you are required to set username & passkey for a cloud-based cross browser testing platform like LambdaTest.
|
1 2 3 4 5 6 7 8 9 10 11 12 13 14 |
Open Chrome Set custom options { const chrome = i('selenium-webdriver/chrome'); let opts = new chrome.Options(); // Call functions on opts here // See set[browser]Options() functions // Refer https://seleniumhq.github.io/selenium/docs/api/javascript/module/selenium-webdriver/index_exports_Builder.html for more information g('browser options', opts); } // These options need to be set before or after Open Chrome command is triggered |
Why Would You Move To Cloud-Based Cross Browser Testing?
Smashtest offers a great approach to accelerated automation testing with Selenium. However, if you wish to execute browser compatibility testing then test coverage is critical. How many browsers have you verified your website on? Have you considered legacy browsers in your automation scripts for Selenium testing? Have you considered the beta and dev versions of major browser vendors? Have you tested a similar browser on both Windows & macOS?
Keeping these questions in mind as you write automation scripts for Selenium testing will leave you with numerous browser + OS combinations. Incorporating them in your in-house Selenium Grid can be troublesome, and maintenance could be pretty strenuous, not to mention, time-consuming too.
A cloud-based cross browser testing platform such as LambdaTest can help you achieve sufficient test coverage with ease. With LambdaTest, you can perform automation testing with Selenium on 3000+ real browsers for both desktop & mobile operating systems. Best part, you won’t have to worry about any setup or maintenance. Just set up your test script and run it on our platform. We will run it over virtual machines hosted on-cloud. You can also enjoy integrations to numerous third-party tools for CI/CD, project management, instant messaging for faster collaboration among your colleagues, allowing you to highlight UI discrepancies in just a single click.
Check Out All Of The LambdaTest Features
With that said, let us get back to automation testing with Selenium using Smashtest.
Responsive Testing – Setting Viewport Size
The viewport is the user’s visible area of a web page. There are different categories of devices i.e. mobile, tablet, desktop, etc. and each device category/device can have different viewport size depending on the display size being used in the device. Which is why your website will render differently on devices that are offering a different screen resolution. For instance, viewport on mobile phones is less/lower than viewport on tablets. So you need to make sure that your website UI doesn’t hamper due to a different viewport. You can do so by performing responsive testing.
Read More: Understanding The Difference Between Cross Browser Testing & Responsive Testing
Smashtest has different groups for desktop (–groups=desktop) and mobile (–groups=mobile) with each group option indicating unique viewport size.
|
1 2 3 4 5 6 7 8 9 10 11 12 13 14 15 16 17 18 19 20 21 22 23 24 25 |
// Execute these exclusively with --groups=desktop Desktop // Browser resolution - 1920 x 1080 Laptop // Browser resolution - 1024 x 768 Laptop L // Browser resolution - 1440 x 900 // Execute these exclusively with --groups=mobile Mobile // Browser resolution - 375 x 667 Mobile Portrait // Browser resolution - 375 x 667 Mobile Landscape // Browser resolution - 667 x 375 Mobile S // Browser resolution - 320 x 480 Mobile S Portrait // Browser resolution - 320 x 480 Mobile S Landscape // Browser resolution - 480 x 320 Mobile L // Browser resolution - 425 x 667 Mobile L Portrait // Browser resolution - 425 x 667 Mobile L Landscape // Browser resolution - 667 x 425 Mobile M // Browser resolution - 375 x 667 Mobile M Portrait // Browser resolution - 375 x 667 Mobile M Landscape // Browser resolution - 667 x 375 Tablet // Browser resolution - 768 x 1024 Tablet Portrait // Browser resolution - 768 x 1024 Tablet Landscape // Browser resolution - 1024 x 768 |
Setting Device Type
There are scenarios where you have to perform automation testing with Selenium on known device types e.g. Pixel 2, Nexus 5, Microsoft Lumia 950, etc. Using Smashtest programming language, you can set the viewport for a given device and perform device emulation in Chrome web browser. For example, the browser viewport size for Nexus 5 is set to 360 x 640 pixels using the device type Nexus 5
|
1 |
Nexus 5 // browser viewport size to 360 x 640 |
Some of the known device types are below
|
1 2 3 4 5 6 7 8 9 10 11 12 13 14 15 16 17 18 19 20 21 22 23 24 25 26 27 28 29 30 31 32 |
BlackBerry Z30 // browser viewport size 360 x 640 Blackberry PlayBook // browser viewport size 600 x 1024 Galaxy Note 3 // browser viewport size 360 x 640 Galaxy Note II // browser viewport size 360 x 640 Galaxy S III // browser viewport size 360 x 640 Galaxy S5 // browser viewport size 360 x 640 Kindle Fire HDX // browser viewport size 800 x 1280 LG Optimus L70 // browser viewport size 384 x 640 Laptop with HiDPI screen // browser viewport size 1440 x 900 Laptop with MDPI screen // browser viewport size 1280 x 800 Laptop with touch // browser viewport size 1280 x 950 Microsoft Lumia 550 // browser viewport size 640 x 360 Microsoft Lumia 950 // browser viewport size 360 x 640 Nexus 4 // browser viewport size 384 x 640 Nexus 5 // browser viewport size 360 x 640 Nexus 5X // browser viewport size 412 x 732 Nexus 6 // browser viewport size 412 x 732 Nexus 6P // browser viewport size 412 x 732 Nexus 7 // browser viewport size 600 x 960 Nexus 10 // browser viewport size 800 x 1280 Nokia Lumia 520 // browser viewport size 320 x 533 Nokia N9 // browser viewport size 480 x 854 Pixel 2 // browser viewport size 411 x 731 Pixel 2 XL // browser viewport size 411 x 823 iPhone 4 // browser viewport size 320 x 480 iPhone 5/SE // browser viewport size 320 x 568 iPhone 6/7/8 // browser viewport size 375 x 667 iPhone 6/7/8 Plus // browser viewport size 414 x 736 iPhone X // browser viewport size 375 x 812 iPad // browser viewport size 768 x 1024 iPad Mini // browser viewport size 768 x 1024 iPad Pro // browser viewport size 1024 x 1366 |
Below is an example which demonstrates usage of viewport size and device type. The browser on which the testing is performed is the Chrome browser.
|
1 2 3 4 5 6 7 8 9 10 11 12 |
Open Chrome Desktop - Desktop test 1 // Some test. Mobile - Mobile test 1 // Some test. Nexus 5 - Nexus 5 test |
Handling browser interactions
It is important to note that before any action is performed on the web browser, Open [browser] command has to be called. Automation testing with Selenium also involves interaction with the keyboard, mouse, etc. First clickable element that matches {{element}} takes precedence over the first non-clickable element that matches {{element}}.
Below are the Interact commands/options
Below are the commonly used Navigate commands/options
Below are some of the commonly used Set commands/options
Type ‘text[enter]’ into ‘element-finder’ |
||
(Clears the text in the textbox element-finder) |
||
Window commands are used to switch between different browser tabs, set window dimensions, open/close tabs, etc. These commands are very handy when Selenium is being used to perform automated cross browser testing. Shown below are the commonly used Window commands/options in automation testing with Selenium.
If a web-page has Alert window (Yes/No/Cancel), you can use Accept alert to click OK in the Alert window and Dismiss alert to click CANCEL in the Alert window. Delay of ‘n’ seconds in automated web browser testing can be achieved by using the Wait command. The syntax is shown below:
Wait {{n}} secs
To sleep for 5 seconds, you can use the following command
|
1 2 |
Wait '5' seconds Wait '5' secs |
The log command can be used to add debug logs in the report. The syntax of the log command is Log {{text}}. An example is shown below:
|
1 |
Log 'Print in the report' |
Cookies and Storage can also be modified using options available in Smashtest programming. You can refer to the official documentation of Smashtest on that topic for usage & further information.
Verifying Page Properties and Raising Asserts
Verify steps are used where you want to check the following
- Title of the web page contains a certain string
- A particular cookie is set to some value
- A certain element is visible on the web-page
- A certain element is not visible on the web-page
In automation testing with Selenium, these commands are very important since any operation on an element which is not loaded/visible could lead to execution delay. It can also lead to failure of test cases. Delayed execution can hamper the performance of test cases targeted towards automated cross browser testing. Verify, Wait until, and Assert can be used in Selenium testing for UI so that the execution of automated cross browser testing can be halted when there are failures.
Verify
Allows the system to wait for roughly 1 second for verifying before passing the signal as a failure. Shown below are some of commonly used verify commands:
Verify at page ‘/blog’ |
||
Wait until
Nowadays, all the websites use web elements that are loaded asynchronously using AJAX (Asynchronous JavaScript and XML). Automation testing with Selenium will result in a failure if the test is performed on a web element that is not yet loaded/not yet part of the DOM. In such situations, a delay of a few seconds can be used for the web page to complete. Wait until will allow you to declare a particular time frame for which you to halt the process to verify the result as pass or fail. By default, Wait until will halt for a minimum duration of 15 seconds, or certain time duration for the verify step to pass before failing. Some of the commonly used Wait until steps are below:
Wait until at page ‘LambdaTest’ (up to ’10’ secs) Wait until at page ‘^http(.*)page.+$’ (up to ’10’ secs) |
||
Assert
This is used to check whether variables are meeting certain conditions. Greater than, Less than, Equal to, Greater than or Equal to, and Less than or Equal to are some of the commonly used conditions. Based on the result of these conditions, subsequent operations can be performed in the implementation.
Verify {var} equals ‘value’ |
||
Verify {var} > ‘value’ |
||
Verify {var} >= ‘value’ |
||
Verify {var} < 'value' |
||
Verify {var} <= 'value' |
Emulating Network Conditions
If the Chrome browser is used for automated cross browser testing, network conditions including throttling of network speeds can be emulated. This will come handy in markets where the networks are flaky and there is major throttling in the network speeds.
Using this option, maximum upload & download speed (Up/Dl) can be set to a threshold value (in bytes/sec) and network latency can also controlled using the same. To set DL threshold -> 600000 bytes/sec, UP threshold -> 500000 bytes/sec, network latency -> 400 ms, and network condition to offline; you can use the command mentioned below
|
1 |
Set network conditions to offline='true' latency='400' max-download-speed='600000' max-upload-speed='500000' |
Element Finders
Before any type of operation (click, check, uncheck, enable, disable, etc.) is performed on a web element; the element should be visible and the web element should be capable of handling that operation. For example, before initiating a click on a button it is necessary to check whether the button (web element) is clickable. Before this step, the web element should be located on the web page using the Inspect tool in the web browser (Chrome, Firefox, etc.).
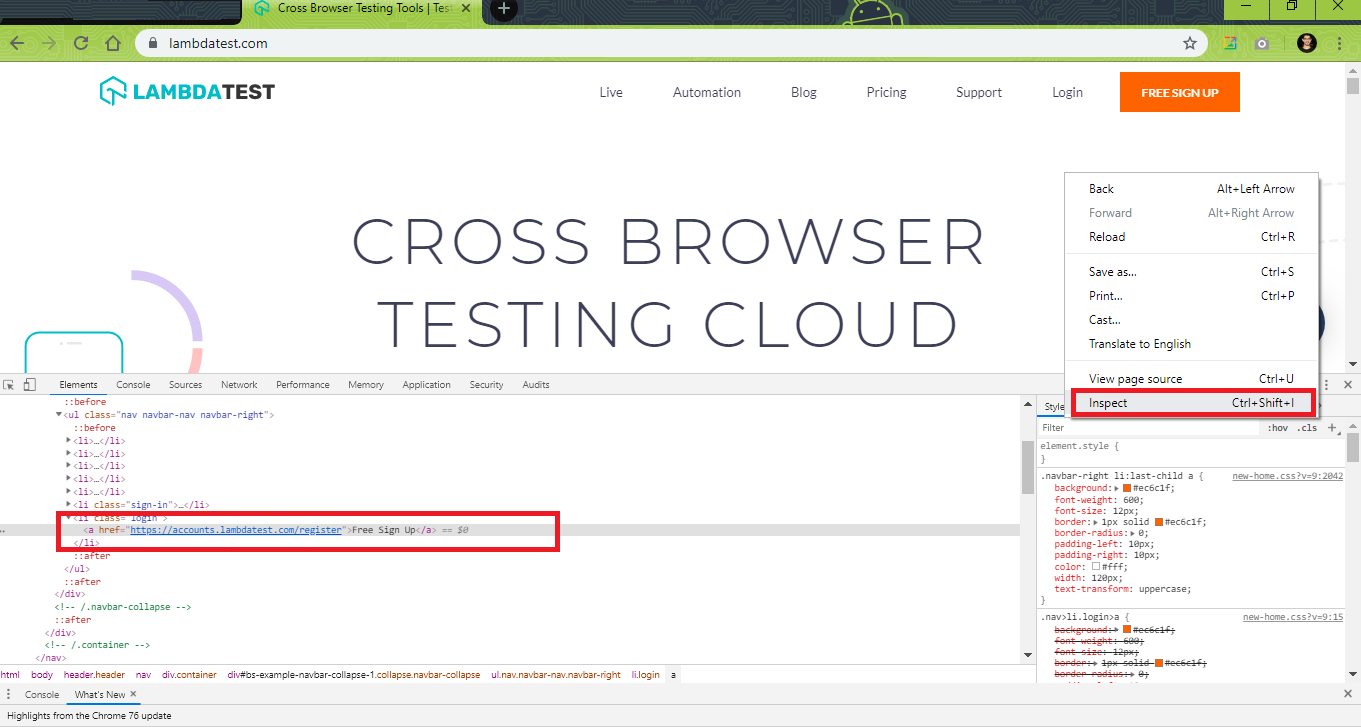
In simple words, Element Finder is a string that matches elements on a web page. Element Finders (EF) consists of a single line, or a collection of lines, where every line is represented with a comma-separated list of props.
A prop stands for the property, defines the element or its state i.e. focused, clickable, checked, unchecked, etc. Element Finders can be very handy when doing automation testing with Selenium.
|
1 2 3 |
// Element Finders are included in Steps Click 'Sign-in button' // "sign-in button" is ElementFinder Click [button, 'sign-in'] // the text inside the [brackets] is ElementFinder |
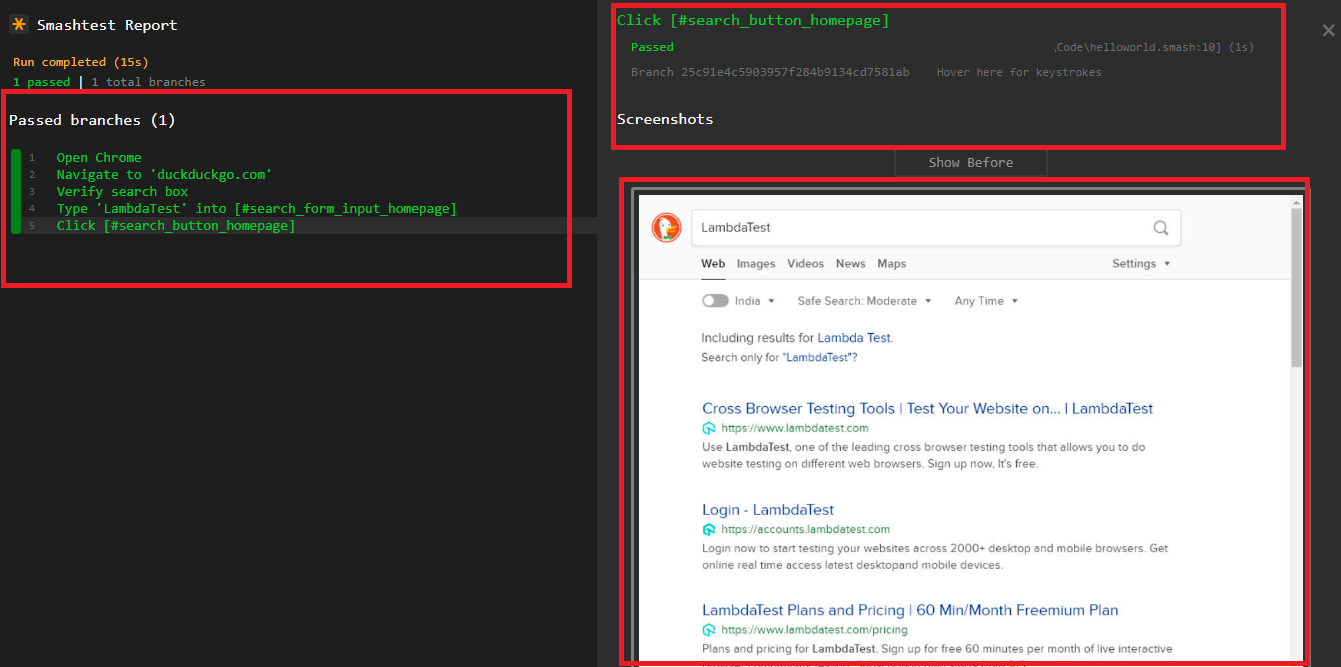
The $() function can be used to check the existence & visibility of a web element. In the example shown below, we perform a search for LambdaTest on DuckDuckGo. Before initiating the search, the existence of web element #search_form_input_homepage is done and if the element is present, search operation is executed.
|
1 2 3 4 5 6 7 8 9 10 |
Open Chrome Navigate to 'duckduckgo.com' Verify search box { // Verifies the existence of at least one visible element that matches the prop `search form` await $(`#search_form_input_homepage`); } Type 'LambdaTest' into [#search_form_input_homepage] Click [#search_button_homepage] |
To execute the code, initiate the command smashtest on the terminal

As seen in the execution snapshot, only one branch is created and that branch performs all the necessary steps
- Open web page on Chrome
- Check existence of element finder (#search_form_input_homepage)
- Enter search criteria in the search box
- Perform a click of the search button (search_button_homepage)
Unless explicitly specified, the report file (default – report.html) will be created in the smashtest folder created at the location which contains the .smash file. Report.html contains the execution snapshot for all the steps present in the branch.
For Selenium tests targeting automated cross browser testing to be more readable & refactorable, props() should be used instead of using web selectors. Props are defined with the props() function. The example shown above is changed to make use of props().
The element finder for the web element #search_form_input_homepage is now making use of the props() function. Keep in mind, an EF may throw an error regarding the full Element Finder with a detailed explanation, in cases where it fails to match the element.
|
1 2 3 4 5 6 7 8 9 10 11 12 13 14 15 16 17 |
Open Chrome On homepage { // Define props for all the elements on the homepage props({ 'search box': `#search_form_input_homepage` }); } Navigate to 'duckduckgo.com' Verify search box { // Verifies the existence of at least one visible element that matches the prop `search form` await $(`0+ x search box`); } Type 'LambdaTest' into [#search_form_input_homepage] Click [#search_button_homepage] |
Shown below are some of the widely used default props:
|
1 2 3 4 5 6 7 8 9 10 11 12 13 14 15 16 17 18 19 20 21 22 23 |
visible any visibility enabled disabled checked unchecked selected focussed element clickable page title 'title' page title contains 'title' page url 'url' page url contains 'url' next to 'text' value 'text' contains 'text' contains exact 'text' innertext 'text' selector 'selector' xpath 'xpath' style 'name:value' position 'N' |
You can also add a note in front of these props to negate the meaning of those props i.e. not visible is the opposite of visible. For more detailed information on Element Finders, you can refer to the Element Finders section on the Smashtest website.
Screenshots
Ability to generate screenshots are a boon to automation testing with Selenium. Like LambdaTest, SmashTest empowers you to generate screenshots using your automation branches.
For every step involved in the branch that includes Open [browser] step, screenshots are generated to represent the before and after the stage of the execution process. Though screenshots can come in handy when debugging failed test scenarios, they also consume a huge amount of disk space. The size will increase if the test contains number of branches. The generation of screenshots also slows down the test execution.
Although you can completely disable screenshot generation, we recommend you to avoid doing so. The option should be avoided as screenshots can help in debugging. Minimizing the number of screenshots is a much better option.
Below are some of the flags that can be used to limit the number of screenshots
|
1 |
--screenshots=[true/false] |
Screenshots are enabled by default. Setting screenshots to false will disable the generation of screenshots.
|
1 |
--max-screenshots=[N] |
Screenshots are not taken after the threshold of ‘N’ number of screenshots is reached.
|
1 |
--step-data=[all/fail/none] |
step-data -> all : Screenshots for all the branches are retained.
step-data -> none : Screenshots for all the branches are not retained.
step-data -> fail : Screenshots for only failed branches are retained.
Read More: 10 Must Try Features Of Automated Screenshot Testing On LambdaTest
API Testing (Request, Response, and Verify)
A built-in package in Smashtest handles HTTP API testing. request(),get(), post(), put(), patch(), etc. can be used with standard HTTP requests. There are APIs to verify the response even if the response is in JSON format. More detailed information about API testing can be found on the official documentation on Smashtest website.
Smashtest – Demonstration and Execution
Now that we have covered most of the aspects of Smashtest programming, let’s have a look at a couple of examples that demonstrate the usage of language for automated cross browser testing.
Example 1 – Usage of branches in Smashtest language
To get started, we take an example where search for ‘LambdaTest’ is performed on Google and DuckDuckGo. The WebDriver for Google Chrome is already present in the location where chrome executable is present. The Python code shown below has to be ported to equivalent .smash file.
|
1 2 3 4 5 6 7 8 9 10 11 12 13 14 15 16 17 18 19 20 21 22 23 24 25 26 27 28 29 30 31 32 33 34 35 36 37 38 39 |
import unittest from selenium import webdriver import time from time import sleep # Importing options for the Opera module from selenium.webdriver.support.ui import WebDriverWait from selenium.webdriver.support import expected_conditions as EC from selenium.webdriver.common.by import By class SeachTest(unittest.TestCase): def setUp(self): options = Options() # Creation of Opera WebDriver instance self.driver = webdriver.Chrome() def test_Search(self): driver = self.driver driver.maximize_window() driver.get("https://duckduckgo.com/") elem = driver.find_element_by_id("search_form_input_homepage") elem.send_keys("Lambdatest") elem.submit() sleep(5) driver.get("https://www.google.com") elem = driver.find_element_by_name('q') elem.send_keys("LambdaTest") elem.submit() sleep(5) def tearDown(self): # Close the browser. self.driver.close() if __name__ == '__main__': unittest.main() |
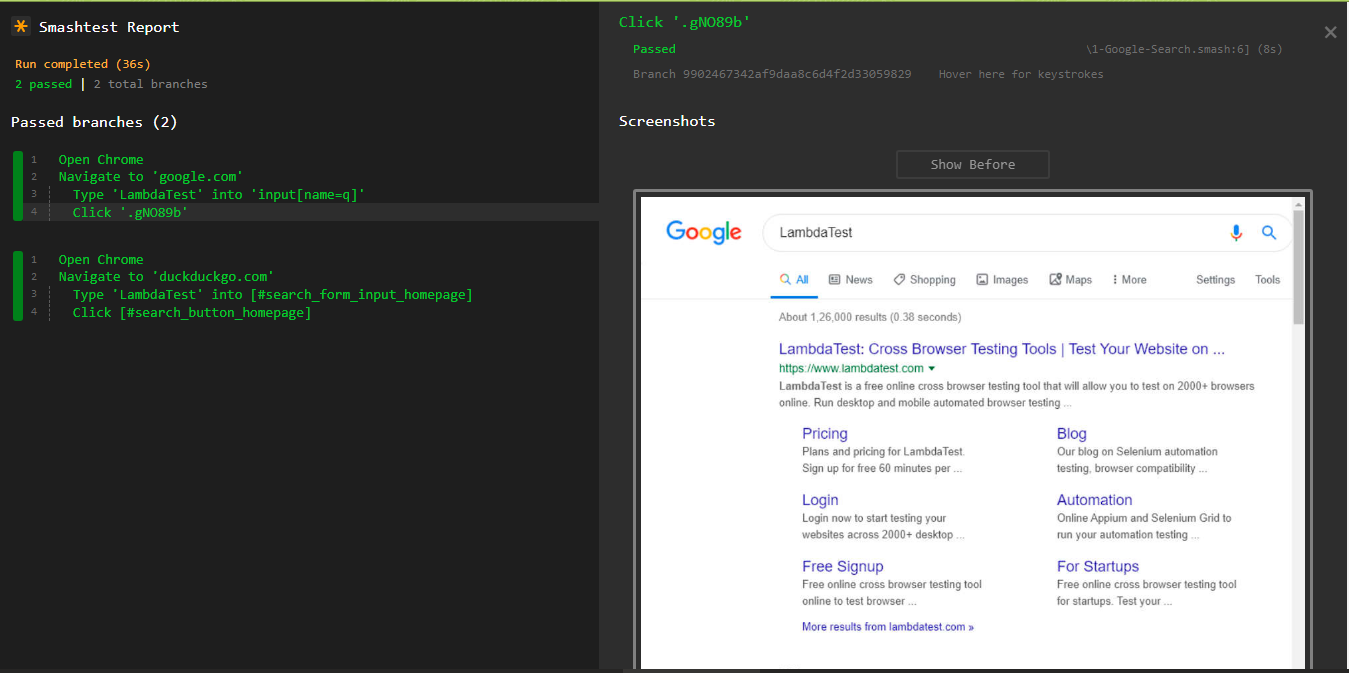
Since there are two search operations, we would require 2 branches and in each branch we navigate to the search engine (Google/DuckDuckGo), enter the search terms and complete search. To get details about web element (e.g. search button, text box on DuckDuckGo), you can use Inspect Tool available in Chrome browser.
|
1 2 3 4 5 6 7 8 9 10 11 12 13 |
Open Chrome Navigate to 'google.com' [ Type 'LambdaTest' into 'input[name=q]' Click '.gNO89b' ] Navigate to 'duckduckgo.com' [ Type 'LambdaTest' into [#search_form_input_homepage] Click [#search_button_homepage] ] |
Branch (1) is Navigate to ‘google.com’ and Branch (2) is Navigate to ‘duckduckgo.com’. Chrome Browser is invoked at Line#1 and the indentation is 0. Rest of the implementation is self-explanatory. You should invoke smashtest <file-name.smash> on the terminal to execute the same. As seen in the report.html, there are 2 branches and search is performed in each branch (1 – Google, 2 – DuckDuckGo).
Example 2 – Step Blocks in Action
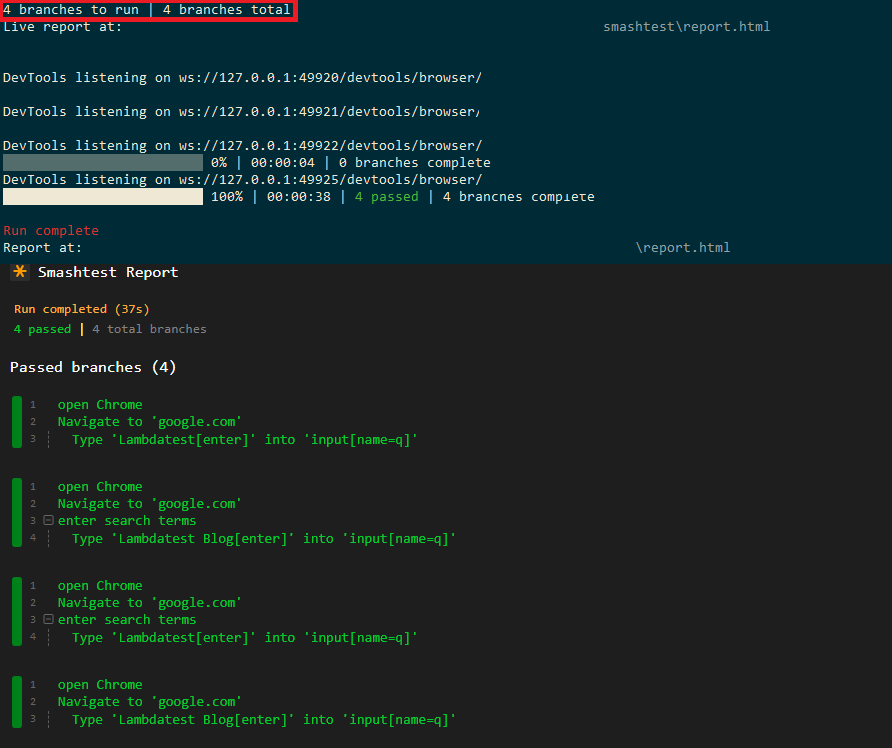
We have a look at an example that demonstrates automation testing with Selenium by using step blocks. Four search operations are performed hence there are 4 branches in the .smash implementation. As seen in the code, a step block named ‘enter search terms’ is created in Branch-3.
|
1 2 3 4 5 6 7 8 9 10 11 12 13 14 15 16 17 18 |
open Chrome Navigate to 'google.com' [ Type 'Lambdatest[enter]' into 'input[name=q]' Type 'Lambdatest Blog[enter]' into 'input[name=q]' ] open Chrome Navigate to 'google.com' enter search terms [ // same as the first example, but names the step block Type 'Lambdatest[enter]' into 'input[name=q]' Type 'Lambdatest Blog[enter]' into 'input[name=q]' ] |
As seen in the output and report snapshot, the step block was not collapsed by default.
Smashtest Usage With LambdaTest Online Selenium Grid
The main advantage of using Smashtest programming language is that the language is 10x faster and tests written in tree-like format are easy to understand. If you are using a cloud based cross browser testing platform like LambdaTest, you can use the power of Smashtest language to your advantage. With minimal changes in your existing implementation, you can port automated cross browser testing implementation to remote Selenium Grid on LambdaTest.
Before we have a look at the implementation, you need to make an account on LambdaTest. Once you have an account, make a note of your user-name and access-token from your LambdaTest profile since that combination will be used for test case development.
The search example (Google and DuckDuckGo) has to be ported to remote Selenium grid on LambdaTest. Browsers on which the automated cross browser testing is performed are Microsoft Edge and Google Chrome. To set the capabilities, you should visit LamdaTest Capabilities Generator and set the programming language Python.
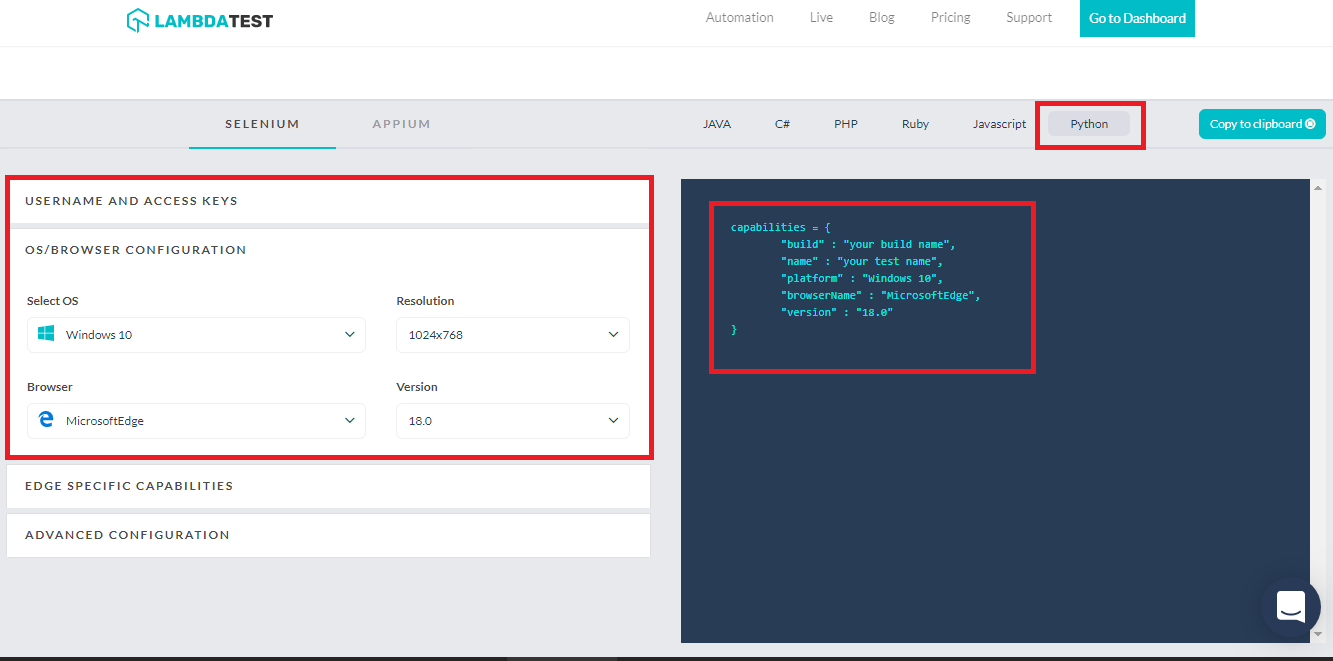
Since we have the browser capabilities, we add those capabilities in the existing implementation. There are four search operations that will be divided into four branches.
|
1 2 3 4 5 6 7 8 9 10 11 12 13 14 15 16 17 18 19 20 21 22 23 24 25 26 27 28 29 30 31 32 33 34 35 36 37 38 39 40 41 42 43 44 45 46 47 |
Set custom capabilities { g('browser capabilities', { 'build' : "SmashTest on MicrosoftEdge", 'name' : "SmashTest on MicrosoftEdge", 'platform': "Windows 10", 'browserName' : "MicrosoftEdge", 'version' : "18.0", }); } Open Edge Navigate to 'google.com' [ Type 'LambdaTest' into 'input[name=q]' Click '.gNO89b' ] Navigate to 'duckduckgo.com' [ Type 'LambdaTest' into [#search_form_input_homepage] Click [#search_button_homepage] ] Set custom capabilities { g('browser capabilities', { 'build' : "SmashTest on Chrome Browser", 'name' : "SmashTest on Chrome Browser", 'platform': "Windows 10", 'browserName' : "Chrome", 'version' : "76.0", }); } Open Chrome Navigate to 'google.com' [ Type 'LambdaTest' into 'input[name=q]' Click '.gNO89b' ] Navigate to 'duckduckgo.com' [ Type 'LambdaTest' into [#search_form_input_homepage] Click [#search_button_homepage] ] |
As you might have rightly noted, we have not used the user-name & pass-key that is used to access Selenium grid on LambdaTest. Smashtest supports CI/CD integration and if tests are running on a test server (like remote Selenium grid), you can make use of advanced command-line options like --test-server=[url]. You can also have a look at some more useful command-line options in the Running tests section on Smashtest website.
To execute the above test, you should invoke the following command on the terminal:
|
1 |
https://<user-name>:<access-token>@hub.lambdatest.com/wd/hub |
user-name and access-token can be obtained from the profile section on LambdaTest.
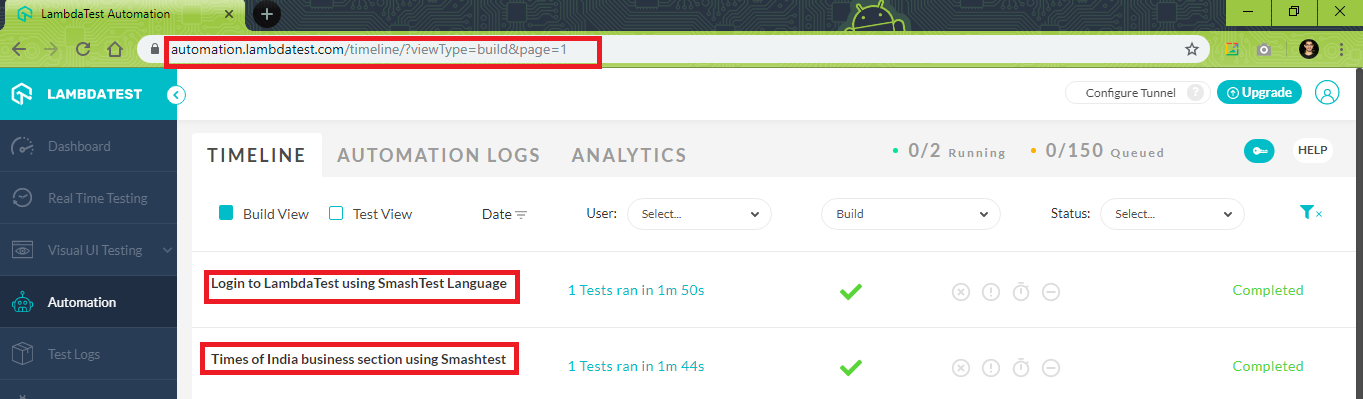
Below is the execution snapshot along with the automation results obtained from the Automation tab on Lambdatest.

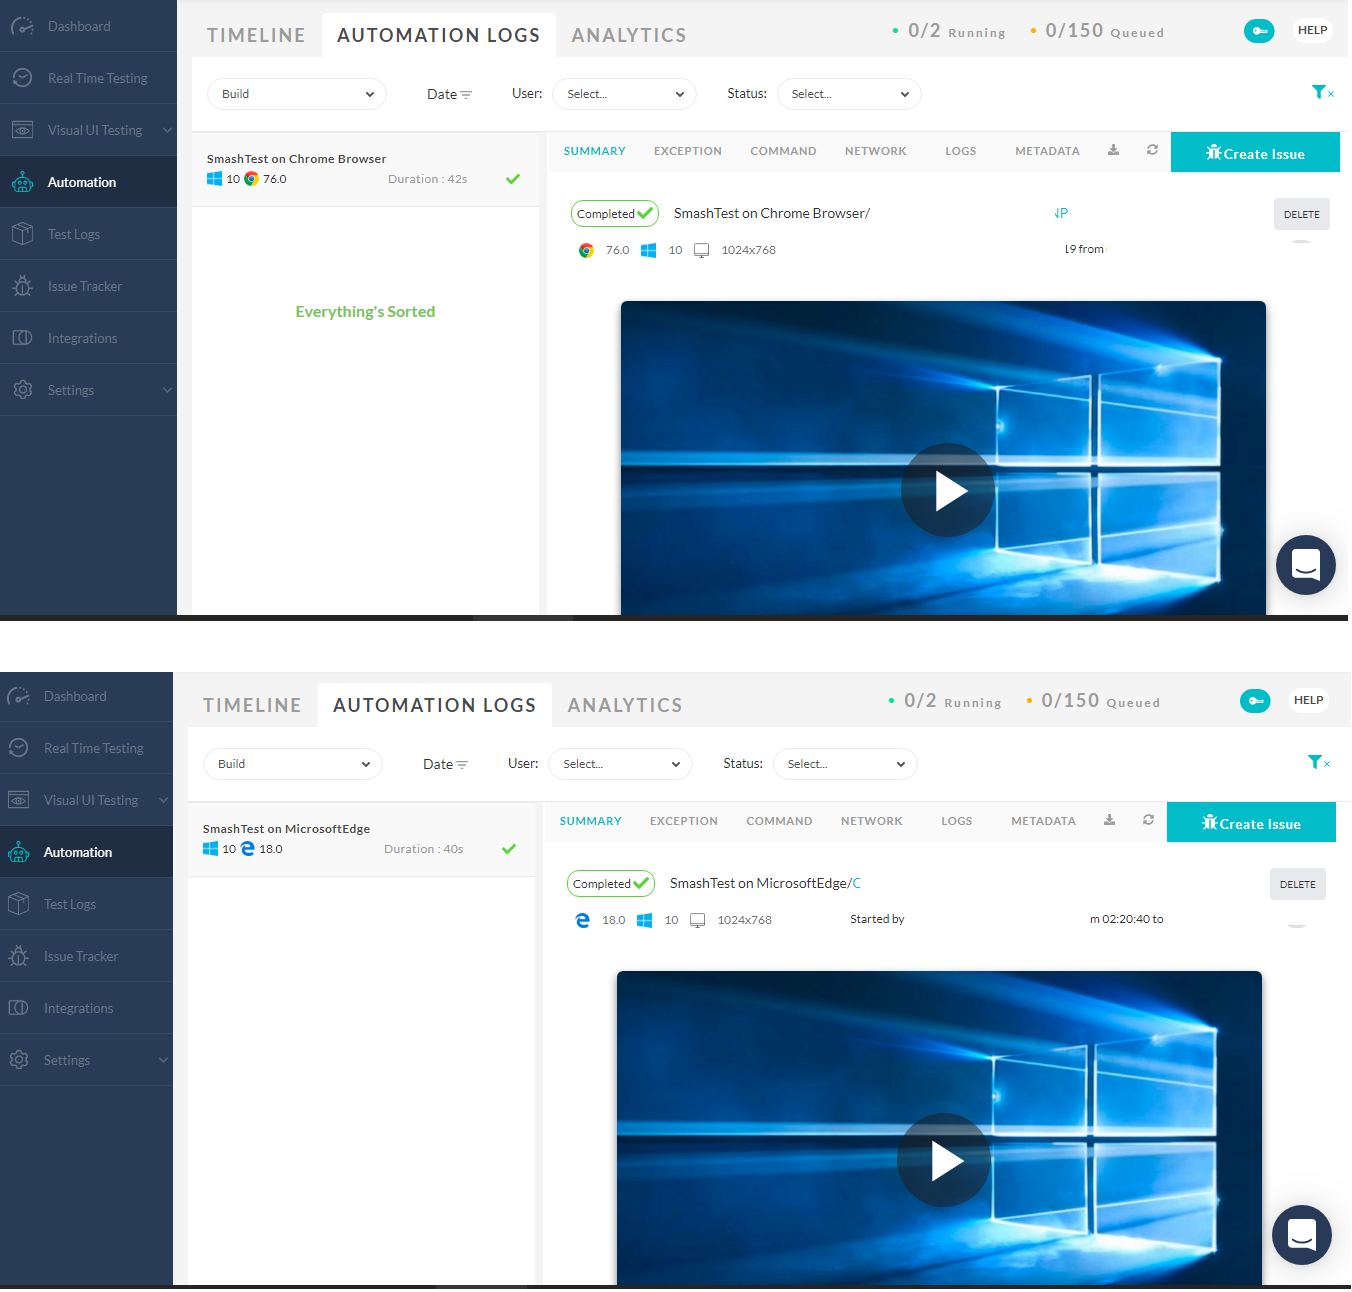
Smashtest execution on LambdaTest Selenium Grid for Cross browser testing on Google Chrome & Microsoft Edge browser
We have a look at another example where two branches are created for automated cross browser testing in Safari and Chrome. Below are the requirements
Branch – 1 (Chrome 76.0 on macOS High Sierra)
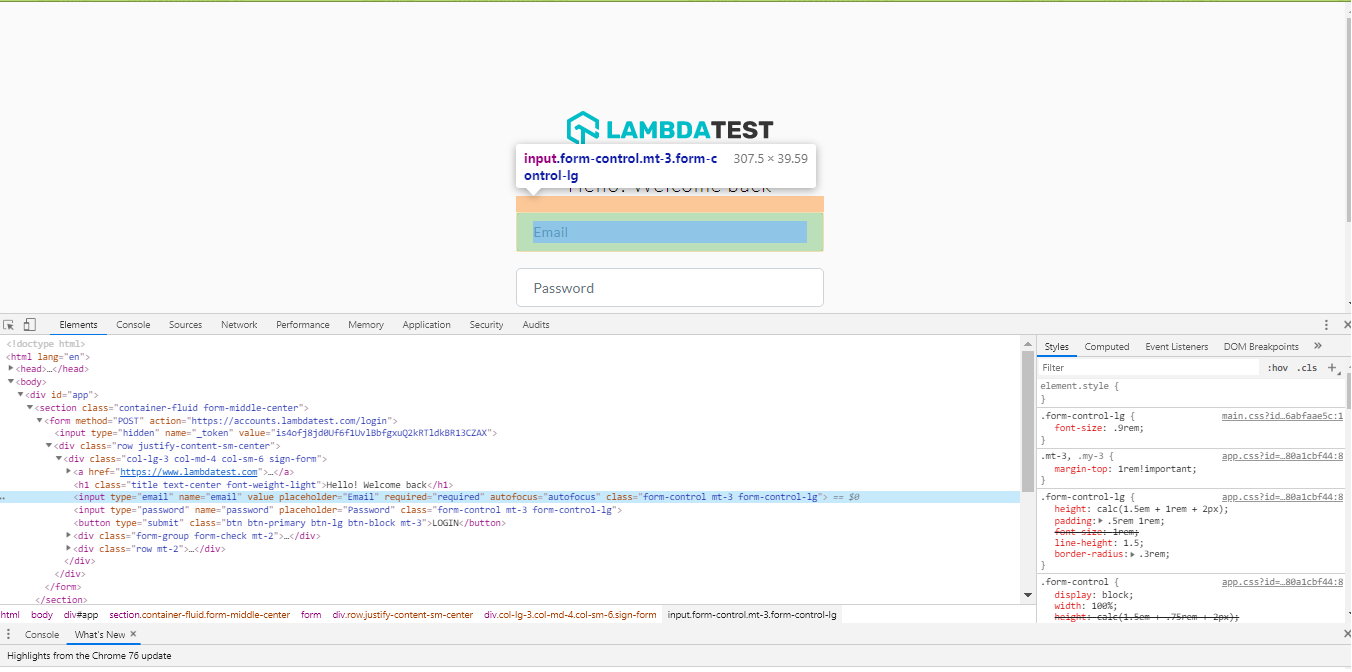
Automate login on LambdaTest website by navigating to LambdaTest login. Inspect tool is used for getting details about the email and password web elements on the web page.
Branch – 2 (Safari 11.0 on macOS High Sierra)
Automate click on Business section of the Times of India. Below is the implementation that uses automated testing with Selenium and execution is done on LambdaTest’s Selenium Grid.
|
1 2 3 4 5 6 7 8 9 10 11 12 13 14 15 16 17 18 19 20 21 22 23 24 25 26 27 28 29 30 31 32 33 34 35 36 37 38 39 40 41 42 43 44 45 46 47 48 49 50 51 52 |
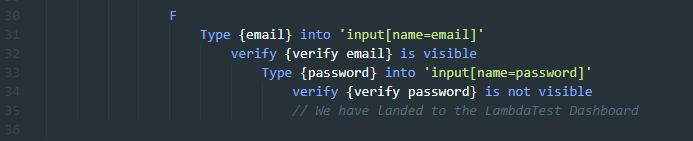
// Test case 1 - Login test on LambdaTest using Chrome on macOS High Sierra Set custom capabilities { g('browser capabilities', { 'build' : "Login to LambdaTest using SmashTest Language", 'name' : "Login to LambdaTest using SmashTest Language", 'platform': "macOS High Sierra", 'browserName' : "Chrome", 'version' : "76.0", }); } Open Chrome * F +? {email} = 'email@gmail.com[enter]' {password} = 'Password[enter]' +? {verify email} = 'selector "input[name=email]"' {verify password} = 'selector "input[name=password]"' Navigate to 'accounts.lambdatest.com/login' On homepage { // Define props for all the elements on the homepage props({ 'user name': `selector "xpath[/html/body/div[1]/section/form/div/div/input[1]]"`, 'password': `selector "xpath[/html/body/div[1]/section/form/div/div/input[2]]"`, 'login-LT': `selector "xpath[/html/body/div[1]/section/form/div/div/button]"` }); } F Type {email} into 'input[name=email]' verify {verify email} is visible Type {password} into 'input[name=password]' verify {verify password} is not visible // We have landed to the LambdaTest Dashboard // Test case 2 - Login test on LambdaTest using Safari on macOS High Sierra Set custom capabilities { g('browser capabilities', { 'build' : "Times of India business section using Smashtest", 'name' : "Times of India business section using Smashtest", 'platform': "macOS High Sierra", 'browserName' : "Safari", 'version' : "11.0", }); } Open Safari Navigate to 'timesofindia.indiatimes.com' [ Click '.nav-Business' ] |
In overall implementation, following features of Smashtest programming language are used
CODE WALKTHROUGH:
Props (line – 23)

Functions * F (line – 13)

Report generation options + ? (Line – 13)

Verify steps – To check if email is visible and password is not visible (Line – 31)
You should follow the earlier steps for executing on LambdaTest grid. Shown below is the execution snapshot which is obtained from the automation tab on LambdaTest.
Conclusion
Smashtest programming language can accelerate test execution since the tests can be rapidly deployed. Since it supports the Selenium testing framework, automated cross browser testing can be done using Smashtest & Selenium. By combining the power of Smashtest’s parallel testing with browser coverage offered by cloud-based service like LambdaTest, automation testing with Selenium can be achieved at a faster pace.
I understand that this was a lengthy tutorial but thanks for bearing with me. Hope you are able to speed up your automation testing process by adapting to Smashtest. If not, let me know what is bothering you. I would love to discuss it out. One last thing, did you know LambdaTest offers lifetime access to the product with 200 free Selenium testing minutes by signing up for free? Well, now you do. Run your Selenium script on LambdaTest’s cloud-based Selenium Grid and boost your test cycles . Happy testing! 🙂


Author’s Profile
Himanshu Sheth
Himanshu Sheth is a seasoned technologist and blogger with more than 15+ years of diverse working experience. He currently works as the 'Lead Developer Evangelist' and 'Senior Manager [Technical Content Marketing]' at LambdaTest. He is very active with the startup community in Bengaluru (and down South) and loves interacting with passionate founders on his personal blog (which he has been maintaining since last 15+ years).
Blogs: 130
Got Questions? Drop them on LambdaTest Community. Visit now