How To Download And Setup Edge Driver For Selenium
Tanay Kumar Deo
Posted On: June 28, 2023
![]() 41202 Views
41202 Views
![]() 22 Min Read
22 Min Read
When it comes to cross browser testing, the majority of the developers (or automation testers) express a feeling falsely that testing on popular and modern browsers like Google Chrome, Mozilla Firefox, and Safari should be sufficient to deliver a top-notch software or application product. However, it is very crucial to consider browsers like Microsoft Edge, Opera, Brave, etc., when building a strong Selenium strategy.
Microsoft Edge has been the trending news in the last couple of months due to its growing AI capabilities. Hence its market share has increased significantly, and it is right behind Apple’s Safari browser. Therefore, it should be on our list of browsers on which automation testing be performed.
Like all other popular browser vendors, Microsoft also provides a separate and specialized driver named “Edge Driver.” It acts as an intermediator between the Microsoft Edge browser and Selenium framework, thus helping to automate Selenium test cases on the Edge browser.
Subsequently, in this article, we will cover the details of Edge Driver, its benefits, features, and how we can run a Selenium test on Edge browser using Edge Driver with an example.
Understanding Edge Driver?
In Selenium testing, the concept of “Selenium WebDriver” plays a vital role in unlocking the full potential of automation on any browser. Microsoft offers a Selenium WebDriver for automating the Microsoft Edge browser called Edge Driver. It acts as a bridge for seamless communication between the Selenium framework and the Microsoft Edge browser.
Whether it be x86, x64 Windows, Mac, or Linux, the Edge driver comes with different versions to support all of them. Any version can be downloaded based on the browser version and the operating system we want to use.
The Edge driver is used to automate the Microsoft Edge browser for Selenium testing purposes. It simulates user interactions like button clicks, text entries, and navigation through different web pages.
When we run any Selenium test case with the Edge driver, we establish two-way communication between the Selenium framework and the Microsoft Edge browser. We utilize this communication information to see if the program’s instructions are sent correctly to the browser. It can be used to extract real-time data from static or dynamic site elements like text, links, or images.
Let’s look at its benefits and features; we’ll uncover how this driver can make a difference in our testing and development efforts. So, get ready to dive in further.
Benefits of Edge Driver
Till now, we have learned about the Edge driver in brief. In this section, we will explore how this driver can revolutionize our testing experience and empower us to achieve greater efficiency and accuracy for automation on the Microsoft Edge browser. Although the Selenium Edge driver comes with a ton of benefits, we have covered a few crucial points in the below list:
- Enhanced Automation: The Selenium Edge driver is like a trusty companion that makes automating tests on the Microsoft Edge browser a breeze. It simplifies the entire process of automation, making it super easy to ensure that web applications are working just as they should. With the Selenium Edge driver by our side, we can effortlessly navigate through web pages, interact with different elements, and double-check that everything is acting as expected on the Microsoft Edge browser.
- Seamless Compatibility: When testing a web application on a specific browser, compatibility between the desired automation tool and the specified browser is crucial. With the Selenium Edge driver, we can achieve seamless integration with different versions of Microsoft Edge, including the latest version of MS Edge, across different operating systems, ensuring tests run smoothly and consistently, regardless of the browser version.
- Edge-Specific Features: Using the Selenium Edge driver, we can access Microsoft Edge’s unique features. These features provide us leverage to take screenshots, respond to alarms or dialogs, and run custom JavaScript code. Hence, these features enable us to write robust and solid test cases.
Features of Edge Driver
All the versions starting with the first supported version of the v79 Microsoft Edge browser, have been implemented in Chromium. Hence major Edge driver versions have support for most of the functionalities of the Chrome driver. In this section, we have tried to list down the most valuable and popular features of the Selenium Edge driver in the following points:
- Seamless Browser Interaction: Microsoft developed The Edge driver to handle automation seamlessly with the Microsoft Edge browser. It seamlessly integrates with the browser and the Selenium WebDriver. It allows automation testers and developers to navigate through web pages effortlessly, interact with different elements, and simulate user actions to guarantee accurate and reliable testing.
- Full Compatibility: The Edge driver is like a weathercock, adapting to different versions of Microsoft Edge on different operating systems. With its diverse range, it ensures full compatibility across different Edge browser versions. This gives us the confidence to conduct testing without any worries, knowing our web application will work seamlessly regardless of the Edge version.
- Cross-Platform Support: The Edge driver is flexible, which extends its support to multiple operating systems like x86, x64 Windows, macOS, and Linux. With this cross-platform compatibility, we can conduct Selenium testing on various OS and environments, ensuring that our web application functions flawlessly on Microsoft Edge, regardless of the platform it is being accessed on.
- Edge-Specific Capabilities: We can unleash the power of Microsoft Edge’s unique features with the Selenium Edge driver. This driver grants us access to unique Edge-specific functionalities that will take our testing experience to new heights. We can effortlessly capture screenshots, effectively handle alerts or dialogs, and execute custom JavaScript code mainly designed for the Microsoft Edge browser.
- Browser Configuration (Options): Tailoring the testing environment to meet our needs is a cakewalk with the Edge driver. This tool provides various configurations, giving us the power to customize the browser behavior to suit our testing requirements. We can tweak settings like the browser window size, user agent, proxy configurations, and more. We can create a personalized testing environment that aligns with our web applications on Microsoft Edge.
- Command Line Switches: With the Edge driver, we have the power to customize our browsing experience using command line switches. These nifty little features allow us to pass a list of instructions when starting the browser, giving us more control over its behavior during testing. For example, we can use the “-start-maximized” switch to open the browser window in full-screen mode or the “–headless=new” switch to run the browser in a headless mode without a visible user interface.
- Network Traffic Control: Imagine having the power to control and monitor network traffic while testing our web applications with the Edge driver! Network Traffic Control allows us to simulate different network conditions like slow internet or limited bandwidth. By replicating real-world scenarios, we can ensure that our web application remains responsive and performs well, even in challenging network environments. So, whether it’s a spotty connection or a slow network, the Edge driver helps us uncover how our web app handles these situations and ensures a smooth user experience for everyone, regardless of their network conditions.
- Robust Error Handling: The Edge driver has robust error handling powers. When something goes wrong during testing, it doesn’t leave us hanging. Instead, it jumps into action, providing us with clear and informative error messages. It even gives us stack traces, like breadcrumbs, to track down the root cause of the failure.
Setup and Integration of Edge Driver with Selenium Framework
Now that we have gone through the benefits and features of the Selenium Edge driver let’s find out the methods for setting up and integrating the Edge driver with the Selenium framework. For the scope of this article, we will install the Edge driver on the x64 Windows operating system. Also, we will be using the Python programming language with Selenium for automating the Microsoft Edge browser moving onwards.
Pre-requisites
Before we jump on to the setup and integration of the Edge driver for the Microsoft Edge browser, let’s look at a few of the prerequisites for Selenium Edge Driver to run the Selenium test cases. Subsequently, we will examine all the configurations and programs required for executing the Selenium test cases on the Microsoft Edge browser:
- Edge Browser: The most apparent prerequisite is the Edge Browser. We recommend having the newest version of the Edge browser, but the current version will also work. To download the Microsoft Edge browser, follow the official download link.
- Python: Although Edge driver supports a variety of programming languages, we would be moving ahead with the Python programming language for the scope of this article. Python has sufficient community support and is easy to understand. It offers various libraries that make automation testing easier. To download Python, we can visit their official download Python page and choose the latest version according to our operating system.
- Visual Studio Code(VS Code): VS Code is a free and popular code editor that helps us start coding quickly. It has support for many programming languages, like C++, Java, Python, Javascript, Ruby, etc.,
- Selenium Framework: Selenium is a powerful tool for controlling a web browser through an executable script or code. It is available for all browsers and works on all major OS. We will use the latest Selenium framework with the Edge driver. We can install the latest version of Selenium by executing the following command:
In this article, we will use the VS Code as our code editor. We can download the latest version of VS Code by visiting the official download page for Visual Studio Code and selecting the correct system configuration.
|
1 |
pip install selenium |

If you are getting an error while executing this command, there may be a possibility that PIP manager is not installed on your system, which is a must. PIP is a package management system used to install and manage software packages written in Python. However, if you don’t have pip, you can install it using the below command in your terminal:
|
1 |
curl https://bootstrap.pypa.io/get-pip.py | python |

Setup and Integration of Selenium Edge Driver
Once we have downloaded all the prerequisites for the setup and integration of the Selenium Edge drive, we can move on to the actual installation and setup. The installation and setup of the Edge driver with the Microsoft Edge browser and Selenium involves the following steps:
- First, we need to check the current version of the Microsoft Edge browser. To do so, open the Edge browser and click on “Settings and More” (the three dots) at the top right corner or press alt + F. Then, hover over “Help and Feedback ” in the settings menu and click on About Microsoft Edge. On the About page, we can find the current browser version, as shown in the image below.
- Next, we need to download the Edge driver for its setup and integration. We can visit the official Microsoft Edge driver download page to download the Edge driver. On the page, we can select the appropriate version based on the operating system and browser to download it. Make sure to download the correct version according to the browser; otherwise, we may get a runtime error or some unexpected crash.
- Once the download is complete, a zip file gets saved. We need to extract the downloaded zip file and store it in the desired location. After extracting it, we can find the executable file – msedgedriver.exe file at the selected location as sown in the image below:
- We will jump into the setup and integration of Edge driver with the Selenium framework to automate the Microsoft Edge browser. Hence we will start by creating a Python file named “automation_script_selenium.py” and open it in Visual Studio Code.
- Finally, we will integrate the Edge driver with the Selenium framework to open a browser session. Here we will open the browser and then navigate to a web page (https://www.lambdatest.com) with an automation script.


This executable file is our required application file for the Edge driver. And in the upcoming steps, we will use this executable file in our automation script to integrate the Edge driver with the Selenium framework. Hence it is advisable to remember the file path.
|
1 2 3 4 5 6 7 8 9 10 11 12 13 14 15 16 17 |
from selenium import webdriver from selenium.webdriver.edge.service import Service # Driver Code if __name__ == '__main__': # create service object edgeService = Service( r"D:\\Lambdatest Tools\\edgedriver_win64\\msedgedriver.exe") # create webdriver object edgeDriver = webdriver.Edge(service=edgeService) # open browser and navigate to the website edgeDriver.get('https://www.lambdatest.com') |
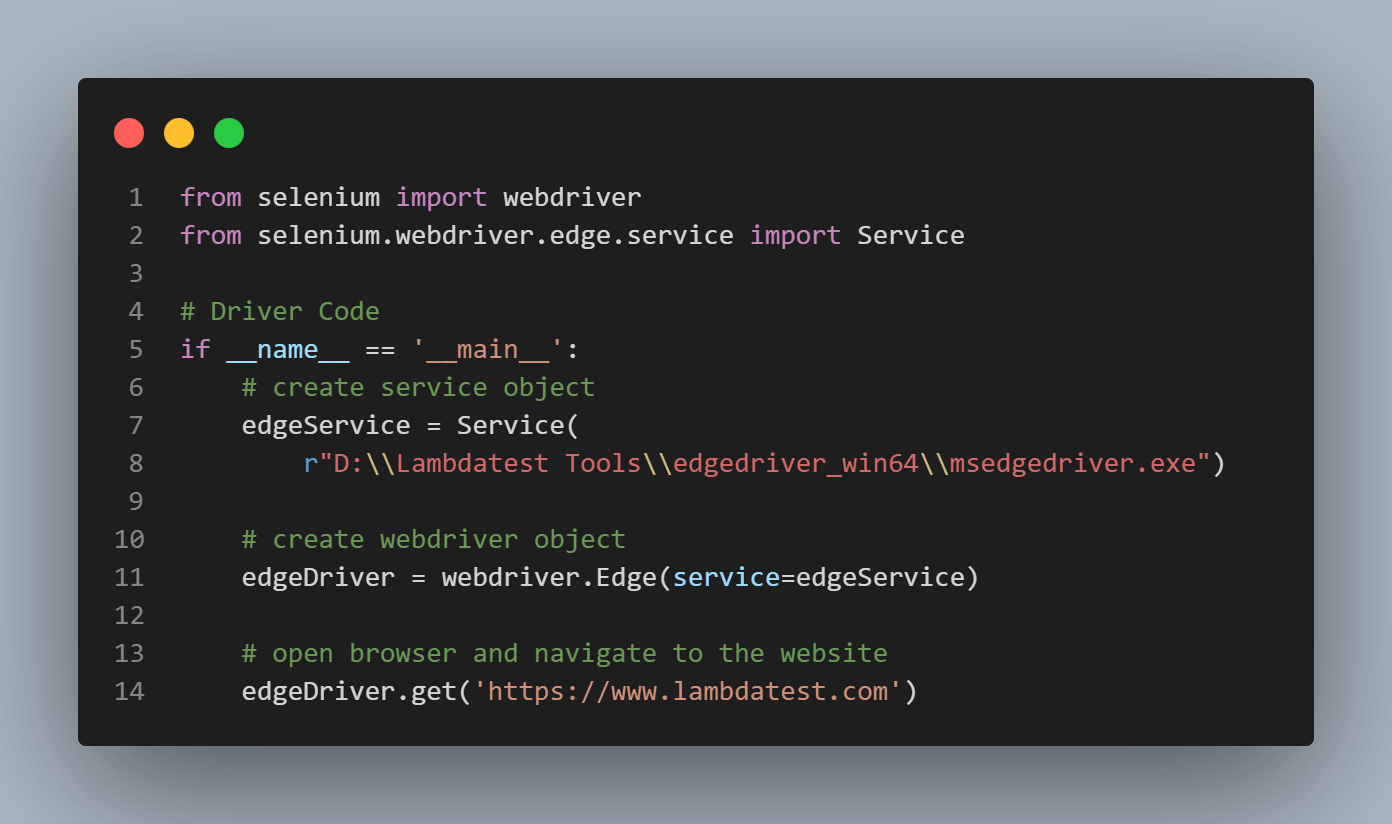
In the above code, we are instructing the Microsoft Edge browser to open the specified web page (https://www.lambdatest.com). At first, we create an “edgeService” object that represents the Microsoft Edge browser using the Service class provided by Selenium.
Next, we assign this service object to the Edge driver in the “edgeDriver” variable. This will be responsible for controlling and executing actions on the browser. Finally, we navigate to the specified web page (https://www.lambdatest.com) with the help of edgeDriver.get(‘https://www.lambdatest.com’) method.
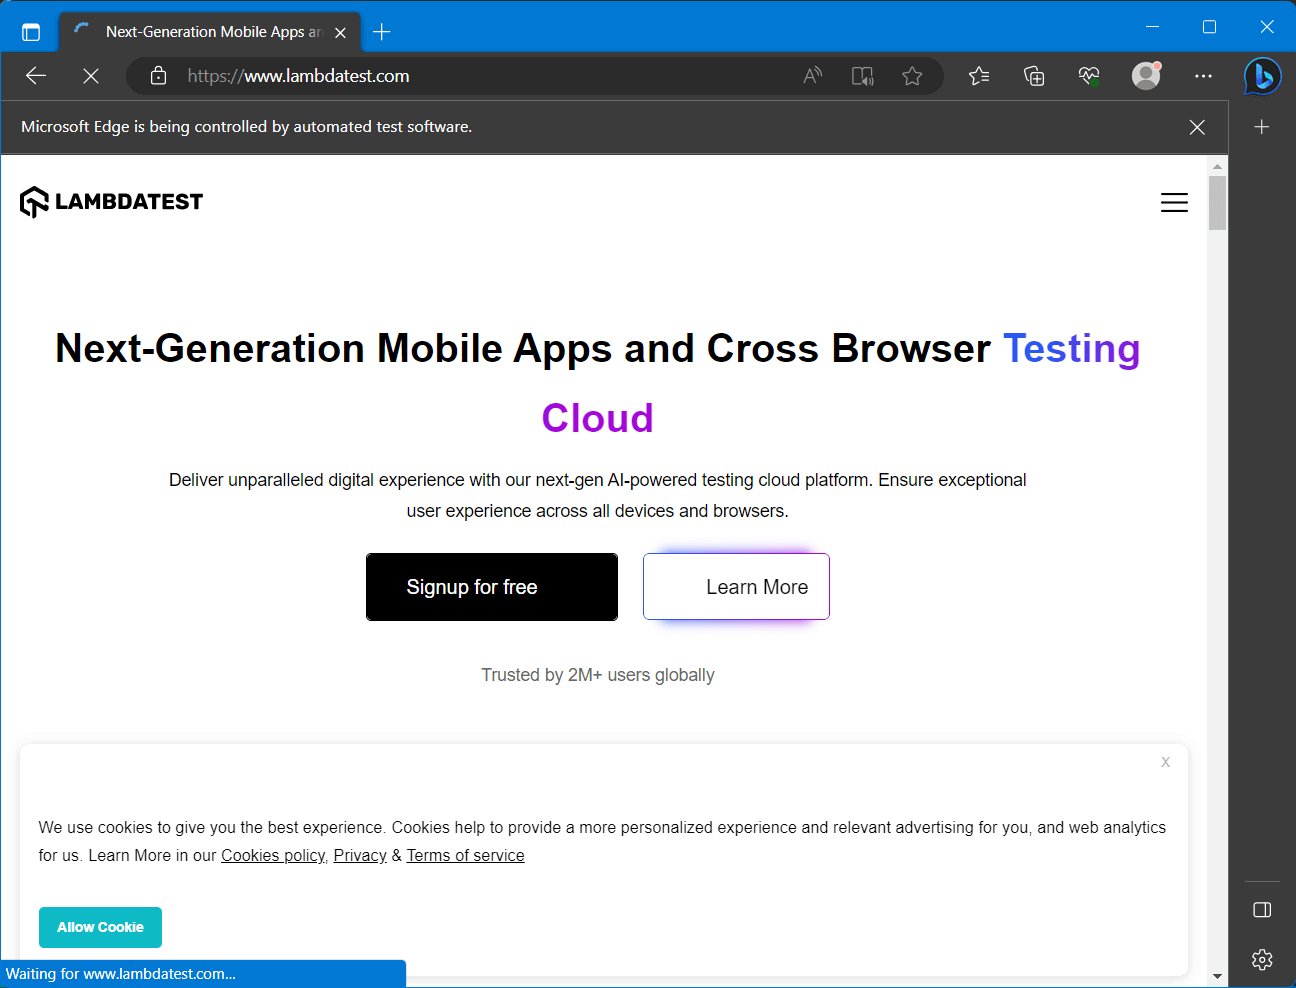
Now if we run this code, it will automate the Microsoft Edge browser and open the specified page in a new browser session, as shown in the image below.
Automating a ToDo App on Edge Browser Using Edge Driver
In the previous section, we looked at how to set up and integrate the Edge driver with the Selenium framework. We opened a specified web page by automating the Microsoft Edge browser. Now let’s look at automating some real-world scenarios like filling and submitting forms and testing the behavior of the web app.
In this article, we will automate a simple Todo App for testing the functionality of “Creating todos,” “Marking as completed,” and “deleting todos.” For simplicity and better understanding, we will split this example of automating the Todo app into three parts separately for testing each functionality. So, let’s dive into the example to master the automation testing on Microsoft Edge through the Edge driver.
Create Todos
The first and undeniable functionality to test in any todo app is its capability of creating new todo and displaying it on the todo list. In this example, we will create three todos and add them to the list one by one with a visible time gap.
The first step for writing any automation script is to figure out the proper intuition and algorithm for the particular test case. The testing algorithm that we will follow for this example will be as follows:
- Start the Microsoft Edge browser and then open the specified URL (https://tanay-deo.web.app/todo) to be tested.
- Select the input tag (“Enter a Todo”) for adding todo and then write the content for the todo to be added.
- Once the content for todo is entered in the input tag, we need to click the button “Add Todo” for adding the todo to the list.
- Verify if the desired todo is added to the list or not.
- Repeat the steps from 2 to 4, for adding multiple todos and testing.
Now we can move ahead to create the automation script based on the above algorithm to automate the Microsoft Edge browser through the Selenium Edge driver. For this automation script, we will be using the Python programing language with the Selenium framework in VS Code as discussed earlier. So, let’s create a file named “add_todos.py” and write the automation script as shown below:
|
1 2 3 4 5 6 7 8 9 10 11 12 13 14 15 16 17 18 19 20 21 22 23 24 25 26 27 28 29 30 31 32 33 34 35 36 37 38 39 40 41 42 43 44 45 46 47 48 49 50 51 52 53 54 55 56 57 |
from selenium import webdriver from selenium.webdriver.edge.service import Service from selenium.webdriver.common.by import By import time def add_todos(edgeDriver): # Add todos one by one todos = ["Buy groceries", "Finish homework", "Go for a run"] for todo in todos: # Find the input field input_field = edgeDriver.find_element( By.CSS_SELECTOR, ".add-todo input[type='text']") # Enter the todo text input_field.send_keys(todo) # Introduce a delay for a realistic effect time.sleep(1) # Find the "Add Todo" button and click it add_button = edgeDriver.find_element( By.CSS_SELECTOR, ".add-todo button") add_button.click() # Introduce a delay for a realistic effect time.sleep(1) # Create the Edge Driver service edgeService = Service( r"D:\\Lambdatest Tools\\edgedriver_win64\\msedgedriver.exe") # Create the Edge WebDriver edgeDriver = webdriver.Edge(service=edgeService) # Open the Todo app url = "https://tanay-deo.web.app/todo" edgeDriver.get(url) # Call the add_todos method add_todos(edgeDriver) # Close the browser edgeDriver.quit() |
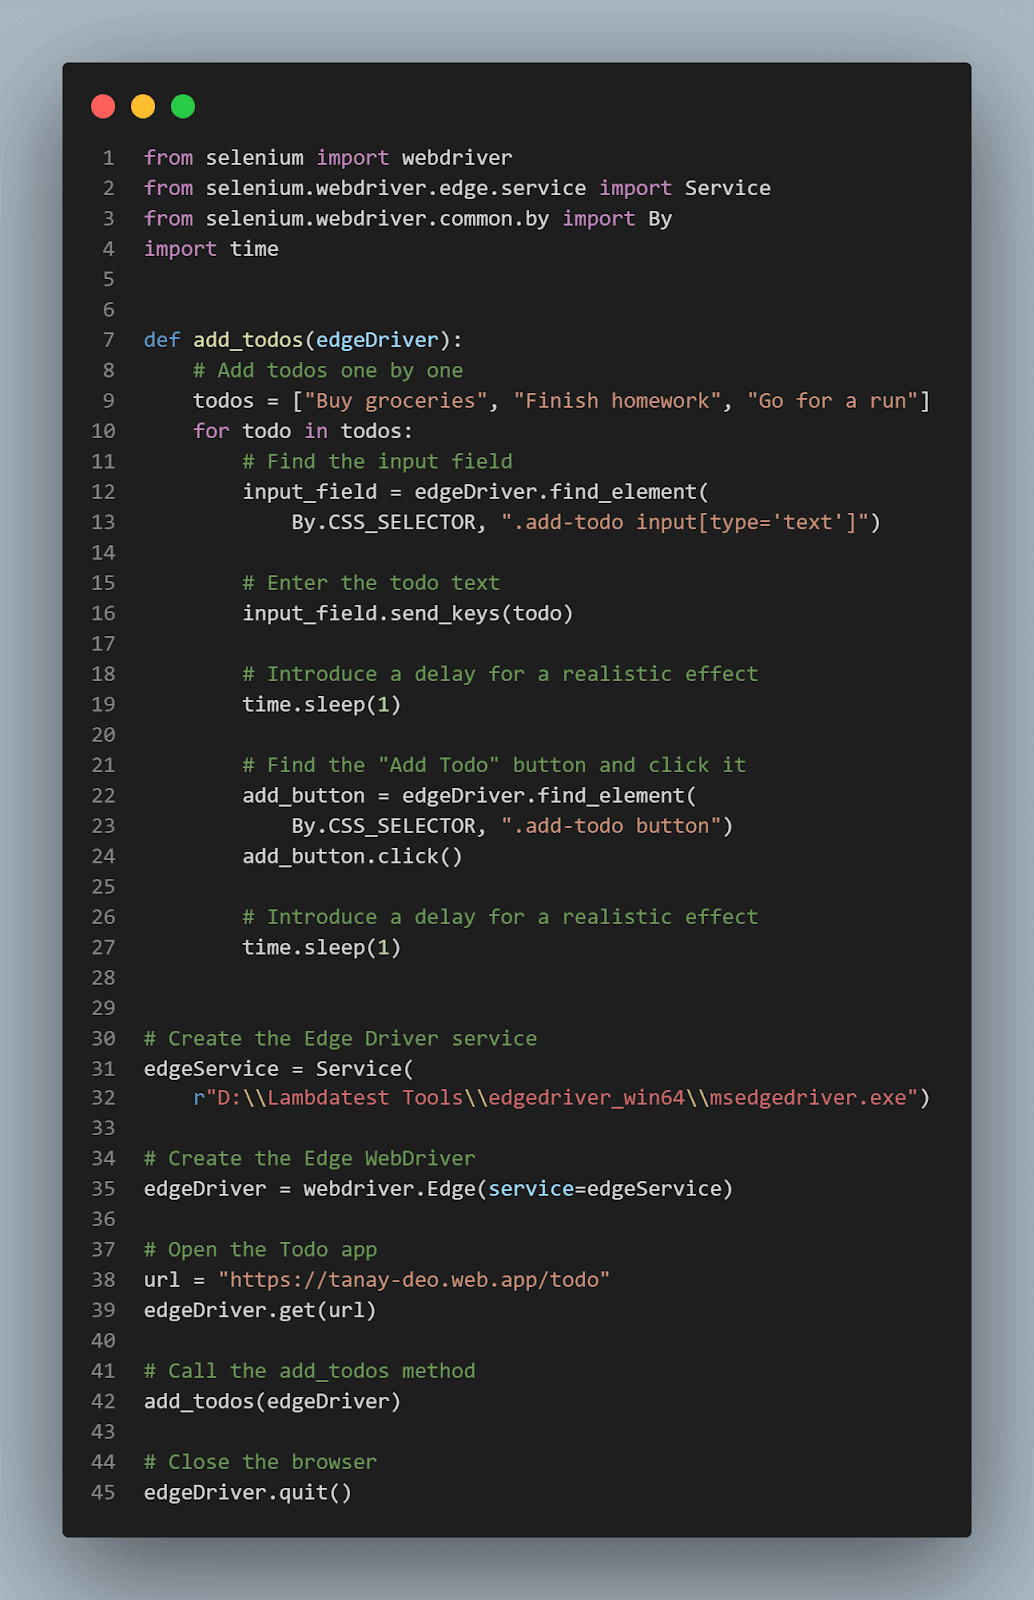
In the automation script above, we first create an instance of the Edge Driver service as “edgeService,” providing the path to the Microsoft Edge WebDriver executable file. And then, we create an instance of the Edge WebDriver as “edgeDriver,” passing the edgeService object as an argument as we did earlier in the previous sections.
Here the add_todos(edgeDriver) method is mainly responsible for creating multiple todos and adding them to the todo list as described in our algorithm. It selects the input_field and add_button with the help of the find_element and CSS_SELECTOR attributes of the Selenium Edge driver.
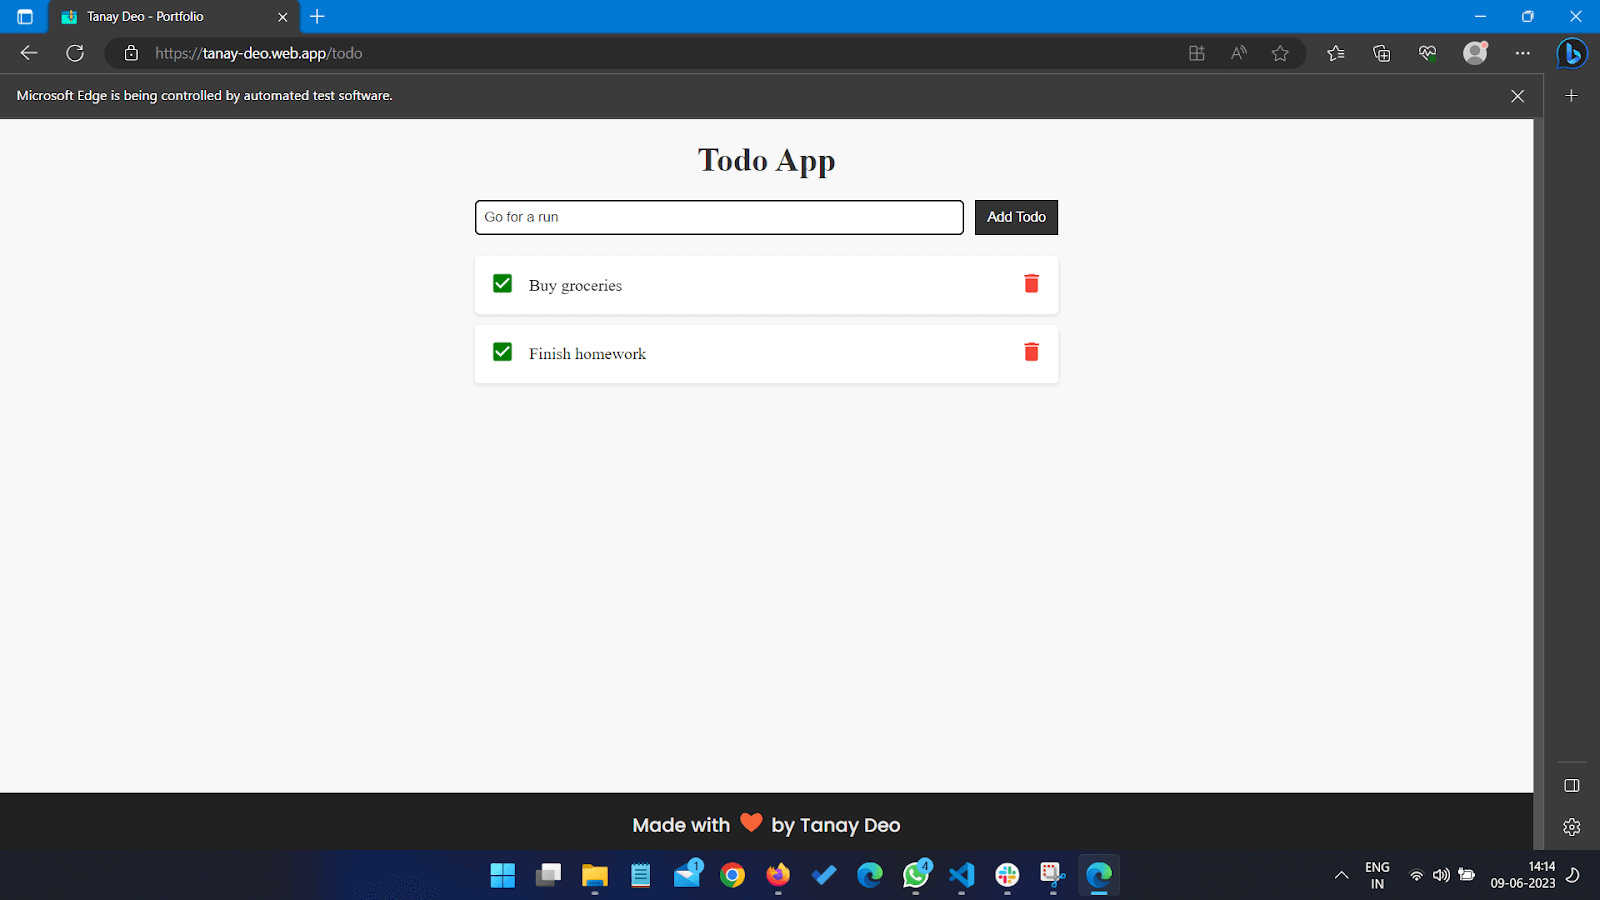
Based upon the selection, it first enters the todo content in the input_field and then performs a click operation on add_button to add the todo to the list. We can also verify if our site is working properly with the visible changes on the todo list, as shown in the image below.
Mark First Todo as Completed
In this example, we will move one step ahead and test the functionality for “marking a todo as completed.” To do so, we will mark the first todo in the todo list from the previous example.
The intuition to mark the first todo element as complete will be very simple. It includes identifying the correct list item and then marking it as completed. The testing algorithm that we will follow for this example will be as follows:
- The obvious prerequisite for this test case is that the todo list must have one or more items in it. So, make sure that the todo list has an element in it. If not then we must add a few todos by following the above example.
- Find all the elements present in the todo list with the help of CSS_SELECTORS and their class names.
- Select the desired todo item by accessing the first child of the todo list.
- Find the “Mark as Complete” button for the selected list item and toggle that to mark it as completed.
- Verify if the first todo element is marked as completed or not.
Let’s move ahead to create the automation script for automating the task of “Marking a todo as completed” on the Microsoft Edge browser through the Edge driver. We can create a file named “mark_completed_todo.py” and jump into the code as shown below:
|
1 2 3 4 5 6 7 8 9 10 11 12 13 14 15 16 17 18 19 20 21 22 23 24 25 26 27 28 29 30 31 32 33 34 35 36 37 38 39 40 41 42 43 44 45 46 47 48 49 50 |
from selenium import webdriver from selenium.webdriver.edge.service import Service from selenium.webdriver.common.by import By from add_todos import add_todos import time def mark_first_todo_completed(edgeDriver): # Locate the first todo in the list first_todo = edgeDriver.find_element( By.CSS_SELECTOR, ".todo-list li:first-child") # Click the checkbox button to mark it as completed checkbox_button = first_todo.find_element( By.CSS_SELECTOR, ".checkbox-button") checkbox_button.click() # Add time delay for ralistic effect time.sleep(2) # Create the Edge Driver service edgeService = Service( r"D:\\Lambdatest Tools\\edgedriver_win64\\msedgedriver.exe") # Create the Edge WebDriver edgeDriver = webdriver.Edge(service=edgeService) # Open the Todo app edgeDriver.get("https://tanay-deo.web.app/todo") # Add todos add_todos(edgeDriver) # Mark first todo as completed mark_first_todo_completed(edgeDriver) # Close the browser edgeDriver.quit() |
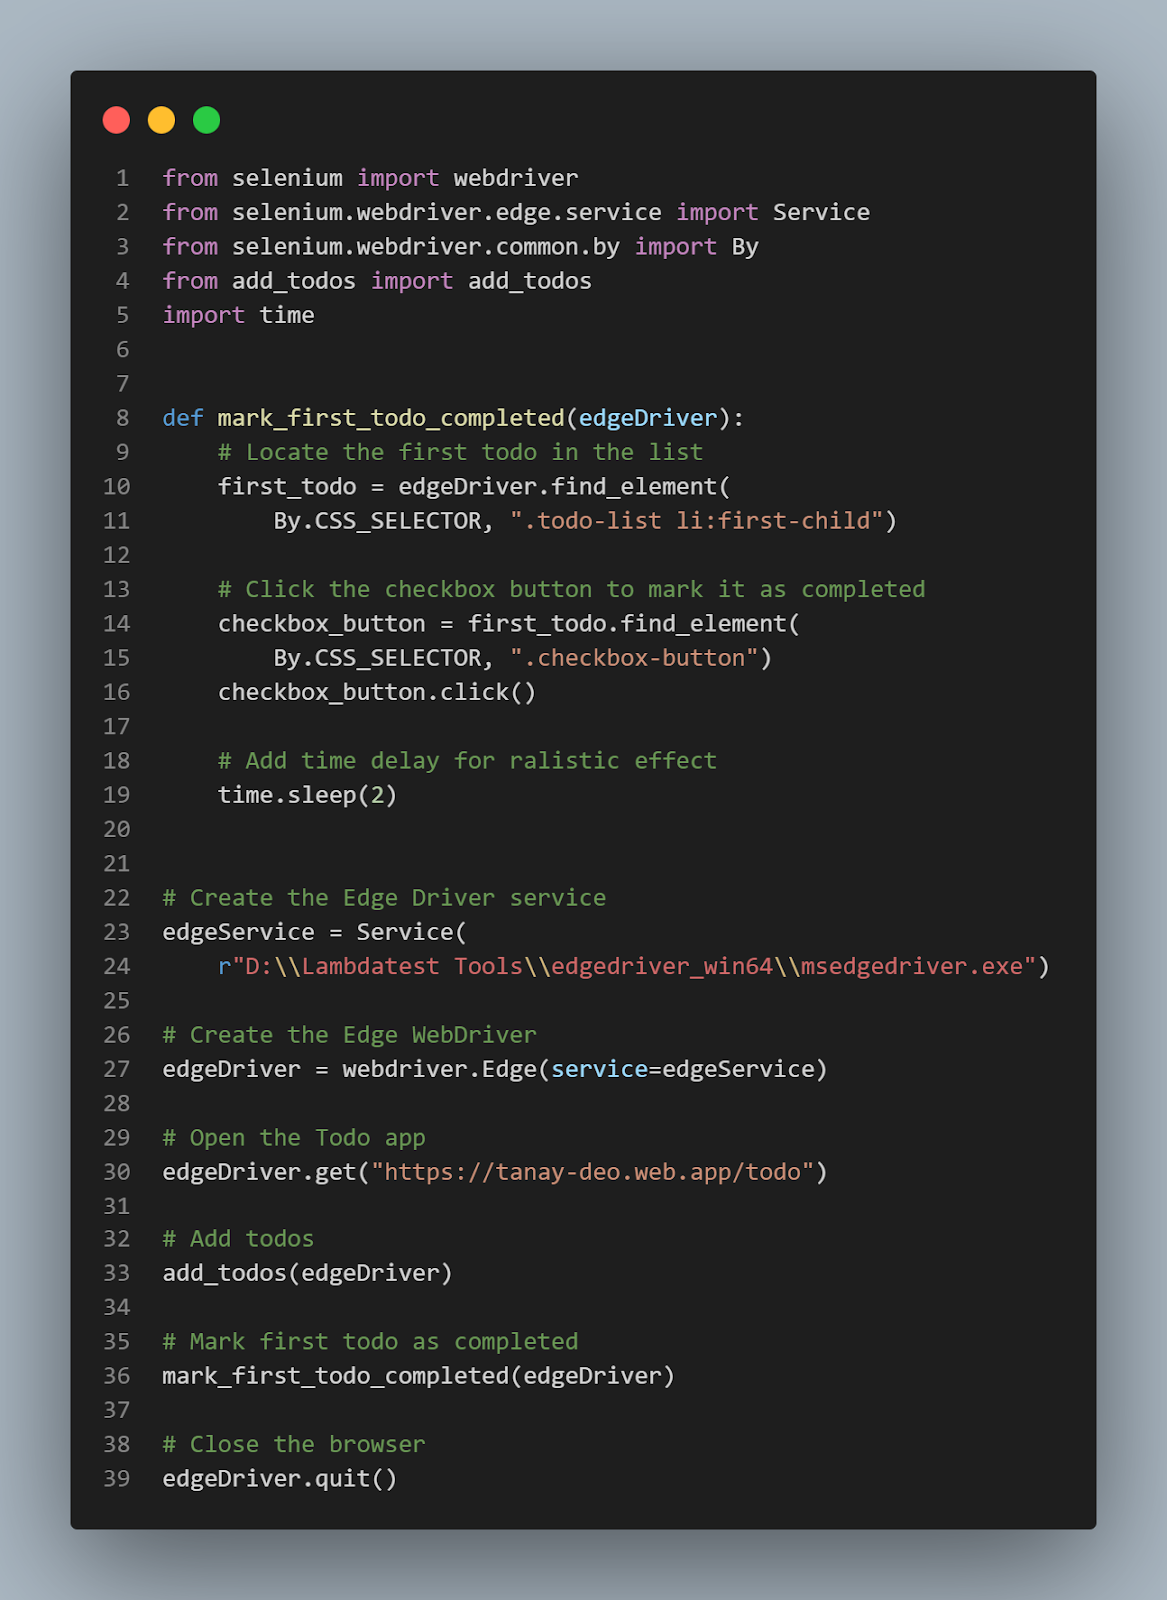
In this automation script for marking the first todo as completed, first, we create a new browser session by the use of the Selenium WebDriver service object and the edgeDriver object similar to the previous example.
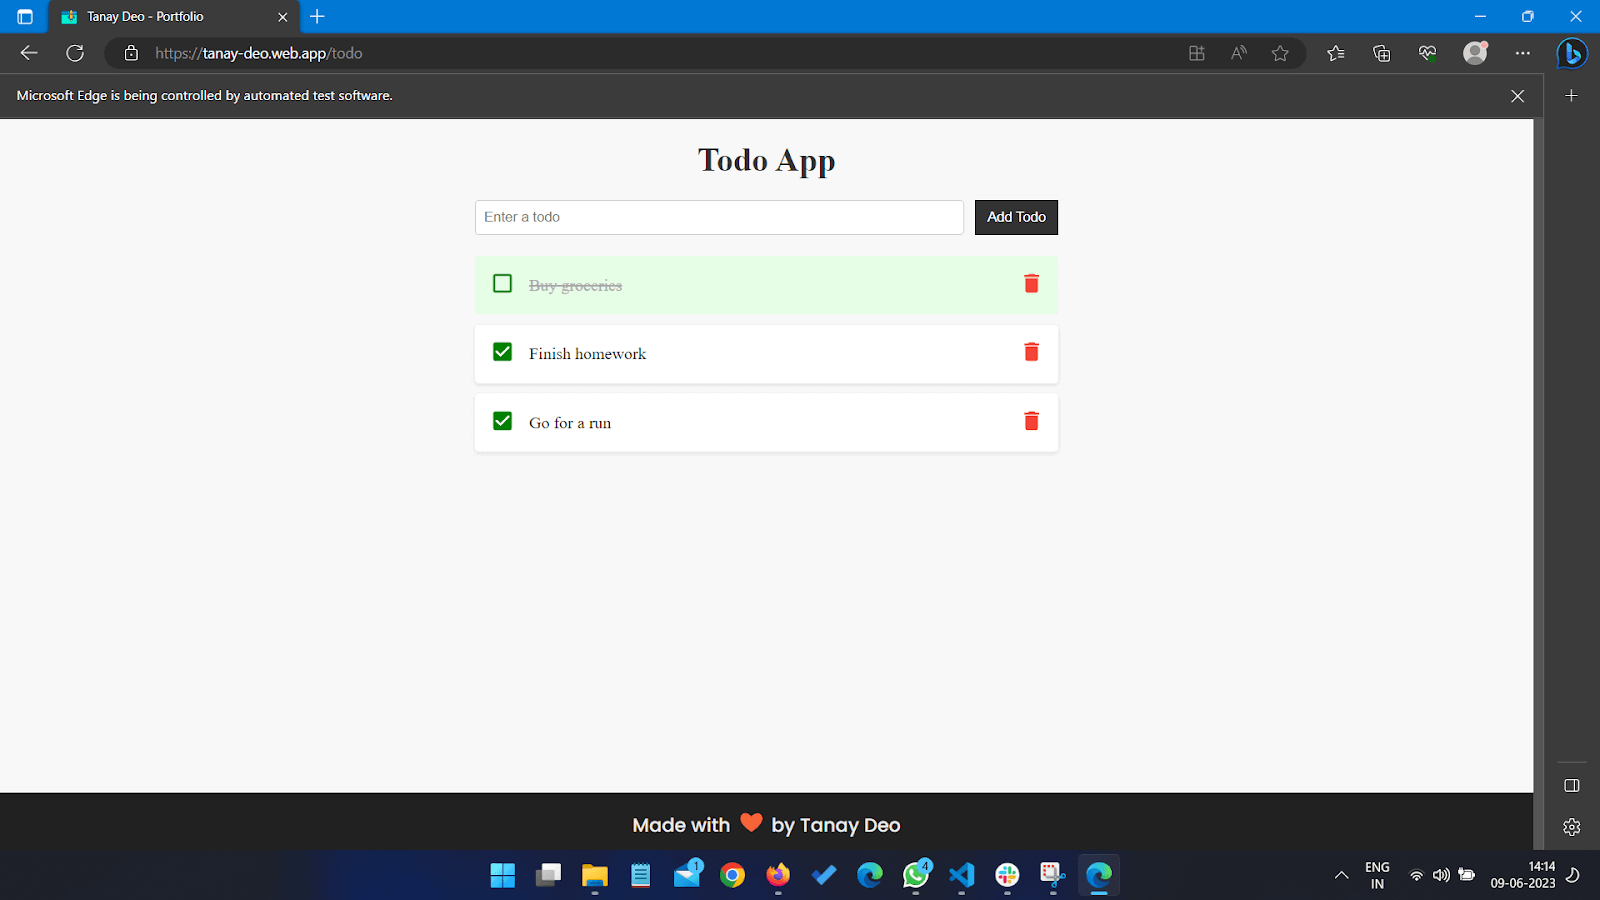
The code first calls the add_todos method to ensure that the todo list has some elements. After mark_first_todo_completed method is called which detects the first_todo element with the help of find_element and CSS_SELECTOR attributes of the Edge driver. Similarly, it also finds the checkbox_button to toggle the “Mark as completed” button. Finally, it performs a click option to mark it as completed. And we can verify the result as the color of the todo element changes as shown in the image below.
Delete the Completed Todos
Now, in this example; we will delete all the todos marked as completed. Doing so will test our web app for the delete todo functionality and ensure that our app is completely functional and responsive with the Microsoft Edge browser. We will write the script for this example in continuation to the previous examples.
Figuring out the testing algorithm for this example is as simple as that of the “Mark First Todo as completed” with just a few modifications. The process involves the selection of all the completed lists and then iterating through them to delete them one by one. The steps for the testing algorithm can be described as follows:
- First step is to make sure that there is at least one todo marked as completed in the todo list on the web app. If not, then we can add some by following the previous examples.
- Select all the completed todos from the todo list using CSS Selectors on the “.completed” class.
- Iterate through each selected list and find their respective delete button with the help of CSS Selectors.
- Perform mouse click on each of the delete buttons one by one to delete them.
- Verify the testing results by checking if all the todos marked as completed are deleted or not.
Now let’s start creating the automation script for this particular example as we did in all previous examples. The automation script will be designed based on the testing algorithm we just figured out. So, we can start by creating a new Python file named “delete_todos.py” as shown below:
|
1 2 3 4 5 6 7 8 9 10 11 12 13 14 15 16 17 18 19 20 21 22 23 24 25 26 27 28 29 30 31 32 33 34 35 36 37 38 39 40 41 42 43 44 45 46 47 48 49 50 51 52 53 |
from selenium import webdriver from selenium.webdriver.edge.service import Service from selenium.webdriver.common.by import By from add_todos import add_todos from mark_completed_todo import mark_first_todo_completed import time def delete_completed_todos(edgeDriver): # Find all completed todos completed_todos = edgeDriver.find_elements( By.CSS_SELECTOR, ".todo-list li.completed") # Iterate over completed todos and delete them for todo in completed_todos: delete_button = todo.find_element( By.CSS_SELECTOR, ".delete-button") delete_button.click() time.sleep(1) # Create the Edge Driver service edgeService = Service( r"D:\\Lambdatest Tools\\edgedriver_win64\\msedgedriver.exe") # Create the Edge WebDriver edgeDriver = webdriver.Edge(service=edgeService) # Open the Todo app edgeDriver.get("https://tanay-deo.web.app/todo") # Add todos add_todos(edgeDriver) # Mark first todo as completed mark_first_todo_completed(edgeDriver) # Delete completed todos delete_completed_todos(edgeDriver) # Close the browser edgeDriver.quit() |
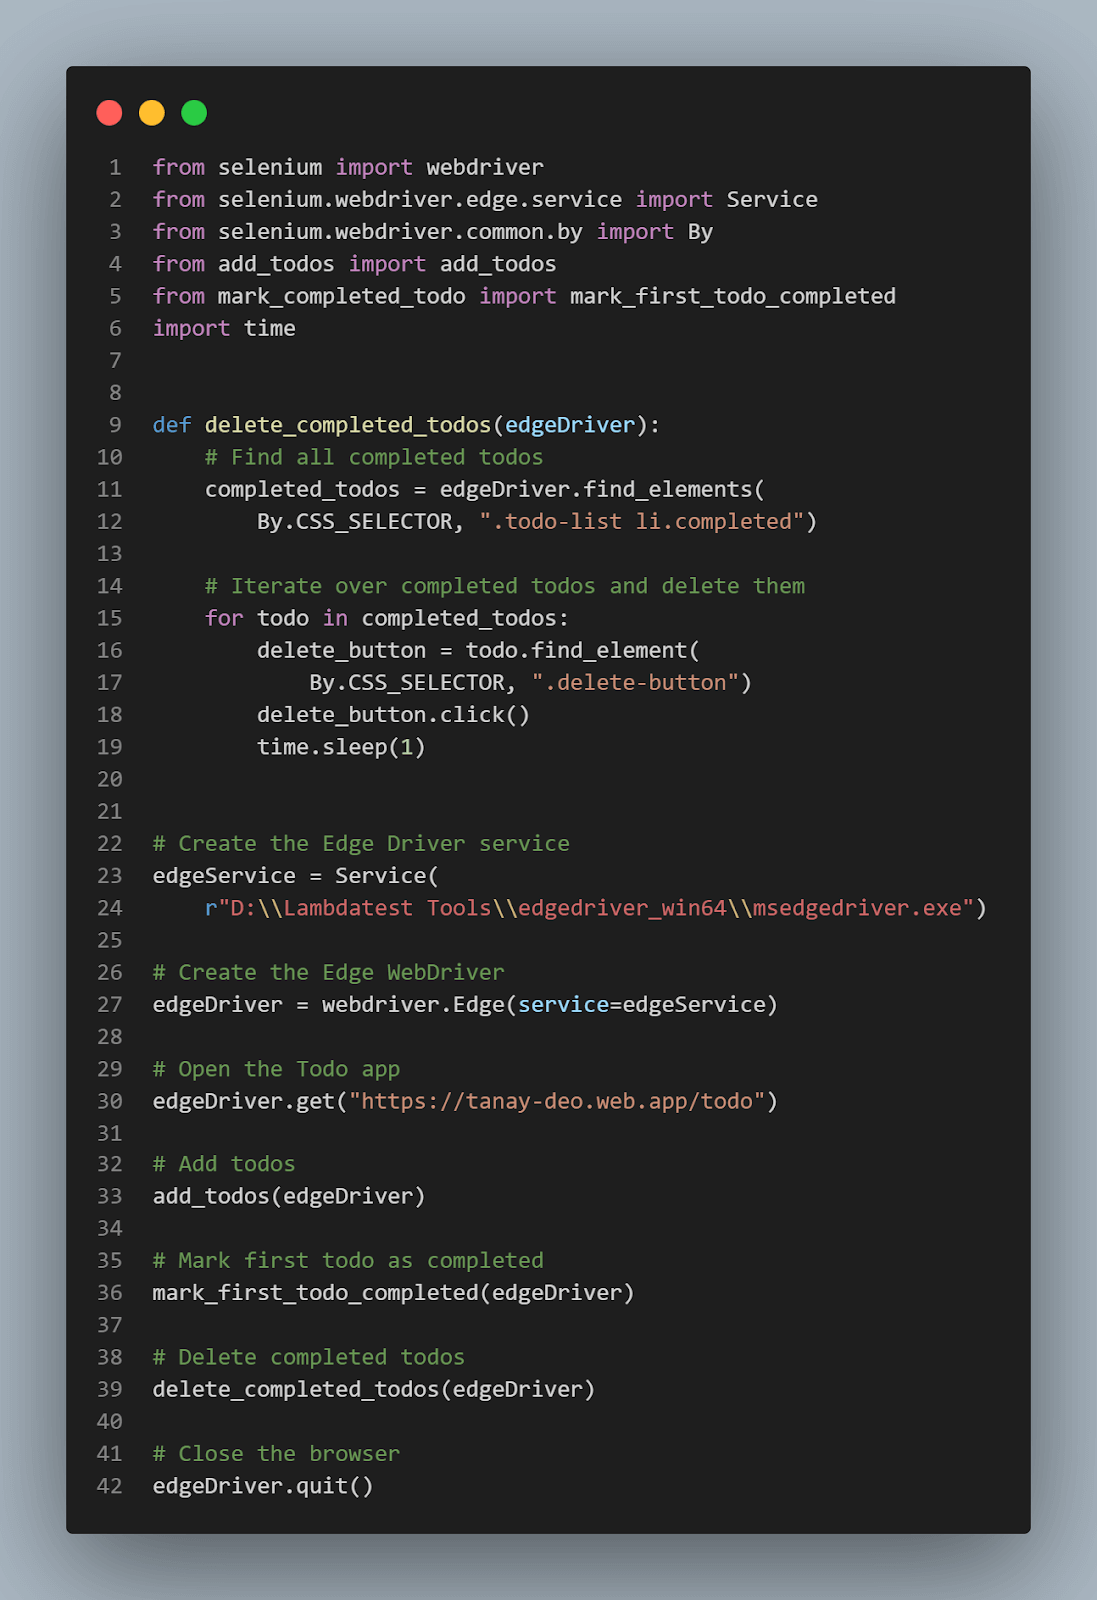
In the above example, we first created a new instance of the Microsoft Edge browser to automate the task of deleting the completed todos.
The code first calls the add_todos method to make sure that the todo list has some elements. After that, mark_first_todo_completed method is called. It marks the first element as completed, as discussed in previous examples. Next, the delete_completed_todos method is called; it detects the completed_todos list with the help of find_element and CSS_SELECTOR attributes of the Edge driver applied on the “.todo-list li.completed” class. Similarly, it also finds the delete_button for each completed_todos and performs a click option to delete it from the todo list. And we can verify the result as visible on the automated Microsoft Edge session as shown in the image below.
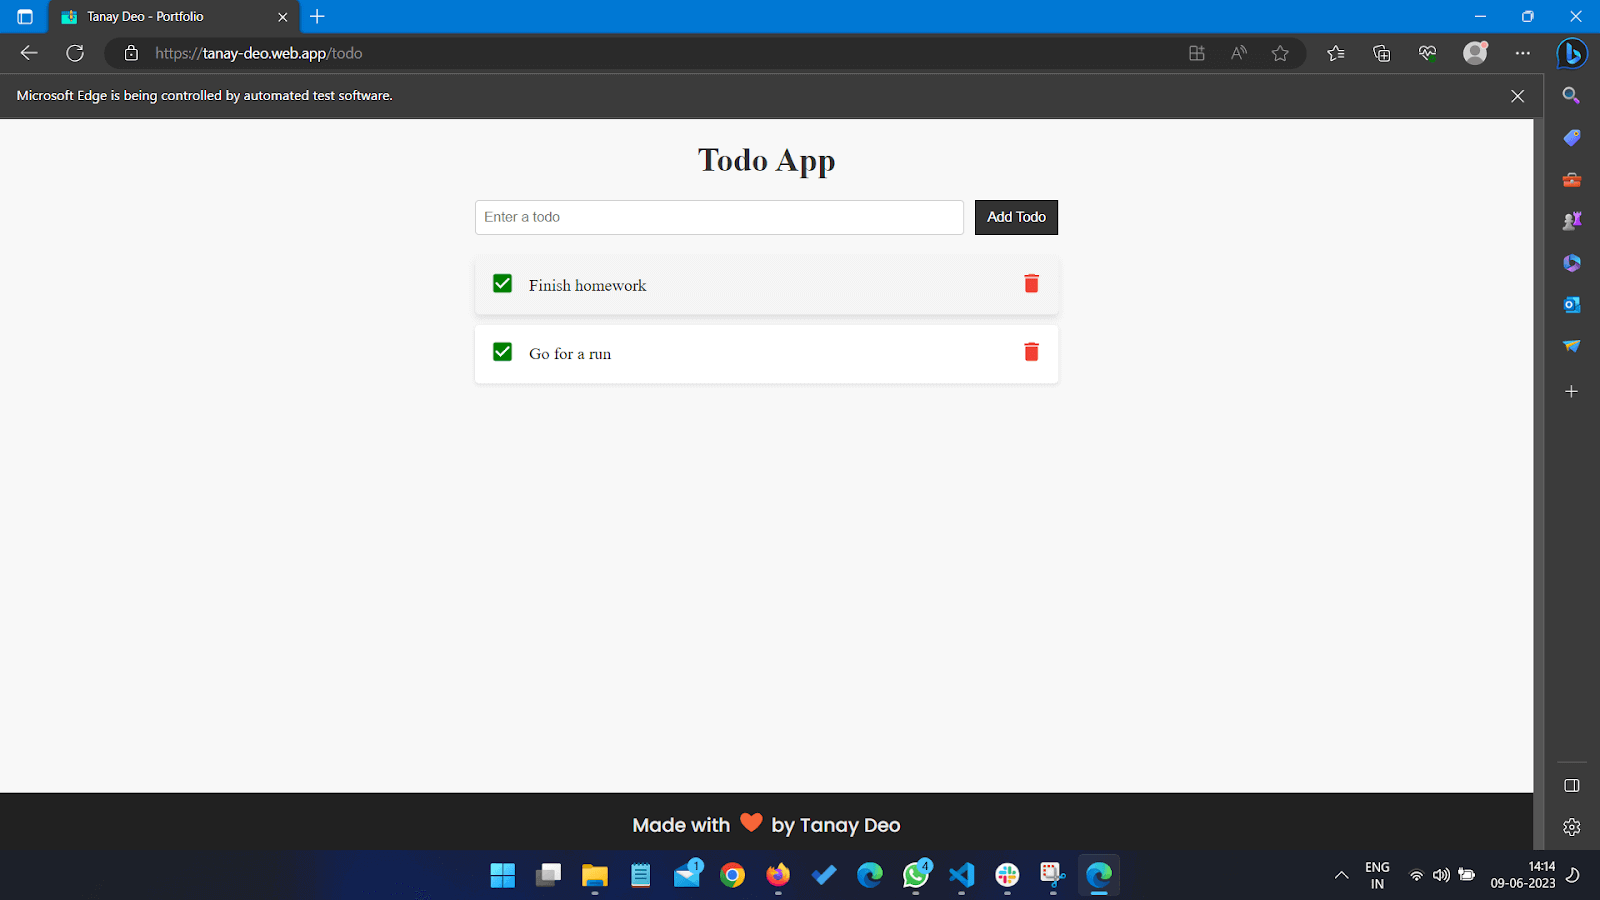
The complete code for the three examples discussed can be found in this GitHub repo.
How Cloud-Based Platforms help overcome Automation challenges?
Imagine you have a cloud infrastructure with all the WebDrivers and related environments ready to use! A cloud-based digital experience testing platform like LambdaTest allows testers and developers to run automated tests without having to manually set up the device and testing environment.
LambdaTest is a cloud-based platform that helps overcome automation challenges by providing a scalable infrastructure and facilitating seamless collaboration. With LambdaTest, organizations can execute automated tests on multiple browsers, operating systems, and devices simultaneously, reducing the need for an extensive in-house testing setup.
The cloud platform also enables real-time collaboration, allowing teams to work together efficiently, regardless of location. Additionally, LambdaTest’s parallel testing capabilities optimize test run times, enhancing productivity for organizations with large test suites or tight release schedules. By leveraging LambdaTest, businesses can overcome the limitations of local testing environments, achieve faster test execution, and improve overall testing efficiency.
Conclusion
Utilizing the Edge Driver in Selenium testing brings many benefits and features that enhance our automation experience with the Microsoft Edge browser. To understand and master the concept of the Edge driver, we have explored the following topics in our articles:
- We looked at the benefits and features of the Edge driver brings to streamline our testing and automation process.
- We then looked at how easy it is to set up and integrate the Edge driver with the Selenium framework to automate the Microsoft Edge browser using Python.
- We also considered a real-world example to demonstrate how to automate a simple ToDo App on the Microsoft Edge browser using the Edge driver. In the example, we automated a todo app to “create todos,” “mark todos as completed,” and “delete completed todos.”
- Finally, we wrapped up our article by having a sneak peek into how a cloud based automation testing tool like LambdaTest overcomes the challenges by providing scalable infrastructure and facilitating seamless collaboration.
Frequently Asked Questions (FAQs)
What do we mean by Edge Driver?
The Edge Driver is a tool developed by Microsoft that facilitates automation testing on the Microsoft Edge browser. The Edge driver acts as a link between the Selenium framework and the Microsoft Edge browser.
Can the Edge Driver handle browser-specific functionalities in Microsoft Edge?
Yes, the Edge Driver provides access to Edge-specific functionalities such as capturing screenshots, handling alerts or dialogs, executing JavaScript code tailored for the Edge browser, and more. These features allow us to perform thorough testing utilizing the unique functionalities of the Microsoft Edge browser.
Are all versions of the Edge driver compatible with the Edge browser?
The Microsoft Edge driver comes with different build versions for their respective browser version. For instance, the Edge driver with a build version of 114.x.xxx.xx is compatible with the Microsoft Edge browser of version number 114.x.xx.xxx. If we use the same Edge browser with an Edge driver of a different version number, it can lead to run-time errors and app crashes.
Got Questions? Drop them on LambdaTest Community. Visit now


