How To Download File Using Selenium Python
Jolivé Hodehou
Posted On: August 12, 2022
![]() 518213 Views
518213 Views
![]() 15 Min Read
15 Min Read
Although browsers such as Firefox and Chrome have made downloading files easier, these downloads depend on users visiting a website and manually clicking a download button. This can be a problem if the user is interested in downloading multiple files.
Automating file downloads saves time and effort, allowing a focus on essential features. Multiple methods can accomplish this task.
The combination of Python and Selenium opens up many opportunities for automating various tasks like clicking, typing, hovering, and downloading files. Using Selenium with Python can automate this process of downloading files by identifying and clicking the download button.
In this Selenium Python tutorial, I will show you how to download files with Selenium WebDriver and Python using the unittest testing framework. You could then download any type of file and save it in a specific folder. If you’re looking to improve your Selenium interview skills, check out our curated list of Selenium interview questions and answers.
So, let’s get started!
TABLE OF CONTENTS
- Test Environment Setup
- Downloading file using Selenium Python to a specific folder
- How to download file using Selenium Python in Chrome?
- How to download file using Selenium Python in Firefox?
- How to download file using Selenium Python in Safari?
- How to download file using cloud Selenium Grid?
- Frequently Asked Questions (FAQs)
Test Environment Setup
You need to have the unittest framework, Selenium, and the different browser drivers on our machine. In this blog on how to download file using Selenium Python, we will consider running our tests on Chrome, Firefox, and Safari.
What is the unittest framework?
The unittest testing framework was initially inspired by JUnit and had a flavor similar to the major unit testing frameworks in other languages. This is the default Python test framework provided with the Python package and, therefore, the one most developers start their tests with. It can also be used for test automation, collection aggregation, etc.
Installing the unittest framework
To have unittest installed on our machine, we first need to install Python.
But make sure you have Homebrew on your machine because we will use a macOS operating system in this tutorial on how to download file using Selenium Python.
- Type the following command in your terminal.
- Once you have installed it, make sure you have Python installed on your machine by typing in your terminal:
- Next, you need to install Selenium on our machine. To do this, we will install pip using get-pip.py.
- Download the script from https://bootstrap.pypa.io/get-pip.py.
- Open a terminal/command prompt, cd to the folder containing the get-pip.py file, and run:
- Check if pip is installed by typing in your terminal
- Once pip is installed, you can install Selenium in the same way.
- Add browser driver. WebDriver is an open source tool for automated testing of web applications on many browsers. It provides capabilities for navigating web pages, user input, executing JavaScript, and much more.
- Now let’s install GeckoDriver, a web browser engine used in many applications developed by the Mozilla Foundation and the Mozilla Corporation. GeckoDriver is the link between your tests in Selenium and the Firefox browser.
|
1 |
brew install Python |
The Python installation should look like this

|
1 |
Python --version |
or
|
1 |
Python3 --version |
![]()
This is a Python script that uses some bootstrapping logic to install pip.
|
1 |
python3 get-pip.py |
|
1 |
pip3 --version |
![]()
|
1 |
pip install selenium |
or depending on your permissions:
|
1 |
sudo pip install selenium |
For Python3:
|
1 |
sudo pip3 install selenium |
We will run tests with Google Chrome, Mozilla Firefox, and Safari to download file using Selenium Python.
Type the following command in your terminal.
|
1 |
brew cask install chromedriver |
ChromeDriver will help us run our tests in Google Chrome. Without it, it is impossible to run Selenium test scripts in Google Chrome and automate any web application. This is why you need ChromeDriver to run test cases on the Google Chrome browser.
Once the installation is complete, check if ChromeDriver is installed by typing the command:
|
1 |
chromeDriver -v |
![]()
|
1 |
brew cask install geckodriver |
Check if GeckoDriver is installed by typing the command:
|
1 |
geckodriver -v |
![]()
However, installation of the browser drivers is unnecessary if the tests will be executed on a cloud Selenium grid like LambdaTest.
LambdaTest is a cloud-based cross browser testing platform that provides you with an online browser farm of 3000+ browsers and operating system combinations to perform cross browser compatibility testing at scale.
You can also Subscribe to the LambdaTest YouTube Channel and stay updated with the latest tutorials around automated browser testing, Selenium testing, Cypress E2E testing, CI/CD, and more.
Downloading file using Selenium Python to a specific folder
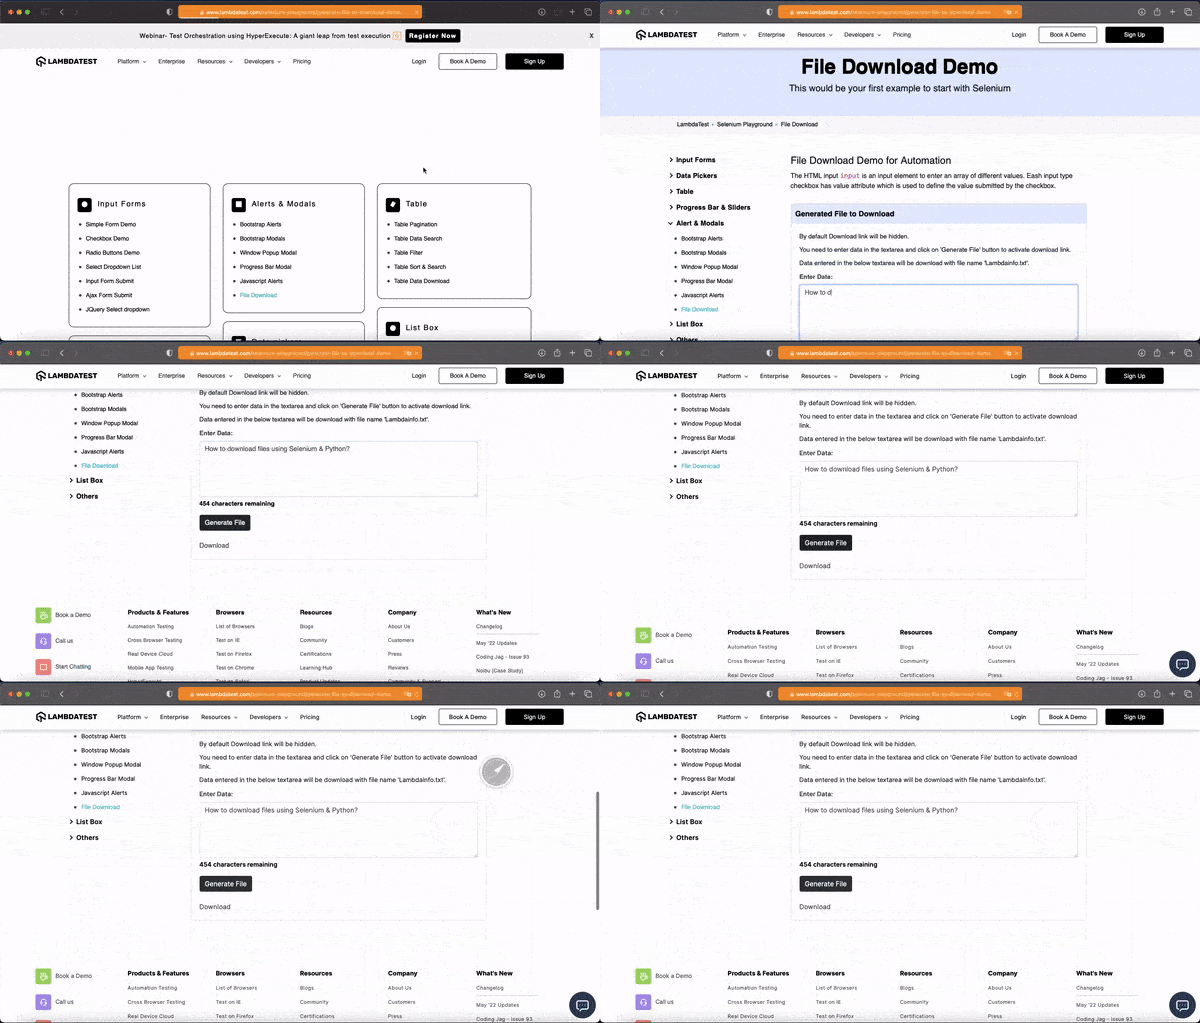
In this section of the Python automation testing tutorial, we will consider the following test scenario to download file using Selenium Python:
- Go to the Selenium Playground.
- Click on the File Download button.
- In the Enter Data field, enter “How to download files using Selenium & Python?”
- Click on the Generate File button.
- Click on the Download button to download the file Lambdainfo.txt, which should contain “How to download files using Selenium & Python?”
This is what the structure of our project should look like.
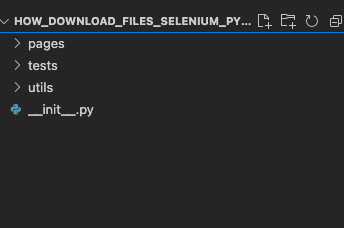
In the blog on how to download file using Selenium Python, we will create three folders which are as follows: pages, tests, and utils.
Python packages are denoted by this __init__.py file (pronounced “dunder init”). It’s just an empty file inside a directory that says, “Hey, this is a Python package, and you can treat it as such, specifically for import statements.”
In our “utils” folder, we will create a locators.py file in which we will put our different locators.

Tests use locators to find elements on a page. Locators are simple query strings for finding elements. They will return all elements that match their query.
Selenium WebDriver supports many types of locators . Some of the most commonly used Selenium locators include— IDs, Names, Class Names, CSS Selectors, XPaths, Link Text, Partial Link Text, and Tag Name.
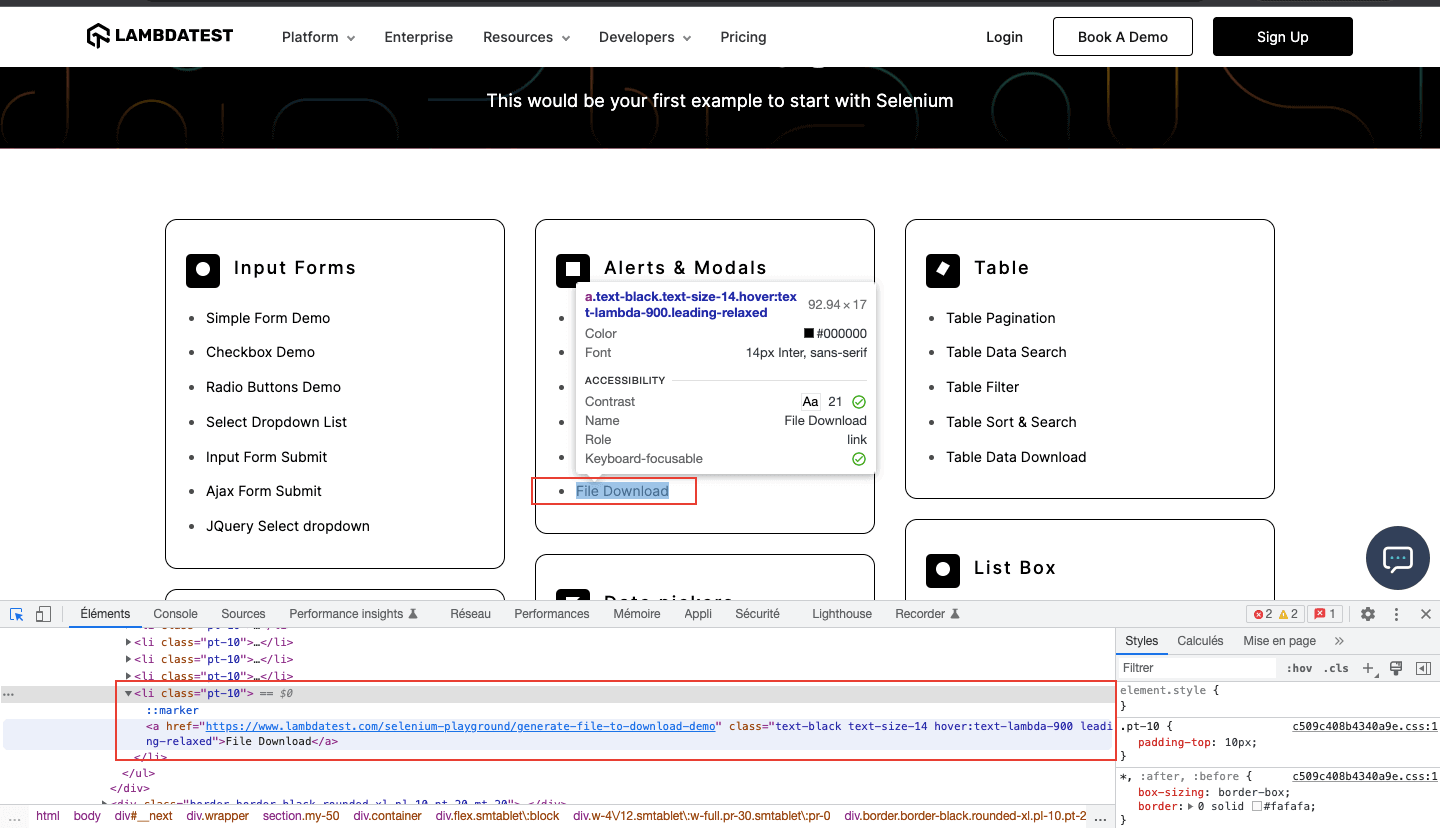
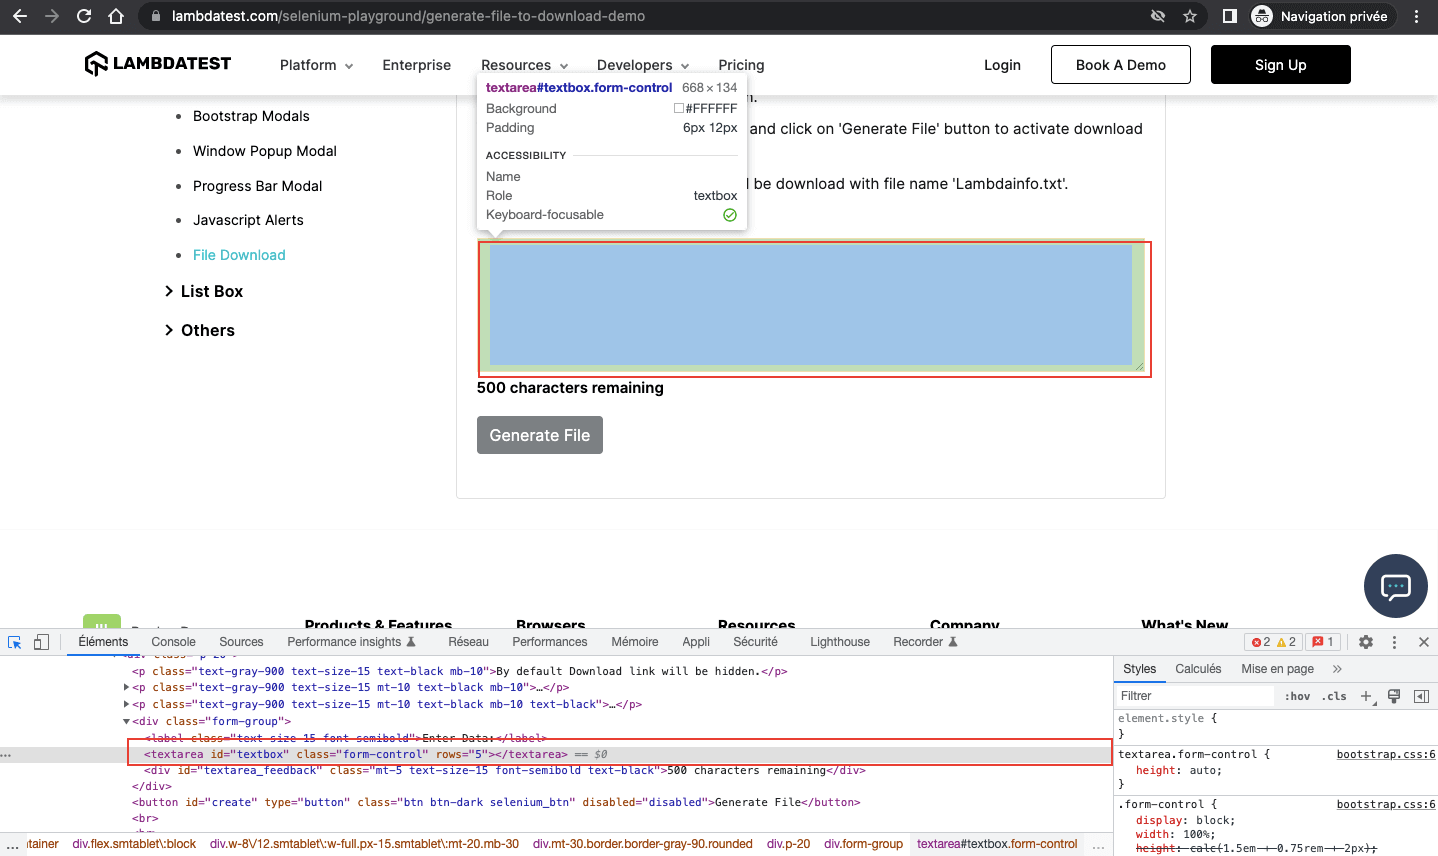
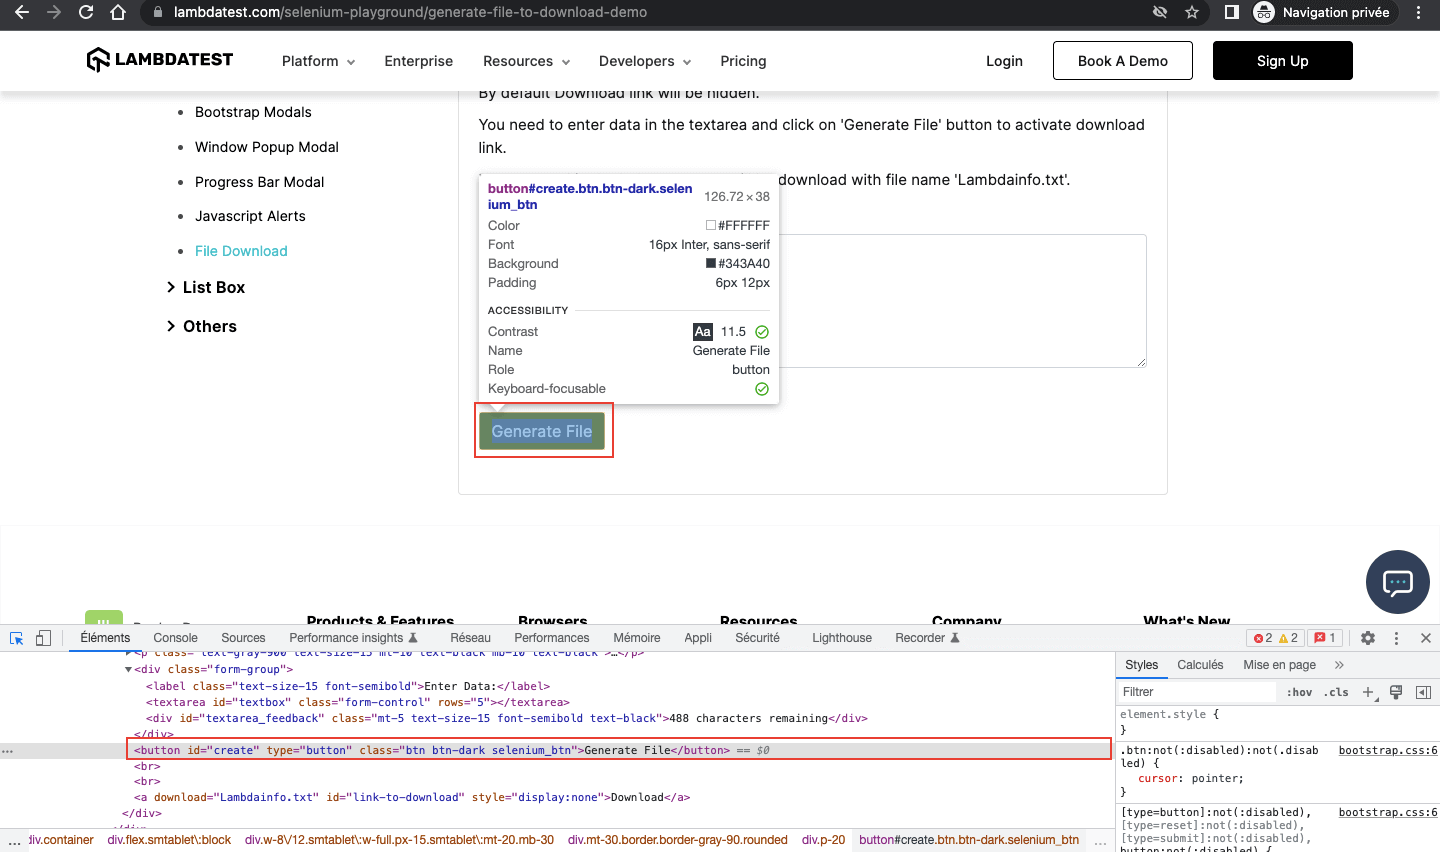
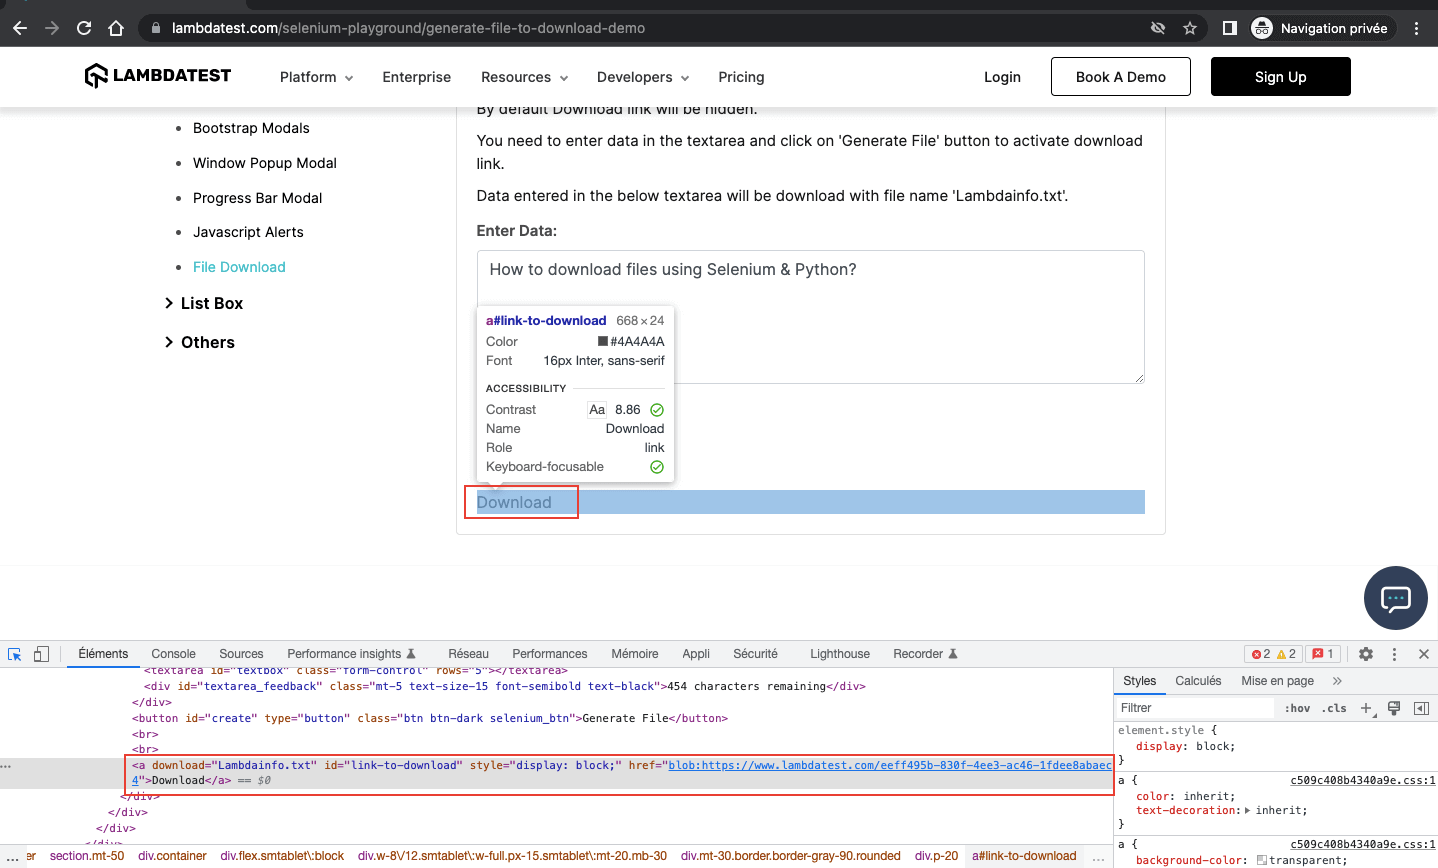
Now let’s look at how to get locators for the target items we need for our test scenario. We have created a SeleniumPlaygroundPageLocators class in which we have created variables for each element in which we will save our selectors for later use in our code.
|
1 |
file_download = (By.XPATH, '//li[.="File Download"]') |
|
1 |
data_field = (By.XPATH, '//*[@id="textbox"]') |
|
1 |
generate_file = (By.ID, 'create') |
|
1 |
download_button = (By.XPATH, '//*[@id="link-to-download"]') |
I have also created a directory called “pages“. In “pages,” we will create a file selenium_playground_page.py in which the page objects are written. To learn more about page objects, refer to our earlier blog on Page Object Model (POM) in Selenium Python.
Code Walkthrough:
|
1 |
from selenium.webdriver.common.keys import Keys |
The selenium.webdriver module provides all the WebDriver implementations. The Keys class provides methods through which you can access keys. You can refer to this blog on Selenium Keys to learn more about Keys class.
|
1 |
from utils.locators import * |
Here, we import all the classes in our locators.py file in the utils folder.
|
1 |
import time |
Python sleep() is a method of the Python time module. So, first, we must import the time module, and then we can use this method:
|
1 |
time.sleep(5) |
In Python projects, it is common practice to create a “tests” directory under the project’s root directory to hold all the test scenarios. In tests, we have two files test_download_file.py and conftest.py.
Code Walkthrough:
|
1 |
import unittest |
The unittest module provides a rich set of tools for constructing and running tests. In this blog on how to download file using Selenium Python, we have used unittest, but several other Python testing frameworks can be used like PyTest, Robot, DocTest, etc.
|
1 |
PATH = "/Users/macbookair/Desktop/how_download_files_selenium_python/download" |
We have created a PATH variable in which we save the path we want to save the file that we will download with Selenium Python.
Later we will add some code to our conftest.py file to be able to run the tests on our different browsers.
Run your Python automated scripts on 3000+ browser environments. Try LambdaTest Now!
How to download file using Selenium Python in Chrome?
In our conftest.py file, we need to add some code. First, we will import the chromeOptions with the following import statement:
|
1 |
from selenium.webdriver.chrome.options import Options |
Chrome Options class is used to control the properties of Chrome Driver and is used with combining Desired Capabilities. It helps you perform various operations, such as defining the folder where you want to save a download file.
Usage to create a Chrome driver instance:
|
1 2 3 4 5 |
#Google Chrome options = Options() prefs = {"download.default_directory" : PATH} options.add_experimental_option("prefs",prefs) self.driver = webdriver.Chrome(options=options) |
- options: This allows you to set the preferences of the Chrome browser.
- download.default_directory: Allows to modify the default download directory. The default download folder will be the path defined in our PATH variable
- add_experimental_option: Allows users to add these preferences to their Selenium webdriver object.
Our conftest.py file should now look like this:
Now you can run your test by typing in your terminal:
|
1 |
python3 -m unittest |
Your test should run as follows:
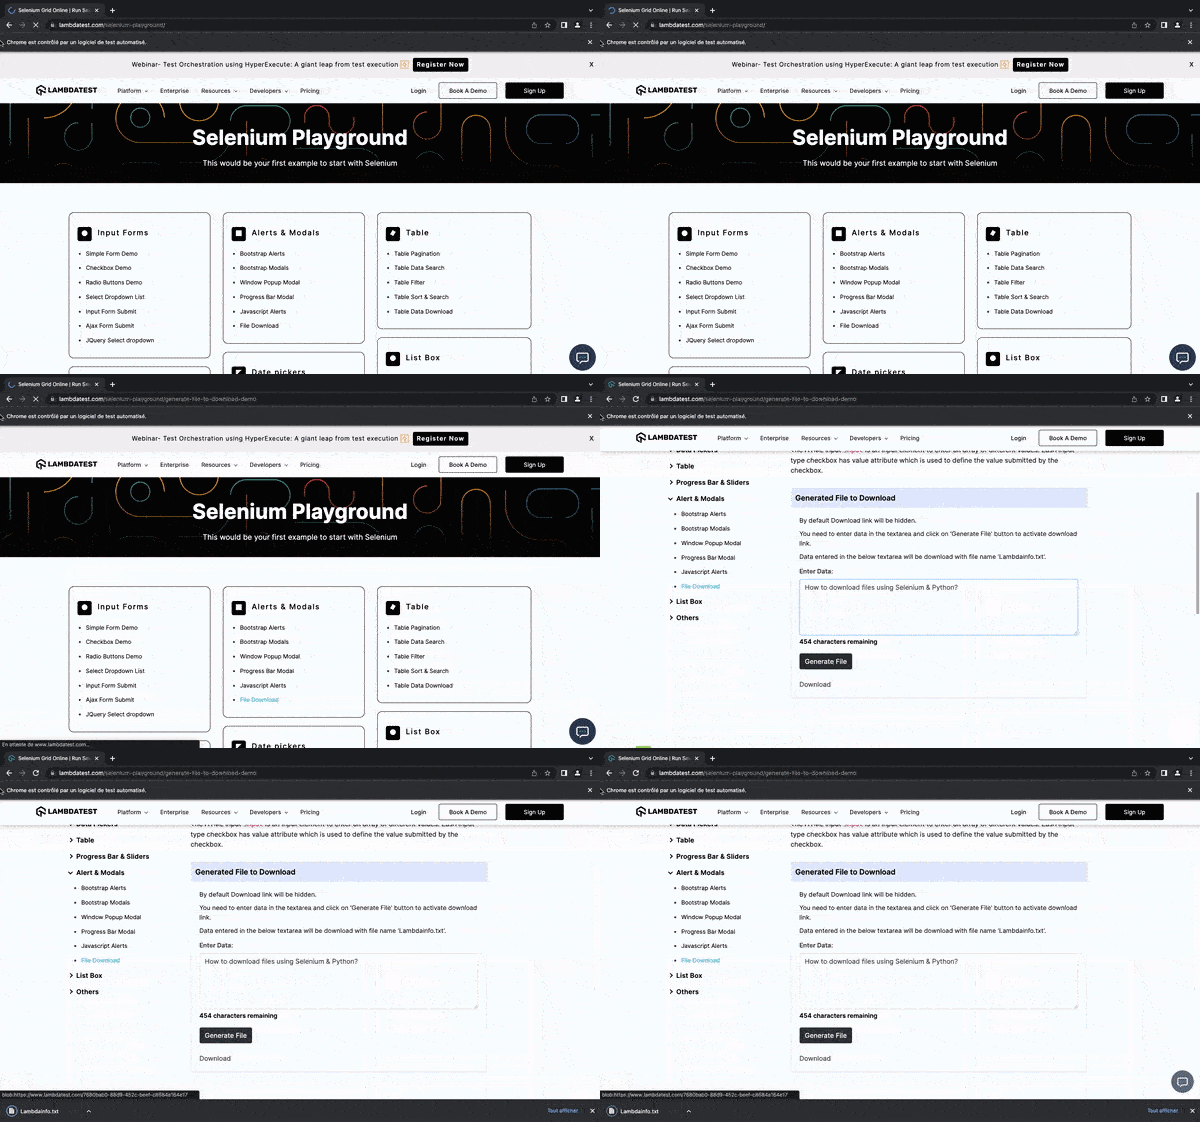
Once your test has run successfully, you should have the Lambdainfo.txt file in your download folder.

The file does contain the text “How to download files using Selenium & Python?”.
How to download file using Selenium Python in Firefox?
Now, we will need to create a Firefox profile. Here is the code you will need to add to your conftest.py file if you plan to run your tests with Mozilla Firefox.
|
1 2 3 4 5 6 7 |
#Firefox profile = webdriver.FirefoxProfile() profile.set_preference("browser.download.folderList", 2) profile.set_preference("browser.download.manager.showWhenStarting", False) profile.set_preference("browser.download.dir", PATH) profile.set_preference("browser.helperApps.neverAsk.saveToDisk", "application/x-gzip") self.driver = webdriver.Firefox(firefox_profile=profile) |
More explanation:
- Profile: The profile object is specific to FirefoxDriver and contains all the preferences to be defined.
- browser.download.folderList: Tells not to use the default Downloads directory.
- browser.download.manager.showWhenStarting: Turns of showing download progress.
- browser.download.dir: Sets the directory for downloads.
- browser.helperApps.neverAsk.saveToDisk: Informs Firefox to automatically download the files of the chosen mime types.
|
1 |
self.driver = webdriver.Firefox(firefox_profile=profile) |
This line of code allows us to create a Firefox driver object with all the preferences.
Our conftest.py file should now look like this:
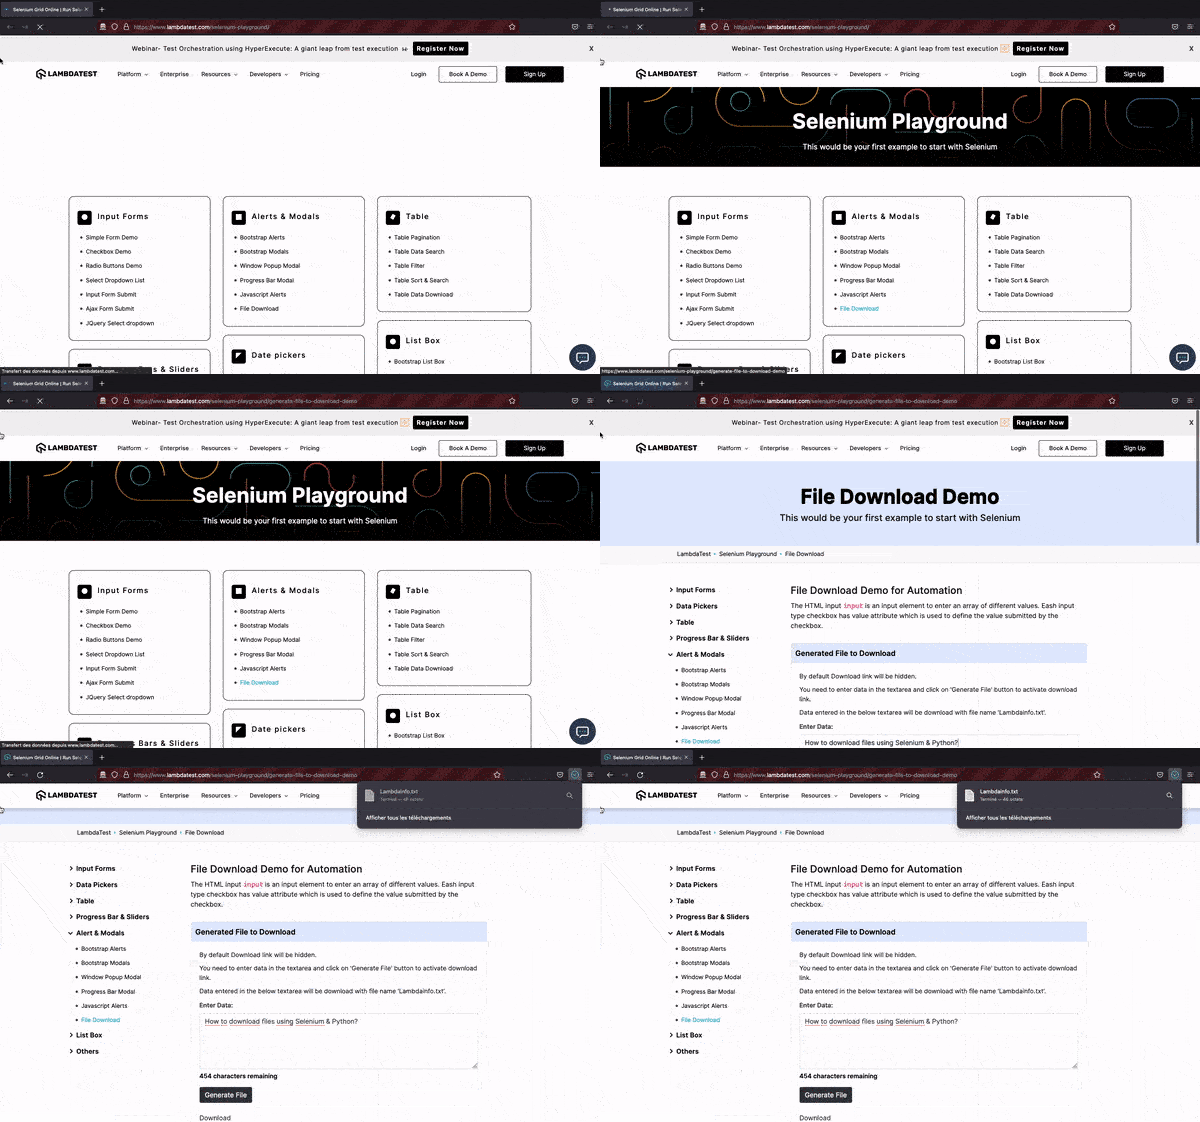
Now, we can rerun our tests.
How to download file using Selenium Python in Safari?
It is not necessary to download the Safari driver for Selenium WebDriver. Instead, the built-in Safari driver, safaridriver, is currently available in most Selenium client libraries. But before running web UI testing in Safari, ensure you enable remote automation in the Safari browser.
To allow remote automation in Safari, you must turn on WebDriver support:
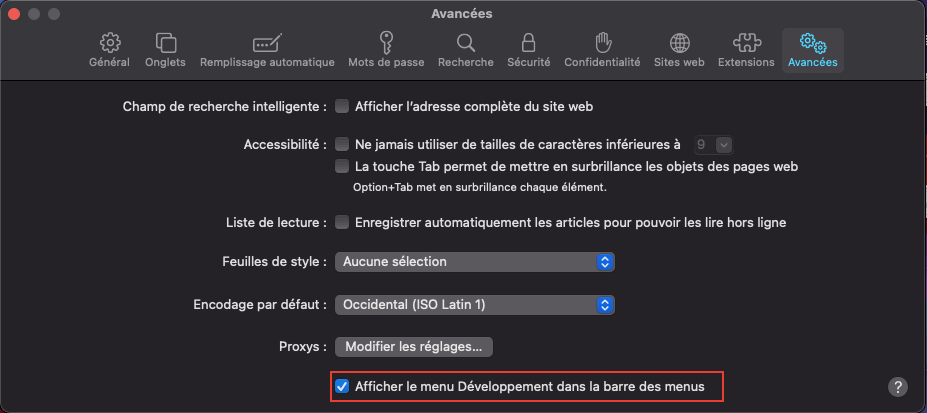
- To enable the Develop menu in the Safari browser, click Safari > Preferences > Advanced tab. Select the Show Develop Menu check box. The Develop menu appears in the menu bar.
- To enable Remote Automation, click Develop > Allow Remote Automation in the menu bar.
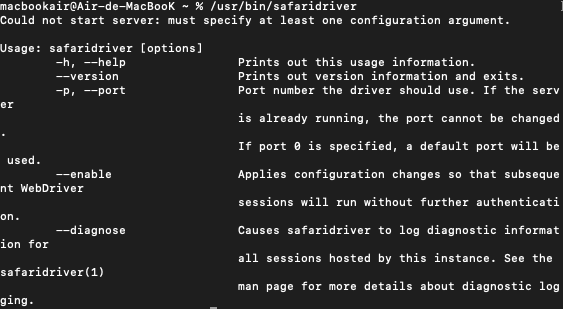
- Authorize safaridriver to launch the webdriver service that hosts the local web server. To permit this, run /usr/bin/safaridriver once manually and complete the authentication prompt.
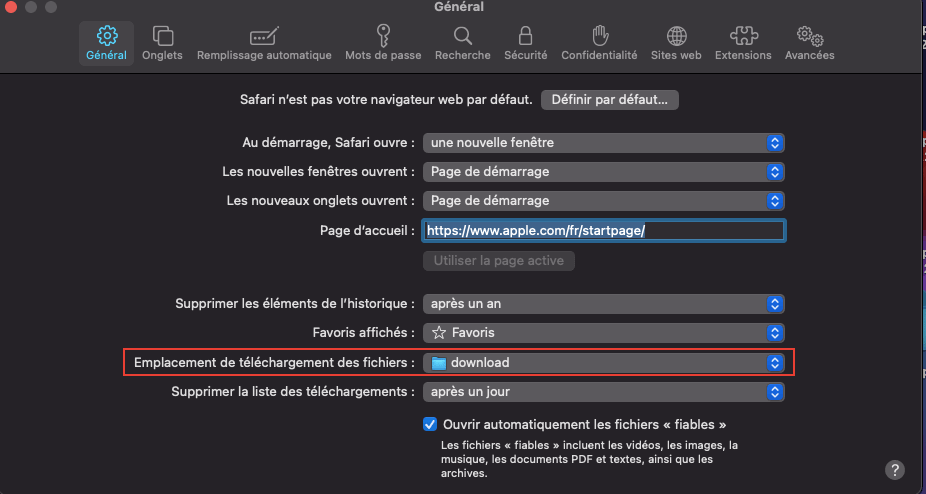
- Now, we will need to make some changes before running the tests. Firstly we will change the default download folder for Safari. You can do this in the Safari preferences in the general tab.
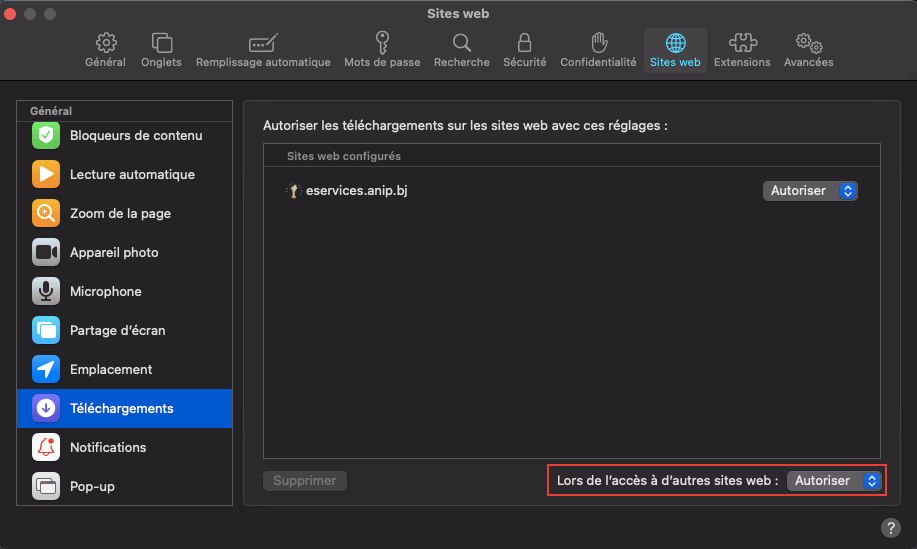
- Now, we will disable the download confirmation alerts. In the website tab, in the preferences.
Now let’s add some code.
|
1 2 |
#Safari self.driver = webdriver.Safari() |
Our conftest.py file should now look like this:
Everything is ready to run the tests with Safari. After running your tests, the result should be as follows
How to download file using cloud Selenium Grid?
Every project is unique, and you must optimize your application for any configuration to provide a smooth and consistent user experience on all devices, browsers, and operating systems.
In an ideal world, developers would test their apps using real devices under real conditions. However, in-house labs tend to be small and thus cannot provide users with real-world experiences. Instead, they opt to use emulators or simulators designed to mimic the real feelings of users. Although these tools are great for app testing, they cannot replace real devices. In such cases, you must opt for a real device cloud testing solution that offers real devices.
LambdaTest cloud Selenium Grid offers an online device farm with 3000+ real devices and browsers to help you get the job done.
In this Python web automation tutorial on how to download file using Selenium Python, we will use LambdaTest REST APIs (/user-files/download) to download files from LambdaTest cloud storage.
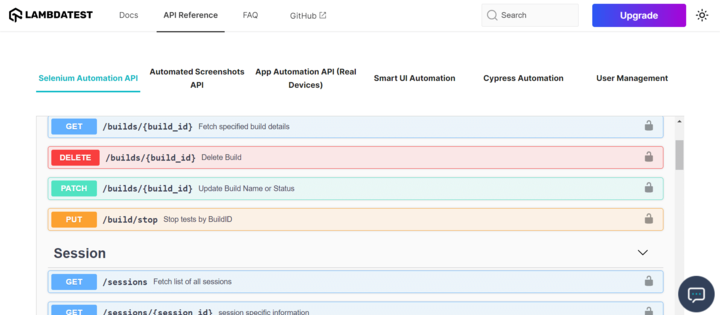
We will have to use the POST request to upload files to our LambdaTest storage and then the PUT request to download the user file from LambdaTest storage.
Before we continue, we will install requests, a Python library that will allow us to make HTTP requests in Python. It abstracts the complexity of requests behind a nice simple API, so you can focus on interacting with services and consuming data in your application.
Run the following command from the terminal:
pip3 install requests
Once requests are installed, you can use them in your project. Importing requests looks like this:
|
1 |
import requests |
In our file test_download_file.py, we import JSON and request packages.
|
1 2 |
import requests import json |
Then let’s add some code.
Code Walkthrough:
In a new class TestAPIDownloadFile that we added to our file we declare two variables as follows:
|
1 2 |
username = "username" access_Key = "access key" |
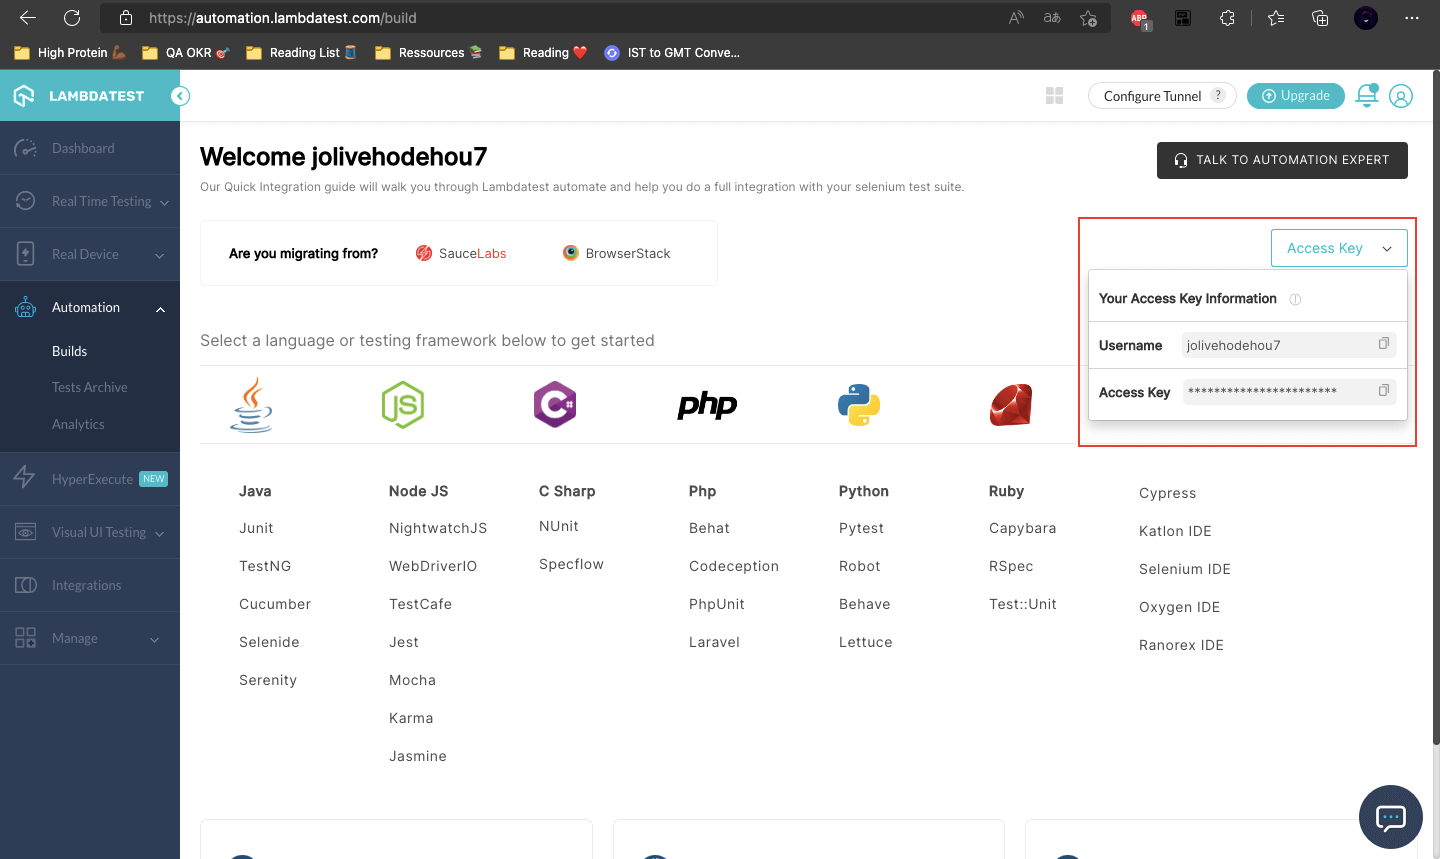
These variables will be used for identification in our API calls before accessing the endpoint.
You need to replace the value of the username and access key using the authentication data that you can retrieve from the LambdaTest profile page.
|
1 2 3 4 5 6 7 8 9 10 11 12 13 14 15 16 |
#POST_REQUEST url = "https://api.lambdatest.com/automation/api/v1/user-files" payload={} files=[ ('files',('Lambdainfo.txt',open('/Users/macbookair/Downloads/Lambdainfo.txt','rb'),'text/plain')) ] headers = { 'authority': 'api.lambdatest.com', 'accept': 'application/json', } response = requests.request("POST", url, auth=(username, access_Key), headers=headers, data=payload, files=files) print(response.text) |
Then we make a POST request to upload a file from our computer to the lambda storage.
|
1 2 |
files=[ ('files',('Lambdainfo.txt',open('/Users/macbookair/Downloads/Lambdainfo.txt','rb'),'text/plain')) ] |
You must replace ‘Lambdainfo.txt‘ by the name of your file and ‘/Users/macbookair/Downloads/Lambdainfo.txt‘ by the path where the file is located.
|
1 |
response = requests.request("POST", url, auth=(username, access_Key), headers=headers, data=payload, files=files) |
In a response variable, we save the response of our request that we display afterward by doing.
|
1 2 3 4 5 6 7 8 9 10 11 12 13 14 15 16 17 18 19 20 |
print(response.text) #PUT_REQUEST url = "https://api.lambdatest.com/automation/api/v1/user-files/download" payload = json.dumps({ "key": "Lambdainfo.txt" }) headers = { 'accept': 'application/octet-stream', 'Content-Type': 'application/json' } response = requests.request("PUT", url, auth=(username, access_Key), headers=headers, data=payload) open('/Users/macbookair/Documents/how_download_files_selenium_python/download/Lambdainfo.txt', 'wb').write(response.content) print(response.text) |
Once our file has been uploaded to the lambda storage, we can now use our PUT requests to download it to the directory of our choice.
|
1 2 3 |
payload = json.dumps({ "key": "Lambdainfo.txt" }) |
Key identifies our file on the storage, so you have to replace it with the name of our file on the storage.
|
1 |
open('/Users/macbookair/Documents/how_download_files_selenium_python/download/Lambdainfo_API.txt', 'wb').write(response.content) |
Then we save the file in the directory of our choice. You must replace the specified path with the one where you want to save the file.
Once the test is run in your console, you can see the response to your requests.

And the file that has been downloaded in the defined directory.

If you’re a Python programmer looking to make a name for yourself in the automation testing domain, then the Selenium Python 101 certification program from LambdaTest is your best bet.
Conclusion
This concludes the tutorial on how to download file using Selenium Python. When you automate your web tests using Selenium, you may need to test the complete functionality of a website or a web application. This means you will have to exercise features like downloading and uploading files, streaming video or audio, and reading/writing documents.
In this tutorial on Selenium Python testing, we saw how to download file using Selenium Python to a specific folder. Moreover, we learned to download file using Selenium Python in different browsers like Chrome, Firefox, and Safari. In the end, we looked at downloading file on a cloud Selenium Grid like LambdaTest.
I hope this has given you a good overview of how to download file using Selenium Python. If you have any questions or comments, please leave them in the section below.
Frequently Asked Questions (FAQs)
How do I download Selenium for Python?
The Selenium Python bindings are easy to install. First, ensure the pip package manager is installed by typing pip into your terminal. Then run the following command:
pip install selenium
How do I save an image using Python Selenium?
Downloading images with Selenium WebDriver is possible. To start with, identify the image you want to download with the help of locators like id; class; xpath, and so on. Once it’s identified, use the open method for opening the file in write and binary mode.
Got Questions? Drop them on LambdaTest Community. Visit now


