How To Use XPath in Selenium: Complete Guide With Examples
Vipul Gupta
Posted On: January 30, 2024
![]() 709429 Views
709429 Views
![]() 29 Min Read
29 Min Read
This article is a part of our Learning Hub. For more in-depth resources, check out our hub on Selenium Tutorial.
Effective test automation relies on selecting the right element locator and balancing functionality, efficiency, and accuracy. Selecting the right element locator is pivotal for effective test automation. This involves a delicate balance, ensuring the chosen locator optimizes functionality, maintains efficiency, and guarantees accuracy, enhancing automated tests’ overall efficacy.
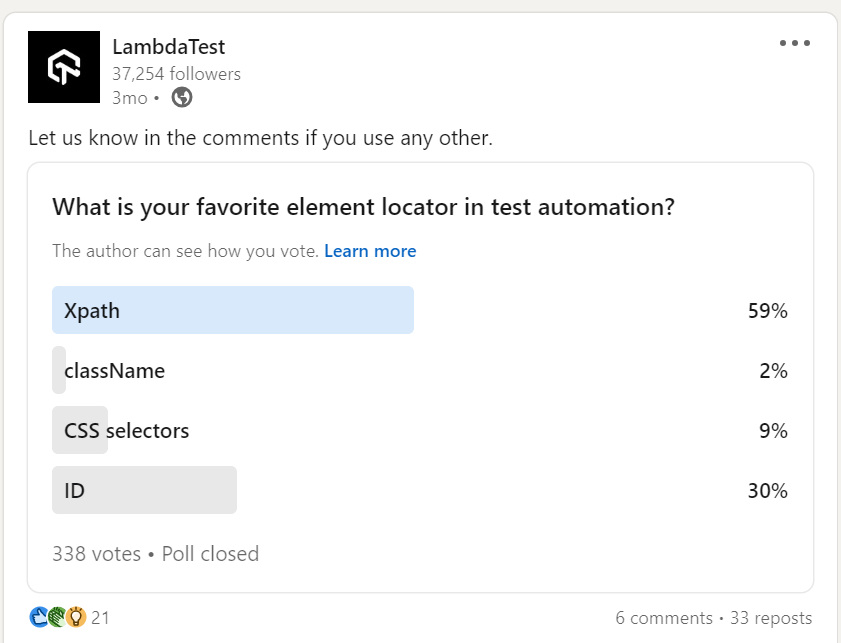
As per the survey conducted by LambdaTest, XPath proved to be the most used element locator for test automation, with 59% of the respondents choosing it over other locator strategies.
XPath, a standout feature within the Selenium framework, is a versatile element locator strategy in Selenium. Its robust capabilities shine in facilitating dynamic searches for WebElements, granting testers the flexibility to customize locators to suit specific requirements. Although not the only technique in Selenium, XPath’s adaptability positions it as a preferred choice for many within the testing community.
In this tutorial on using XPath in Selenium, we will learn about the types of XPath and how to write basic and complicated XPath. We will also see how to capture the XPath of a few tricky WebElements while performing Selenium automation testing. If you are preparing for an interview you can learn more through Selenium interview questions.
Let’s get started!
TABLE OF CONTENTS
- What is XPath?
- What is XPath in Selenium?
- Types of XPath in Selenium
- How to write XPath in Selenium?
- How to write XPath in Selenium using axes methods?
- The difference between static and dynamic XPath
- How to create a dynamic XPath in Selenium?
- How to capture the XPath of loader images?
- Frequently Asked Questions (FAQs)
What is XPath?
XPath, or XML Path Language, selects nodes from an XML document. Its widespread usage is attributed to its flexibility in navigating the XML structure’s elements and attributes. XPath expressions play a key role in traversing the XML document, enabling the selection of elements or attributes based on their names, values, or positions in the document hierarchy.
XPath is adept at navigation and serves as a tool for data extraction from XML documents. Furthermore, it can be used to verify the existence of an element or attribute within the XML document, showcasing its versatility in handling various aspects of XML data.
Need to test your XPath expressions? Try Free XPath Tester tool for accurate and efficient web scraping and automation.
What is XPath in Selenium?
XPath in Selenium is a powerful technique used to traverse and interact with the HTML structure of a web page. It provides a standardized way to navigate HTML and XML documents, allowing testers to locate elements for automation testing precisely. This makes XPath an invaluable technique for writing robust and adaptable test scripts.
The basic format of XPath in Selenium is explained below.
Here,
- //: denotes the current node
- tagname: denotes the tag name of the current node
- @: denotes the Select attribute
- Attribute: denotes the attribute of the node
- Value: denotes the value of the chosen attribute
Types of XPath in Selenium
The XPath is the language used to select elements in an HTML page. XPath can locate any element on a page based on its ID, CSS Selectors, Name, TagName, ClassName, etc. There are two types of XPath in Selenium.
- Absolute XPath
- Relative XPath
Absolute XPath
Absolute XPath is the simplest XPath in Selenium. It starts with a single slash ‘/’ and provides the absolute path of an element in the entire DOM. To understand the workings of Absolute XPath, let us take an example below.
In the following example, we will use Absolute XPath in Selenium to locate the page title of a website. For demonstration, we will focus on the LambdaTest Sign up page and perform a series of operations.

To locate the element, right-click on the WebElement and select Inspect. Then, in the Elements tab, you can begin creating the locator.

In the above scenario, we started from the HTML tag and traversed to the < div > tags containing the tag step by step, leading to the final < img > tag. While this method appears straightforward, the significant drawback of using Absolute XPath is its vulnerability to changes in the DOM structure.
Even a minor alteration, such as removing a single < div > tag in the above example, could cause this locator to fail.
Relative XPath
Relative XPath in Selenium identifies elements dynamically, starting with ‘//’ followed by the tag name. It allows for navigating from a particular point in the DOM, making it adaptable to page updates without needing the full path, enhancing test script robustness.

The Relative XPath of the highlighted WebElement will be.
Here, we located the title using the corresponding < img > tag and its alt attribute and then created the corresponding Relative XPath.
Learn how to interact with various WebElement when performing automation on various repetitive tasks. Watch this complete video tutorial on interacting with WebElement using Selenium WebDriver.
How to write XPath in Selenium?
Now that you have seen Absolute and Relative XPath in Selenium let us see some basic XPath examples with various methods and how to use them in the section below.
Basic XPath in Selenium
This is the common and syntactic approach to writing the XPath in Selenium, which combines a TagName and attribute value.
Here are a few basic XPath examples in Selenium using the syntax:
Element Identification:

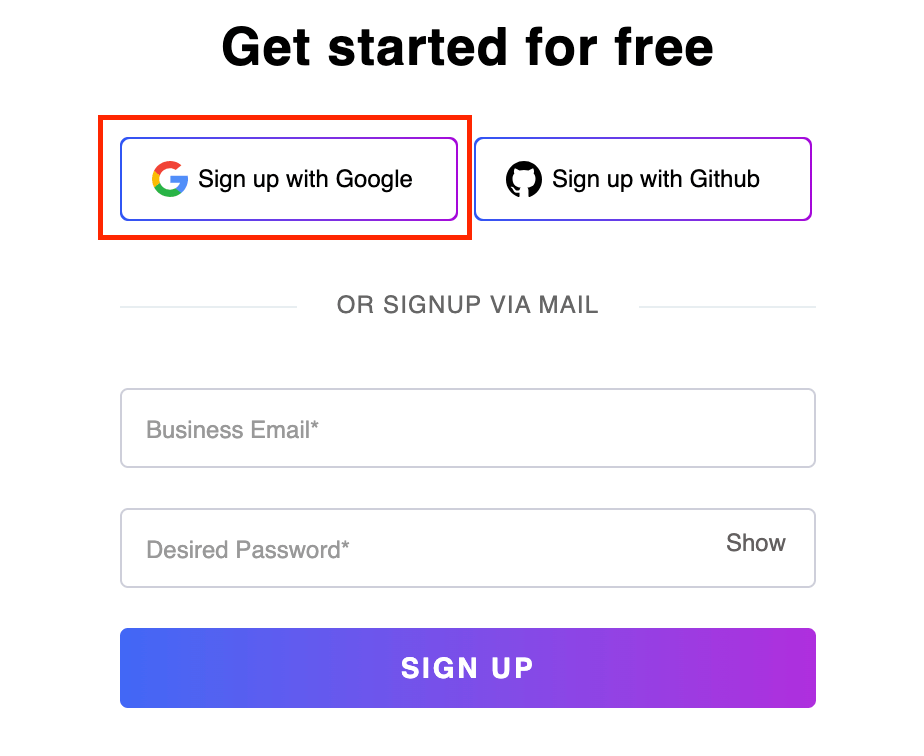
- //div[@aria-labelledby=’sign_up_with_google_label’]: This XPath is for locating the Sign up with Google button on the LambdaTest Sign up page, as highlighted below. We have used the aria-labelledby attribute and its sign_up_with_google_label value of the corresponding tag.
- //input[@placeholder=’Business Email*’]: This XPath is for locating the Business Email text box in the image above. We have used the placeholder attribute and its corresponding value, Business Email*, for the input tag.
- //input[@placeholder=’Desired Password*’]: Similar to the first option, this XPath is for locating the Desired Password text box where the name attribute is being used with its value being Desired Password* for the input tag.
- //button[@data-testid=’signup-button’]: This XPath is for the SIGN UP button of the web page, where we are using its data-testid attribute, which has a value of signup-button.
XPath using contains()
contains(), a highly useful technique in XPath that is especially used for handling WebElements with dynamically changing values.
The syntax for using the contains() method in XPath is:
For example, let’s say the ID for the login field, for instance, signin_01 has an ending number that keeps changing every time the page is loaded. In this case, contains() helps us locate the element below.
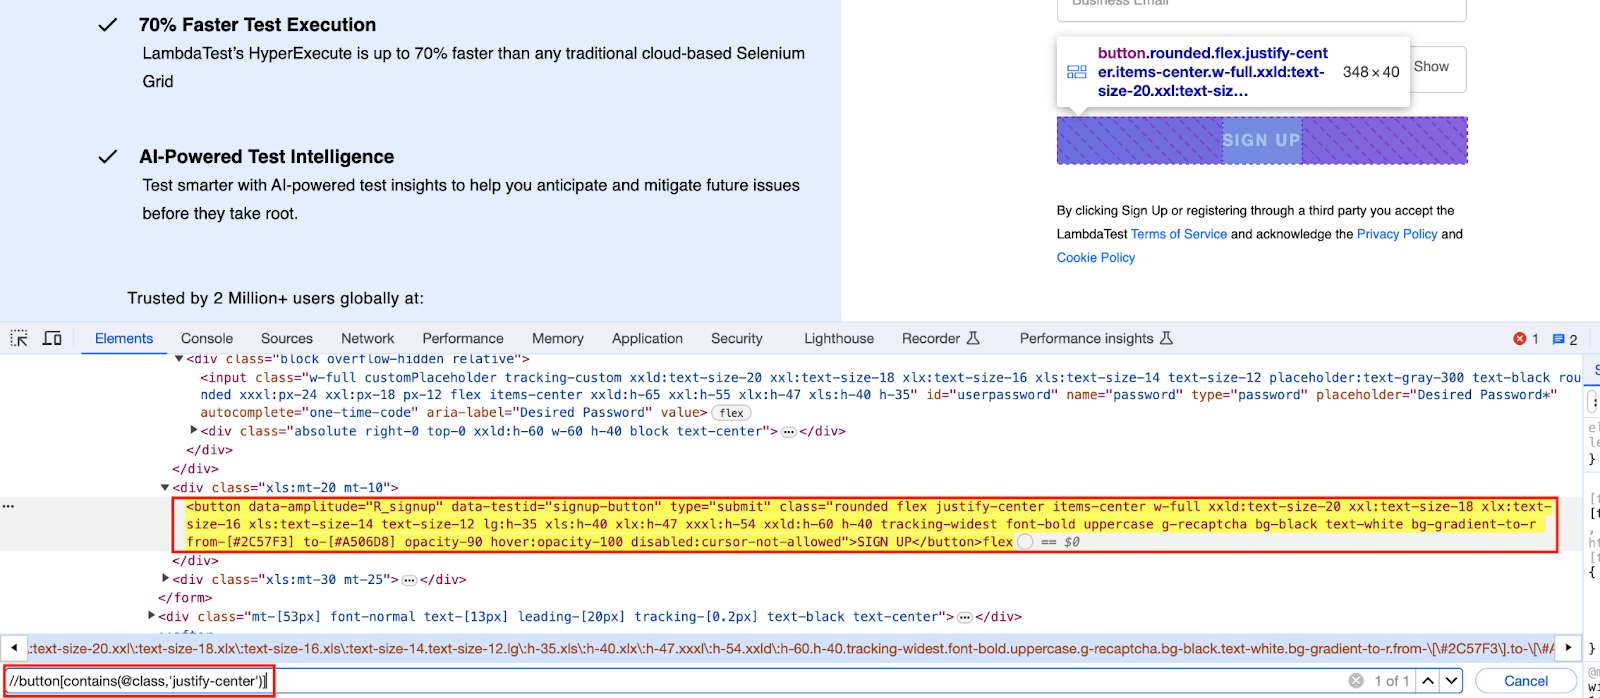
Check a similar example on the LambdaTest page for the SIGN UP button. On inspecting the element, you will see that the class attribute has a lot of values. However, you can use the contains() method and easily locate the WebElement. Let’s take an example below.
Element Identification:

When a class or className attribute in WebElement is not unique, making it challenging to identify or locate a specific element, the contains() method becomes particularly helpful. In this case, we can use contains() to identify the SIGN UP button based on its class attribute.
XPath using logical operators ( OR & AND )
Logical operators, OR & AND, can be used in attribute conditions. With OR, any one or both conditions should be true, while with AND, both conditions must be true.
The syntax for utilizing these operators is:
| Logical operators | Syntax |
|---|---|
| OR |
|
| AND |
|
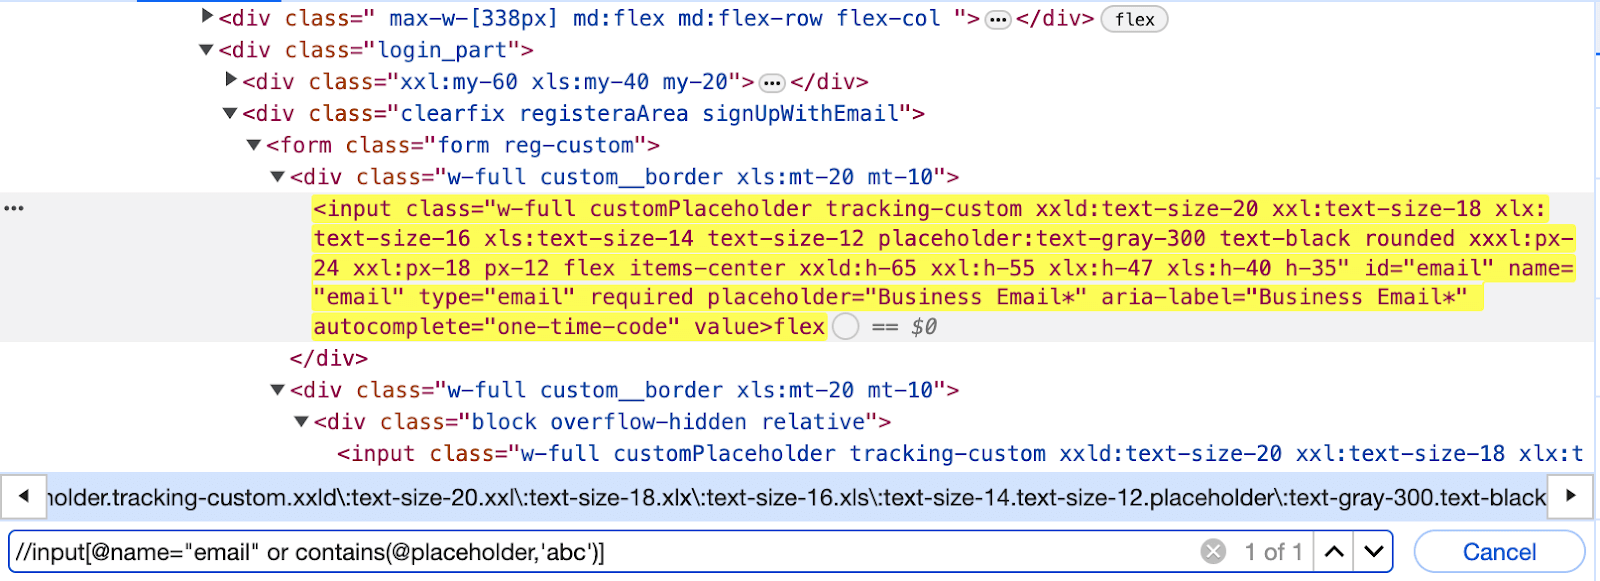
Now, let us see an example for each of these operators. First, we will locate the Business Email input text box on the Sign up page of LambdaTest, as highlighted below.
Element identification:

OR
Here, we have used the name attribute and the placeholder attribute, incorporating the contains() method on the placeholder attribute. Interestingly, despite using an incorrect value for the placeholder attribute, the element can still be located, as the first expression fulfills the condition.
AND
Here, we have utilized the same attributes and used the AND operator. Both expressions must satisfy the condition; hence, the following XPath successfully locates the element.
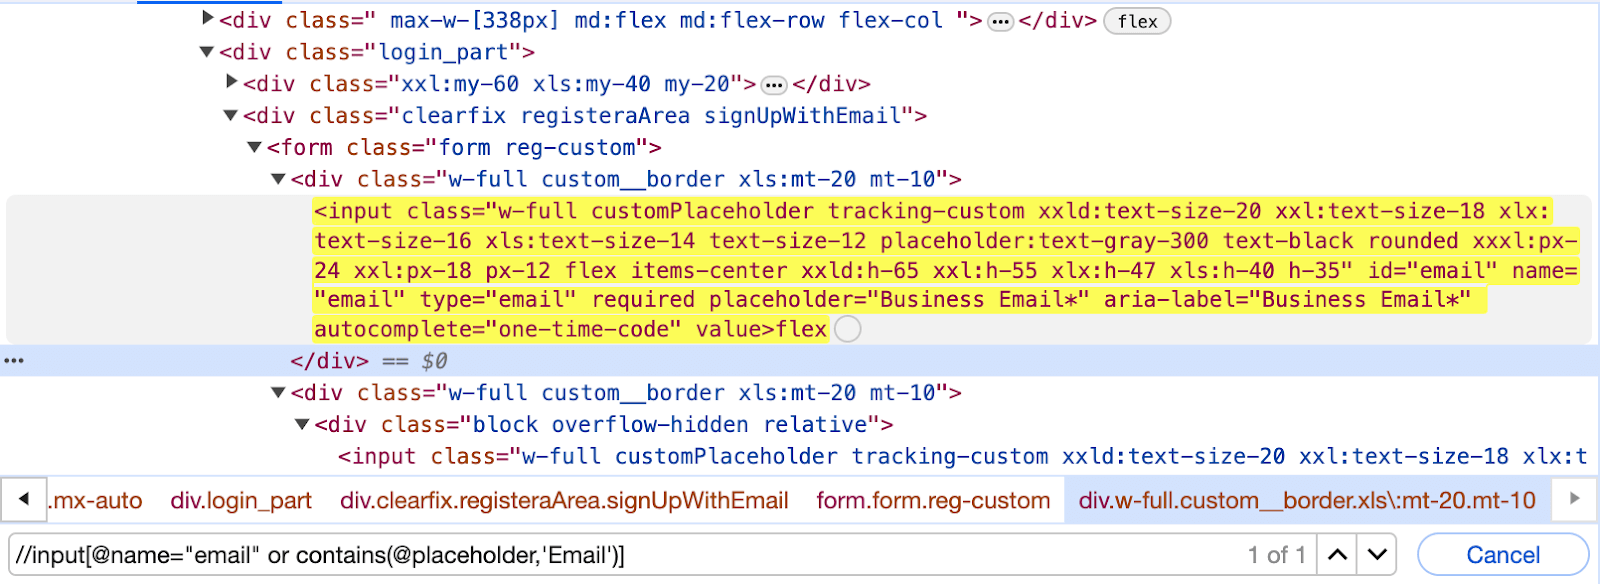
Note: Both logical operators must be written as ‘and’ and ‘or’ because they are case-sensitive. If you use ‘OR’ or ‘AND,’ you will encounter an error in the console, indicating an invalid XPath expression.
 Note
NoteRun your automation tests using various browsers and platforms. Try LambdaTest Today!
XPath using text()
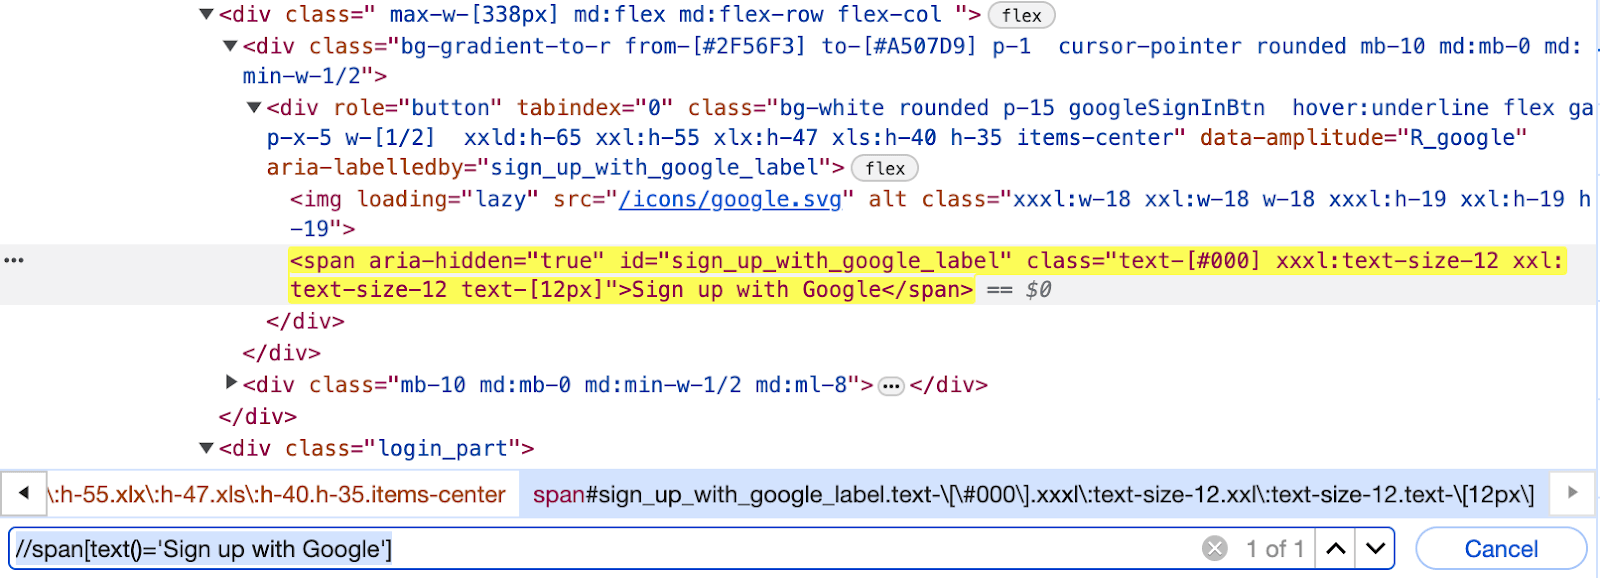
The text() method is used in XPath whenever we have a text defined in an HTML tag and wish to identify that element via text. This comes in handy when the other attribute values change dynamically with no substantial attribute value used via starts-with() or contains().
The syntax for using text() in XPath is:
To learn more about using text() methods in Selenium, follow this guide on using findElement() by Text and enhance your element identification skills for your automation testing.
Let’s write the XPath for the Sign up with Google button on the Sign up page of LambdaTest, as highlighted below in the image, using the text() method.
Element Identification:
XPath using starts-with()
The starts-with() method is similar to the contains() method. It is helpful in the case of WebElements, whose attribute values can change dynamically. In the starts-with() method, the starting value of the attribute’s text is used for locating the element.
Below is the syntax for using the starts-with() method:
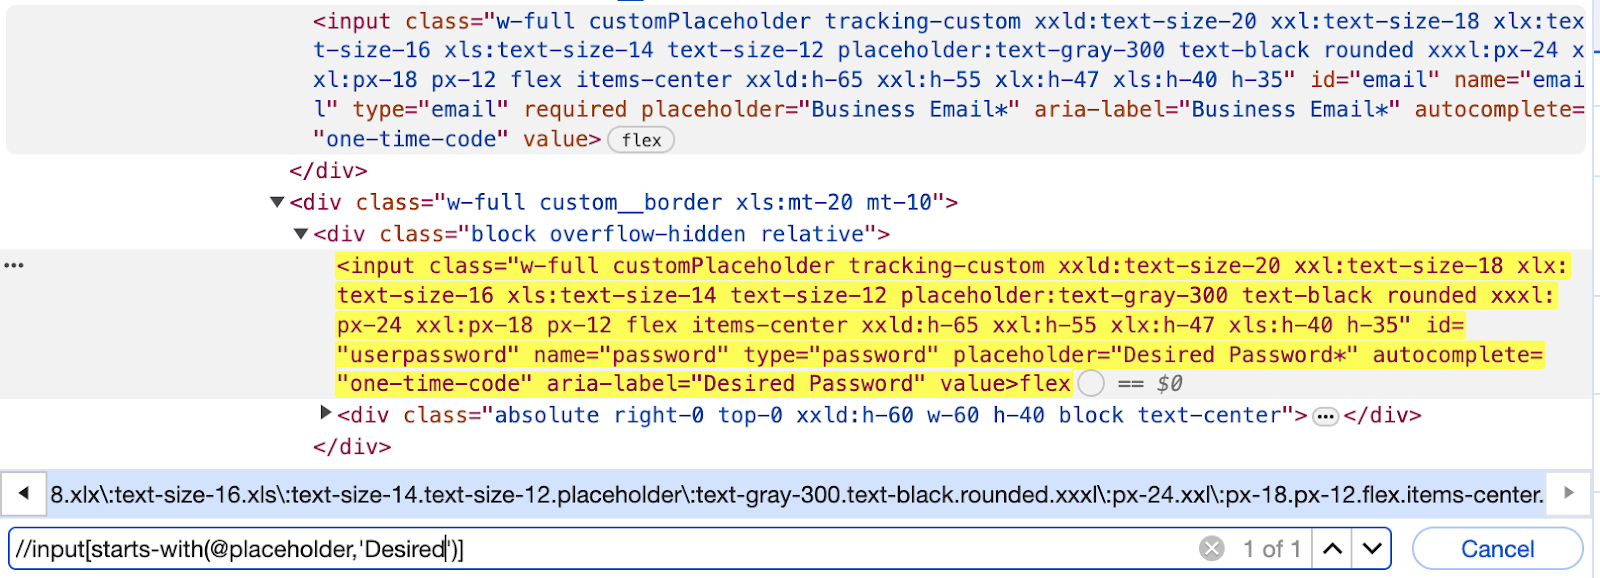
Let us locate the text box for the Desired Password on the Sign up page of LambdaTest using the starts-with() method, as highlighted in the image below.
Element Identification:
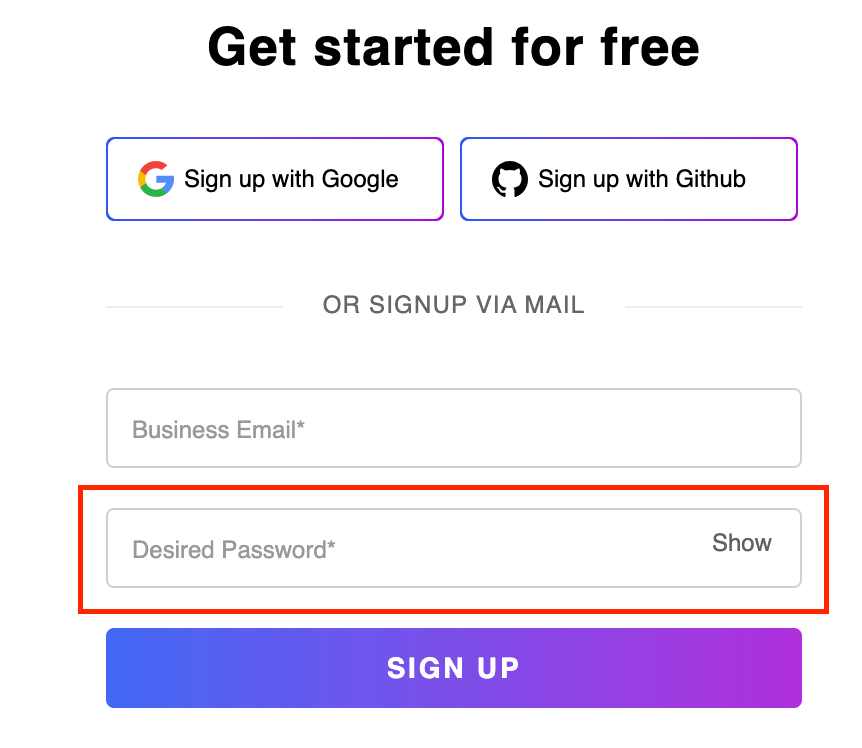
Here, the placeholder attribute of the Desired Password text box contains two words. However, it starts with the word “Desired”. Hence, using the starts-with() method, you can locate the element in this case.
XPath using Index
This approach comes in handy when you wish to specify a given TagName in terms of the index value you wish to locate. For instance, consider a DOM with multiple input tags for each field value, and you wish to input text into the 4th field. In such cases, you can use the index to switch to TagName.
The syntax for using the index in XPath is:
Indexes can also be helpful when the same XPath returns multiple WebElements to you. Let us understand how to use indexes in such cases by referring to the two input text boxes on the LambdaTest Sign up page.
First, we will use a generic XPath for the WebElement and later use an index for locating the exact element.
Element Identification:
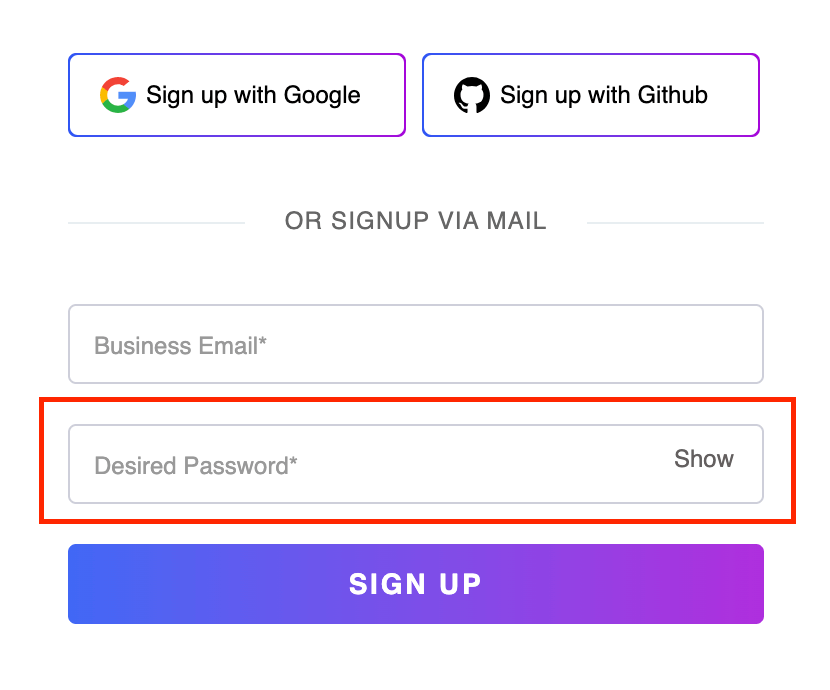
Now, observe the Elements tab; you will see that the above XPath returns you two elements since there are two input text boxes on the web page.
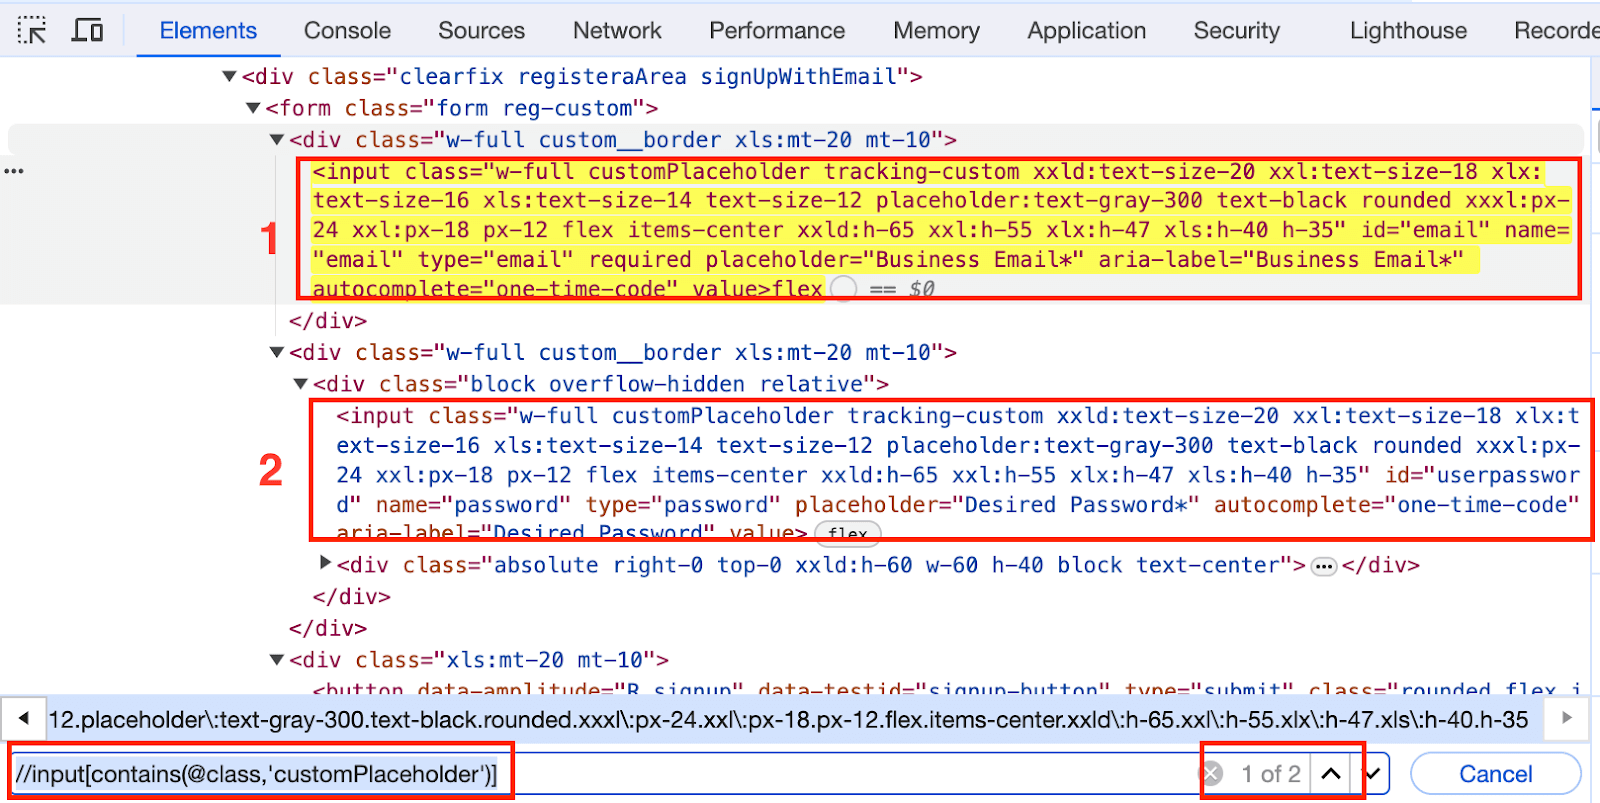
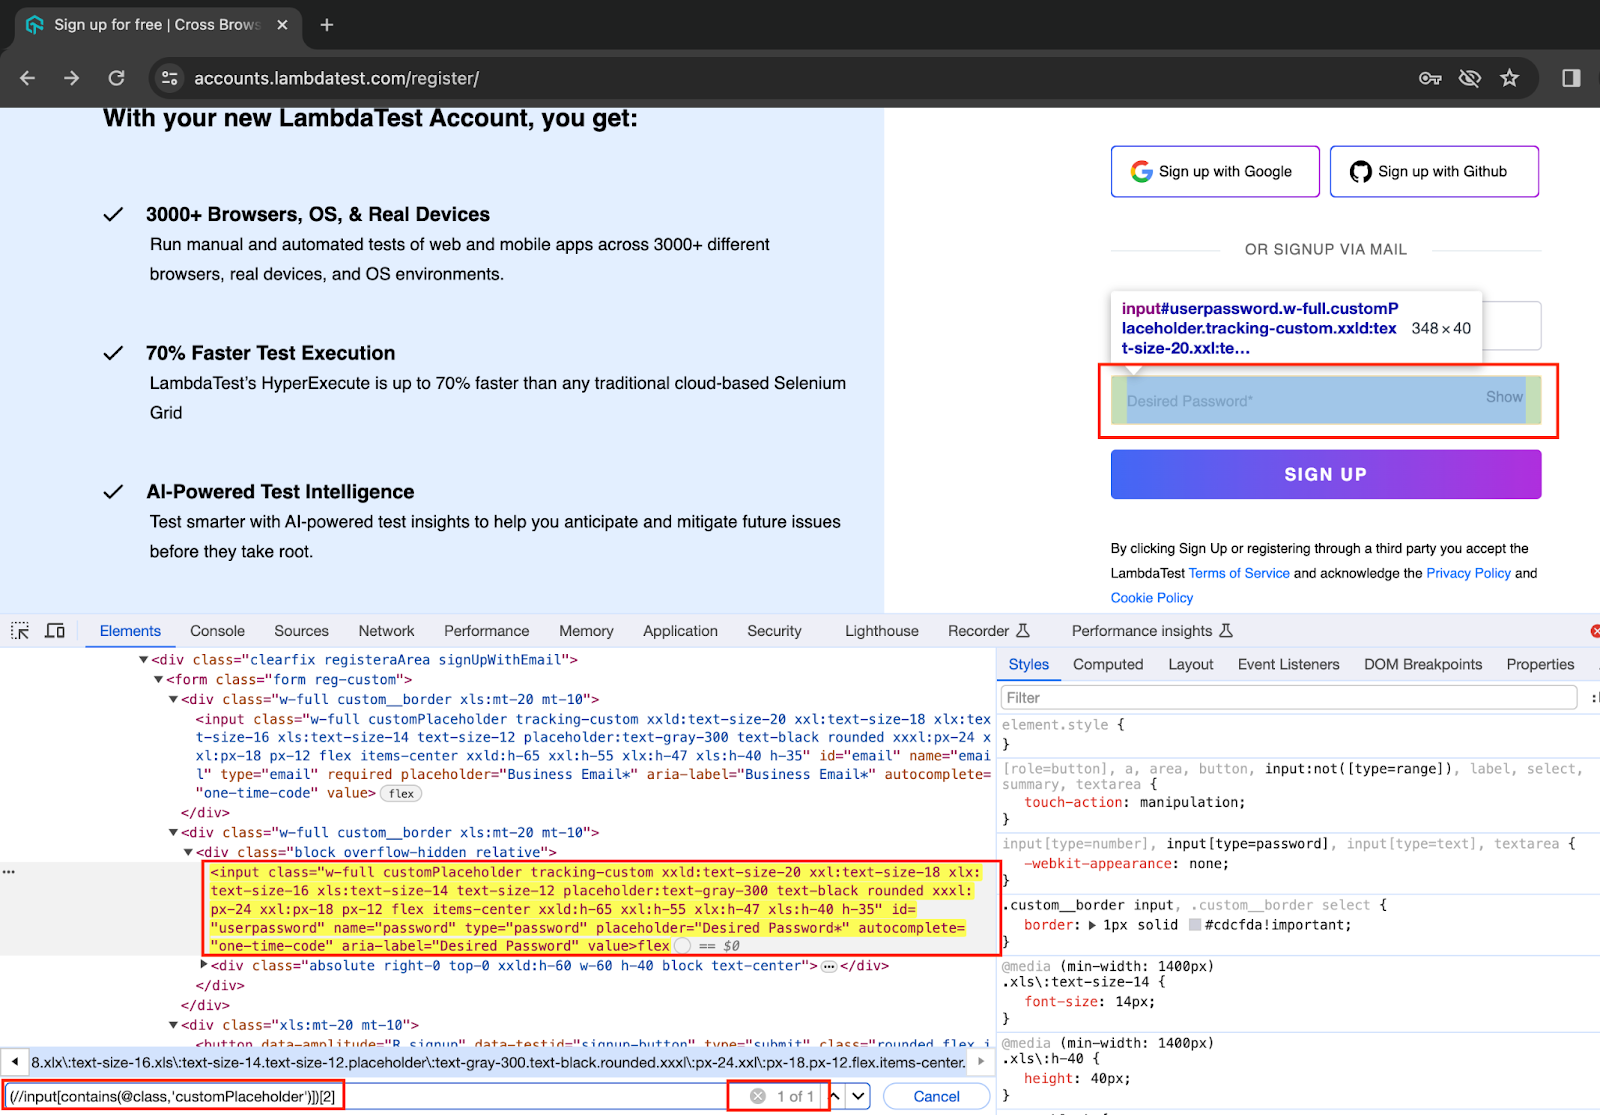
However, in such cases, you can specify the index for the entire XPath and get the right element.
In this case, the Desired Password WebElement is the second text box on the web page. Hence, by specifying the 2nd index for the entire XPath, we can get the Desired Password WebElement.
Chained XPath in Selenium
As the name suggests, we can use multiple XPath expressions and chain them together. The syntax for using chained XPath is as mentioned below.
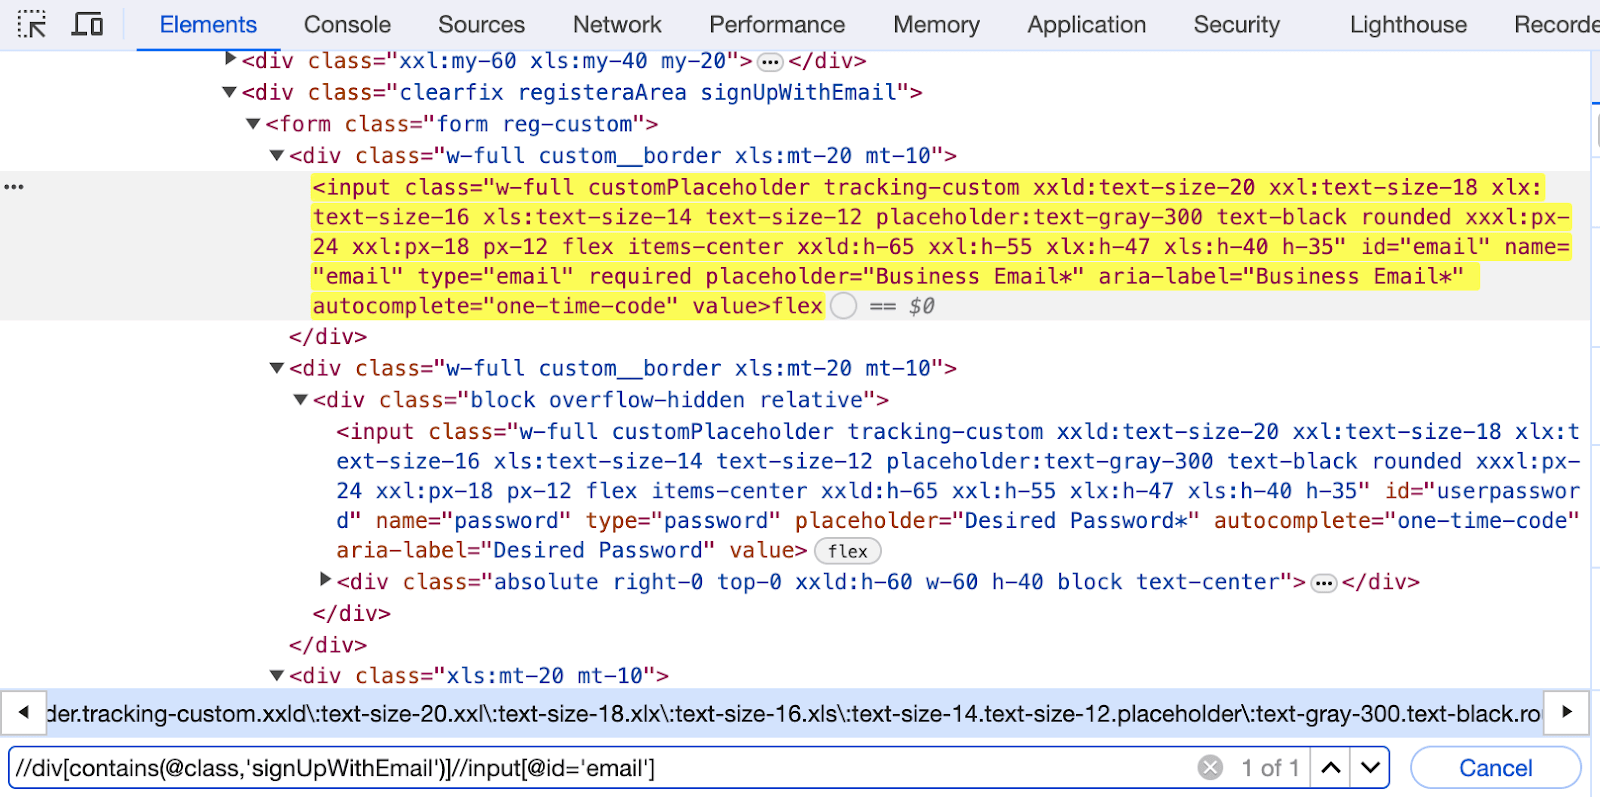
Let us write a chained XPath for the Business Email text box from the LambdaTest Sign up page as highlighted below.
Element Identification:
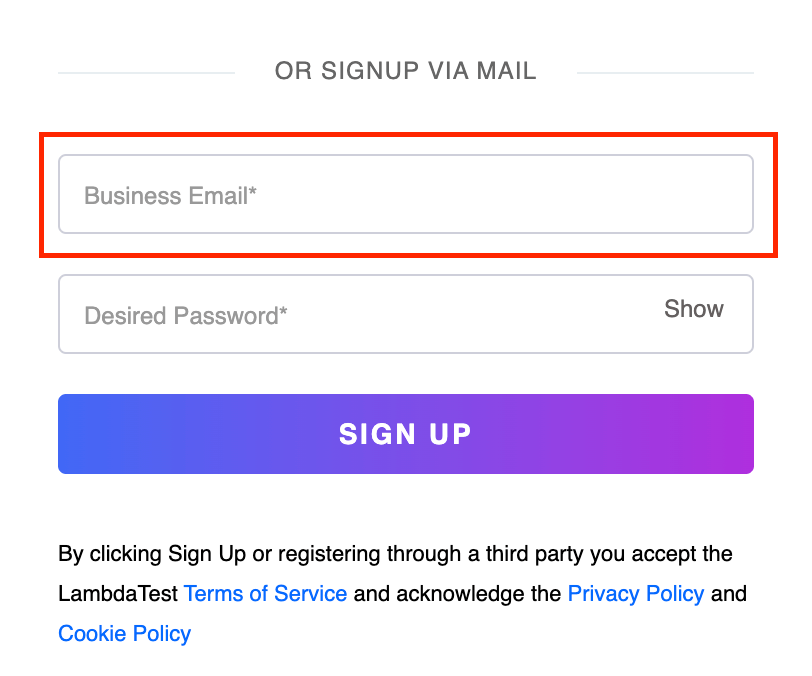
Here, we locate the Business Email input text box using the < div > tag and then navigate to the required text box that follows it.
To gain comprehensive insights into every selector in Selenium, follow this guide on SelectorsHub. It provides detailed information on CSS Selectors and Next Gen XPath in greater depth.
How to write XPath in Selenium using axes methods?
XPath axes come in handy when the exact element TagName or its attribute value is dynamic and cannot be used to locate an element. In such cases, locating elements by traversing through child/sibling or parent elements becomes easy.
Some of the widely used XPath axes are:
XPath using the following
This can be used when you have a unique attribute of the tag before your actual WebElement. For example, using the following, you can have all the elements that follow the current node, and you can simply use Index or another chained XPath to locate your actual WebElement.
The syntax for using the following is.
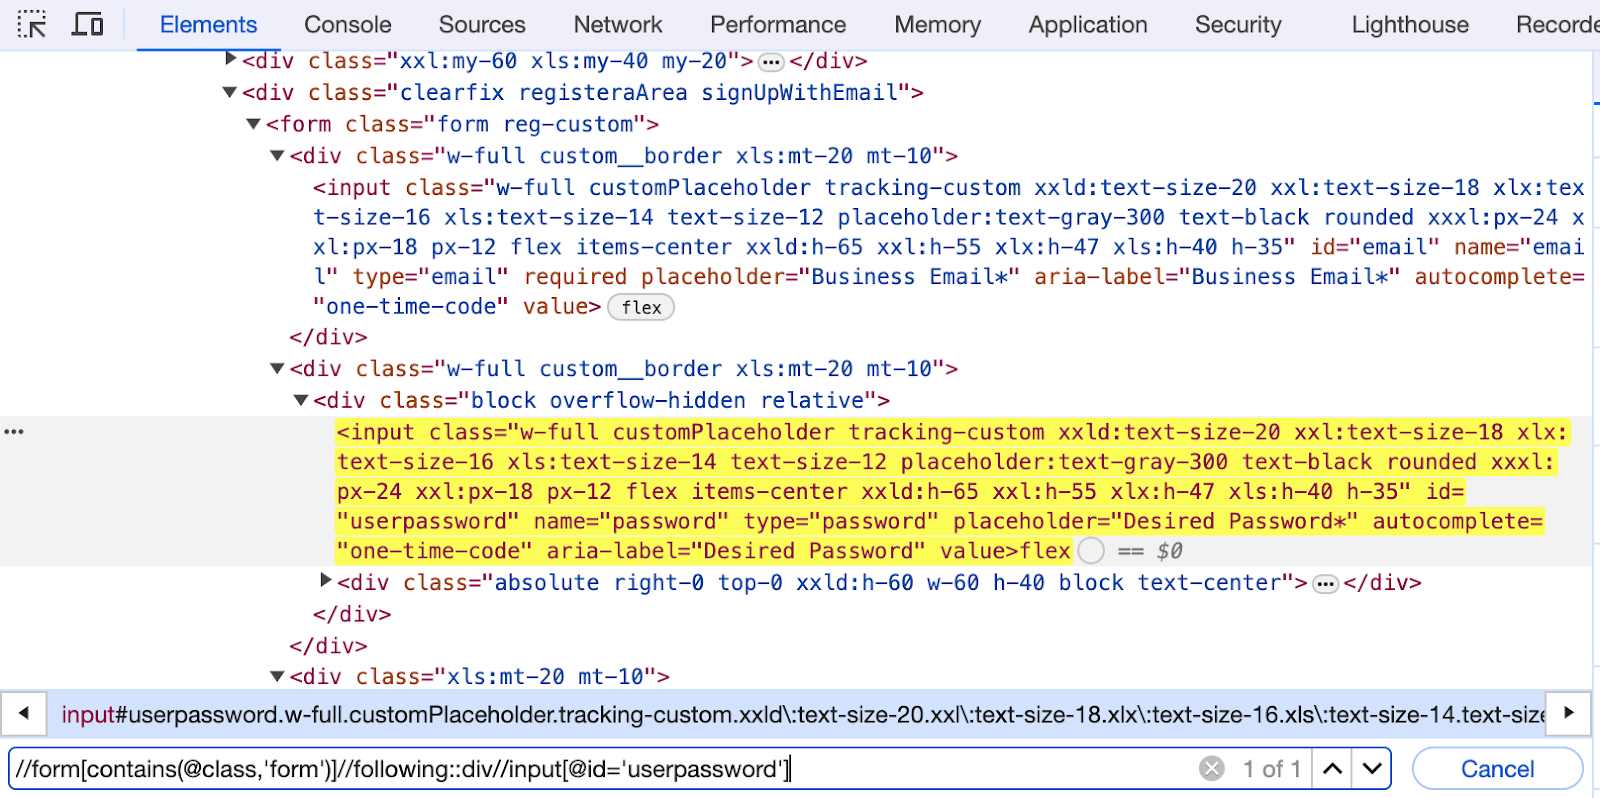
Let us locate the input text box for the Desired Password on the LambdaTest Sign up page using the following.
Element Identification:
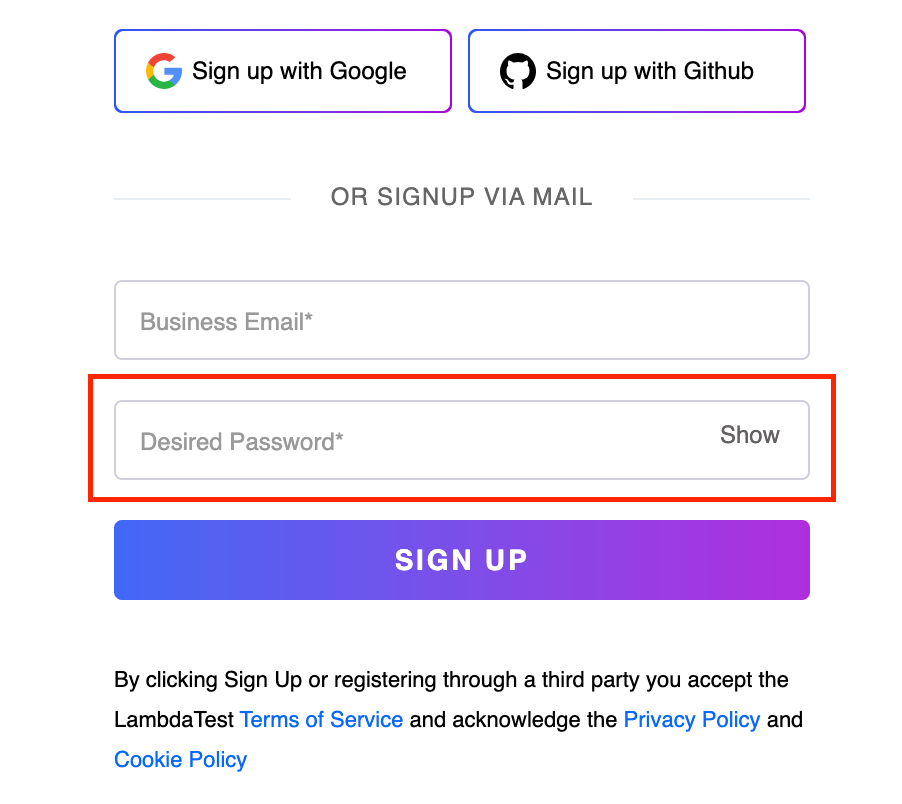
In this case, we have first located the entire form, and then, by using the following, we get the list of all the < div > tags in the form. From there, we use the input tag and locate the input box for the Desired Password.
XPath using following-sibling
As the term signifies, siblings are those nodes that share the same parent or are at the same level. Hence, the following-sibling will return you to the node at the same level and after the current node.
The syntax for using following-sibling is.
Let us understand following-sibling using the Business Email and Desired Password text boxes with the same LambdaTest Sign up page.
Element Identification:
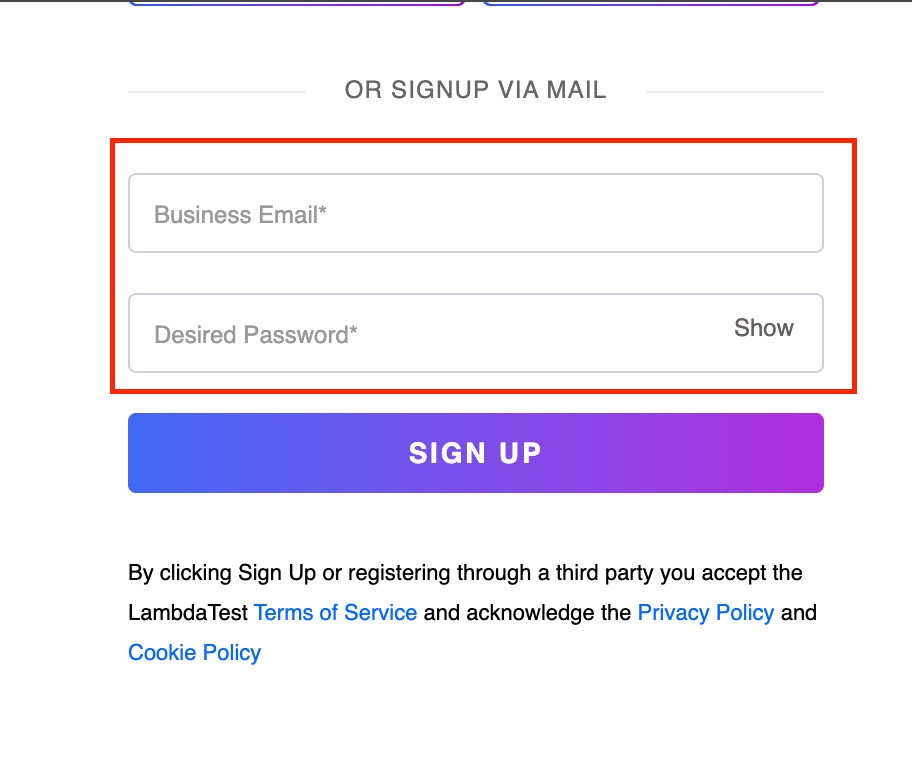
In this case, we first locate the Business Email text box and later, by using the following-sibling, locate the Desired Password text box. Since multiple elements are present at the same level, all can be selected. We use its index to select the particular text box, as discussed in the previous section.
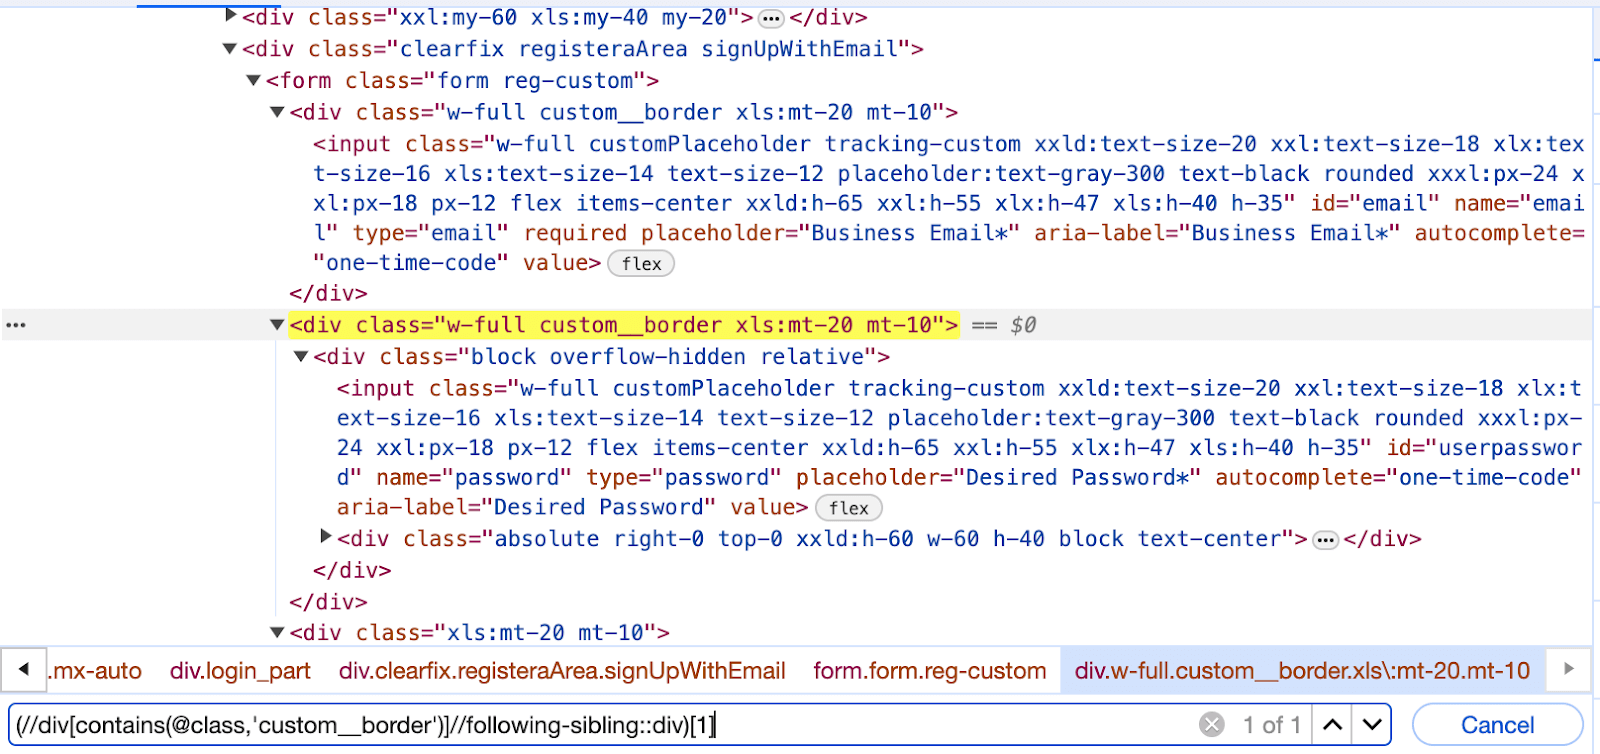
However, you need to understand that in the above option, the simplest way of writing this XPath would be //input[@id=’userpassword’]. The above is one of the implementations for the same element using the following-sibling.
XPath using preceding
In contrast to the following axes, the preceding axes help locate all the elements before the current node in XPath in Selenium.
Using preceding, you can retrieve all the elements preceding the current node, and with an index or another chained XPath expression, you can pinpoint the specific WebElement you are looking for.
The syntax for utilizing the preceding axes is as follows:
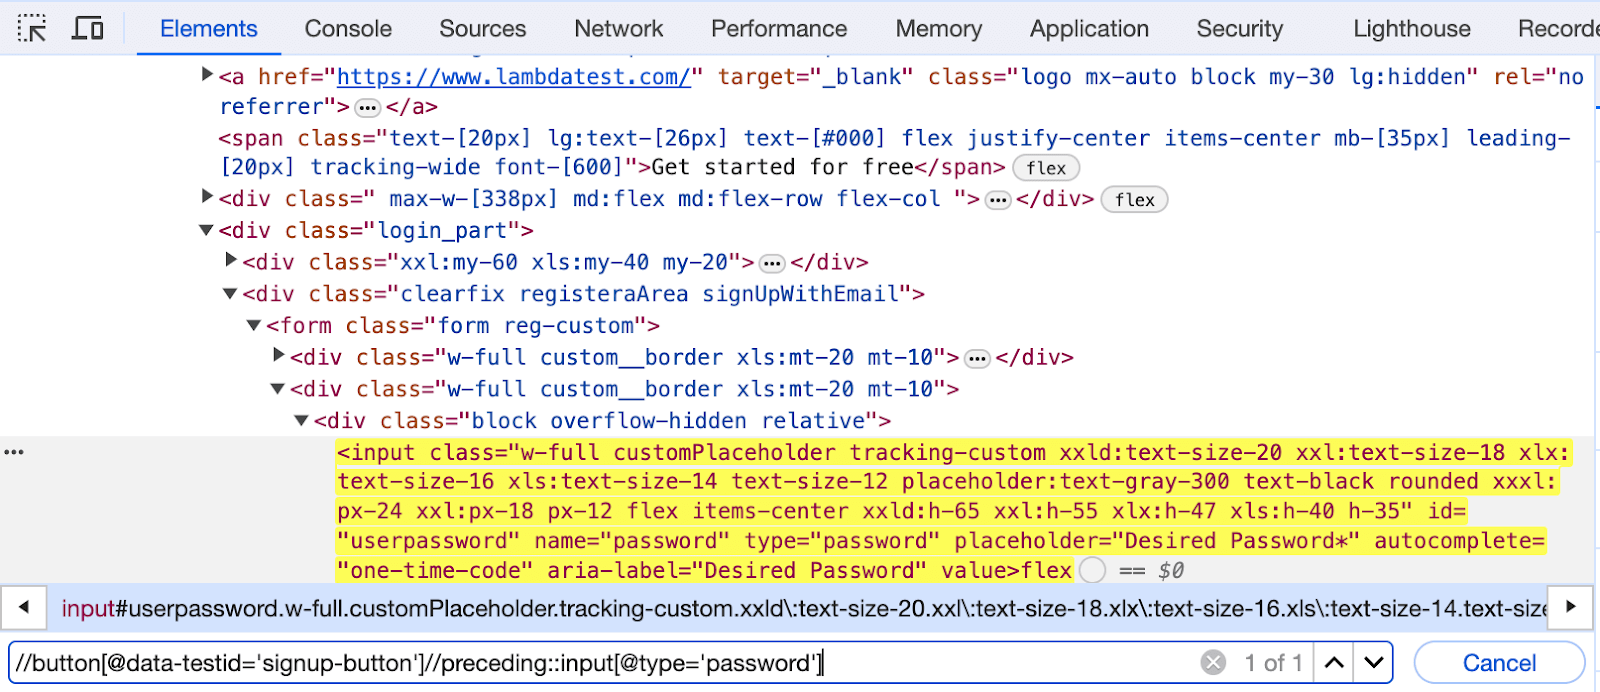
This XPath selects the first preceding < input > element before the Desired Password input field with the attribute type set to password. You may need to adjust the expression based on the specific structure of the HTML on the LambdaTest Sign up page.
Element Identification:

In this case, the initial step involves locating the SIGN UP button below the Desired Password text box on the LambdaTest Sign up page. We navigate to all the < input > tags before that particular node using the preceding axes.
Subsequently, by filtering these preceding elements based on the type attribute with a password value, precisely locate the desired WebElement corresponding to the Desired Password text box.
This method provides an effective way to traverse the HTML structure and pinpoint the specific element of interest.
XPath using preceding-sibling
This concept is very similar to following-sibling. The key distinction lies in the functionality of the preceding-sibling. In contrast to following-sibling, preceding-sibling retrieves all nodes that are siblings or at the same level but appear before the current node
The syntax for using preceding-sibling is as follows:
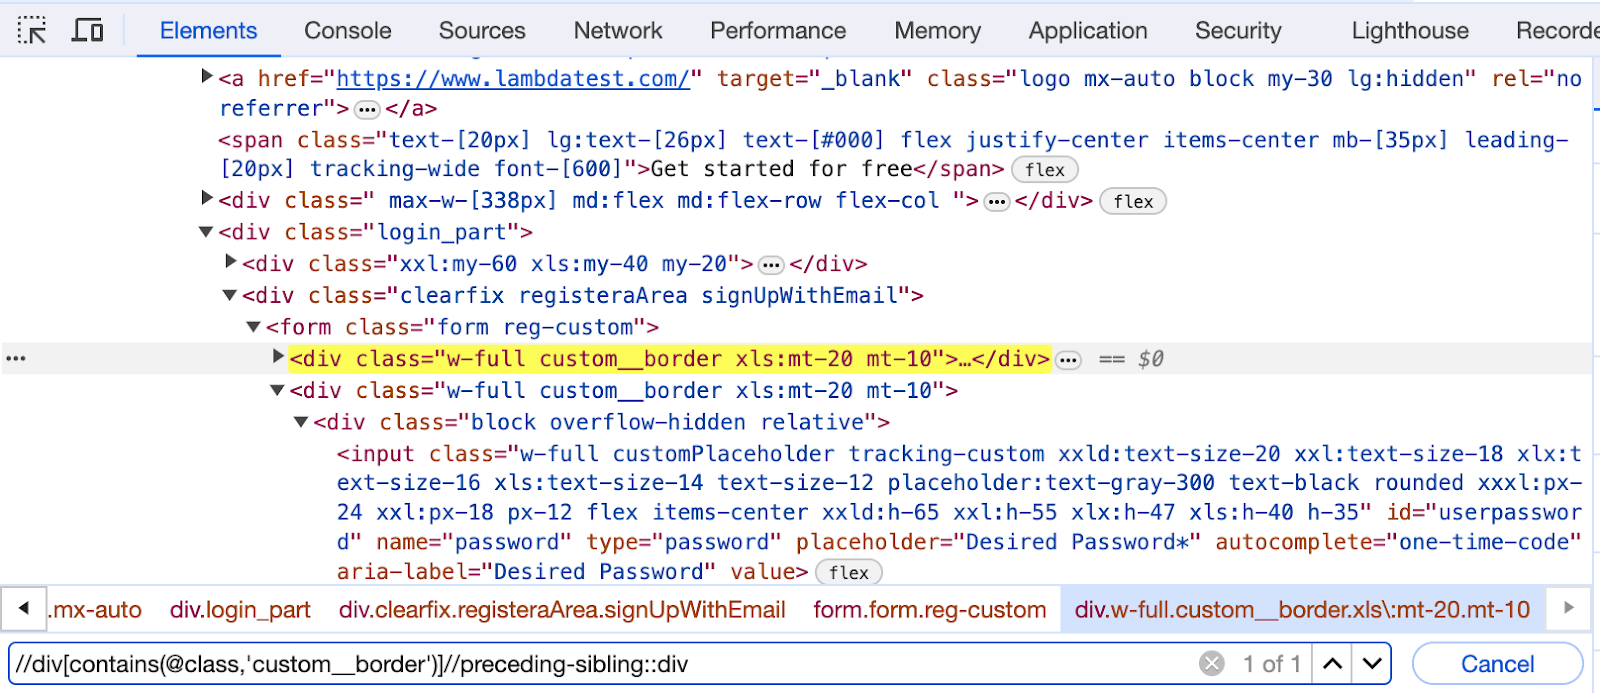
Let us see the same example as in following-sibling for locating the below highlighted WebElement using preceding-sibling.
Element Identification:
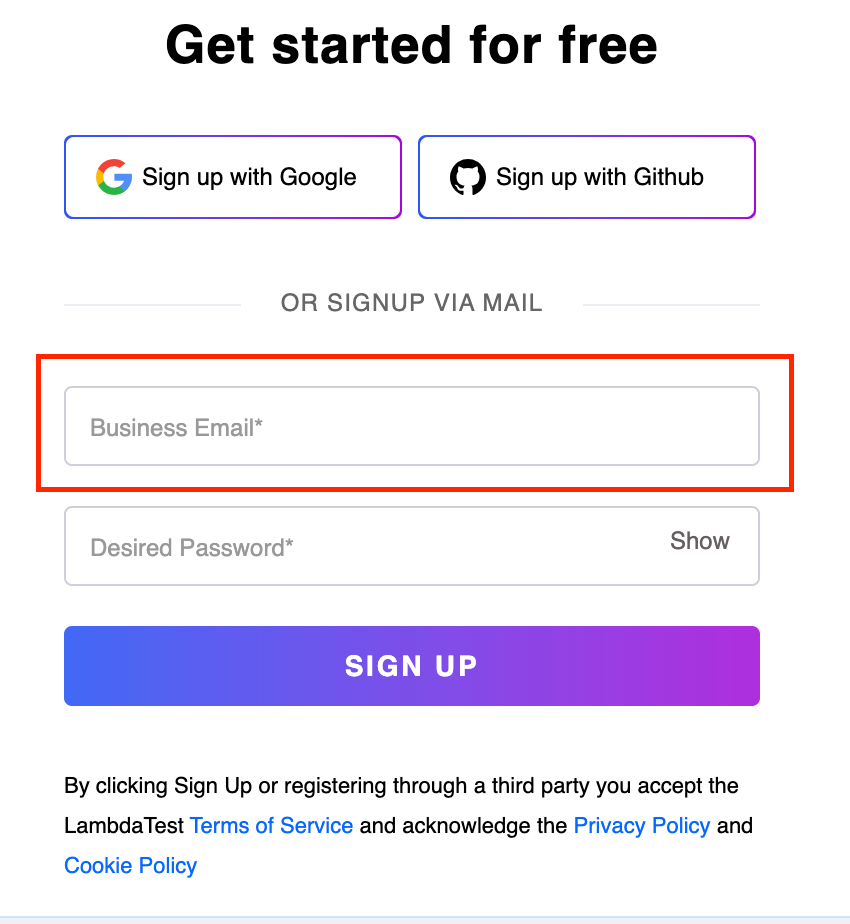
In this scenario, the initial step involves locating the Desired Password text box. Subsequently, by utilizing the preceding-sibling axes, we navigate to the preceding-sibling of the Desired Password text box, which is the Business Email text box.
XPath using child
As the name suggests, this approach is used to locate child elements of a particular node. A common use case for this approach is to iterate through the data in a table by navigating through its rows.
The syntax for using the child axes is.
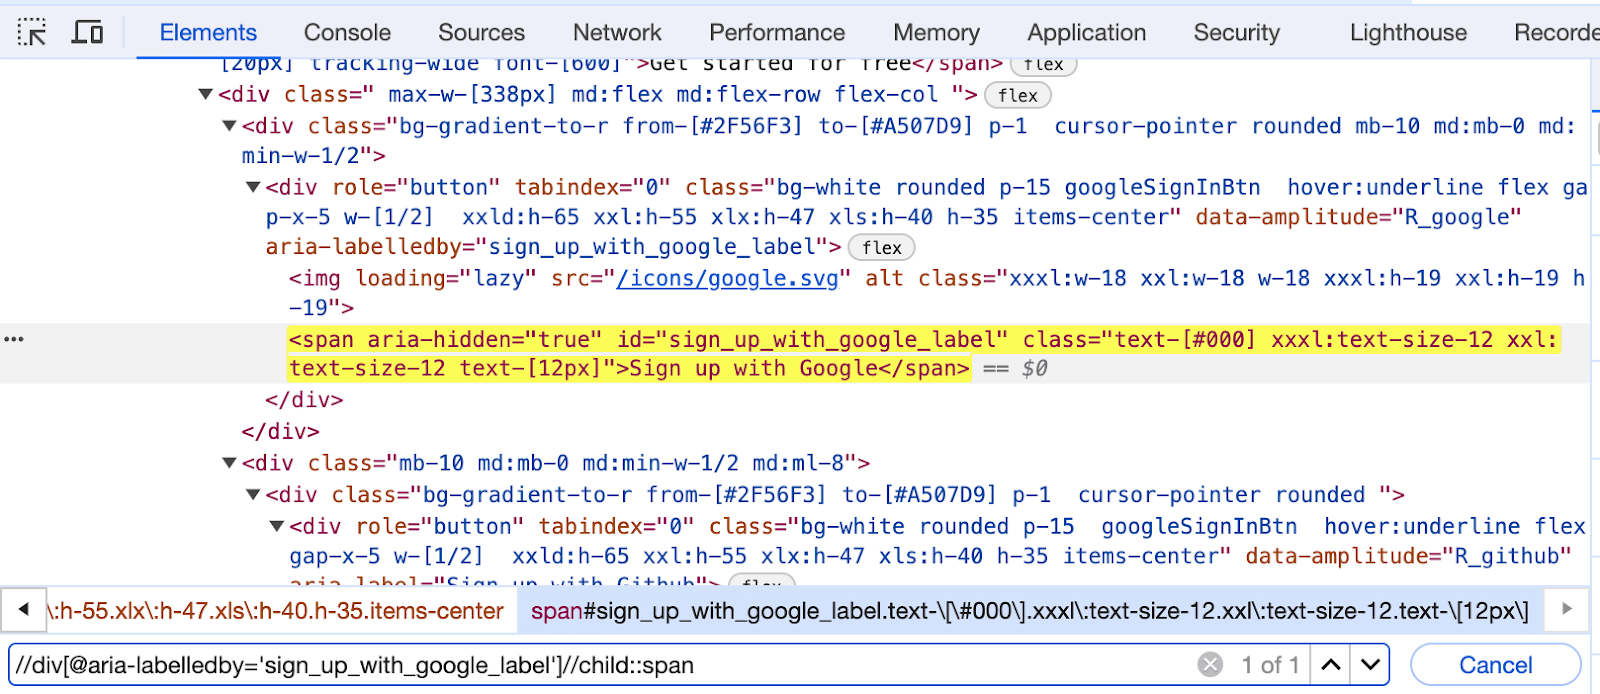
Let us write XPath for the Sign up with Google option using the child axes.
Element Identification:
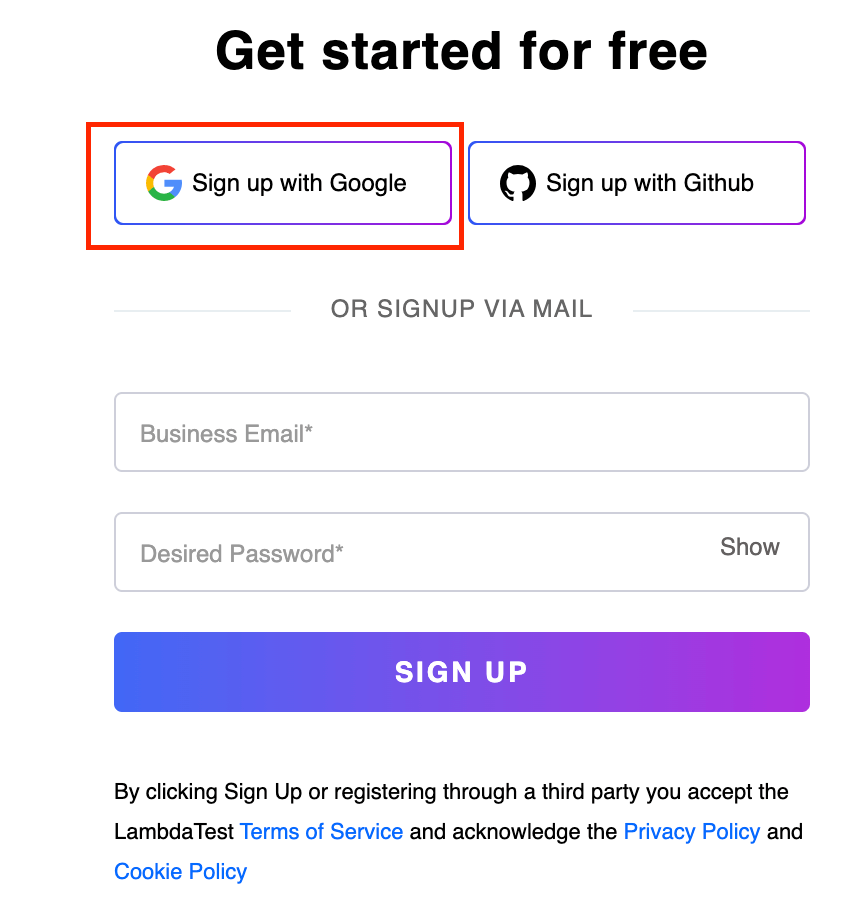
In this case, the initial step involves locating the Sign up with Google button node, containing two child nodes.
Later, by utilizing the child axes and specifying the < span > tag, navigate to the specific child node represented by the < span > tag.
XPath using parent
XPath using the parent axes is a method used to select the parent node of the current node in an XML or HTML document. This axes allows you to navigate from a specific element to its immediate parent.
The syntax for using the parent axes is.
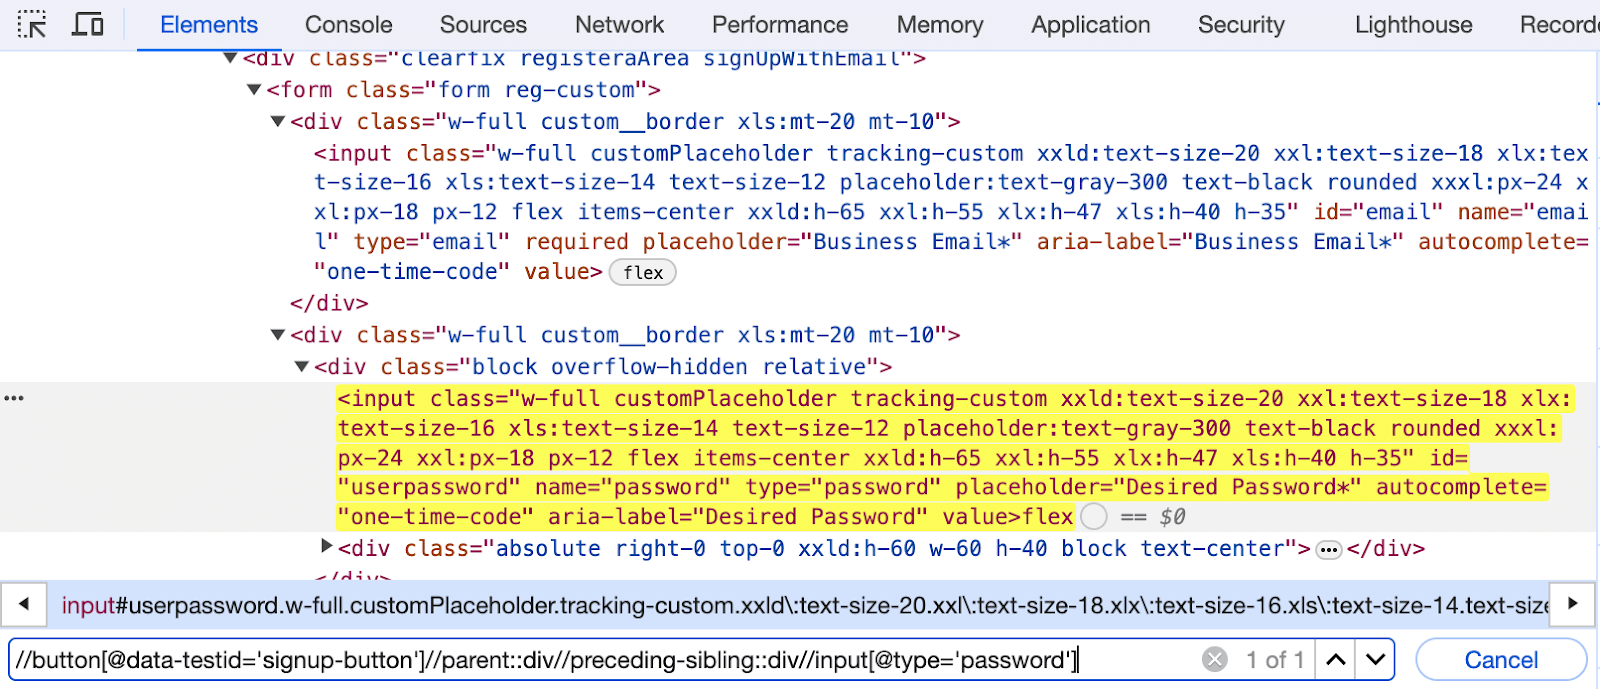
Let us see the XPath of the Desired Password input text box of the LambdaTest Sign up page, shown in the below image.
Element Identification:

In this case, we have first located the node for the SIGN UP button and then navigated to its parent < div >. From there, by using the preceding-sibling we get all the < div > tags at the same level, from where the desired input tag is located, with the help of the type attribute.
XPath using descendant
XPath using the descendant axes is a method employed to select all the descendants of the current node in an XML or HTML document. In this context, descendants encompass not only immediate child nodes but also include grandchild nodes, great-grandchild nodes, and so forth.
The syntax for using descendant is.
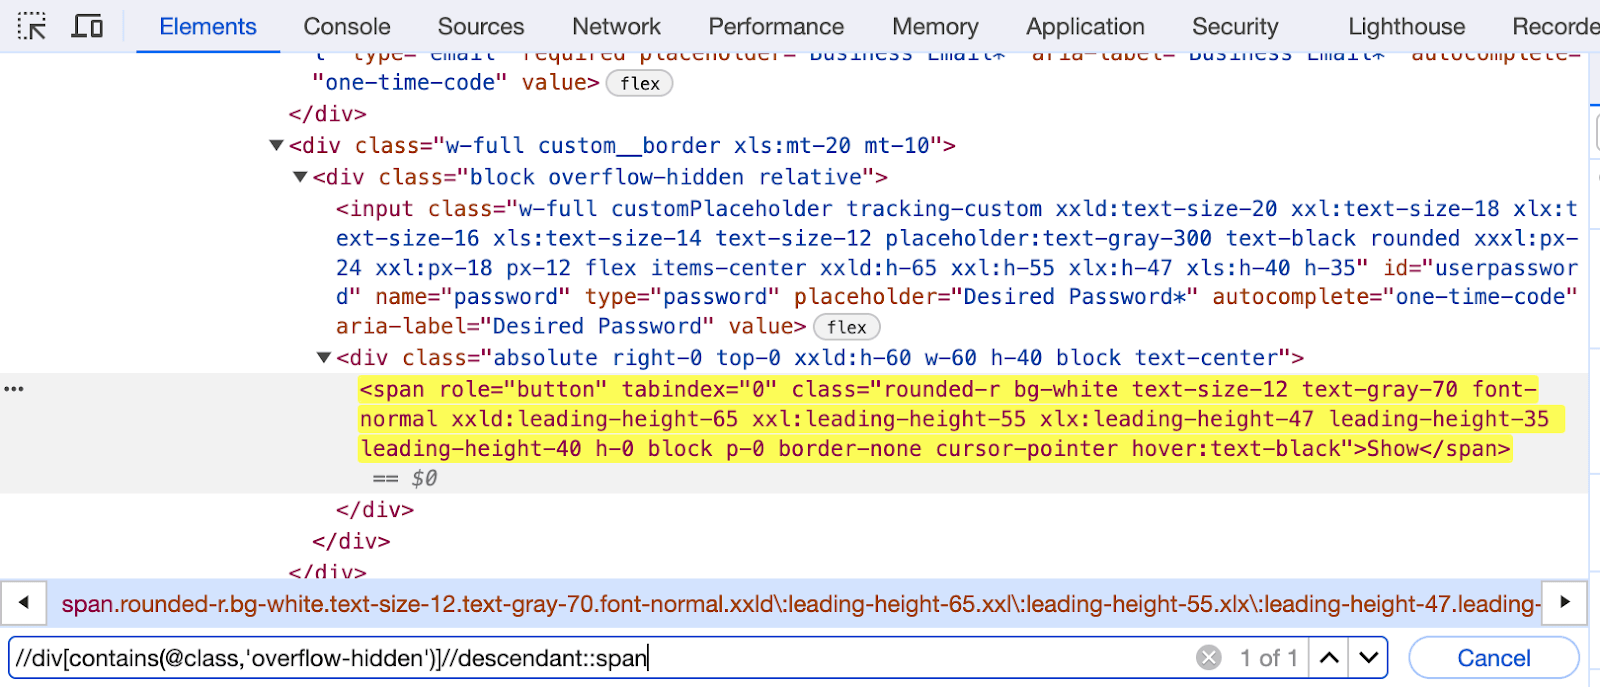
Let us locate the Show button next to the input box for a Desired Password using the descendant.
Element Identification:

The code selects all the < span > elements that are descendants of an < div > element with a class containing the overflow-hidden substring.
XPath using ancestor
This method is used for selecting the ancestors of the current node. In this context, ancestors refer to the parent nodes, grandparent nodes, and so forth.
The syntax for using the ancestor axes is.
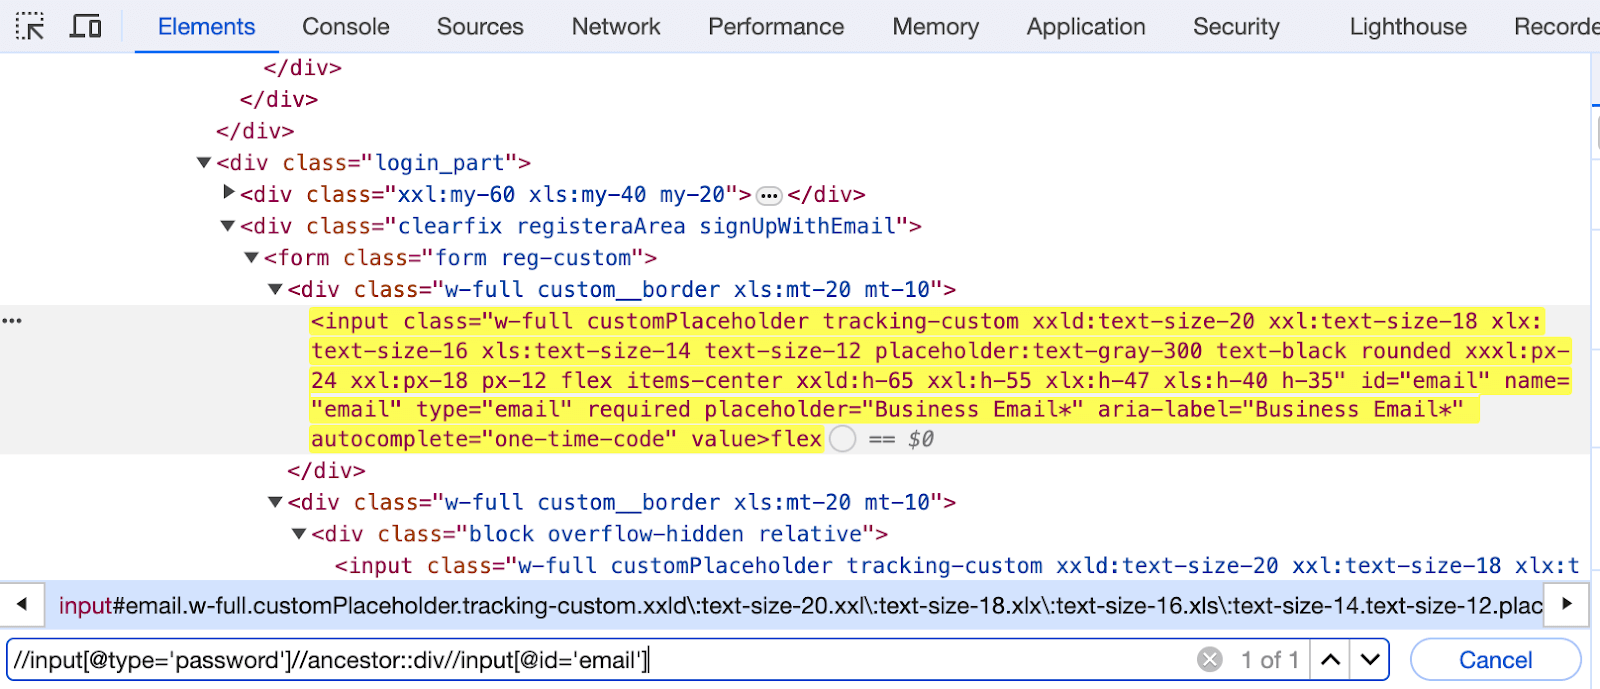
Let us write the XPath of the Business Email input box on the LambdaTest Sign up page.
Element Identification:

Here, we locate the Desired Password input box and, using its ancestor < div >, locate the email input element.
To know more detailed information on locating the elements using TagName in Selenium, follow this guide with practical insights on locating elements by TagName in Selenium.
You can also learn how to automate a basic Sign up page with various locating strategies to enhance your testing experience. Follow the video tutorial for detailed guidance on automating the sign-up page using Selenium 4.
In the following section, let us learn more about the difference between static and dynamic XPath in Selenium.
The difference between static and dynamic XPath
XPath can be classified into static XPath and dynamic XPath based on the implementation of the locator string and the WebElements under consideration. Let us look at the differences between the two to understand them better.
| # | Static XPath | Dynamic XPath |
|---|---|---|
| Definition | Static XPath refers to the direct, absolute path specified from the root of the webpage to locate elements. | Dynamic XPath involves creating XPath expressions based on the attributes and relationships of elements relative to other elements. |
| Type of XPath | Absolute XPath | Relative XPath |
| Flexibility & Adaptability | Less flexible because any changes in the structure or attributes of the elements can break the XPath, making it fragile. | More adaptable to changes in the structure or attributes of the elements as it’s based on properties that are less likely to change. |
| Maintenance | Requires more maintenance as any changes in the structure or attributes of the elements, often necessitating manual updates to XPath expressions. | Tends to be more resilient to changes, as the XPath created is relative based on attributes or using axes methods. |
| Readability | Relatively less readable as the XPath locator string becomes large for elements towards the end of the DOM or larger web pages. | More readable and understandable as they utilize attributes or relationships that convey the purpose of locating elements more intuitively. |
| Examples | /html/body/div[1]/form/input[2] | //input[@id=’username’] |
Now that we are aware of using XPath in Selenium with various methods, one common challenge testers face when dealing with dynamic WebElements.
Consider a scenario where you have a form with input fields, and the IDs of these fields are dynamically generated or frequently changed by the application.
As a tester, you must consistently locate and interact with these input fields, regardless of their changing IDs.
The following section will show how to deal with dynamic WebElements using XPath.
How to create a dynamic XPath in Selenium?
The dynamic XPath refers to creating XPath expressions for dynamic WebElements. Dynamic WebElements are those WebElements whose positions or attributes change or get refreshed frequently, either as a result of user input, previous actions, or changes to the webpage itself.
Dynamic XPaths are XPath locators that can adapt to changes in a WebElement and do not require the locator to be rewritten each time a change is made or a previous condition is modified. They are written so that the same expression can be located in the WebElement in all conditions.
Some of the most commonly used XPath locator strategies that can be used to locate dynamic WebElements have already been discussed in previous sections. These include
- Using contains(), text(), starts-with(), dynamic element indexes
- Using logical operators OR & AND separately or together
- Using XPath axes methods: following,following-sibling, preceding, preceding-sibling, child, parent, ancestor, descendant.
Another commonly used method for creating dynamic XPaths involves using wildcards. The asterisk ’*’ wildcard can represent any element tag, allowing the location of elements without specifying a particular TagName.
Additionally, you can combine the wildcard with specific attribute conditions to create more targeted and adaptable XPath expressions for locating elements in a dynamic context.
The syntax for dynamic XPath is.
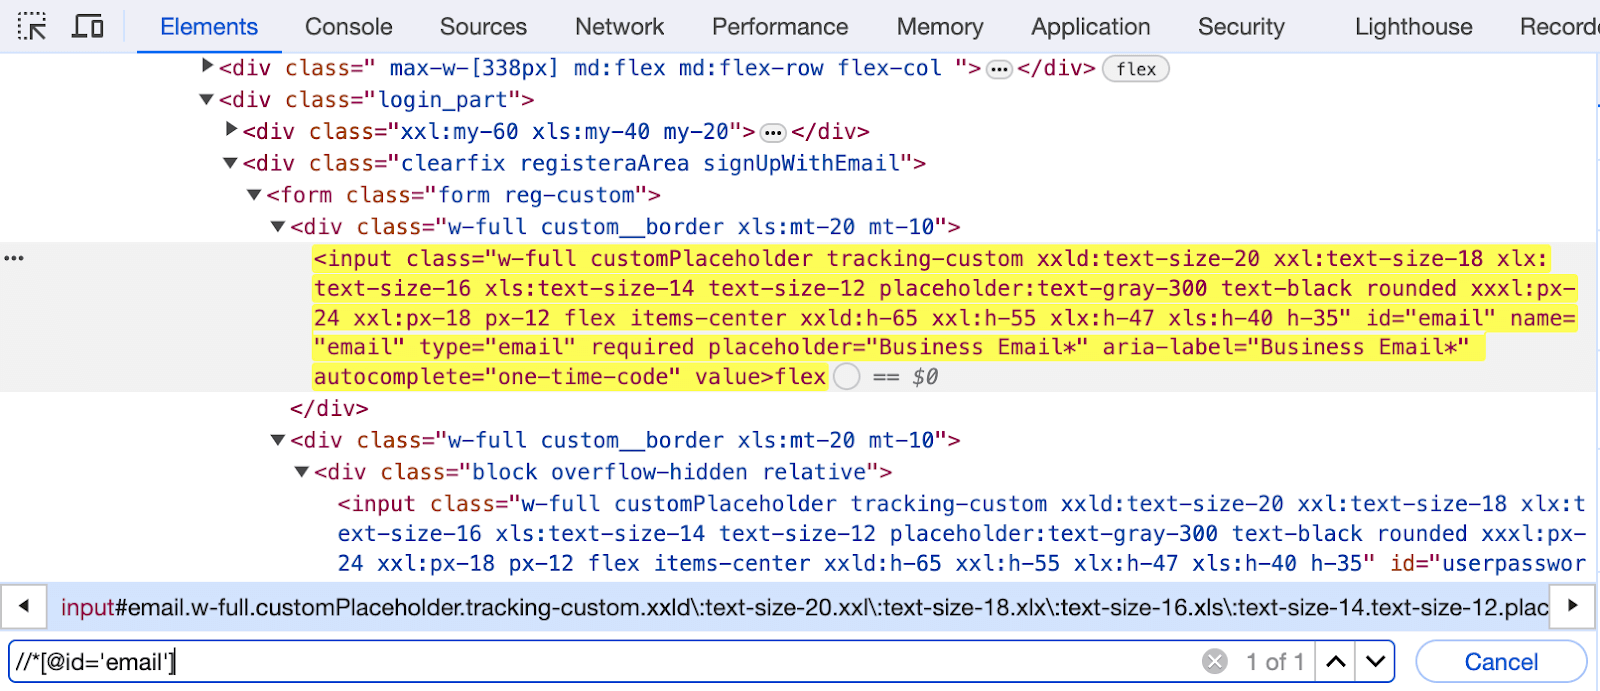
Element Identification:
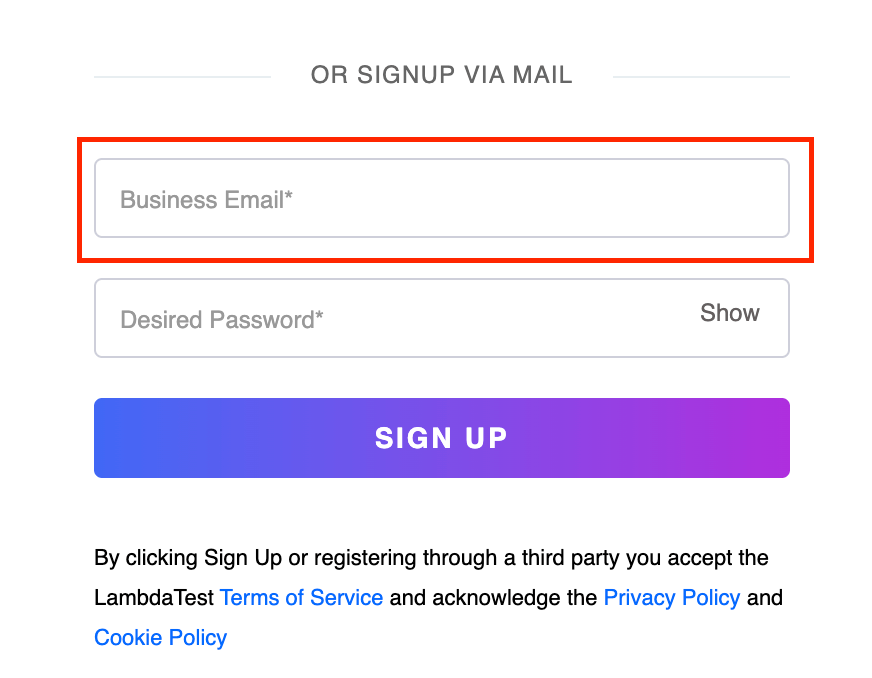
In this case, we are utilizing the asterisk ‘*’ with a relative XPath to dynamically identify and locate the element of the Business Email input box.
Handling dynamic elements can be challenging for testers as identifying locators of elements with frequently changing attributes, like IDs or Classes, becomes a significant challenge, especially when testing various browsers.
In these situations, traditional automation approaches may struggle to maintain stability and reliability. To address these challenges, leveraging a cloud-based platform like LambdaTest proves beneficial.
LambdaTest is an AI-native test orchestration and execution platform that lets you perform manual and automated testing at scale with over 5000+ real devices, browsers, and OS combinations.
What features does LambdaTest offer for handling dynamic WebElements?
This platform is a robust solution for handling dynamic WebElements, prioritizing stability and reliability. With features such as real device cloud testing, parallel testing, and instant infrastructure scalability, it’s tailored to manage dynamic elements across diverse environments effectively. Let’s delve into the reasons why LambdaTest is the preferred choice.
- Browser and device diversity: It provides a wide range of real browsers and devices for comprehensive testing coverage.
- Parallel testing capabilities: It executes scripts concurrently on multiple environments, speed testing and validating dynamic elements across configurations.
- Real-time testing: It enables real-time testing, allowing observation of dynamic element behavior under various conditions.
- Real device cloud testing: It offers real device cloud testing, allowing you to test mobile apps on real devices and emulators and simulators across various platforms and versions. This approach provides a comprehensive testing environment for observing dynamic element behavior under different conditions.
- Instant infrastructure scalability: It offers instant scalability, meeting the demands of handling dynamic elements without managing physical hardware.
To start with the LambdaTest platform, follow this complete video tutorial guide and upgrade your automation testing.
To explore automation testing concepts, subscribe to the LambdaTest YouTube Channel and access tutorials on Selenium testing, Cypress testing, Playwright testing, Appium testing, and more.
How to capture the XPath of loader images?
While performing automation testing using Selenium, testers often encountered scenarios where certain WebElements appeared on the screen for a brief duration. Writing XPaths for such elements can be challenging, especially when dealing with dynamic content like loading images that don’t stay visible for an extended period.
Consider the example of loading web page images; they often appear and disappear quickly. Capturing their locators can be tricky due to their transient nature. Below is a screen capture from Twitter (X) illustrating a loader image. Let us demonstrate how to capture the XPath in the step-by-step process below.
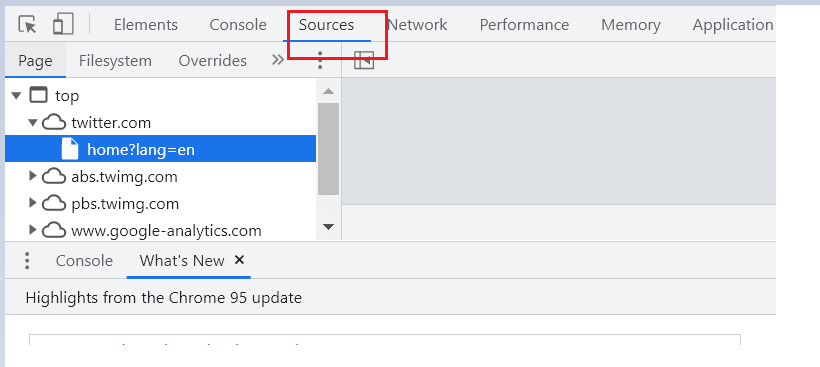
Step 1: As soon as the page opens, press F12 to be ready to inspect the element. Switch to the Sources tab, as highlighted in the below image.
Step 2: When the loading symbol appears on your screen, press F8 or click on the image highlighted below.
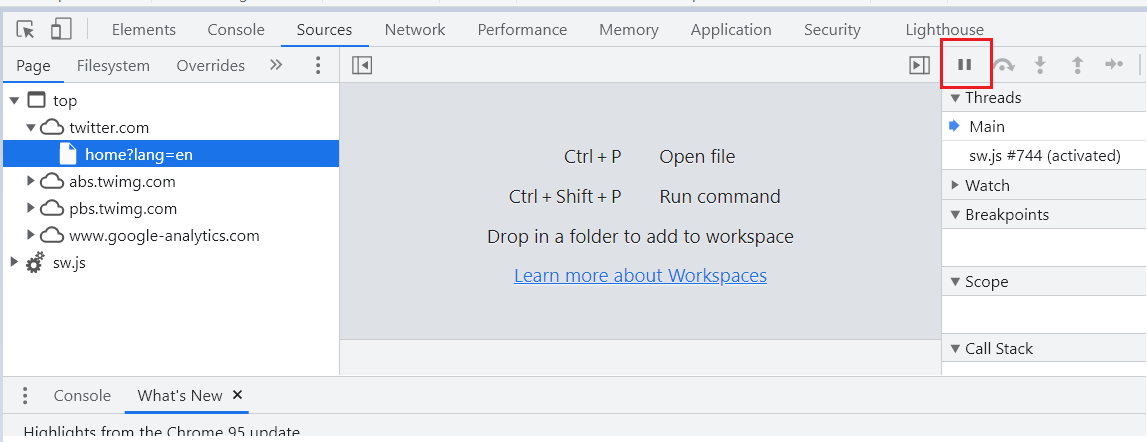
This will pause the execution, and you will see a notification badge like below on top of your screen.

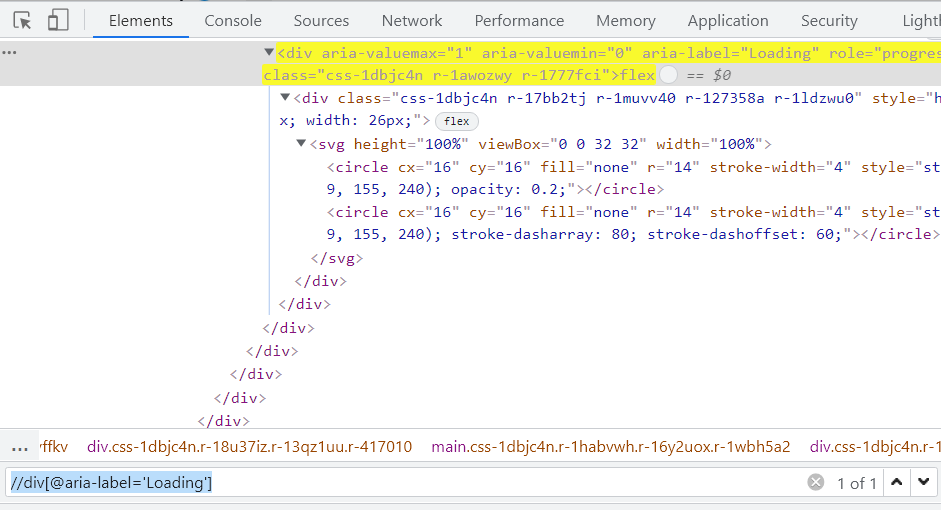
Step 3: Now, you can return to the Elements tab and start identifying and writing the locator.
Step 4: Go back to the Sources tab and click on the resume icon as shown below.
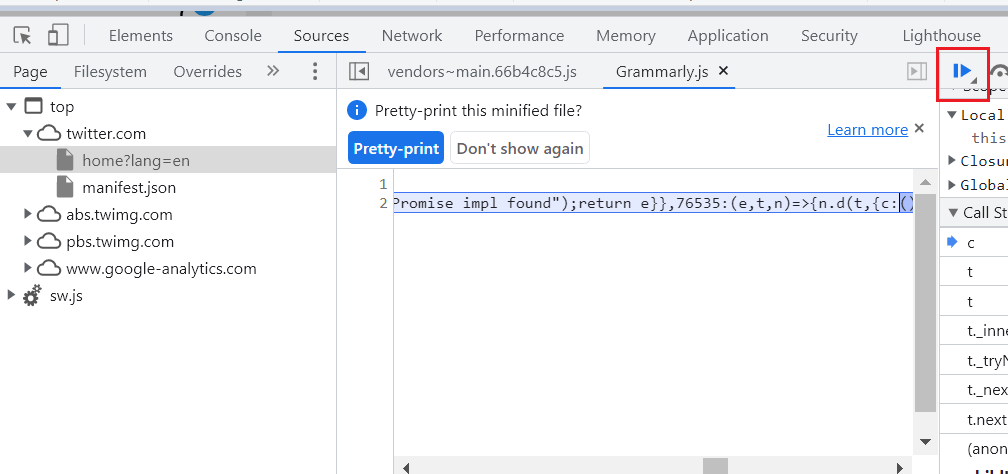
This way, you can simply pause the execution and let the element be on your screen till you identify the locator. To learn more about XPath, follow this XPath locator cheat sheet to learn and use all the various ways of locating WebElement efficiently, making your automation testing process faster.
Conclusion
XPath in Selenium is a fundamental concept while working with test automation. Whether using a simple XPath that contains() or starts-with() or more complex ones with following or preceding, choosing the right XPath is crucial for test case stability.
We also learned how leveraging a cloud-based platform can be beneficial in enhancing the testing process when working around dynamic WebElements, and we also learned how LambdaTest provides greater control over script stability. With other WebElements, learning XPath is also essential and can be an enjoyable part of building your automation skills.
Frequently Asked Questions (FAQs)
What is the XPath web locator in Selenium?
XML Path Language, or XPath, is used to find WebElements on a page. This allows you to interact with different WebElements as needed. These actions can include entering values, selecting or deselecting options, clicking on buttons, or fetching the properties of the WebElement.
Which WebElements locators can be used other than XPath in Selenium?
The most commonly used WebElement locators besides XPath include ID, Name, LinkText, PartialLinkText, and CSS Selectors.
What is the difference between Absolute and Relative XPath?
Absolute XPath begins from the root of the HTML document and specifies the complete path to the element. It starts with a single slash /.
Relative XPath starts with a double slash // and refers to any element directly in the DOM, which can then be used to traverse and locate the desired element using its tag and attributes. It is always preferred over an absolute XPath as it is not a complete path from the root element.
Can XPath be used to locate dynamic WebElements?
Yes, XPath is one WebElement locator that can be used to locate dynamic WebElements with ease. It provides several methods to do this effectively. These include using contains, logical operators, XPath axes, wildcards, etc.
Is XPath the fastest WebElement locator in Selenium? If not, which one is the fastest?
XPath is not the fastest WebElement locator. However, it is widely used because it can locate almost all types of WebElements and provides a wide range of functions for doing so.
ID locator is the most precise and quickest way to locate a WebElement. This is because the ID of an element is supposed to be unique throughout the DOM, making it easy to identify. As a result, the ID locator is the preferred method for locating WebElements in Selenium.
What are some differences between XPath and CSS selectors?
CSS selectors are simpler to learn and faster to use than XPath. This makes them easier to maintain and a better choice for larger and more complex projects.
Another major difference between XPath and CSS is that XPath can locate elements in both directions using XPath axes methods, while CSS can only move in the forward direction.
Got Questions? Drop them on LambdaTest Community. Visit now


