What Is Hypothesis Testing in Python: A Hands-On Tutorial
Jaydeep Karale
Posted On: June 5, 2024
![]() 152768 Views
152768 Views
![]() 28 Min Read
28 Min Read
In software testing, there is an approach known as property-based testing that leverages the concept of formal specification of code behavior and focuses on asserting properties that hold true for a wide range of inputs rather than individual test cases.
Python is an open-source programming language that provides a Hypothesis library for property-based testing. Hypothesis testing in Python provides a framework for generating diverse and random test data, allowing development and testing teams to thoroughly test their code against a broad spectrum of inputs.
In this blog, we will explore the fundamentals of Hypothesis testing in Python using Selenium and Playwright. We’ll learn various aspects of Hypothesis testing, from basic usage to advanced strategies, and demonstrate how it can improve the robustness and reliability of the codebase.
TABLE OF CONTENTS
- What Is a Hypothesis Library?
- Decorators in Hypothesis
- Strategies in Hypothesis
- Setting Up Python Environment for Hypothesis Testing
- How to Perform Hypothesis Testing in Python?
- Hypothesis Testing in Python With Selenium and Playwright
- How to Run Hypothesis Testing in Python With Date Strategy?
- How to Write Composite Strategies in Hypothesis Testing in Python?
- Frequently Asked Questions (FAQs)
What Is a Hypothesis Library?
Hypothesis is a property-based testing library that automates test data generation based on properties or invariants defined by the developers and testers.
In property-based testing, instead of specifying individual test cases, developers define general properties that the code should satisfy. Hypothesis then generates a wide range of input data to test these properties automatically.
Property-based testing using Hypothesis allows developers and testers to focus on defining the behavior of their code rather than writing specific test cases, resulting in more comprehensive testing coverage and the discovery of edge cases and unexpected behavior.
Writing property-based tests usually consists of deciding on guarantees our code should make – properties that should always hold, regardless of what the world throws at the code.
Examples of such guarantees can be:
- Your code shouldn’t throw an exception or should only throw a particular type of exception (this works particularly well if you have a lot of internal assertions).
- If you delete an object, it is no longer visible.
- If you serialize and then deserialize a value, you get the same value back.
Decorators in Hypothesis
Before we proceed further, it’s worthwhile to understand decorators in Python a bit since the Hypothesis library exposes decorators that we need to use to write tests.
In Python, decorators are a powerful feature that allows you to modify or extend the behavior of functions or classes without changing their source code. Decorators are essentially functions themselves, which take another function (or class) as input and return a new function (or class) with added functionality.
Decorators are denoted by the @ symbol followed by the name of the decorator function placed directly before the definition of the function or class to be modified.
Let us understand this with the help of an example:

In the example above, only authenticated users are allowed to create_post(). The logic to check authentication is wrapped in its own function, authenticate().
This function can now be called using @authenticate before beginning a function where it’s needed & Python would automatically know that it needs to execute the code of authenticate() before calling the function.
If we no longer need the authentication logic in the future, we can simply remove the @authenticate line without disturbing the core logic. Thus, decorators are a powerful construct in Python that allows plug-n-play of repetitive logic into any function/method.
Now that we know the concept of Python decorators, let us understand the given decorators that which Hypothesis provides.
Hypothesis @given Decorator
This decorator turns a test function that accepts arguments into a randomized test. It serves as the main entry point to the Hypothesis.
The @given decorator can be used to specify which arguments of a function should be parameterized over. We can use either positional or keyword arguments, but not a mixture of both.
|
1 |
hypothesis.given(*_given_arguments, **_given_kwargs) |
Some valid declarations of the @given decorator are:
|
1 2 3 4 5 6 7 8 9 10 11 12 13 14 15 16 17 18 19 20 21 22 23 24 25 26 27 28 29 30 31 32 33 34 35 36 37 38 39 40 41 42 43 44 45 46 |
@given(integers(), integers()) def a(x, y): pass @given(integers()) def b(x, y): pass @given(y=integers()) def c(x, y): pass @given(x=integers()) def d(x, y): pass @given(x=integers(), y=integers()) def e(x, **kwargs): pass @given(x=integers(), y=integers()) def f(x, *args, **kwargs): pass class SomeTest(TestCase): @given(integers()) def test_a_thing(self, x): pass |
Some invalid declarations of @given are:
|
1 2 3 4 5 6 7 8 9 10 11 12 13 14 15 16 17 18 19 20 21 22 23 24 |
@given(integers(), integers(), integers()) def g(x, y): pass @given(integers()) def h(x, *args): pass @given(integers(), x=integers()) def i(x, y): pass @given() def j(x, y): pass |
Hypothesis @example Decorator
When writing production-grade applications, the ability of a Hypothesis to generate a wide range of input test data plays a crucial role in ensuring robustness.
However, there are certain inputs/scenarios the testing team might deem mandatory to be tested as part of every test run. Hypothesis has the @example decorator in such cases where we can specify values we always want to be tested. The @example decorator works for all strategies.
Let’s understand by tweaking the factorial test example.

The above test will always run for the input value 41 along with other custom-generated test data by the Hypothesis st.integers() function.
Strategies in Hypothesis
By now, we understand that the crux of the Hypothesis is to test a function for a wide range of inputs. These inputs are generated automatically, and the Hypothesis lets us configure the range of inputs. Under the hood, the strategy method takes care of the process of generating this test data of the correct data type.
Hypothesis offers a wide range of strategies such as integers, text, boolean, datetime, etc. For more complex scenarios, which we will see a bit later in this blog, the hypothesis also lets us set up composite strategies.
While not exhaustive, here is a tabular summary of strategies available as part of the Hypothesis library.
| Strategy | Description |
|---|---|
| st.none() | Generates none values. |
| st.booleans() | Generates boolean values (True or False). |
| st.integers() | Generates integer values. |
| st.floats() | Generates floating-point values. |
| st.text() | Generates unicode text strings. |
| st.characters() | Generates single unicode characters. |
| st.lists() | Generates lists of elements. |
| st.tuples() | Generates tuples of elements. |
| st.dictionaries() | Generates dictionaries with specified keys and values. |
| st.sets() | Generates sets of elements. |
| st.binary() | Generates binary data. |
| st.datetimes() | Generates datetime objects. |
| st.timedeltas() | Generates timedelta objects. |
| st.one_of() | Choose one of the given strategies with equal probability. |
| st.sampled_from() | Chooses values from a given sequence with equal probability. |
| st.lists() | Generates lists of elements. |
| st.dates() | Generates date objects. |
| st.datetimes() | Generates datetime objects. |
| st.just() | Generates a single value. |
| st.from_regex() | Generates strings that match a given regular expression. |
| st.uuids() | Generates UUID objects. |
| st.complex_numbers() | Generates complex numbers. |
| st.fractions() | Generates fraction objects. |
| st.builds() | Builds objects using a provided constructor and strategy for each argument. |
| st.characters() | Generates single unicode characters. |
| st.text() | Generates unicode text strings. |
| st.sampled_from() | Chooses values from a given sequence with equal probability. |
| st.data() | Generates arbitrary data values. |
| st.shared() | Generates values that are shared between different parts of a test. |
| st.recursive() | Generates recursively structured data. |
| st.deferred() | Generates data based on the outcome of other strategies. |
Setting Up Python Environment for Hypothesis Testing
Let’s see the steps to how to set up a test environment to perform Hypothesis testing in Python.
- Create a separate virtual environment for this project using the built-in venv module of Python using the command.
- Activate the newly created virtual environment using the activate script present within the environment.
- Install the Hypothesis library necessary for property-based testing using the pip install hypothesis command. The installed package can be viewed using the command pip list. When writing this blog, the latest version of Hypothesis is 6.102.4. For this article, we have used the Hypothesis version 6.99.6.
- Install python-dotenv, pytest, Playwright, and Selenium packages which we will need to run the tests on the cloud. We will talk about this in more detail later in the blog.


The example tests in this blog are fully compatible with Python 3.12, pytest 7.4, Playwright 1.14.2, and Selenium 4.18.1.
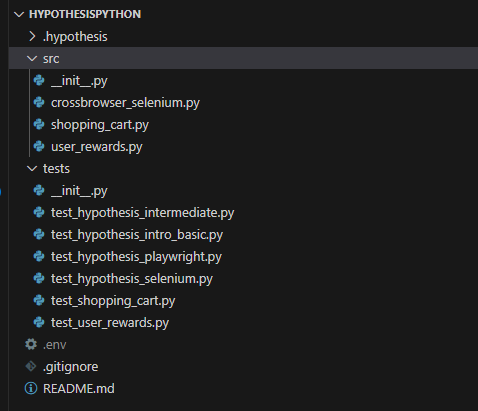
Our final project structure setup looks like below:
With the setup done, let us now understand Hypothesis testing in Python with various examples, starting with the introductory one and then working toward more complex ones.
Subscribe to the LambdaTest YouTube Channel for quick updates on the tutorials around Selenium Python and more.
How to Perform Hypothesis Testing in Python?
Let’s now start writing tests to understand how we can leverage the Hypothesis library to perform Python automation.
For this, let’s look at one test scenario to understand Hypothesis testing in Python.
Test Scenario:
|
Implementation:
This is what the initial implementation of the function looks like:
|
1 2 3 4 5 6 7 8 9 |
def factorial(num: int) -> int: if num < 0: raise ValueError("Input must be > 0") fact = 1 for _ in range(1, num + 1): fact *= _ return fact |
It takes in an integer as an input. If the input is 0, it raises an error; if not, it uses the range() function to generate a list of numbers within, iterate over it, calculate the factorial, and return it.
Let’s now write a test using the Hypothesis library to test the above function:
|
1 2 3 4 5 6 7 8 9 |
from hypothesis import given, strategies as st @given(st.integers(min_value=1, max_value=30)) def test_factorial(num: int): fact_num_result = factorial(num) fact_num_minus_one_result = factorial(num-1) result = fact_num_result / fact_num_minus_one_result assert num == result |
Code Walkthrough:
Let’s now understand the step-by-step code walkthrough for Hypothesis testing in Python.
Step 1: From the Hypothesis library, we import the given decorator and strategies method.

Step 2: Using the imported given and strategies, we set our test strategy of passing integer inputs within the range of 1 to 30 to the function under test using the min_value and max_value arguments.

Step 3: We write the actual test_factorial where the integer generated by our strategy is passed automatically by Hypothesis into the value num.
Using this value we call the factorial function once for value num and num – 1.
Next, we divide the factorial of num by the factorial of num -1 and assert if the result of the operation is equal to the original num.

Test Execution:
Let’s now execute our hypothesis test using the pytest -v -k “test_factorial” command.

And Hypothesis confirms that our function works perfectly for the given set of inputs, i.e., for integers from 1 to 30.
We can also view detailed statistics of the Hypothesis run by passing the argument –hypothesis-show-statistics to pytest command as:
|
1 |
pytest -v --hypothesis-show-statistics -k "test_factorial" |

The difference between the reuse and generate phase in the output above is explained below:
- Reuse Phase: During the reuse phase, the Hypothesis attempts to reuse previously generated test data. If a test case fails or raises an exception, the Hypothesis will try to shrink the failing example to find a minimal failing case.
- Generate Phase: During the generate phase, the Hypothesis generates new test data based on the defined strategies. This phase involves generating a wide range of inputs to test the properties defined by the developer.
This phase typically has a very short runtime, as it involves reusing existing test data or shrinking failing examples. The output provides statistics about the typical runtimes and the number of passing, failing, and invalid examples encountered during this phase.
The output provides statistics about the typical runtimes and the number of passing, failing, and invalid examples generated during this phase. While this helped us understand what passing tests look like with a Hypothesis, it’s also worthwhile to understand how a Hypothesis can catch bugs in the code.
Let’s rewrite the factorial() function with an obvious bug, i.e., remove the check for when the input value is 0.
|
1 2 3 4 5 6 7 8 9 |
def factorial(num: int) -> int: # if num < 0: # raise ValueError("Number must be >= 0") fact = 1 for _ in range(1, num + 1): fact *= _ return fact |
We also tweak the test to remove the min_value and max_value arguments.
|
1 2 3 4 5 6 |
@given(st.integers()) def test_factorial(num: int): fact_num_result = factorial(num) fact_num_minus_one_result = factorial(num-1) result = int(fact_num_result / fact_num_minus_one_result) assert num == result |
Test Execution:
Let us now rerun the test with the same command:
|
1 |
pytest -v --hypothesis-show-statistics -k test_factorial |
Test Execution:
Let us now rerun the test with the same command:
|
1 |
pytest -v --hypothesis-show-statistics -k test_factorial |
We can clearly see how Hypothesis has caught the bug immediately, which is shown in the above output. Hypothesis presents the input that resulted in the failing test under the Falsifying example section of the output.


Hypothesis Testing in Python With Selenium and Playwright
So far, we’ve performed Hypothesis testing locally. This works nicely for unit tests, but when setting up automation for building more robust and resilient test suites, we can leverage a cloud grid like LambdaTest that supports automation testing tools like Selenium and Playwright.
LambdaTest is an AI-native test orchestration and execution platform that enables developers and testers to perform automation testing with Selenium and Playwright at scale. It provides a remote test lab of 3000+ browser-OS combinations and 10,000+ real environments.
How to Perform Hypothesis Testing in Python Using Cloud Selenium Grid?
Selenium is an open-source suite of tools and libraries for web automation. When combined with a cloud grid, it can help you perform Hypothesis testing in Python with Selenium at scale.
Let’s look at one test scenario to understand Hypothesis testing in Python with Selenium.
Test Scenario:
|
Implementation:
The code to set up a connection to LambdaTest Selenium Grid is stored in a crossbrowser_selenium.py file.
|
1 2 3 4 5 6 7 8 9 10 11 12 13 14 15 16 17 18 19 20 21 22 23 24 25 26 27 28 29 30 31 32 33 34 35 36 37 38 39 40 41 42 43 44 45 46 47 48 49 50 51 52 53 54 55 56 57 58 59 60 61 62 63 64 65 66 67 68 69 70 71 72 73 |
from selenium import webdriver from selenium.webdriver.chrome.options import Options from selenium.webdriver.common.keys import Keys from time import sleep import urllib3 import warnings import os from selenium.webdriver import ChromeOptions from selenium.webdriver import FirefoxOptions from selenium.webdriver.remote.remote_connection import RemoteConnection from hypothesis.strategies import integers from dotenv import load_dotenv load_dotenv() # Get username and access key of the LambdaTest Platform username = os.getenv('LT_USERNAME', None) access_key = os.getenv('LT_ACCESS_KEY', None) class CrossBrowserSetup: global web_driver def __init__(self): global remote_url urllib3.disable_warnings(urllib3.exceptions.InsecureRequestWarning) remote_url = "https://" + str(username) + ":" + str(access_key) + "@hub.lambdatest.com/wd/hub" def add(self, browsertype): if (browsertype == "Firefox"): ff_options = webdriver.FirefoxOptions() ff_options.browser_version = "latest" ff_options.platform_name = "Windows 11" lt_options = {} lt_options["build"] = "Build: FF: Hypothesis Testing with Selenium & Pytest" lt_options["project"] = "Project: FF: Hypothesis Testing withSelenium & Pytest" lt_options["name"] = "Test: FF: Hypothesis Testing with Selenium & Pytest" lt_options["browserName"] = "Firefox" lt_options["browserVersion"] = "latest" lt_options["platformName"] = "Windows 11" lt_options["console"] = "error" lt_options["w3c"] = True lt_options["headless"] = False ff_options.set_capability('LT:Options', lt_options) web_driver = webdriver.Remote( command_executor = remote_url, options = ff_options ) self.driver = web_driver self.driver.get("https://www.lambdatest.com") sleep(1) if web_driver is not None: web_driver.execute_script("lambda-status=passed") web_driver.quit() return True else: return False |
The test_selenium.py contains code to test the Hypothesis that tests will only run on the Firefox browser.
|
1 2 3 4 5 6 7 8 9 10 11 12 13 14 |
from hypothesis import given, settings from hypothesis import given, example import hypothesis.strategies as strategy from src.crossbrowser_selenium import CrossBrowserSetup @settings(deadline=None) @given(strategy.just("Firefox")) #@given(strategy.just("Chrome")) def test_add(browsertype_1): cbt = CrossBrowserSetup() assert True == cbt.add(browsertype_1) |
Code Walkthrough:
Let’s now understand the step-by-step code walkthrough for Hypothesis testing in Python using Selenium Grid.
Step 1: We import the necessary Selenium methods to initiate a connection to LambdaTest Selenium Grid.
The FirefoxOptions() method is used to configure the setup when connecting to LambdaTest Selenium Grid using Firefox.

Step 2: We use the load_dotenv package to access the LT_ACCESS_KEY required to access the LambdaTest Selenium Grid, which is stored in the form of environment variables.

The LT_ACCESS_KEY can be obtained from your LambdaTest Profile > Account Settings > Password & Security.

Step 3: We initialize the CrossBrowserSetup class, which prepares the remote connection URL using the username and access_key.

Step 4: The add() method is responsible for checking the browsertype and then setting the capabilities of the LambdaTest Selenium Grid.

LambdaTest offers a variety of capabilities, such as cross browser testing, which means we can test on various operating systems such as Windows, Linux, and macOS and multiple browsers such as Chrome, Firefox, Edge, and Safari.
For the purpose of this blog, we will be testing that connection to the LambdaTest Selenium Grid should only happen if the browsertype is Firefox.
Step 5: If the connection to LambdaTest happens, the add() returns True; else, it returns False.

Let’s now understand a step-by-step walkthrough of the test_selenium.py file.
Step 1: We set up the imports of the given decorator and the Hypothesis strategy. We also import the CrossBrowserSetup class.

Step 2: @setting(deadline=None) ensures the test doesn’t timeout if the connection to the LambdaTest Grid takes more time.
We use the @given decorator to set the strategy to just use Firefox as an input to the test_add() argument broswertype_1. We then initialize an instance of the CrossBrowserSetup class & call the add() method using the broswertype_1 & assert if it returns True.
The commented strategy @given(strategy.just(‘Chrome’)) is to demonstrate that the add() method, when called with Chrome, returns False.

Test Execution:
Let’s now run the test using pytest -k “test_hypothesis_selenium.py”.

We can see that the test has passed, and the Web Automation Dashboard reflects that the connection to the Selenium Grid has been successful.

On opening one of the execution runs, we can see a detailed step-by-step test execution.

How to Perform Hypothesis Testing in Python Using Cloud Playwright Grid?
Playwright is a popular open-source tool for end-to-end testing developed by Microsoft. When combined with a cloud grid, it can help you perform Hypothesis testing in Python at scale.
Let’s look at one test scenario to understand Hypothesis testing in Python with Playwright.
Test Scenario:
|
Implementation:
|
1 2 3 4 5 6 7 8 9 10 11 12 13 14 15 16 17 18 19 20 21 22 23 24 25 26 27 28 29 30 31 32 33 34 35 36 37 38 39 40 41 42 43 44 45 46 47 48 49 50 51 52 53 54 55 56 57 58 59 60 61 62 63 64 65 66 67 |
import os from dotenv import load_dotenv from playwright.sync_api import expect, sync_playwright from hypothesis import given, strategies as st import subprocess import urllib import json load_dotenv() capabilities = { 'browserName': 'Chrome', # Browsers allowed: `Chrome`, `MicrosoftEdge`, `pw-chromium`, `pw-firefox` and `pw-webkit` 'browserVersion': 'latest', 'LT:Options': { 'platform': 'Windows 11', 'build': 'Playwright Hypothesis Demo Build', 'name': 'Playwright Locators Test For Windows 11 & Chrome', 'user': os.getenv('LT_USERNAME'), 'accessKey': os.getenv('LT_ACCESS_KEY'), 'network': True, 'video': True, 'visual': True, 'console': True, 'tunnel': False, # Add tunnel configuration if testing locally hosted webpage 'tunnelName': '', # Optional 'geoLocation': '', # country code can be fetched from https://www.lambdatest.com/capabilities-generator/ } } # replace cloud_grid_page with local_grid_page while running on local def interact_with_lambdatest(quantity): with sync_playwright() as playwright: playwrightVersion = str(subprocess.getoutput('playwright --version')).strip().split(" ")[1] capabilities['LT:Options']['playwrightClientVersion'] = playwrightVersion lt_cdp_url = 'wss://cdp.lambdatest.com/playwright?capabilities=' + urllib.parse.quote(json.dumps(capabilities)) browser = playwright.chromium.connect(lt_cdp_url) page = browser.new_page() page.goto("https://ecommerce-playground.lambdatest.io/") page.get_by_role("button", name="Shop by Category").click() page.get_by_role("link", name="MP3 Players").click() page.get_by_role("link", name="HTC Touch HD HTC Touch HD HTC Touch HD HTC Touch HD").click() page.get_by_role("button", name="Add to Cart").click(click_count=quantity) page.get_by_role("link", name="Checkout ").first.click() unit_price = float(page.get_by_role("cell", name="$146.00").first.inner_text().replace("$","")) page.evaluate("_ => {}", "lambdatest_action: {\"action\": \"setTestStatus\", \"arguments\": {\"status\":\"" + "Passed" + "\", \"remark\": \"" + "pass" + "\"}}" ) page.close() total_price = quantity * unit_price return total_price # Hypothesis strategy for generating product names and quantities quantity_strategy = st.integers(min_value=1, max_value=10) # Use Hypothesis to generate test cases for interacting with the website @given(quantity=quantity_strategy) def test_website_interaction(quantity): assert interact_with_lambdatest(quantity) == quantity * 146.00 |
Code Walkthrough:
Let’s now understand the step-by-step code walkthrough for Hypothesis testing in Python using Playwright Grid.
Step 1: To connect to the LambdaTest Playwright Grid, we need a Username and Access Key, which can be obtained from the Profile page > Account Settings > Password & Security.
We use the python-dotenv module to load the Username and Access Key, which are stored as environment variables.
The capabilities dictionary is used to set up the Playwright Grid on LambdaTest.
We configure the Grid to use Windows 11 and the latest version of Chrome.

Step 3: The function interact_with_lambdatest interacts with the LambdaTest eCommerce Playground website to simulate adding a product to the cart and proceeding to checkout.
It starts a Playwright session and retrieves the version of the Playwright being used. The LambdaTest CDP URL is created with the appropriate capabilities. It connects to the Chromium browser instance on LambdaTest.
A new page instance is created, and the LambdaTest eCommerce Playground website is navigated. The specified product is added to the cart by clicking through the required buttons and links. The unit price of the product is extracted from the web page.
The browser page is then closed.

Step 4: We define a Hypothesis strategy quantity_strategy using st.integers to generate random integers representing product quantities. The generated integers range from 1 to 10
Using the @given decorator from the Hypothesis library, we define a property-based test function test_website_interaction that takes a quantity parameter generated by the quantity_strategy.
Inside the test function, we use the interact_with_lambdatest function to simulate interacting with the website and calculate the total price based on the generated quantity.
We assert that the total_price returned by interact_with_lambdatest matches the expected value calculated as quantity * 146.00.

Test Execution:
Let’s now run the test on the Playwright Cloud Grid using pytest -v -k “test_hypothesis_playwright.py”

The LambdaTest Web Automation Dashboard shows successfully passed tests.

On opening one of the execution runs, we can see a detailed step-by-step test execution.

 Note
NoteRun Your Hypothesis Tests With Selenium & Playwright on Cloud. Try LambdaTest Today!
How to Perform Hypothesis Testing in Python With Date Strategy?
In the previous test scenario, we saw a simple example where we used the integer() strategy available as part of the Hypothesis. Let’s now understand another strategy, the date() strategy, which can be effectively used to test date-based functions.
Also, the output of the Hypothesis run can be customized to produce detailed results. Often, we may wish to see an even more verbose output when executing a Hypothesis test.
To do so, we have two options: either use the @settings decorator or use the –hypothesis-verbosity=<verbosity_level> when performing pytest testing.
Test Scenario:
|
Implementation:
|
1 2 3 4 5 6 7 8 9 10 11 12 13 14 15 16 17 18 19 20 21 22 23 |
from hypothesis import Verbosity,settings, given, strategies as st from datetime import datetime, timedelta # Function to generate an alert for expiry date within 45 days def generate_expiry_alert(expiry_date): current_date = datetime.now().date() days_until_expiry = (expiry_date - current_date).days return days_until_expiry <= 45 # Use Hypothesis to generate test cases for expiry alerts @given(expiry_date=st.dates()) @settings(verbosity=Verbosity.verbose, max_examples=1000) def test_expiry_alert_generation(expiry_date): alert_generated = generate_expiry_alert(expiry_date) # Check if the alert is generated correctly based on the expiry date days_until_expiry = (expiry_date - datetime.now().date()).days expected_alert = days_until_expiry <= 45 assert alert_generated == expected_alert |
Code Walkthrough:
Let’s now understand the code step-by-step.
Step 1: The function generate_expiry_alert(), which takes in an expiry_date as input and returns a boolean depending on whether the difference between the current date and expiry_date is less than or equal to 45 days.

Step 2: To ensure we test the generate_expiry_alert() for a wide range of date inputs, we use the date() strategy.
We also enable verbose logging and set the max_examples=1000, which requests Hypothesis to generate 1000 date inputs at the max.

Step 3: On the inputs generated by Hypothesis in Step 3, we call the generate_expiry_alert() function and store the returned boolean in alert_generated.
We then compare the value returned by the function generate_expiry_alert() with a locally calculated copy and assert if the match.

Test Execution:
We execute the test using the below command in the verbose mode, which allows us to see the test input dates generated by the Hypothesis.
|
1 |
pytest -s --hypothesis-show-statistics --hypothesis-verbosity=debug -k "test_expiry_alert_generation" |

As we can see, Hypothesis ran 1000 tests, 2 with reused data and 998 with unique newly generated data, and found no issues with the code.
Now, imagine the trouble we would have had to take to write 1000 tests manually using traditional example-based testing.
How to Perform Hypothesis Testing in Python With Composite Strategies?
So far, we’ve been using simple standalone examples to demo the power of Hypothesis. Let’s now move on to more complicated scenarios.
Test Scenario:
|
Implementation:
The implementation of the UserRewards class is stored in a user_rewards.py file for better readability.
|
1 2 3 4 5 6 7 8 9 10 11 12 13 14 15 |
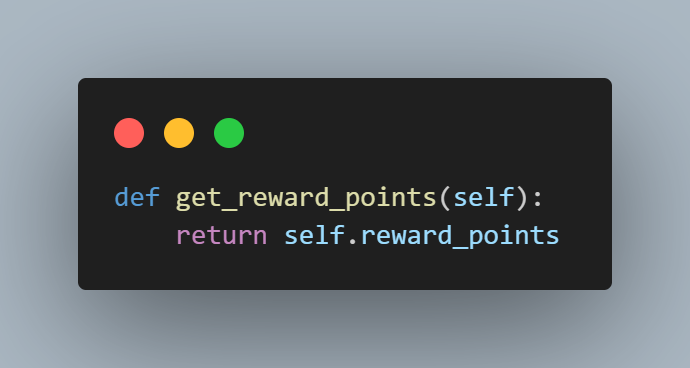
class UserRewards: def __init__(self, initial_points): self.reward_points = initial_points def get_reward_points(self): return self.reward_points def spend_reward_points(self, spent_points): if spent_points<= self.reward_points: self.reward_points -= spent_points return True else: return False |
The tests for the UserRewards class are stored in test_user_rewards.py.
|
1 2 3 4 5 6 7 8 9 10 11 12 13 14 15 16 17 18 19 20 21 22 23 24 25 26 27 28 29 30 31 32 |
from hypothesis import given, strategies as st from src.user_rewards import UserRewards # Define a strategy for generating user rewards data reward_points_strategy = st.integers(min_value=0, max_value=1000) # Use Hypothesis to generate test cases for checking reward points @given(initial_points=reward_points_strategy) def test_get_reward_points(initial_points): user_rewards = UserRewards(initial_points) assert user_rewards.get_reward_points() == initial_points # Use Hypothesis to generate test cases for spending reward points @given(initial_points=reward_points_strategy, spend_amount=st.integers(min_value=0, max_value=1000)) def test_spend_reward_points(initial_points, spend_amount): user_rewards = UserRewards(initial_points) remaining_points = user_rewards.get_reward_points() if spend_amount <= initial_points: assert user_rewards.spend_reward_points(spend_amount) remaining_points -= spend_amount else: assert not user_rewards.spend_reward_points(spend_amount) assert user_rewards.get_reward_points() == remaining_points |
Code Walkthrough:
Let’s now understand what is happening with both the class file and the test file step-by-step, starting first with the UserReward class.
Step 1: The class takes in a single argument initial_points to initialize the object.

Step 2: The get_reward_points() function returns the customers current reward points.
Step 3: The spend_reward_points() takes in the spent_points as input and returns True if spent_points are less than or equal to the customer current point balance and updates the customer reward_points by subtracting the spent_points, else it returns False.

That is it for our simple UserRewards class. Next, we understand what’s happening in the test_user_rewards.py step-by-step.
Step 1: We import the @given decorator and strategies from Hypothesis and the UserRewards class.

Step 2: Since reward points will always be integers, we use the integer() Hypothesis strategy to generate 1000 sample inputs starting with 0 and store them in a reward_points_strategy variable.

Step 3: Use the rewards_point_strategy as an input we run the test_get_reward_points() for 1000 samples starting with value 0.
For each input, we initialize the UserRewards class and assert that the method get_reward_points() returns the same value as the initial_points.
Step 4: To test the spend_reward_points() function, we generate two sets of sample inputs first, an initial reward_points using the reward_points_strategy we defined in Step 2 and a spend_amount which simulates spending of points.

Step 5: Write the test_spend_reward_points, which takes in the initial_points and spend_amount as arguments and initializes the UserRewards class with initial_point.
We also initialize a remaining_points variable to track the points remaining after the spend.

Step 6: If the spend_amount is less than the initial_points allocated to the customer, we assert if spend_reward_points returns True and update the remaining_points else, we assert spend_reward_points returns False.

Step 7: Lastly, we assert if the final remaining_points are correctly returned by get_rewards_points, which should be updated after spending the reward points.

Test Execution:
Let’s now run the test and see if Hypothesis is able to find any bugs in the code.
|
1 |
pytest -s --hypothesis-show-statistics --hypothesis-verbosity=debug -k "test_user_rewards" |

To test if the Hypothesis indeed works, let’s make a small change to the UserRewards by commenting on the logic to deduct the spent_points in the spend_reward_points() function.

We run the test suite again using the command pytest -s –hypothesis-show-statistics -k “test_user_rewards“.

This time, the Hypothesis highlights the failures correctly.
Thus, we can catch any bugs and potential side effects of code changes early, making it perfect for unit testing and regression testing.
To understand composite strategies a bit more, let’s now test the shopping cart functionality and see how composite strategy can help write robust tests for even the most complicated of real-world scenarios.
Test Scenario:
|
Implementation:
Let’s view the implementation of the ShoppingCart class written in the shopping_cart.py file.
|
1 2 3 4 5 6 7 8 9 10 11 12 13 14 15 16 17 18 19 20 21 22 23 24 25 26 27 28 29 30 31 32 33 34 35 36 37 38 39 40 41 42 43 44 45 46 47 48 49 50 51 52 53 54 55 56 57 58 |
import random from enum import Enum, auto class Item(Enum): """Item type""" LUNIX_CAMERA = auto() IMAC = auto() HTC_TOUCH = auto() CANNON_EOS = auto() IPOD_TOUCH = auto() APPLE_VISION_PRO = auto() COFMACBOOKFEE = auto() GALAXY_S24 = auto() def __str__(self): return self.name.upper() class ShoppingCart: def __init__(self): """ Creates a shopping cart object with an empty dictionary of items """ self.items = {} def add_item(self, item: Item, price: int | float, quantity: int = 1) -> None: """ Adds an item to the shopping cart :param quantity: Quantity of the item :param item: Item to add :param price: Price of the item :return: None """ if item.name in self.items: self.items[item.name]["quantity"] += quantity else: self.items[item.name] = {"price": price, "quantity": quantity} def remove_item(self, item: Item, quantity: int = 1) -> None: """ Removes an item from the shopping cart :param quantity: Quantity of the item :param item: Item to remove :return: None """ if item.name in self.items: if self.items[item.name]["quantity"] <= quantity: del self.items[item.name] else: self.items[item.name]["quantity"] -= quantity def get_total_price(self): total_price = 0 for item in self.items.values(): total_price += item["price"] * item["quantity"] return total_price |
Let’s now view the tests written to verify the correct behavior of all aspects of the ShoppingCart class stored in a separate test_shopping_cart.py file.
|
1 2 3 4 5 6 7 8 9 10 11 12 13 14 15 16 17 18 19 20 21 22 23 24 25 26 27 28 29 30 31 32 33 34 35 36 37 38 39 40 41 42 43 44 45 46 47 48 49 50 51 52 53 54 55 56 57 58 59 60 61 62 63 64 65 66 67 68 |
from typing import Callable from hypothesis import given, strategies as st from hypothesis.strategies import SearchStrategy from src.shopping_cart import ShoppingCart, Item # Create a strategy for items @st.composite def items_strategy(draw: Callable[[SearchStrategy[Item]], Item]): return draw(st.sampled_from(list(Item))) # Create a strategy for price @st.composite def price_strategy(draw: Callable[[SearchStrategy[int]], int]): return draw(st.integers(min_value=1, max_value=100)) # Create a strategy for quantity @st.composite def qty_strategy(draw: Callable[[SearchStrategy[int]], int]): return draw(st.integers(min_value=1, max_value=10)) @given(items_strategy(), price_strategy(), qty_strategy()) def test_add_item_hypothesis(item, price, quantity): cart = ShoppingCart() # Add items to cart cart.add_item(item=item, price=price, quantity=quantity) # Assert that the quantity of items in the cart is equal to the number of items added assert item.name in cart.items assert cart.items[item.name]["quantity"] == quantity @given(items_strategy(), price_strategy(), qty_strategy()) def test_remove_item_hypothesis(item, price, quantity): cart = ShoppingCart() print("Adding Items") # Add items to cart cart.add_item(item=item, price=price, quantity=quantity) cart.add_item(item=item, price=price, quantity=quantity) print(cart.items) # Remove item from cart print(f"Removing Item {item}") quantity_before = cart.items[item.name]["quantity"] cart.remove_item(item=item) quantity_after = cart.items[item.name]["quantity"] # Assert that if we remove an item, the quantity of items in the cart is equal to the number of items added - 1 assert quantity_before == quantity_after + 1 @given(items_strategy(), price_strategy(), qty_strategy()) def test_calculate_total_hypothesis(item, price, quantity): cart = ShoppingCart() # Add items to cart cart.add_item(item=item, price=price, quantity=quantity) cart.add_item(item=item, price=price, quantity=quantity) # Remove item from cart cart.remove_item(item=item) # Calculate total total = cart.get_total_price() assert total == cart.items[item.name]["price"] * cart.items[item.name]["quantity"] |
Code Walkthrough of ShoppingCart class:
Let’s now understand what is happening in the ShoppingCart class step-by-step.
Step 1: We import the Python built-in Enum class and the auto() method.
The auto function within the Enum module automatically assigns sequential integer values to enumeration members, simplifying the process of defining enumerations with incremental values.
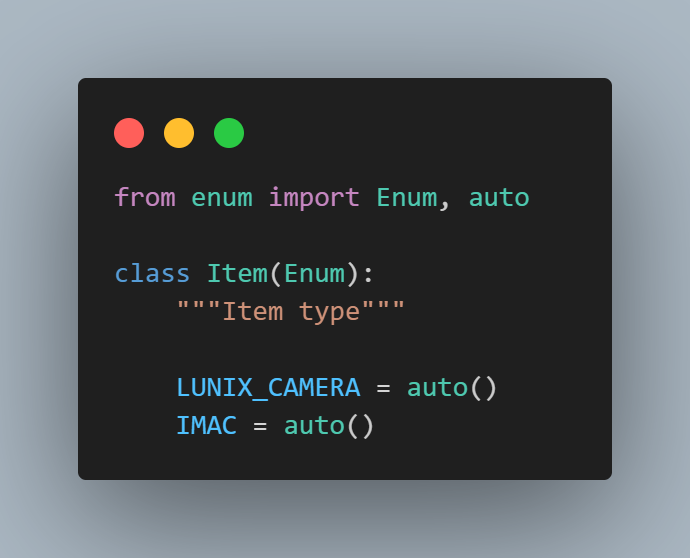
We define an Item enum corresponding to items available for sale on the LambdaTest eCommerce Playground website.
Step 2: We initialize the ShoppingCart class with an empty dictionary of items.

Step 3: The add_item() method takes in the item, price, and quantity as input and adds it to the shopping cart state held in the item dictionary.

Step 4: The remove_item() method takes in an item and quantity and removes it from the shopping cart state indicated by the item dictionary.

Step 5: The get_total_price() method iterates over the item dictionary, multiples the quantity by price, and returns the total_price of items in the cart.

Code Walkthrough of test_shopping_cart:
Let’s now understand step-by-step the tests written to ensure the correct working of the ShoppingCart class.
Step 1: First, we set up the imports, including the @given decorator, strategies, and the ShoppingCart class and Item enum.
The SearchStrategy is one of the various strategies on offer as part of the Hypothesis. It represents a set of rules for generating valid inputs to test a specific property or behavior of a function or program.

Step 2: We use the @st.composite decorator to define a custom Hypothesis strategy named items_strategy. This strategy takes a single argument, draw, which is a callable used to draw values from other strategies.
The st.sampled_from strategy randomly samples values from a given iterable. Within the strategy, we use draw(st.sampled_from(list(Item))) to draw a random Item instance from a list of all enum members.
Each time the items_strategy is used in a Hypothesis test, it will generate a random instance of the Item enum for testing purposes.

Step 3: The price_strategy runs on similar logic as the item_strategy but generates an integer value between 1 and 100.

Step 4: The qty_strategy runs on similar logic as the item_strategy but generates an integer value between 1 and 10.

Step 5: We use the @given decorator from the Hypothesis library to define a property-based test.
The items_strategy(), price_strategy(), and qty_strategy() functions are used to generate random values for the item, price, and quantity parameters, respectively.
Inside the test function, we create a new instance of a ShoppingCart.
We then add an item to the cart using the generated values for item, price, and quantity.
Finally, we assert that the item was successfully added to the cart and that the quantity matches the generated quantity.

Step 6: We use the @given decorator from the Hypothesis library to define a property-based test.
The items_strategy(), price_strategy(), and qty_strategy() functions are used to generate random values for the item, price, and quantity parameters, respectively.
Inside the test function, we create a new instance of a ShoppingCart. We then add the same item to the cart twice to simulate two quantity additions to the cart.
We remove one instance of the item from the cart. After that, we compare the item quantity before and after removal to ensure it decreases by 1.
The test verifies the behavior of the remove_item() method of the ShoppingCart class by testing it with randomly generated inputs for item, price, and quantity.

Step 7: We use the @given decorator from the Hypothesis library to define a property-based test.
The items_strategy(), price_strategy(), and qty_strategy() functions are used to generate random values for the item, price, and quantity parameters, respectively.
Inside the test function, we create a new instance of a ShoppingCart.
We add the same item to the cart twice to ensure it’s present, then remove one instance of the item from the cart. After that, we calculate the total price of items remaining in the cart.
Finally, we assert that the total price matches the price of one item times its remaining quantity.
The test verifies the correctness of the get_total_price() method of the ShoppingCart class by testing it with randomly generated inputs for item, price, and quantity.
Test Execution:
Let’s now run the test using the command pytest –hypothesis-show-statistics -k “test_shopping_cart”.

We can verify that Hypothesis was able to find no issues with the ShoppingCart class.
Let’s now amend the price_strategy and qty_strategy to remove the min_value and max_value arguments.

And rerun the test pytest -k “test_shopping_cart” .

The tests run clearly reveal that we have bugs with respect to handling scenarios when quantity and price are passed as 0.
This also reveals the fact that setting the test inputs correctly to ensure we do comprehensive testing is key to writing robots and resilient tests.
Choosing min_val and max_val should only be done when we know beforehand the bounds of inputs the function under test will receive. If we are unsure what the inputs are, maybe it’s important to come up with the right strategies based on the behavior of the function under test.
Discover the top Python frameworks to watch out for in 2025. Stay updated on the tools shaping the future of development.
Conclusion
In this blog we have seen in detail how Hypothesis testing in Python works using the popular Hypothesis library. Hypothesis testing falls under property-based testing and is much better than traditional testing in handling edge cases.
We also explored Hypothesis strategies and how we can use the @composite decorator to write custom strategies for testing complex functionalities.
We also saw how Hypothesis testing in Python can be performed with popular test automation frameworks like Selenium and Playwright. In addition, by performing Hypothesis testing in Python with LambdaTest on Cloud Grid, we can set up effective automation tests to enhance our confidence in the code we’ve written.
Frequently Asked Questions (FAQs)
What are the three types of Hypothesis tests?
There are three main types of hypothesis tests based on the direction of the alternative hypothesis:
- Right-tailed test: This tests if a parameter is greater than a certain value.
- Left-tailed test: This tests if a parameter is less than a certain value.
- Two-tailed test: This tests for any non-directional difference, either greater or lesser than the hypothesized value.
What is Hypothesis testing in the ML model?
Hypothesis testing is a statistical approach used to evaluate the performance and validity of machine learning models. It helps us determine if a pattern observed in the training data likely holds true for unseen data (generalizability).


Author’s Profile
Jaydeep Karale
Jaydeep is a software engineer with 10 years of experience, most recently developing and supporting applications written in Python. He has extensive with shell scripting and is also an AI/ML enthusiast. He is also a tech educator, creating content on Twitter, YouTube, Instagram, and LinkedIn. Link to his YouTube channel- https://www.youtube.com/@jaydeepkarale
Blogs: 6
Got Questions? Drop them on LambdaTest Community. Visit now