How To Run Your Appium Cucumber Tests On Cloud
Priti Gaikwad
Posted On: January 30, 2023
![]() 84825 Views
84825 Views
![]() 16 Min Read
16 Min Read
Just as the rise of the Internet led businesses to shift their business to the web, the wide adoption of smartphones led businesses to offer mobile application services. As per Statista, in 2022, consumers downloaded 255 billion mobile apps to their connected devices.

Other statistics shows that a user spent an average of 4.48 hours on these applications. The numbers reflect the need for a high-quality application in less time to survive the market competition.
To achieve this, businesses need to have the best possible development and testing approach that will help deliver these applications with great quality and in less time. This also means that the application testing team should use the latest tools and technologies to accelerate the test cycle and increase the test coverage in all possible ways.
Relying on mobile automation testing tools like Appium and using tools for cloud mobile testing can help in building a highly scalable test infrastructure and thereby increase the test coverage quicker. If you are preparing for an interview you can learn more through Cucumber interview questions.
To help you succeed in your mobile automation test, this Appium Cucumber tutorial will help you explain how to test your application using Appium and Cucumber on a cloud platform. All you need is your mobile application and set up the infrastructure using Appium and Cucumber and a cloud testing platform.
So let’s begin.
TABLE OF CONTENTS
What is Appium?
Appium is an open-source mobile application automation testing tool for testing native applications, mobile-web applications, and hybrid applications on Android or iOS platforms. It is one of the most used and widely adopted test automation frameworks for mobile application testing

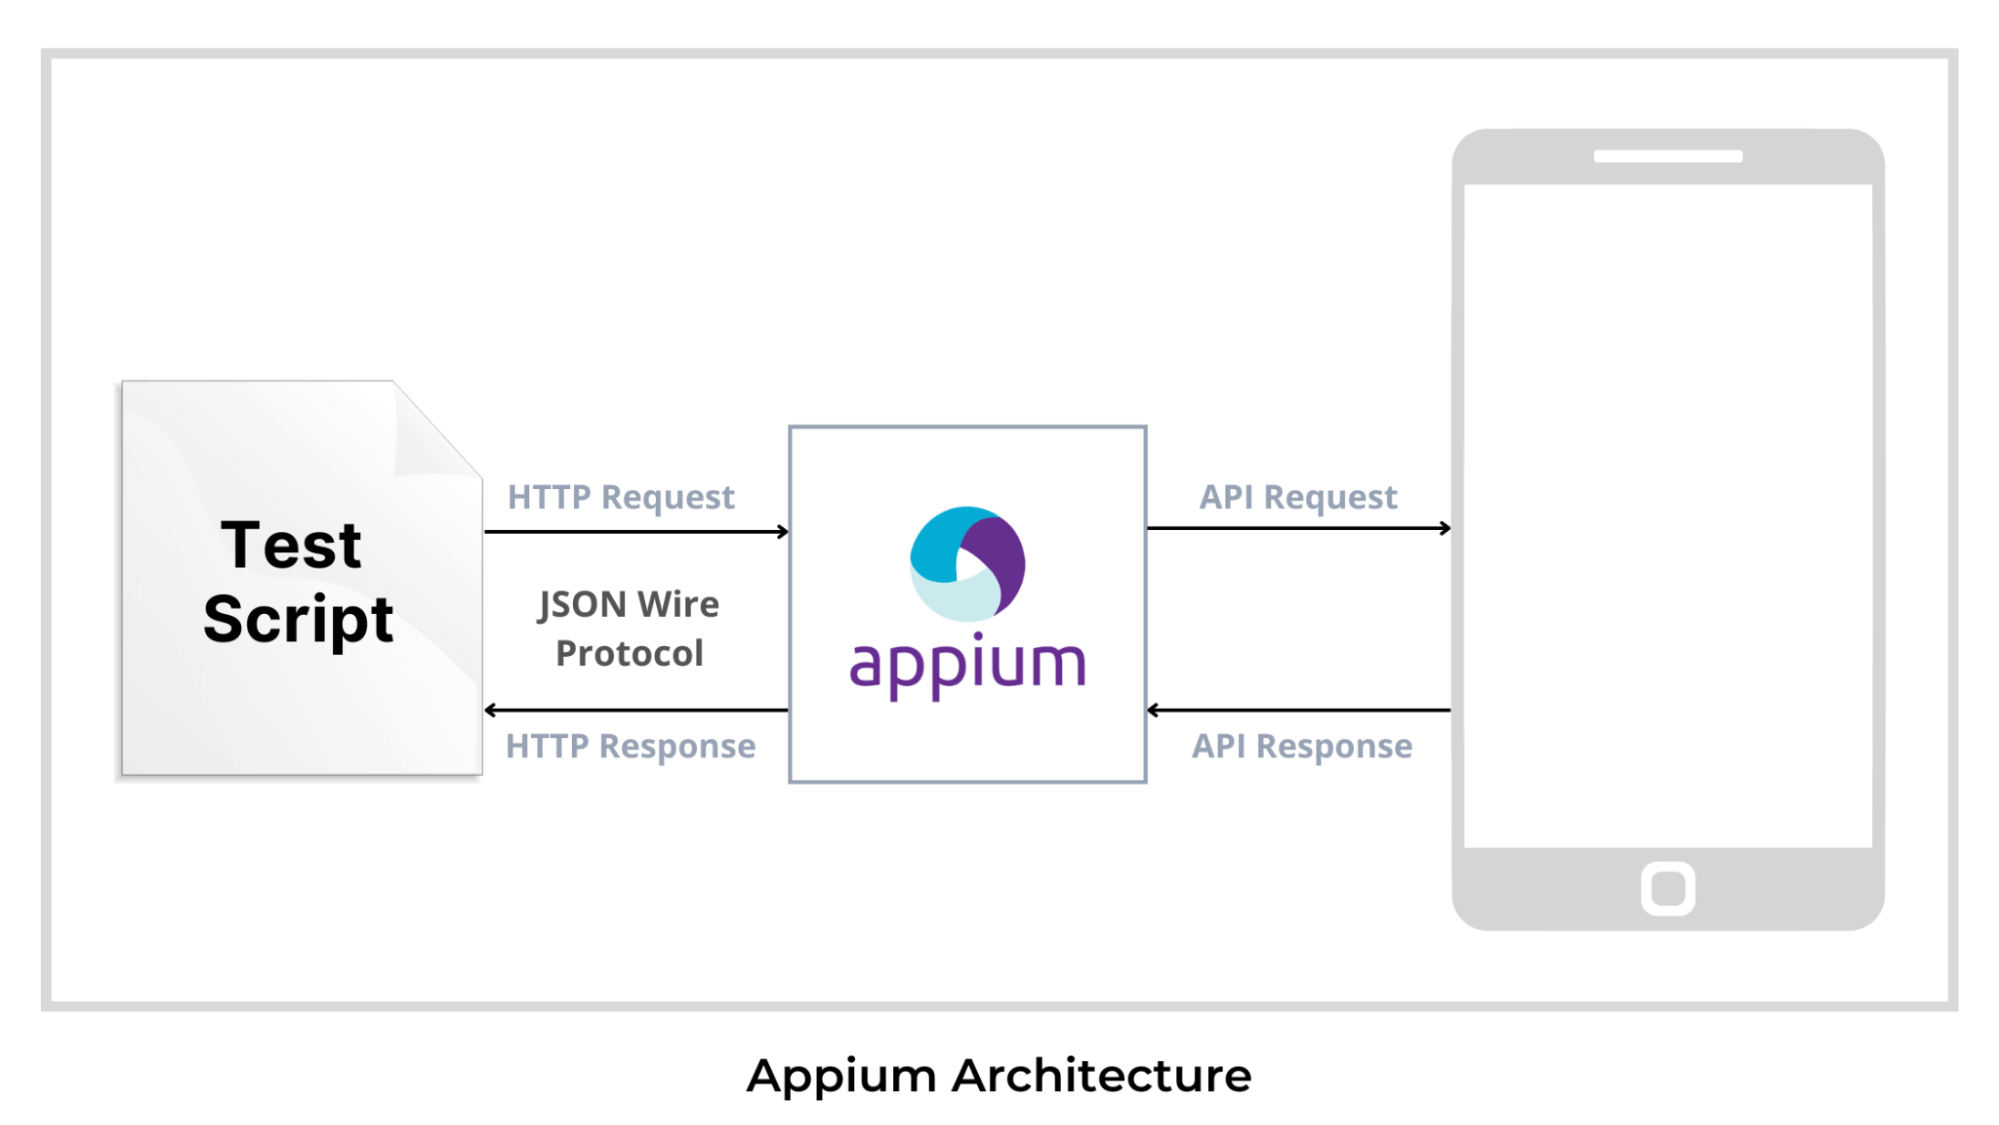
Following is the Appium architecture diagram that will help you understand the Appium framework.
Advantages of using Appium:
- Appium is an open-source tool that supports both Android and iOS.
- Appium tests can be written in multiple programming languages like Java, Python, JavaScript, C#, etc.
For the convenience of testing our application, we will use the Behaviour Driven Development (BDD) framework. So we are using Cucumber as it uses the BDD framework. The main advantage of using the BDD framework is that it helps to bridge the gap between the technical and the non-technical team. The tests are easy to understand as they are written in plain English language syntax called Gherkin.
So now let us understand what is BDD, Gherkin, and Cucumber.
What is BDD?
Behavior Driven Development (BDD) is a software development process that helps to create simple scenarios to define how an application should behave from the end user’s perspective.
What is Gherkin?
Gherkin syntax used to write tests in Cucumber helps us document examples of the behavior our stakeholders want. To write test scenarios using Gherkin, we must deeply understand the keywords used in the Gherkin language and write our test scenario using these keywords.
Some Keywords used in Gherkin language:
- Feature – Describes a software feature.
- Scenario – Defines how a system should behave under certain circumstances.
- Given – Sets the context where the scenario happens.
- When – This is used to interact with the system.
- Then – Used to check the outcome of the interaction.
- And, But – Used to add more steps to the scenario’s Given, When, or Then section.
What is Cucumber?
Cucumber is a testing framework that uses the Behavior Driven Development (BDD) methodology and is designed to help build bridges between the technical and non-technical members of a software team.
Advantages of using Cucumber:
- It is an open-source tool and is maintainable and scalable.
- It uses the Gherkin syntax, which is simple and easy to use.
- It is helpful for business stakeholders who can’t easily read code.
How does the Cucumber work?
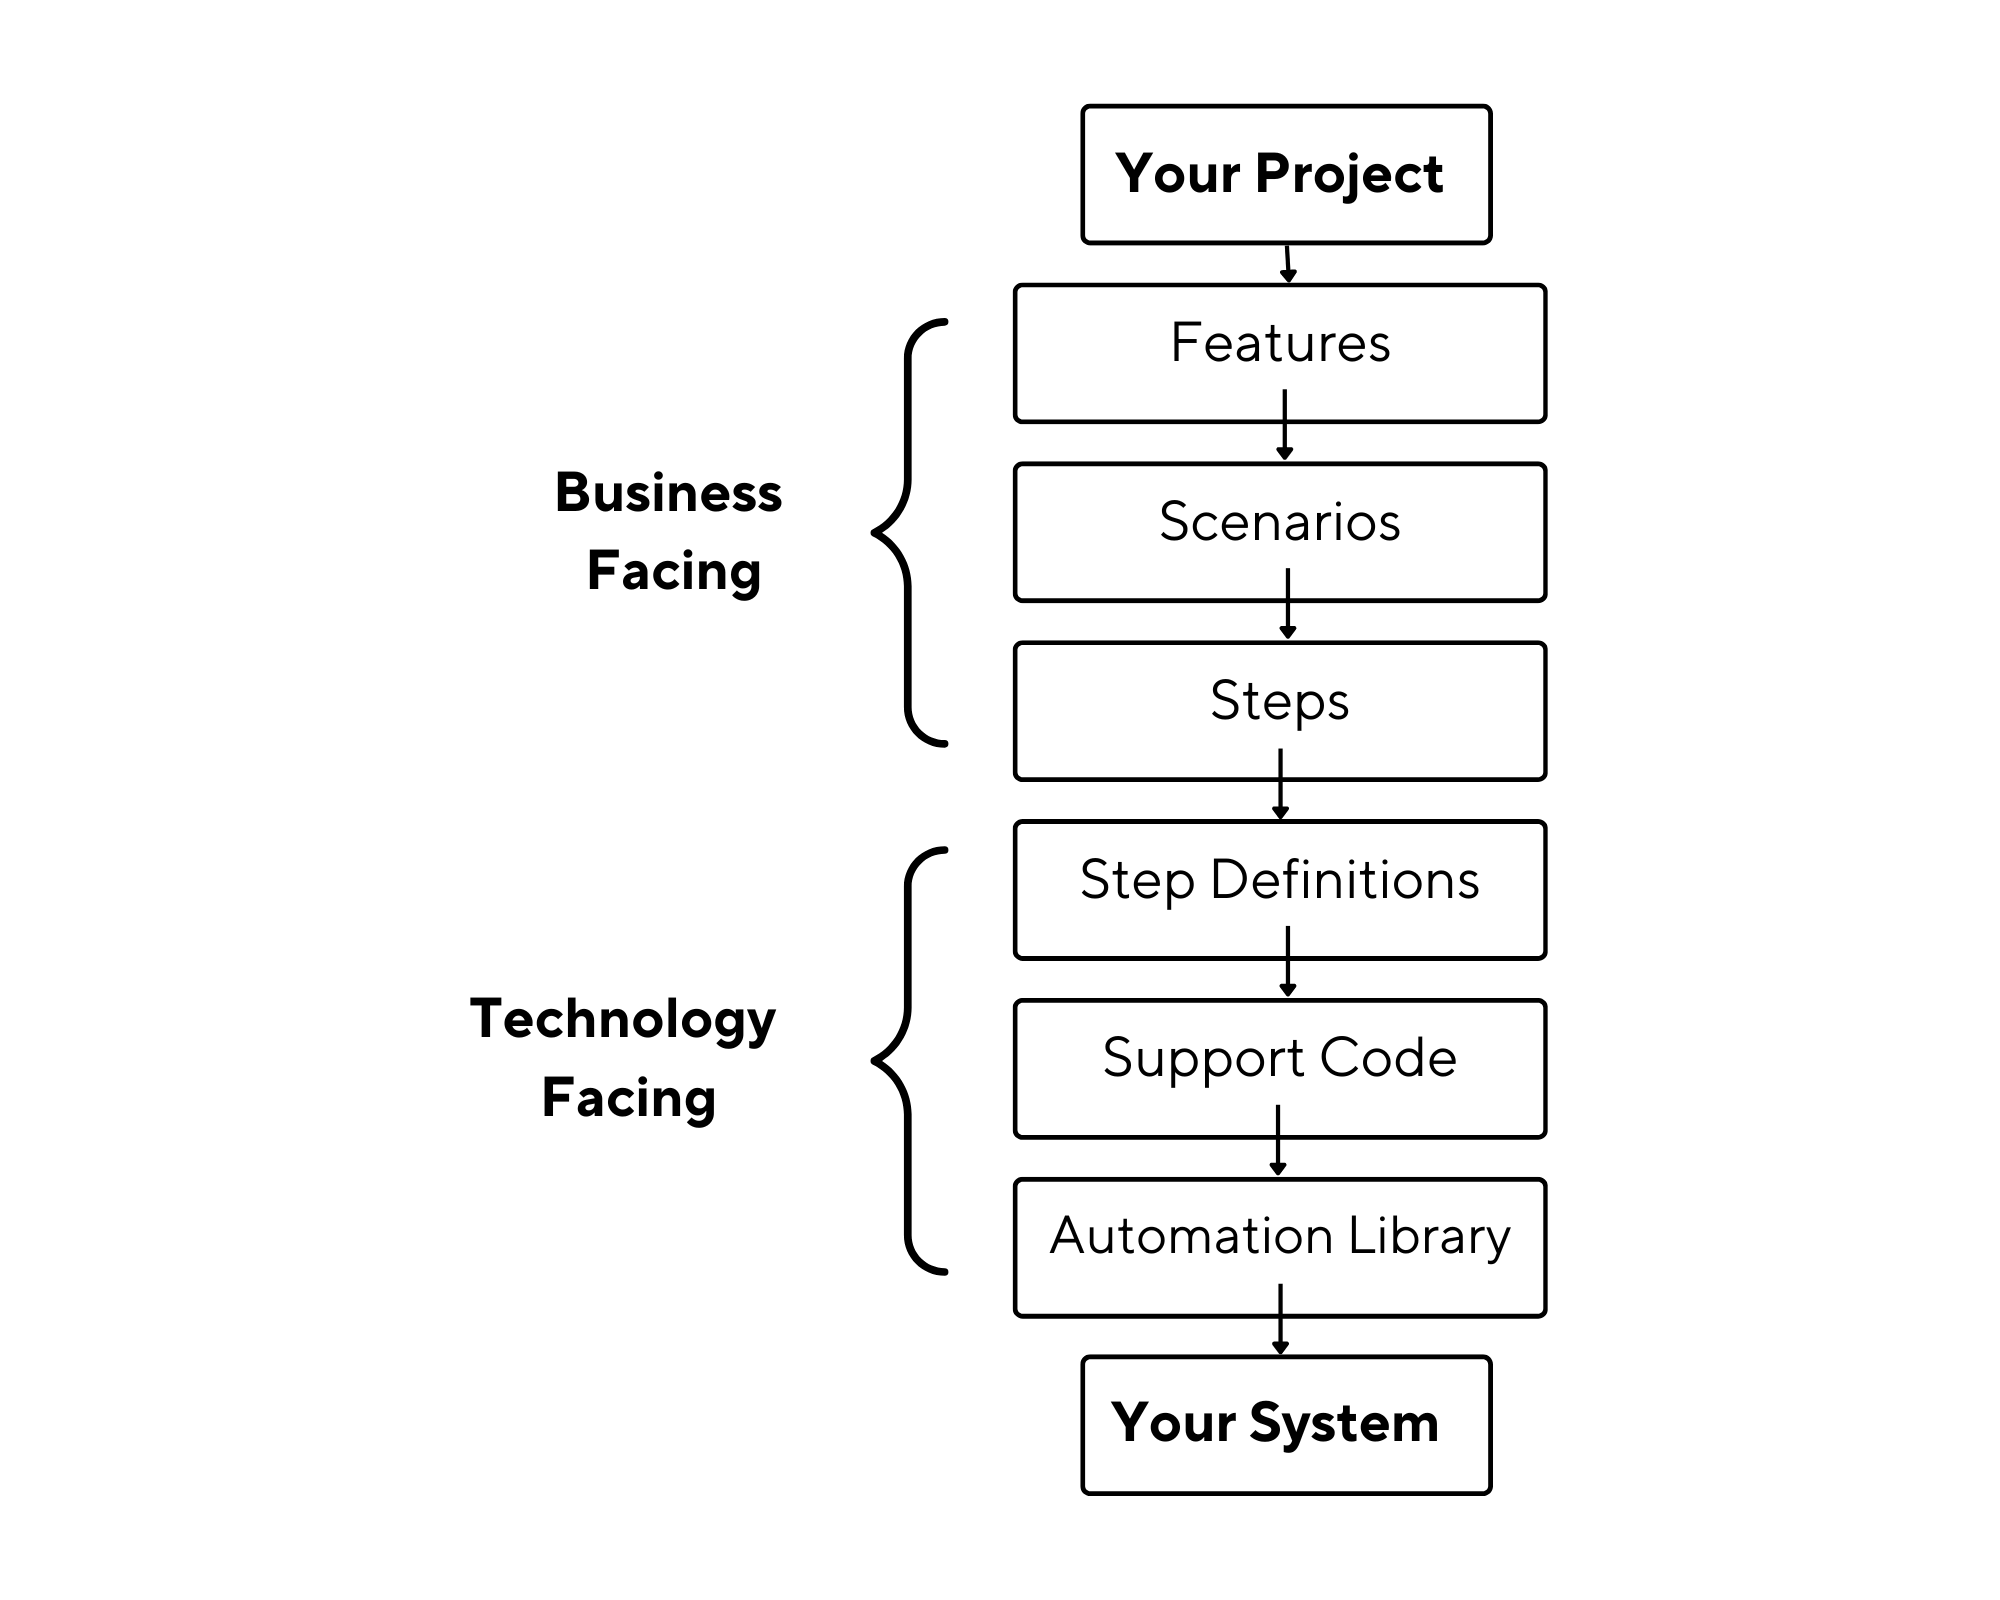
The Cucumber reads your specifications from plain-language text files called features. It then checks for the scenarios to test and runs them against your system. It then executes each scenario as a list of steps. The feature file must follow a basic syntax rule known as Gherkin. Cucumber associates the feature file with step definitions, which maps the business-readable language of each step into code.
Code of a sample Feature file used in Cucumber:
Code sample of a Step Definition file:
Automate your apps on Appium cloud of 3000+ environments. Try LambdaTest Now!
Why test on cloud testing platforms?
The combination of the Appium and Cucumber can be used for testing your iOS and Android mobile applications in the cloud using different cloud testing platforms. To thoroughly test your application, it is important to use it on real devices to ensure that the application’s behavior is as expected for your end-users.
Given the various devices and operating system combinations available in the market, traditional testing methods have become challenging and time-consuming. A cloud testing platform provides access to a range of real devices on the cloud at scale. This helps us access the required testing infrastructure to carry out test execution.

You can also subscribe to the LambdaTest YouTube Channel and stay updated with the latest tutorials around Selenium testing, Cypress E2E testing, CI/CD, and more.
Benefits of using a cloud testing platform:
- Increased test coverage
- Testing on thousands of real devices.
- Using a cloud testing platform can accelerate test execution time.
- Cloud testing platforms provide access to the latest set of devices for testing.
Test Scenario that we will be running in the project:
We are testing the functionalities of a shopping application, ‘General store’
As we can see in the above code, we will be running a simple scenario where a user can redirect to the shopping page. The steps are as follows in the Gherkin format.
Scenario Outline: Verify user is able to redirect to the shopping page
Given User is on General Store page
When User select the country < country >
And User enters the name < name >
And User selects the gender < gender >
And User clicks on the let’s Shop button
Then User is able to redirects to the products page
Now we need to configure our Appium Cucumber project.
Configuring your Appium Cucumber project
To configure your Appium Cucumber project we need to perform the following steps:
- You will have to first set up Java along with an IDE. You can ignore this step if you already have the Java setup. Following this, you must set up JUnit and IntelliJ IDEA IDE. To install Java, you need to download JDK and run the installer. Following this, you need to validate the JAVA_HOME setting.
- While JUnit is used as a unit testing framework, IntelliJ IDEA is an integrated development environment (IDE) written in Java and Kotlin. To Install Java, JUnit, and IntelliJ IDEA IDE, you can refer to this blog on setting JUnit environment.
- Following this, you need to create a Maven project and add dependencies. To install Maven, you can download the latest Maven distribution. Once the zip file is downloaded, you can unzip it in the folder you want to install and later set its path in the PATH environment variable.
- To install Appium, you can do it via NPM or by downloading Appium Desktop. If you want to run Appium through an npm install, you will need Node.js and NPM. You can refer to this Appium tutorial to install Appium.
- You can add the dependencies for Cucumber, Gherkin, Appium, and Extent Reports as shown in the below code:
export PATH=/path/to/apache-maven-3.8.6/bin:$PATH
You can use the command run mvn -v to check for the maven version installed.

Example of POM.xml:
| <?xml version="1.0" encoding="UTF-8"?> | |
| <project xmlns="http://maven.apache.org/POM/4.0.0" | |
| xmlns:xsi="http://www.w3.org/2001/XMLSchema-instance" | |
| xsi:schemaLocation="http://maven.apache.org/POM/4.0.0 http://maven.apache.org/xsd/maven-4.0.0.xsd"> | |
| <modelVersion>4.0.0</modelVersion> | |
| <groupId>org.example</groupId> | |
| <artifactId>MobileAutomationFramework</artifactId> | |
| <version>1.0-SNAPSHOT</version> | |
| <properties> | |
| <maven.compiler.source>1.8</maven.compiler.source> | |
| <maven.compiler.target>1.8</maven.compiler.target> | |
| <project.build.sourceEncoding>UTF-8</project.build.sourceEncoding> | |
| </properties> | |
| <dependencies> | |
| <dependency> | |
| <groupId>junit</groupId> | |
| <artifactId>junit</artifactId> | |
| <version>4.11</version> | |
| <scope>test</scope> | |
| </dependency> | |
| <dependency> | |
| <groupId>io.appium</groupId> | |
| <artifactId>java-client</artifactId> | |
| <version>7.6.0</version> | |
| </dependency> | |
| <dependency> | |
| <groupId>com.github.javafaker</groupId> | |
| <artifactId>javafaker</artifactId> | |
| <version>0.15</version> | |
| </dependency> | |
| <dependency> | |
| <groupId>io.cucumber</groupId> | |
| <artifactId>cucumber-java</artifactId> | |
| <version>6.8.1</version> | |
| </dependency> | |
| <!-- https://mvnrepository.com/artifact/io.cucumber/cucumber-picocontainer --> | |
| <dependency> | |
| <groupId>io.cucumber</groupId> | |
| <artifactId>cucumber-picocontainer</artifactId> | |
| <version>6.8.1</version> | |
| </dependency> | |
| <!-- https://mvnrepository.com/artifact/io.cucumber/cucumber-junit --> | |
| <dependency> | |
| <groupId>io.cucumber</groupId> | |
| <artifactId>cucumber-junit</artifactId> | |
| <version>6.8.1</version> | |
| <scope>test</scope> | |
| </dependency> | |
| <!-- https://mvnrepository.com/artifact/io.cucumber/gherkin --> | |
| <dependency> | |
| <groupId>io.cucumber</groupId> | |
| <artifactId>gherkin</artifactId> | |
| <version>15.0.2</version> | |
| </dependency> | |
| <!-- https://mvnrepository.com/artifact/io.cucumber/cucumber-jvm --> | |
| <dependency> | |
| <groupId>io.cucumber</groupId> | |
| <artifactId>cucumber-jvm</artifactId> | |
| <version>6.8.1</version> | |
| <type>pom</type> | |
| </dependency> | |
| <dependency> | |
| <groupId>tech.grasshopper</groupId> | |
| <artifactId>extentreports-cucumber6-adapter</artifactId> | |
| <version>2.13.0</version> | |
| </dependency> | |
| <dependency> | |
| <groupId>com.aventstack</groupId> | |
| <artifactId>extentreports</artifactId> | |
| <version>5.0.4</version> | |
| </dependency> | |
| <dependency> | |
| <groupId>org.apache.logging.log4j</groupId> | |
| <artifactId>log4j-core</artifactId> | |
| <version>2.17.1</version> | |
| </dependency> | |
| <dependency> | |
| <groupId>log4j</groupId> | |
| <artifactId>log4j</artifactId> | |
| <version>1.2.17</version> | |
| </dependency> | |
| <dependency> | |
| <groupId>org.json</groupId> | |
| <artifactId>json</artifactId> | |
| <version>20210307</version> | |
| <scope>test</scope> | |
| </dependency> | |
| <!-- https://mvnrepository.com/artifact/com.github.mkolisnyk/cucumber-runner --> | |
| <dependency> | |
| <groupId>com.github.mkolisnyk</groupId> | |
| <artifactId>cucumber-runner</artifactId> | |
| <version>1.3.3</version> | |
| </dependency> | |
| </dependencies> | |
| <build> | |
| <pluginManagement><!-- lock down plugins versions to avoid using Maven defaults (may be moved to parent pom) --> | |
| <plugins> | |
| <!-- clean lifecycle, see https://maven.apache.org/ref/current/maven-core/lifecycles.html#clean_Lifecycle --> | |
| <plugin> | |
| <artifactId>maven-clean-plugin</artifactId> | |
| <version>3.1.0</version> | |
| </plugin> | |
| <!-- default lifecycle, jar packaging: see https://maven.apache.org/ref/current/maven-core/default-bindings.html#Plugin_bindings_for_jar_packaging --> | |
| <plugin> | |
| <artifactId>maven-resources-plugin</artifactId> | |
| <version>3.0.2</version> | |
| </plugin> | |
| <plugin> | |
| <artifactId>maven-compiler-plugin</artifactId> | |
| <version>3.8.0</version> | |
| </plugin> | |
| <plugin> | |
| <artifactId>maven-surefire-plugin</artifactId> | |
| <version>2.22.1</version> | |
| </plugin> | |
| <plugin> | |
| <artifactId>maven-jar-plugin</artifactId> | |
| <version>3.0.2</version> | |
| </plugin> | |
| <plugin> | |
| <artifactId>maven-install-plugin</artifactId> | |
| <version>2.5.2</version> | |
| </plugin> | |
| <plugin> | |
| <artifactId>maven-deploy-plugin</artifactId> | |
| <version>2.8.2</version> | |
| </plugin> | |
| <!-- site lifecycle, see https://maven.apache.org/ref/current/maven-core/lifecycles.html#site_Lifecycle --> | |
| <plugin> | |
| <artifactId>maven-site-plugin</artifactId> | |
| <version>3.7.1</version> | |
| </plugin> | |
| <plugin> | |
| <artifactId>maven-project-info-reports-plugin</artifactId> | |
| <version>3.0.0</version> | |
| </plugin> | |
| <plugin> | |
| <groupId>org.apache.maven.plugins</groupId> | |
| <artifactId>maven-compiler-plugin</artifactId> | |
| <configuration> | |
| <source>1.8</source> | |
| <target>1.8</target> | |
| </configuration> | |
| </plugin> | |
| </plugins> | |
| </pluginManagement> | |
| </build> | |
| </project> |
Once your project setup is done you can start with the execution of the project.
How to run your Appium Cucumber test on the cloud?
Cloud based Appium testing platforms like LambdaTest offer reliability, scalability, security, and high performance while performing Appium Cucumber tests. It enables development and testing teams to speed up their release cycles by providing access to a cloud of over 3000 real iOS and Android devices for automating mobile app testing.

Note: To access the LambdaTest cloud testing platform, you need a LambdaTest username and accessKey.
Step 1: Upload your mobile application on the cloud testing platform.
Your mobile application can be uploaded directly to the LambdaTest platform or through the ‘curl’ command:
Step 2: Upload your application through the curl command.
Use this command: curl -u
Step 3: Upload your mobile application on the LambdaTest platform.
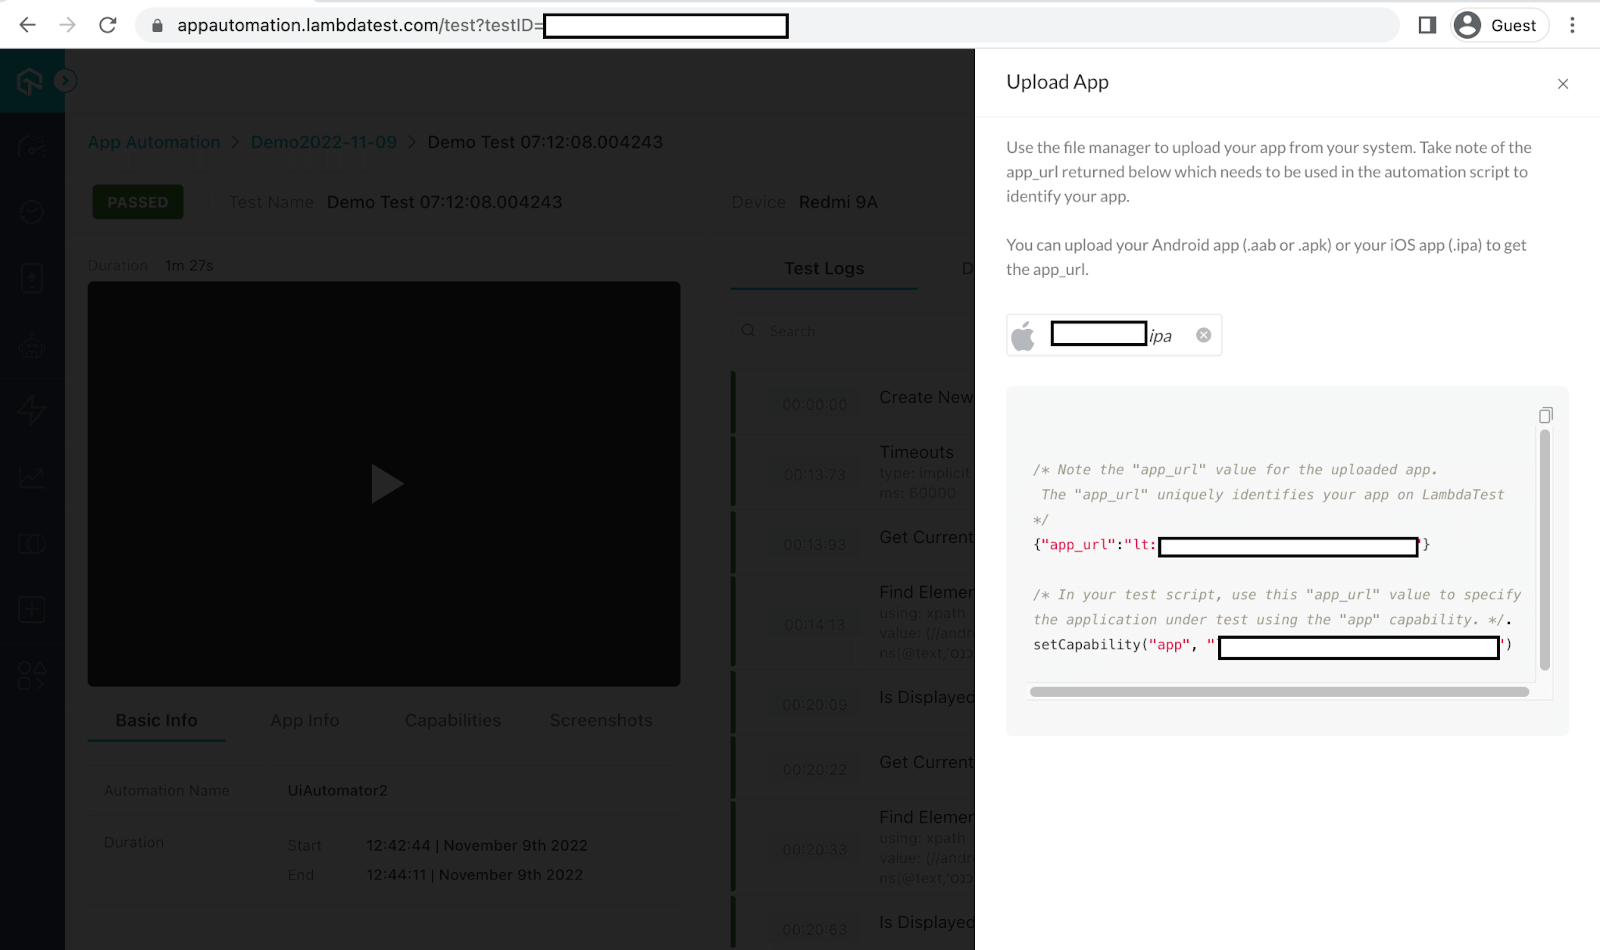
https://app.lambdatest.com/console/realtime/app
Step 4: Define the Capabilities and Properties file.
Once your mobile application is uploaded on the LambdaTest platform, you will receive app id details that need to be passed into the capabilities parameter.
Following are the changes you will have to make in your project’s Capabilities and Properties file. You can get a copy of the capabilities from the LambdaTest Capabilities Generator. Before running your tests, you must update the username and accessKey in the scripts by referring to the LambdaTest Profile Section.
Set the desired capabilities and properties.
Step 5: Properties file to select Devices on which you need to execute your tests.
You need to update your LambdaTest username and accesskey in the parameters and add the APP url provided by LambdaTest when the app is loaded on LambdaTest.
Step 6: Configuring your Cucumber tests.
In Cucumber, the step definition code links methods with an expression that links it to one or more Gherkin steps mentioned in the feature file. When Cucumber starts executing a Gherkin step in a scenario, it will look for a matching step definition to execute.
Cucumber file: Cucumber executes each step in a scenario one at a time. The steps follow Given, When, Then, And.
Feature file:
Step definition file code:
Step 7: Execute and view your tests.
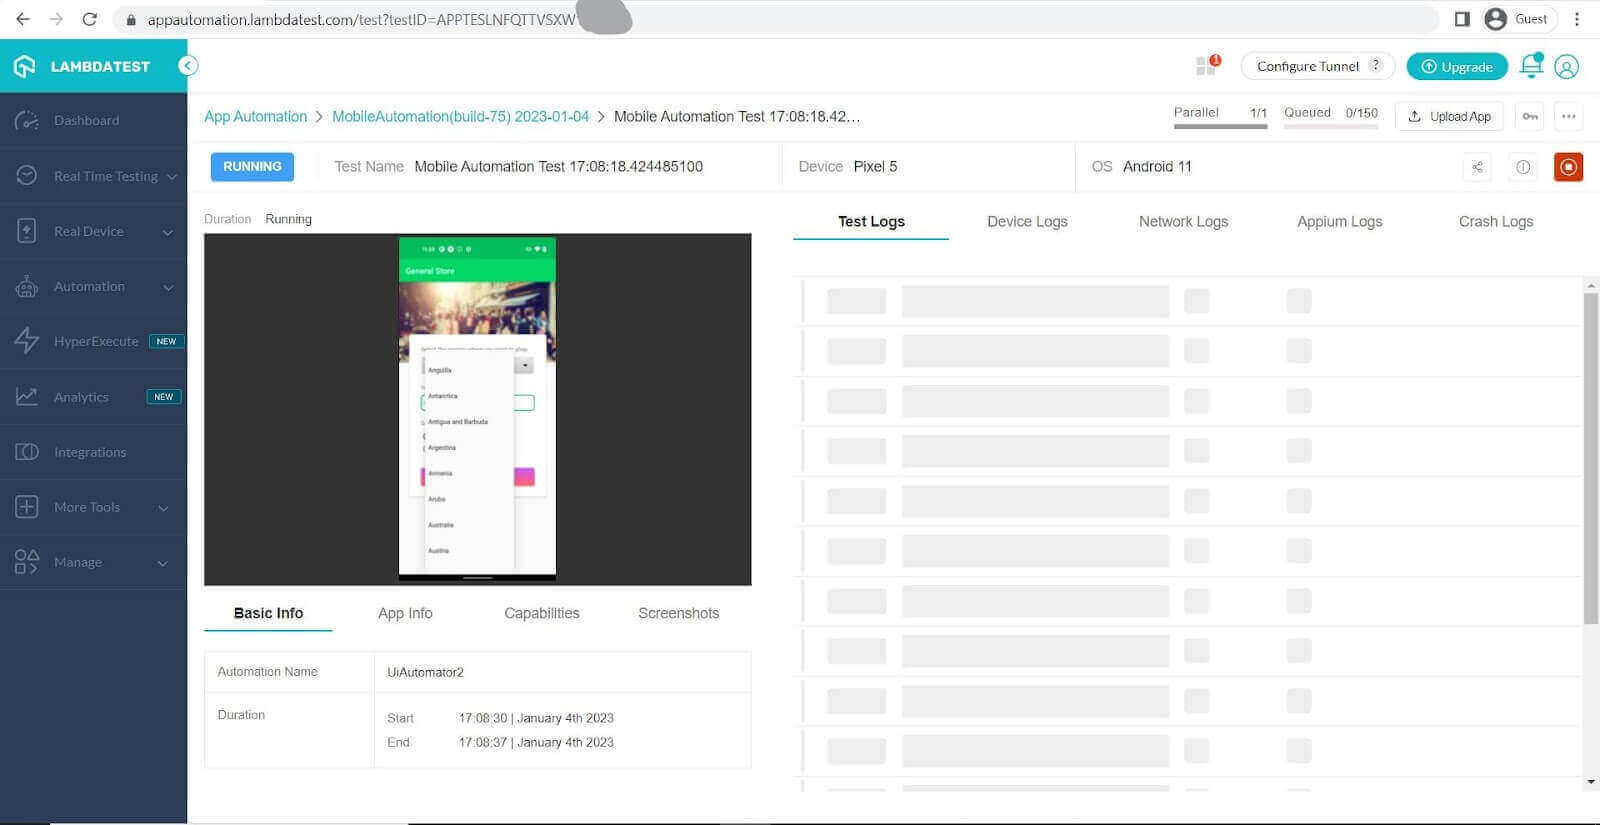
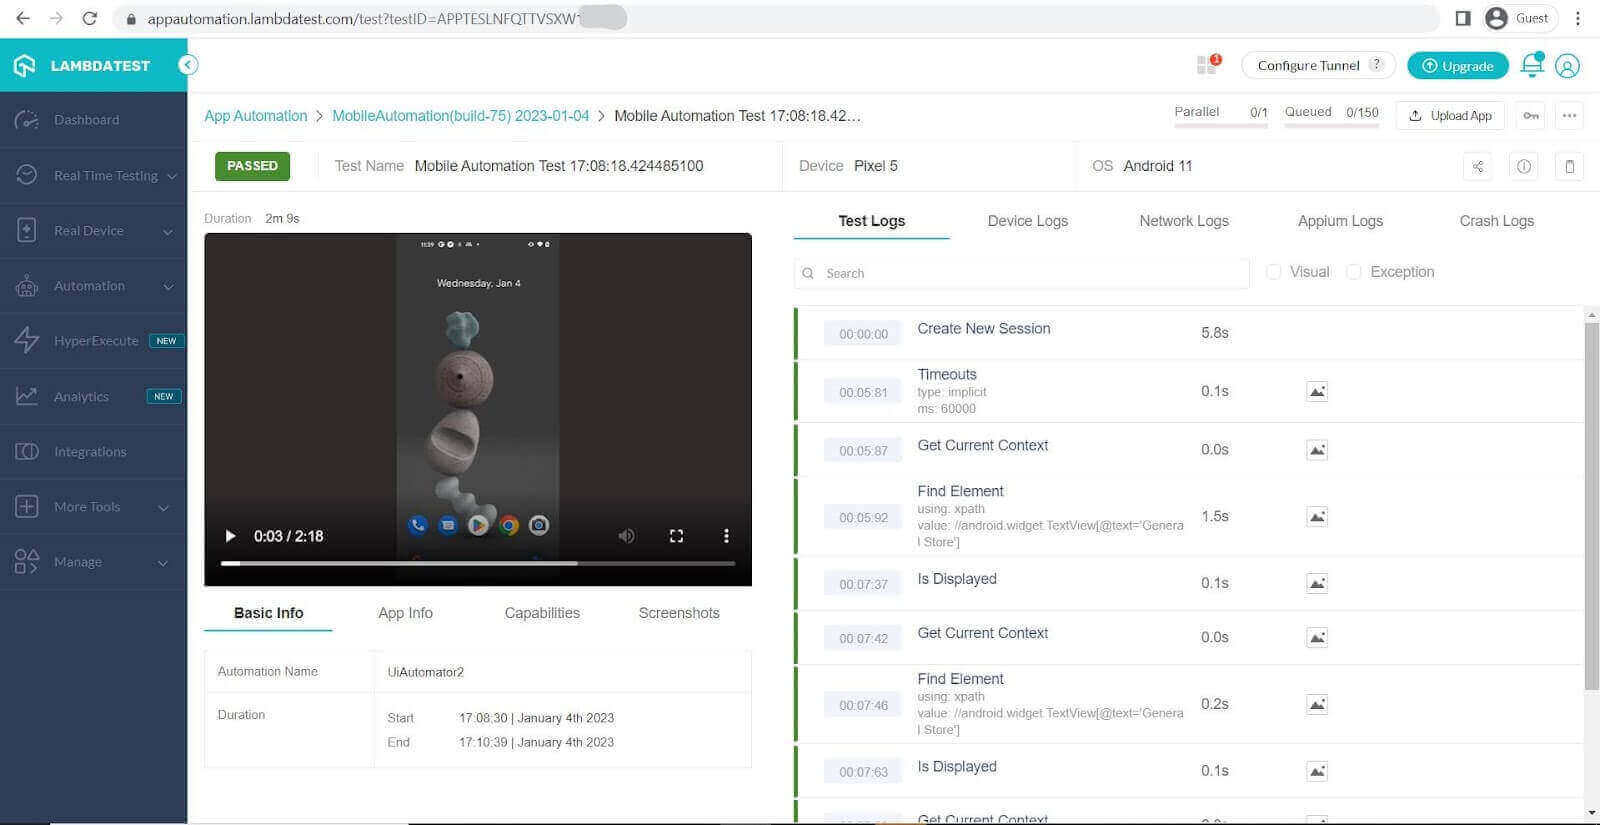
Once you have executed your tests you can view the results of your tests on the LambdaTest Dashboard as seen in the pictures below.
Here we can see the test running in the background:
Here we can see the dashboard after the test is passed.
Note: Boost your efficiency by ultimate guide of Appium Commands Cheat Sheet for Developers.
Conclusion
In the above Appium Cucumber tutorial, we saw the step-by-step method to install Appium and Cucumber and how it can be used to carry out the Appium mobile testing process on a cloud testing platform. We also saw the benefits of using a cloud testing platform and how it can be a cost-effective and quicker way to test your applications across different platforms.
Frequently Asked Questions (FAQs)
Does Cucumber support mobile testing?
Cucumber can test mobile applications (both iOS and Android) through various methods such as Appium, Calabash, etc. These tools allow Cucumber to interact with the mobile app and perform automated tests. Cucumber’s Gherkin language can be used to write tests in a readable and understandable format, making it easy for non-technical stakeholders to understand the tests. This helps to ensure that the tests accurately reflect the intended functionality of the mobile app.
What is Cucumber used for in testing?
Cucumber is a tool used in behavior-driven development (BDD) for software testing. It allows developers to write tests in plain, human-readable language that can be easily understood by non-technical stakeholders. Cucumber tests are written in a language called Gherkin and describe the behavior of the system being tested in terms of specific scenarios. These scenarios are then executed automatically to verify that the system behaves as expected. Cucumber helps to ensure that the system under test meets the functional requirements and can also serve as a form of documentation for the system.
Which is better TestNG or Cucumber?
It depends on the specific testing needs and requirements of your project. Both TestNG and Cucumber have their strengths and weaknesses.
TestNG is a testing framework for Java that is primarily used for unit testing, integration testing, and functional testing. It provides a wide range of features and annotations that make writing and executing tests easy and has a large user community.
Cucumber, on the other hand, is a tool used in behavior-driven development (BDD) for software testing. It allows developers to write tests in plain, human-readable language that can be easily understood by non-technical stakeholders. Cucumber is well-suited for acceptance and end-to-end testing, focusing on verifying the system’s overall behavior.
In conclusion, if you’re looking to write and execute unit tests and integration tests, TestNG is a good choice. If you want to write tests in plain language that can be easily understood by non-technical stakeholders and focus on acceptance and end-to-end testing, then Cucumber is a better choice.
Got Questions? Drop them on LambdaTest Community. Visit now




 by
by 