A Beginner’s Guide To Figma Testing
Irshad Ahamed
Posted On: July 26, 2022
![]() 103514 Views
103514 Views
![]() 20 Min Read
20 Min Read
Before we understand the complete Figma testing requirements related to its Prototypes, let us first try and understand the basics associated with this design tool Figma, which helps to improve the overall design process and the way we do prototyping.
The modern web design process has evolved over the past few years. Therefore, there are more specialized tools that help to improve the overall design. There are many great options, one of which is Figma – a powerful cloud-based design tool that allows you to create websites, applications, logos, and more.
Furthermore, you are not required to install it locally or buy expensive licenses to provide your team members with the required access to design files. As a result, it becomes more accessible to developers. In addition, the vector graphics editor and prototyping features ensure that the design requirements are accurately described.
A Figma mobile app for Android and iOS allows you to view and manage Figma prototypes on mobile devices. So, the aspects related to user interface and user experience design are the main focus areas with real-time collaboration. The user interface is all about the visual elements such as screens, buttons, icons, etc., that are visible when you interact with them when you are using a website or app.
User experience is your interactions with the product you are using. Both of them combined help to improve the overall design experience. In order to ensure a mind-blowing user experience, testing your Figma designs on different devices and web browser online is crucial.
In this article on Figma testing, we shed light on what Figma is, its top features, components, and how to perform Figma testing of your web and mobile apps.
TABLE OF CONTENTS
- User Experience Design Process
- Top Features of Figma
- How Figma Transformed the Entire UX Design Process?
- Creating Different Components in Figma
- Figma vs. Sketch
- Pros and Cons of Figma Prototype Testing
- When Should you Perform Figma Testing?
- Prerequisites to Perform Figma Testing
- Common Mistakes during Figma Testing
- Different Approaches for Figma Testing
- How to Perform Figma Testing using LambdaTest Platform
- Frequently Asked Questions (FAQs)
User Experience Design Process
Before we move further in this Figma testing tutorial, let us elaborate on the different phases that help to improve and make your design better continuously. The various steps are:
- Understand design requirements: Understand your design requirements and create different user personas. Then, based on the user personas, you can also define use cases.
- Research: This phase is about analyzing competitors, discovering different UX trends, and keeping a close eye on new design guidelines.
- Sketch: This phase allows you to gather ideas and draw illustrations to get more clarity on the design requirements.
- Design: You can design images and create prototypes.
- Implementation: You can implement functionality and build a user experience.
- Evaluation: You can perform usability testing and evaluate improvements that can be made in your designs.
You can provide a great user experience by following an iterative design process. It is not the responsibility of only the design team to finalize design requirements. All major stakeholders in the company contribute to the operation of improving it every day. This is the only way to retain your existing customers and attract new ones.
Top Features of Figma
Shown below are some of the great features offered by Figma –
- Cross-platform compatibility: Figma is compatible with any operating system on a web browser. You can use Windows, Mac, and Linux machines seamlessly with Figma. Despite being supported by multiple operating systems, users can still share, open, and edit Figma files without any hassles. In many organizations, Figma helps to bring great collaboration between design and development teams so that design requirements can be easily accessible to all the required team groups.
- Great and easy collaboration: Since Figma is also a browser-based tool, teams can easily collaborate as they would do in Google Docs. It helps to track the people that are viewing and editing a file which is displayed right at the top.
When you click on the corresponding user avatar, it is easier to track the user activity. This comes in handy during the review of design prototypes. The design lead can keep track of the changes done by the design team in real-time by simply opening the shared file. It all comes down to providing constructive feedback to the groups you work with rather than keeping a close eye on their design activities. - Slack for team communication: Figma uses Slack as its communication channel. When you create a Figma channel in Slack, any comments or design-related edits done in Figma are readily available on Slack. So, when making iterative changes to your design with multiple designers involved, Slack can easily manage and track all the user activities performed.
- Sharing is simple and flexible: Figma allows permissions-based sharing on any file, page, or frame. When a shared link is created, the person that is accessing that link will open a browser version of Figma if the required permissions are assigned.
- Great for design review feedback: Figma has simplified how design reviews are handled in different organizations. Gone are those traditional days when multiple review comments were provided on the mockups designed using pen and paper, and it took a long time to close design changes. Figma supports in-app commenting functionality in both design and prototyping modes. These comments can be tracked easily using Slack or email. You are not required to publish PNG files, so the design changes are closed quickly.
- Improvise existing design processes: A great design tool like Figma helps identify existing gaps in the existing design process and brings about improvements you can implement.
How Figma Transformed the Entire UX Design Process?
Figma has changed the way we review and deliver design requirements. Before Figma, the teams used to follow the below steps where design requirements took a lot of time to be finalized:
- The pencil sketches of concepts were created based on the discussions with different stakeholders.
- The mockups were created and updated using available design tools.
- You could also create a prototype based on the finalized mockups.
- The draft changes were published, and the design changes were reviewed with the teams.
- The final changes were published and uploaded on the file server.
- After multiple iterations and reviews with the teams, it was delivered to the developer.
Once you use Figma to finalize your design requirements, the feedback and iterations are shortened with quick delivery cycles. This includes
- Creation of pencil sketches of concepts based on the initial discussions.
- Creating and updating mockups.
- Prototype creation.
- Review and edit the changes in real-time.
- The changes are being delivered to the developer quicker.
Creating Different Components in Figma
In design, components are elements that can be reused across multiple designs. Creating and managing consistent designs across projects is easier with them. You can create components from any objects or layers you create. A whole range of things can be included, such as buttons, icons, layouts, etc. Figma interface encompasses three main parts:
- The Middle portion is where the design canvas is located.
- The Left side is the sidebar that contains the layers, assets, and page of a file.
- Finally, the right toolbar contains all the required information about elements in the file.
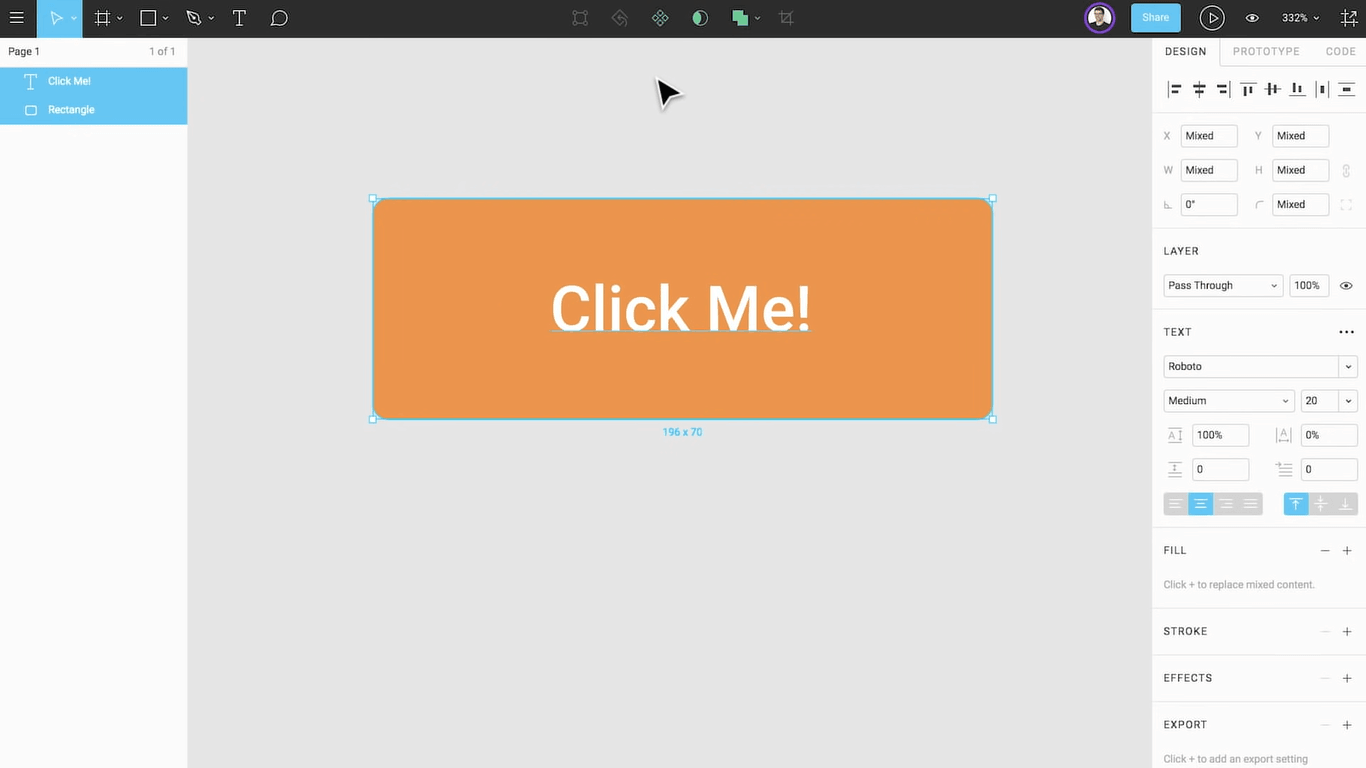
You can create different components, from frames to shapes to assets. First, you must create an account on the Figma website or access Figma.com. You can also sign up using your email for free. Then, you can start by creating your first default page. Next, select the + sign, or create a new design page on the right-hand side. Some critical components that can be created in Figma are explained below:
- Frame Creation in Figma
- Adding Grids in Figma
- Using Shapes in Figma
- Adding Images in Figma
You can start by creating a frame in Figma. This is the same as a page where the design will show. You can size an edge depending on your project requirements. You can either create custom frames or mobile application-specific frames. Select the frame tool from the top menu and the required frame size on the right panel.
Before you start with the design, you should add grids that allow you to keep the consistent alignment of content suitable for the page. The grids can be added to the frames and then customized. For example, ensure that you select a layout grid for consistency and usability after selecting the frame.
You can use shapes and elements in Figma to create squares, circles, lines, and a lot more that helps to make your design more appealing and user-friendly. You can select and resize the desired shapes using the shape tool.
Images always add significant value to our design requirements. Figma provides an option to add pictures from an online source or perform drag and drop locally to your page. In addition, you can resize the image as and when required.
Figma vs. Sketch
There has been a constant debate about Figma and Sketch. However, there are some reasons why design teams are switching to Figma rather than Sketch:
- Figma is an All-in-one design tool that provides all the required functionalities to design and collaborate. Sketch uses plugins such as Zeplin, InVision, and Abstract to provide the desired functionalities related to prototyping and developer handoff.
- Figma is also a browser-based app that allows you to handle your design requirements on the web. While on Sketch, you have to create and manage design on a Mac app that requires frequent version updates. This is not great from the usability perspective.
There are no surprises that Figma is a preferred choice over Sketch for most design-centric organizations because it is a complete tool and allows great collaboration between design teams.
Test your Figma-designed web apps on over 3000+ browsers. Try LambdaTest Now!
Pros and Cons of Figma Prototype Testing
The following benefits are involved when you are doing Figma testing of its prototypes that include both high-fidelity and low-fidelity prototypes:
- Cost-effectiveness: Solving usability problems for your existing design will cost a couple of times more than you can ever imagine. So, when testing for Figma prototypes, you save time and effort in retaining your existing customers.
- Identification of potential issues: The potential issues are identified and fixed before the final product is rolled out to the end-users or customers.
- Improvement in the end-user experience: When you are performing Figma testing of its prototypes with real users, it helps to improve the overall user experience, which is excellent for your product’s success in the long run.
- Incorporate feedback from different stakeholders: Constructive feedback helps improve the teams’ overall performance. The design teams can incorporate that feedback to improve the general design processes.
- Helps to eliminate your doubts: Testing Figma prototypes provide a clear picture of your design requirements. It helps to answer all the confusing questions, making sure you can take an informed decision on rolling out your new website or app.
- Discover new ideas: The user feedback improves your current design and uncovers countless opportunities for future design development. Getting in touch with real users can provide insights we are unaware of, and this is where you lay a solid foundation for your future releases.
So, if you want to provide a great user experience with Figma prototypes, you should run a usability test. By finding potential issues, the designs will only get better and more usable from an end-user perspective.
In addition to Figma’s benefits, it also has some limitations:
- Figma provides excellent collaboration between different design teams, but you must always be online to perform seamless partnership.
- There is a version control functionality in Figma, but tracking the last edits performed is essential because a small change can impact the entire existing version. You may need to revert the changes if design updates are not done correctly.
- When the design file is in draft state, there is no owner assigned to it, so there can always be ownership issues that they crop up.
- There are cache issues specific to a browser in Figma where the design updates done by fellow team members might not even reflect. Therefore, you need to perform a refresh on your Figma files to view the updated changes.
When Should you Perform Figma Testing?
It becomes essential to evaluate when you want to perform Figma testing of its prototypes. There is no fixed answer that depends entirely on the project requirements. But it is always a great practice to set aside some guidelines that design teams can follow every time for consistency. When working on a new product or trying to improvise the existing one, it is always a good practice to run a usability test early in the design process. It allows you to have early feedback on your designs before too much development work has been done.
Implementing a full usability test may not be a good idea when you make minor improvements to an existing product. Instead, you can have quick feedback to ensure that your design requirements align with the project goals.
To sum up, when introducing a new product with new features and enhancements, it is always advisable to perform comprehensive Figma testing to evaluate the quality of your designs. On the other hand, when an existing product is already available to the customers and you are making new enhancements, it is not required to run a complete usability test.
Prerequisites to Perform Figma Testing
Here are some tips to help you perform Figma testing of its prototypes:
- Choose the participants carefully. When you are testing high-fidelity Figma prototypes, choosing the group of participants who are familiar with Figma and have experience using similar software is essential. The participants new to Figma can be used for testing a low-fidelity Figma prototype.
- You can execute a pilot run before the actual implementation of Figma testing. This ensures that there will be no blockers or issues when Figma testing is performed with potential users.
- You can schedule a walkthrough of the design prototypes with relevant stakeholders.
- It is great to ask questions during the testing and get feedback from participants. In addition, you can collect feedback from a design and end-user experience perspective.
- Analyzing the feedback results and improving the designs going forward is essential.
- Ensure you have the right testing strategy to achieve the desired outcome.
Common Mistakes during Figma Testing
Do not commit the following mistakes if trying to make a strategy related to Figma testing:
- You do not allow your users to complete the entire set of tasks. Therefore, giving them time to experiment with the prototype and answer their questions is vital. This is when you will get great feedback on your design requirements.
- When you do not provide a clear set of instructions for users to perform the required tasks, if they are not aware of what they are supposed to do, they cannot even provide the accurate feedback you are looking for.
- You ask for early feedback even before the testing is completed. Unfortunately, this causes much-needed frustration to the participants invited to this testing activity. Instead, give them the required time to explore different features and functionalities.
Different Approaches for Figma Testing
Shown below are the different approaches to performing Figma testing –
Testing of Figma Prototypes Using Maze
You can test your Figma prototypes using Maze if you have the following required permissions related to editing. A Maze is an excellent tool for testing the prototypes with real users. You can use it for
- Usability testing of Figma prototypes.
- A/B test designs to compare the performance.
- Get quantitative data like success rates.
- Find the best user flow for your designs.
The Maze uses the Figma prototype to share a link to create a new project. Then, you can import the files into Maze, where you can perform required Figma testing for your prototypes.
Specialized Remote User Testing Tools
Suppose you are looking for specialized tools to perform your Figma Prototype testing. In that case, you can rely on remote user testing tools such as Userbrain, which is also compatible with Figma. There are a lot of other remote testing tools that you can use based on your testing requirements. Here are the top benefits of using remote user testing tools:
- You can set up in minutes with easy sign-up and predefined templates.
- You can invite your team of testers to validate the testing requirements.
- You can analyze the user’s needs by revisiting the test videos anytime.
- You also get iterative feedback based on the design revisions.
LambdaTest Platform – Simplifying Testing Requirements
Technology has evolved, so you will see a sudden shift in how organizations operate. We have moved beyond the traditional ways of testing, where a dedicated team of testers will create manual test cases and scenarios and use excel sheets to record their testing observations. This means you must spend a lot of time configuring your testing and infrastructure requirements.
There is no harm in relying on traditional means of testing, but it becomes a challenge when testing on multiple browsers and operating systems. So again, it is about managing your testing requirements on a scale. This is where cross browser testing platforms like LambdaTest come into the picture.
LambdaTest is a test orchestration, and execution platform that meets your testing needs using cloud infrastructure. It lets you test your websites and web applications on an online browser farm of 3000+ real desktop and mobile browsers.
Here are some of the great features that make the LambdaTest a great platform for your Figma testing needs:
- Automation testing to test websites and web apps with automation testing tools like Selenium, Cypress, Playwright, Puppeteer, Appium, Espresso, and XCUITest.
- Blazing-fast test automation cloud – HyperExecute is 70% faster than any traditional cloud grid.
- Live-interactive testing of web and mobile applications.
- Faster Automated browser screenshot testing.
- You can perform localhost testing of your application or website to achieve the desired performance.
- Geolocation testing and Localization testing to test web and mobile applications.
- Integrate the LambdaTest platform with your favorite tool, such as JIRA, Bitbucket, Slack, GitHub, etc., so you can track your project’s key performance metrics effectively.
Test your Figma-designed Mobile apps on real devices. Try LambdaTest Now!
How to Perform Figma Testing using LambdaTest Platform
LambdaTest gives you the flexibility to perform Figma testing of your Figma-developed websites and mobile apps on its high-performing real device cloud. You can also perform manual or automated Figma testing across different browsers and OS combinations.
In addition, you can leverage the following additional features to conduct Figma testing –
- Screenshot testing
- Responsive testing
- UI Comparison testing
Screenshot testing
Using Automated screenshot testing, you can capture screenshots on various desktops and mobile devices running multiple operating systems simultaneously! You can visualize how seamlessly your web app renders on various screen sizes using different browsers. You can capture up to 25 screenshots of different browsers and OS configurations in a single test session.
You can test on various browser versions, including Chrome, Firefox, Safari, Edge, Internet Explorer, and Opera. You can also test on multiple operating systems, including Windows, macOS, Android, and iOS.
You can follow these steps to perform screenshot testing on the LambdaTest platform.
- Login to your LambdaTest account. Don’t have an account? Sign up for free.
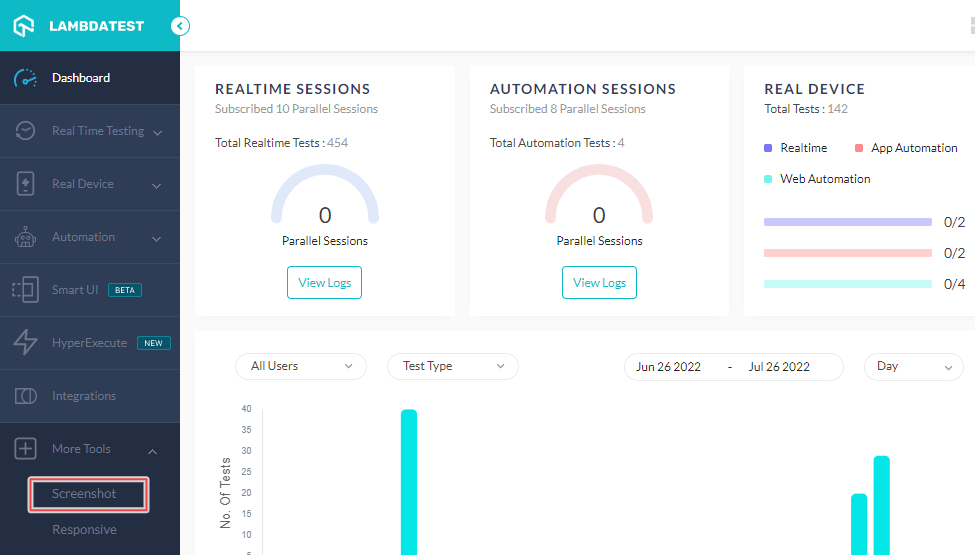
- From the left sidebar, navigate to More Tools > Screenshot.
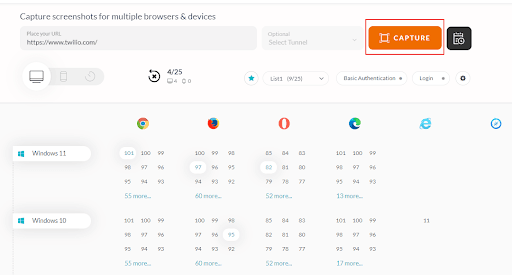
- It will redirect you to the screenshot testing console. For demonstration, let’s run screenshot tests on Desktop browsers. First, enter your URL and select the browser and operating system combination. Then press CAPTURE.
- Clicking the capture will take you to the screenshot result page. Here you can view and download your screenshots.
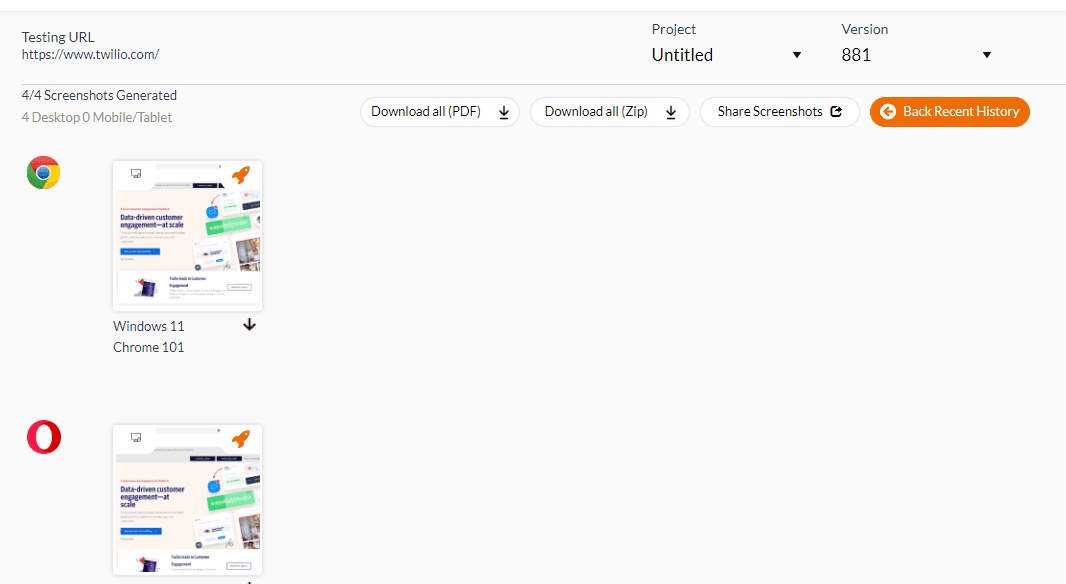
To start screenshot testing on LambdaTest, check out the video tutorial below.
Responsive testing
The LambdaTest Responsive testing lets you test websites on mobile across different 50+ different screen sizes in a single go.
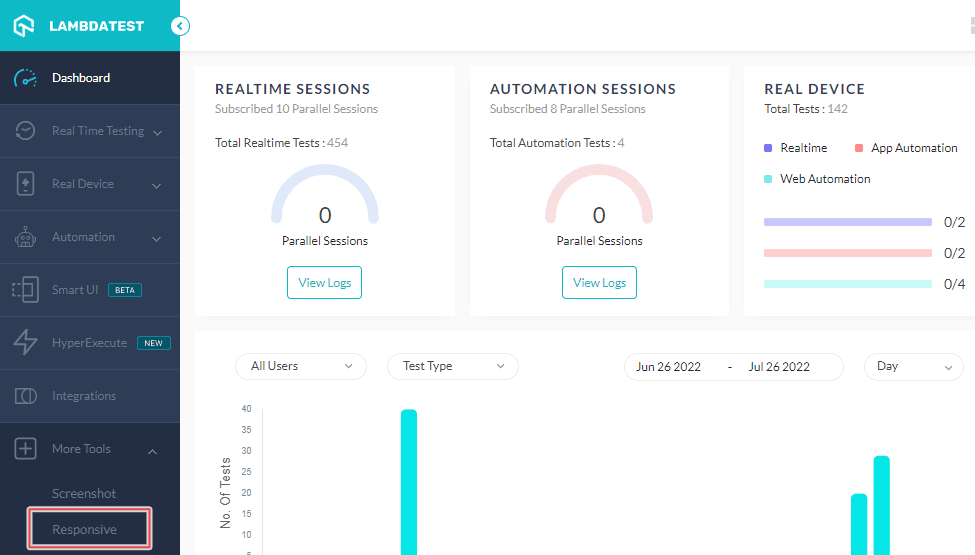
You can follow the below steps to perform responsive testing on LambdaTest –
- Login to your LambdaTest account.
- From the left sidebar, navigate to More Tools > Responsive.
- Select the required Monitor size.
- Enter the test URL. You can also add tunnel details. (if required)
- Next, select the device from the available options where the Device name and Viewport are auto-populated.
- Once all the required details are entered, click GENERATE.
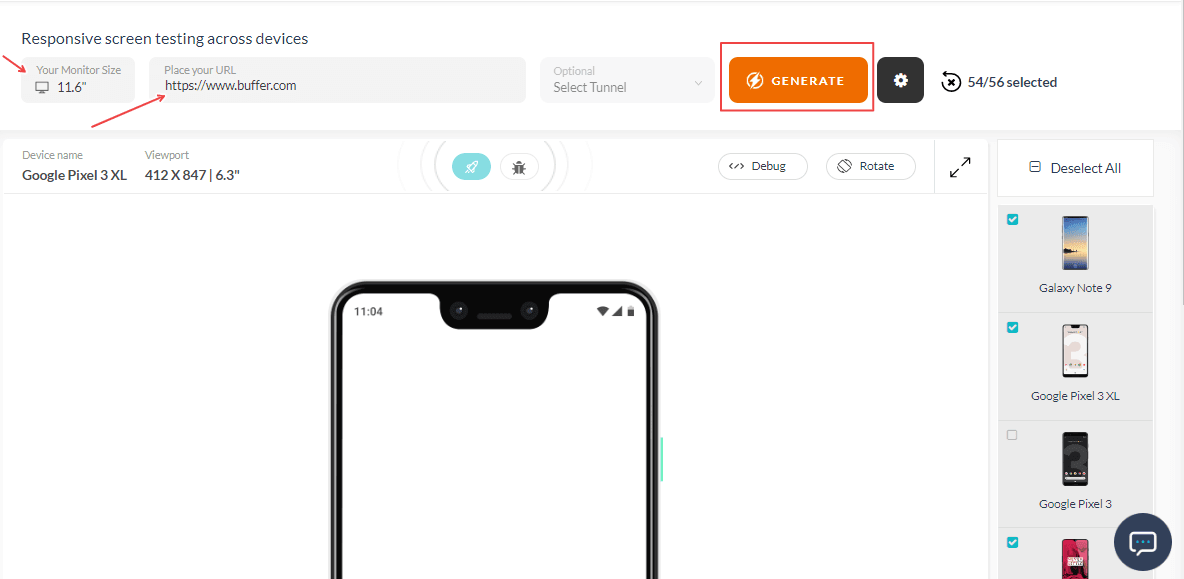
To start responsive testing on LambdaTest, check out the video tutorial below.
UI Comparison testing
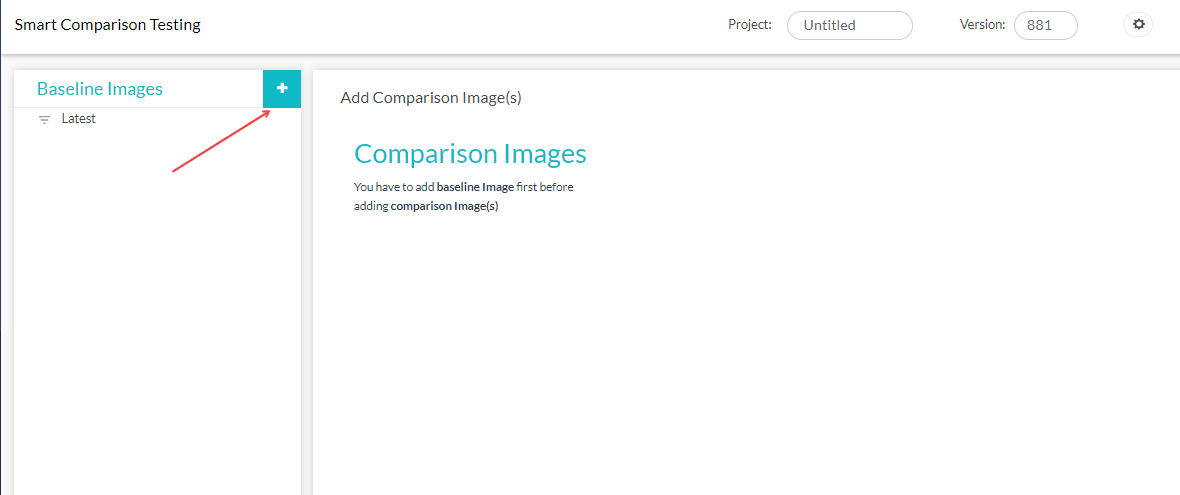
With UI Comparison Testing, you can test and compare two image layouts to determine their differences. In addition, you can view visual bugs with one click, including Icon Size, Padding, Color, Layout, Text, Element Placement, and more.
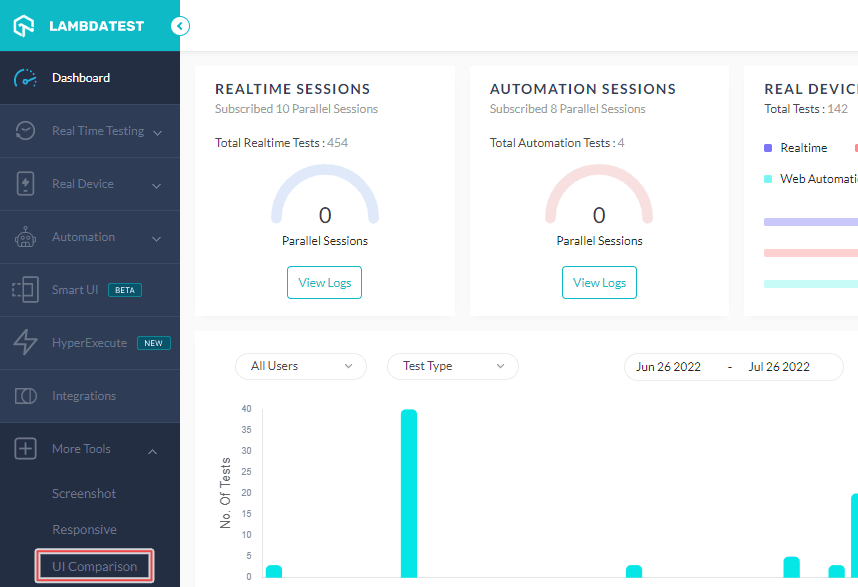
You can follow these steps to perform UI Comparison testing on the LambdaTest platform.
- Login to your LambdaTest account.
- From the left sidebar, navigate to More Tools > UI Comparison.
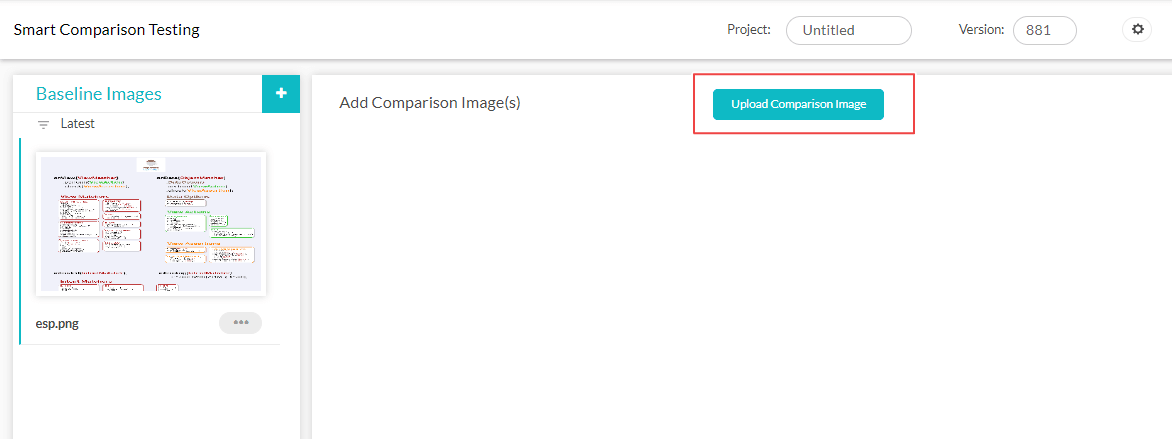
- Click on the + icon to upload a Baseline image.
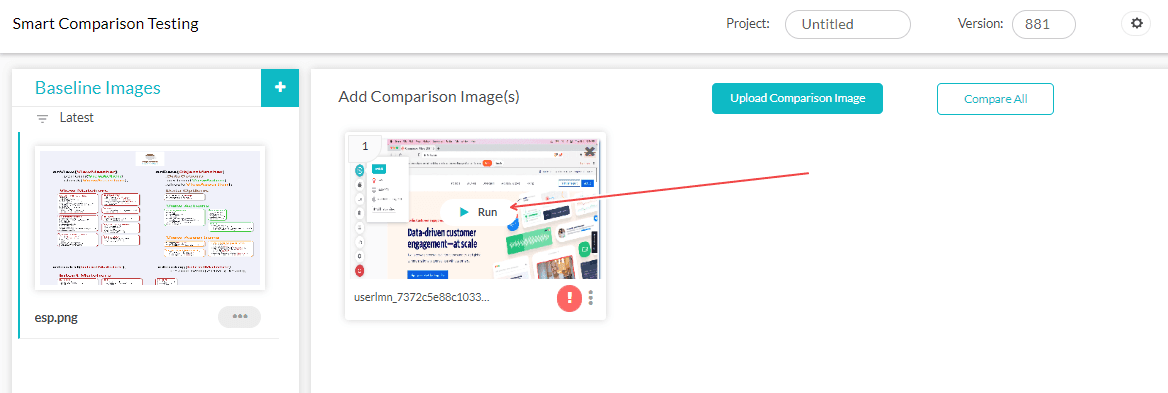
- Once you have uploaded the Baseline image, click Upload Comparison Image.
- After uploading the comparison images, click the Run button on the comparison image thumbnail.
- After that, click View Issues.
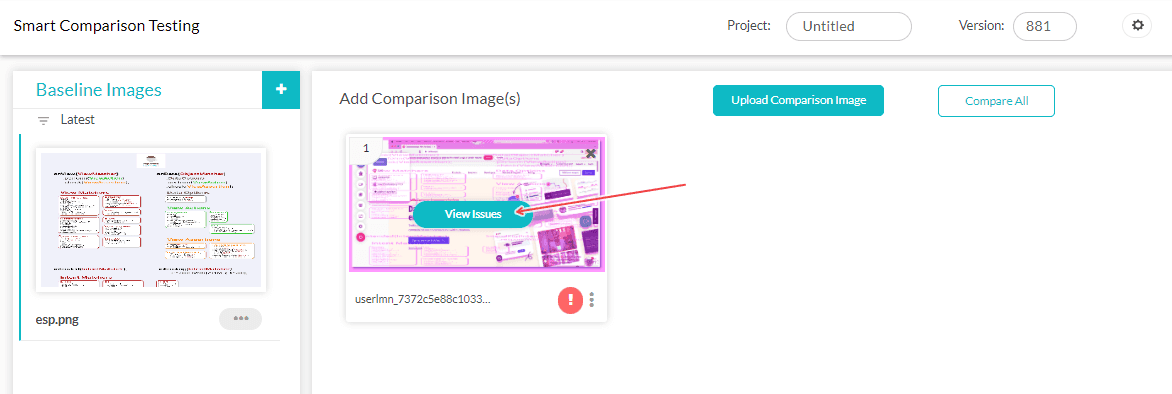
You can now view the visual UI mismatches between your baseline and comparison images.
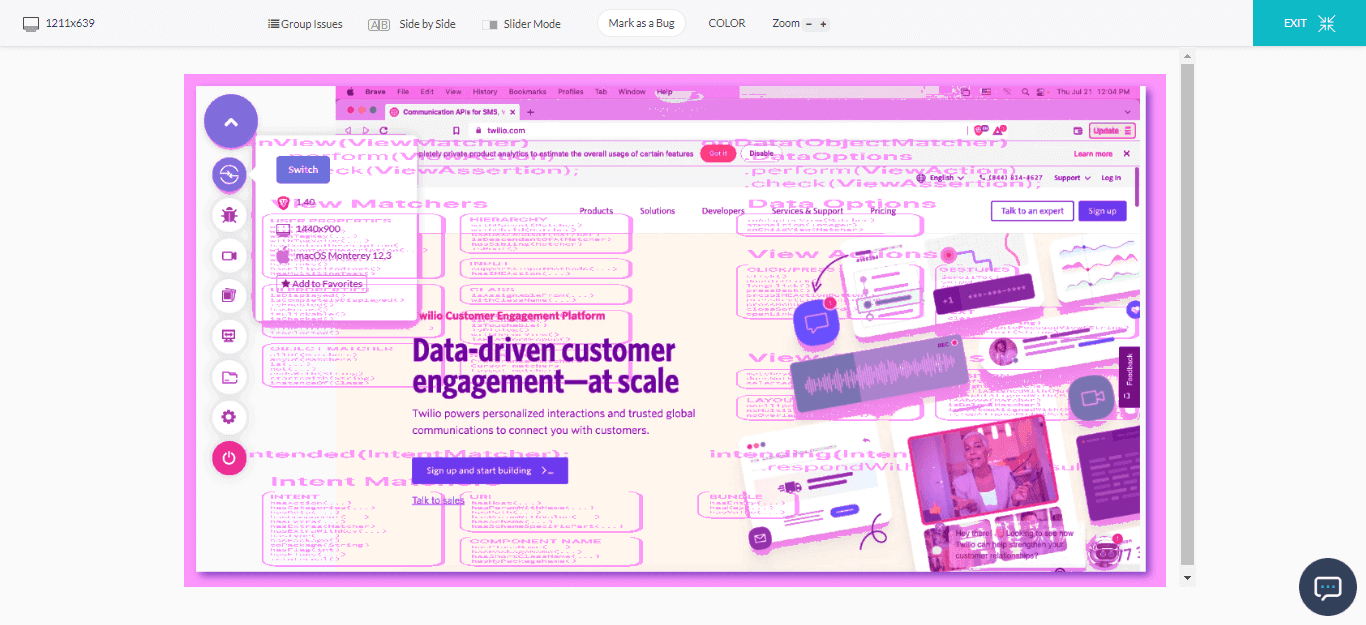
That’s not all! In addition to web testing, you can also perform live and automated app testing of your Figma-developed mobile apps on LambdaTest online device farm of 3000+ real devices and OS combinations.
Check out the below tutorial to get started with real device cloud testing on LambdaTest.
Subscribe to LambdaTest YouTube Channel, and stay up to date with the latest tutorials around Selenium automation testing, Cypress testing, real-time testing, and more.
Conclusion
Prototyping plays a vital role in the design process. But that does not mean that you will focus only on the creation part, and your job is done. You must perform Figma testing to identify and fix potential issues impacting the end-user experience.
There are some of the questions you must answer during the Figma testing phase:
- When should you run a usability test on Figma Prototypes?
- How can you run these tests with real users, and who should be the users in that case?
- What are the common mistakes that happen during Figma testing?
When you get a clear answer to the above questions, you can create a strategy to perform Figma testing with the required tools to help you achieve the desired outcomes.
Frequently Asked Questions (FAQs)
How can I test my Figma website?
There are various approaches you can use to test your Figma website, including testing Figma prototypes with Maze, testing with remote user testing tools, etc. The best way to test Figma-designed web apps is to use cloud-based testing tools like LambdaTest. With LambdaTest, you can test your Figma websites across 3000+ real desktop and mobile browsers on its high-performing device cloud.
Is Figma good for prototyping?
UX/UI prototyping is easy with Figma. You can create interactive flows directly in the design file using advanced tools. With a few clicks, you can turn your static designs into realistic replicas of your website or apps.
Got Questions? Drop them on LambdaTest Community. Visit now


