How To Use Appium Inspector For Mobile Apps
Amrita Angappa
Posted On: May 30, 2022
![]() 56083 Views
56083 Views
![]() 16 Min Read
16 Min Read
Let’s put it short: Appium Desktop = Appium Server + Inspector. When Appium Server runs automation test scripts, Appium Inspector can identify the UI elements of every application under test. The core structure of an Appium Inspector is to ensure that you discover every visible app element when you develop your test scripts. Before you kickstart your journey with Appium Inspector, you need to understand the details of it.
In this article on Appium Inspector, let’s cover what Appium Inspector is, why choose it, its pros, what are the specifications of Appium Inspector, how to integrate Appium Inspector, and much more.
TABLE OF CONTENTS
- Introduction to Appium Inspector
- Why choose Appium Inspector?
- Benefits of Appium Inspector
- Specifications of Appium Desktop Inspector
- Getting started with Appium Inspector
- Element inspector tools to identify mobile app elements
- How to use Appium Inspector for app testing?
- Limitations of Appium Inspector
- Recent updates on Appium Inspector
- Frequently Asked Questions (FAQs)
In case you are a beginner to Appium you can learn to perform mobile app testing easily through this tutorial. If you are preparing for an interview you can learn more through Appium Interview Questions.

Introduction to Appium Inspector
Appium Inspector is the most comprehensive tool for managing tasks such as script recording and element discovery. This tool comes in handy when you want to automate a new app. This is known to be a standard procedure for identifying the mobile app’s unique UI elements. The tool has been under maintenance for Windows and OS X.
All you need to do is download Appium Inspector and install it, for which both Windows and OS X versions (.app and .exe) are available.
Why choose Appium Inspector?
Appium Inspector is a boon for testers wanting to identify UI elements of a mobile app. We can download Appium Inspector and use it to manage the following tasks:
- Get a thorough idea of the element hierarchy: Developers can feel this is just the tip of the iceberg, but it means the iceberg itself for testers. It provides developers with the right information on how to align certain UI elements with each other and also on what different fragments/layers are present in the app.
- Find the attributes: Appium Inspector is used for finding the name, value, description, and different object/element attributes. Objects consist of certain identifiable characteristics which we can identify through the tool. It would then be used directly for the XPath command.
- Record manual app actions: Appium Inspector lets you record different app actions manually to access hierarchy and elements and record them to ensure clear test scripts for the app.
Do you want to know more about XPath? Go through our XPath locator cheatsheet to get a better understanding of XPath locators.
Benefits of Appium Inspector
When you download Appium Inspector, it comes along with tons of benefits for mobile app testers. It isn’t as taxing as it used to be earlier to achieve all these benefits. Let’s explore them:
- No need to install Appium Software
- Access Device Remotely
- Obtain Web Objects
Appium can be a tough nut to crack for new users. Many must be wondering about facts like how to use Appium Inspector. To start Appium testing, enterprise mobility teams should install Appium Desktop on every workstation available for testing. This process is quite lengthy but the resources and time spent can be a daunting affair as a whole.
Appium Inspector allows you to perform tests on real mobile devices in app testing scenarios, such as writing mobile test scripts with Appium Inspector to identify objects easily. This has provided ample reasons for teams to use real Android and iOS devices to perform testing.
Using a built-in Appium server and inspector is not compulsory for emulators and/or simulators. Instead, they can switch to real devices to write and run Appium test scripts.
Enterprise mobility teams would love Appium Inspector since it can help testers identify objects quickly when they write Appium test scripts. Besides that, Appium Inspector can work on additional content and app types that are not supported by Appium Desktop, such as hybrid apps. It can support native mobile apps though.
Specifications of Appium Desktop Inspector
Basically, Appium Desktop Inspector needs the following to run:
- A running Appium server that you can access through the network via the Inspector (It can be an Appium server that runs on localhost or another one that runs on a cloud service).
- Every Appium driver, plugin, tool, and other necessities you might come across.
If you are in a position to start an Appium session from the typical client library, you can get the same done with the Inspector.
These are the Appium Desktop specifications:
- To test Android apps:
- A Desktop or a PC with macOS X 10.7 or Windows 10 or later versions.
- Java SE version 8 or advanced versions, Java Development Kit (JDK).
- A simulator or an iOS device.
- Node and npm (Version 10 and above).
- Integrated development environment (IDE).
- An emulator or an Android device.
- Appium or Appium Desktop.
- To test iOS Apps:
- A PC with macOS X 10.7 or above versions.
- Xcode- latest version.
- Homebrew
- Integrated development environment (IDE).
- Java SE version 8 or Java Development Kit (JDK).
- Node and npm (Version 10 and above).
- A simulator or an iOS device.
- Paid, active Apple developer account when you run Appium on a real iOS device.
- Appium or Appium Desktop.
Getting started with Appium Inspector
The below image is the core architecture of the Appium request flow. It’s important to know this before you venture on to know how to use Appium Inspector. When the client requests the Appium server to provide a set of commands, the Appium Inspector identifies the mobile app elements included in it. It uses a set of attributes to identify the elements before it reaches the target system. This is when the user would be able to perform the action they had intended to perform.
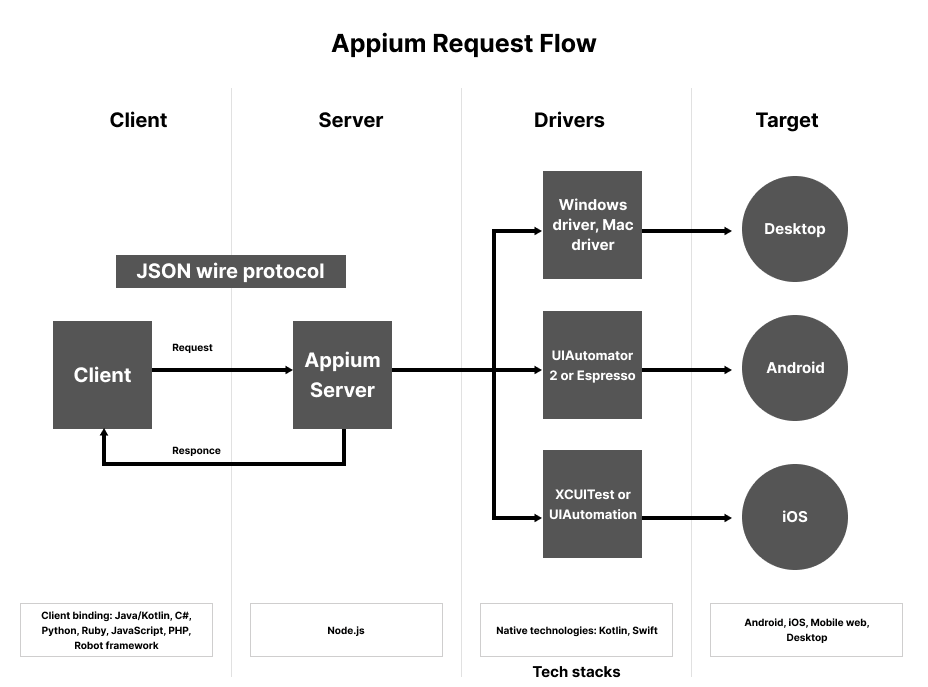
Appium inspection process is used to identify or locate mobile app elements. When you need to automate any mobile app scenario, you can follow these steps:
Step 1: Locate the unique element
Step 2: Perform identified element action
With Appium Inspection, you can get the first step sorted out. For example, let’s say that your app consists of signups. The next step would be to enter your username and password. The Appium inspection process can let you “inspect” your screen and identify the unique text fields. This is the way through which you can enter the username and password in the right fields.
Element inspector tools to identify mobile app elements
You have different tools available in the market through which you can inspect your mobile app elements. These are the top methods used in the industry:
- UIAutomatorViewer: This tool is provided by Android Studio to inspect mobile app elements.
- Appium Desktop Inspector: The latest Appium GUI version (Appium Desktop) supports a built-in inspector. This inspector can come in handy for both Android and iOS apps, which would need a Mac.
How to use UIAutomatorViewer?
This GUI tool can analyze and scan the Android application’s UI components. To automate any Android app with Appium, the user needs to locate the objects in Application Under Test (AUT).
- You can follow the below-mentioned steps to install and use UIAutomatorViewer.
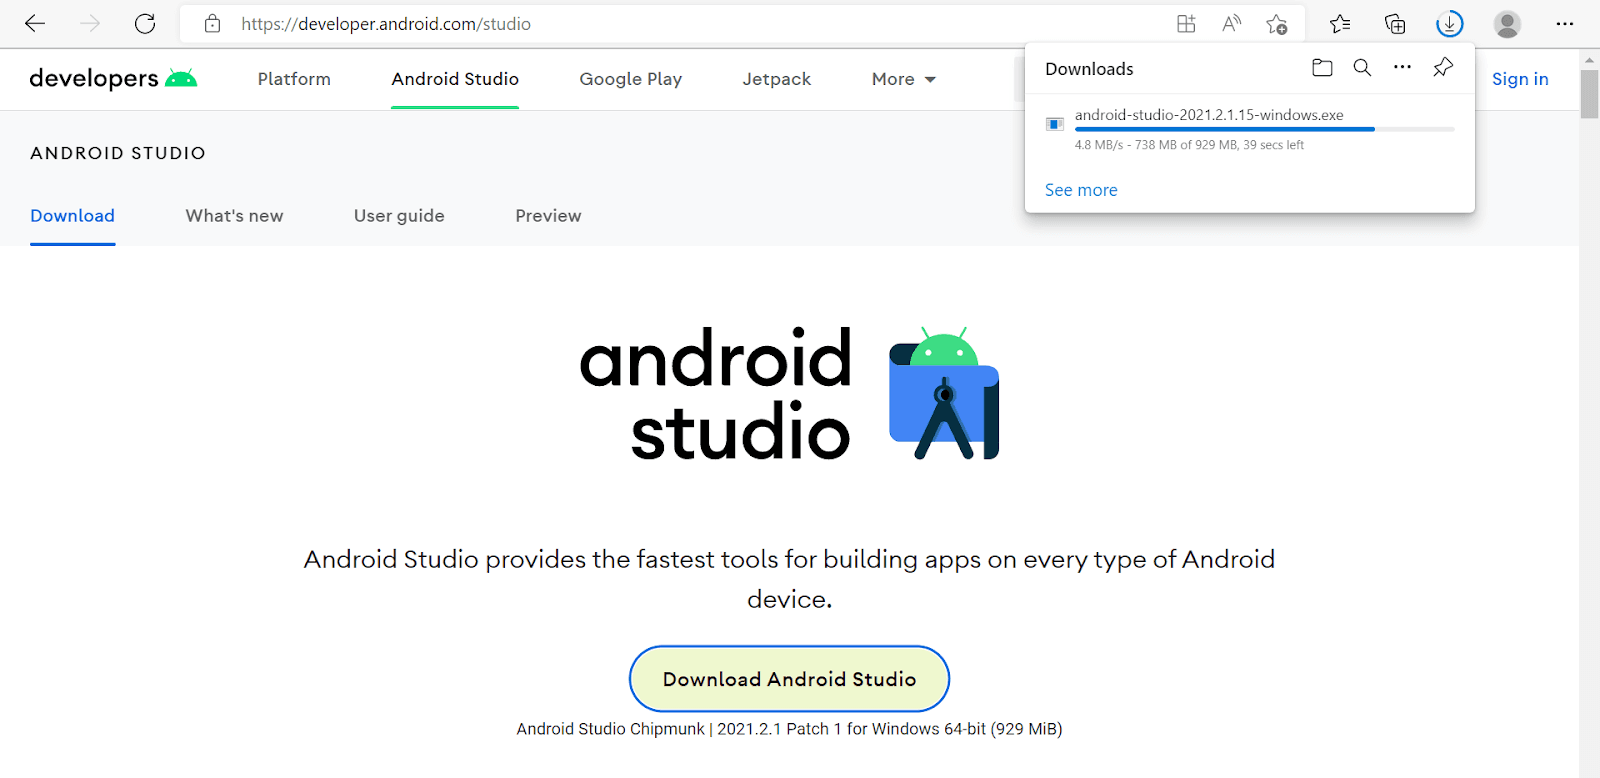
Install Android Studio to access UIAutomatorViewer, which would be installed by default in it.
Method 1: Through Command Prompt
1.1. Open the command prompt
1.2. Type uiautomatorviewer. Press the “Enter” button.
After a couple of seconds, the UIAutomatorViewer window would instantly open.
Method 2: Through file location
Open UIAutomatorViewer from the location of the folder. You can find that UIAutomatorViewer has been installed on your system in a .bat file. This method can let you navigate to the location of the installed folder. Open it. These are the steps to open it:
2.1: Use the location – C:\Users\username\AppData\Local\Android\sdk\tools\bin (Replace ‘username’ with the username that you have on your machine)
2.2: The bin folder can contain uiautomatorviewer.
2.3: Select uiautomatorviewer. This would go on to open the UI Automator Viewer window within a few seconds
Any of the methods mentioned above can help you open UI Automator Viewer.
Connect your mobile phone to your system with USB
Before you inspect your mobile app elements, go ahead and connect the mobile device to your system through USB. To ensure that the mobile phone has been connected well, open the command prompt to run the ADB devices command. This command would show the Device ID of the mobile phone. This is to ensure that you have connected the mobile phone properly to the system. Next, open the app you need to inspect.
Inspect mobile app using UI Automator Viewer
Follow the steps given below to inspect your mobile app with UI Automator Viewer:
- Click on the Device Screenshot icon, which is a part of the UI Automator Viewer screen.
- The popup message can show the information on progress.
- After a few seconds, the UI Automator Viewer would process every piece of information on the screen. After doing this, UI Automator Viewer would load the phone screenshot.
- Now, bring the mobile cursor to the device screenshot. You can get the information you need on the right side panes
Here is a gist of what’s happening
After you click on the Device screenshot icon, the UI Automator Viewer will capture the details of every visible object in XML format on the screen. Then it would capture the mobile screen screenshot in PNG format. After capturing both the details, UI Automator Viewer would show these both as a part of the UI.
How does an Appium Inspector perform?
Appium Desktop Inspector leverages similar methods to UIAutomatorViewer for identifying the mobile app elements. This can include the following:
- Find element by ClassName
- Find element by ID
- Find element by XPath
- Find element by Accessibility
- Find element by Tag
The mobile element properties, namely content-disc, resource-id, name, and text would be similar for UIAutomatorViewer and Appium Desktop Inspector.
How to use Appium Inspector on Cloud?
Appium also supports remote inspection on remote devices. There are a number of cloud-based solutions available that provide a real device cloud for inspecting UI elements while testing mobile apps.
LambdaTest is a cross browser testing platform offering businesses an all-in-one platform to test their apps on 3000+ real browsers, devices, and OS. With LambdaTest for Appium Inspection, you get the following benefits:
- Connect with different cloud servers of your choice.
- A user-friendly GUI to get the inspection process done hassle-free.
- Speed up the Appium inspection process through automated features.
- Get accurate results
Get a gist on how to perform app test automation on LambdaTest real device cloud.

Subscribe to the LambdaTest YouTube Channel for more such videos around Selenium Testing, Real-Time Testing, Cypress E2E Testing, and more.
Integrating Appium Inspector on LambdaTest
This Appium Inspector meant to manage mobile apps is run by the horsepower of an Appium server. Appium Desktop Inspector is nothing but an Appium client such as Appium’s Java or Python client with a high-end UI. The interface can be used to specify the capabilities of Appium Server Version and Setting. As soon as the Appium Server integrates with the LambdaTest App, interacting with different elements and running other Appium Commands becomes a breeze.
Incorporate Appium commands seamlessly with our Appium Commands Cheat Sheet to enhance your testing experience. For a deeper understanding of utilizing Appium Inspector on LambdaTest.
How to use Appium Inspector for app testing?
In this section, we demonstrate how to use Appium Inspector using LambdaTest platform. It’s quite simple, user-friendly and time-saving. It’s highly recommended to switch over to real device testing on cloud as per your needs since it comes along with more benefits related to cost and speed.
Uploading your Application
Upload your application (Android or iOS) to the LambdaTest cloud servers with our REST API. To make this happen, you need to provide your LambdaTest credentials like username and access key in the cURL command for authentication.
Below is a cURL request example for uploading the app with our REST API. Also, you can offer a pathway to the local app or provide an application URL.
For Android:
Note: Response of the above curl will be an app URL in the below format and will be used in the next step.
Setting the capabilities
When you launch the app, the Appium server will start with the default IP address of 0.0.0.0, and the port assigned would be 4723. You need to set the Appium Server specifications and then choose the one you need from the saved capabilities.
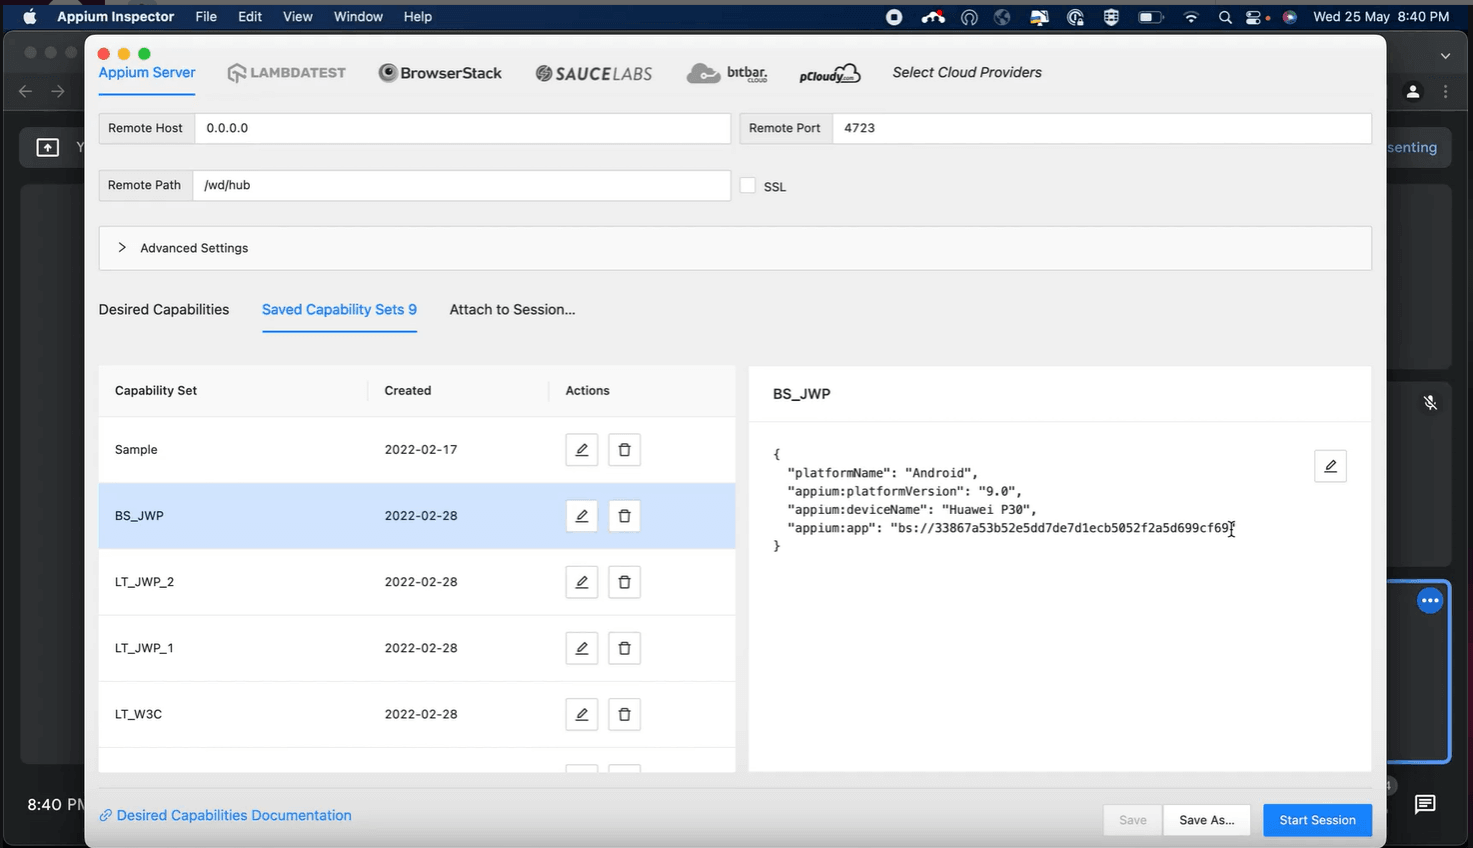
The sets you choose would become a part of the desired capabilities. You can make the necessary changes to it.
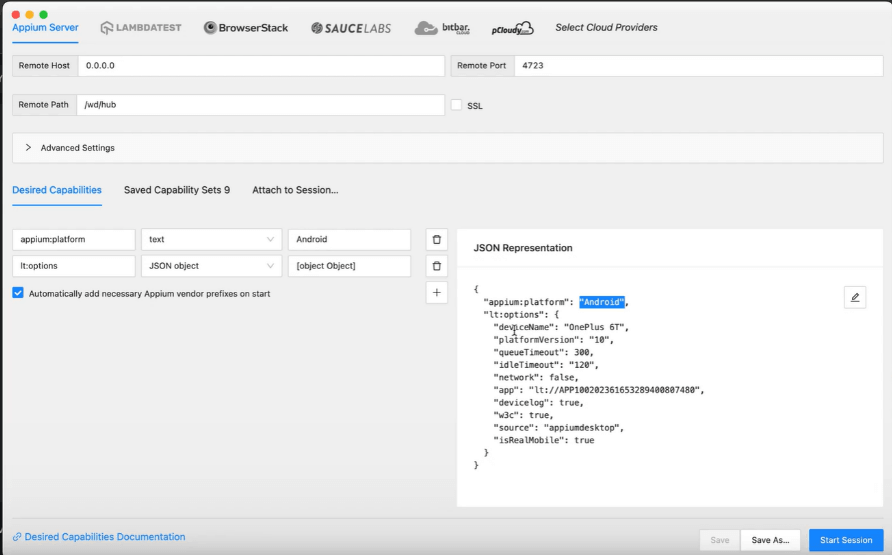
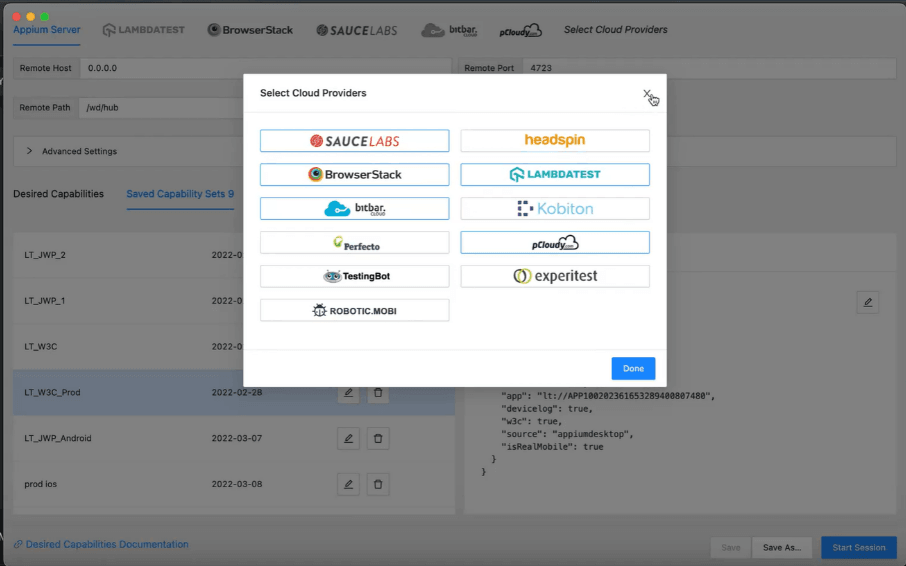
Starting an Appium Inspector Session
Choose the Appium Inspector & select LambdaTest from the Cloud Test Providers list.
Configuring your credentials
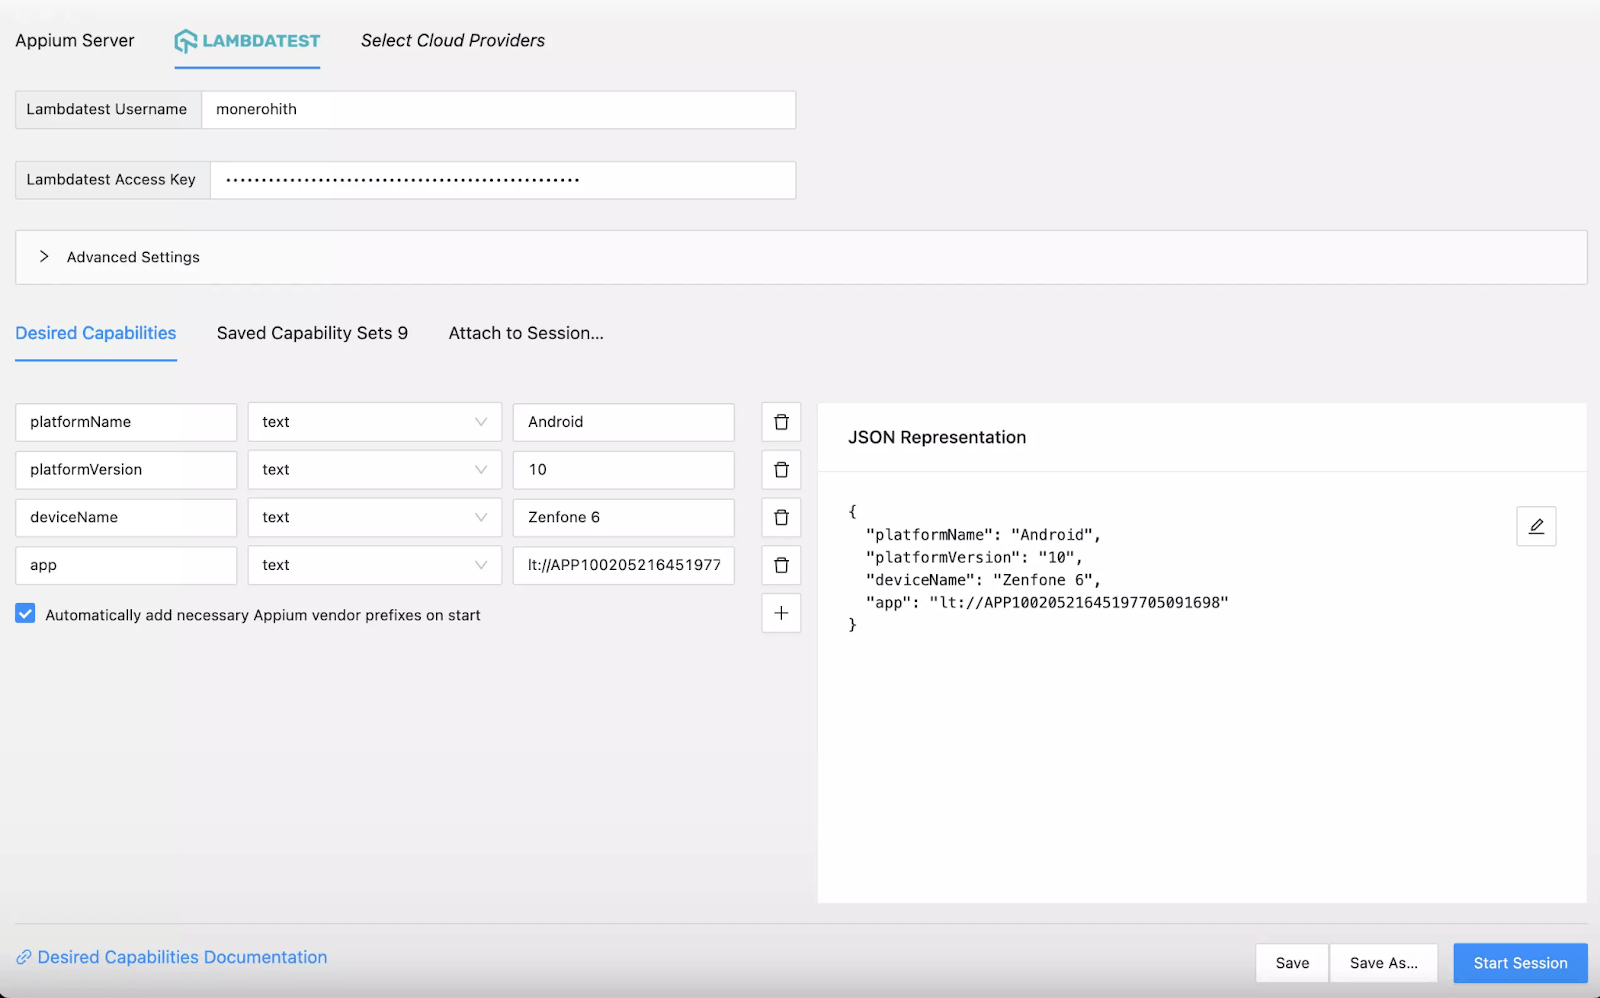
Enter the LambdaTest userName and access Key. You can find them in your LambdaTest Profile section.

Configuring the Required Capabilities & Starting the Session
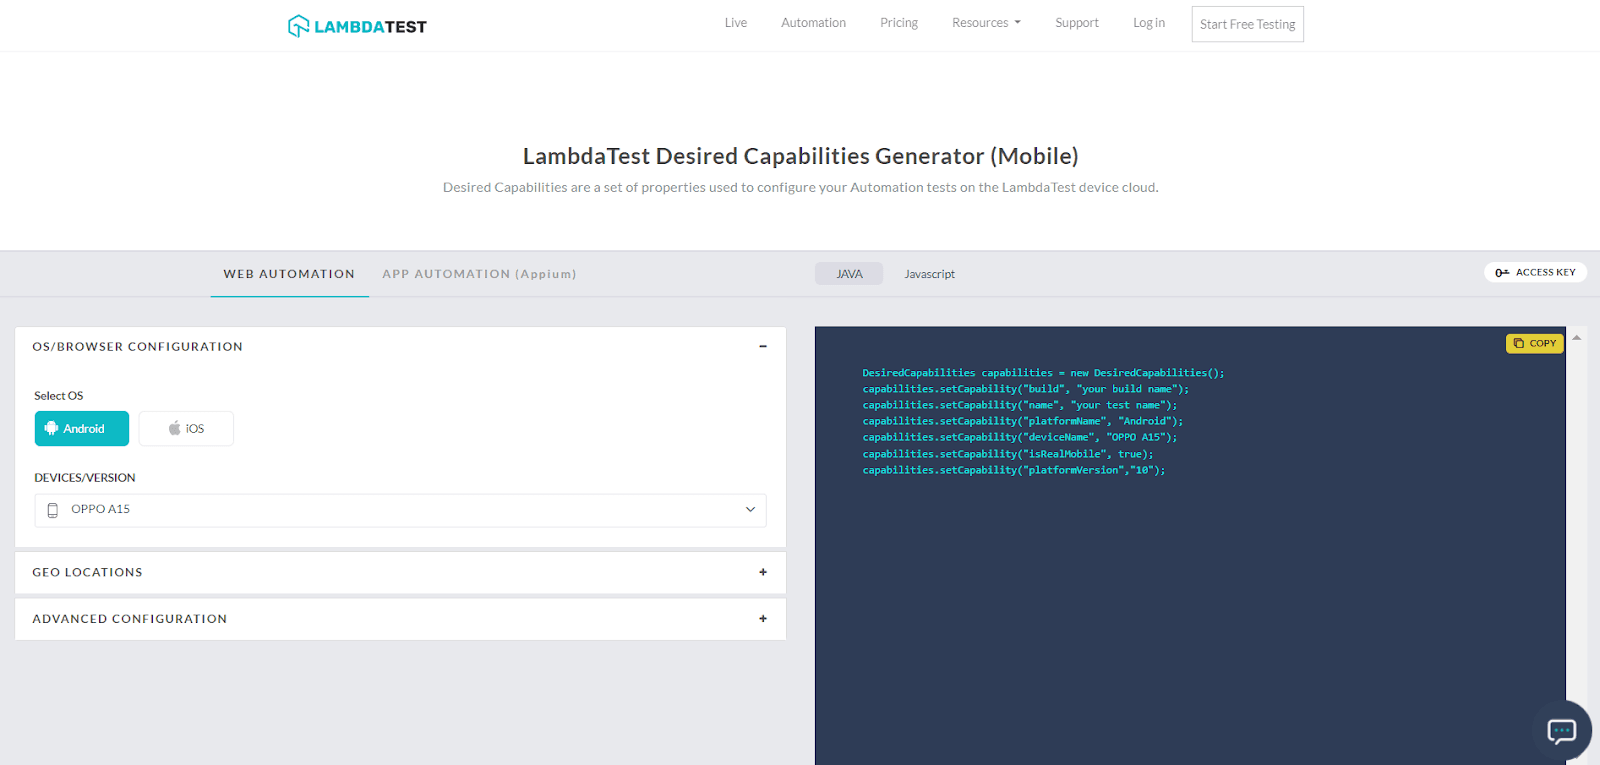
Configure the LambdaTest capabilities under the Appium Desktop inspector’s Desired Capabilities tab. Leverage the unique app URL, which is a part of Step 1 for setting the value of the app capability. Here, you will find the list of every capability that LambdaTest supports.
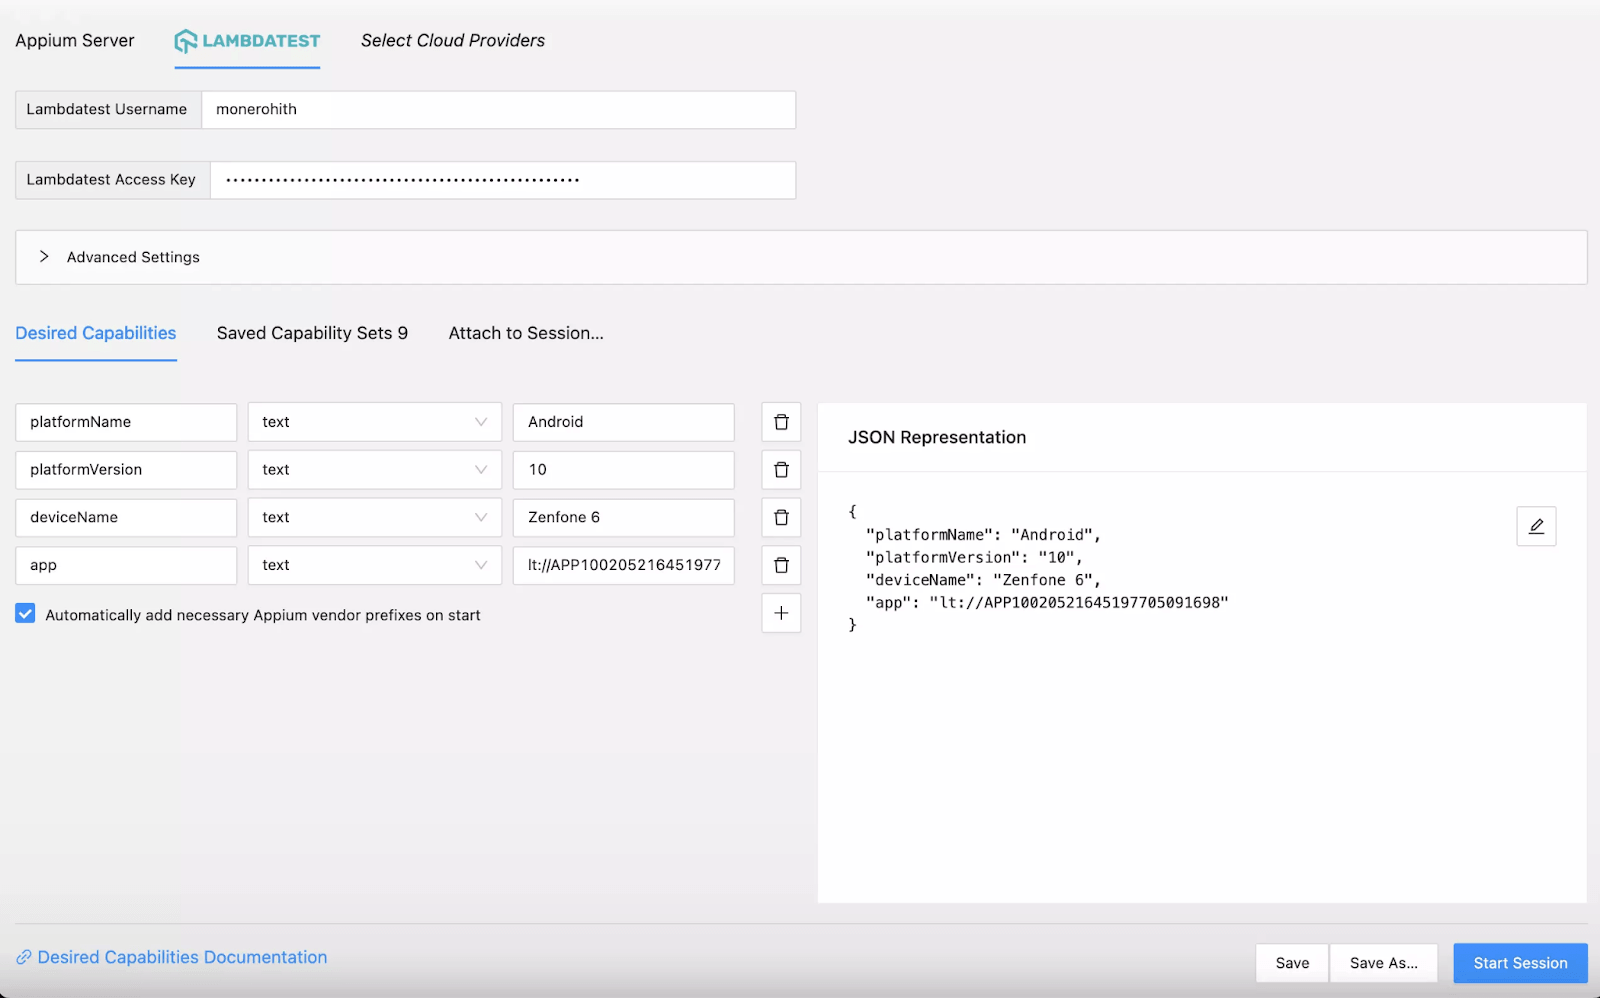
You can visit our Desired Capability Generator and use GUI to generate the Capability Representation.
After completing this, it’s time to run the test. Click on the Start Session.
After starting the session, you can access the video recording with elaborate info and test logs on the LambdaTest App Automation Dashboard.
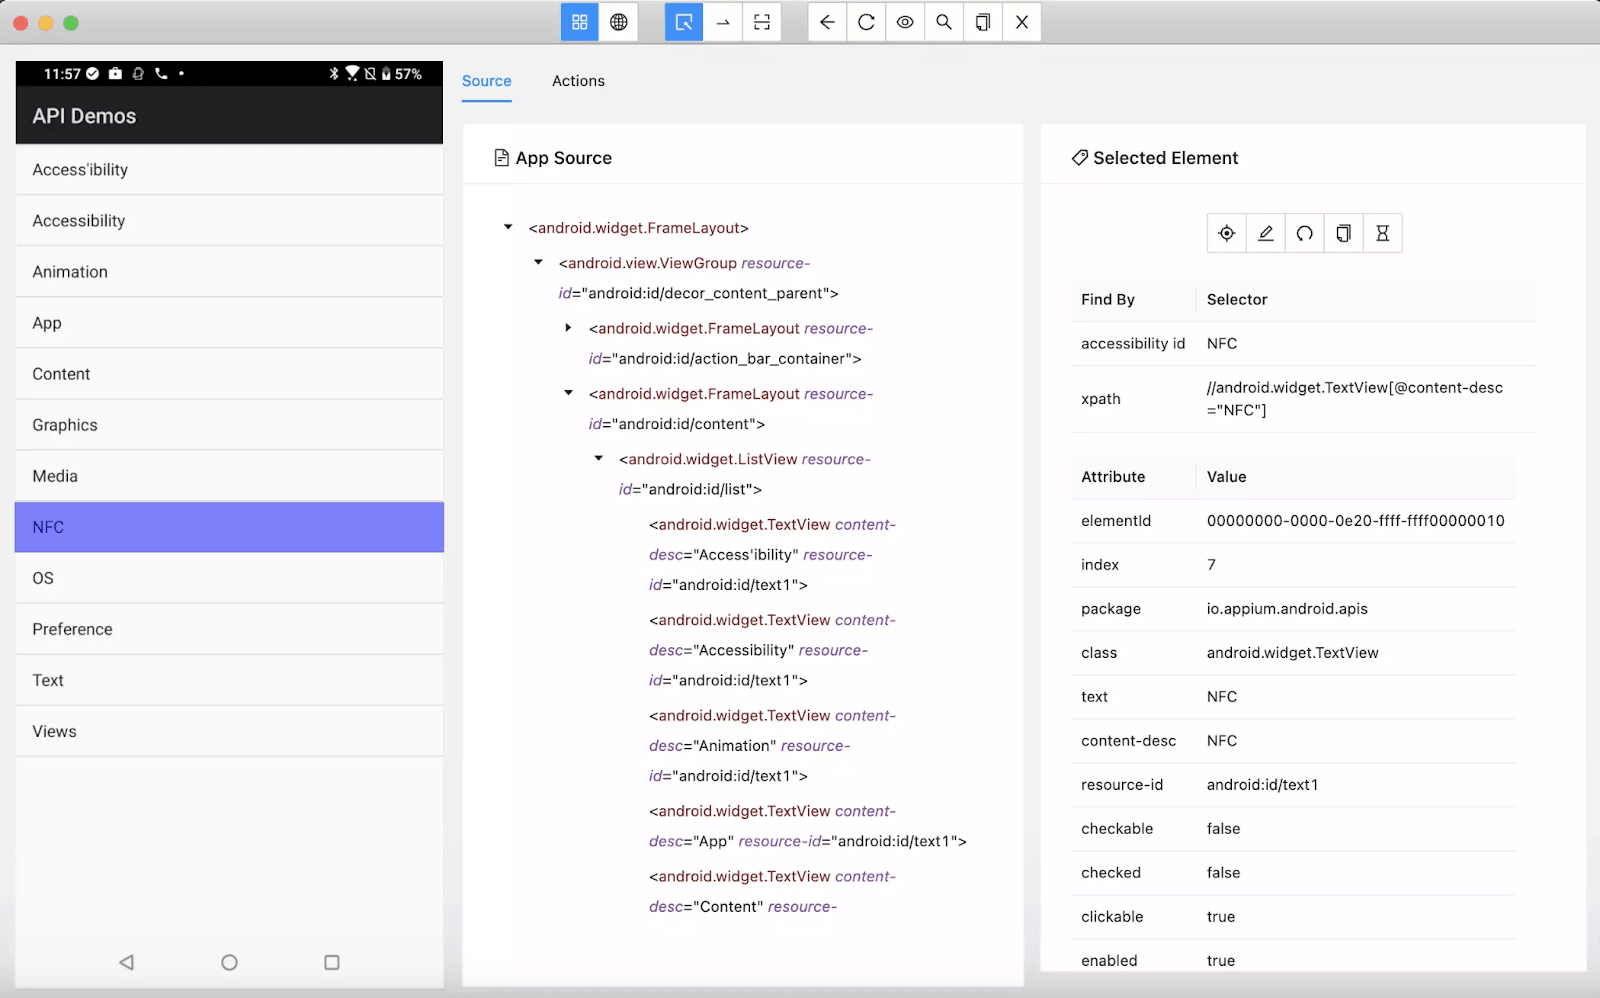
Inspect UI elements using Appium Desktop Inspector
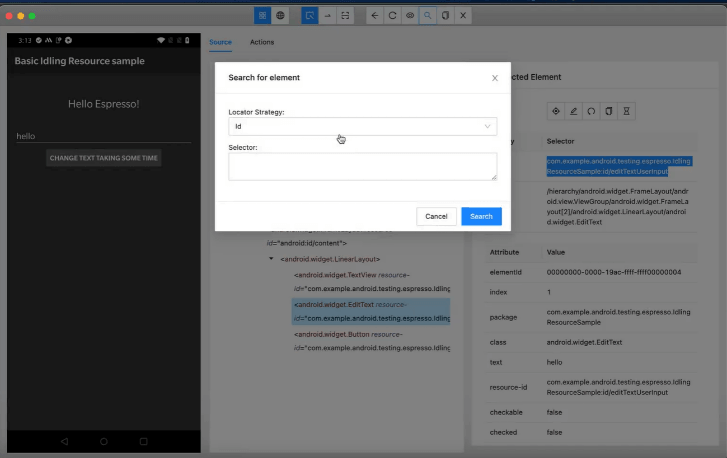
For exploring the inspection of UI Elements using Appium Desktop Inspector, here is a scenario where you can open the App and inspect the Search Bar. When the tester highlights the search bar with the cursor, you can get the selected element details. You can use these details in the test script to perform various tests on the specified element.
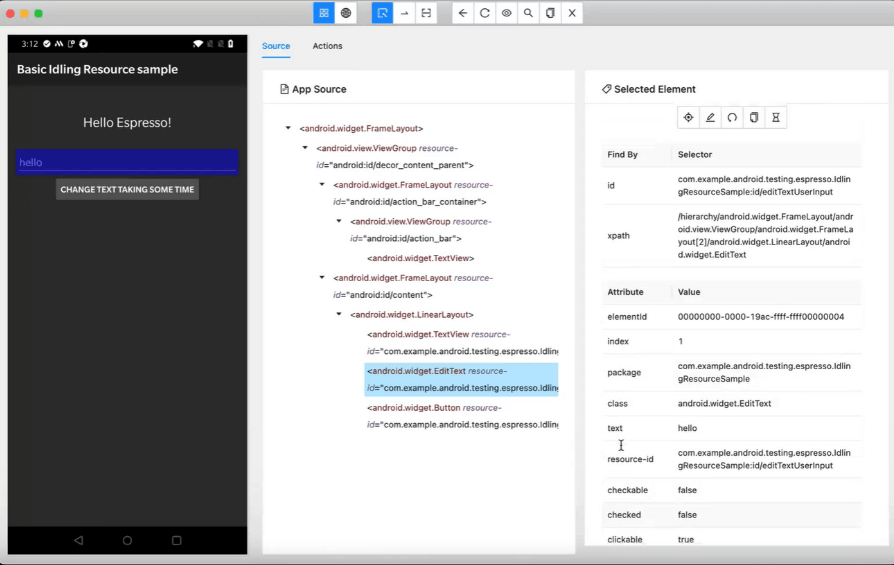
You can also search for an element using its element id, XPath, attribute, package, class, and text through the GUI options provided on the screen, rather than typing the code.
Limitations of Appium Inspector
- It doesn’t allow the Android app testing for versions below 4.2.
- Appium offers less to no support for hybrid app testing. It’s not possible to test different actions that let you switch applications from native to the web app and a web app to native.
- There is no support for running Appium desktop inspector directly on Microsoft Windows.
- The Appium team has accepted that it has a few flaws that need to be fixed. To fix that, the Appium team recommends UIAutomatorViewer.
Like any other tool, Appium Desktop Inspector also has its own set of disadvantages.
Here they are:
Recent updates on Appium Inspector
The latest version of Appium Inspector is v2022.5.4.
Here are the latest updates:
- Monospace font in capability values and names (but make sure that the whitespace doesn’t become a hindrance).
- Show mjpeg stream in the place of the static screenshot and include the capability that points to an MJPEG streaming server.
- Save the info of remote connection with saved sets capabilities.
Register on LambdaTest to carry out Appium testing. Try LambdaTest Now!
Conclusion
The job of Appium Desktop is to provide the user with a high-end environment to manage automated web, native, and hybrid app testing. This is to shield the user from anomalies, bugs, and other issues sabotaging the user experience. Every Appium test can be run on different real mobile devices since app monitoring under real user conditions can lead to results with 100% accuracy.
Mobile app testing platforms like LambdaTest let you run Appium testing for mobile apps with less fizzy processes. Get the benefit of Cloud support on real devices when you access this platform. Your testing and quality assurance team can access many devices to manage online from a single Appium-ready platform. With built-in Appium support, your team can start leveraging Appium to automate testing.
Mobile testers needn’t manually download Appium inspector to write and run Appium tests, be it parallel tests or simple tests. With cloud support, teams can find it easier to work than setting up Appium Desktop on-site with no need to expect any help or support from Appium experts often or just to figure out how to use Appium Inspector.
Frequently Asked Questions (FAQs)
What is Appium inspector?
Appium inspector conducts Appium inspection, a standard procedure to identify the unique UI elements of any mobile app. It can support Android emulators, iOS simulators, and real devices.
How to use Appium Inspector?
The first step is to download and install Appium Inspector. It consists of Windows and OS X versions (.exe and .app). While opening the app, the Appium server will get started with the default IP address set to 0.0.
Can Appium Inspector run on Windows?
Yes, it can run as a desktop app for macOS, Windows, and Linux.
Got Questions? Drop them on LambdaTest Community. Visit now


