How To Build And Execute Selenium Projects
Veena Devi
Posted On: April 20, 2022
![]() 599082 Views
599082 Views
![]() 22 Min Read
22 Min Read
Building and executing Selenium projects with automation platforms is a powerful way to test websites (or web apps) at a faster pace. By using automation testing tools, you can test faster, more often, and more accurately.
The most important and time-consuming tasks in the entire test automation cycle include managing test scripts, reusable components (scripts, utilities like data provider), test data, test results, setting up the test execution environment, etc. As per my experience, enterprises (irrespective of their scale or size) need to transition from manual to automation testing. But does that mean that manual testing can be taken over by automation testing? Definitely not! Exploratory testing is still the ideal candidate for manual testing.
It makes technical and business sense to get started with automation testing, especially for areas where it can have the maximum impact! However, the main challenge is to build a manageable project with better orchestration of scripts that can make peer QA folk’s life easier:) It seems like a complex saying, but in simple terms, it is referred to as the Selenium test automation framework. Throughout my career in pre-sales and testing, I have realized that Selenium is still the go-to framework for web automation testing. In my opinion, Cypress vs Selenium comparison will always be relevant in the field of web testing 🙂
The Selenium automation framework doesn’t need special servers to execute Selenium test cases. It can also be easily integrated with other frameworks like TestNG, JUnit, Maven, Gradle, or Ant build tools. The potential offered by Selenium gets amplified when integrated with a popular CI/CD tool like Jenkins. Selenium integration with Jenkins can go a long way in expediting the TTM by leveraging the benefits offered by Continuous Testing.
Before we get into building and executing Selenium projects, you can learn about basic selenium commands and locator strategies to interact with web elements. This tutorial focuses on building and executing Selenium Java projects. Though the demonstration is performed on macOS, replicating the same steps for Windows OS is not challenging!
If you’re looking to improve your Selenium interview skills, check out our curated list of Selenium interview questions and answers.
So, let’s get started!
TABLE OF CONTENTS
How to build a Selenium project?
Selenium is a growing open-source test automation framework that can be considered a great boon to the web development industry. However, when it comes to integrating Selenium into your project, you need to be aware that there are different ways of doing this. I am personally excited about the major advancements happening in Selenium 4. However, I would limit the discussion in this blog limited to Selenium 3.
In this section, I will showcase setting up the Selenium Java with Maven. If you are new to Selenium and want to know what is Selenium, here’s a short explanation about the same:
What is Selenium?
Selenium is the most popular open-source framework for cross-browser and cross-platform testing of web applications. It is a suite that allows you to write automated tests of websites and web applications, then execute them in different browsers on multiple platforms using any programming language of your choice.
Here are the major components of the Selenium framework:
- Selenium IDE is a browser plugin that lets you write, execute, and debug your Selenium scripts. Selenium IDE in the latest version of Selenium is available for Chrome and Firefox web browsers. The current release of Selenium IDE is more than a simple Playback & Record tool since it lets you export the script in Selenium-supported programming. Hence, you can get the automation tests without writing a single line of code. In a nutshell, Selenium IDE alleviates these problems by conveniently recording and running tests directly from the browser.
- Selenium WebDriver is a collection of open-source APIs that ease you write test scripts. You can write Selenium test scripts in popular programming languages like Python, JavaScript, Java, C#, PHP, and Ruby. It has been designed to assist in the automation of testing processes, therefore increasing productivity and accuracy. The browser-specific drivers bind with popular programming languages and provide an interface to write and execute the browser automation scripts for testing web applications.
- Selenium Grid is another tool included in the Selenium suite, which helps scale and distribute the test scripts across multiple browsers and operating systems or platforms. It’s possible to run the same test script on multiple browsers simultaneously using Selenium Grid. This not only reduces the execution time but also ensures that your application works well on all browsers, operating systems, and platforms without any issues.
Selenium Grid also lets you perform parallel testing across different browsers and operating systems (or platforms). As a result, the Selenium Grid is the go-to solution to realize the benefits of parallel testing in Selenium.
Also read – Parallel Test Execution in TestNG and Selenium
Though a local Selenium Grid is good to start with, test efforts cannot be scaled exponentially when using a local Grid. This is where cloud Selenium Grid can be beneficial in reaping the immense benefits offered by Cloud and Selenium. Remote WebDriver in Selenium is used for connecting with the cloud Selenium Grid.
A cloud Selenium Grid like LambdaTest lets you perform Selenium automation testing at scale on a secure, reliable, and scalable grid on the cloud. On a lighter note, you can bid adieu to the endless woes of maintaining a local Grid :D.
Also read- Benefits of Cloud Testing
If you are a Selenium fanatic, you must have tried Selenium 4. Selenium 4 is the latest version of the Selenium WebDriver and has rewritten the Selenium project from the ground up to become leaner and faster.
With the latest Selenium 4, you have the added luxury of using a comprehensive and user-friendly IDE, an advanced web locator system, and an up-to-date REST API.
The new standard for the W3C WebDriver in Selenium 4 is an architectural change from Selenium 3. This new interface is meant to be more stable and less flaky than previous versions. The creators of Selenium are working to make sure this change happens smoothly for everyone using their framework.
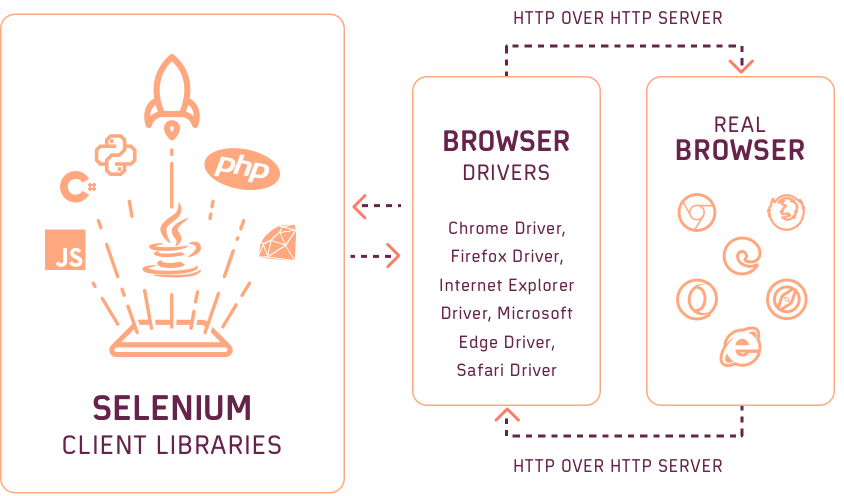
However, if you are intrigued to know more about what’s new in Selenium 4, you can go through the following Selenium 4 tutorial for beginners and professionals to know more about the features and improvements in Selenium 4.
You can also go through the LambdaTest YouTube Channel to stay updated with more videos on Selenium Testing, Cypress Testing, and more.
Also read – How To Upgrade From Selenium 3 To Selenium 4?
How to Build and Execute Selenium projects using Java?
To build a Selenium project using Java Client libraries, you first need to ready your system by installing Java and any IDE (Integrated Development Environment) of your choice.
Installing Java in Mac OS
Since we are using Java to build a Selenium project, we need to install Java or JDK.
Step 1: Download the latest version of Java. (At the time of writing this blog, the latest version is Java SE 17)
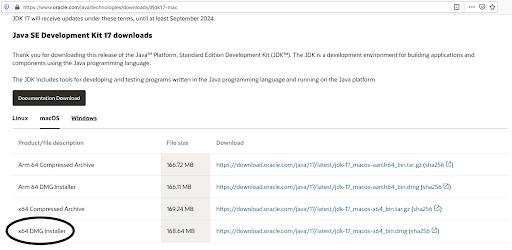
Step 2: Double-click the .dmg file and complete the installation.

Step 3: Open the terminal once the installation completes and type java -version.

Once you have installed Java, you can install any IDE of your choice. IDE is a software that serves developers by providing them tools to design and program their applications. You can write your Selenium Java Code in different IDEs like Eclipse, IntelliJ IDEA, NetBeans, etc. Each IDE has its unique features and plugins to support developers. However, for our Selenium project, we will use IntelliJ IDEA.
Installing IntelliJ IDEA in Mac OS
I will demonstrate the Selenium Project in IntelliJ IDEA (community-based IDE) for developing Java and other JVM languages like Kotlin and Scala-based software programming.
You can download the community version of IntelliJ, which is free and can be downloaded from the JetBrain website.
Step 1: Download and install IntelliJ IDEA on your system.

Step 2: Once installation completes, open the IDE and click New Project from the home page.

Step 3: On the project template page, click Next, and then on the next screen, mention Project name, Project location, and click Finish.

Done !. Our first Java project was created successfully. Next, write Java code in the src folder shown on the navigation bar.

Setting up Selenium Libraries in Java project
To add Selenium to the Java project, you need to set up Selenium libraries in the project’s CLASSPATH. You need to add TestNG libraries to get better reports and test orchestration in our project.
Step 1: Download the required Selenium libraries and Selenium Server from the Selenium home page.
Along with Selenium WebDriver libraries, adding any Java test automation frameworks like TestNG, JUnit will further enhance test data management and help on parallel execution and report generation. For example, I have used the TestNG framework to manage test cases and reports in this blog.
Step 2: Download the TestNG jar file and save it in a local folder. TestNG has a wide range of Annotations and Listeners, which helps organize test case execution and manage logs.
Step 3: In IntelliJ IDEA, click File -> Project Structure -> Modules. Click the dependencies tab from the right panel, click + sign, and select JARs or Directories.

Step 4: Browse and select all files, including TestNG jar and jar files extracted from the selenium-java-4.x.x.zip file and click Apply and Ok. Now you will see all libraries listed under Project’s External Libraries section.

Our project is now ready to write Selenium test cases. Let’s write a simple test case to launch a web application and validate its title using TestNG.
Step 5: In IntelliJ IDEA, right-click on the src folder click New -> Java Class. Create a new Java class, “SeleniumSampleTest.”
Step 6: Write a simple script to validate the title of the LambdaTest Selenium Playground page.

Code Snippet
Mentioning a comment in your code is one of the best practices in Java programming language, which other team members can take up without any assistance to use or extend.
|
1 2 3 4 5 6 7 8 9 10 11 12 13 14 15 16 17 18 19 20 |
import org.openqa.selenium.WebDriver; import org.openqa.selenium.chrome.ChromeDriver; import org.testng.Assert; import org.testng.annotations.Test; public class SeleniumSampleTest { @Test public void checkTest(){ //set up Chrome Exe path //Launch Browser WebDriver driver= new ChromeDriver(); //Launch URL driver.get("https://www.lambdatest.com/selenium-playground/"); //Define Expected Title Value String expectedTitle="Selenium Grid Online | Run Selenium Test On Cloud"; //Validate using TestNG Assertion Assert.assertEquals(driver.getTitle(),expectedTitle,"Title doesn't match"); } } |
Code Walkthrough

This statement initializes the driver object and launches the Chrome Browser. Here I haven’t mentioned the path of the ChromeDriver.exe file explicitly. Let me show how to set up the ChromeDriver path in Mac System-Path, so Selenium WebDriver picks the ChromeDriver path automatically.
Step 1: Download the ChromeDriver file depending on the system from the official Selenium download. For this project, I am using Chrome browser version 96.

Step 2: Unzip the chromedriver_mac64.zip to get the chromdriver.exe file.
Step 3: Open Finder in Mac, click Go->Go to Folder, and type /usr/local/bin. In this folder, paste the chromedriver.exe file.
Step 4: Open the test URL using the get() command in Selenium.


Here the string expectedTitle variable stores the expected test data for the page title.
TestNG Assertions validate the actual result fetched from the application against the expected result (Test Data). Here, the assertEquals accept three parameters: actual result, expected result, and the message, which describes the failure if the page title does not match the expected title.
Also read – Assert and Verify in Selenium WebDriver
How to Execute TestNG Class
IntelliJ IDEA may not generate TestNG reports by default. Check the below configuration before executing the test case.
Step 1: Right-click project -> Modify Run Configuration -> under Listener select use default reporters check box.

Step 2: Once done, right-click the Class file name and click “Run ‘SeleniumSampleTest’”

Execution
Once execution completes, results can be seen in the Log panel. Even though we didn’t create any suite file, the default suite file gets generated in the system temp folder, adds test class, and executes test methods.

TestNG generates an emailable-report.html file as a test report.

We can open that in the browser and also can share it with stakeholders.
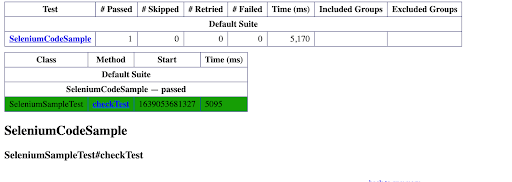
Also read – TestNG Reporter Log in Selenium
How to Build and Execute Selenium projects using Maven?
Maven is a project management tool that uses POM.xml. In the previous section, we manually downloaded Selenium and TestNG jar files and set up CLASSPATH in IDE. However, that is not the best approach to realize web automation testing using Java and Selenium. Therefore, it is recommended to use Maven for dependency management, which will download and manage the required jar files for the project.
If you are not familiar with Maven, you can refer to the Selenium Maven tutorial before proceeding with the further sections of this blog. In my case, I would be using the macOS to demonstrate running a full-fledged Selenium Java project. If you are using Python (a popular programming language for automation testing and web scraping), this Selenium Python tutorial will help you get started with Python and Selenium.
In the interest of time, I will be limiting this blog to only Java with Selenium 🙂
Installing Maven in macOS
Apache Maven is an open-source project management and comprehension tool that helps software developers build, manage and maintain their projects. Installing Maven in your Operating System is an important step to deploy and execute Java programs. You can follow the below-mentioned steps to install Maven in macOS:
Step 1: Install Maven via Homebrew. Homebrew is a package manager for macOS which lets you install free and open-source software using your terminal.
Step 2: To Install Homebrew, open the terminal window and paste the below command:

Step 3: Once Installed, Open the new terminal window, and type brew install maven. It will install the latest Maven
Step 4: Once the installation completes, open the new terminal and type mvn –version.

Note: Installation of Maven in Windows is pretty straightforward. You just need to download, unzip, and set the path in the System Path.
Creating Maven project in IntelliJ IDEA
IntelliJ IDEA supports an integration with Maven that helps automate our building Selenium Java project. Therefore, we don’t need any additional setup or configuration in IntelliJ IDEA.
The video shown below highlights the getting started guide of IntelliJ IDEA IDE with Selenium JUnit framework.
Step 1: From the IntelliJ IDEA Home page, click New Project -> select Maven from the left panel.
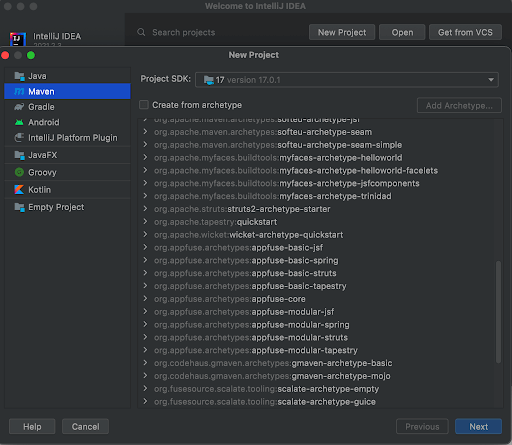
Step 2: Click Next and mention the Project name ( FirstSeleniumMavenProject).
- Group Id corresponds to your organization’s name, product name.
- Artifact Id refers to the project name. It is the jar file name when we package our project.
Here, you can see that the default project structure and POM.xml file are in the newly created Maven Project.

We add TestClass files or other Java files under src/test/java as the best practice.
Step 3: Add non-class files like excel sheets for data-driven framework and driver exe files under src/test/resources (create a new folder if not available by default ).
Step 4: Create a new Class file by right-clicking src/test/java folder, then click new->Java Class and name the file.
Selenium Dependencies for Maven Project
- All the external libraries like the Selenium jar files, testng jar files, and WebDriverManager jar file manage browser setup for Selenium WebDriver managed by maven dependencies.
- POM stands for Page Object Model. POM files have different elements like dependencies, plugins.
Step 5: Place the dependencies where we mention all our external libraries. Then, fetch the required dependency from Maven public repository in the below format and paste it directly into the pom.xml file.

Step 6: Add this into the POM.xml file under the dependencies section. Similarly, add the TestNG and WebDriverManager dependencies.
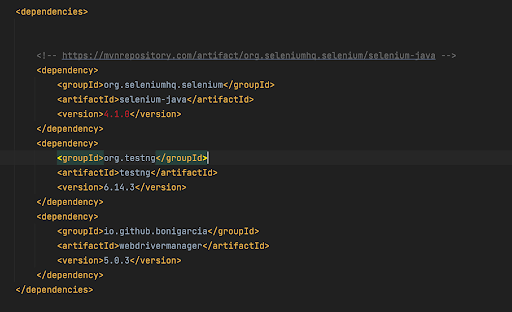
Step 7: Once you have added all the dependencies, click “load maven changes“ from the pom file or right-click pom.xml file and click Maven->Reload Project, which downloads and creates a local repository of our libraries.
In macOS, .m2( local repository) is available under the username. Usually, it’s hidden, and you have to press (Commond+Shit+. ) to view the folder.
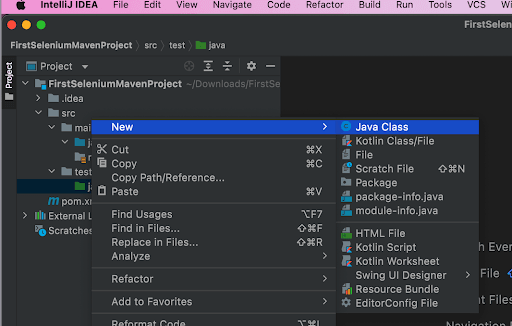
Step 8: Now, the Project is ready to write our Selenium test case. Right-click src/test/java and click New->Java Class and enter the name as LTPlayGroundTest. In this class, we validate the status of the check box from Selenium Playground.
Code Snippet
|
1 2 3 4 5 6 7 8 9 10 11 12 13 14 15 16 17 18 19 20 21 22 23 24 25 26 27 28 29 30 |
import io.github.bonigarcia.wdm.WebDriverManager; import org.openqa.selenium.By; import org.openqa.selenium.WebDriver; import org.openqa.selenium.WebElement; import org.openqa.selenium.chrome.ChromeDriver; import org.testng.Assert; import org.testng.annotations.Test; public class LTPlayGroundTest { @Test //TestNG Annotation public void validateCheckBoxStatus (){ /**WebDriverManager is an open Source API to ease the Browser Initialisation . We can skip driver exe path definition**/ WebDriverManager.chromedriver().setup(); //Chrome Browser Initialized WebDriver driver= new ChromeDriver(); //Launch the URL driver.get("https://www.lambdatest.com/selenium-playground/checkbox-demo"); //get the WebElement of Check Box WebElement singleCheckBox= driver.findElement(By.id("isAgeSelected")); //click that check box singleCheckBox.click(); //Validate checkbox is selected or not Assert.assertTrue(singleCheckBox.isSelected()); } } |
Code Walkthrough

Wondering what is WebDriverManager and how it helps in the Selenium Project?
WebDriverManager is an open-source Java library. It helps carry out the driver exe path setup for all browsers like Chrome, Edge, and Firefox in a single line. Here WebDriverManager.ChromeDriver.setup initializes the latest Chrome browser installed in the system. However, even initializing the version of the browser also is possible.

This statement initializes chrome with version 85.

Similar to Chrome, this statement initializes the Firefox browser.

This statement initializes the driver object and launches the Chrome browser.

This statement opens the AUT(Application under Test ) URL in the browser session initialized by the driver object.

This fetches the webelement, which has the id “isAgeSelected.” In our application, it’s a checkbox element.

The above code performs a click action on the selected element.

Here, the element .isSelected returns the selection status as True or False. This method is valid only for checkbox and radio button elements.
Now the TestNG Assertion assertTrue, validates whether the value returned from the isSelected method is True, if not, then it fails the test case with the message “Checkbox is not selected.”
Executing Maven project
The Selenium Maven project can be executed in multiple ways:
1. Execute as TestNG class File
Right-click the LTPlayGroundTest file -> Run LTPlayGroundTest.Before that edits configuration to add default report listeners.
2. Use POM.xml File to execute TestSuite
We need to modify POM.xml to read our TestNG suite and Class files. So instead of running TestNG as an individual class, create a testSuite.xml file and add that in POM.xml using a sure-fire plugin.
Here is the complete POM.xml file after adding all required elements.
|
1 2 3 4 5 6 7 8 9 10 11 12 13 14 15 16 17 18 19 20 21 22 23 24 25 26 27 28 29 30 31 32 33 34 35 36 37 38 39 40 41 42 43 44 45 46 47 48 49 50 51 52 53 54 55 56 57 58 59 60 61 62 |
<?xml version="1.0" encoding="UTF-8"?> <project xmlns="http://maven.apache.org/POM/4.0.0" xmlns:xsi="http://www.w3.org/2001/XMLSchema-instance" xsi:schemaLocation="http://maven.apache.org/POM/4.0.0 http://maven.apache.org/xsd/maven-4.0.0.xsd"> <modelVersion>4.0.0</modelVersion> <groupId>org.example</groupId> <artifactId>FirstSeleniumMavenProject</artifactId> <version>1.0-SNAPSHOT</version> <properties> <maven.compiler.source>17</maven.compiler.source> <maven.compiler.target>17</maven.compiler.target> <suiteXmlFile>src/test/resources/testngSuite.xml</suiteXmlFile> </properties> <build> <pluginManagement> <plugins> <plugin> <artifactId>maven-compiler-plugin</artifactId> <version>3.7.0</version> <configuration> <release>10</release> </configuration> </plugin> <plugin> <groupId>org.apache.Maven.plugins</groupId> <artifactId>Maven-surefire-plugin</artifactId> <version>2.17</version> <configuration> <suiteXmlFiles> <suiteXmlFile>${suiteXmlFile}</suiteXmlFile> </suiteXmlFiles> </configuration> </plugin> </plugins> </pluginManagement> </build> <dependencies> <!-- https://mvnrepository.com/artifact/org.seleniumhq.selenium/selenium-java --> <dependency> <groupId>org.seleniumhq.selenium</groupId> <artifactId>selenium-java</artifactId> <version>4.1.0</version> </dependency> <dependency> <groupId>org.testng</groupId> <artifactId>testng</artifactId> <version>6.14.3</version> </dependency> <dependency> <groupId>io.github.bonigarcia</groupId> <artifactId>webdrivermanager</artifactId> <version>5.0.3</version> </dependency> </dependencies> </project> |
Now in the IntelliJ IDEA terminal, run this command mvn clean test.
Once execution completes, we can see logs in the terminal.

You can also see surefire-reports generated under our project structure.
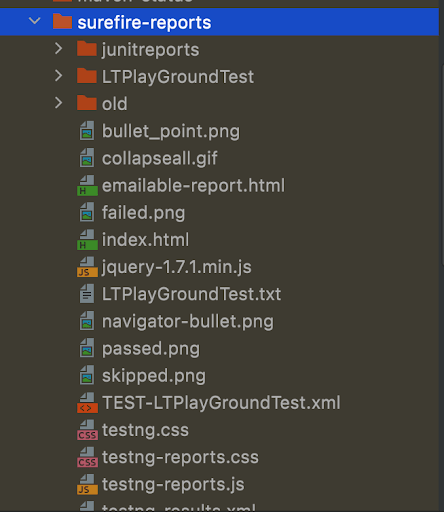
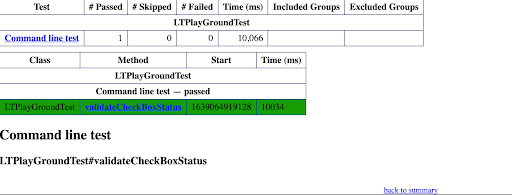
Surefire-reports are similar to TestNG reports with emailable html format. You can also generate an XML report, which you can view with extent or Allure report format.
This Selenium 4 complete tutorial covers everything you need to know about Selenium 4.
How to Build and Execute Selenium projects using Gradle?
Gradle is a build automation system that is fully open-source and uses the concepts of Apache Maven and Apache Ant. Either a single or multiple “build.gradle” file describes the Gradle project task. At least one build file must be located in the project’s root folder. Each build file defines a project and its tasks.
- Gradle allows us to write the build script with Java programming language.
- It is easy to use and maintain projects and their dependencies.
- It provides high-performance and scalable builds.
- Having better dependency management like ReplacedBy rules.
The Gradle integration process is quite easy.
To add dependencies to a project, state the dependency configuration like the dependencies block of the build.gradle file.
Installing Gradle in macOS
Step 1: Install via Homebrew package manager. Open a terminal in Mac and execute the below command:

Step 2: Once installation is complete, check the installed Gradle version using the “gradle -v” command.
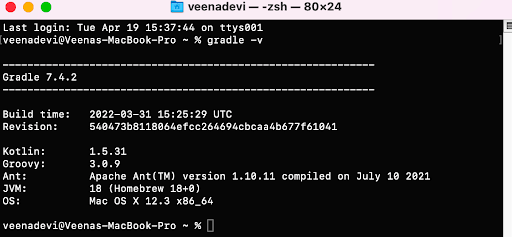
Note: Installation of Gradle in Windows is pretty straightforward. You just need to download, unzip, and set the path in the System Path.
Creating Gradle project in IntelliJ IDEA
Gradle comes along with Latest IntelliJ IDEA IDE, so we don’t need any specific installation.
Step 1: From the IntelliJ IDEA Home page, click “New Project” -> select “Gradle” from the left panel.

Step 2: Select the Java check box. Click Next and mention the Project name (FirstSeleniumGradleProject). Mention GroupId as required.
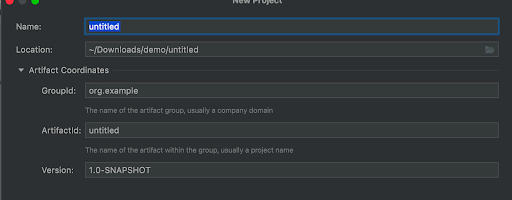
Once created, the new project structure and default build.gradle file will look like this:
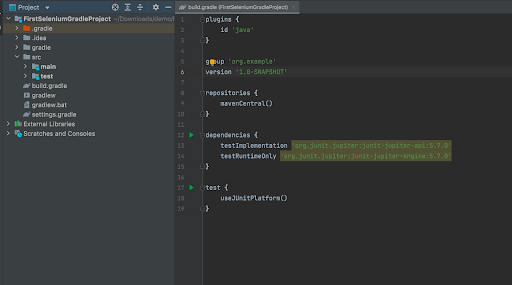
Step 3: Add Selenium and TestNG dependency for the project. Fetch the required dependency from Maven public repository, navigate to the Gradle tab and copy the statement in the below format and paste it directly into the build.gradle file.

To start with our test cases, we need to add Selenium -Java, TestNG, and WebDriverManager dependencies.

I am going to use the TestNG framework so that I can remove default JUnit dependencies and useJUnit() test.
Step 4: Add useTestNG test .When specifying useTestNG(), Gradle scans for all the methods annotated with @Test and executes them.
Step 5: Once you have added all the dependencies, click “Load Gradle Changes“ from the gradle file.
Step 6: Now, the Project is ready to write our Selenium test case. Right-click src/test/java and click New->Java Class and enter the name as LTSimpleFormTest. In this class, we validate the Simple Input Form from Selenium Playground.
This test pass the values to the text box, click the “Get Checked Value” button and validate the message under “Your Message” section .
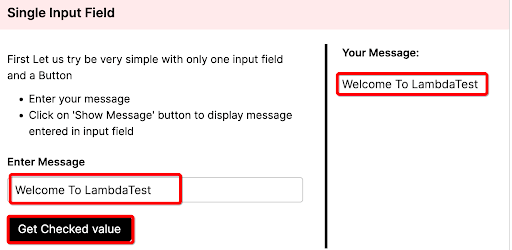
Code Snippet
|
1 2 3 4 5 6 7 8 9 10 11 12 13 14 15 16 17 18 19 20 21 22 23 24 25 26 27 28 29 30 31 |
import io.github.bonigarcia.wdm.WebDriverManager; import org.openqa.selenium.By; import org.openqa.selenium.WebDriver; import org.openqa.selenium.WebElement; import org.openqa.selenium.chrome.ChromeDriver; import org.testng.Assert; import org.testng.annotations.Test; public class LTSimpleFormTest { @Test //TestNG Annotation public void validateCheckBoxStatus (){ /**WebDriverManager is an open Source API to ease the Browser Initialisation . We can skip driver exe path definition**/ WebDriverManager.chromedriver().setup(); //Chrome Browser Initialized WebDriver driver= new ChromeDriver(); //Launch the URL driver.get("https://www.lambdatest.com/selenium-playground/simple-form-demo"); //get the WebElement of textInput WebElement userTestBox= driver.findElement(By.id("user-message")); ///send values to textbox userTestBox.sendKeys("Welcome To LambdaTest"); WebElement getValueButton= driver.findElement(By.id("showInput")); getValueButton.click(); WebElement checktextArea= driver.findElement(By.id("message")); //validate the fetched text Assert.assertEquals(checktextArea.getText(),"Welcome To LambdaTest","Message is different"); } } |
Code Walkthrough

WebDriverManager is an open-source project from bonigarcia, which helps to skip the process of setting the driver executable path.

The WebDriver instance of the ChromeDriver object launches the Chrome Driver and the get() method opens the mentioned URL in the Chrome session.

The text box is identified by id “user-message” and sendKeys method of driver object pass values as “Welcome To LambdaTest” to the selected textBox element.

The button is identified by id “showInput” and clicked by the click() method.

The Text area element is identified by its id, and the getText() method fetches the element’s text value.
The assertEquals method verifies whether the fetched text is the same as “Welcome To LambdaTest,” which is entered in the text field in the previous step. If not, it fails the test case with the “Message is different” error message.
Executing Gradle project
The Selenium Maven project can be executed in multiple ways.
- Execute as TestNG class File.
- Use the Gradle file to execute TestClass.
- Execute Testsuite.xml via Gradle.
Right-click the LTSimpleFormTest file -> Run LTSimpleFormTest file . After successful execution, you can see TestNG reports under the target folder.
After successful execution, Gradle generates its own reports under the build folder
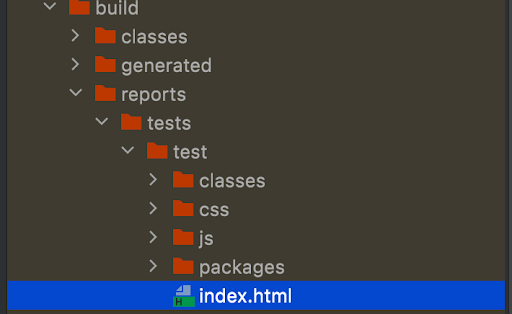
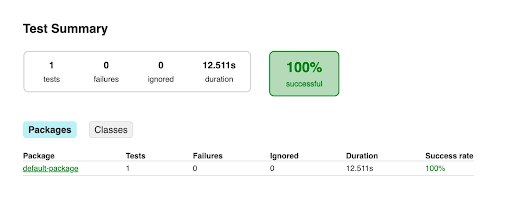
Open the index. html file in the browser, and you can see the results
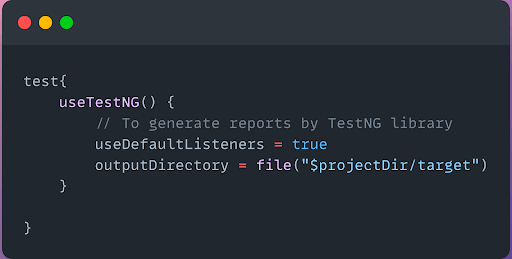
If you need a report from TestNG, you must add listeners and a report folder in the build.gradle file before start execution.
In the IDE terminal, type “gradle clean test“. It executes all the test cases under src/test/java package and generates results .

If you need to execute only one test method from the test class , for example validateCheckBoxStatus in LTSimpleFormTest class, then use:
“gradle test –tests LTSimpleFormTest.validateCheckBoxStatus”
In times, you need to have multiple test cases in place and pass common parameters to the test cases and include and exclude test cases based on current test execution. All can be achieved by creating a suite xml file.
TestNG Suite file looks like:
|
1 2 3 4 5 6 7 8 9 10 11 12 13 14 15 16 17 18 19 20 21 22 23 |
<?xml version="1.0" encoding="UTF-8"?> <!DOCTYPE suite SYSTEM "http://testng.org/testng-1.0.dtd"> <suite thread-count="1" parallel="none" name="GradleSuite"> <test name="GradleTest"> <classes> <class name="LTSimpleFormTest"> <methods> <exclude name="checkSkipped"></exclude> </methods> </class> </classes> </test> <!-- Test --> </suite> <!-- Suite --> Now add this suite xml file to build.gradle under test test{ useTestNG() { // To generate reports by TestNG library // useDefaultListeners = true // outputDirectory = file("$projectDir/target") suites file("$projectDir/src/"+"testSuite.xml") } } |
After adding the suite xml file , execute the “gradle clean test” command from the terminal, trigger the suite file and generate reports under the build folder.
Watch this video to learn about collecting performance metrics in Selenium 4 using the Chrome DevTools Protocol on the LambdaTest platform.
How to execute Selenium projects on cloud Selenium Grid?
In this section, we will see how to go about harnessing the power of cloud-based online Selenium Grids, like those offered by LambdaTest, in conjunction with our local grid setups.
Selenium testing tools like LambdaTest allow you to perform cross browser testing on over 3000+ browsers and operating systems combinations at scale.
In this section of the article on executing Selenium projects, let us now see how to run the test classes in parallel using cloud Selenium Grid like LambdaTest.
Here is the code for running Selenium TestNG tests in cloud Selenium Grid.
|
1 2 3 4 5 6 7 8 9 10 11 12 13 14 15 16 17 18 19 20 21 22 23 24 25 26 27 28 29 30 31 32 33 34 35 36 37 38 39 40 41 42 43 44 45 46 47 48 49 50 51 52 |
import org.openqa.selenium.By; import org.openqa.selenium.WebElement; import org.openqa.selenium.remote.DesiredCapabilities; import org.openqa.selenium.remote.RemoteWebDriver; import org.testng.Assert; import org.testng.ITestContext; import org.testng.annotations.AfterClass; import org.testng.annotations.BeforeMethod; import org.testng.annotations.Test; import java.lang.reflect.Method; import java.net.MalformedURLException; import java.net.URL; public class LTPlayGroundTestinSeleniumGrid { public String username = ""; public String authkey = ""; public static RemoteWebDriver driver = null; public String hub = "@hub.lambdatest.com/wd/hub"; @BeforeMethod public void setup(Method m, ITestContext ctx) throws MalformedURLException { DesiredCapabilities caps = new DesiredCapabilities(); caps.setCapability("platform", "MacOS Catalina"); caps.setCapability("browserName", "Safari"); caps.setCapability("version", "latest"); caps.setCapability("build", "TestNG With Java"); caps.setCapability("name", m.getName() + " - " +this.getClass().getName()); caps.setCapability("plugin", "git-testng"); String[] Tags = new String[] { "Feature", "Falcon", "Severe" }; caps.setCapability("tags", Tags); driver = new RemoteWebDriver(new URL("https://" + username +":" + authkey + hub), caps); } @Test public void testCheckBoxStatus(){ driver.get("https://www.lambdatest.com/selenium-playground/checkbox-demo"); //get the WebElement of Check Box WebElement singleCheckBox=driver.findElement(By.id("isAgeSelected")); //click that check box singleCheckBox.click(); //Validate check box is selected or not Assert.assertTrue(singleCheckBox.isSelected(),"Checkbox is not selected "); } @AfterClass public void closeBrowser() { driver.close(); System.out.println("Closing the browser"); } } } |
Code WalkThrough
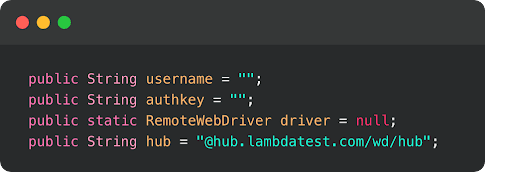
Here, we define the global variables to launch Selenium cloud Grid with username and authentication Key.
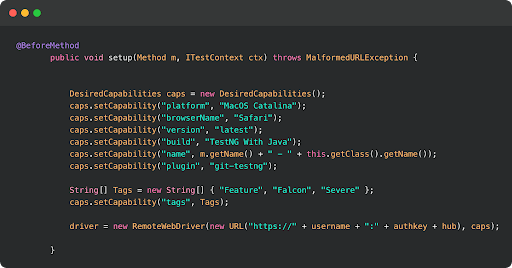
You can populate the values for your corresponding username and access key, which can be collected by logging into your LamdaTest Profile Section. However, the grid URL will remain the same.
BeforeMethod is a TestNG Annotation, which executes code blocks before each Test Method executes.
Here, I have used the LambdaTest Desired Capabilities Generator and have set the necessary capabilities of browser name, version, platform, etc.
RemoteDriver is a Selenium Library Class which implements the WebDriver interface on the remote server.
The remote server mentioned here as hub URL along with authentication, which is LambdaTest Selenium Cloud Grid.

Test annotation executes after the BeforeMethod code block, so it refers to the browser launched Selenium Cloud Grid and opens the LambaTest Selenium Playground URL.

This statement identifies the checkbox element using the ID Locator in Selenium WebDriver and performs click action.
Then using TestNG assertion, it fetches the status of the checkbox and validates whether it’s true or false.
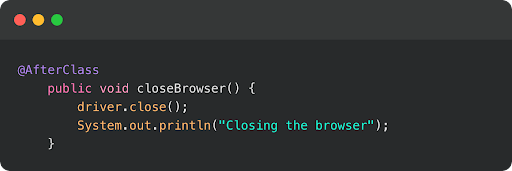
AfterClass TestNG annotation helps perform all teardown actions like closing files and browser sessions after TestMethod execution completes.
You can execute this test case either as TestNG Class or using TestNG Suite or using the “maven clean test “, or if it’s a Gradle project, use the “gradle clean test” command from the terminal.
Once the tests are completed, log on to LambdaTest Automation Dashboard to check the status of the test execution on LambdaTest.
This certification is ideal for testing professionals who want to acquire advanced, hands-on knowledge in Selenium automation testing.
Here’s a short glimpse of the Selenium Advanced certification from LambdaTest:
That’s a Wrap
Selenium is the most powerful framework when we approach the problem statement correctly. In this tutorial, we focused on building a Java Project with and without Maven build and learned how to execute from IntelliJ IDEA.
Learn more about other popular frameworks like Page Object Model, Executing Parallel Test Cases via TestNG, Handling Test Data using TestNG Data Providers from LambdaTest Blogs and LambdaTest Learning Hub.
Thanks for your time; please keep us posted with your feedback and comments.
Happy Testing…!
Frequently Asked Questions (FAQs)
What are selenium projects?
Selenium is an open-source umbrella project that provides a range of tools and libraries aimed at supporting web browser automation. Selenium IDE is a free and open-source cross-platform web application for authoring and running tests without the need to learn a testing scripting language.
What is selenium mainly used for?
Selenium is a free and open-source web browser automation suite for testing purposes. It’s used by many businesses worldwide to help with their test automation.
How do you structure a selenium project?
- Select a programming language.
- Select a unit test framework.
- Design the framework architecture.
- Build the Selenium core component.
- Choose a reporting mechanism.
- Implement CI/CD.
- Integrate it with other tools.
Got Questions? Drop them on LambdaTest Community. Visit now


