Building A CI/CD Pipeline With Travis CI, Docker, And LambdaTest
Rakesh Vardhan
Posted On: August 19, 2021
![]() 528583 Views
528583 Views
![]() 31 Min Read
31 Min Read
This article is a part of our Content Hub. For more in-depth resources, check out our content hub on CI/CD Testing.
With the help of well-designed Continuous Integration systems in place, teams can build quality software by developing and verifying it in smaller increments. Continuous Integration (CI) is the process of pushing small sets of code changes frequently to the common integration branch rather than merging all the changes at once. This avoids big-bang integration before a product release. Test automation and Continuous Integration are an integral part of the software development life cycle. As the benefits of following DevOps methodology in a development team becomes significant, teams have started using different tools and libraries like Travis CI with Docker to accomplish this activity.
In this blog, we will discuss the role of Travis CI in Selenium test automation and dive deep into using Travis CI with Docker. We will also look at some effective Travis CI and Docker examples. We would also integrate and automate Selenium tests suites with Travis CI on the LambdaTest cloud grid.
In the meantime, if you’d like to run your CICD test script over a Selenium Grid online then leverage LambdaTest for your test automation.
Without further ado, Let’s build a CI/CD pipeline with Travis CI, Docker, and LambdaTest.
TABLE OF CONTENT
Overview Of Travis CI
Travis CI is a cloud-based service available for teams for building and testing applications. As a continuous integration platform, Travis CI supports the development process by automatically building and testing the code changes, providing immediate feedback if the change is successful. It can also help us automate other steps in the software development cycle, such as managing the deployments and notifications.
Travis CI can build and test projects on the cloud platform hosted on code repositories like GitHub. We could also use other best CI/CD tools such as Bitbucket, GitLab, and Assembla, but some of them are still in the beta phase. When we run a build, Travis CI clones the repository into a brand-new virtual environment and performs a series of steps to build and test the code.
When a build is triggered, Travis CI clones the GitHub repository into a brand-new virtual environment and performs a series of tasks to build and test the code. If any of those jobs fails, the build is considered broken; else, the build is successful. On the success of the build, Travis CI will deploy the code to a web server or an application host.
In case you are eager to learn about the Travis CI/CD pipeline, please refer to our detailed blog that deep dives into how to build your first CI/CD pipeline with Travis CI.
.travis.yml Configuration
Builds on Travis CI are configured mostly through the build configuration defined in the file .travis.yml in the code repository. It allows the configuration to be version-controlled and flexible. Once the application code is completed, we need to add the .travis.yml file to the repository.
It contains the instructions on what to build and how exactly to test the application. Travis CI performs all the steps configured in this YAML file.
Some of the commonly used terms associated with Travis CI are:
- Job – Job is an automated process that clones the code repository into a brand-new virtual environment and performs a set of actions such as compiling the code, running tests, deploying the artifact, etc.
- Phase – Job is a collection of different phases. Sequential steps, aka phases, collectively create a job in Travis CI. For example, install phase, script phase, before_install phase, etc.
- Build – Build refers to a group of jobs that are running in a sequence. For example, a build can have two jobs defined in it. Each job tests the project with a different version of the programming language. The build is finished only when all of its jobs have completed execution.
- Stage – Stage refers to the group of jobs that run in parallel.
Features Of Travis CI
Some of the salient features that Travis CI provides as a CI/CD platform are given below:
1. Free cloud-based hosting
2. Automatic integration with GitHub
3. Safelisting or Blocklisting branches
4. Pre-installed tools and libraries for build and test
5. Provision to add build configuration via a shell script
6. Caching the dependencies
7. Building Pull-Requests
8. Support for multiple programming languages.
9. Build Configuration Validation.
10. Easily set up CRON jobs.
In case you want to deep dive into how Jenkins (the preferred open-source CI/CD tool) stacks up against Travis CI, please refer to our blog Travis CI Vs. Jenkins to make an informed decision.
Overview Of Docker
According to the Stack overFlow 2021 Developer survey, Docker is one of the most used containerization platforms to develop, ship, and run applications.
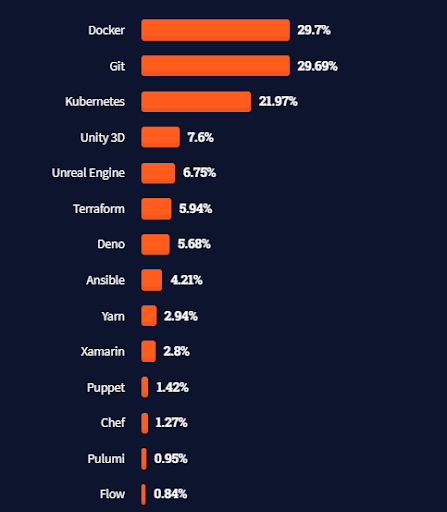
Docker enables us to separate applications from the infrastructure so that the application software can be delivered quickly. In short, Virtual Machines(VM) virtualizes the hardware, whereas Docker virtualizes the Operating System(OS).
In a Virtual Machine – multiple operating systems are run on a single host machine using the virtualization technology known as Hypervisor. Since the full OS needs to be loaded, there may be a delay while booting up the machines; also, there is an overhead of installing and maintaining the operating systems. Whereas in Docker, the host operating system itself is leveraged for virtualization.
Docker daemon, installed on the host machine, manages all the heavy lifting tasks like listening to the API requests, managing docker objects (images, containers, and volumes), etc. In case you are looking to leverage Docker with Selenium, do check out our detailed blog that outlines how to run Selenium tests in Docker.
Some of the useful concepts Docker leverages from the Linux world are as follows:
- Namespaces – Docker uses a technology called namespaces to provide the isolated workspace called container. For each container, Docker creates a set of namespaces when we launch it. Some namespaces in Linux are pid, net, ipc, mnt, and uts.
- Control Groups – Docker Engine on Linux also uses another technology known as control groups (cgroups). A cgroup restricts an application to a limited set of resources.
- Union file systems – Union file systems, or UnionFS, are lightweight and fast file systems that work by creating layers. Docker Engine makes use of UnionFS to provide container building blocks.
- Container Format – Docker Engine combines the namespaces, control groups, and UnionFS into a container format wrapper. The default container format is libcontainer.
Basics Of Docker
Docker uses a client-server architecture at its core. Some of the common objects and terminology used in Docker are explained below.
- Image – An image is a read-only template with all the required instructions to create a Docker container. The image is a collection of files and metadata. These files collectively form the root filesystem for the container. Typically images are made up of layers which are stacked on top of each other. And these images can share layers to optimize disk usage, memory usage, and transfer times.
- Container – Container is the runnable instance of an image. Containers have their lifecycle to create, start, stop, delete, and move using the Docker client API commands. Containers are by default isolated from other containers and the host machine. Basically, the container is defined by the image it is created from. If required, we need to give specific configuration or environment variables before starting it.
- Engine – Docker Engine is a client-server application that includes the following major components.
- A server is a form of long-running application known as a daemon process (i.e. the Dockerd command).
- A REST API defines interfaces that applications can use to communicate with the daemon and instruct it on what needs to be done.
- A client for the command-line interface (CLI) (i.e. the Docker command).
- Registry – Registry is a place where all the Docker images are stored and distributed. Docker hub manages all the openly available docker images.
- Network – Docker uses a networking subsystem on the configurable host OS, using different drivers. These drivers provide the core networking functionality.
- Bridge
- Host
- Overlay
- Macvlan
- none
- Volume – Since Docker containers are ephemeral by default, we need a provision to store the data between 2 different containers. Docker volumes provide this functionality where the data is persisted across containers.
- Dockerfile – It is a flat-file with instructions on how to create an image and run it.
- Docker-compose – Docker compose is a utility tool for defining and running multi-container docker applications. Here we use a YAML file to configure the services required for the application. By using a single command, we can start all the services and also establish dependencies between them.
How to Integrate Travis CI with Selenium using Docker
Using Docker Images
Now that we have understood the fundamentals of Travis CI and Docker let us start using them together to run some UI tests with Selenium WebDriver.
The first step is to define a test scenario for our Travis CI and Docker Example. Here is the Selenium test scenario:
1. Open a specific browser – Chrome, Firefox, or Edge
2. Navigate to the sample application
3. Verify headers on the page
4. Select the first two checkboxes and see if they are selected
5. Clear the textbox – Want to add more and enter some text into it and click on Add
6. Check if the new item is added to the list and verify its text
Here is the code that we need to write using Selenium WebDriver agnostic of any browser. First, we use the BrowserFactory to instantiate the browser based on the input and pass it on to our tests.
We are using TestNG and adding appropriate annotations for our tests. We also configured the testng.xml file to include what tests to run.
And finally, we use the below Maven command to trigger the tests. In case you are relatively new to Maven, do check out our detailed blog that will help you getting started with Maven for Selenium Automation.
The entire code for this project is available on the GitHub repository.
Since our goal is to configure and run the Selenium tests using Travis CI and Docker, you should check the following prerequisites:
1. Active GitHub account, with the code repository available in GitHub.
2. Active TravisCI account and the required permissions to access the repository from GitHub.
Once all these prerequisites are met, let’s take a quick look at the travis.yml file configured in the project.
As we learned earlier, travis.yml is the configuration file that we use to instruct the Travis CI cloud server on what actions to perform for the given project.
Let’s understand all these details one by one.
dist: When a new job is started in Travis CI, it spins up a new virtual environment in the cloud infrastructure. Each build is run in the pre-configured virtualization environments. Then, using the dist key, we specify the infrastructure needed to be spun up by the server. Some of the available values for dist in the Linux environment are trusty, precise, bionic, etc.
language: Language key is used to specify the language support needed during the build process. We can choose the language key appropriately from the list of available values. Some examples include Java, Ruby, Go, etc.
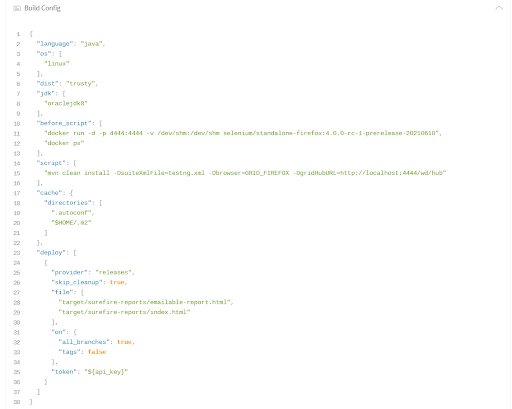
jdk: The key JDK is used while the language key is selected as Java. We basically give the version of the JDK that needs to be used while building the project. In our case, it should be oraclejdk8 as we are using Java 1.8 version.
script: Script key is used to run the actual build command or script specific to the selected language or environment. In the example, we use mvn commands as we have created a maven-based project for the example.
before_script: It is used to run any commands before running the actual script commands. Before running the Maven command in the script phase, we need to ensure the Docker environment is set up successfully.
cache: This key is used to cache the content that doesn’t change frequently, and running this can help speed up the build process. Cache has many supported keys available for different caching strategies. Some of them are directories, npm, cache, etc.
directories: This is a caching strategy used for caching the directories based on the given string path.
We can also use the build configure explorer from Travis CI and check how the Travis CI system reads and understands the configuration. This is helpful in validating the configuration, adding the correct keys, and updating as per the latest specifications.
Once the prerequisites mentioned above are met, we can start with our build-in Travis CI with Docker. There are various ways in which we can start the builds.
1. Commit the code and push to Github; the default hook will trigger a new build on the server.
2. Manually trigger a build from the dashboard views.
3. Trigger with the Travis CI API.
Here is the default dashboard view of my user in Travis CI. As we can see, I have activated only two projects from GitHub.
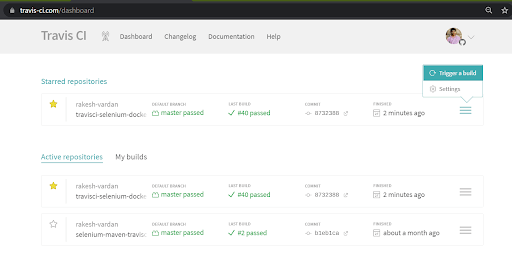
From any of the options described above, Travis CI will start performing the below actions when a build is triggered:
1. Reads the configuration defined in travis.yml
2. Adds the build to the job queue
3. Start creating the brand new virtual environment to execute the steps mentioned in the travis.yml file
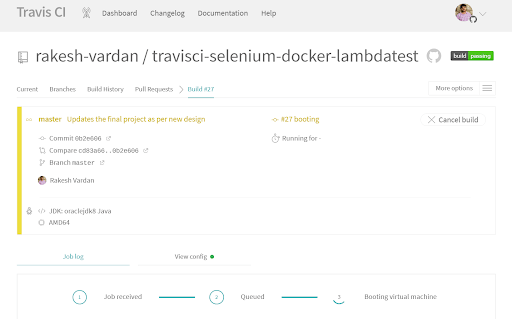
In the View config tab, we can also see the build configuration as read by Travis CI. Since we haven’t specified any os value in the travis.yml file, it takes the default value as Linux and proceeds with the build set-up.
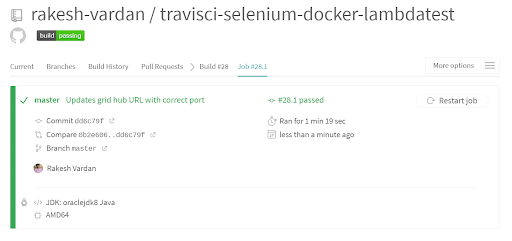
Once the build is completed, we could see the image banner which indicates that the build has passed successfully. It also gives us other information such as branch information, time taken for execution, latest commit message, operating system information, build environment, etc.
Let’s navigate to the Job log section and understand what Travis CI and Docker have performed for our build.
In the Job log section, we can see the complete log information for the current job. As seen below, Travis CI has spun up the below worker for our build. It has created a new instance in the Google Cloud Platform, and the start-up time is around 6.33 seconds.
Travis CI will dynamically decide which platform (like GCP Compute Engine or AWS EC2 machines) to choose for the instance. If an enterprise version is used, we could also configure our infrastructure to be used by Travis CI.

In the Build system information from the logs, we could identify the build language used, the distribution of the OS, Kernel version, etc. For each operating system, Travis CI has a set of default tools defined already. Travis CI will install and configure all the required services required for the build. In this case, Git is installed.
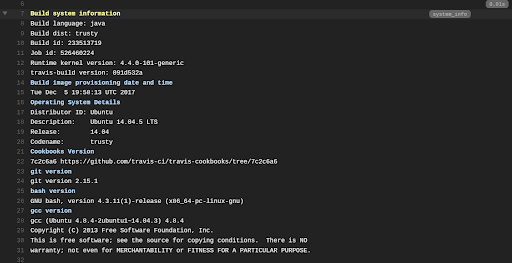
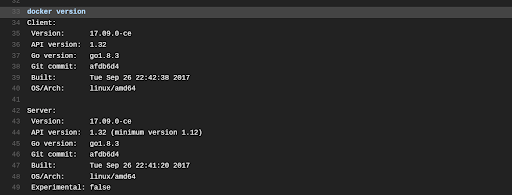
Also, the Docker client and server will be installed by default. We can verify the version used by these components in the below screenshot:
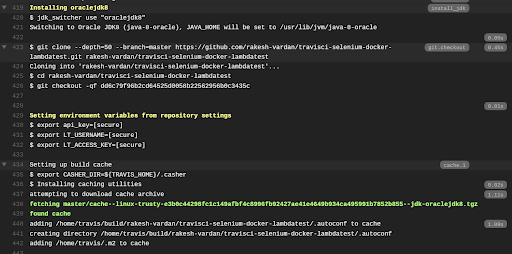
Since our build config uses Java JDK, Travis CI will configure the JDK as specified in the travis.yml file and update the JAVA_HOME path variable as appropriate.
Next, it clones the latest code from the specific branch(master in our example) and updates the current directory. It also reads the environment variables if defined and updates the set-up as needed. Finally, it also checks if there is any build-cache defined for the project. We will discuss more about build cache in the later section.
Before pointing our tests to a remote server, we should have a browser configured on a specific port and listen for the incoming requests. From our example, we have configured the RemoteWebDriver as below for launching our tests in Chrome.
If you remember the travis.yml file in our project, we have a before_script stage defined, and we have already added the below two commands.
Let’s understand the commands that we have used.
The first one is the Docker run command that starts the Selenium Firefox container on port 4444.
docker: Docker is the base command for its CLI
run: Runs the commands in a new container
-d: Command option for Docker run to run the container in the background
-p: Command option for Docker run to publish a container’s port to the host port. Here we are mapping the 4444 port of the container to the 4444 port in the host. The format is host port: container port
-v: Command option for Docker run to bind mount a volume. Here we are using the shared memory /dev/shm in the container and mapping it to the shared memory /dev/shm of the host.
Next is the image that we are using to run the docker command. Here we are using the Selenium Firefox standalone image with tag 4.0.0-rc-1-prerelease-20210618. More information about the latest versions available can be found from the official Selenium Github repository and the Docker hub public registry.
Using the below command, Travis CI pulls the specified Selenium Firefox image from the Docker registry and starts creating a new container with the provided configuration. Once it has successfully created a container, we can see the list of the running containers using the second command:
docker ps
As we observe from the job logs, the docker run has been executed successfully, and the running container has been listed with the container ID, image name used, ports mapped between container and host, volumes mounted, and status of the container.
With this, the required setup is completed for running our tests with Travis CI and Docker. The next step is to start sending the HTTP requests to this container on a specific port. We do this using the Maven command as shown below.
Here we are using the Maven build command along with TestNG to clean the repository and using the install phase with the command arguments such as the suite file, required browser to use, and the grid URL.
Read – Parallel Execution in TestNG
Since the Firefox container is running in the Travis CI instance on port 4444, we send the test requests to this port on the mentioned URL.
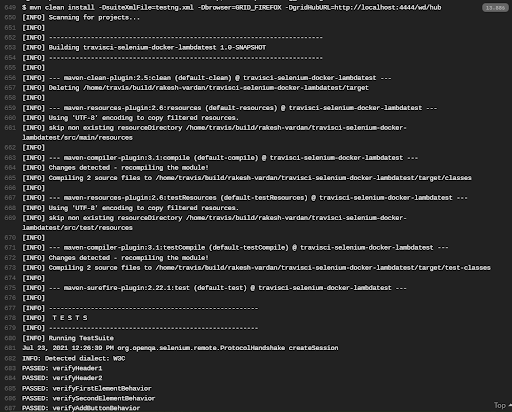
Once the Maven build is started, Travis CI downloads the required dependencies from the Maven central repository for the first time. Since we are using the cache configuration for Maven as below, it uses the cache for subsequent runs.
Therefore, Travis CI can cache the content for the build so that the build process can be sped up. In order to use this caching feature, we need to set the Build pushed branches to ON in the repository settings.
Once all the tests are executed on the browser which is available in the Docker container, we get the results and the build status as zero(0).
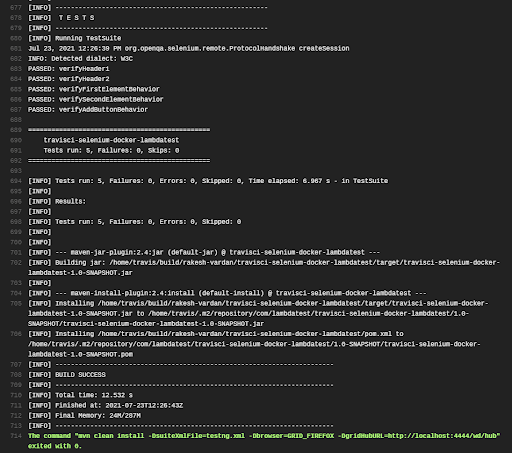
We have successfully performed our first Selenium test automation with Travis CI and Docker. If the build completes with an exit code as zero(0), it will be treated as passed. For many of us in Selenium test automation, it is required to see the test results to assess the regression suite quality. So we just added a phase in the travis.yml file to deploy the artifacts back to GitHub once the build is completed.
Since we have used TestNG in our Travis CI and Docker example, we get test execution reports in a clean and precise format in the target folder.
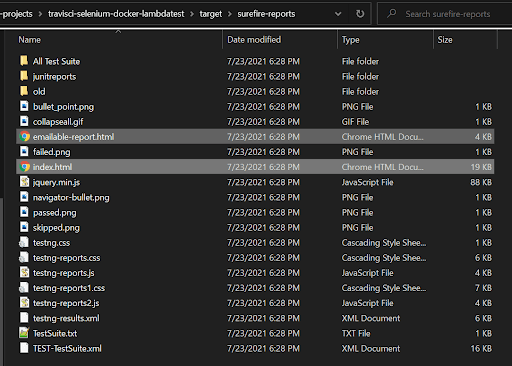
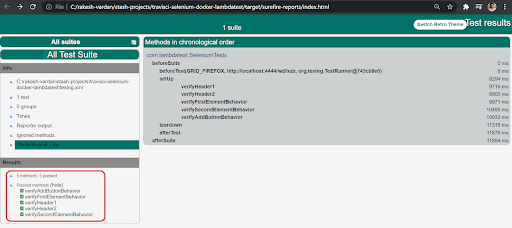
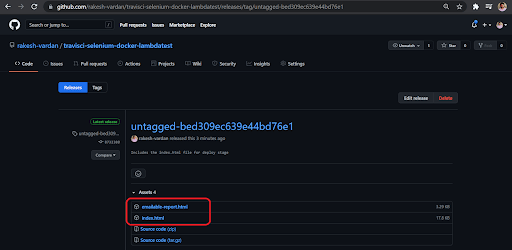
We are trying to deploy the index.html and emailable-report.html as per the below details.
Deploy phase details from the Travis CI build logs.

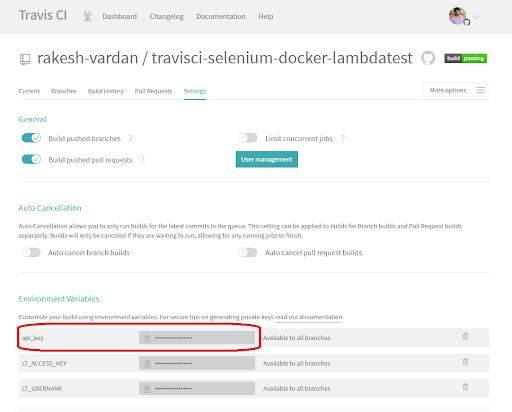
In order to publish the artifacts to GitHub, we need to create a personal access token from the GitHub developer settings page and add it to the environment variables section of the Travis CI repository. The same variable api_key is used in the deploy phase of our configuration.

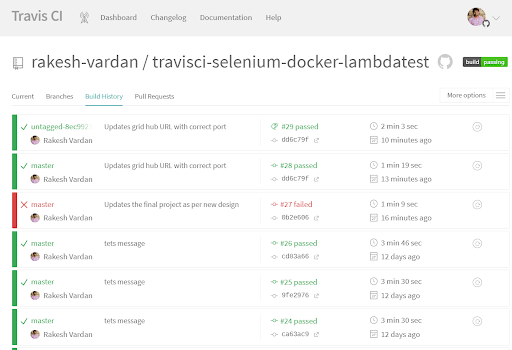
That’s all! We are done with running one complete build in Travis CI with Docker. In the Build History section, we can see the whole history of test runs as below.
We can see the deployed artifacts in the Releases section on GitHub as below.
We can also run the tests in other browsers using the other browser containers. But, first, we need to update the before_install phase with the relevant run command in the travis.yml file.
Also need to update the -DgridHubURL in the maven command with a configured host port for each browser.
Using Docker Compose
In our previous Travis CI and Docker example, we have used Docker standalone images from Selenium and started running our tests in Travis CI with Docker. However, if you would have observed, adding each Docker run command in the travis.yml file is not fool-proof, and we need to update the travis.yml file for all the changes required on the browser end.
Instead, we could leverage the docker-compose utility tool from Docker itself. We can define all the browser-specific services required in a file called docker-compose.yml file and refer to it in the travis.yml file. It would really help us improve the readability of the build configuration file and separate the browser containers.
Using docker-compose we can use a single command to activate all the services in a single go. Also, docker-compose files are very easy to write as they also use the YAML syntax. All the services in docker compose can even be stopped with a single command.
We use the below docker-compose.yml file to define the services.
So now the new travis.yml configuration looks as below. Update the travis.yml file in the project with this file, and commit and push the code to start the new build in Travis CI and Docker using the new build configuration.
The only change here is that in the before_script phase, we are using docker-compose instead of running the direct docker commands. Instead, we use the curl utility to download the docker-compose file and save the content to a file named docker-compose.yml.
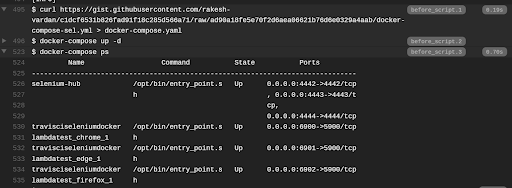
Once that is completed, we use the docker-compose up -d statement to start all the services. This command starts all the services in the compose file and starts listening to the requests on the mentioned ports. Then we use the docker-compose ps command to see the services that are started. Finally, we use the same maven command to point our tests and execute them using the Travis CI build job.
The below is the screenshot of the Travis CI logs, which shows that the docker-compose has successfully started the defined services.
Build log details while running the tests on the Chrome browser with the below maven command.
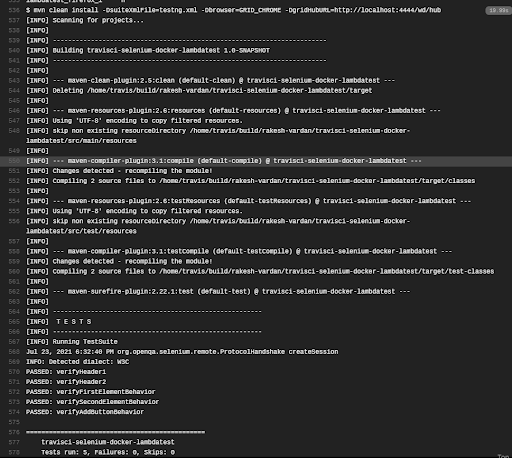
Build log details while running the tests on the Firefox browser with the below maven command.

As you have observed, we are using the same port for running the tests in Chrome and Firefox browsers. It is because we are leveraging the hub-node architecture of the Selenium Grid here. In our earlier Travis CI and Docker example, where we are running the stand-alone container, we haven’t used the hub container.
To run the tests with Travis CI and Docker on Selenium Grid 4 architecture, please read our blog on Selenium Grid 4 Tutorial For Distributed Testing.
Run Selenium Tests With Zalenium And Travis CI
As per our previous examples of using Selenium, Travis CI, Docker images to run the tests, we can clearly see that we always need to update the versions as and when a new version is out. This becomes an overhead, as we need to spend a lot of time updating the configurations.
If you search for an alternative, you might come across a solution called Zalenium. Zalenium is a flexible and scalable container-based Selenium Grid with video recording, live preview, basic auth & dashboard. It provides all the latest versions of browser images, drivers, and tools required for Selenium test automation. It also has a provision to send the test requests to a third-party cloud provider if the browser requested is not available in the setup.
Let’s see how we can use them together using Docker images and with Docker compose.
Using Docker Images
In order to use Zalenium, we need to pull the two images as specified below. Once those images are available, start the container using the Docker run command with the necessary options.
Use the below travis.yml file to configure the build using Docker images for Zalenium.
Also, we have made use of environment variables options available in Travis CI to dynamically pass the values at run time for TestNG XML file name, browser, and grid hub URL. We can set these values as below in the Settings section of the project.

Once the execution is started, we can observe in the logs that the Travis CI system has read the environment variables and passed them to the running build.

Next, the required Docker images are pulled from the central registry, and the Docker run command runs. Finally, the command docker ps shows the running containers at the moment.

The required browser container is started on port 4444, and the tests will be executed successfully. We can see the test execution status as below.

Similarly, we can change the browser value to GRID_FIREFOX and trigger a new build.

Once the execution for GRID_FIREFOX is started, the Travis CI system will read the environment variables and pass them to the running build.

The required browser container is started on port 4444, and the tests will be executed successfully. We can see the test execution status as below.

Using Docker Compose
We can also leverage Docker compose and Zalenium here to quickly spin up a scalable container-based Selenium Grid and run our tests.
The below is the docker-compose.yml file with the required services. Here we are starting two services, Selenium and Zalenium, and listening to the incoming requests on port 4444.
The complete travis.yml file, in this case, is as below.
Once the build has started, we can see the log details as below. After that, required services will be started, and the tests are executed.

Run Selenium Tests With Selenium Cloud using Travis CI
From all our previous examples, it is evident that we can use Travis CI, Docker, and Selenium together to create automation regression pipelines with ease. As per our requirement, we can configure the declarative YAML files – travis.yml & docker-compose.yml as per our requirement, trigger the build, and get the results. However, there is one drawback with all our previous examples.
Let’s say if we want to see the regression execution live as it is happening, it is not possible, at least in the community version of Travis CI. On the enterprise version, along with some additional configuration, we could achieve this. Also, if we wanted to check the logs – driver logs, network logs, etc.-. we have to make changes to our examples that required additional effort again. Is there a solution to this problem? The answer is YES! We have LambdaTest cloud-based Selenium grid to our rescue.
LambdaTest is a cross browser testing cloud platform to perform automation testing on 3000+ combinations of real browsers and operating systems. It is very easy to configure a project using LambdaTest and start leveraging the benefits out of it. Let’s integrate our project examples with the LambdaTest cloud grid and see how it’s working.
We try to understand both options – using Docker images and starting the services using the docker-compose.
Using Docker Images
To start with the LambdaTest, first, navigate to the LambdaTest registration page and sign-up for a new account. Once the LambdaTest account is activated, go to the Profile> section and note the LambdaTest Username and LambdaTest Access key. We will need these LambdaTest Username and Access keys to execute our tests on the LambdaTest platform.
We use the below travis.yml file to run our tests with Travis CI and Docker on the LambdaTest cloud grid.
Before triggering the build, we need to ensure that the below environment variables are set in the project settings in Travis CI.
LT_USERNAME - Username from the LambdaTest profile page.
LT_ACCESS_KEY - Access key obtained from the LambdaTest profile page.
Below should be the form of gridHubURL.
Where

Once the build starts, Travis CI reads the configured environment variables.

As per the travis.yml file configuration, the respective Docker images are pulled, and containers are started.

We are using the Docker run command with the flag lambdatestEnabled as true. Because of this, Zalenium starts the hub on port 4444 and one custom node using docker-selenium. A cloud proxy node is registered to the grid since we enabled the cloud integration with the LambdaTest platform. Once the test request is received, it will be sent to the available node with all the capabilities to execute the tests.
Once Travis CI completes the Selenium test automation execution, we can navigate to the Automation dashboard of LambdaTest to see our test execution in the Timeline view. Click on the test case; we would be navigated to the Automation logs screen to see other details such as execution recording, logs, etc.
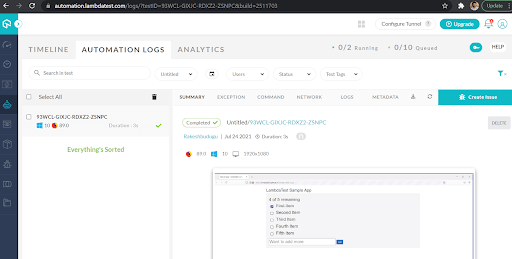
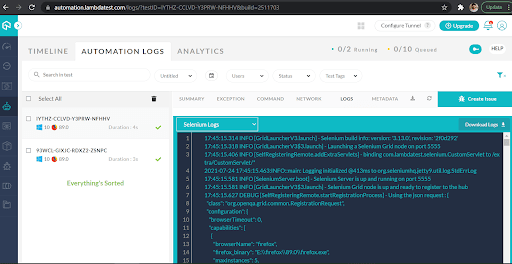
Next, let’s do the same using the docker-compose.
Refer to our documentation for more details on Zalenium integration with LambdaTest.
Using Docker Compose
It’s pretty much the same as our previous examples with minor modifications. Here is the docker-compose.yml file we use to integrate our tests with the LambdaTest cloud grid.
The configuration is almost similar to previous Travis CI and Docker examples, except that we are configuring the lambdatestEnabled flag to true for the start command. And adding the environment variables for LambdaTest username and access keys using LT_USERNAME and LT_ACCESSKEY. Also, please make sure that the environment variables in the Travis CI project are still intact and available during the build.

The build result would be similar as the services are created by docker-compose, and the test execution happens on the browser containers in LambdaTest.
Parallel Testing With Travis CI, Docker And LambdaTest
Till now, we have been discussing running the Selenium UI tests sequentially using multiple options with Travis CI, Docker, and LambdaTest. But as the application enhances we will have more tests in the testing suite. And as the size of the testing suite is big, the time it takes to execute will also be more.
If the execution time is more than we are not meeting the primary goal of test automation, we need to provide early feedback on the product quality to the development team. So how do we achieve this goal without compromising on the testing scope?
The answer is to run the tests in parallel mode wherever feasible to reduce the execution time drastically.
Read: What Is Parallel Testing And Why Is It Important?
Coming back to our discussion, let us make some changes to the testng.xml file as below to support parallel test execution. Add the required changes in a new file called testng-parallel.xml and add them to our project. We are using the parallel attribute of testNG with a value of tests and configuring the tests to run in parallel with a thread count of 2. As you observe, we are configuring the file to run our tests in Chrome and Firefox browsers from the LambdaTest cloud platform.
There are many approaches to running parallel tests using TestNG configuration.
Refer to our detailed blog on configuring TestNG XML and execute parallel testing with detailed explanations.
In order to support the parallel test execution, we need to make the below changes to our .travis.yml file. Here we are using the Zalenium Docker along with LambdaTest to set up our test execution infrastructure.
The maven command used to run the tests is as below. We are passing the suite file and the grid URL from the environment variables of Travis CI.
And the configuration for the job within the Travis CI platform is as below. We are defining the environment variables required for our test execution.

Once these values are set, let’s start our job in Travis CI. After the job is completed successfully, we can see the job log as below. We have added logger statements to our code in the test methods to print the currently used thread id.
Hence from the log, we can see that TestNG creates two threads, and the tests are distributed across them. And a total of 10 tests are executed successfully, five on chrome browser and five on firefox browser in LambdaTest cloud grid.
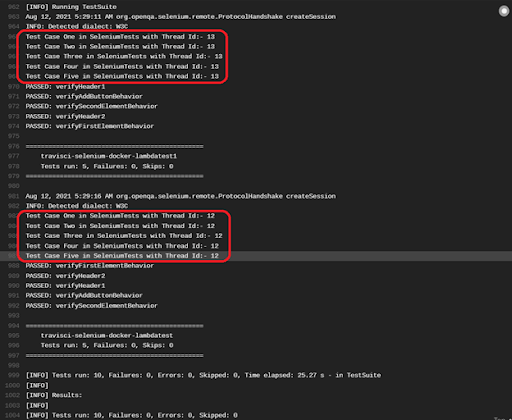
If we go back to our LambdaTest automation dashboard, we can observe that two sessions are started as the job is executed. One session is for a chrome browser and one for a firefox browser. Also, we can observe that we are using 2 of 5 parallel sessions in the LambdaTest platform – which indicates that our tests are being executed in parallel mode.

Like this, we could play around with configurations available in TestNG, Docker, and LambdaTest and build efficient and robust Selenium test automation suites.
Conclusion
In this post, we have covered some of the important concepts in Travis CI and Docker to build the pipelines for performing the Selenium test automation. We have also discussed integrating our test suites with the LambdaTest cloud grid and leveraging it in our Selenium test automation efforts. and build robust CI/CD pipelines using Travis CI, Docker, and LambdaTest. There are many more exciting features that you can try upon and explore.
Let us know in the comments if you want to have another article on the same topic with advanced capabilities.
Happy Testing and Travis-ci-ing!
Frequently Asked Questions
Which are the two main parts of the Travis CI job?
There are two main parts to a job:
- install: Install any dependencies required.
- script: Run the build script.
Does Travis CI use Docker?
Travis CI facilitates continuous integration of Docker projects via container image builds and pushes to enabled Docker registries. This can benefit organizations that need to deploy containerized applications on web service platforms, in open-source software development projects and more.
What is Docker Buildx?
Docker Buildx is a Docker plugin that extends the docker command with the full support of the features provided by the Moby BuildKit builder toolkit. In addition, it provides docker build with many new features like creating scoped builder instances and building against multiple nodes concurrently.
Got Questions? Drop them on LambdaTest Community. Visit now


