How To Perform Automation Testing With Cucumber And Nightwatch JS?
Harita Ravindranath
Posted On: June 28, 2021
![]() 325528 Views
325528 Views
![]() 20 Min Read
20 Min Read
This article is a part of our Content Hub. For more in-depth resources, check out our content hub on Selenium Cucumber Tutorial.
One of the key features of the agile way of software development is the combination of DevOps and automation testing. Test automation speeds up the testing cycle, aids in detecting bugs at an early stage, and helps in handling repetitive, time-consuming tasks at a faster pace. To ensure that quality is not compromised while leveraging the benefits of automated testing, adopting the right test automation framework and strategy becomes critical for the success of the project.
In this Cucumber test automation tutorial, we explore Nightwatch.js, one of the widely used JavaScript-based automation frameworks. We will also deep dive into Cucumber, a widely adopted automation tool that supports BDD (Behaviour Driven Development). By the end of this tutorial, you would be in a comfortable position to integrate Cucumber into the Nightwatch.js framework and build a robust BDD framework setup for performing Selenium automation testing. Enhance your Cucumber interview proficiency with our meticulously curated compilation of questions and answers. Explore the comprehensive list of Cucumber Interview Questions and Answers for valuable insights.
So, let’s get started!
TABLE OF CONTENT
If you’re new to Selenium and wondering what it is then we recommend checking out our guide – What is Selenium?
Why use Nightwatch.js for automation testing?
Nightwatch.js is a popular open-source, Selenium JavaScript-based test automation framework for automating browser-based web applications and websites. It is written in Node.js runtime and uses the W3C WebDriver API (formerly Selenium WebDriver) for interacting with various browsers to perform commands and assertions on DOM elements.
Read – Selenium 4 Is Now W3C Compliant: All You Need To Know
It is an End-to-End (E2E) testing framework that aims to simplify the process of writing automation test scripts.
Here are some of the noteworthy of the Nightwatch.js framework for Selenium testing:
- Easy to Use – Write efficient code with a clean and simple syntax.
- Built-In Test Runner – Comes with an in-built command-line test runner suite with Grunt style support for performing Selenium automation testing.
- Built-In Test Runner – Comes with an in-built command-line test runner suite with Grunt style support for performing Selenium automation testing.
- Page Object Model – Supports CSS and XPath locators to make browser automation more manageable. You can read our blog to know more about Selenium automation testing using Page Object Model (POM).
- Flexibility – Enables unit, integration as well as end-to-end testing. A robust automated acceptance test can be written with a Gherkin-based Cucumber setup.
- Integrations – Provides a single integrated solution for application testing, thereby eliminating the dependency on third-party software(s). This makes the framework extremely lightweight.
- Support for cloud services – Compatible with cloud-based testing platforms like LambdaTest that lets you perform Selenium automation testing at a mammoth scale.
- Continuous Integration (CI) – Supports tools like Jenkins, TeamCity, etc., to assist developers in building and testing software continuously.
Read – E2E Headless Browser Testing Using Nightwatch JS
How to Install and Configure Nightwatch.js
In this part of the Cucumber test automation tutorial, we first proceed with the installation and environment set-up for Nightwatch.js. Before installing nightwatch.js, make sure your system is pre-equipped with the following:
Prerequisites for Nightwatch.js:
- Java
Check whether Java is already installed in your system using the following command:
java -versionIf not, you can download the latest JDK appropriate to your machine.
- NodeJS and NPM
Check whether Node.js is already installed in your system using the following command:
node -vIf not, download the latest LTS version from the Node.js official website.
Note: NPM will be installed along with Node.js. So no need for separate installation.
- IDE of your choice.
Here we will be using Visual Studio Code. You may download VSC from the Visual Studio official website.
How to install and setup projects with Nightwatch.js:
With the pre-requisites for Nightwatch.js installed on the machine, it’s time to install this powerful automation framework. Follow the below-mentioned steps for install and setup projects with Nightwatch.js:
Step 1: Create a folder for your project in the desired location in your system. Open the folder in the preferred IDE.
Step 2: Initialize the project with the package.json file.
- Open the terminal in VS Code.
- Verify whether it is pointing to the project folder.
- Trigger the following command on the terminal to initialize the project:
npm init - Fill in the project details or leave them blank.
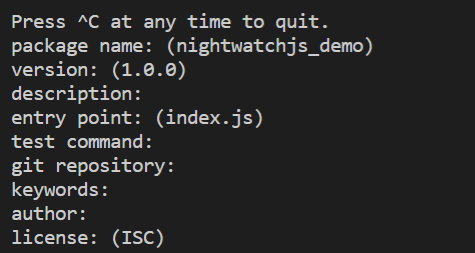
- You will notice the package.json file is created in your root folder. It contains details about the project configuration.
However, you can save some time by using the following command to generate a default empty npm project file by skipping the above interactive process.
npm init -yHere -y stands for “yes.”
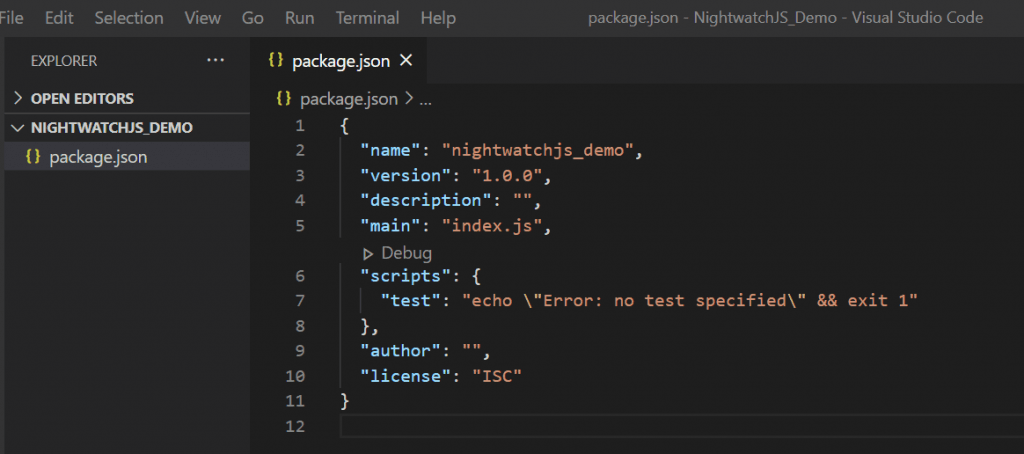
- With this, we have successfully created the package.json file.
Step 3: Run the following command on the terminal to install Nightwatch.js in the current project.
|
1 |
npm install --save-dev nightwatch |
This command will add the “node_modules” folder in your directory and download nightwatch.js as a devDependency in package.json.
You will also notice the “package-lock.json” file in the project folder. This file is used to lock all the dependencies with the version number, making it easy to set up the code in another system.
Step 4: Finally, let us install our browser web drivers (i.e., ChromeDriver and GeckoDriver).
|
1 |
npm install --save-dev chromedriver geckodriver |
The Selenium Server was required with older Nightwatch versions (’v0.9’ and prior), starting with version ‘1.0’ Selenium is no longer necessary.
With this, we are all done with the installation of Nightwatch.js. It’s time to get our hands dirty with some implementation 🙂
Running your first test with NightWatch.js
In this part of the Cucumber test automation tutorial, we look into the additional configurations required for automation in testing. By the end of this section, you will be able to write and run your first test case successfully!
Configuration for automation testing with Nightwatch.js
Our goal is to run our test files using the “npm test” command from the project’s base directory. Also, we are setting Chrome as the default browser. You can use the browser of your choice, please download the corresponding browser driver before writing the test.
Step 1: Create two folders in the root directory:
- “tests” for keeping test files
- “reports” to store reports after each test run.
You can provide any folder name of your choice; however, it should be properly mapped in the nightwatch.json file, which we will discuss in step 3.
Step 2: In your package.json file, replace “scripts -> test” with “nightwatch.”
|
1 2 3 |
“scripts”: { “test”: “nightwatch” } |
This is how the package.json file looks like:
Step 3: In the root, create the “nightwatch.json” file and paste the following snippet.
|
1 2 3 4 5 6 7 8 9 10 11 12 13 14 15 16 17 18 |
{ "src_folders" : "tests", "output_folder" : "reports", "webdriver" : { "start_process": true, "server_path": "node_modules/chromedriver/lib/chromedriver/chromedriver.exe", "host": "localhost", "port": 4444 }, "test_settings" : { "default" : { "desiredCapabilities" : { "browserName" : "chrome" } } } } |
The “nightwatch.json” is the configuration file that is required by the Nightwatch test runner.
Let’s have a close look into the above code structure of “nightwatch.json.”
- src_folders: Contains the test suites. You can also give an array of folders.
- output_folder: Test reports get saved in this location ( i.e., JUnit report files, XML reports, test logs, selenium log, screenshots, video logs, network logs, etc.).
- webdriver: An object containing configurations related to Selenium WebDriver.
- test-settings: Defines the browser we want to use.
You may also create “nightwatch.conf.js” for configuration. If both these files are present in the project, the nightwatch.conf.js file will be given more precedence over the nightwatch.json (i.e., settings mentioned in nightwatch.conf.js will override the ones mentioned in nightwatch.json).
Step 4: With this, we are all done with the configurations required for automation testing with Nightwatch.js. Let’s write our first test.
Writing Nightwatch.js tests for automation testing
In the previous section of this Cucumber test automation tutorial, we have created a “tests” folder. Now, we will be creating test files inside this folder. Each file will be loaded as a test suite by the Nightwatch test runner.
Step 1: Create a test file and name it as – testfile1.js.
Step 2: Let’s create the test structure.
|
1 2 3 |
module.exports = { } |
Step 3: Inside each file, the test runner will look for keys that are exported for usage by other modules. The key is the test case name. Each key is mapped to a function in which the browser instance will be passed as an argument.
|
1 2 3 4 |
module.exports = { "Step one: Navigate to google and verify URL and title" : function(browser){ } |
Step 4: Inside this function, we write our test code. Let’ examine the snippet below:
This is a simple and straightforward test scenario. The code is written in two steps.
- The code will launch the Chrome browser and navigate to google.com, and verify the page URL and title with the expected result.
- The search field inputs “nightwatch” and verifies search results to match the text “nightwatch.”
Here are the major aspects of the implementation:
- url() – Navigates to a specific URL.
- urlContains() – Checks if the current URL contains the given value.
- title() – Checks if the page title equals the given value.
- containsText() – Checks if the given element contains the specified text.
- setValue() – Sets the value of the DOM element as the given value.
- pause() – Suspends the test for the given time in milliseconds.
- assert – When an assertion fails, the test ends, skipping all other assertions.
Step 5: To run the code, go to the terminal and navigate to the base directory of the project. Run the following command once you are in that directory:
npm test
The test starts running, and the browser will be launched.
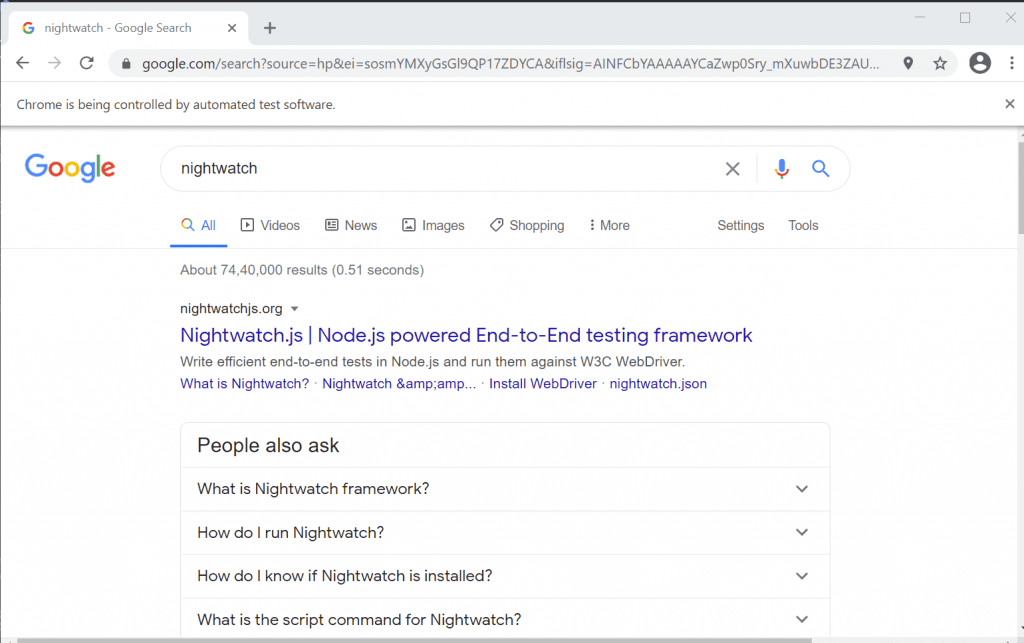
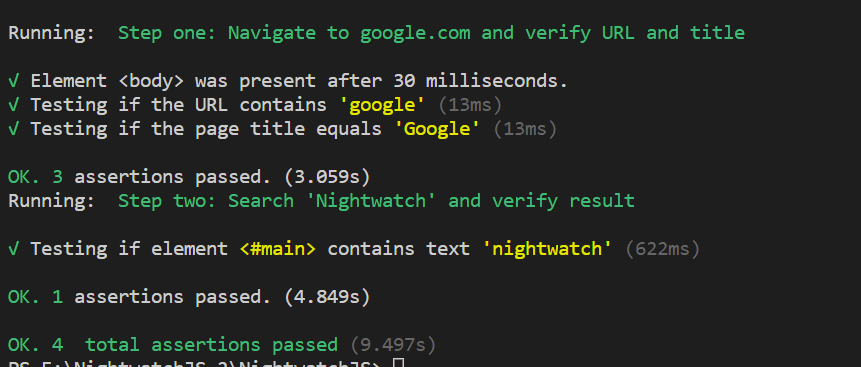
All assertions are passed!! We have successfully written our first test code with the Nightwatch.js.
Step 6: Check out the reports generated in your “reports” folder.
Read – Running Your First Test With NightWatchJS
Why use Cucumber.js for Selenium automation testing?
Behavior Driven Development (BDD) is an approach where the behavior of the feature is defined using simple Domain Specific Language (DSL). The major advantage is that the requirements are easily understandable to anyone (including the non-technical fraternity). DSL is widely used for writing test scripts.
Cucumber is an automation tool based on the BDD framework, using which you can write automated acceptance tests for web applications in the Gherkin language.
Here are the major benefits of the Cucumber BDD framework:
- It acts as a bridge between the technical team (Developers, QA, etc.) and the non-technical team (Business Analysts, stakeholders, etc.) as the features are written in simple language (i.e., Gherkin).
- It focuses more on the user experience.
- It has an easy installation and set-up process.
- There is immense focus on the re-usability and improved maintenance of the test code.
You can take this certification as proof of expertise in the field of test automation with JavaScript to empower yourself and boost your career.
Here’s a short glimpse of the Selenium JavaScript 101 certification from LambdaTest:
How does Cucumber test automation work?
As mentioned in the previous section of this Cucumber test automation tutorial, we can use Cucumber to write scenarios in simple text using Gherkin’s syntax. Some commonly used Gherkin keywords are Feature, Scenario, Given, When, Then, And, etc.
Feature represents the high-level description of the functionality that is used to group related scenarios. A Scenario is a collection of steps for Cucumber to work through. The steps are constructed using keywords Given, When, And, Then, etc., each serving a specific purpose. A Gherkin document is stored in a file called a feature file having a .feature extension.
A typical feature file for login functionality will look like this:
Step definitions are used to connect Gherkin’s steps to programming code. There should be a step definition associated with each step where the code to be executed will be defined.
With this, let’s get started with BDD-Cucumber.
Read – Top 5 Cucumber Best Practices For Selenium Automation
Automation testing with Nightwatch.js and Cucumber.js
In the previous sections, we have explored Nightwatch.js and Cucumber frameworks and their key features that are instrumental in Selenium automation testing. We successfully installed and wrote our first test case using the Nightwatch.js automation framework.
In the upcoming sections of this Cucumber test automation tutorial, we look at how to integrate Cucumber into the Nightwatch.js framework for building a robust BDD setup for testing web applications.
How to install and configure Cucumber
Let’s start with the installation and setup of the Cucumber framework.
Step 1: Installing dependencies:
You may skip previously installed dependencies like nightwatch and chromedriver.
|
1 |
npm install --save-dev nightwatch-api nightwatch @cucumber/cucumber chromedriver |
Nightwatch API adds huge flexibility and control to Nightwatch.js, which is extremely helpful in running acceptance tests based on feature requirements written in the Gherkin language.
Step 2: Configuring Nightwatch.js:
In the Nightwatch.js automation framework set up, we configured the framework through the nightwatch.json file or the nightwatch.conf.js. Moving forward, we will be sticking with the nightwatch.conf.js file since it provides more flexibility in terms of configuration.
The only difference here from the previous setup is that we have removed “src_folder” as tests are running using Cucumber.
|
1 2 3 4 5 6 7 8 9 10 11 12 13 14 15 16 |
const chromedriver = require('chromedriver'); module.exports = { test_settings: { default: { webdriver: { start_process: true, server_path: chromedriver.path, port: 4444, }, desiredCapabilities: { browserName: 'chrome' } } } }; |
The Cucumber test automation requires three types of files:
- Cucumber configuration file
- Feature file
- Step definition file
Step 3: Configuring Cucumber:
Now it’s time to configure Cucumber. Create a file named cucumber.conf.js in the root folder of the project root and paste the following snippet.
This file is responsible for setting up the default timeout, starting the WebDriver, and creating the browser session.
Step 4: Writing a feature file:
Create a folder named “features” in the project root folder. All the feature files are maintained inside this folder.
Create a feature file named “google.feature.” We will continue using the same example we used for Nightwatch.js setup.
Step 5: Writing step definitions:
As mentioned in the previous section of this Cucumber test automation tutorial, each feature step should be associated with its corresponding step definition where the code to be executed is written.
Create a step definition file named google.js under the step-definitions folder
Unsure how to write step definitions?
Simply execute the code using the run command (which we will be customizing in step 6). Due to the Cucumber’s design patterns, you will be displayed with a suggestion as shown below in the terminal for unimplemented steps. Next, copy-paste the code into the step definition file and fill it with your assertions.

Step 6: Creating npm script:
In package.json, define any short command to execute the Cucumber tests. Here we have given the “e2e-test.” You have the flexibility to choose any name for it.
|
1 2 3 |
"scripts": { "e2e-test": "cucumber-js --require cucumber.conf.js --require step-definitions" }, |
Step 7: Run the tests:
Trigger the following command on the terminal for running the tests:
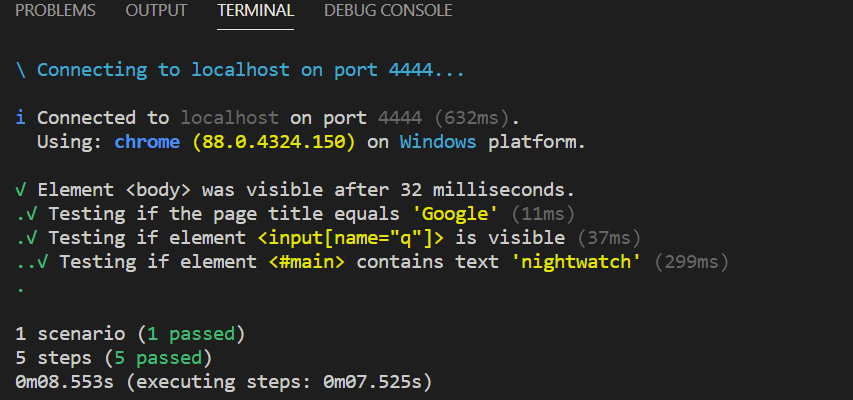
npm run e2e-test
The test runs successfully, and all assertions are passed!
Customizing test runs in Cucumber
Use the following commands for customizing test runs in Cucumber:
- For running a single feature file:
1npm run e2e-test -- features/google.feature
- For running multiple feature files:
1npm run e2e-test -- features/google.feature -- features/firefox.feature
- For using glob patterns:
1npm run e2e-test -- features/**/*.feature
- For running Feature directory:
1npm run e2e-test -- features/dir
- For running a scenario by its line number:
1npm run e2e-test -- features/my_feature.feature:3
- For running a scenario by its name that matches a regular expression:
1npm run e2e-test -- --name "topic 1"
- For using tags (@) for a selective run:
Add tags to the Feature or Scenario and mention the tag in the run command to run or skip the scenario or feature in a selective manner.
- To run the features or scenarios marked with the tag @google:
1npm run e2e-test -- --tags ‘@google’
- To skip running the features or scenarios marked with tag @google:
1npm run e2e-test -- --tags "not @google"
How to create custom reporters in Nightwatch.js and Cucumber
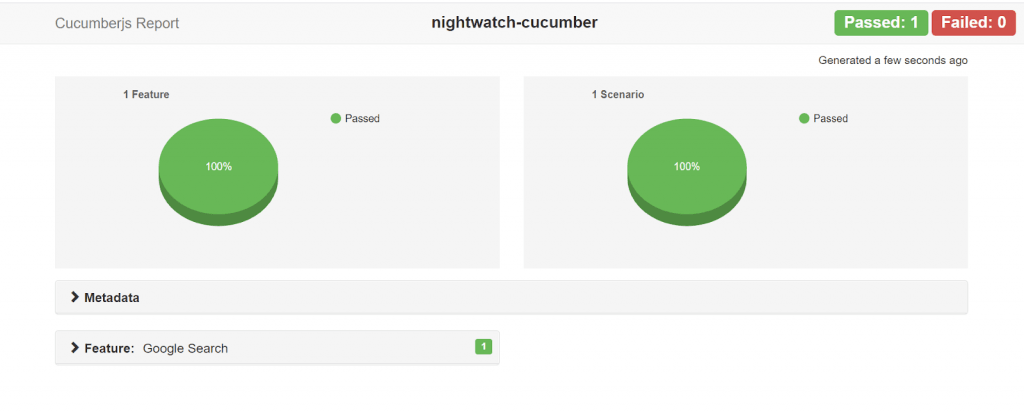
Cucumber provides a number of options for generating reports. A report is a very valuable tool in debugging. Also, it provides immediate visual feedback for analyzing potential problems.
You can enable HTML reporting in the framework by installing the required dependencies and minimal configurations. Reports in the HTML format are easy to read and understand.
Read – Nine Of The Best Reporting Tools For Selenium
Follow the below steps for generating reports in Cucumber and Nightwatch.js:
Step 1: Installing dependencies:
|
1 |
npm install --save-dev cucumber-html-reporter mkdirp |
Step 2: Configuring Nightwatch.js:
Enable screenshots in default settings of nightwatch.config.json file.
|
1 2 3 4 5 |
default: { screenshots: { enabled: true, path: 'screenshots' }, |
Step 3: Configuring Cucumber config file:
Implement the “After” hook by adding code for handling screenshots and attaching them to the report.
Step 4: Updating the npm scripts:
In the package.json file, update scripts to accommodate the report feature. Here, mkdirp is used to make sure the report folder exists before running the test.
JSON formatter generates a JSON report, which is then utilized by cucumber-html-reporter to generate the HTML report.
|
1 2 3 |
"scripts": { "e2e-test": "mkdirp report && cucumber-js --require cucumber.conf.js --require step-definitions --format json:report/cucumber_report.json" }, |
Step 5: Running the tests:.
npm run e2e-test
After successful execution, you should see the HTML report getting generated and getting displayed in a new browser tab.
Automation testing with Cucumber and Nightwatch.js on a cloud-based Selenium Grid
So far in this Cucumber test automation tutorial, we deep-dived into the integration of the Nightwatch.js framework with Cucumber. The tests were executed on a local Selenium Grid, a solution that is not feasible for running automation tests at scale.
To stay ahead in a highly competitive market, it is our duty as testers to ensure the quality of the application in all scenarios, i.e., the app (or website) should behave consistently across all platforms, browsers, and devices. This is where the importance of test coverage arises in cross browser testing.
This can be achieved by building an in-house infrastructure or outsourcing to a third-party cloud platform like LambdaTest. Automation testing (or cross browser testing) on a cloud-based Selenium Grid lets you run tests at an expedited pace across different browsers, platforms, and devices. Your automation tests can leverage the advantages of parallel testing in Selenium to run automation tests at a super-fast pace.
Read – How To Get Started With Automated Browser Testing
Using a combination of remote Selenium Grid with the right cloud-based solution provider like LambdaTest for cross browser compatibility testing is the optimum strategy to run automation tests at scale. LambdaTest provides you access to 3000+ browsers for mobile and desktop to help you gain the maximum browser coverage during the automated browser testing process.
Follow the below steps to get started with cross browser testing on LambdaTest:
Step 1: Log in to LambdaTest or Create a free LambdaTest account. Once an account is created, make a note of the username and access token from the LambdaTest profile section.
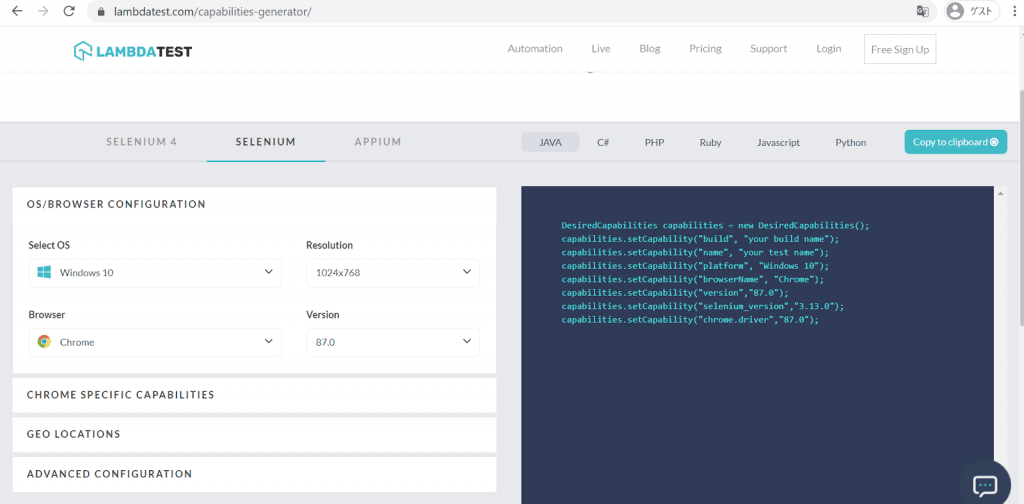
Step 2: Use the LambdaTest Desired Capabilities generator to generate browser and platform capabilities as per your test requirements.
|
1 2 3 4 5 6 7 |
desiredCapabilities: { build:"Nightwatch-Cucumber-Test", platform : "Windows 10", browserName : "chrome", version : "87.0", selenium_version: "3.13.0" } |
Step 3: Now it’s time to make the required configuration changes in your nightwatch.conf.js file. Let’s examine the code below.
Following are the additions made to the config file:
- Pass your Access Token and User details (obtained from Step 1).
- Provide Desired Capabilities for the browser (obtained from Step 2).
- Set the Hostname corresponding to LambdaTest.
- Enable video recording, console, network logs, etc., in the desired capabilities.
We have used the following additional parameters to configure “nightwatch.config.js” for cloud-based cross-browser testing:
- selenium – It is an object containing options related to the Selenium Server. If “selenium” is not used, “webdriver” options should be set instead (as we did in the local setup). Starting with Nightwatch 1.0, Selenium is only required when testing is done against a Grid setup or a cloud-based Selenium Grid like LambdaTest.
- cli_args – It contains a list of CLI args to be passed to the Selenium process (i.e., browser drivers).
- test_settings:
- silent – It is used to show the extended HTTP traffic command logs from the WebDriver or Selenium server.
- desiredCapabilities – It is an object to specify various capabilities like browser name, browser version, etc.
- username and access_key – It is needed for accessing the cloud-based Grid.
Step 4: Add a new “scripts” argument value in package.json.
Here we have added “remote-test,” which is specific for cloud-based Selenium testing. We have removed the custom HTML report params associated with local execution.
|
1 2 3 4 |
"scripts": { "e2e-test": "mkdirp report && cucumber-js --require cucumber.conf.js --require step-definitions --format json:report/cucumber_report.json", "remote-test": "cucumber-js --require cucumber.conf.js --require step-definitions" }, |
Step 5: Run the test using the following command.
|
1 |
npm run remote-test |
The code starts running, and logs can be observed in the terminal.
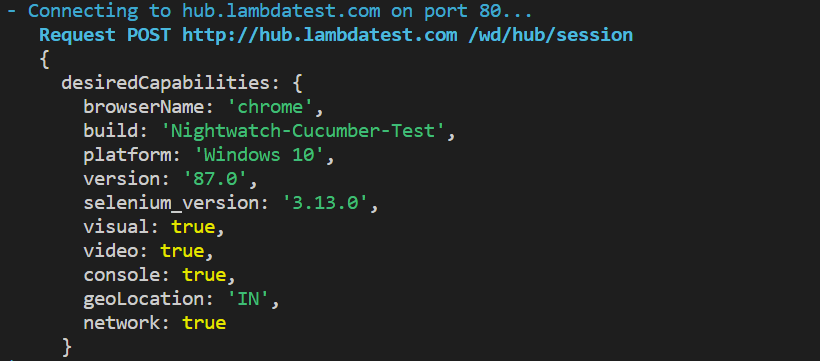
Navigate to the Automation dashboard in LambdaTest to keep a watch on the status of test execution.

As shown below, the test was executed successfully:

We can analyze individual test run reports from Automation Logs.
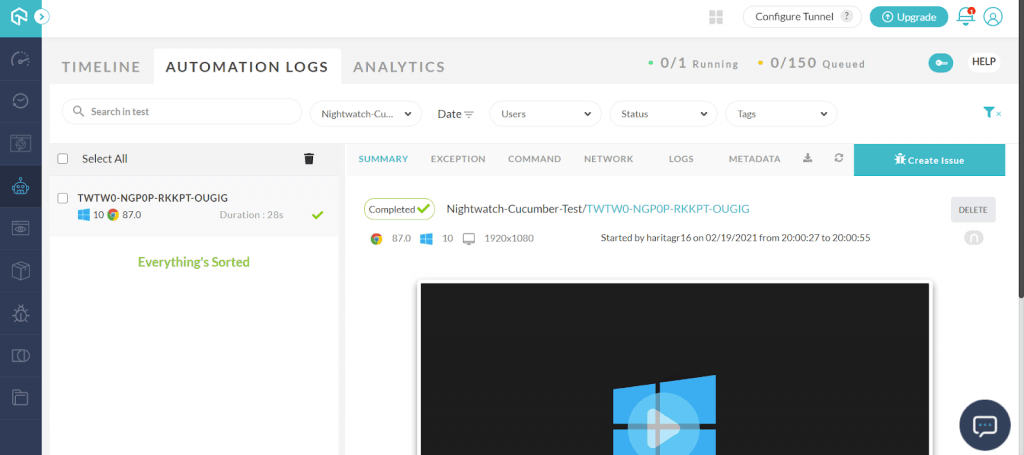
We have successfully run our test cases using an automated cross-browser testing solution provided by LambdaTest through a hassle-free experience!
Read – Automation Testing with Selenium JavaScript [Tutorial]
In case you are looking for video resources on Selenium automation testing with JavaScript, be sure to check out LambdaTest YouTube Channel. The video shown below is an excellent resource on automation testing with JavaScript:
Conclusion
Nightwatch.js is one of the most popular JavaScript-based Selenium automation frameworks, and Cucumber is one of the top tools for BDD implementation. Cucumber can be integrated with Nightwatch.js to build a robust automation testing framework. Together they enable you to create highly configurable test scripts along with easily readable documentation and additional features like custom HTML report generation. Start your free automation testing today.
Hopefully, this Cucumber test automation tutorial enables you to implement the Nightwatch.js automation with the Cucumber and run your first test successfully with alluring HTML reports. If you wish to further optimize your framework and guarantee your web application quality by achieving test coverage, please explore the LambdaTest platform.
Happy Testing!
Got Questions? Drop them on LambdaTest Community. Visit now


