JavaScript Alert in Selenium WebDriver Using Python
Praveen Mishra
Posted On: May 31, 2021
![]() 118081 Views
118081 Views
![]() 12 Min Read
12 Min Read
This article is a part of our Content Hub. For more in-depth resources, check out our content hub on Selenium Python Tutorial.
Alert windows are widely used across websites where an alert message acts as a mode to ‘interrupt’ the current flow of the user journey. A simple example of a JavaScript alert would be someone filling in details on the sign-up page and submitting the details without entering some mandatory information. This user flow also needs to be verified when Selenium automation testing is performed on the web product.

Handling popups and alerts is one of the common test scenarios that should be tested using Selenium WebDriver. In this post of the Selenium Python tutorial series, we look at how to handle JavaScript alerts in Python. It is worth mentioning that the core fundamentals of JavaScript alerts and popups remain unchanged irrespective of the programming language used for Selenium .
Starting your journey with Selenium WebDriver? Check out this step-by-step guide to perform Automation testing using Selenium WebDriver.
TABLE OF CONTENT
Common Scenarios Of Javascript Alerts
There are numerous areas where you would come across popups and alerts when browsing the internet. Alert windows are quite common in banking websites where an alert window comes up to inform you about session expiry due to prolonged inactivity on their banking website.
Shown below is an example of a JavaScript alert on India-based music streaming website:
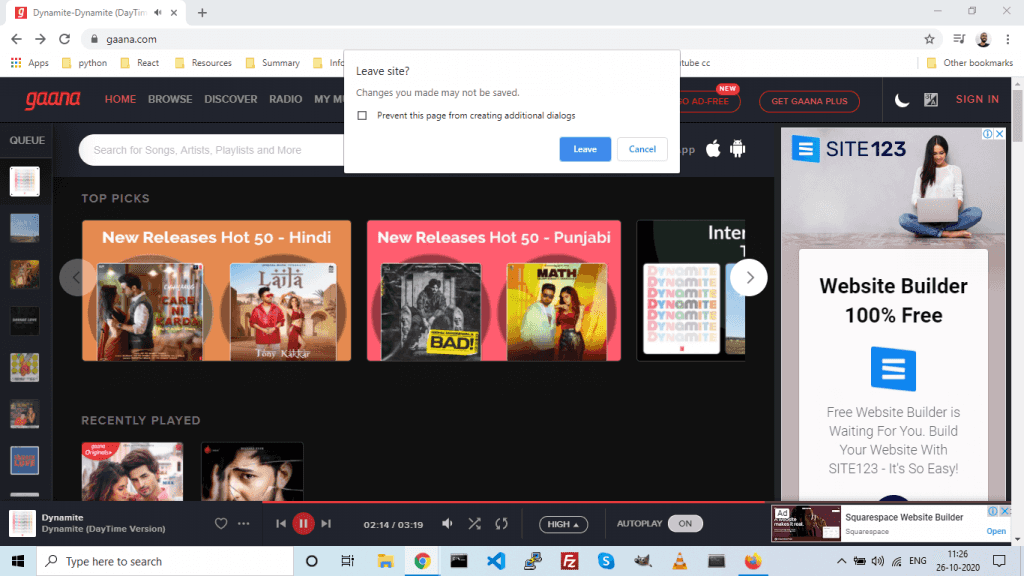
Well developed modern websites track your activity, providing them an opportunity to raise JavaScript alerts, either for retaining the user on the website or for raising alert in erroneous scenarios. As soon as you are about to close the browser tab or window, these websites trigger a confirmation JavaScript alert to confirm your actions.
A few websites have implemented JavaScript popup alerts to notify the users about an error – wrong username, incorrect password, or right pattern for input to fill a form. You would come across such alerts when subscribing to corporate mailing lists with generic emails or signing up for a new service on any web platform. Such implementations are old-school and redundant in the Web 3.0 world (and beyond). It has been replaced with more sophisticated in-built Javascript form methods.
When writing automation tests to test JavaScript alerts with Selenium WebDriver, you might have to factor in Selenium automation testing on age-old websites.
Now that we have covered the major scenarios where you would encounter JavaScript alerts, it’s time to explore ways to handle Javascript alerts in Selenium WebDriver tutorial using Python.
Setting Up Python Selenium WebDriver Environment

In case you are new to Selenium with Python, do check out our detailed Python Selenium WebDriver tutorial to get started with the said topic. As far as the setup for automation testing with Python is concerned, we set up a virtual environment in Python. We follow this as a standard practice to avoid messing up with global Python packages and versions. This also isolates our testing environment from the global environment.
We create a new folder named jsalert in G:\ drive. You can create a folder with the same name in the drive (or location) of your choice. We then used Virtualenv library of Python to set up an isolated virtual environment for testing JavaScript alerts in Selenium.
virtualenv venv
Next, we activate this virtual environment and check for installed packages in this environment
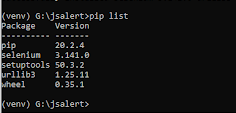
By default only three libraries are available, so we need to install python-selenium binding inside this virtual environment to proceed with the Selenium test automation for demonstrating JavaScript alerts in Selenium.
Run the below command to install Selenium bindings for Python
pip install selenium
Here is the installation snapshot:
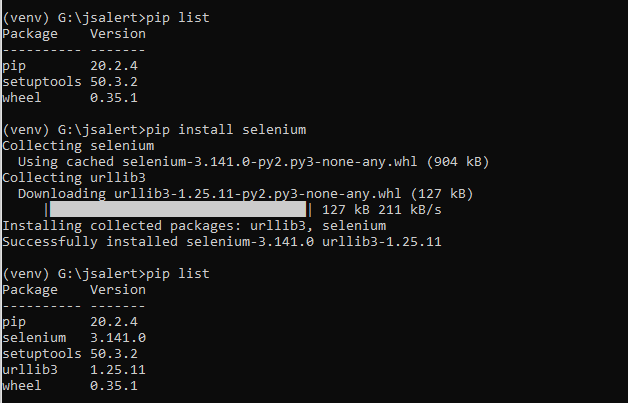
This will install the Selenium Python binding in the js alert virtual environment (or venv). Run the below command to verify whether Selenium binding was successfully installed or not:
pip list
How to handle JavaScript alert in Selenium WebDriver using Python
Windows-based alerts and browser-based alerts are two main categories of alerts or popups in JavaScript. In this blog, we would be majorly focusing on handling browser-based JavaScript alerts in Selenium WebDriver. We would also touch base on windows-based JavaScript alerts.
What are windows-based alerts?
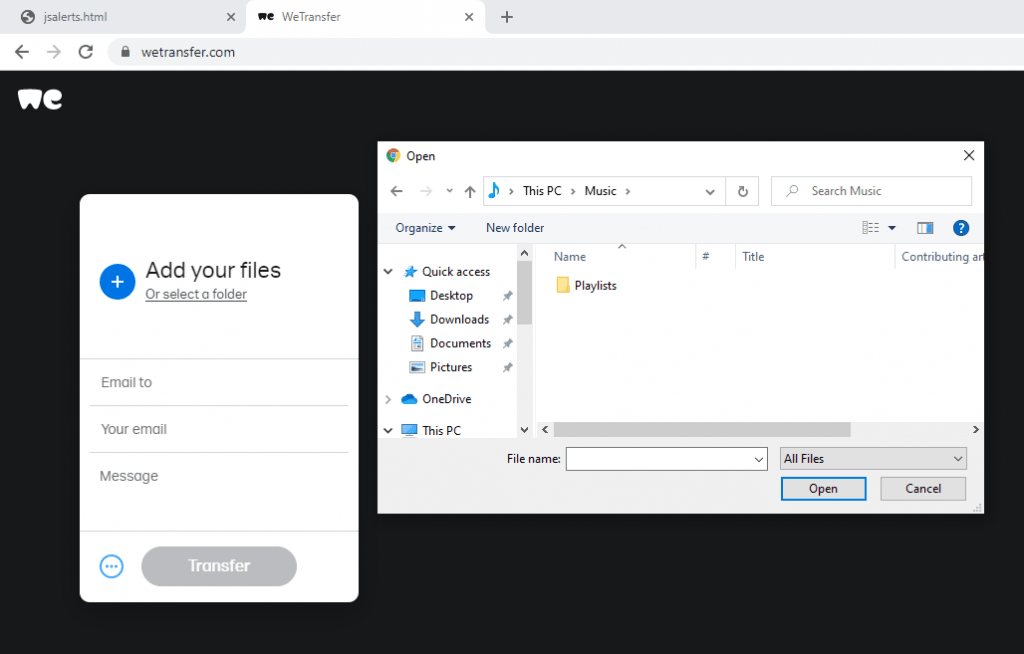
Windows (or OS-based alerts) are alerts that are triggered by calling native operating system APIs. These types of alerts cannot be interacted directly using Selenium WebDriver, as Selenium is primarily used for automating browser interactions and not OS interfaces. The AutoIT & Robot class in Java and win32com.client in Python is used for handling windows-based alerts.
Read – 24 Testing Scenarios You Should Not Automate With Selenium
An example of windows based alert pop-up is ‘file uploading window’ on websites. For instance, when we visit wetransfer to upload files, we get the below screen:
What are web browser-based alerts?
As the name indicates, browser-specific alerts (or popups) are generally encountered when interacting with websites (or web products). They are broadly classified in three categories:
- Simple alerts
- Prompt alerts
- Confirm alerts
- Authentication alerts
For demonstrating Simple, Confirm, and Prompt JavaScript alerts in Python, we create an html file named jsalerts.html within the jsalert folder. This file has barebone code to demo JavaScript alert functionality which we shall later automate using Selenium WebDriver and Python.

| <!DOCTYPE html> | |
| <html> | |
| <body> | |
| <h2>Handling JavaScript Alerts Using Selenium WebDriver</h2> | |
| <button id="simple" onclick="simpleAlert()">Try Simple Alert</button> | |
| <button id="prompt" onclick="promptAlert()">Try Prompt Alert</button> | |
| <button id="confirm" onclick="confirmAlert()">Try Confirm Alert</button> | |
| <p id="lambdaTestDemo"></p> | |
| <script> | |
| function simpleAlert() { | |
| alert("This is how simple alert looks!"); | |
| } | |
| function confirmAlert() { | |
| var textToDisplay; | |
| if (confirm("Click Ok or Cancel!")) { | |
| textToDisplay = "Selenium Webdriver clicked on OK!"; | |
| } else { | |
| textToDisplay = "Selenium Webdriver clicked on Cancel!"; | |
| } | |
| document.getElementById("lambdaTestDemo").innerHTML = textToDisplay; | |
| } | |
| function promptAlert() { | |
| var textToDisplay; | |
| var pincode = prompt("Please enter your area pincode:", "560061"); | |
| if (pincode == null || pincode == "") { | |
| textToDisplay = "Selenium Webdriver cancelled the prompt."; | |
| } else { | |
| textToDisplay = "Product will be delivered to " + pincode + ". Happy?"; | |
| } | |
| document.getElementById("lambdaTestDemo").innerHTML = textToDisplay; | |
| } | |
| </script> | |
| </body> | |
| </html> |
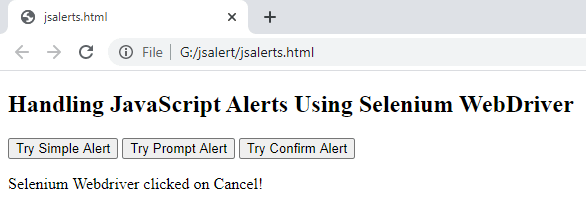
Save the html code and open jsalerts.html with Chrome browser. Click iteratively on each of the buttons and observe different varieties of alerts.
Simple JavaScript alert is triggered using built-in alert() function. On similar lines, prompt() and confirm() functions are used for handling Prompt and Confirm alerts.
- Simple JavaScript Alerts
- Confirm JavaScript Alerts
- Prompt JavaScript Alerts
- Authentication JavaScript Alerts
Simple Alert is used to display some message (or error) in the browser pop-up. An example is informing the user about mandatory fields (e.g. “email is a mandatory field”).

Confirm alert is used to take confirmation from the user regarding a specified action that will be performed by the user. For example, a confirmation alert saying “You have unsaved changes. Do you want to reload anyways?” comes up when you have unsaved work in Google docs, Canva, or other similar websites.

When you perform a mouse operation on Okay or Cancel, the activity is recorded and the corresponding code block is executed.
Prompt alert is used to send a message to the user as well as collect a message from the user.

We input pin code in the input window and an alert message appears when the Submit button is clicked.

Authentication alert is an advanced form of a prompt alert. To exhibit an authentication alert, we need to set up a server and then trigger the pop-up. The user enters a URL to be fetched in the browser and the server responds with a 401 response.
Additionally, it triggers an authentication pop-up. When the user enters the credentials and submits the pop-up, the same URL is requested yet again but this time with credentials in the request header. If authenticated, the website loads normally.
It’s beyond the scope of this article to demonstrate server setup. We are using this setup for demonstrating the handling of authentication alerts in Selenium WebDriver.

This certification is for professionals looking to develop advanced, hands-on expertise in Selenium automation testing with Python and take their career to the next level.
Here’s a short glimpse of the Selenium Python 101 certification from LambdaTest:

Alert Interface Methods Provided By Selenium WebDriver
When an alert gets triggered, the control still remains with the webpage and an alert interface is required to shift the control to the pop-up window. The switch_to method in Python is used for switching to the desired alert window.
alert = driver.switch_to.alert
The Java equivalent of the same is below:
Alert alert = driver.switchTo().alert();
Here are the major operations that can be performed on JavaScript alert in Selenium WebDriver:
- accept()
This is akin to pressing the “OK” button in the alert pop-up window.
- sendKeys()
This is for prompt alert which requires input from the user. Using this method you can send keys/text as input to the alert box.
- dismiss()
Cancels the alert, closes the window, and control is handed over to the webpage.
- text()
Enter text in the alert box using the sendKeys() method in Selenium.
Now that we have covered the essential aspects of JavaScript Alerts in Selenium WebDriver using Python, let’s get our hands dirty with python-selenium script (e.g. jsalerts.py) for realizing Selenium automation testing with jsalerts.html.
Read – Tutorial on Handling Alerts/PopUs in Selenium C#
The demonstration will be performed on the local Selenium Grid hence, you would need to download the respective browser drivers (e.g. ChromeDriver for Chrome and GeckoDriver for Firefox) for interacting with the WebElements in the DOM.
| from selenium import webdriver | |
| import time | |
| from selenium.webdriver.support.ui import WebDriverWait | |
| from selenium.webdriver.support import expected_conditions as EC | |
| from selenium.common.exceptions import TimeoutException | |
| driver = webdriver.Chrome() | |
| driver.get("file:///G:/jsalert/jsalerts.html") | |
| try: | |
| driver.find_element_by_id('simple').click() | |
| WebDriverWait(driver, 5).until(EC.alert_is_present(), 'Timed out waiting for simple alert to appear') | |
| alert = driver.switch_to.alert | |
| alert.accept() | |
| print("alert accepted") | |
| except TimeoutException: | |
| print("no alert") | |
| time.sleep(2) | |
| print("simple alert test passed") | |
| print("Now running prompt alert test") | |
| try: | |
| driver.find_element_by_id('prompt').click() | |
| WebDriverWait(driver, 5).until(EC.alert_is_present(), 'Timed out waiting for prompt alert to appear') | |
| alert = driver.switch_to.alert | |
| alert.send_keys('560085') | |
| print("printing alert text") | |
| print(alert.text) | |
| alert.accept() | |
| print("alert accepted") | |
| except TimeoutException: | |
| print("no alert") | |
| time.sleep(2) | |
| print("prompt alert test passed") | |
| print("Now running confirm alert test") | |
| try: | |
| driver.find_element_by_id('confirm').click() | |
| WebDriverWait(driver, 5).until(EC.alert_is_present(), 'Timed out waiting for prompt alert to appear') | |
| alert = driver.switch_to.alert | |
| print("printing alert text from confirmation alert") | |
| print(alert.text) | |
| alert.accept() | |
| print("alert accepted") | |
| except TimeoutException: | |
| print("no alert") | |
| time.sleep(2) | |
| print("confirmation alert test passed") | |
| driver.quit() |
Trigger the following command on the terminal to run the test:
python jsalerts.py
Here is the execution snapshot:

Handling Simple JavaScript Alert Using Selenium WebDriver in Python
This line of code identifies the button that triggers a simple alert and clicks on it. In our example, we had given the id=”simple” in the jsalerts.html file.
To get started, waits in Selenium are used for adding delay so that the required WebElement is available in the DOM. This line pauses the driver for 5 seconds or until the alert is identified in the browser.
Shifts the interface to alert window.
alert.accept()
Identical to pressing the Ok button in the alert window.
Handling Prompt JavaScript Alert Using Selenium WebDriver in Python
In the try block that handles prompt alerting using Selenium WebDriver, the send_keys(‘560085’) sends the input “560085” to the prompt textbox and alert.accept() submits the input.
Handling Confirmation JavaScript Alert Using Selenium WebDriver in Python
print(alert.text)
Handling confirmation alerts is similar to handling simple alerts. A confirmation alert is normally about a user action and it makes sense to log the message from confirmation alert boxes. The above does the same.
Handling Authentication JavaScript Alert Using Selenium WebDriver in Python
As mentioned earlier, authentication alert handling is carried out by utilizing third party non-selenium libraries. In Python, it can be done using the win32com package.
To install it, run the following command
Here is the sample implementation that demonstrates handling of authentication alerts:
You may also consider using pyautogui library to handle browser upload pop-up windows. For installing pyautogui library, run the following command on the terminal:
After clicking on the element that triggers the file upload window, execute the following code to upload the desired file:
Handling Unexpected JavaScript Alert Handling Using Selenium WebDriver in Python
The try..catch..finally code block can be used for handling unexpected alerts in Selenium WebDriver using Python. In certain test scenarios, you might have to write hook functions to constantly look for the presence of the expected condition of alert and accordingly handle it.
Log the error and trigger a notification functionality to write better robust test automation scripts. You can also check out best practices in Selenium WebDriver to make the most of automation testing in Selenium.
Handling JavaScript alerts in Selenium Python using cloud-based Grid
As we have seen in the earlier examples, you had to install browser drivers so that the test URL can be opened in the desired web browser and necessary operations can be performed on the WebElements in the DOM. This Selenium test automation approach falters if the tests have to be performed on numerous combinations of browsers and OS combinations.
This is where cloud-based Selenium test automation can be leveraged to perform automation tests at scale. Along with running tests in parallel, it also helps expedite the build, test, and release process using the integrations with popular CI/CD tools (e.g. Jenkins, Circle CI, GitLab CI, etc.). Read our detailed blog to understand the advantages of cloud-based Selenium test automation.
LambdaTest is one such platform that provides cloud-based Selenium Grid that lets you run tests across 2,000+ browsers, browser versions, and operating systems at scale. Do check out our Learning Hub on Automation Testing to get started with Selenium test automation on LambdaTest. Once you make an account on LambdaTest, make sure to save the user-name and access-key which is available in the LambdaTest profile section.

We have hosted the jsalerts.html file with Github Pages and jsalerts.html is also accessible at https://pynishant.github.io. When performing Selenium test automation on LambdaTest, we use https://www.pynishant.github.io and not file:///G:/jsalert/jsalerts.html.
We have modified the existing jsalerts.py file so that the tests are run on the LambdaTest Grid and not the local Selenium Grid. The implementation has relevant comments so that it becomes easy to understand the internals of the code.
As you can see, we have only done infrastructural level changes. There is no change in the logical aspects of the implementation. The final jsalerts.py file is below:
| from selenium import webdriver | |
| import time | |
| from selenium.webdriver.support.ui import WebDriverWait | |
| from selenium.webdriver.support import expected_conditions as EC | |
| from selenium.common.exceptions import TimeoutException | |
| from selenium.webdriver.common.keys import Keys | |
| username = "Your_username_within_double_quotes" | |
| accessToken = “Your_access_token_in_quotes” | |
| gridUrl = "hub.lambdatest.com/wd/hub" | |
| desired_cap = { | |
| 'platform' : "win10", | |
| 'browserName' : "chrome", | |
| 'version' : "67.0", | |
| "resolution": "1024x768", | |
| "name": "LambdaTest python google search test ", | |
| "build": "LambdaTest python google search build", | |
| "network": True, | |
| "video": True, | |
| "visual": True, | |
| "console": True, | |
| } | |
| url = "https://"+username+":"+accessToken+"@"+gridUrl | |
| print("Initiating remote driver on platform: "+desired_cap["platform"]+" browser: "+desired_cap["browserName"]+" version: "+desired_cap["version"]) | |
| # driver = webdriver.Chrome() | |
| driver = webdriver.Remote( | |
| desired_capabilities=desired_cap, | |
| command_executor= url | |
| ) | |
| # driver.get("file:///G:/jsalert/jsalerts.html") | |
| driver.get("https://pynishant.github.io/") | |
| time.sleep(7) | |
| try: | |
| driver.find_element_by_id('simple').click() | |
| WebDriverWait(driver, 5).until(EC.alert_is_present(), 'Timed out waiting for simple alert to appear') | |
| alert = driver.switch_to.alert | |
| time.sleep(4) | |
| alert.accept() | |
| print("alert accepted") | |
| except TimeoutException: | |
| print("no alert") | |
| time.sleep(7) | |
| print("simple alert test passed") | |
| print("Now running prompt alert test") | |
| try: | |
| driver.find_element_by_id('prompt').click() | |
| WebDriverWait(driver, 5).until(EC.alert_is_present(), 'Timed out waiting for prompt alert to appear') | |
| alert = driver.switch_to.alert | |
| time.sleep(7) | |
| alert.send_keys('560085') | |
| time.sleep(7) | |
| print("printing alert text") | |
| print(alert.text) | |
| alert.accept() | |
| print("alert accepted") | |
| except TimeoutException: | |
| print("no alert") | |
| time.sleep(5) | |
| print("prompt alert test passed") | |
| print("Now running confirm alert test") | |
| try: | |
| driver.find_element_by_id('confirm').click() | |
| WebDriverWait(driver, 5).until(EC.alert_is_present(), 'Timed out waiting for prompt alert to appear') | |
| alert = driver.switch_to.alert | |
| print("printing alert text from confirmation alert") | |
| print(alert.text) | |
| time.sleep(7) | |
| alert.accept() | |
| print("alert accepted") | |
| except TimeoutException: | |
| print("no alert") | |
| time.sleep(5) | |
| print("confirmation alert test passed") | |
| driver.quit() |
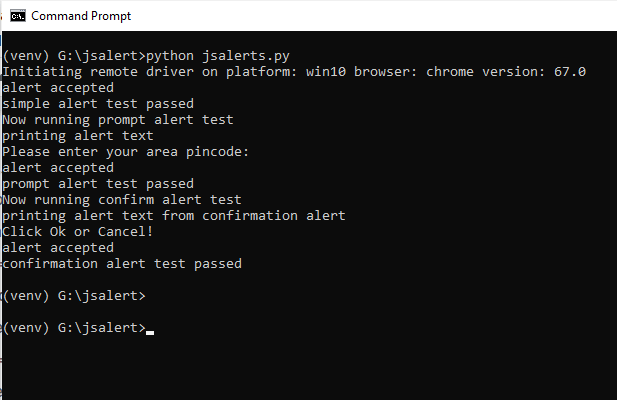
Run the test by triggering the following command on the terminal:
python jsalerts.py
Here is the terminal execution output which indicates that the tests were executed successfully. You can also check the status of the tests by visiting the automation dashboard on LambdaTest.
Conclusion
Popups or alert windows are pretty common in web products. Usually, JavaScript alerts in websites are triggered when the user performs some action. Some of the major types of JavaScript alerts in Selenium Python are Simple alerts, Prompt alerts, Confirm alerts, and Authentication alerts.
Selenium test automation on JavaScript alerts helps in automating different test scenarios related to alert windows. Here we looked at some of the different ways of handling alerts in Selenium Python. To make the most out of automation testing with Alerts, it is recommended to run tests on a cloud-based Selenium Grid like LambdaTest instead of a non-scalable local Selenium Grid.
Got Questions? Drop them on LambdaTest Community. Visit now


 by
by 

