A Lazy Load Images Guide For Better Website Performance
Harish Rajora
Posted On: April 19, 2021
![]() 149221 Views
149221 Views
![]() 14 Min Read
14 Min Read
The pandemic of 2019-2020 made us all lazy. With no option but to sit at home, 35.82% of us gained weight in that phase, thanks to our laziness. Fortunately, that phase gives us an excellent chance to understand a somewhat similar concept in web development. So, how do you define the term “lazy”? While Google says, “Unwilling to work”, I can rephrase it to “not willing to work until necessary”. Until it is extremely necessary for a lazy person to move to another place than that lousy couch, they will stick to it.
Similarly, in CSS we call lazy images those images that are not willing to be fetched from the server to the client (from couch to the place X in our analogy) until it’s extremely necessary. Lazy images will serve as the center point of this blog. The post will revolve around encouraging the developers to make more and more images lazy in contrast to real life. The main attractions that will throw a bit of light on what these lazy load images are, how to lazy load images as well as the ways in which a developer can convert an image to lazy.
TABLE OF CONTENT
What Are Lazy Load Images?
Lazy loading in “images” or Computer Science as a general concept avoids the fetch request of that element until extremely necessary. For example, in Scala, we use lazy variables to avoid their initialization and calculation until necessary. This executes the program faster and consumes lesser memory.
In CSS, the same concept is used to load the images only when it is necessary. Images are something that loads the page heavily with their size. On average, Google analyzes that the images account for more than 60% of bytes of the web page. If you own a website, you can also check your page speed insights and know-how images overload your web page.
Apart from lazy loading, there are a lot of ways that the developers can try to optimize the web page performance. These may include understanding the images’ responsiveness, making their size smaller and using the correct file format. But still, whatever we do, images contribute to the majority of a web page, and the web page is incomplete today without appropriate images. Therefore, something is needed that can help us improve performance without omitting any images.
Images contribute so much to the web page today because they are important!
A study shows how 65% of people learn through visual imagery, and another one by Brandwatch highlights that 3.2 billion image shares are executed every day.
We cannot skip the images on our web page, which raises a new technique to load them and still save on the bandwidth. This is where lazy load images come to the rescue. The concept behind lazy load images is that not all the users arriving at a webpage read it entirely till the end. Some people come wandering off the internet to find out that the page is irrelevant to them. Some close the page at a point where they no longer need it.
Loading the page altogether for every user is wasting bandwidth and a potential user when we know that most users do not wait more than 2 seconds to load. So, why not skip the image loading and wait for our user to reach the point where the image is placed? This way, we are sure that if we are making a heavy request to the user, it would be worth it! For the people abandoning the page before the image is placed, the web page becomes faster, and the server requests become fewer. It is a win-win.
From the next section onwards, we shall discuss three methods for ‘how to lazy load images?’- the hard one, the mediocre one, and the easy one!!
Lazy Load Images with JavaScript – The Hard Way
The first method to focus on is the conventional way which has been used for a long time to make an image lazy. Implementing lazy load images- JavaScript is more complicated than the other ways discussed in this post, but I am sure it will brush up your JS skills along the way and will bring its own set of benefits.
To load an image on a webpage, we use the “img” tag with the “src” attribute defining the URL of the image.
<img src = “URL” />
To apply lazy loading to the “img” tag, we need to remove the “src” tag first. The reason being that the browser quickly loads all the URLs when it sees a “src” tag. So when we are waiting for the event to be triggered through JavaScript, our browser would already have loaded the image as soon as the document object model loads.
To prevent the automatic loading of the image, we make use of the data-src attribute instead of src.
<img data-src = “URL” />
For the current demonstration, we will use the “scroll” event to trigger the JavaScript function, but since it’s your website, you can take any event you like to let the browser know the time to load the images.
To let the browser know that we want to call a function after an event, we need to add the event listener as follows:
document.addEventListener(“scroll”, function_name);
Here, we need to replace the function_name with the actual function name. Let’s say our function will be named “Wake_Up_Image” to check if the image is in the viewport or not. If it is, wake it up, i.e. load it.
document.addEventListener(“scroll”, Wake_Up_Image);
Now we need to implement our function as follows:
|
1 2 3 4 5 6 7 8 9 10 11 12 13 |
function Wake_Up_Image() { if(lazyloadTimeout) { clearTimeout(lazyloadTimeout); } lazyloadTimeout = setTimeout(function() { var scrollTop = window.pageYOffset; lazyImages.forEach(function(img) { if(img.offsetTop < (window.innerHeight + scrollTop)) { img.src = img.dataset.src; } }); } |
The above function iterates over the images and calculates the offset of the image with respect to the window to get the viewport. If the image is found to be inside the viewport, the data-src tag we used above will be converted to the src tag through img.src = img.dataset.src. Seeing the src tag, the browser will load the image on the webpage.
The timeout function is used for optimizations and improved performance. This code will work fine in the browser but would need slight performance improvements.
First, we need to capture images in lazyImages that we want to be lazy. For this, we can implement “lazy” as a class in the image tag.
|
1 2 3 4 5 6 7 8 9 10 11 12 13 14 15 16 17 18 19 20 21 22 23 24 25 26 27 28 29 30 31 32 33 34 35 36 37 38 |
<img loading="lazy" class = “lazy” data-src = “URL” /><pre> Now we can capture these images using querySelector as follows: <strong>var lazyImages = document.querySelectorAll("img.lazy");</strong> As a next step, we should remove the eventListener as soon as the timeout becomes 0. This can be achieved through the removeEventListener: <strong>document.removeEventListener("scroll", Wake_Up_Image);</strong> Combining all of the above changes and optimizations, the overall code becomes: <pre> var lazyImages = document.querySelectorAll("img.lazy"); var lazyloadTimeout; function Wake_Up_Image() { if(lazyloadTimeout) { clearTimeout(lazyloadTimeout); } lazyloadTimeout = setTimeout(function() { var scrollTop = window.pageYOffset; lazyImages.forEach(function(img) { if(img.offsetTop < (window.innerHeight + scrollTop)) { img.src = img.dataset.src; img.classList.remove('lazy'); } }); if(lazyloadImages.length == 0) { document.removeEventListener("scroll", lazyload); } }, 15); } document.addEventListener("scroll", lazyload); }); |
You can add other event listeners if you feel- like orientation change or window resizing.
The above code results in the following output:
Alright! With this implementation, we are done with the hard method to implement the lazy load images. As a web developer, I might not use lazy load images JavaScript to implement lazy loading while developing a web page. If the final motive is to load the images based on their viewport visibility only, JavaScript is a bit longer and harder than other methods. It is prone to more errors than other methods, and code reading also becomes complex. Although if you intend to play according to the event listeners, nothing gives better control than the JavaScript.
In the above demonstration, you might feel that there is a bit of delay in the image loading, and in that time, a grey canvas is visible. As a developer, you can colour that canvas with some dominant colours to not let the user notice the lag. This is just a slight UI adjustment that would not affect the lazy load images’ performance.
Lazy Load Images with Intersection Observer API – The Mediocre Way
Observing the high demand for viewport based functions, JavaScript introduced a new API called Intersection Observer. The Intersection Observer API observes the intersection between the target element with the ancestor element or with the top-level document’s viewport. The intersection observer API skips the usual JavaScript conditions, loops and event handlers that created complex code in the first method.
We will modify the above given code to adjust it according to the Intersection Observer API as follows:
|
1 2 3 4 5 6 7 8 9 10 11 12 13 14 15 16 17 18 19 20 21 22 23 24 25 26 27 28 29 30 31 32 33 34 35 36 37 38 39 40 41 42 43 44 |
document.addEventListener("DOMContentLoaded", function() { var lazyImages; if ("IntersectionObserver" in window) { lazyImages = document.querySelectorAll(".lazy"); var imageObserver = new IntersectionObserver(function(entries, observer) { entries.forEach(function(entry) { if (entry.isIntersecting) { var image = entry.target; image.src = image.dataset.src; image.classList.remove("lazy"); imageObserver.unobserve(image); } }); }); lazyImages.forEach(function(image) { imageObserver.observe(image); }); } else { var lazyloadTimeout; lazyImages = document.querySelectorAll(".lazy"); function lazyload () { if(lazyloadTimeout) { clearTimeout(lazyloadTimeout); } lazyloadTimeout = setTimeout(function() { var scrollTop = window.pageYOffset; lazyImages.forEach(function(img) { if(img.offsetTop < (window.innerHeight + scrollTop)) { img.src = img.dataset.src; img.classList.remove('lazy'); } }); if(lazyloadImages.length == 0) { document.removeEventListener("scroll", lazyload); } }, 15); } document.addEventListener("scroll", lazyload); } }) |
The “unobserve” method tells the Intersection Observer to stop observing the target element while the observed method is the opposite. Notice how we removed the event handlers and the offset calculation while using the API.
The above code generates the following output:
As seen in the above interaction video performed on LambdaTest, the Intersection Observer API is faster and performs much better on the scroll event. The lag that was generated while writing the code in JavaScript was also not visible in the API.
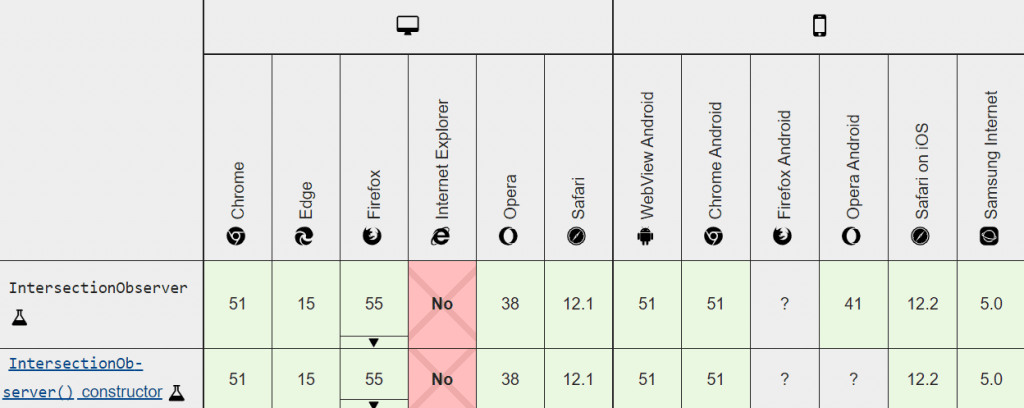
Browser Support for Intersection Observer API
The browser support for the intersection observer API is also great, giving us the freedom to use it without worrying about a crash:

The Intersection Observer API is a much better option for loading the images lazily on the web page. A more straightforward method for lazy load images is also available in the browsers called the “loading” attribute.
Lazy Load Images with the Loading Attribute- The Easy Way
The web pages are growing over time. Developers now know that images have a significant effect on the user and how they perceive the website. As a result, it has become a rare phenomenon to see a web page that does not have a single image. Some web pages are just filled with images raising their count to more than ten or sometimes 15. As good as that is for everyone, Google Chrome developers did start to take the lazy loading seriously.
As our web page’s size has increased so significantly, developers have started to use lazy loading on their website to save from the embarrassment of loading their webpage in a lifetime. Google Chrome developers hence thought out to implement this feature into the native browser library so that developers can skip the complex JS code and directly implement lazy loading and the existence of the src attribute. This attribute is called the “loading” attribute.
The “loading” attribute consists of three values:
- auto: The “auto” value depends on the browser’s in-built capabilities. For example, Google Chrome automatically loads the images located deep down the viewport to save the bandwidth. If any other browser does not have that capability, the image will load immediately with the page.
- lazy: The “lazy” value tellS the browser that this image needs to be loaded lazily in the browser.
- eager: The “eager” value is used to tell the browser to load the image immediately as the content is loaded. The “eager” value is opposite to the “lazy” value.
Since we need to load the image lazily, we will use the “lazy” value here. This is a Chromium-based update and, therefore, will be available to all Chromium-based browsers.
There is no need to implement JavaScript, and a small addition to the image tag would work as follows:
|
1 |
<img loading="lazy" src = “URL” loading = “lazy”> |
The above code will bring out the same output as the Intersection Observer API without any extra code. So, why don’t we skip everything and use just the native lazy loading feature?
Browser Support for the Loading Attribute
The browser support for the loading attribute is as follows:

The Chrome browser and other Chromium-based browsers show full support. In contrast, Mozilla’s Firefox is currently providing partial support to the attribute. The “loading” attribute is more accessible, but as I mentioned above, if you want to play with the events and want more control over your elements, JavaScript is the best choice.
Lazy Load Images JavaScript Libraries
The above methods will invite you to complex code every condition and loop without any support. However, similar to any other operation, JavaScript comes here to our rescue, too, with multiple libraries that can encourage lazy loading not in only images but other elements as well. The following libraries will help you in loading elements lazily in JavaScript:
Apart from this, for WordPress fans, you can use the A3 Lazy Load plugin for implementing lazy loading very efficiently.
Which Option is your Favorite?
Lazy load images is an excellent concept for improving website performance. If you have a web page that contains a few images in different areas of the web page, lazy loading will save the network calls and precious time in loading the website. Not only this, lazy loading provides substantial performance gains and reduces your overall cost. For someone who hosts all their images to the AWS cloud, minimizing the server calls can bring down the costs in your monthly bills.
This does not mean we start to lazy load everything on our web page. Lazy loading everything might sound like a huge performance bonus but is not necessary. The servers today are not that slow, and the networks are faster too. Lazy loading will increase the server calls if the developer starts dividing the sections that could have been fetched through a single request. Hence, it is advisable to use lazy loading but not everywhere.
The methods explained in this post precisely aim towards lazy load images on a web page. With the three methods available today, all of them have their importance and their demerits. JavaScript might give you a hard time but will provide you with more control. The loading attribute is a work of seconds but might not render on all the browsers. With three options in our hand, we would love to know your thoughts around these methods and which one would you prefer as a development and testing community ourselves. Mention your method and reason to use in the comment section and help the community to get more personal insights from all the developers.
Frequently Asked Questions (FAQs)
What are lazy load images?
A web development method known as “lazy loading” postpones the loading of images until they are needed. The user experience is enhanced thanks to this optimization strategy’s increased page loading speed and overall performance.
What is the difference between eager and lazy loading images?
Lazy loading defers resource loading until it reaches a specified viewport distance, optimizing performance. In contrast, eager loads images regardless of their page position.
What is the function of lazy load?
The new React function eliminates the need for additional libraries by enabling lazy loading of components through code splitting. Critical user interface components are prioritized for rendering first through lazy loading, and less important ones are gradually revealed. By speeding up initial load times and enhancing user experience, this strategy improves performance.
Is lazy load good for SEO?
Improved loading times, a key feature taken into account by search engines, have a significant impact on website SEO rankings. Higher search engine rankings are more likely and the user experience is improved by faster loading.
Got Questions? Drop them on LambdaTest Community. Visit now


