Selenium Grid 4 Tutorial For Distributed Testing
Himanshu Sheth
Posted On: August 20, 2020
![]() 165908 Views
165908 Views
![]() 17 Min Read
17 Min Read
This article is a part of our Content Hub. For more in-depth resources, check out our content hub on Selenium 4.
Selenium Grid has been an integral part of automation testing, as it lets you perform test case execution on different combinations of browsers, operating systems (or platforms), and machines. It also enables you to perform parallel execution to expedite the cross browser testing process.
Selenium Grid 4, the successor to Selenium Grid 3, has been in the Alpha stage for the last couple of months. The developer community was very excited regarding Selenium 4 (Alpha), and the addition of several useful features such as Selenium 4 Relative Locator has helped accelerate activities related to Selenium test automation. Selenium 4 Alpha features an improved Selenium Grid design; the significant change is the introduction of ‘fully distributed mode.’ In this Selenium 4 tutorial, we take a deep dive into Selenium 4 and the vital architectural differences in comparison to Selenium 3. If you are preparing for an interview you can learn more through Selenium interview questions.
TABLE OF CONTENT
Introduction to Selenium Grid 4
A Selenium Grid is primarily used for distributed test execution and works on the hub-node architecture.
Unlike the earlier versions of Selenium (i.e. version 3.x), the Selenium 4 Server jar contains everything (including dependencies) required to run a Grid. As per Selenium’s official documentation, Selenium Grid 4 is designed from scratch and does not share any codebase with the earlier versions.
How to Download Selenium Grid 4?
The latest version of Selenium 4 (Alpha) is 4.0.0-alpha-6 and the same can be downloaded from the official website of Selenium. For demonstration, we will be using Selenium Grid version 4.0.0-alpha-2, as it is more stable than the other versions. It offers the advantage of the latest technologies in order to facilitate scaling up, whilst still letting the users perform Selenium test automation.
It is recommended to download the jar file in the same location where the Selenium WebDriver for different browsers is present. This is because Selenium 4 Alpha has the ability to automatically detect the WebDrivers present on the node machine.
Selenium 4 Alpha can be run by executing the following command from the terminal:
|
1 |
java -jar selenium-server-4.0.0-alpha-2.jar |
In my case, the jar file is downloaded in the same directory where Selenium WebDriver for Chrome, Firefox, and other browsers are present.

This Selenium 4 complete tutorial covers everything you need to know about Selenium 4.
Salient Features of Selenium Grid 4
The release of Selenium 4 was delayed for quite some time and this built up a lot of excitement about the features offered for test automation. Without further ado, let us take a look at some of the most important features of Selenium 4 Alpha before moving ahead with Selenium 4 tutorial:
Single Jar for Hub and Node
Until now, the process to set up Selenium Grid involved starting up the Hub and Node(s) separately. With Selenium 4, the process has become much smoother, as the hub and node are a part of the same jar file. Once the server is started, it acts both as Hub and Node.
Improved Architecture
From Selenium 2 onwards, the Hub consisted of three processes – Router, Session Map, and Distributor. Selenium 4 has a new architecture that supports four separate processes – Router, Session Map, Distributor, and Node.
- Router – Listens to the new session request.
- Distributor – Selects the appropriate node where the test should be executed.
- Session Map – Maps the session ID to the node.
- Node – Test machine where the test execution takes place.
In further sections of the Selenium 4 tutorial, we would take a detailed look at the architecture of Selenium 4 Alpha.
Different Grid Types
Until version 3 of the Selenium Grid, it could only be used as Hub and Node(s). Though this is still supported in Selenium 4, it now supports two more types of Grid. Here are the three grid types supported in Selenium 4:
- Standalone Mode
- Classical Grid (Hub and Node like earlier versions)
- Fully Distributed (Router, Distributor, Session, and Node)
Docker Support
This version also comes with Docker support. As of now, the Docker integration does not make use of Unix domain sockets, so you need to make sure that the daemon is listening on port 2375.
When compared to Selenium Grid 3, this version is easier to use on virtual machines. We will also discuss the ease of use in this Selenium 4 tutorial.
This certification is ideal for testing professionals who want to acquire advanced, hands-on knowledge in Selenium automation testing.
Here’s a short glimpse of the Selenium Advanced certification from LambdaTest:
Architectural Overview of Selenium Grid 4
Before we take a detailed look into the architecture of Grid 4, we do a quick recap of Selenium Grid 3. It will help in getting a clearer picture of the architectural differences between Grid 4 and earlier versions of the Grid. Also helps us understand how it affects the process of Selenium test automation.
Architecture of Selenium Grid 3
As I have mentioned in this section of Selenium 4 tutorial, Grid 3 version consists of two major blocks – Hub and Node, as shown in the graphic below.
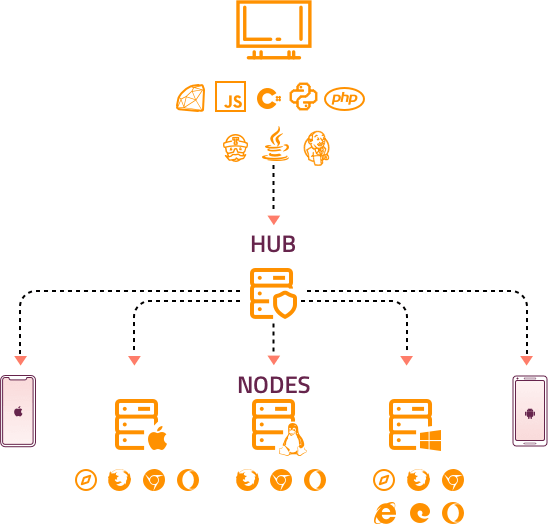
As you can see, this version of Selenium Grid only consisted of a Hub and Nodes (where tests are executed) connecting to the Hub.
Architecture of Selenium Grid 4
Selenium 4 is now W3C compliant that signifies that Selenium aligns with the standards and specifications set forth by W3C for web automation.
W3C, or the World Wide Web Consortium, is a global community dedicated to establishing and upholding standards and guidelines for the World Wide Web. W3C’s primary objective is to ensure the significant growth and interoperability of the Web. This organization formulates open standards and specifications to further compatibility and uniformity across diverse web technologies and platforms.
In Selenium’s architecture, all browsers and browser drivers stick to W3C, except for Selenium 3 WebDriver.
Consequently, JSON Wire Protocol is utilized for encoding and decoding requests and responses. Selenium 4 WebDriver has been adapted to W3C compliance, streamlining communication between client libraries and browser drivers and enhancing stability. Earlier versions of the Grid only had two components – Hub and Node but that has changed with Selenium Grid 4.
Below are the components of Selenium Grid 4 that will help to understand the communication between client and server using WebDriver protocol.

Router
The initial point for handling all incoming requests is the router. Much like a network router, it receives requests from the client (an external request) and directs them to the appropriate component.
For instance, a request within an ongoing session can be directly linked to the node where the session was established. It is accomplished by consulting the session map. However, for new requests, the router assesses and channels them to the session queue. The router also ensures a balanced distribution across the grid to prevent any node from overloading.
Session Map
The session map records the mapping of a client’s session to a specific node. This information is crucial when the router needs to inquire about the node associated with a particular session for request forwarding. The session map provides the node ID, allowing the request to be directly forwarded to the respective node.
Distributor
The distributor plays a crucial role in mapping new session requests to a specific node to ensure that requests from that session are directed to the correct node. It involves attaching new requests to a node and keeping the session-node mapping updated in the session map. The distributor also maintains awareness of all nodes, receiving notifications when adding a new node. The distributor sends acknowledgments via HTTP to confirm the connection. Once successful, the node is established as added, and a session is assigned for future requests.
New Session Queue
The new session queue component keeps track of all incoming new session requests for processing within the Selenium Grid. The router adds new requests to the queue, recognizing them as new requests. The distributor then polls these requests to check if a node is available and assigns the request to the node.
However, in polling and assigning a request, the distributor ensures that the request has not timed out. Otherwise, it is rejected and removed from the queue.
Event Bus
Communication between components, including the Distributor, Node, Session Map, and New Session Queue, occurs through the event bus. This approach avoids HTTP communication due to its associated cost with multiple calls.
Node
The actual execution of tests in a distributed network occurs on a node. Multiple nodes with different configurations for specific tests are connected in a grid. A node must be registered with the distributor to be assigned a request, providing its configurations for matching requests requiring those configurations.
In the hub-node mode of Selenium Grid, nodes solely execute the received commands without making judgments or evaluations.
Collectively, these components form an effective system for test execution using Selenium.
Here is the detailed list of steps performed as a part of the cross browser testing on the fully distributed variant of Selenium Grid 4:
Step 1 – The first step is starting the Session map which is primarily responsible to map Session IDs to the corresponding Node on which the session is running.
|
1 |
java -jar selenium-server-4.0.0-alpha-2.jar sessions |
When a new session is created, the combination of a Session ID and Node URI (Uniform Resource Identifier) is stored in the Sessions Map.
Step 2 – The next step is to start the distributor process. When there is a request from the Selenium client to create a Sessions request, the Distributor is responsible for assigning an appropriate node.
|
1 |
java -jar selenium-server-4.0.0-alpha-2.jar distributor --sessions http://localhost:5556 |
Step 3 – The Router is the one that is normally exposed to the web. The router listens to the new Session requests on http://localhost:4444.
Client requests are sent to the Router and depending on the request type, the appropriate path is selected. Incoming request for creating a new session is redirected to the Router process.
|
1 |
java -jar selenium-server-4.0.0-alpha-2.jar router --sessions http://localhost:5556 --distributor http://localhost:5553 |
All other types of requests are sent to the Node based on the request after querying the node URI from the Sessions map using the Session ID.
Step 4 – The Grid is of no use without the Node. Selenium WebDrivers of the respective browsers are placed in the same directory where the Grid 4 jar file is located.
The –detect-drivers option is used for automatically identifying the Selenium WebDrivers present in the system.
|
1 |
java -jar selenium-server-4.0.0-alpha-2.jar node --detect-drivers |
When a node is created under the distributor, the details of the Node along with Node URI are updated in the Session Map. In the screenshot shown below, the Node URI is 5555.

Step 5 – The request by the Selenium WebDriver for starting a remote session is sent to the router.
|
1 2 3 4 5 6 7 8 9 |
public void testSetUp() throws MalformedURLException { String Node = "http://localhost:4444"; DesiredCapabilities caps = new DesiredCapabilities(); caps.setBrowserName("chrome"); /* The execution happens on the Selenium Grid with the address mentioned earlier */ driver = new RemoteWebDriver(new URL(Node), caps); } |
The command curl http://localhost:4444/status is used for checking the status of the invocation, along with checking whether the session is established or not.

Once the session is established under the node, the Session ID is updated in the Session Map for the corresponding node. As mentioned in Step (3), this helps the Router process in identifying the Node so that other ‘matching’ client requests can be directly sent to that node.
Step 6 – Session creation calls are diverted by the Router to the Distributor and all other types of requests are sent directly from the Router to the Node.
In the earlier versions of Selenium Grid, these processes occurred inside the Hub hence, the internals were not completely known to the developers and testers using that version of Selenium Grid. The renewed architecture of Selenium Grid 4 makes the process of debugging and troubleshooting easier which, in turn, makes Selenium test automation more seamless.
Now, we will get to the interesting part of the Selenium 4 tutorial i.e. running tests for Selenium test automation.
This Selenium WebDriver Tutorial for beginners and professionals will help you learn what’s new in Selenium 4 (Features and Improvements).
Running Tests on Selenium Grid 4
In this part of the Selenium 4 tutorial, we demonstrate different ways to run tests on Grid 4 for Selenium test automation. The test case used for demonstrating the usage is below:
- Navigate to this URL: https://lambdatest.github.io/sample-todo-app/
- Select the first two checkboxes.
- Send ‘Yey, Let’s add it to list’ in the textbox with id – sampletodotext.
- Select the Add Button and verify whether the text has been added or not.
Implementation
Further in this Selenium 4 tutorial, we will use the TestNG automation framework for performing Selenium test automation. You can refer to our earlier blogs in case you require a quick recap of the TestNG framework. (Refer: DataProviders in TestNG)
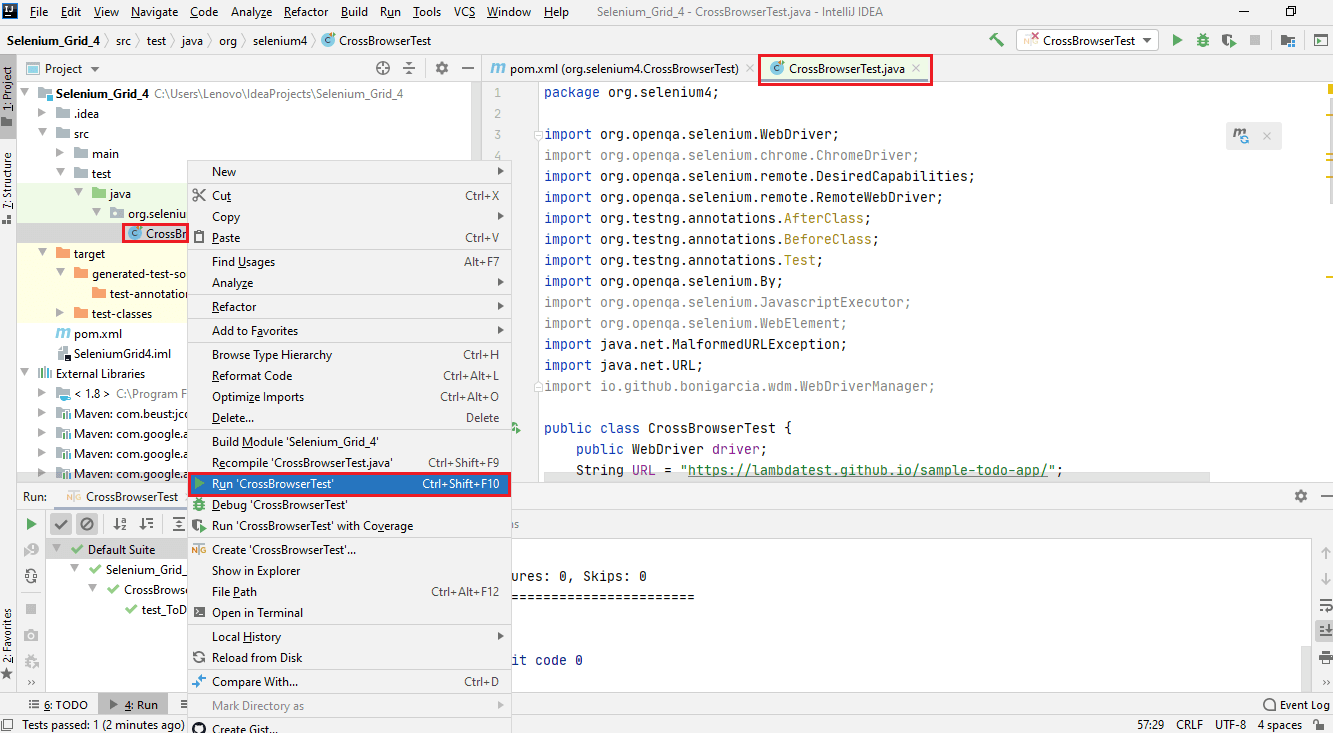
We have used the IntelliJ IDE for development and test execution. You could also use the same project on the preferred IDE of your choice e.g. Eclipse for this Selenium 4 tutorial demonstration.
This might be helpful: How To Install TestNG In Eclipse.
Code Walkthrough
Allow me to take you through the code used above in this Selenium 4 tutorial. The code under @BeforeClass annotation sets the browser capabilities for Chrome browser. The RemoteWebDriver instance is created and the same is executed on Grid 4 (Hub Address – http://localhost:4444)
|
1 2 3 4 5 6 7 |
@BeforeClass public void testSetUp() throws MalformedURLException { DesiredCapabilities caps = new DesiredCapabilities(); caps.setBrowserName("chrome"); /* The execution happens on the Selenium Grid with the address mentioned earlier */ driver = new RemoteWebDriver(new URL(Node), caps); |
The test case (test_ToDo_App()) is implemented under the @Test annotation. Standard Selenium methods (e.g. sendKeys, click, etc.) are applied on the required web elements.
We will execute the same test code on different Grid types – Standalone Selenium Grid, Classical Selenium Grid, and Fully Distributed Selenium Grid.
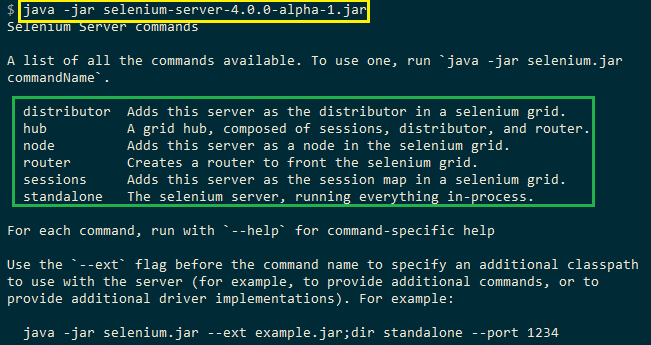
We know by now in this Selenium 4 tutorial that Grid 4 automatically detects the Selenium drivers you have in the system. It is recommended that either all the executables are in the PATH or in the folder where the Selenium jar file is present.

Here comes the most important part of Selenium 4 tutorial which will be essential for successful Selenium test automation.
Standalone Selenium Grid
In the Standalone mode, the Selenium server is running everything in-process. It is invoked by executing the following command on the terminal:
|
1 |
java -jar selenium-server-4.0.0-alpha-2.jar standalone |
The Grid automatically identifies that the WebDrivers for Chrome and Firefox are present on the system.

The server is listening on http://localhost:4444/ which is the same address used in the configuration of the Remote WebDriver. Once the test code is executed, the Chrome WebDriver is registered in the Grid.

Check the output of this command: curl http://localhost:4444/status to confirm that a session with Session ID 01c2215d66abfdaceb8d06c363bbb017 is created.
I hope this Selenium 4 tutorial has helped you understand how to create a session with Grid 4 for Selenium test automation.
‘Hub and Node’ Selenium Grid
This is the classical way of using the Grid for Selenium test automation that consists of two major components – Hub and ‘N’ Nodes. If the Hub and Nodes are running on the same machine, you can start them with the following commands:
Hub
|
1 |
java -jar selenium-server-4.0.0-alpha-2.jar hub |
Node (if Hub and Node are running on the same machine)
|
1 |
java -jar selenium-server-4.0.0-alpha-2.jar node --detect-drivers |
Node (if Hub and Node are on different machines)
|
1 |
java -jar selenium-server-4.0.0-alpha-2.jar node --detect-drivers --publish-events tcp://hub:4442 --subscribe-events tcp://hub:4443 |
For the demonstration, we are running Hub and Node on the same machine. Once the Hub is started, it opens XPUB and XSUB sockets that bind to tcp://*:4442 and tcp://*.4443 respectively.

Once the node is started using the command mentioned earlier, it connects to the same address (i.e. tcp://*:4442 and tcp://*.4443). The –detect-drivers option automatically detects the Selenium WebDrivers present in the system.

As soon as the instance of Chrome WebDriver is instantiated, it is registered on the Grid.
|
1 2 3 4 5 |
DesiredCapabilities caps = new DesiredCapabilities(); caps.setBrowserName("chrome"); /* The execution happens on the Selenium Grid with the address mentioned earlier */ driver = new RemoteWebDriver(new URL(Node), caps); |

As seen in the output, a session with Session ID 609efa510550943bdcedc46f4d67d1c6 was created.
‘Fully Distributed’ Selenium Grid
Grid 4 can be started in a fully distributed manner, with each piece running in its own process. I have already covered the architecture of Fully Distributed Selenium Grid in this section of the Selenium 4 tutorial. It will give a general idea about what a fully distributed Grid looks like.
Step 1 – Start the Sessions Map
|
1 |
java -jar selenium-server-4.0.0-alpha-2.jar sessions |
It maps the Session IDs to the node, the session is currently running on.

Step 2 – Start the Distributor
|
1 |
java -jar selenium-server-4.0.0-alpha-2.jar distributor --sessions http://localhost:5556 |
It listens for Session requests on port 5556.

Step 3 – Start the Router
|
1 |
java -jar selenium-server-4.0.0-alpha-2.jar router --sessions http://localhost:5556 --distributor http://localhost:5553 |
Router gets the Node URI to forward that request to Node. Request for a new session goes to the Distributor. The Router listens for new requests on http://localhost:4444.

Step 4 – Create a Node
Node is the machine where the test will be executed.
|
1 |
java -jar selenium-server-4.0.0-alpha-2.jar node --detect-drivers |
Once the Node is created, Node details and Node URI are updated in the Sessions Map.

Once the instance of Chrome WebDriver is instantiated, it is registered on the Grid.
|
1 2 3 4 5 |
DesiredCapabilities caps = new DesiredCapabilities(); caps.setBrowserName("chrome"); /* The execution happens on the Selenium Grid with the address mentioned earlier */ driver = new RemoteWebDriver(new URL(Node), caps); |

As shown in the screenshot, the session details are also updated in the Sessions Map. The Node URI is 5555.

The output of curl http://localhost:4444/status indicates that a session with Session ID 432562bb885dfc616e260e26dec365e0 was created for Selenium test automation.
Wrapping It Up
I hope this Selenium 4 tutorial was able to bring an entirely fresh perspective to Selenium test automation for distributed testing. Due to the completely new architecture, it supports different modes – Standalone, Hub & Node, and Fully Distributed. It is more modern than the previous versions of the Grid, as it can be used with modern technologies like Docker and Kubernetes with ease. It is also designed to take the advantage of cloud infrastructures like AWS and Azure. Though Selenium 4 is still in the Alpha phase, there is a lot of excitement amongst the developer and tester community and its features have fared well so far.
Selenium 4 can be used to perform Selenium test automation on LambdaTest, which offers cross browser testing for 2000+ browsers and operating systems. The Desired Capabilities Generator offers capabilities for both Selenium Grid 3 & Selenium Grid 4.
Check out LambdaTest’s support documentation for New Capabilities in Selenium 4 for more.
Happy Testing!
Got Questions? Drop them on LambdaTest Community. Visit now


